AirGap 2.0 Guide
- Overview
- Golden Copy File to Object Integration
- Easy Auditor Integration Enables Custom Vault Open Criteria
- What's New
- Key Features
- Solution Summary diagram
- AirGap Location Independent Solution
- How to protect high change rate and low change rate data
- FAQ - Buyers Guide to Cyber Vaults
- Operational Best Practices
- Audited Operations
- Requirements & Prerequisites
- Firewall Vault Network
- Additional Requirements for Enterprise AirGap Licensed Deployments
- High Level Configuration Steps
- Security Configuration of Components
- Eyeglass VM Security
- Vault Cluster Configuration
- Role Based Management of the AirGap Feature
- Detailed Deployment Diagrams
- Network Considerations for Layer 2 or Layer 3 Vault Network
- Overview
- Layer 2 or Layer 3 - Fan-In cluster protection (Enterprise Airgap License)
- Virtual AirGap Mode - Layer 3 Vault Network (side the vault only deployment)
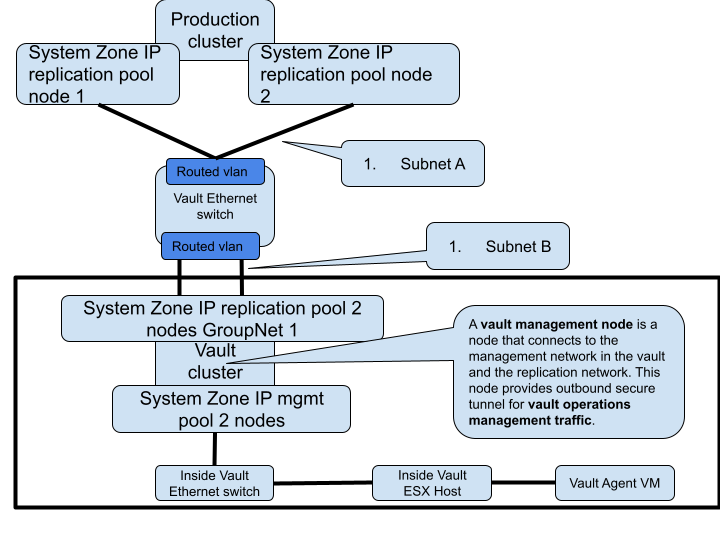
- Inside the Vault mode Deployment (Enterprise AirGap License Required)
- Overview
- Inside the Vault Physical Topology - Layer 3 example
- How to Enable Inside the Vault Agent VM (Enterprise AirGap)
- Operations of Vault Data Replication
- Data Flow Example for Data Replication with Enterprise Airgap
- Vault Management Data Flow Example for Enterprise Airgap
- Configuration Steps for AirGap Setup
- Overview video
- How to setup syncIQ policies for AirGap
- How to Configure AirGap policies and setup Virtual AirGap (Outside only deployment)
- How to test an Airgap Policy job
- How Alarms from the vault Isilon are Viewed and Forwarded
- How to Expand the Airgap Sync Job Timeout and the Airgap job prefix name
- Operational Procedures for AirGap Management
- How to stop AirGap Replication in an Emergency
- How to monitor replication AirGap policy success failure
- How to monitor available disk space on the vault cluster
- How to push vault cluster hardware alarms and events to Eyeglass
- How to Monitor AirGap Replication Reports
- How to enable or disable the Airgap daily summary report or change the schedule
- How to pause all AirGap policies to complete Vault cluster maintenance
- How to Pause the AirGap policies for maintenance with a timed auto close of the AirGap Network
- How to Configure Enterprise AirGap Ransomware Defender Enterprise Airgap Agent
- Overview
- Enterprise Airgap Agent Management of Vault cluster
- Topology and Communications
- Multi Vault Topology
- Requirements
- Prerequisites
- Configuration Steps for Enterprise Airgap
- Operational Procedures Enterprise Airgap
- How to reach outside the vault through the vault cluster it is possible to open and close the vault with cli commands
- How to push Vault Agent support logs to Eyeglass with the vault agent CLI
- How to Open the Airgap for maintenance from Ransomware Defender CLI
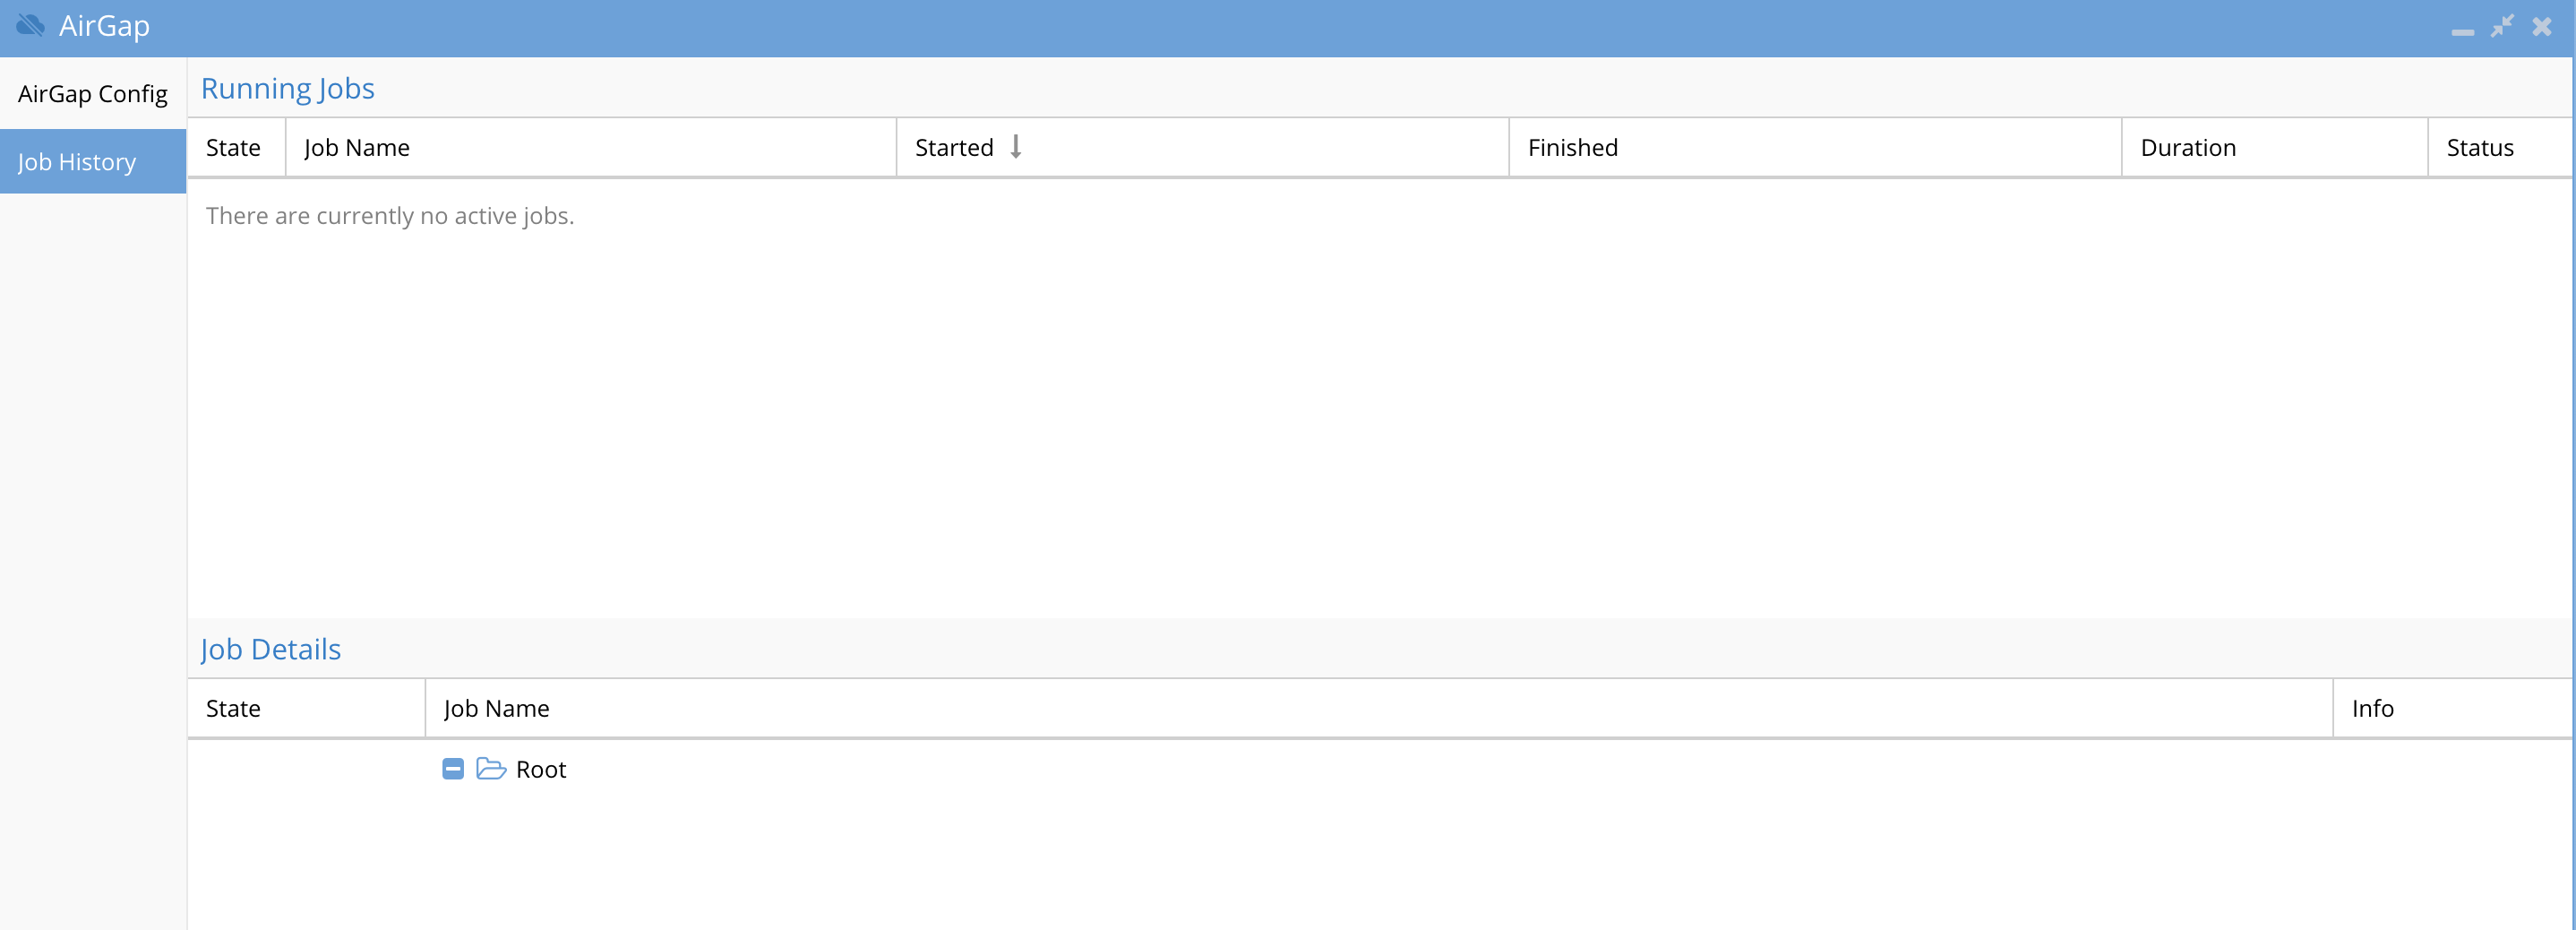
- How to list running jobs
- How to run an Airgap job from the Vault agent VM
- How to monitor a running airgap job
- How to check the remaining time of a maintenance window request on the vault agent
- How to configure Vault cluster Log Gather Automation for Hardware Support
- Advanced Vault Agent and Airgap Eyeglass Configurations
- Scheduled check for new or changed Airgap policies
- How to change the name of the Airgap policies.
- How to enable Vault Agent Open delay
- Change the number of SSH retries from the Vault Agent to the Powerscale Clusters
- Security
- Airgap Audit log
- Recovery Scenarios
- Considerations Before Considering Recovery
- Partial Vault Data Recovery Scenario
- Complete Vault Data Recovery Scenario
- DR Vault Data Access Scenario - Rapid Recovery
- Airgap Virtual Clean Room
- Overview
- Key Values
- Requirements
- Configuration
- Virtual Clean Room OnDemand Operations
Overview
Superna offers several products to protect data from Ransomware or unauthorized access. We recommend the Ransomware Defender product as the primary tool to protect data since it covers all requirements for detection, prevention, and recovery. Ransomware Defender includes an AirGap 2.0 solution that provides the only solution on the market that integrates user behavior detection of the protected data to suspend data updates to the secure vault copy until administrators take action on the alarms. Complete role based administration solution with split roles for user behavior monitoring and separate AirGap administration.
Golden Copy File to Object Integration
Expanding on file based projection solution for Isilon is the introduction of Golden Copy Advanced that can copy files to Objects off site locations example Amazon S3 or Azure to allow. This integration allows Golden copy to get real-time updates on source cluster data threats from Ransomware Defender user behavior monitoring and suspend syncing to the S3 targets.
Easy Auditor Integration Enables Custom Vault Open Criteria
- Customers that own the Easy Auditor platform can extend the vault auto close replication criteria using Easy Auditor active auditing. This extends the security of protecting the vault data by using builtin triggers for DLP , Mass delete or custom triggers to control vault replication.
- This enables security teams to apply user aware, network aware policies that will stop replication for any active events in Easy Auditor.
- This provides a powerful capability to customize when the vault replication should occur depending on the data that is being protected. No other solution offers fully customizable real time triggers to control vault replication.
- The guide on active auditing can be referenced here.
What's New
- Multi cyber vault support to allow more than on distributed cyber vault and mapping source clusters to a specific cyber vault.
- Push from vault agent for alarms, usage, log gather
- Auto detection of the Airgap nodes for in-band vault alarm management
- Enterprise vault OVF with automated log push during airgap syncs
- Enterprise Airgap vault agent will log gather on vault cluster and copy to the production cluster for simplified support every time the vault network is open to ensure the vault network is not opened more than necessary to get support hardware logs
- Airgap automation API for external on demand airgap job execution
- Smart Airgap API available for 3rd party integration or monitoring the threat level from SIEM tools.
- Airgap maintenance request CLI command (disabled by default) to allow a request to open the vault for x minutes for maintenance activity on the vault.
- Vault cluster disk monitoring returns available space into proxy alarms each time the a data sync occurs.

August 1, 2022
- Airgap basic is no longer available and is now outside the vault airgap feature of the Enterprise Airgap and requires the Enterprise Airgap subscription
Key Features
- Unified data protection at the source and Automated AirGap in a single product.
- Integrated user behavior detection "Smart AirGap" ensures data sync is suspended when suspicious user behavior is detected on the source production cluster.
- Split roles between AirGap management and Vault cluster access and passwords and day to day monitoring of data protection of the source production cluster.
- Fastest incremental always sync solution on the market powered by SyncIQ, keeps the AirGap open the least amount of time to sync the block changes of individual files into the Vault.
- Lowest Cost storage with longest retention of Vault data with SnapshotIQ that only stores the block differences of the changes made to the file system in production. This translates to the longest retention of your versioned data with the lowest cost.
- The only solution that offers < 2 hour rapid recovery of any quantity of data. Protect Petabytes of data and bring it online < 2 hours provides unparalleled recovery speed to handle the worst case data recovery scenarios.
- Eyeglass DR mirrors shares, exports and quotas to the vault cluster to ensure your rapid recovery solution has the exact data access security as production. No other solution considers configuration data as a critical component of a Cyber Vault.
- Easy Auditor extends the solution to include full file auditing solution to monitor suspicious user behavior covering Data Loss Prevention, Mass Delete detection and custom triggers along with historical searching of audit data.
- Full User auditing within the Unified Desktop
- Future API integration with Golden Copy to allow Golden Copy copy/sync control when active threat to source cluster is detected. For more information on license requirements for Golden copy click here.
- Integration with Easy Auditor will block replication to the Vault cluster if Mass delete, DLP or other custom triggers have active events.
- Inside vault Smart Airgap solution provides a VM inside the vault to automate the Airgap with the same functionality as the virtual Airgap mode.
- Cloud Pool Vaulting allows stub to be deep copied and inflated before they are stored in the Vault at full size. This ensures stubs are not inflated on the source cluster but they are inflated and copied to the Vault cluster.
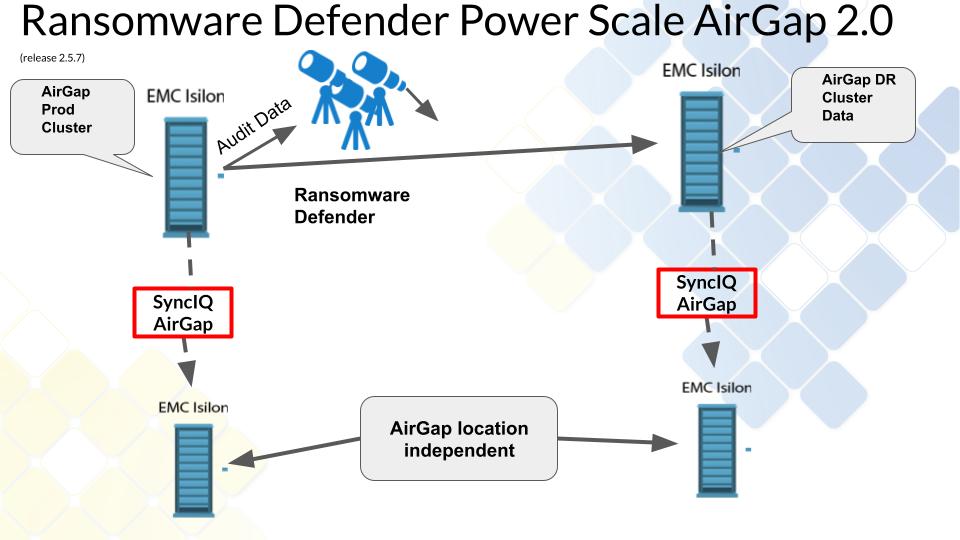
Solution Summary diagram
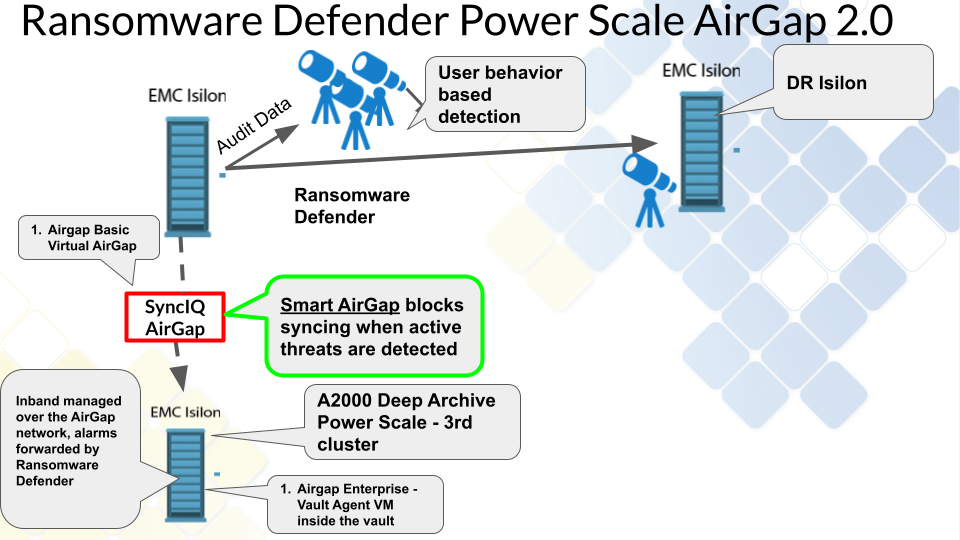
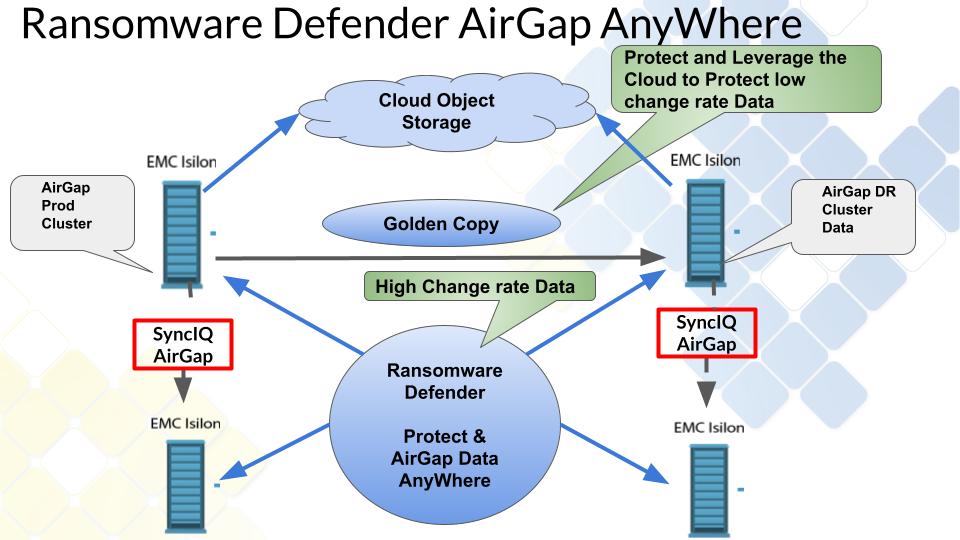
AirGap Location Independent Solution
How to protect high change rate and low change rate data
FAQ - Buyers Guide to Cyber Vaults
- How will the data be protected in the vault?
- The 3rd PowerScale is the vault since SyncIQ locks the replicated data in a read-only state, this data cannot be deleted or modified even by the root user on the cluster.
- Can I use my DR cluster as the target?
- We recommend a 3rd cluster because DR replication should be as fast as possible ie 5 minutes to protect against site failure. A 3rd Cyber vault copy should be slower example 24 hours to allow detection time of data issues that would require the 3rd copy. This buffer time is important to ensure compromised data is not replicated into the vault.
- The 2nd reason is an AirGap means fire-walling and securing the 3rd copy device. The DR should be available and reachable for a DR event and blocking all access to the DR site would compromise a DR solution effectiveness and readiness. The firewall would still require Eyeglass access to the DR cluster so this solution is not as secure as a dedicated Vault cluster device.
- In summary, a 3rd copy AirGap copy of data and DR have opposite requirements that prevent using the DR cluster as the AirGap device due to sync interval and security impact of fire-walling your DR site.
- Can the Airgap be opened and closed from the inside of the cyber vault?
- Yes Ransomware Defender supports 2 modes of operation with an outside the vault automation and an inside the vault automation that requires additional resources inside the cyber vault.
- Is the data immutable? What is the granularity?
- Yes, the data is immutable and cannot be modified regardless of the permission applied to the data
- The entire source cluster, or only certain paths, can be replicated to the vaulted PowerScale. This is a matter of creating more SyncIQ policies to sync specific paths of data to the vault.
- How will the AirGap be managed? Internal to vault or external? What are the requirements?
- The recommendation is the vault PowerScale is located next to the source cluster since this is not a DR copy of the data. Off-site remote is supported using SyncIQ which allows the vault PowerScale to be located anywhere. This will add AirGap networking requirements to ensure no IP routing to the remotely located cluster, and will not allow any access other than from the source production PowerScale. This is a networking implementation with firewalls but is fully supported.
- Considerations for location of the vault onsite versus remote site means you are trading off rapid recovery with the onsite device versus remote that offers a longer recovery of data to an onsite device.
- Recommendation is always use an on site solution since DR is designed to protect against site failures and a Cyber vault is protecting data from an on site threat.
- The recommendation is the vault PowerScale is located next to the source cluster since this is not a DR copy of the data. Off-site remote is supported using SyncIQ which allows the vault PowerScale to be located anywhere. This will add AirGap networking requirements to ensure no IP routing to the remotely located cluster, and will not allow any access other than from the source production PowerScale. This is a networking implementation with firewalls but is fully supported.
- How will a customer get into the vault to make future modifications?
- Inline SSH access to through the production cluster. This will allow access to the vault PowerScale over SSH with a command that can open the AirGap for maintenance, and will automatically close the AirGap after X minutes.
- Optionally a physical management interface can be connected to the vault PowerScale for GUI access. This would require physical access to connect and disconnect the management interface. The recommendation is to use the inline SSH access since the PowerScale CLI provides all management commands.
- What type of maintenance should be expected?
- A feature will collect alarm data via the AirGap when a copy is running and forward the data through the Normal Eyeglass alarm feature (email, syslog snmp etc..). This allows full alarm event monitoring of the vault PowerScale even when it is fully disconnected most of the time. Any serious alarms detected would then require remediation or CLI access to debug the issue on the Vault PowerScale.
- Benefits: inline AirGap vault aware alarm monitoring avoids most scheduled maintenance on the vault PowerScale until a critical alarm requires action.
- What is needed in the vault to perform analytics or reporting?
- All reporting and analytics are done by Ransomware Defender from the source cluster. All data copy jobs are monitored, trended, and reported over 24 hours, 30 days, and 60 days. A report is emailed daily that covers success, failure, throughput, average AirGap open time, and more, along with a CSV with raw per path and policy reporting.
- Benefit: Fully automated monitoring and reporting.
- How will data be made available outside the vault in a recovery scenario?
- The vault PowerScale can have data exposed for 3 different scenarios and offers flexibility that no other vault backup solution offers since PowerScale can serve data over SMB, NFS as well as act a vault.
- Access to a subset of the vaulted and immutable data. Connect the management interface, create an SMB share on the data path that is required for recovery. NOTE: The share data will be read-only regardless of the permissions since it is locked by SyncIQ.
- Access or recover all the data. SyncIQ steps can be executed to reverse replicate the data from the vault PowerScale back to the production cluster and will use SyncIQ speed and performance advantage to restore data and ACL permissions to the source cluster. This would be used when the volume of data that is needed to be recovered is a very large % of the data.
- Emergency Operations mode. This mode highlights the advantages of a vault PowerScale solution. This scenario turns the vault PowerScale into the production cluster to serve data directly from the vault without a recovery phase. This allows getting operational as fast as possible to operate the business. High-level steps for Emergency Operations Mode are outlined below.
- Connect management interface of the Vault PowerScale to the network
- Eyeglass DR can copy the shares, exports, quotas to the vault PowerScale (requires the Vault PowerScale to be added to Eyeglass, delete DR cluster first and add Vault PowerScale)
- Pre-staged IP pools, SmartConnect names from the production cluster needed to get access to some of the data that is urgently needed. Connect interfaces to the network. Update DNS to point at the new vault cluster with NS recored edit.
- Execute a failover from Eyeglass to the Vault cluster and sync all shares, exports and quotas to re-secure the vault data.
- Start accessing the PowerScale data.
- Done.
- The vault PowerScale can have data exposed for 3 different scenarios and offers flexibility that no other vault backup solution offers since PowerScale can serve data over SMB, NFS as well as act a vault.
- How will testing of the data recovery be done?
- In vault:
- Via ssh from source cluster - Use Open AirGap command to ssh to the vault cluster and then use scp command to copy the files to the production cluster.
- External:
- On a quarterly basis - Connect the management interface on the vault cluster to the network, create an SMB test share mount, and test read the protected data. NOTE: no write access will be allowed in this test mode.
- Delete the share and disconnect the management interface to complete the test.
- Benefit: vault replication is still active during a test with the source cluster still in full production mode. No downtime is needed for this test.
- In vault:
- Who is creating the recovery runbooks?
- Everything is documented in this guide to operate and test the vault data, and most management is automated with no day to day tasks needed. The professional service also offers customers assistance in the design, implementation and operations. See here.
- No Run books are needed since most tasks are automated. Pre-staged rapid recovery option is recommended.
- Is there any dependence on NTP or other services?
- No, the cluster time can free run from its own clock.
- Are there any additional hardware/software components that may be recommended or required to make the overall solution work?
- 2 AirGap Options are available:
- Virtual AirGap - Requires a layer 2/3 switch to route between the source PowerScale and the Vault PowerScale. All other requirements are within Ransomware Defender to manage static routes to reach the Vault PowerScale.
- 2 AirGap Options are available:
- Is there any visibility in production that a copy is being sent to a vault?
- Yes, full reporting 24 hour, 30 day and 60 day reporting on all copied data with success, failure, and throughput metrics along with AirGap average open time. This is the time the Gap is open and should be minimized at all times. The solution reports on this daily, or an on-demand report can be created.
Operational Best Practices
- Ransomware Defender Role - assign to infosec team - provides access to the Ransomware Defender GUI for day to day configuration/management of the real time monitoring component
- Easy Auditor Role - assign to infosec team - provides access to the Easy Auditor GUI for day to day configuration of auditing
- AirGap Role - assign to CSO or senior management - provides access to the AirGap GUI
- Ransomware Defender Read-Only Role
- Easy Auditor Read-Only Role
Audited Operations
- This summarizes how the Airgap solution has many checks and audits of daily operations that send immediate alarms.
- Airgap Network state alarm
- A network test is executed to validate the airgap is closed when it should be closed. The Airgap is detected as open when it should not be an alarm is raised. This ensures that any tampering with the network are detected and alerts sent.
- Airgap job fails to Run
- This test validates that all scheduled Airgap jobs run when they are expected to run. This audits the Vault Agent VM from the Ransomware Defender logic running in the Eyeglass vm. This check verifies that all scheduled jobs execute if they do not executed on the schedule it indicates an issue with the vault agent. This check runs daily
- Airgap Report
- This daily summary report is sent as an html report that shows last 24 hours and last 30 days statistics. It captures success and failure counts of all sync jobs, throughput, GB replicated, run time of sync jobs, RPO target set for syncing, any policy running outside it's normal operating range over 30 days. In addition, a CSV is emailed with a break down per Airgap policy. This provides a complete daily and historical view of Airgap replication.
- Airgap Policy Audit Monitor
- Airgap policies are inventoried every 5 minutes and fingerprint is calculated. If any property of the policy is modifed a change audit alert is to the administrator to investigate.
Requirements & Prerequisites
- License Requirements
- Ransomware Defender license for each source cluster that is protected by the vault.
- Airgap Enterprise - Agent VM license for inside the vault automation.
- No DR license for the Vault cluster is required.
- automation feature inside the vault.
- A PowerScale cluster, any make model with OneFS release matching source cluster, sized for the data set and change rate and retention of data required. Sizing can be done with assistance from the sales team.
- Dedicated Airgap Ethernet switch
- Minimum of 4 x 10G ports for synciq port connections.
- NOTE: It is not recommended to use the front end ethernet switches to connect to the vault cluster using a vlan. Physical connections offers the best practice network separation and reduces the attack surface.
- OR Firewall - Enhanced network option for the vault networking
- This option provides additional control of ports and data flow into the and out of the vault cluster. This provides enhanced security to reduce the potential attack surface and provides logging. The inside vault switch can be a firewall to lock down this network.
- Powerscale Production Node Connections
- Best Practise with High Availability: At least 2 nodes and 1 interface per node on the production cluster and 2 nodes on the Vault cluster connected to the AirGap Ethernet switch.
- Next Best option without High Availability: One node and 1 interface connected from production cluster to the Airgap Ethernet network switch.
- NOTE: if the production cluster has no available ports the choices above offer lower port count for physical separation connections to the AirGap network. It is also possible to add nodes to the production cluster that are dedicated to connect to the AirGap network.
Firewall Vault Network
| Port | Direction | Airgap Solution | Description of port | Comments |
| SSH TCP 22 | production cluster <--> vault cluster | Outside the vault and Enterprise Edition | SSH | ssh tunnel --> to connect from the vault cluster to the production cluster. Used to build secure tunnel to prod cluster to communicate with Ransomware Defender |
| API 8080 TCP HTTPS | production cluster --> vault cluster | Outside the vault only deployment | Vault cluster API over https | |
| SyncIQ ports TCP ports 5666, 5667, 2097, 2098, 3147 and 3148 | production cluster --> vault cluster | Outside the vault and Enterprise Edition | Sync data replication ports | |
| https 8080 API | vault cluster --> prod cluster(s) | Enterprise Edition | inventory production cluster resources during vault open | |
| https 443 TLS API | prod cluster (s) --> eyeglass VM | Enterprise Edition | Vault Agent VM secure communications with Eyeglass Ransomware Defender | |
| ICMP | vault cluster -> prod cluster(s) | Enterprise Edition | Ping from prod cluster to vault cluster | Used to assess network reachability and vault isolation |
Additional Requirements for Enterprise AirGap Licensed Deployments
- Hardware Recommendation:
- A dual socket server with 512 GB of RAM, 1 and 10G Ethernet interface options, 2 - 4T B of local flash storage.
- Hardware should be future proofed to allow additional VM's to run for cyber security protection solutions and Windows desktop(s) for administrators that has key tools installed to allow a guaranteed clean, secure OS desktop to be used for used recovery operations or upgrades to the Isilon hardware, firmware and software.
- A dual socket server with 512 GB of RAM, 1 and 10G Ethernet interface options, 2 - 4T B of local flash storage.
- Ransomware Defender VM Agent
- Vmware ESX host server that will run a single Ransomware Defender VM with 16G ram 130G disk and 4 x vcpu. This ESX host only needs to run this one VM but can be used to run other applications inside the vault.
- Networking - Outside the vault Airgap network option, for a more secure option see below
- Ethernet switch to connect the VMware ESX host to the management ports on the vault cluster. The 1G Ethernet interfaces can be used to connect to the ESX host using the system zone management interfaces.
- Allows device expansion in the vault for future equipment
- OR Firewall - Enhanced network option for the vault networking
- This option provides additional control of ports and data flow into the and out of the vault cluster. This provides enhanced security to reduce the potential attack surface and provides logging. The inside vault switch can be a firewall to lock down this network.
- A vault Management Node
- This node is connected to the management network and the vault replication network that allows access to the production source clusters. This is the management path to securely manage the vault and allows an outbound tunnel to be built by the vault agent.
High Level Configuration Steps
- Install 3rd PowerScale at the same location as the cluster with data to be protected.
- Best practice deployment:
- Use a bastion host (VM connected to private IP vault management network) and complete all configuration of the vault cluster through this bastion host. This avoids connecting the vault cluster to the corporate network during commissioning steps. The vault cluster should never be exposed to the network directly.
- NOTE: The Airgap can be located at the DR location using the DR copy as the source of the data to copy to the vault.
- Vault PowerScale Requirements on Deployment :
- Cyber Recovery RunBook: As much of the pre-configuration, labeling, Ethernet port planning (VLAN's,) cabling and logic configuration as possible should be completed at deployment time to speed up recovery scenarios described in this guide.
- The configuration steps completed should be documented in a Cyber Recovery RunBook. This will be used along with this guide when executing a cyber recovery scenario. This guide documents the high-level steps needed to complete recovery. These high-level steps should be turned into detail specific steps for your environment and added to the Cyber Recovery Runbook.
- Management System zone access network configured but should be disconnected physically after installation.
- Vault Cluster High level hardening
- Note: The Advanced service will provide detailed hardening of the vault cluster. This service scope is out lined here. The information below is not the complete solution and only identifies high level steps.
- Delete all default shares and NFS exports on the cluster.
- Stage and plan physical ports, or VLANs required for the Vault cluster nodes, to be connected to the production network in the event a rapid recovery scenario is required. These cables should be physically in place but not connected, with labeling applied to each cables Ethernet port connection. The node Ethernet interfaces should be the minimal configuration needed to serve data for production IP pools and Access Zones.
- Stop the SMB and NFS services.
- Add NTP server (even though it will not be reachable). Used for Rapid Recovery.
- Add DNS servers (even though they will not be reachable). Used for Rapid Recovery.
- For additional hardening consult Dell documentation on how to apply additional changes for hardening.
- NOTE: The Airgap Design And Implementation Service includes hardening of the vault cluster based on Dell documentation.
- Production Powerscale IP Address space and IP pool for replication with SyncIQ and management IP pool
- Use the default groupnet and subnet (enable vlan tagging on the subnet).
- A syncIQ pool and management pool will be created in this subnet
- Review the layer 3 vs layer 2 vault network pros and cons.
- Production Powerscale Management IP pool
- Create a new IP pool in the new private IP subnet, and configure at least 2 nodes to join the management IP pool and set the pool mode to dynamic for HA IP address failover.
- NOTE: Make sure the IP pool is set to System Access zone
- NOTE: Vault cluster does not require a management IP pool facing the vault replication network
- Vault and Production PowerScale SyncIQ replication IP pool
- Create a new IP pool in the default subnet, and configure at least 2 nodes to join the replication SyncIQ IP pool (static IP pool), for HA replication access to the vault PowerScale from the source PowerScale.
- NOTE: Make sure the IP pool is set to System Access zone
- Vault cluster Inside Airgap
- If the inside Airgap solution is used an ethernet switch , ESX host and VM deployment are required for inside the Airgap automation.
- Ransomware Defender vault VM requires the eyeglass minimum permissions configured on the vault cluster. See guide.
- The vault cluster is added to the VM using the eyeglass service account.
- SSH tunnel to a production cluster to allow communications with Ransomware Defender from within the vault. See the Enterprise license Vault Agent configuration in this guide.
- Cyber Recovery RunBook: As much of the pre-configuration, labeling, Ethernet port planning (VLAN's,) cabling and logic configuration as possible should be completed at deployment time to speed up recovery scenarios described in this guide.
- Best practice deployment:
- Source PowerScale
- Create a new IP pool called "Vault Replication", and add at least 2 nodes, and 2 interfaces to this pool. No SmartConnect name is required for this pool. The pool must be in the system zone.
- Layer 3 Vault Replication switch
- The network between the source PowerScale and the vault PowerScale will require a layer 3 device between the clusters. The Interface on the source PowerScale IP pool will have a static route with a next-hop of the layer 3 vault switch added, to reach the private subnet created on the vault PowerScale.
- NOTE: This does not need to be a managed device and should be a statically configured routing device. It can be a larger switch using VLAN routing, but this exposes the potential for misconfiguration and allowing routing into the vault network. This is a business cost decision as a VLAN routing configuration can also be used.
- Best Practice: Use a dedicated switch with physical separation from production networks, and do not enable management of this switch, or leave the management port of the switch disconnected.
- Ransomware Defender and Eyeglass steps
- Vault policies are created on the source PowerScale with the a policy name prefixed with rw-airgap-xxxx where xxxx can be any text to describe the policy, more than one policy can be created if required.
- SyncIQ Policy details:
- The source path should NOT be a path that is used as a DR replication path on your production cluster.
- Example: DR policy /ifs/data/zone1, the AirGap policy can use a policy path above or below this DR policy source path. i.e. above would be: /ifs/data, or below: /ifs/data/zone1/somepath.
- Reason: In a full re-sync recover from the Vault PowerScale, DR cluster mirror policies will cause an overlapping SyncIQ condition with 2 clusters trying to write data into the same path on the production cluster. This will block the Vault cluster policies from running successfully in a full recovery scenario.
- Solution: Avoid the overlapping condition by using non-overlapping paths when creating the AirGap policies. This may mean creating more policies to replicate all the data and to avoid the overlap with DR. This is the best option to avoid several manual steps in a full re-sync recover scenario and will make recovery simpler, faster, and less complicated.
- Schedule = set to manual (note Ransomware Defender manages the policy)
- Target host - is the IP address of an IP on the vault PowerScale replication pool.
- Restrict at source option enabled, and select the vault replication Pool created above to force replication traffic to use the vault pool node interfaces. This is the same pool that will have the static route applied for virtual Airgap mode.
- Create the policy with the same target path used on the source path
- The source path should NOT be a path that is used as a DR replication path on your production cluster.
- SyncIQ Policy details:
- Configure the policy replication schedule on the Eyeglass appliance, the recommended schedule is daily at midnight.
- Virtual Airgap mode
- Add the static route to the Eyeglass Ransomware AirGap GUI.
- The static route will be the next hop of the layer 3 vault switch, and target network will be the private network subnet created on the vault PowerScale replication pool.
- Inside the vault Airgap mode with Vault Agent VM
- This requires the Vault Agent VM to be deployed on a dedicated ESX host that is secured inside the vault with the vault cluster.
- Configure inside the vault agent vm to connect to the vault cluster with minimum permissions user
- Add management IP pool to source cluster mapping information (see guide for more details)
- Verify Ransomware Defender reachability with test command to verify Airgap interfaces can be opened closed and remote API calls to the Ransomware Defender are functional.
- Reporting requires no steps other than configuring email on Eyeglass to receive the daily Airgap sync reports.
- Vault PowerScale alarm monitoring requires a service account user on the vault cluster. This simplifies management and monitoring of the Vault PowerScale if any hardware faults are detected. Alarm collection is completed during replication windows when the network is open. This means alarms will only be collected once a day if the replication schedule is daily.
- Vault policies are created on the source PowerScale with the a policy name prefixed with rw-airgap-xxxx where xxxx can be any text to describe the policy, more than one policy can be created if required.
Security Configuration of Components
The sections below outline additional security configuration that should be implemented when deploying the AirGap feature.
Eyeglass VM Security
- Implement the hardening guidelines and password complexity and password management using this guide.
- Implement the fail to ban feature to auto ban and firewall failed login attempts to eyeglass using the hardening guide above.
- Configure 2 factor SSH on Eyeglass, ECA and the Vault Agent VM following this guide.
- Firewall ssh and https access to the Eyeglass VM to management network jump box (administration VM) that has 2 factor authentication.
- Using the ECA firewall requirements restrict ECA ports to only be authorized between Eyeglass and ECA and allow ssh access to the ECA from a network jump-box only. See firewall guide here.
- Configure Role for AirGap management and configuration separately from Ransomware Defender management. see next section.
- Full user UI access and configuration auditing covered in this guide.
Vault Cluster Configuration
- NOTE: The AirGap Design and implementation service covers more hardening; the items below are the minimum changes that should be applied to the cluster.
- Use only local accounts and no AD provider. This simplifies security infrastructure and ensures a lower attack surface to the device itself.
- Enable Configuration Auditing to track all changes made to the cluster configuration.
- Disable all non essential services
- SMB, NFS
- Delete default SMB share and NFS export
- Disable all built-in users accounts except for the root user
- The password should be a random password of 20 characters or longer with upper case, lower case, numbers and at least 1 special character
- This password should be created and managed by the senior management within the security team and should not be shared with anyone outside of the security group.
- Create the Eyeglass service account with minimum permissions for vault alarm collection. See the minimum permissions guide.
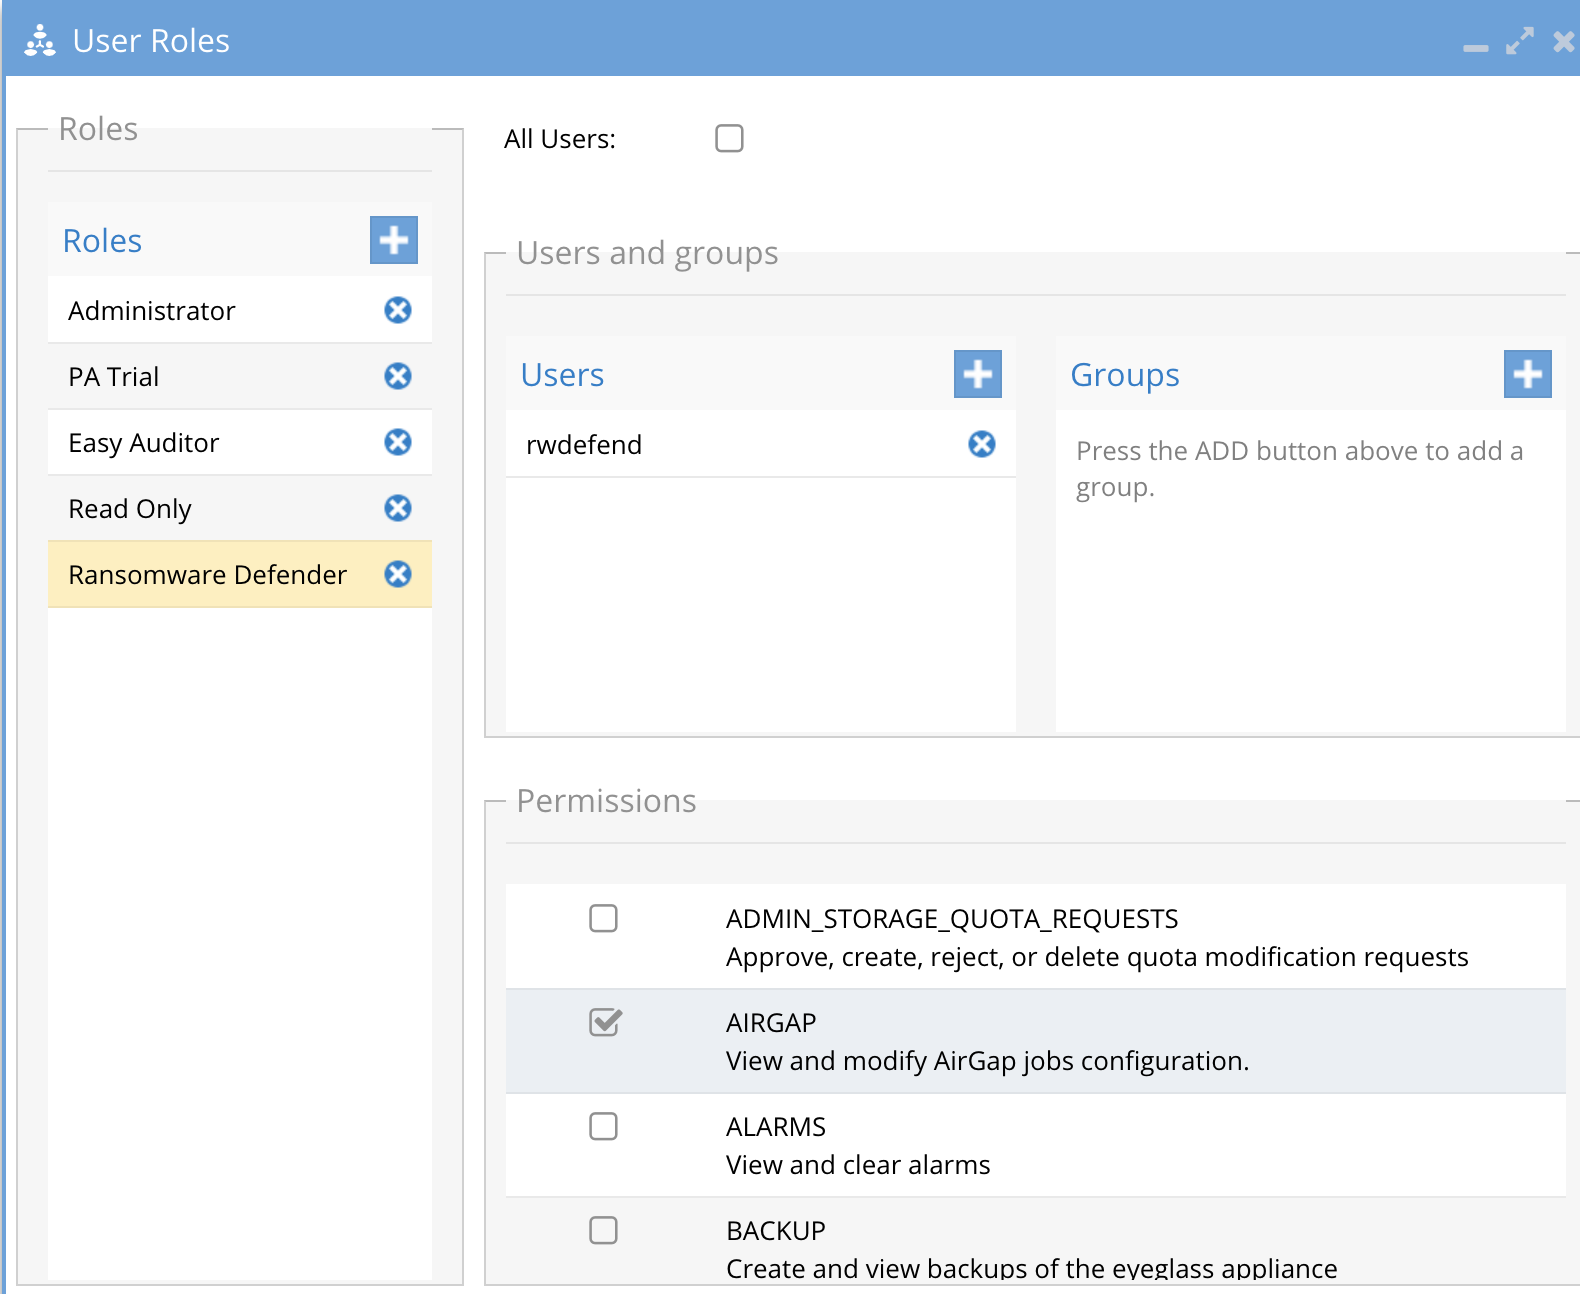
Role Based Management of the AirGap Feature
- The AirGap feature is added to the Ransomware Defender builtin role
- This allows the AirGap management to be separate from day-to-day Ransomware Defender management. See the example of a dedicated role option that can be removed from the Ransomware Defender role and added to a custom role.
- Recommendation: CSO or senior security management personnel should be assigned this role. The personnel with this role should be separate from the Ransomware Defender personnel.
Detailed Deployment Diagrams
Network Considerations for Layer 2 or Layer 3 Vault Network
Overview
The vault network itself can be designed using layer 2 or layer 3 between the prod and vault clusters. The choices and best practices are as follows.
Layer 2 or Layer 3 - Fan-In cluster protection (Enterprise Airgap License)
- Highest Secure networking option - Inside the vault VM agent with Enterprise Airgap license.
- The Vault network the connects each protected cluster to the vault can use layer 2 flat vlan or a layer 3 network with routing between the protected clusters and the vault cluster.
- Example below is a layer 3 network example
- Example below is layer 2 vault network
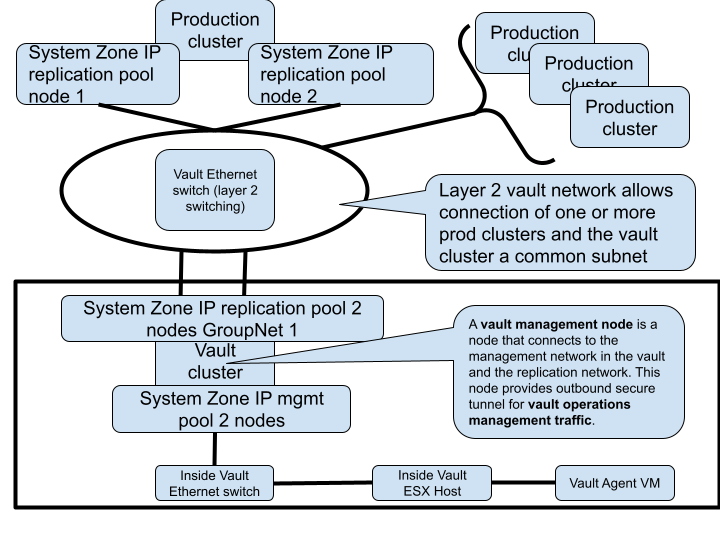
- Best Practise:
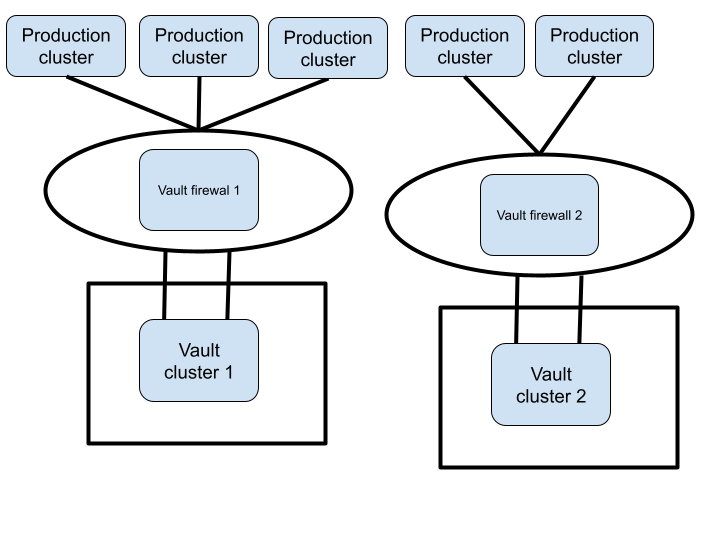
- For multiple source production clusters, a single vault network subnet allows all clusters to attach to a single layer 2 network and a single vlan can be used between all the clusters.
- A layer 3 vault network allows a firewall to be used between the source protected clusters and the vault cluster to add additional traffic firewall rules between the clusters.
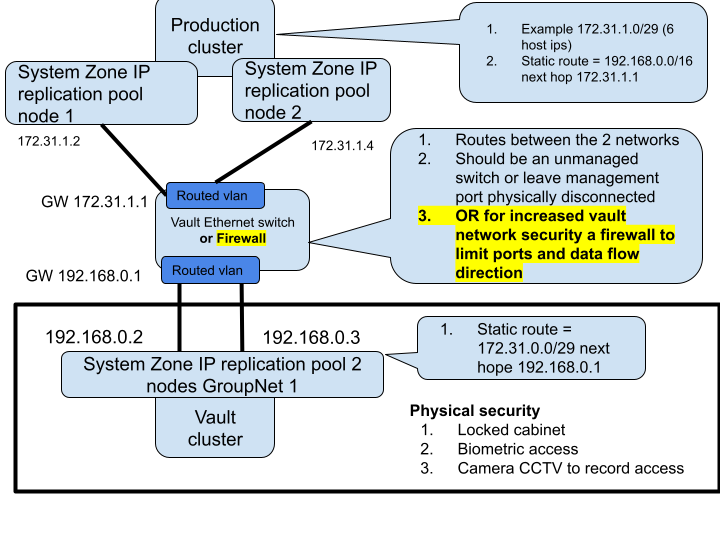
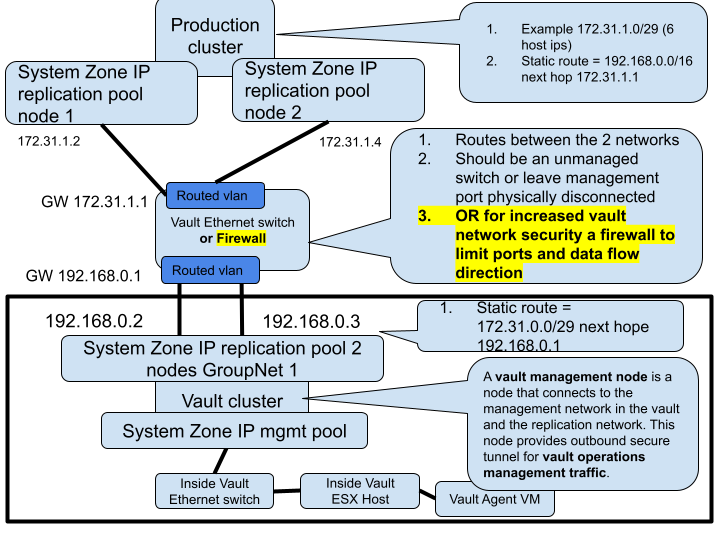
Virtual AirGap Mode - Layer 3 Vault Network (side the vault only deployment)
- The diagram below shows the networking required for source and vault PowerScale clusters, and how the vault switch and ip static routes should be configured for initial setup and configuration. The static route added on the source PowerScale will be added to the Ransomware Defender configuration to open and close the virtual AirGap.
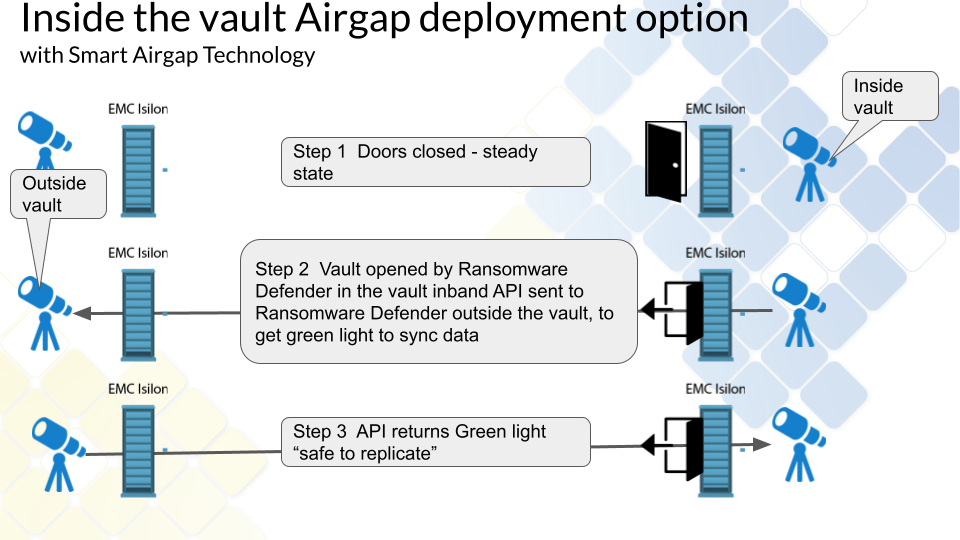
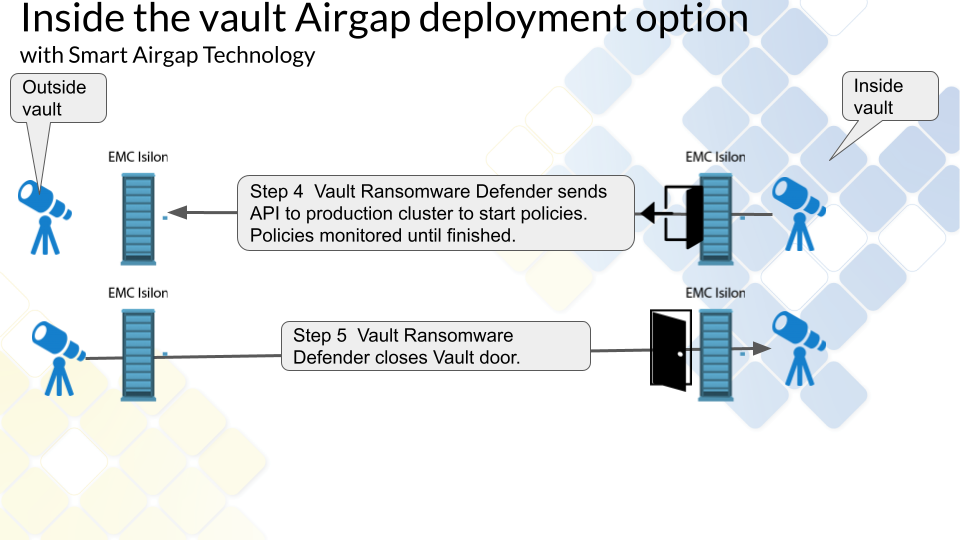
Inside the Vault mode Deployment (Enterprise AirGap License Required)
Overview
This provides an alternate mode of operation with an inside the vault host and VM that opens and closes the vault from within the vault. This requires the Enterprise Airgap license key. This is done by removing the replication interfaces from the IP pool which removes the IP address from the interfaces. This mode places a VM inside the vault and disables the IP stack that connects the vault cluster to any outside network. This mode offers Smart Airgap feature and all the same automation and enables this through a hardened Linux OS that autonomously manages the Airgap and verifies if is safe to replicate data. The slides below show how this mode is deployed.
Inside the Vault Physical Topology - Layer 3 example
How to Enable Inside the Vault Agent VM (Enterprise AirGap)
- Requirements:
- Airgap Enterprise agent VM license key is installed during deployment to enable this mode.
- To enable Airgap policies to be managed by the secure hardened inside the Vault VM agent the Airgap administrator must switch from Virtual Airgap mode defaults to inside the vault mode.
- The inside the vault VM agent will collect schedules configured in the Airgap UI and import them during initial setup.
- Once activated all vault open and close operations are managed by the Vault VM agent vm securing the vault access and shutting the vault networking if Ransomware defender or Easy Auditor triggers have alarms raised.
- Smart Airgap - Active alarms will cause the vault vm agent to shut the network down without replicating data.
- NOTE: a static route will still need to be added, a fake route can be used that has no relevance to replication network. This requirement will be removed in a future release. example route 192.168.1.0/24 next hope 192.168.1.1 (NOTE: this assumes you are not using 192.168.x.x ip ranges)
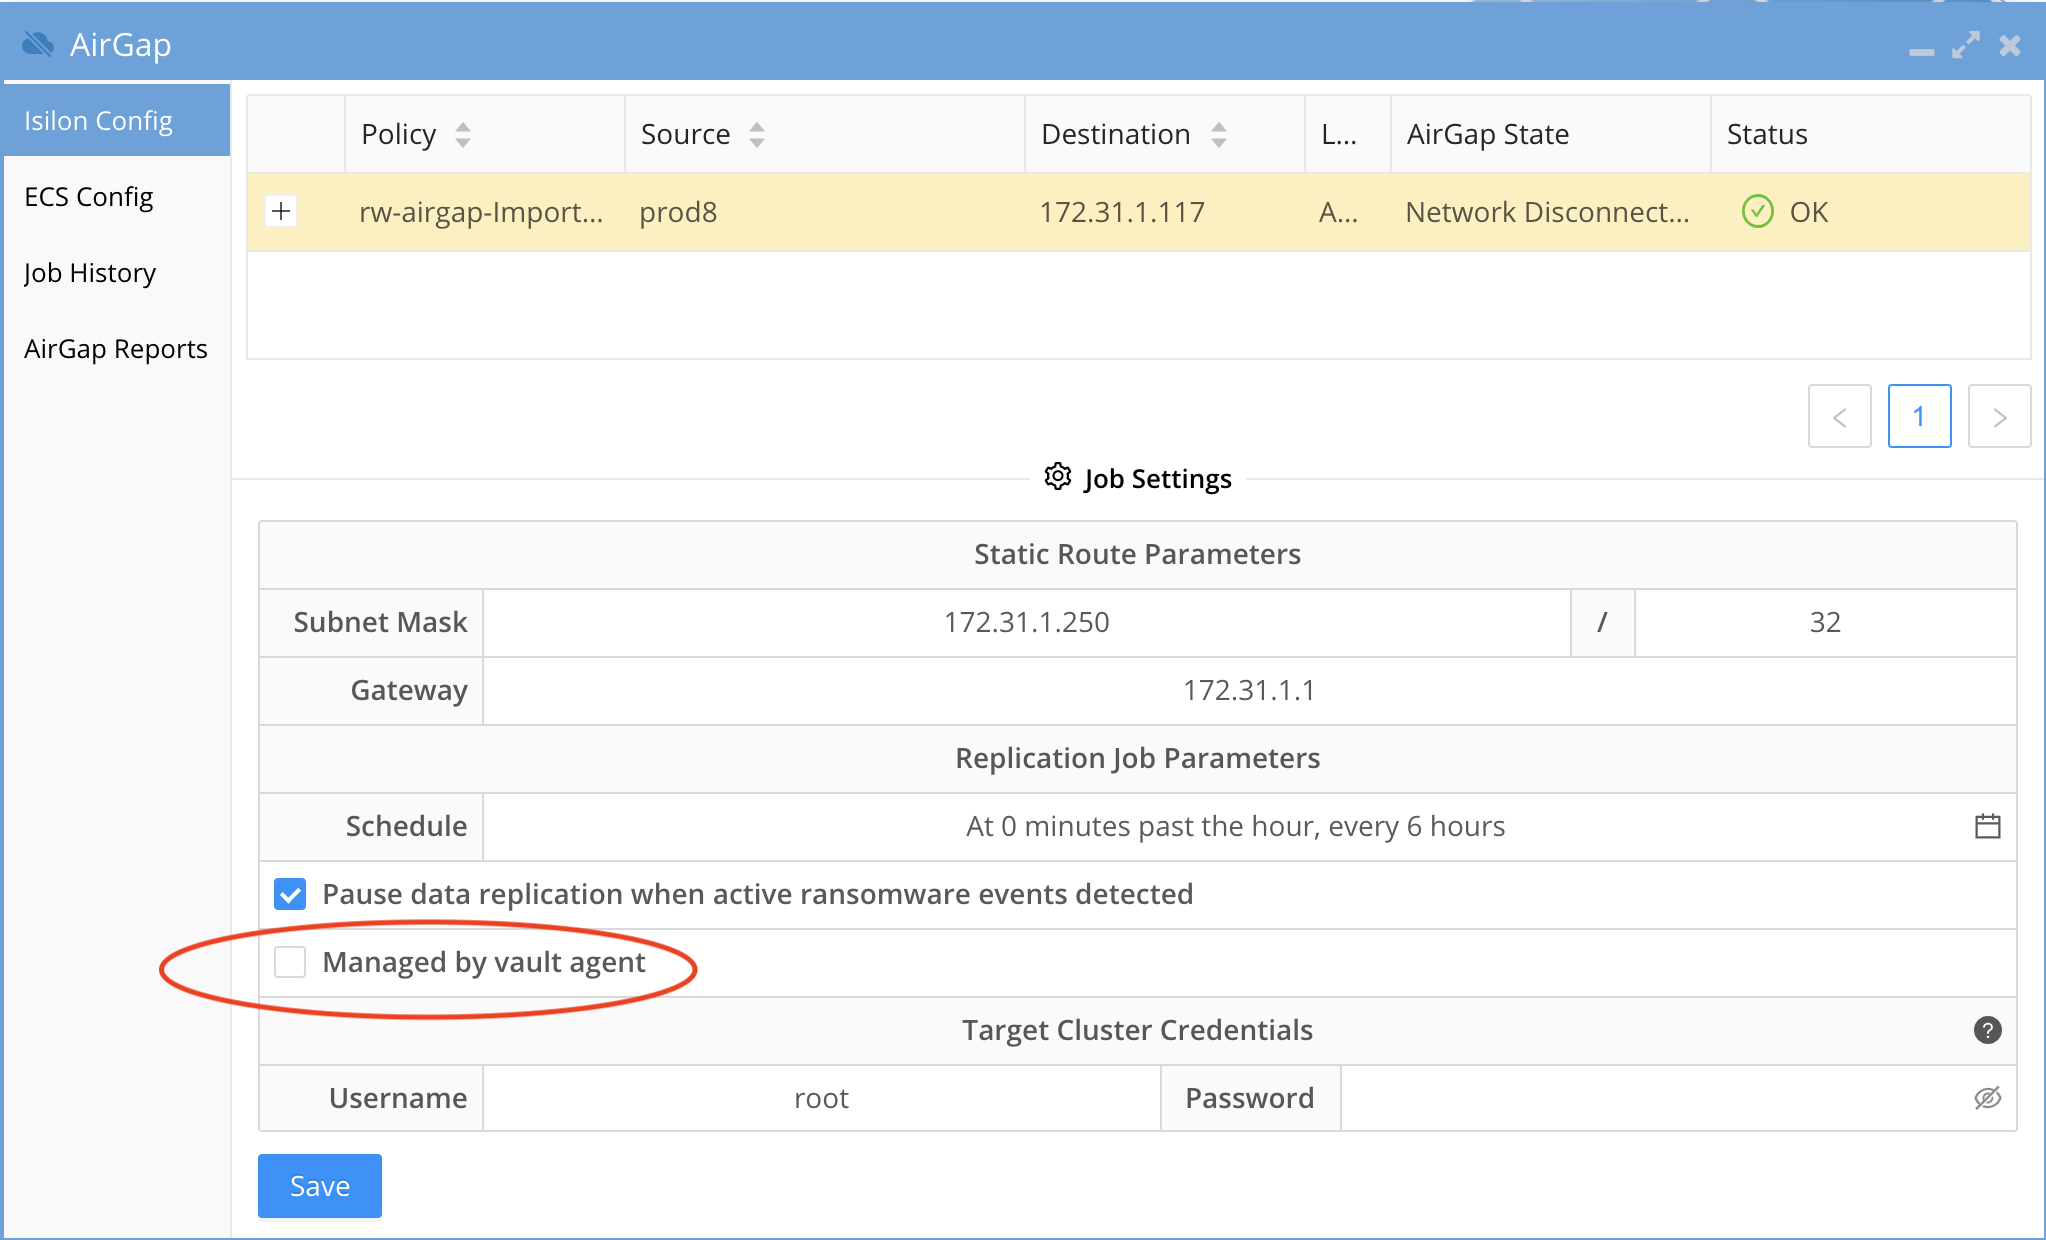
- Open the Airgap Icon
- Click on Settings
- Enable "Managed by vault agent" check box and click save
- Done
Operations of Vault Data Replication
- When using the inside the vault VM the CLI commands to force open the vault for maintenance are not supported and physical console access is required to gain access to the vault cluster or ESX host and VM. A physical keyboard mouse inside the locked cabinet will be required. This is a more secure operating mode.
- 2 modes exist on the vault agent that allow a 2 hour maintenance heartbeat API request from the vault agent VM. This heartbeat API checks for a request for a maintenance access window using Airgap CLI command on the Eyeglass VM.
- This is defaulted to disabled but can be enabled to check for a request every 2 hours to open the vault for maintenance for a timed window in minutes.
- When the request is for 60 minutes the vault will close automatically after 60 minutes.
- Ransomware Defender Smart Airgap API reachability failure is a fail safe for the vault. If the Eyeglass Smart Airgap API end point for safe replication cannot be reached the inside vault agent VM will fail safe and will close the vault on any failures keeping the data safe inside the vault.
Data Flow Example for Data Replication with Enterprise Airgap
Vault Management Data Flow Example for Enterprise Airgap
Configuration Steps for AirGap Setup
Overview video
How to setup syncIQ policies for AirGap
- The AirGap policies are created on the Isilon and use restrict at source pool created in the physical configuration outlined in this guide. This ensures vault cluster replication traffic will use the correct nodes and physical interfaces. This also ensures Virtual AirGap to control the static route on this replication IP pool.
- Select the source path based on your data protection requirements that select the data that should be protected in the vault. NOTE: multiple policies can be created to protect different paths and change the replication schedule for each policy within the AirGap management GUI.
- The Name of the policy must use the following naming to be treated as an AirGap policy
- rw-airgap-xxxx where xxxx is unique part of the policy name. See Advanced settings to change the policy name prefix.
- Synciq Policy Property requirements
- sync mode
- no schedule set leave at manual
- Mandatory - restrict at source pool set to the AirGap pool for synciq replication. This is required for Airgap to add the static route to the correct pool
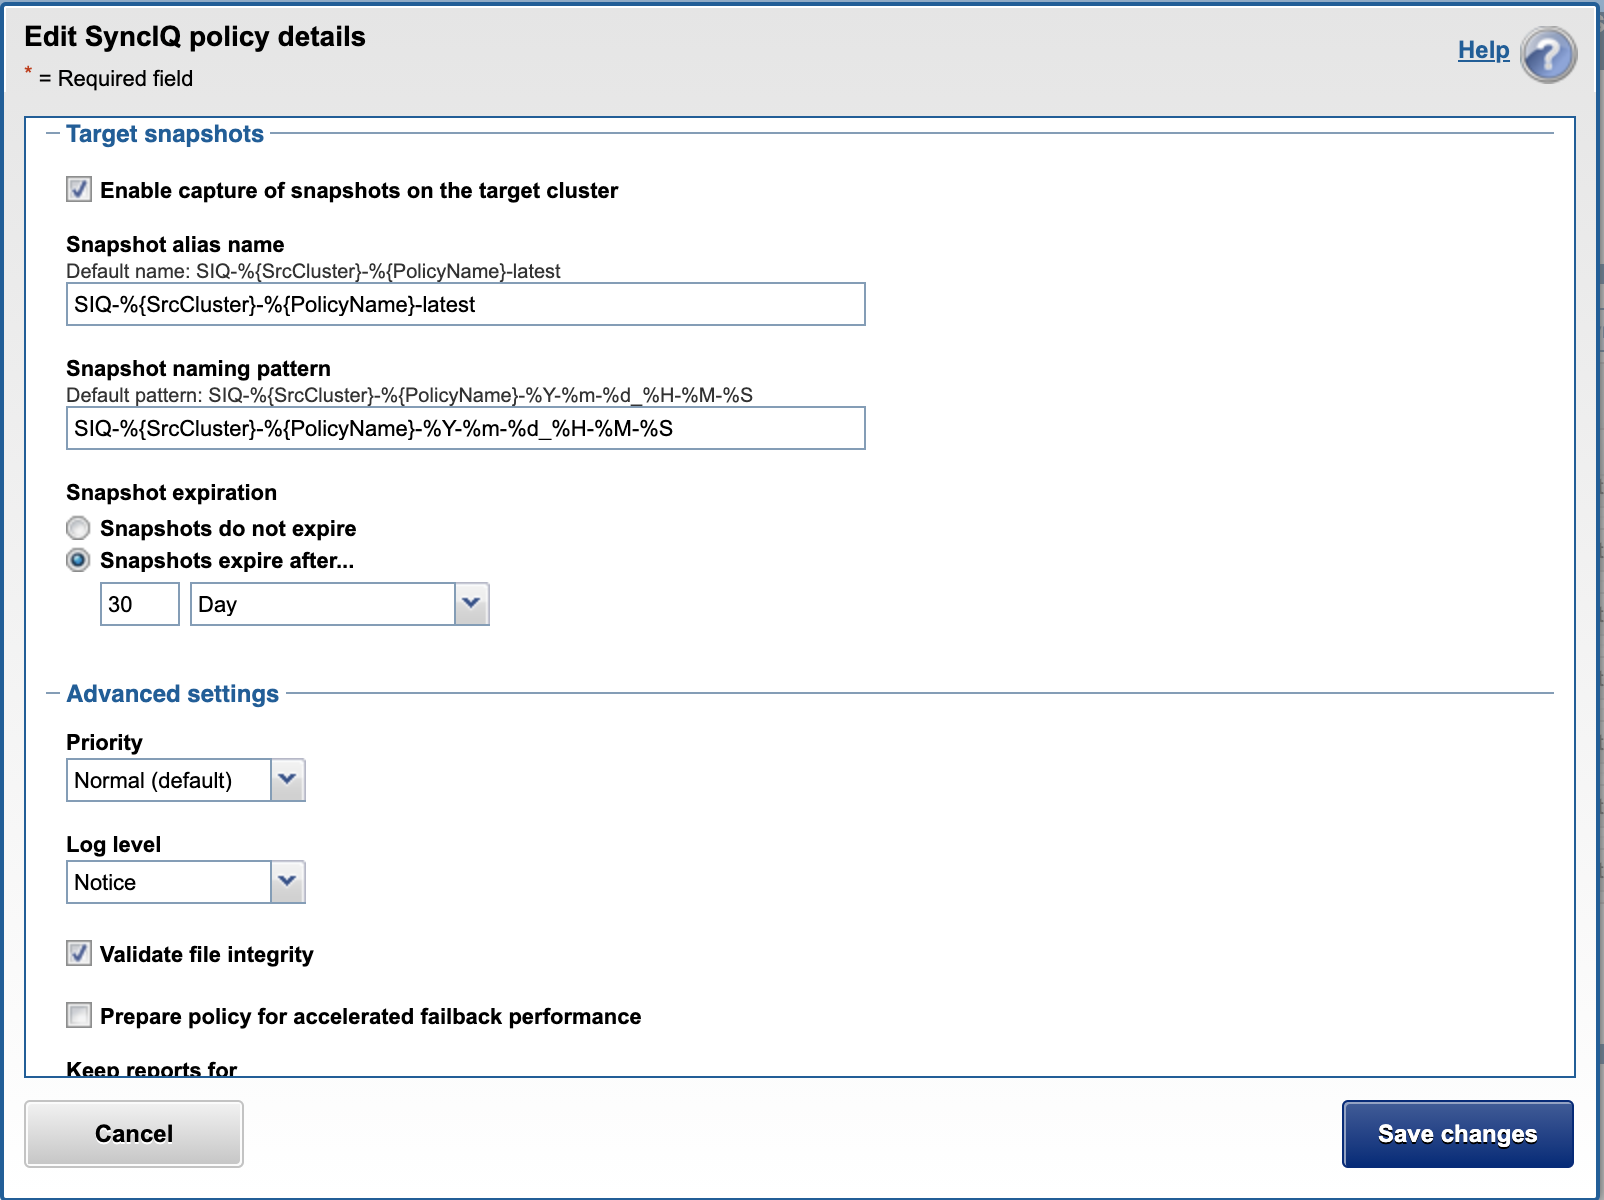
- Data Retention
- This is an important consideration to provide maximum protection and options to recover data in a worst case data recovery scenario.
- Longer SyncIQ data Retention will require more space with longer retention. Data change rates will determine how many days of retention.
- When creating the policy enable Target Snapshots mode and set the retention in days. See example below.
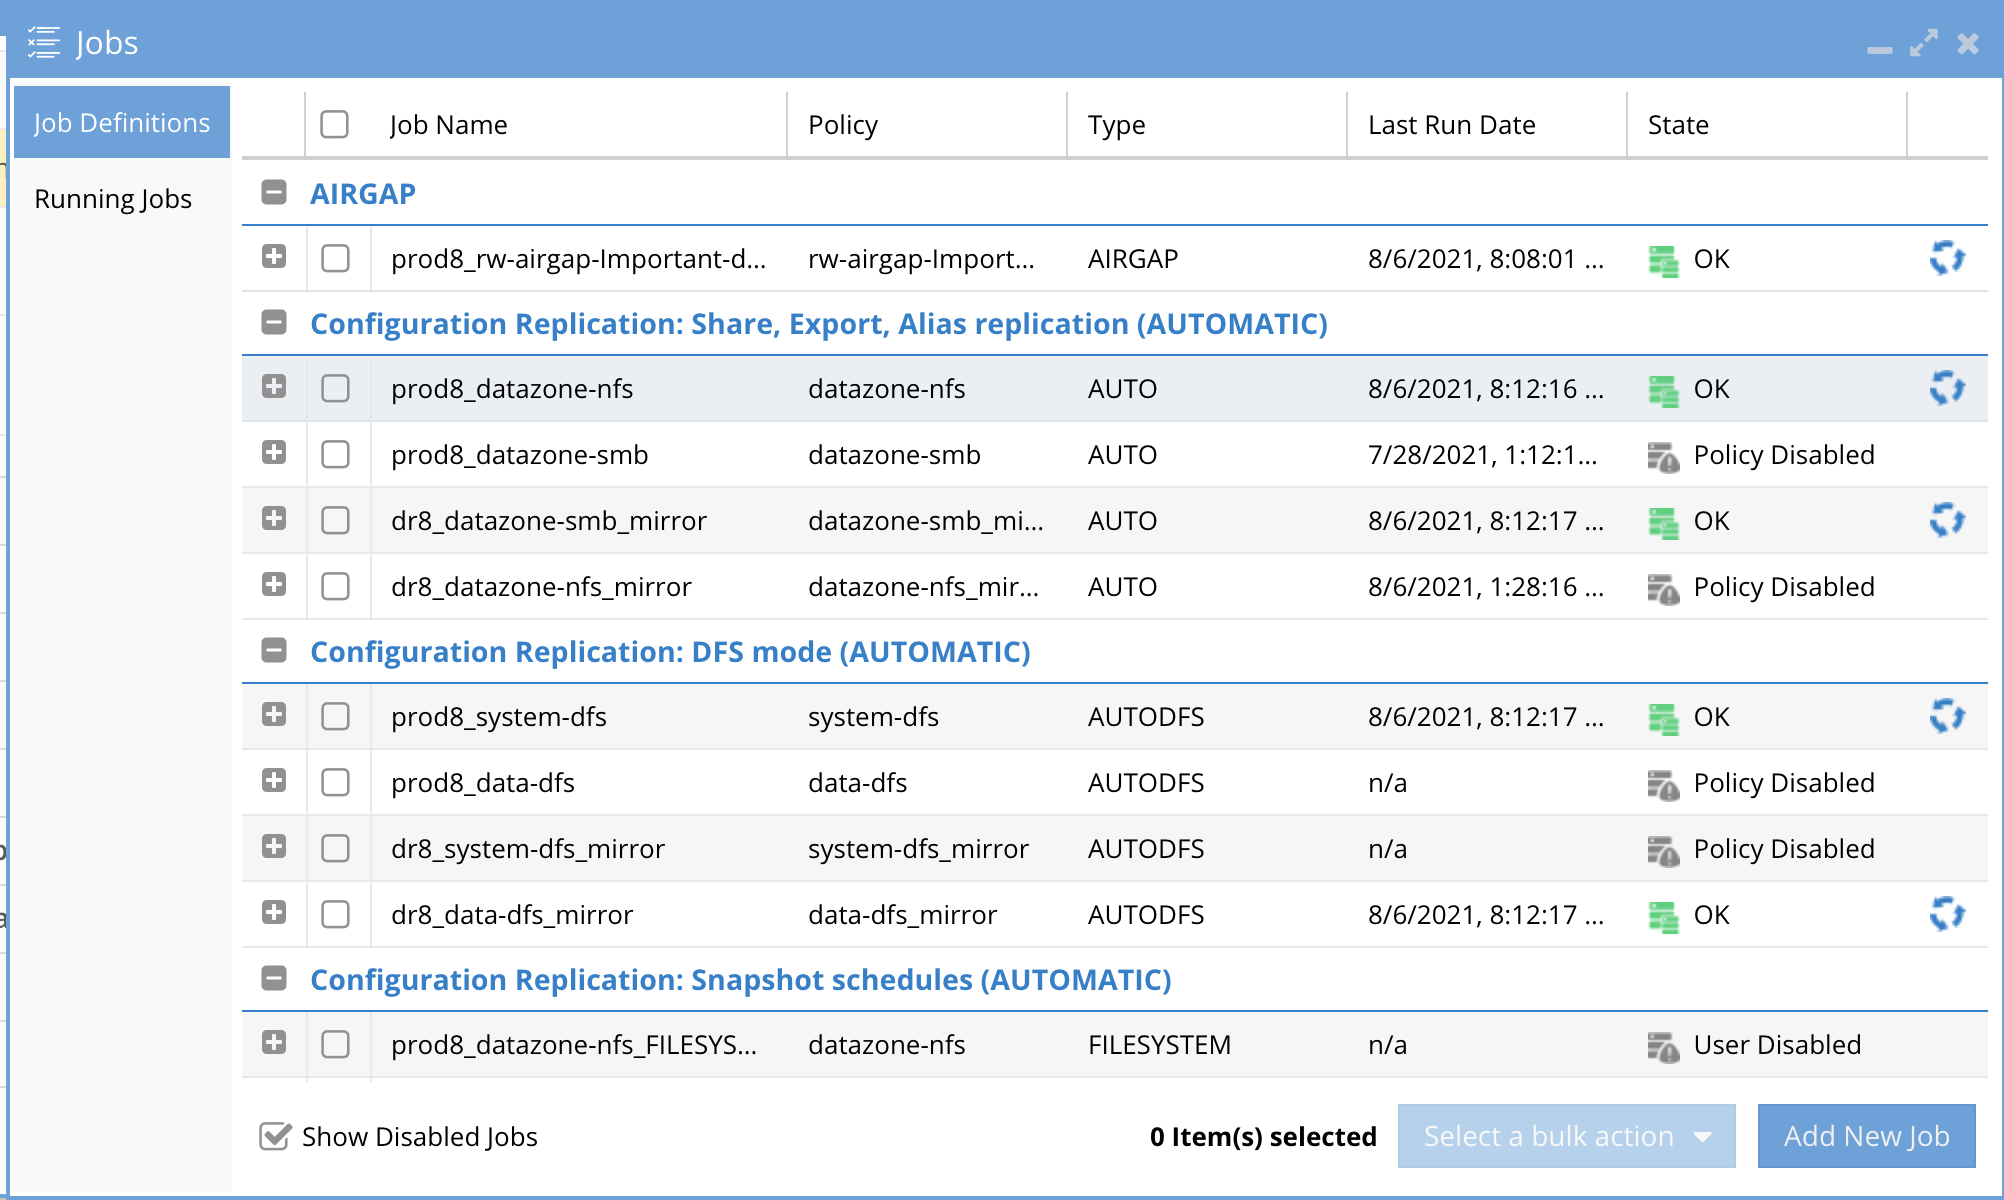
- New policies will appear in the AirGap icon AirGap Config tab.
- Configuration replication inventory defaults to 5 minutes to detect new SyncIQ policies
- Locate the policy in the Un-configured section of the jobs icon. The policy must be run once before it will move to the Airgap section of the jobs window.
- Verify the new policy appears in the AirGap icon
- done.
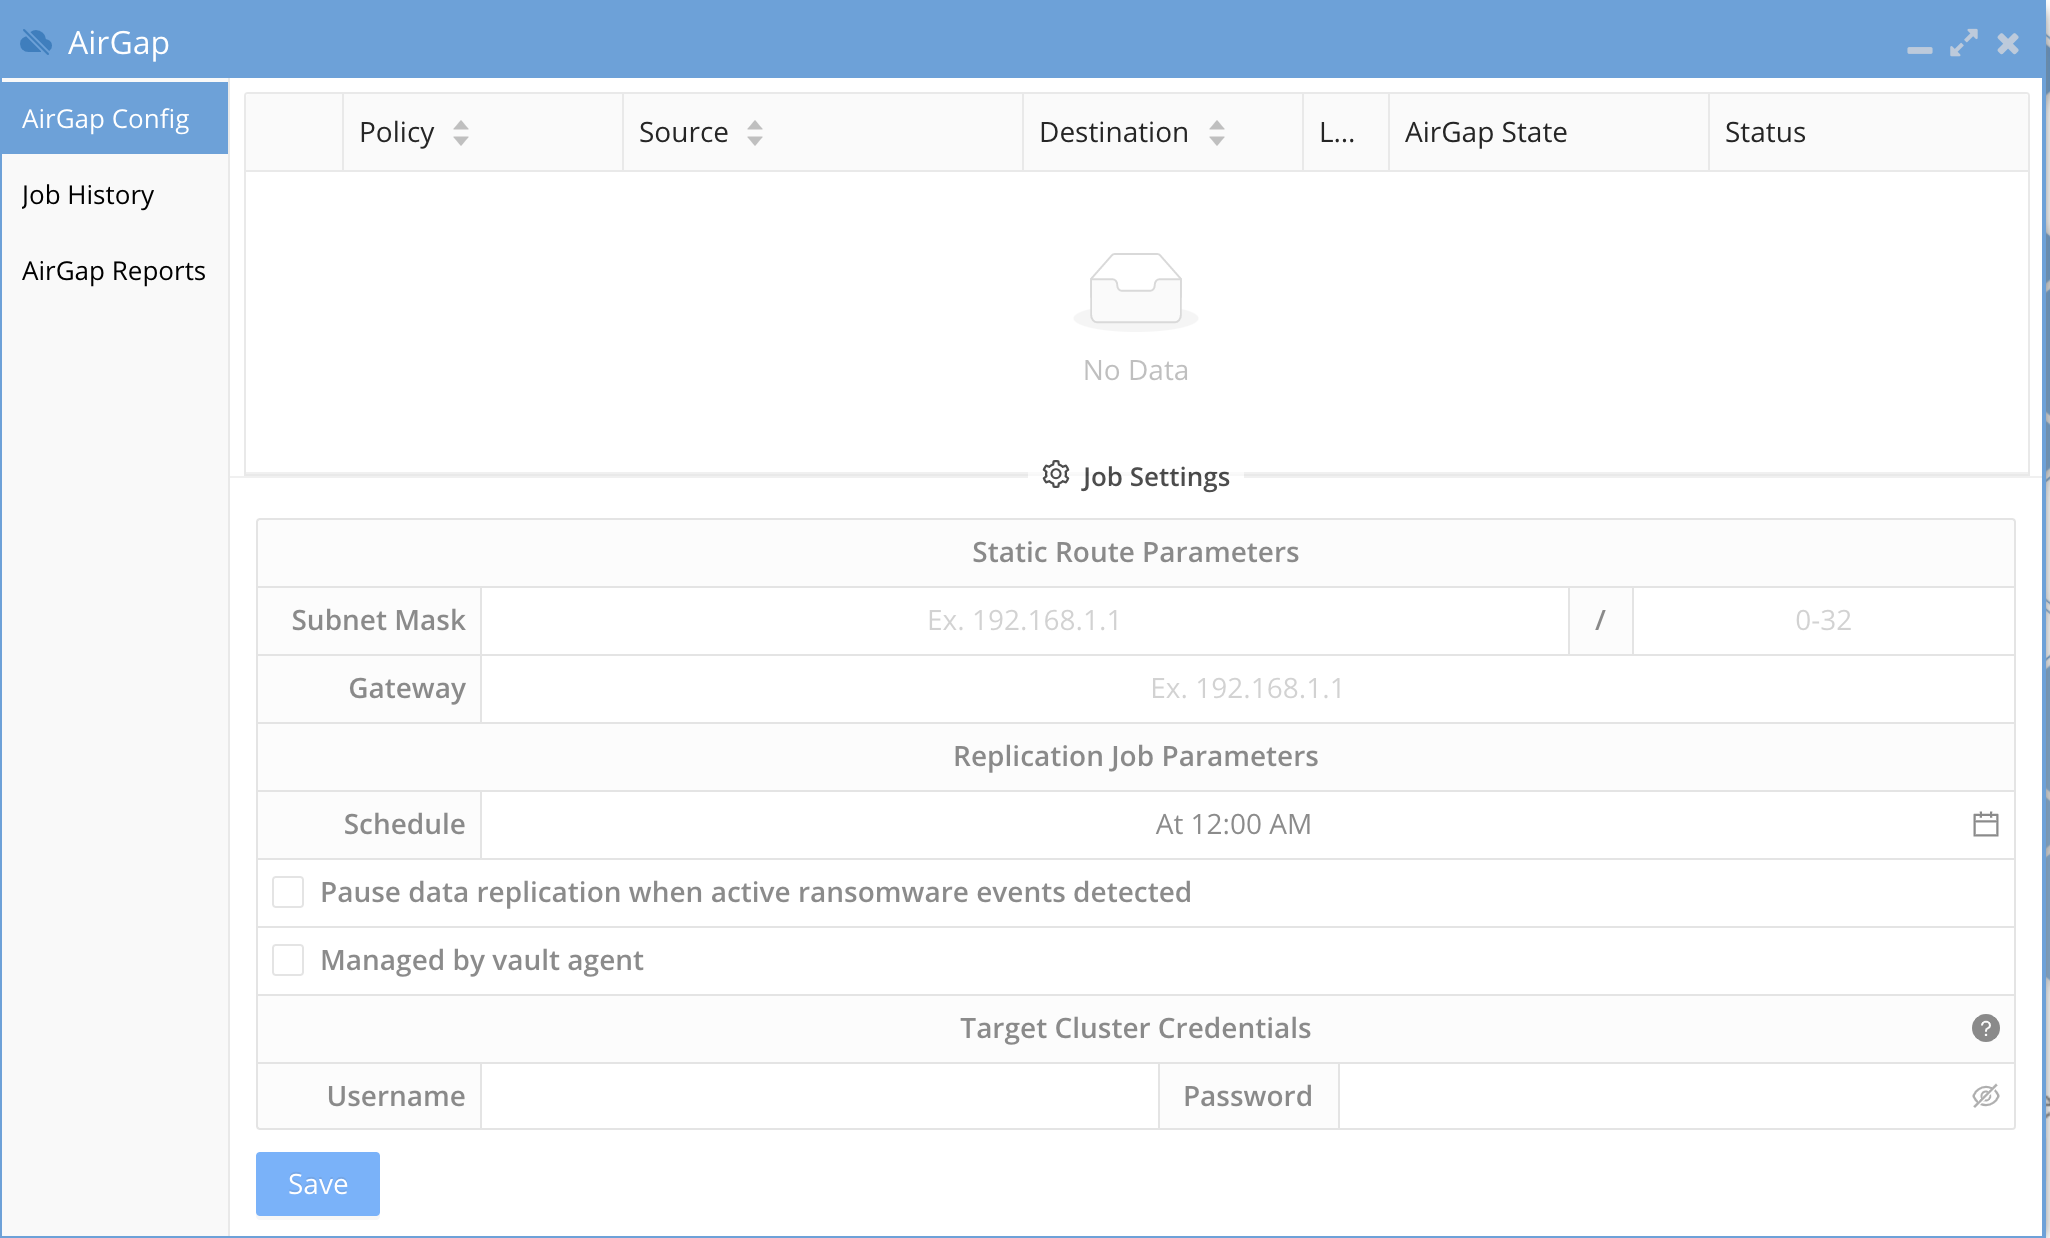
How to Configure AirGap policies and setup Virtual AirGap (Outside only deployment)
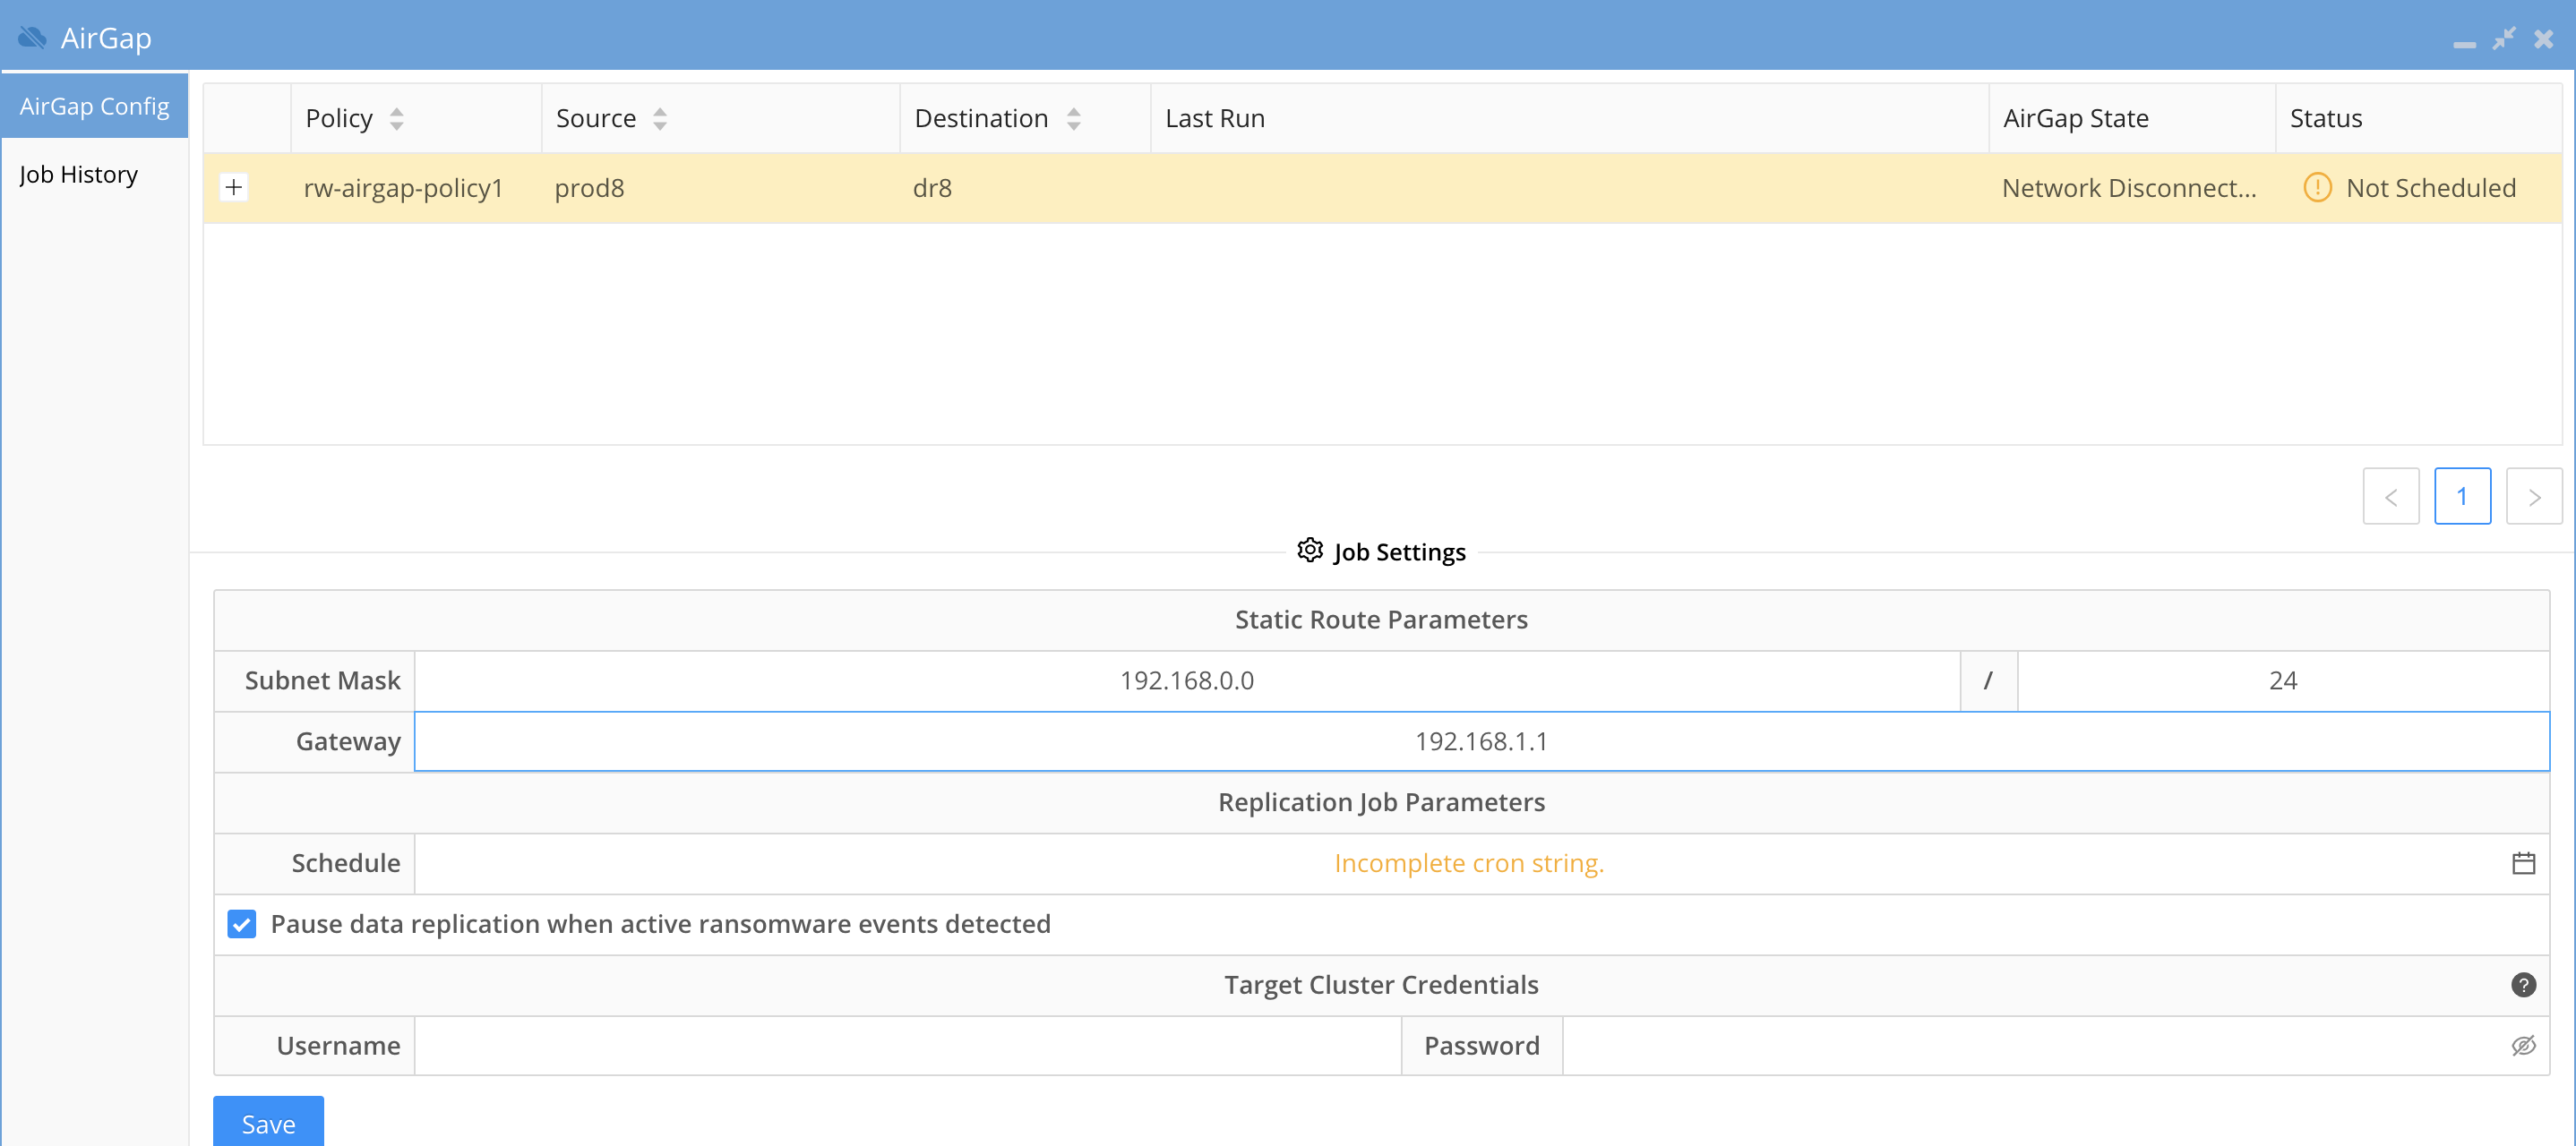
- The SyncIQ AirGap policy should be configured as per the above section. Open the AirGap Icon to verify you can see the policy. NOTE: The schedule is not set and the policy is not managed in this state.
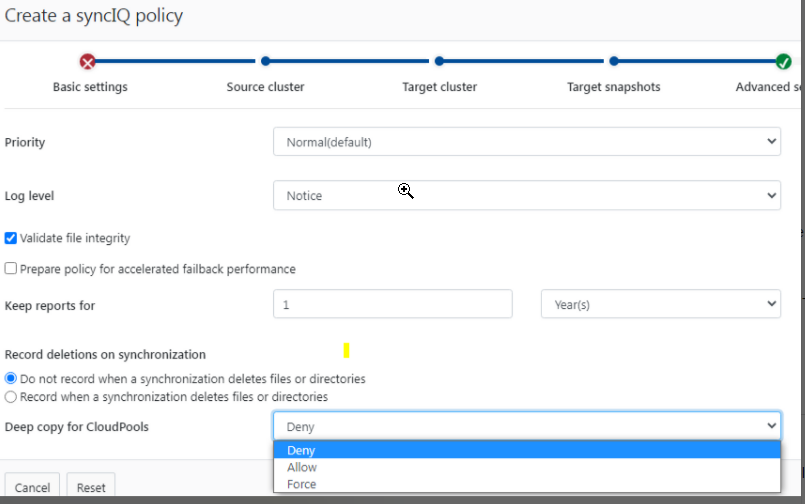
- NOTE: If cloudpools are used to stub data the synciq Policy must use the deep copy flag with the force option.
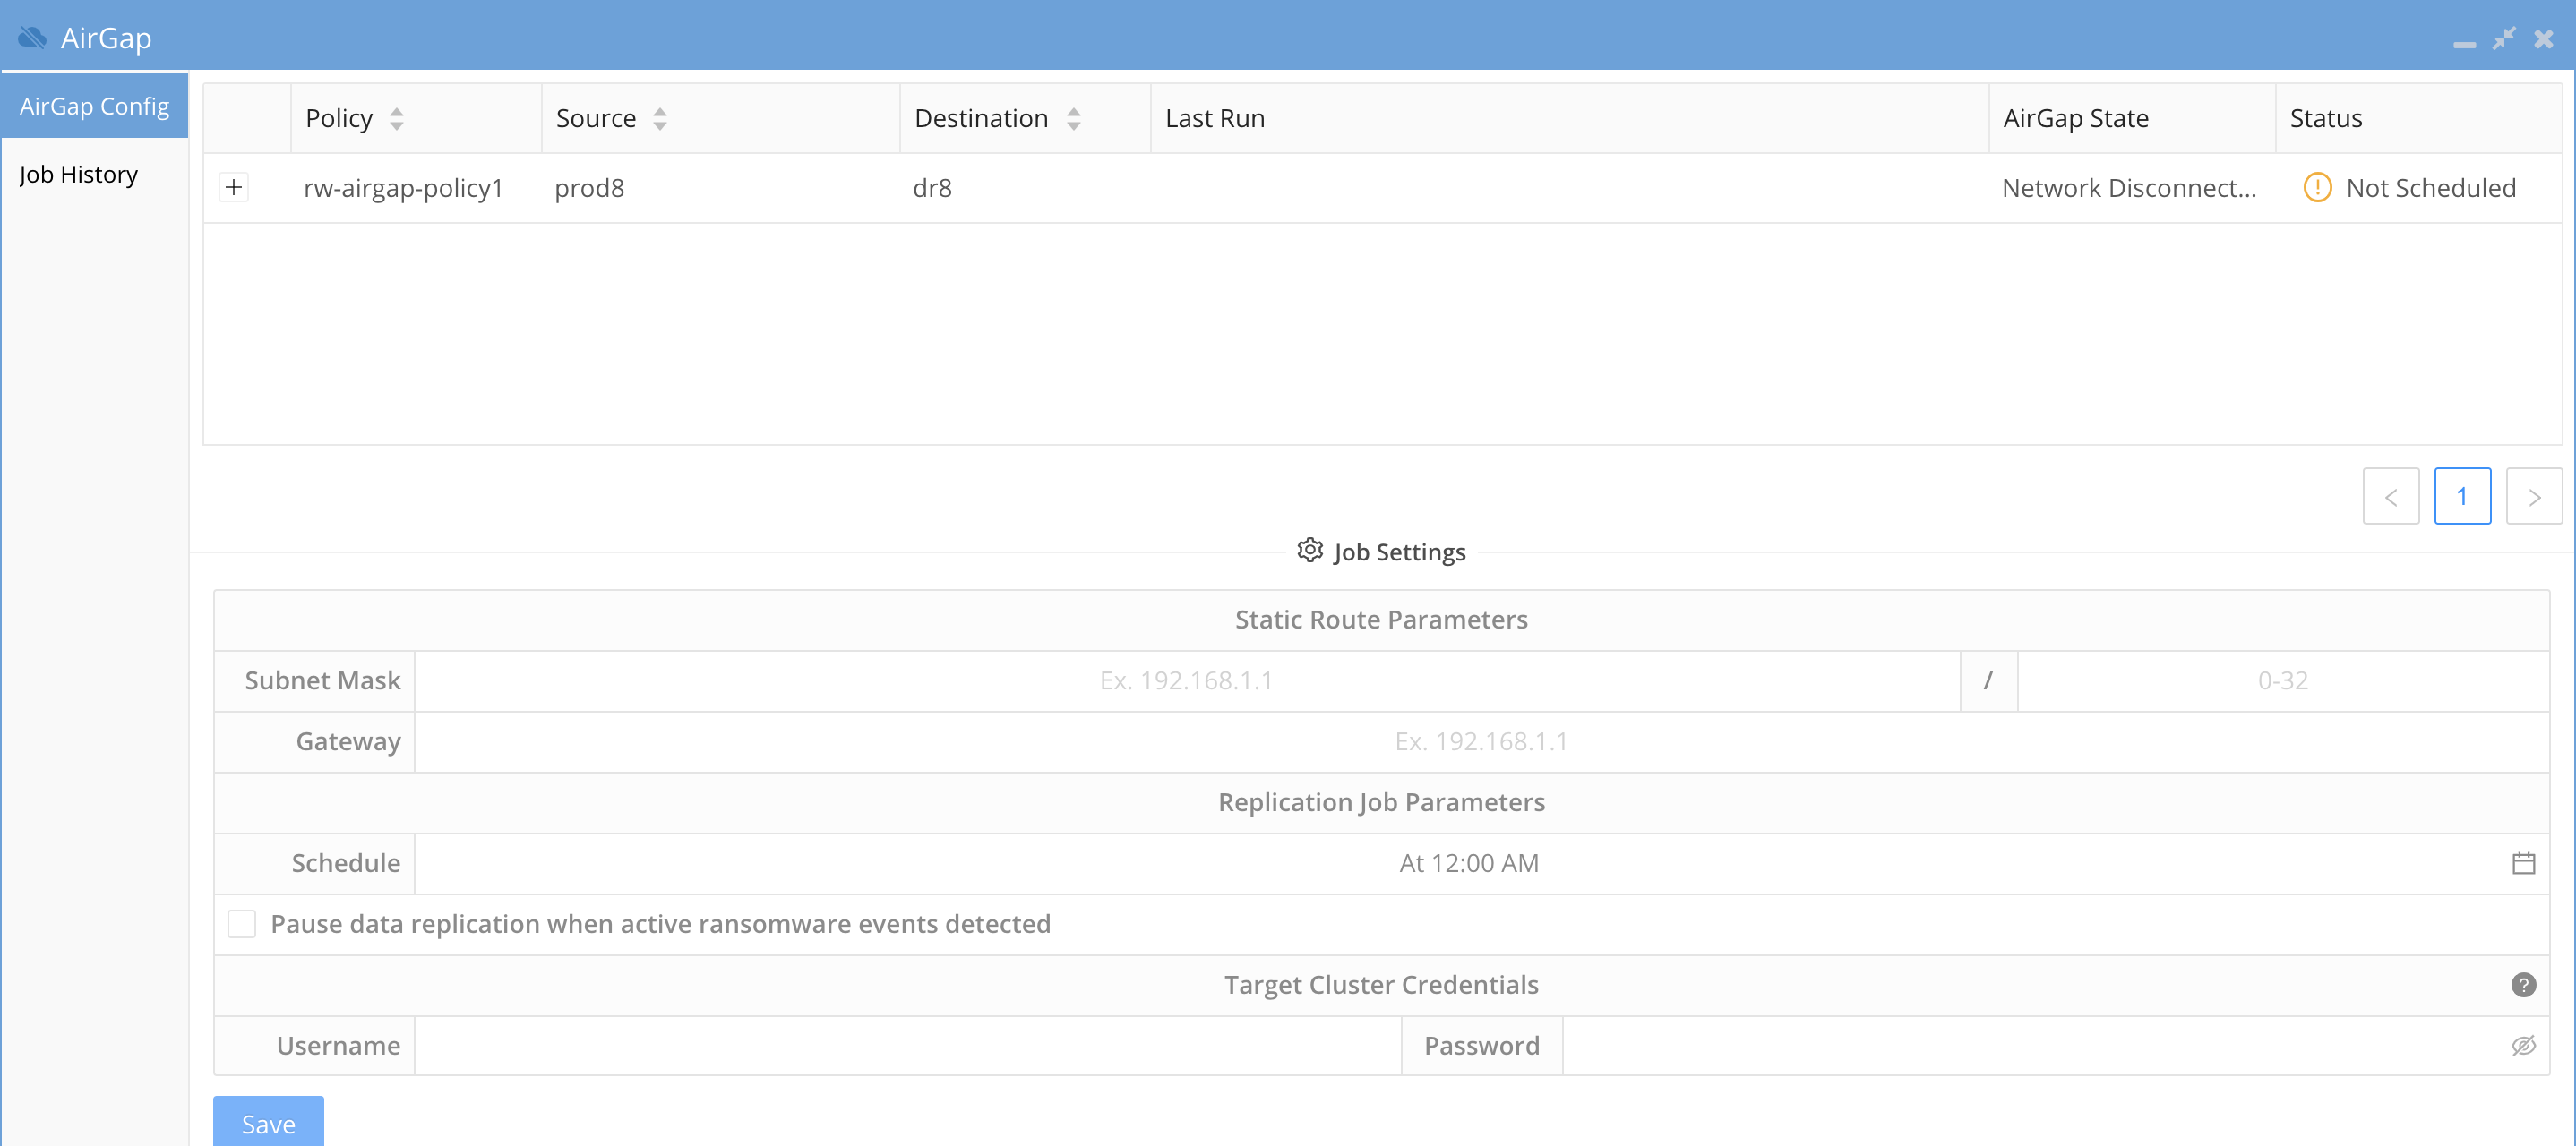
- Enter the Virtual AirGap subnet range , network mask bits and next hop gateway.
- subnet = the network that the vault Isilon cluster IP pool that is configured for SyncIQ replication.
- The subnet mask bits to apply to the subnet entered. example 24 bits for a 255.255.255.0 subnet
- The next hop gateway IP address will be the IP address of a router between the production Isilon IP pool for AirGap and the Vault Isilon. Refer to the diagrams above on how to network the clusters together on a private network that is only reachable by the production cluster via the IP pool configured for the AirGap. See the example vault cluster subnet of 192.168.0.0/24 and next hope of 192.168.1.1
- NOTE: You must enter a valid subnet that starts with the broadcast address for the subnet example 192.168.1.0/24 is the start of the subnet. An invalid subnet would be 192.168.1.1/24 since this does not include the broadcast address.
- Next configure the schedule by clicking the calendar icon and completing the scheduling.
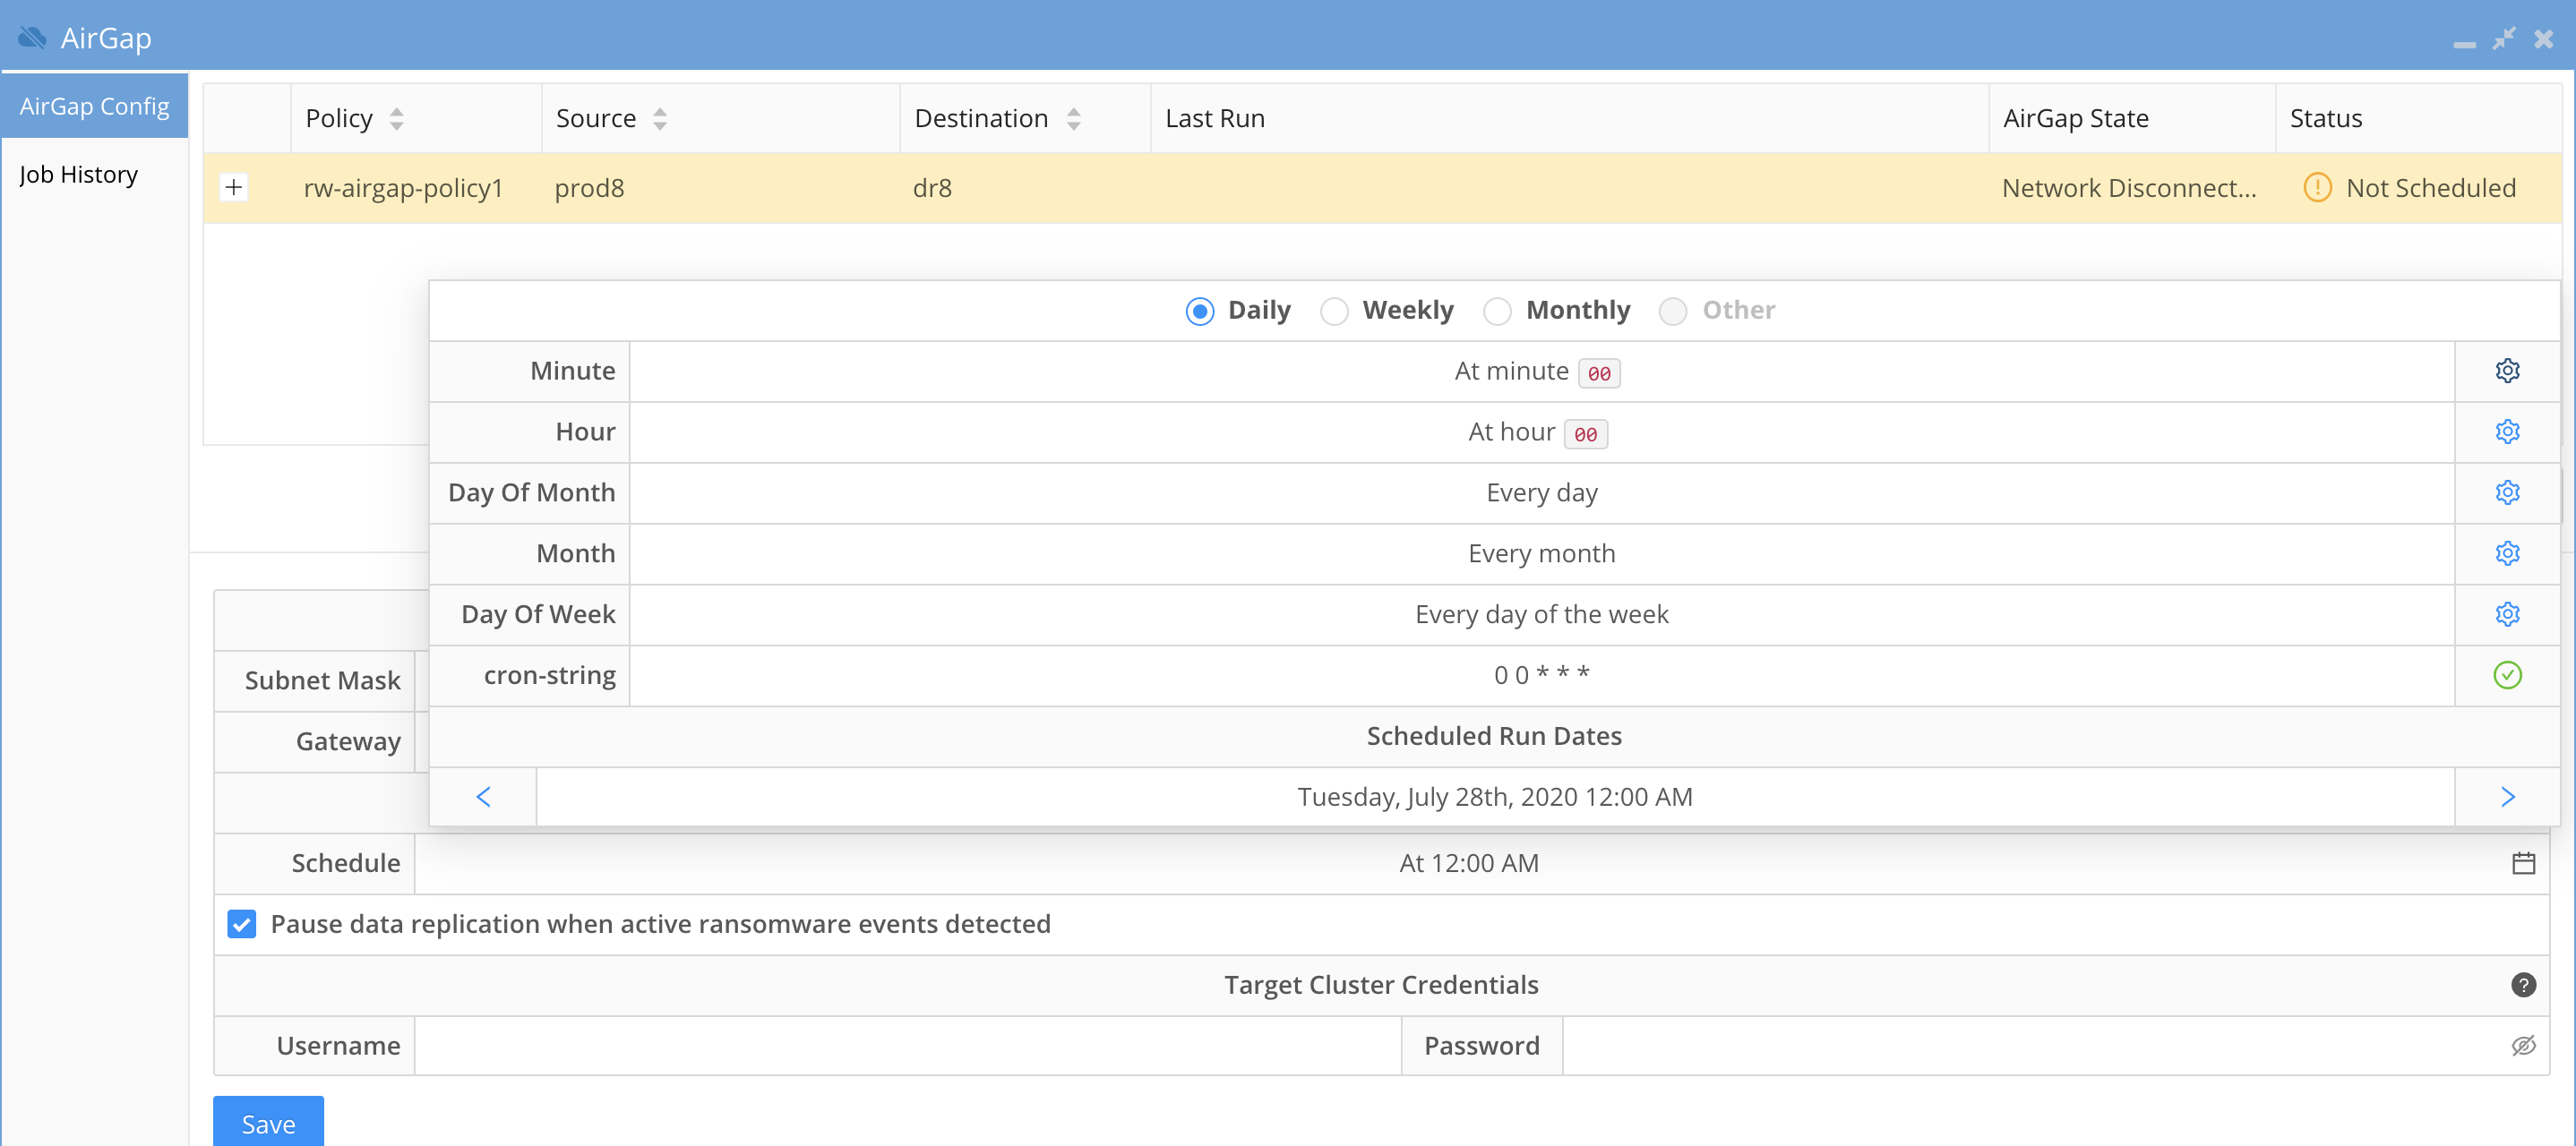
- The defaults radio button at the top if the windows allows simply setup for daily , weekly, monthly
- Select Other to have a custom schedule and complete all fields to complete the custom schedule.
- Recommendation: Always enable pause data replication when active ransomware events detected. This is the Intelligent data protection option that overcomes limitations on other backup based cyber vaults that allow encrypted comprised data to be copied into the vault.
- Note the check box "Pause data replication when active Ransomware events detected" This enables Smart AirGap mode that will monitor user behaviors for any activity that could be considered Ransomware this includes warning, major or critical detections.
- If these alarms are not cleared or managed as resolved in Ransomware Defender Icon the copy schedule will be skipped until an administrator makes addressed the alarms.
- If Easy Auditor is installed all Active Auditor trigger active alarms will also block replication to the vault and must be cleared to allow replication.
- DLP, Mass Delete or custom triggers all block vault replication.
- Suggested Configuration to enable a honeypot trigger to monitor snooping of open SMB shares. See the guide.
- Best Practices: This option should always be enabled to offer the highest protection level of your data and ensures no copies are stopped until an administrator makes a decision on the events. When the events are cleared by an administrator AirGap will resume copies on the next schedule incremental update schedule. Consult support if you plan to disable this check box. If disabled the schedule will run regardless of what alerts are present in Ransomware Defender.
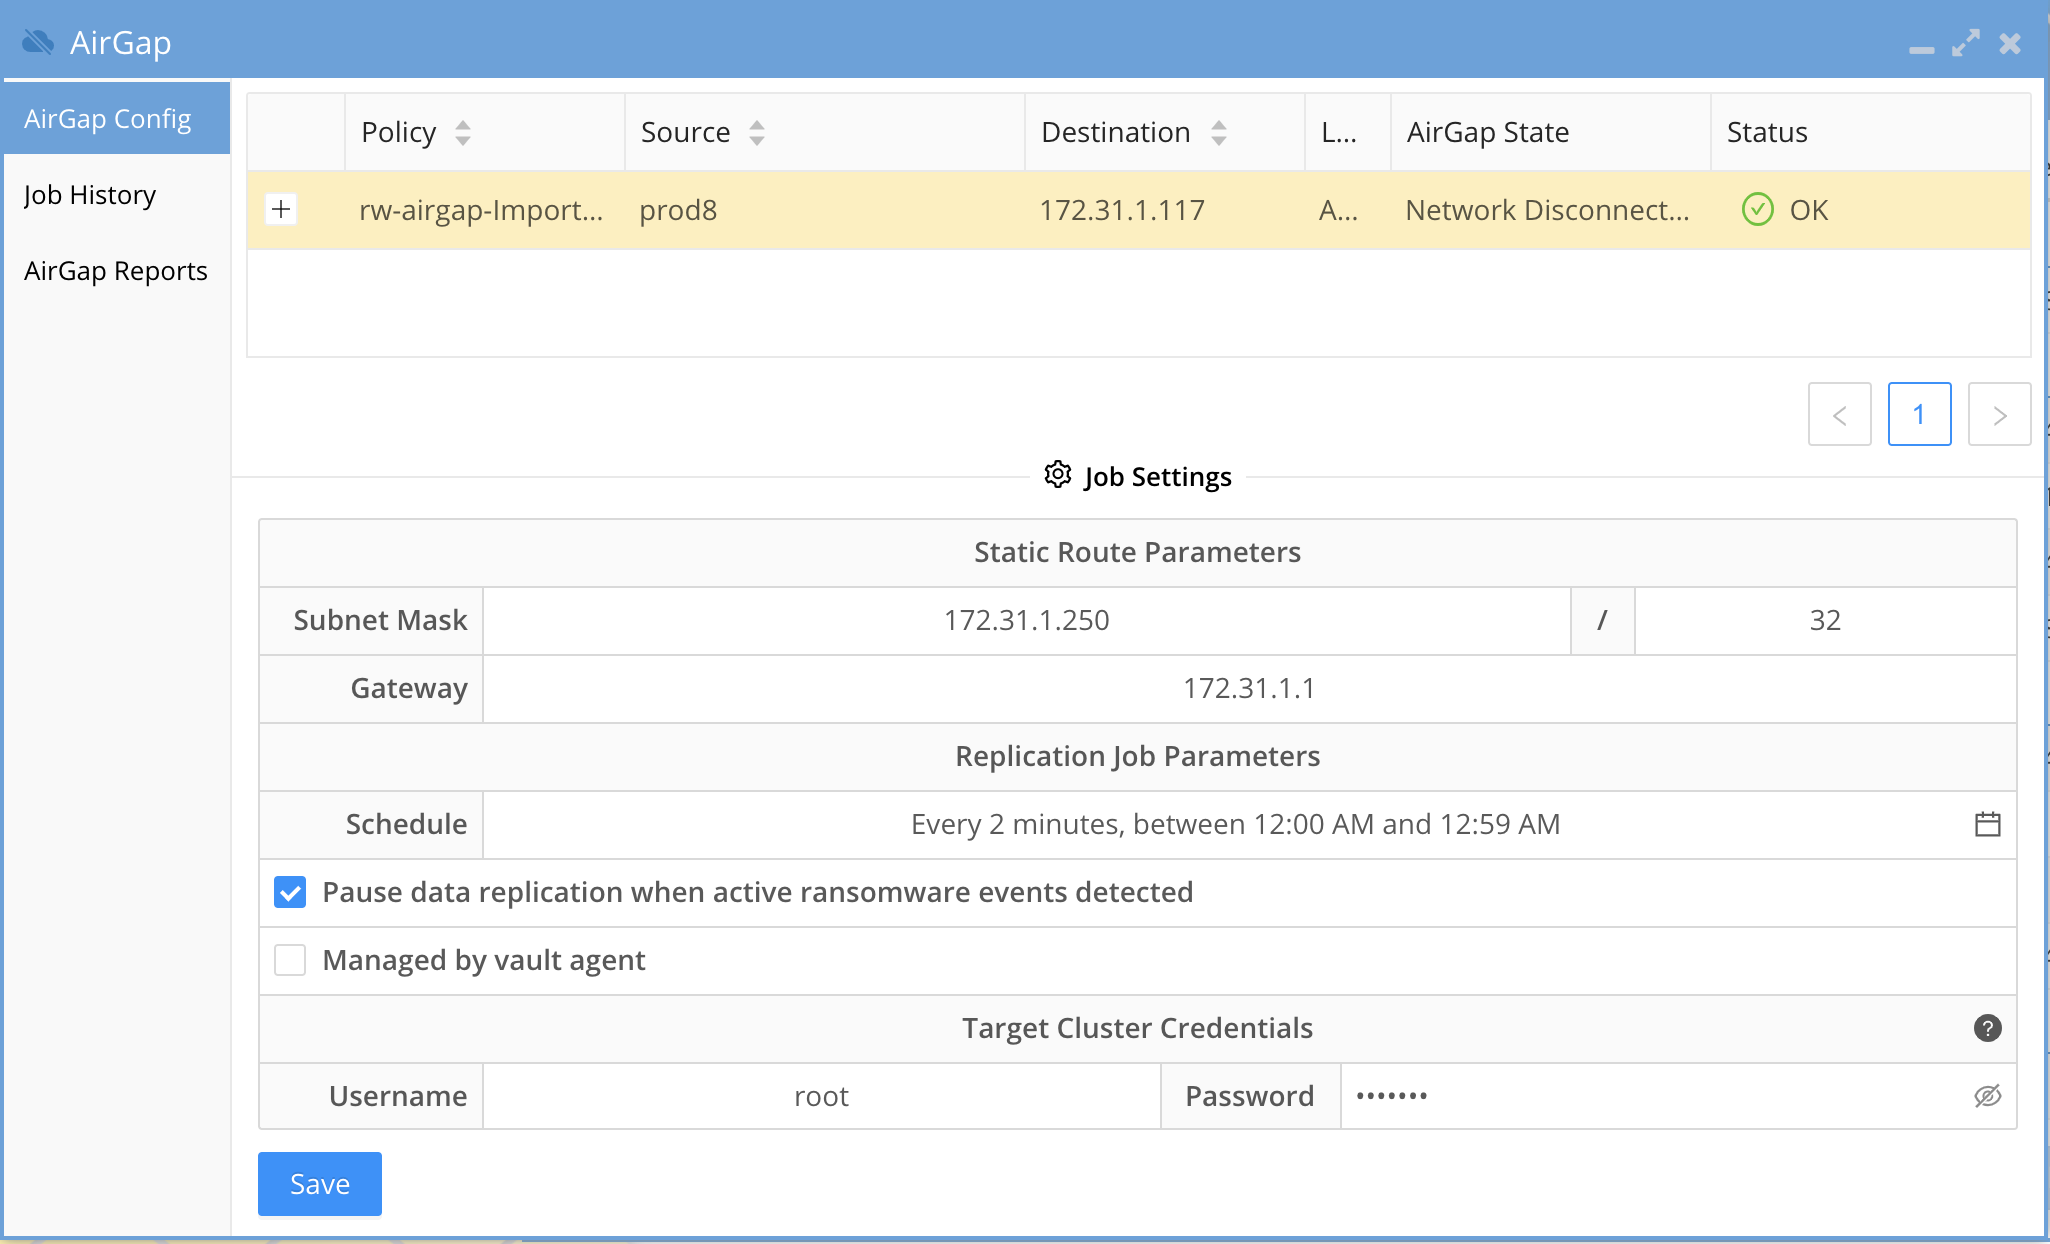
- Target cluster Credentials

- The user and password should be the service account created above section for vault cluster configuration. This service account is a minimum privilege user to collect alarm data only.
- These credentials are used to retrieve alarms from the vault Isilon in-band while the AirGap is open and proxies alarms on the Vault cluster to administrators to monitor physical hardware issues that may occur.
- This ensures an automated solution that is lights out at all times to secure the vault data.
- Then submit the save button and the state should now change to show next schedule replication and AirGap state

- The AirGap policy is now in production mode.
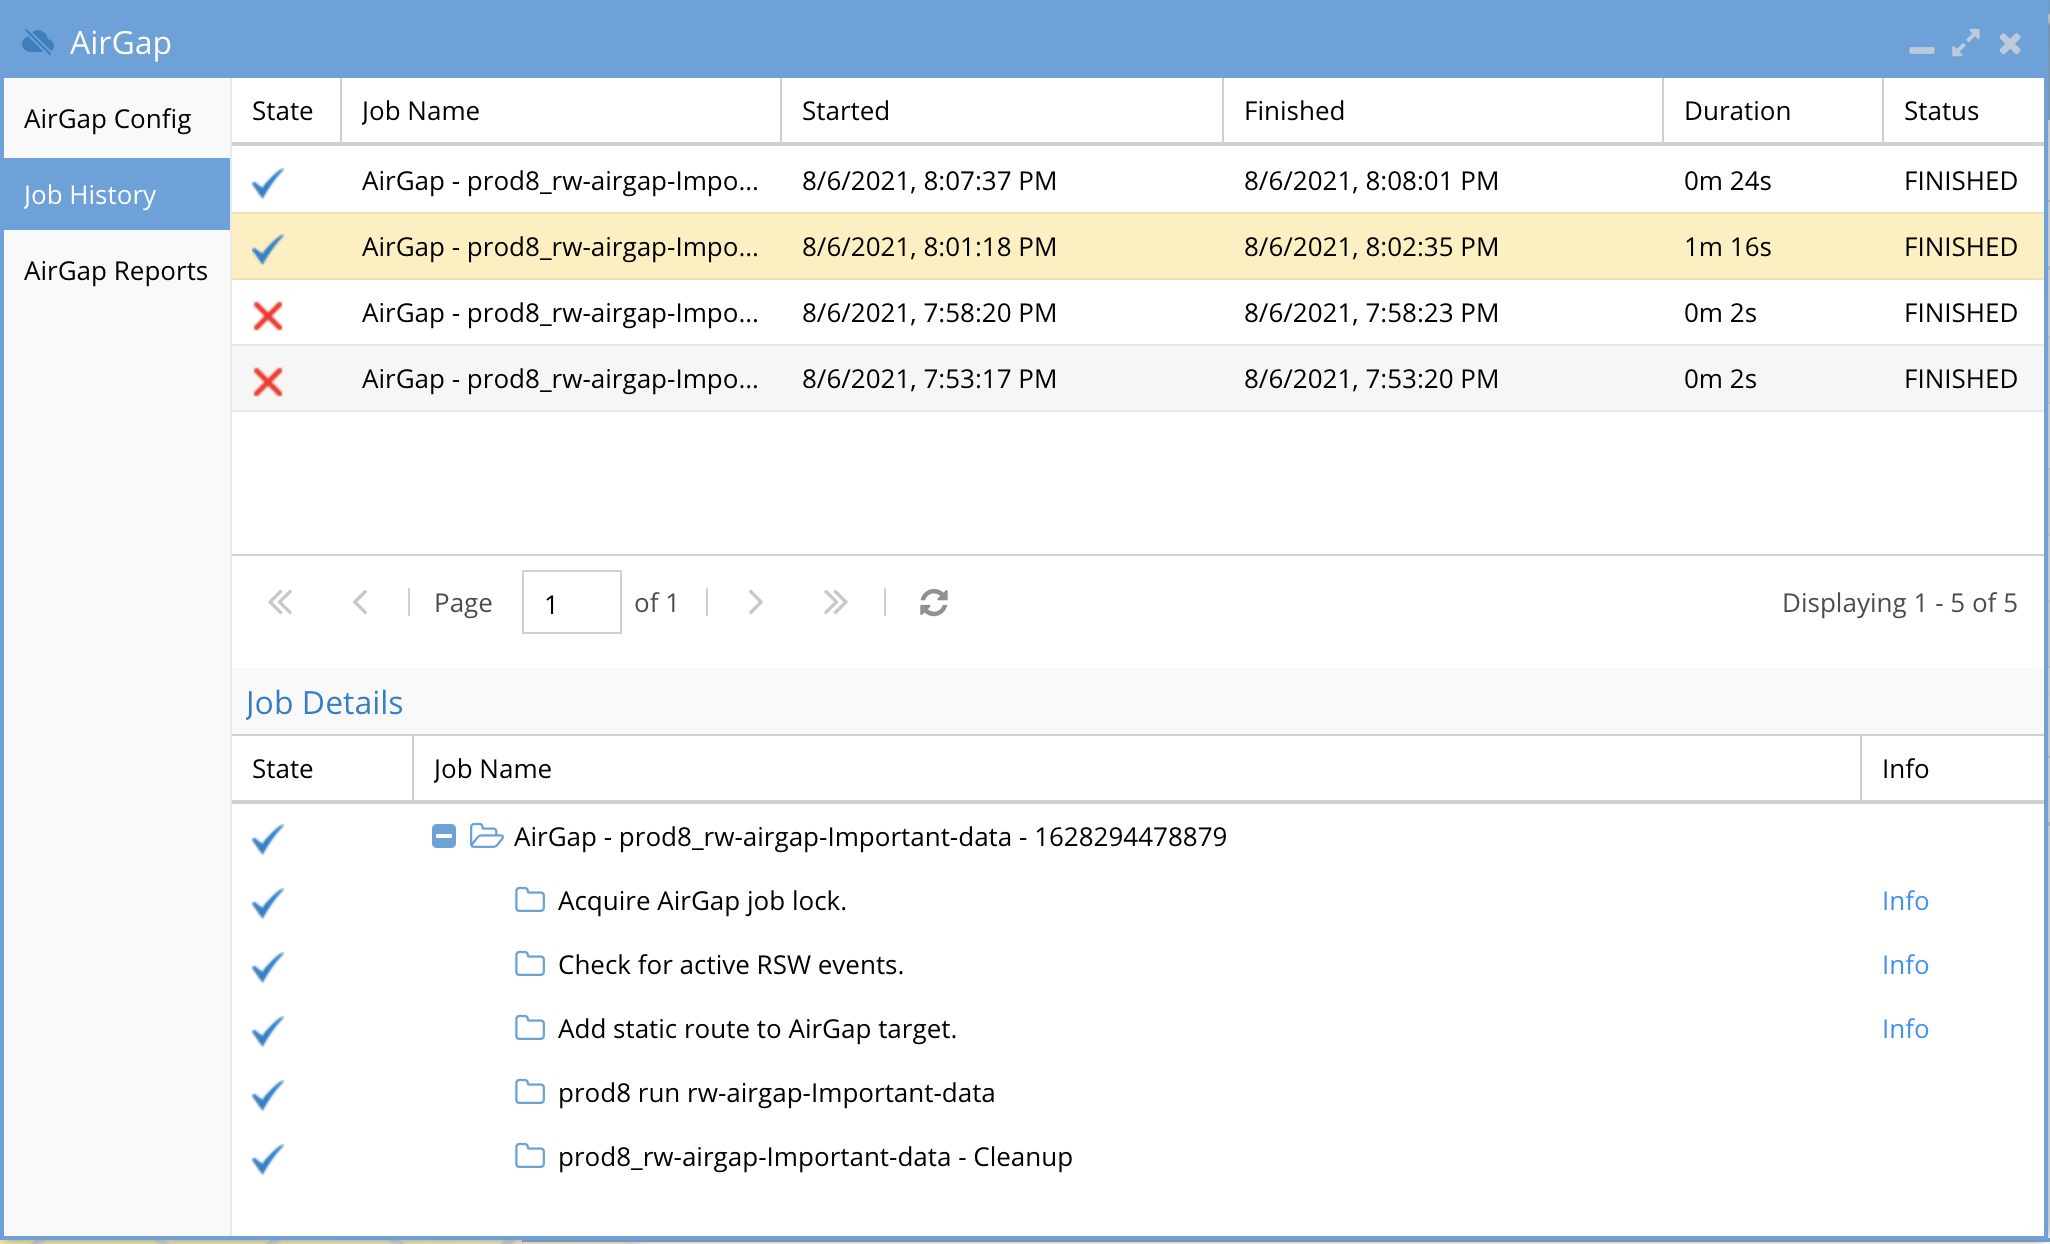
How to test an Airgap Policy job
- Open the Jobs icon and click the run now icon to start the job and then monitor the job from job history tab of the airgap Icon.
How Alarms from the vault Isilon are Viewed and Forwarded
- Configuring the Target cluster credentials allows remote alarm collection during incremental AirGap copies using the in-band replication network to collect alarms.
- Alarms are forwarded through email only and will not display in the Active Alarms icon that is reserved for Eyeglass alarms only. The history alarm will display on the Managed Cluster Alerts tab of the Alarms Icon.
- Sample email proxy alarm
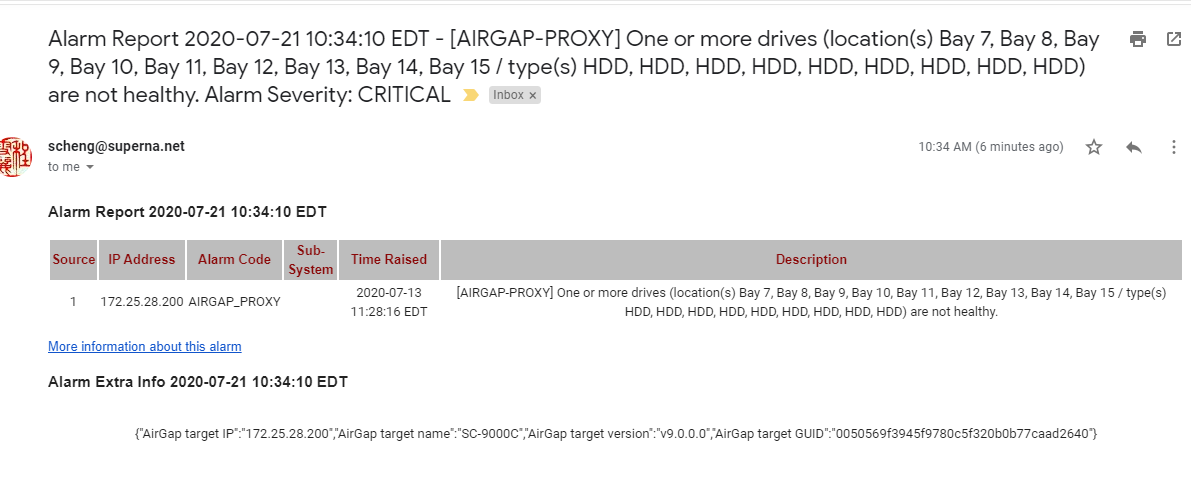
- To route alarms to a specific email address use the Eyeglass custom email routing guide here.
- Example Tab in Alarms

How to Expand the Airgap Sync Job Timeout and the Airgap job prefix name
- The default timeout is 240 minutes or 4 hours and will fail a sync job that takes longer. This only applies to incremental syncs. These steps can also be used to change the default prefix that is used to match the airgap synciq policy as an airgap policy.
- To change this timeout value
- On the eyeglass vm login as admin
- nano /opt/superna/sca/data/system.xml
- Add an airgap section with tags as per below and change the policy prefix value and or the timeout value in minutes.
- Save the file with control+x and answer yes to save and exit.
- <airgap><policyPrefix>rw-airgap-</policyPrefix><logsMaxAgeInDays>7</logsMaxAgeInDays><airgapJobTimeout>240</airgapJobTimeout></airgap>
Operational Procedures for AirGap Management
- After the initial configuration, running the AirGap policies manually will start the large first full sync of the data. This can be done from the Onefs GUI SyncIQ tab.
- Monitor the initial data sync phase, and then enable AirGap on Ransomware Defender to take over the sync schedule and manage the AirGap replication automatically.
- Day to Day Administration
- The Vault PowerScale is monitored in-band by Ransomware Defender to collect alarms. This allows administrators to monitor the vault PowerScale without needing to expose the vault PowerScale to the external network. When the AirGap is open to sync data, the in-band management is done over SSH from the production PowerScale to the vault PowerScale.
How to stop AirGap Replication in an Emergency
- If you suspect you IT environment has been compromised in any way it is important to shutdown the AirGap permanently to protect the AirGap copy of the data.
- See the AirGap CLI command in the CLI guide here.
- ssh to Eyeglass as the admin user and issue this command to disable and isolate the AirGap data.
- igls AirGap disable
How to monitor replication AirGap policy success failure
- Login to Eyeglass and open the AirGap icon and click on the Jobs History tab to review the history of the replication jobs
How to monitor available disk space on the vault cluster
- Each time the vault opens for replication the disk space is collected while the vault is open using an in band management path.
- The disk usage alarm is created and added to the proxy device tab of the Alarms icon. This should be monitored daily to verify free space is available on the vault cluster.

How to push vault cluster hardware alarms and events to Eyeglass
- When logged into the vault agent use this CLI to send any unsent (since previous sync) alarms and events to Eyeglass GUI
- ecactl airgap pushevents
How to Monitor AirGap Replication Reports
- The SyncIQ jobs are managed and reported on by a dedicated AirGap report. Setting up report notification in notification center with an email recipient set to reports , will receive the AirGap replication report. Consult Eyeglass admin guide on how to configure email and recipients.
How to enable or disable the Airgap daily summary report or change the schedule
- igls admin schedules list (to check the current schedule)
- igls admin schedules set --id AirGapReportsTask --interval 7D (to change schedule to every week)
- igls admin schedules set --id AirGapReportsTask --enabled false (to disable the report)
How to pause all AirGap policies to complete Vault cluster maintenance
- This mode should be used to complete network or vault cluster maintenance and stops policy replication
- See the AirGap CLI command in the CLI guide here.
How to Pause the AirGap policies for maintenance with a timed auto close of the AirGap Network
- This option uses the igls AirGap connect, and disconnect command and operate separately on a per policy basis and sets a timer to keep the AirGap network open for X minutes or hours. This ensures the AirGap network is not left open accidentally and automatically closes the AirGap network after the timer expires.
- See the AirGap CLI command in the CLI guide here.
How to Configure Enterprise AirGap Ransomware Defender Enterprise Airgap Agent
Overview
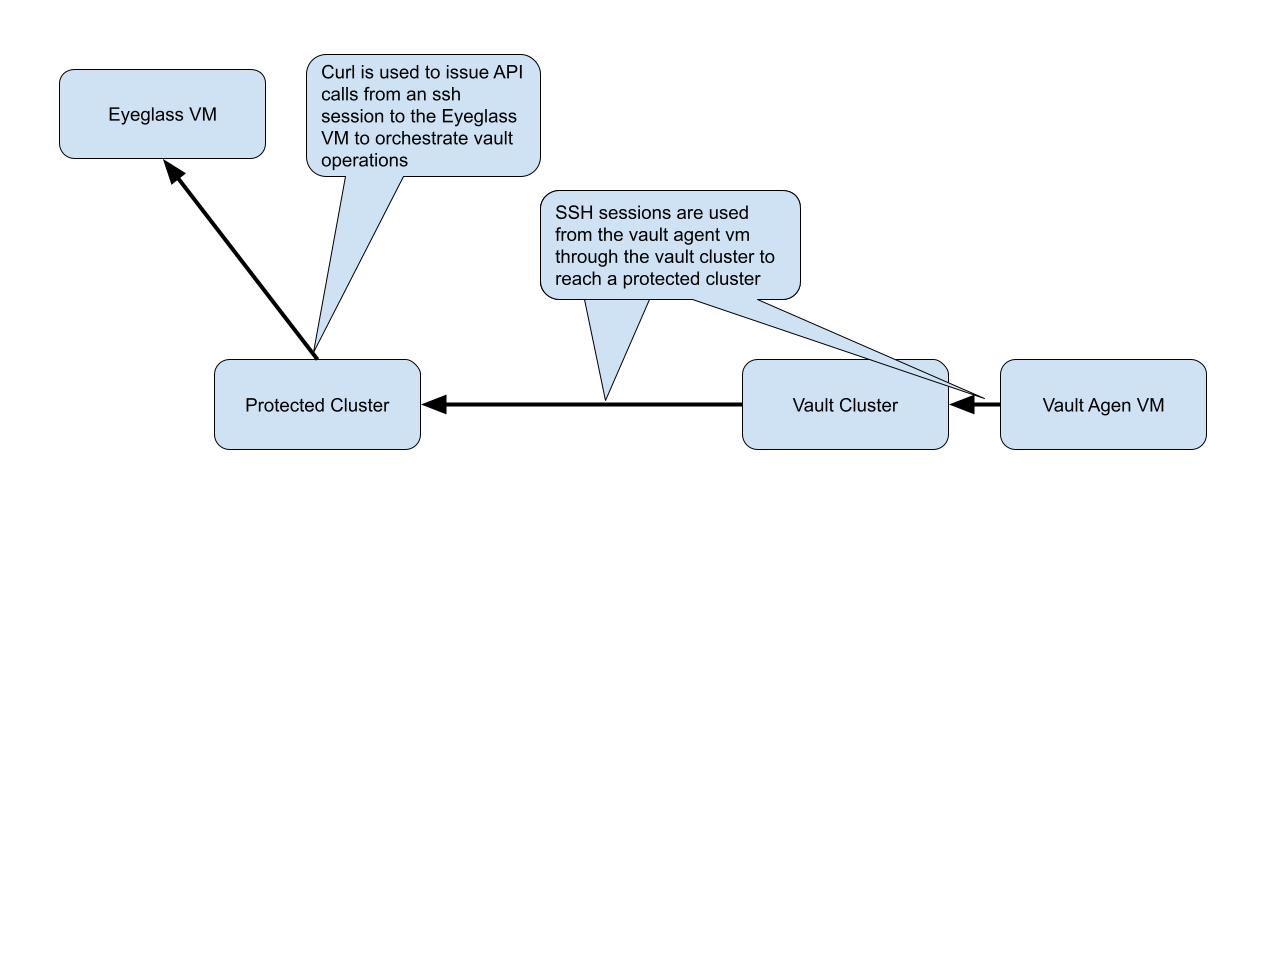
This section covers how to configure the vault agent VM on the ESX host that is deployed inside the secure vault. This VM manages the vault cluster and orchestrates all replication from protected source clusters. The vault agent uses a secure SSH tunnel from the vault cluster to a source protected cluster to reach Ransomware Defender VM to send secure messages to orchestrate replication tasks, upload logs, download new policies or protected clusters and updates to schedules configured in the AirGap UI.
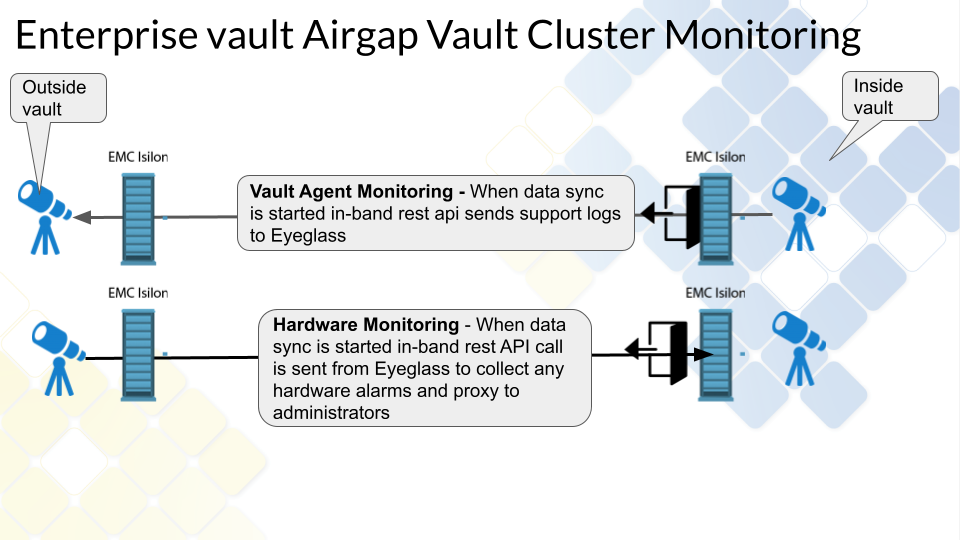
Enterprise Airgap Agent Management of Vault cluster
- The vault cluster is fully managed device all managed in band following the secure network topology in the diagram below.
- Vault hardware alarms and events are collected and pushed to eyeglass GUI to forward via the secure in band network
- Vault cluster free space is collected and forwarded daily as an informational alert
- Vault cluster log gather is completed daily and SCP copied to the Eyeglass home directory for Dell support daily. Copied through the secure inband network.
- The Vault agent logs are sent in band to eyeglass for support.
- Maintenance vault open can be configured for a time period and auto closed to login to the vault cluster in band using the secure ssh network from the production clusters.
- Heart beats are scheduled by the vault agent to check for new policies and schedule changes to policies that need to be synced to the vault agent.
- Heart beat checks for maintenance requests
- Vault cluster upgrades can be completed via the in band secure maintenance open or physically (recommended) inside the vault.
- All of the above functions are done when data sync operations are running.
Topology and Communications
Multi Vault Topology
Requirements
- Enterprise Airgap license
- Release 2.5.8.1 or later
Prerequisites
- Enterprise Airgap license
- ECA single VM deployed - See the Guide here.
- After first boot run this command
- ovf set-value -f mode=vault-agent
- How to startup the software
- ecactl cluster up
Configuration Steps for Enterprise Airgap
- Install the Eyeglass Vault Agent (EVA) license in Eyeglass
- After completing configuration steps it is best practice to push logs to Eyeglass. Use the command below after completing each configuration step.
- ecactl airgap pushvaultagentlogs
- Login to Eyeglass, open the license manager Icon and click upload new license zip file. This license is required to enable the managed by vault check box in the Airgap icon.
- After completing configuration steps it is best practice to push logs to Eyeglass. Use the command below after completing each configuration step.
- Configure Keyless ssh from Vault cluster to each protected source cluster to allow an ssh tunnel to be created for communications between the Vault Agent and the Eyeglass VM.
- NOTE: The minimum permissions user eyeglass should be created on all clusters that are protected or the vault cluster. The minimum permissions guide lists the ISI commands to verify that have been applied to the eyeglass user.
- Login to the protected cluster that will be used for the SSH tunnel as the eyeglass user.
- mkdir .ssh
- procedure done
- Login to the vault cluster over ssh as the eyeglass user
- create an ssh key pair
- run this command: ssh-keygen -t rsa
- Hit Enter for default path
- Hit Enter for passphrase
- An ssh key pair should be created in /ifs/home/eyeglass/.ssh
- Copy public key (id_rsa.pub) to the primary protected cluster that will be used for Eyeglass communications.
- scp /ifs/home/eyeglass/.ssh/id_rsa.pub eyeglass@x.x.x.x:/ifs/home/eyeglass/.ssh/id_rsa.pub
- Complete protected cluster keyless SSH configuration
- ssh as eyeglass user to the production cluster
- cd .ssh
- cat id_rsa.pub >> authorized_keys
- chmod 600 authorized_keys
- done
- Test keyless SSH from vault to production cluster
- ssh to the vault cluster as eyeglass user
- ssh again to the production cluster
- If no password is requested then keyless ssh was successful; if a password prompt is presented it means a step was missed and review all steps above were completed.
- done.
- create an ssh key pair
- Add the vault cluster IP and ip address for the SSH tunnel to this cluster. (Requires license key applied)
- NOTE: All vault cluster nodes should have an interface connected to the synciq Pool facing the vault network. The vault interfaces command must list an interface on each node in the cluster.
- ecactl isilons add --vaulthost x.x.x.x --user eyeglass --protectedManagementNode X --vaultPoolName groupnet0.subnet0.synciq --vaultsynciqexternalInterface 1:ext-1, 2:ext-1, 3:ext-1, 4:ext-1
- --vaulthost - isilon management IP address in system zone x.x.x.x is the system pool IP address on the inside of the vault.
- --vaultPoolName - the IP pool on the vault cluster used to receive synciq data from a protected cluster
- --user - service account created on the vault cluster for the vault agent VM
- --protectedManagementNode x (x is the protected cluster node ID of a node that has data network access. This means a node that can be used to reach the Eyeglass GUI VM, this node must have a system zone interface that allows IP reachability to Eyeglass, This node will be used to send api calls during vault operations from the Vault agent)
- --protectedManagementNode auto (Requires 2.5.8.2 or later and it will auto detect a node that has reachability to the eyegalss VM automatically)
- --vaultsynciqexternalInterface - This is the list of interfaces in the synciq pool. enter the node and interface name in a comma separated list example 1:ext-1, 2:ext-1, 3:ext-1, 4:ext-1
- Add a protected cluster to the EVA VM to create the secure tunnel to reach Eyeglass Ransomware Defender
- NOTE: This cluster must be reachable over the vault cluster synciq IP pool interfaces configured in the vault cluster add command.
- NOTE: This cluster will be used for all communications via a secure SSH tunnel from the vault cluster and will be used to send api calls to Ransomeware Defender.
- ecactl isilons add --protectedhost x.x.x.x --user eyeglass
- Test API communications over the secure tunnel to a protected cluster
- NOTE: This tests the ssh secure tunnel from the vault cluster to the named protected cluster and issues a test api to Ransomware Defender to verify end to end communications.
- ecactl isilons list (to get the cluster name from the add command)
- ecactl airgap check --prod <protected cluster name>
- Example output
- Opening vault connection..Command succeededRunning command on vault.. whoami; hostnameeyeglassProd-clusterRunning command on prod.. whoami; hostnameeyeglassProd-clusterRunning command on eyeglass.. ' 'https://172.25.49.15/sera/v1/healthcheck' -k"\"Wed Aug 18 07:16:00 EDT 2021\""Closing vault connectionCommand succeededDONE!
- Modify a cluster configuration
- ecactl isilons modify --name prodclusterA --protectedManagementNode x --vaultsynciqexternalInterface 1:ext-1, 2:ext-1, 3:ext-1, 4:ext-1, 5:ext-1
- --protectedManagementNode x (x is the protected cluster node ID of a node that has data network access. This means a node that can be used to reach the Eyeglass GUI VM, this node must have a system zone interface that allows IP reachability to Eyeglass, This node will be used to send api calls during vault operations from the Vault agent)
- List clusters of type vault and protected
- ecactl isilons list
- Remove a cluster
- ecactl isilons remove --name ISL-EASEE-8-2-1-0-172-25-47-75
- List Synciq Jobs between the vault and a remote cluster
- ecactl airgap list
- Retrieves the airgap policies configured in Ransomware Defender, retrieves the schedules configured for each policy and saves this information locally to run on a schedule. NOTE: New airgap policies and schedule changes are checked each time the vault opens to run a job. A secondary schedule can be configured to check for new configuration or schedule changes independently of scheduled airgap sync schedules.
- ecactl airgap schedules
- Run an Airgap job on demand to test an incremental sync of data into the vault.
- NOTE: Use the ecactl airgap schedules command to get the names of remote cluster synciq policies configured within the Airgap Icon in Eyeglass. This will retrieve from all Ransomware Defender managed clusters.
- ecactl airgap runjob --job ISL-EASEE-8-2-1-0-172-25-47-73_rw-airgap-test3
- --job - this is the name of the policy returned from the list command above.
Operational Procedures Enterprise Airgap
How to reach outside the vault through the vault cluster it is possible to open and close the vault with cli commands
- ecactl vault open - this will open the vault interfaces from the IP pool
- ecactl vault close - this will close and remove the vault interfaces from the IP pool
- How to open the vault on a schedule
- ecactl airgap openvault --interval x (x is minutes to keep the vault open and it will auto close. This allows for testing and debugging)
How to push Vault Agent support logs to Eyeglass with the vault agent CLI
- Use this command if you are logged into the vault agent and want to push logs to the Eyeglass VM after completing configuration tasks.
- ecactl airgap pushevents
How to Open the Airgap for maintenance from Ransomware Defender CLI
- NOTE: This command is default disabled on the vault agent and must be explicitly enabled. This is for doing maintenance or temporary access to the vault and then disabling this feature after work is completed. The vault agent will Not open the vault be default even if this command is used.
- In order to enable this feature on the vault agent.
- nano /opt/superna/eca/eca-env-common.conf
- add this variable
- export EYEGLASS_OPEN_VAULT_ENABLED=true
- save the file control+x
- ecactl cluster down
- ecactl cluster up
- igls airgap vaultaccessrequest --interval=x (request to open the airgap for x minutes, after this time the airgap will auto close, the heartbeat check for pending requests is every 2 hours by default and will open the airgap for x minutes only once the pending request has been seen)
- igls airgap vaultaccessview (view pending requests to open)
- igls airgap vaultaccesscancel (cancel a pending request)
How to list running jobs
- ecactl jobs running
How to run an Airgap job from the Vault agent VM
- ecactl airgap startjob --job <job name> (use ecactl airgap list to get job names)
How to monitor a running airgap job
- ecactl jobs view --follow --id job-1630432432546-879575052 (replace with job name)
How to check the remaining time of a maintenance window request on the vault agent
- Use this command if you have requested a timed maintenance window from the eyeglass vm. This command runs on the vault agent. NOTE: The maintenance window time will survive and vault agent upgrade or cluster restart.
- ecactl airgap checkopen

How to configure Vault cluster Log Gather Automation for Hardware Support
- These steps enable automation to allow automation to collect a log gather and place this on the production cluster to allow Dell Support the ability to verify the health of the vault cluster, if any alarms are proxied by the vault agent through Eyeglass managed devices.
- Requirements:
- 2.5.8 build 228 or later
- Configuration:
- ecactl airgap startisilonloggather -> to start the job now
- ecactl airgap isilonloggather -> to read the schedule
- Recommended for all deployments
- ecactl airgap isilonloggather --setschedule "0 0 * * *" => to set the schedule for the job every day at midnight
- Logging will output location of the log gather gz file
- Starting the vault gather job. Will find it under the production cluster /ifs/data/home/eyeglass/IsilonLogs-<vault_cluster_name>.tgz
- The file can be provided to Dell Support to monitor or investigate vault hardware cluster issues.
- How to change production cluster path for the log gather in eca-env-common.conf
- export EVA_VAULT_LOG_GATHER_PATH_ON_PROD=/ifs/xxxx (change xxxx to path to store the log gather in a different location)
Advanced Vault Agent and Airgap Eyeglass Configurations
Scheduled check for new or changed Airgap policies
- Configuration check schedule can be changed using a variable in the conf file. This scheduled task will open the vault and download new policies or schedule changes and then close the vault. The vault will only be open for a few seconds.
- on the vault agent VM
- nano /opt/superna/eca/eca-env-common.conf
- add this line with a cron string interval. This is a 5 minute example.
- export TASKMASTER_AIRGAP_SCHEDULING_CRON="*/5 * * * *"
- control + x to save
- ecactl containers restart taskmaster
How to change the name of the Airgap policies.
- Use this procedure to change the name of the airgap policy prefix
- Login to eyeglass vm over ssh
- nano /opt/superna/data/system.xml
- add the tag below in a new section
- <airgap><policyPrefix>rw-airgap-</policyPrefix></airgap>
- Edit the yellow value to a string that will prefix all airgap policies.
- AIRGAP jobs are listed in Jobs window and AirGap Config'
How to enable Vault Agent Open delay
- This variable can be changed to increase a timer to wait x seconds after the vault is opened with the IP interfaces to allow time for the cluster to bring up the interfaces. The default is 15 seconds.
- Login to the vault agent as ecaadmin
- nano /opt/superna/eca/eca-env-common.conf
- add this variable
- export EVA_WAIT_FOR_OPEN_VAULT_SEC=x (x is seconds and can change to higher value than 15 second defaul)
- control + x to save and exit
- ecactl cluster down
- ecactl cluster up
Change the number of SSH retries from the Vault Agent to the Powerscale Clusters
In case of intermittent connections loss with eyeglass
- Check vaultagent logs. If in there are errors like “SSH connection failed!” without any evidence that the vault was closed:
a. Check in vaultagent logs for how many times the same command was trying to run
b. Command ... FAILED on try nb 1 / (default is 3 tries with 10 seconds waiting between tries)
2. Tune the number of tries and wait time between the tries like this: (this is just an example with 5 tries and 7 seconds between)
a. Login in vaultagent as admin
b. nano /opt/superna/eca/eca-env-common.conf
c. add the variables:
export EVA_NB_OF_SSH_RETRIES=5
export EVA_SECONDS_BETWEEN_SSH_RETRIES=7
d. control + x to save
e. ecactl cluster down/up
Security
Airgap Audit log
- The Eyeglass VM audits the reachability of the vault cluster and logs this information to a dedicated log.
- This log can be found on Eyeglass below, the check is run every 5 minutes.
- cat /opt/superna/sca/logs/AirgapAudit.log
Recovery Scenarios
Depending on the recovery requirements, the following three scenarios describe the high-level steps to gain access to the vault data, that are possible with the AirGap 2.0 solution.
Considerations Before Considering Recovery
- This procedures in this section should never be started until the all clear has been declared. This would require all supporting infrastructure (AD, DNS etc..) with no threat present in the environment. CSO or similar role in your organization should not request this procedure start until the environment has been cleaned of all active threats. The risk that this final copy is comprised due to active threat still present in the environment.
- Review this link here on How to recovery from a large scale Ransomware attack.
Partial Vault Data Recovery Scenario
- In this scenario, you require access to some of the data in the vault, due to an issue with the production data affecting a subset of the data protected by the vault. The PowerScale vault makes this very simple.
- Method #1- Windows Explorer + SMB Share
- Physically connect the PowerScale management interface to the vault Ethernet switch management VLAN or port.
- Connect to the PowerScale WebUI, and login.
- Enable the SMB protocol on the cluster. Protocols tab, enable SMB protocol.
- Create an SMB share on the path that stored the data you require. Since there is no AD provider on the vault cluster, a local user will be needed to authenticate to the SMB share. The admin user can be used for this authentication.
- NOTE: The data is locked by SyncIQ and immutable while connected to the network.
- Copy the data from the recovery SMB share using a Windows PC connected to the production cluster folder location. Using Windows Explorer, copy the files or folders to the production cluster.
- Once the data restore is completed:
- Delete the SMB Share.
- Disable the SMB protocol.
- Disconnect the Management port Ethernet cable.
- Done.
- Method #2 - SCP in-band copy
- This method is best when a path of data needs to be restored and may require a long copy process. NOTE: SSH needs to be enabled on the vault cluster this may have been disabled with hardening steps. This will prevent this method from being used.
- SSH to the production cluster.
- Open the AirGap - Use the Ransomware Defender CLI command to open the AigGap with the timed open command. This command will open the AirGap for X minutes and will automatically close when the timer expires.
- Remotely copy data from the Vault PowerScale to the production PowerScale using the SCP command. Use the secure in-band replication network to copy data.
- This is syntax of the command that needs to be customized for your environment:
- scp -rp <user>@x.x.x.x:/ifs/data/yyy/* /ifs/data/ccc
- The user should be the admin.
- x.x.x.x is the ip address of the remote vault PowerScale replication pool IP address (pick any IP address in the pool).
- yyy - is the path on the remote vault PowerScale that contains the data to be restored.
- ccc - is the location on the production PowerScale where the data should be copied.
- NOTE: -rp means recursive copy and -p preserves the date stamps on the files when copied.
- NOTE: The timed AirGap open command should be set long enough to ensure the copy completes. Monitor the SCP command progress until it completes.
- The AirGap will auto close after the timer expires.
- Done.
- Method #1- Windows Explorer + SMB Share
Complete Vault Data Recovery Scenario
- This scenario covers recovery of all the data on a production cluster protected by the AirGap SyncIQ policies. This would be a worst-case scenario where the data in the Vault is determined to be the best copy of the data to be used for recovery.
- This scenario assumes that the production PowerScale itself is in a usable state, and simply needs data recovered to get back into an operational state.
- NOTE: This is a recovery of last resort. This option should only be considered, if after a full evaluation of the data state is completed, it is determined the production data and its snapshots offer no restore option. It is strongly suggested that you open a case with support, and open a Dell SR for a joint meeting to make sure this procedure should be used.
- Procedures to reverse Replicate Vault PowerScale data back to Production:
- Run the igls CLI command to disable AirGap SyncIQ policies from replicating.
- Run the igls CLI command to open the AirGap and open it for hours. (Estimate the time needed to complete reverse replication. It is best to use a large number of hours to ensure the copy can complete without the AirGap closing during the copy process. Example: 1000 hours used on the CLI command)
- Issue the SyncIQ CLI command for resync prep on the production cluster AirGap policies (repeat for each policy if you have more than one AirGap policy configured). Consult Dell PowerScale documentation on the command syntax. Verify the command completes successfully using the view jobs CLI command for SyncIQ.
- SSH to the vault PowerScale using an IP address of the remote vault PowerScale replication IP pool.
- Issue the SyncIQ command to list the SyncIQ policies. You should now see a <AirGap policy name>_mirror policy created by the Resync prep process (if you do not see any mirror policies, open a Dell SR for assistance with SyncIQ)
- The <AirGap policy name>_mirror can now be used to replicate the data in the vault back to the production cluster. NOTE: This assumes the production PowerScale is fully operational and can serve the data as required, once the data is re-synced from the Vault PowerScale back to the production PowerScale. (Repeat this step for each AirGap policy)
- NOTE Data Impacting Steps: Make sure you have confirmed all data protected by the AirGap policy needs to be restored. Their is no way back after starting a resync from the vault PowerScale to the production cluster, and resync Prep will make the data on the production cluster read-only blocking all IO to the data.
- Run the <AirGap policy name>_mirror to reverse replicate the data from the vault PowerScale to the production cluster. Use the cluster ISI cli view synciq command to monitor the progress of the copy job.
- Once the SyncIQ job(s) complete exit the SSH session with Vault PowerScale cluster. You should now have an SSH session on the production cluster, verify by looking at the command prompt cluster name before you continue.
- Data SyncIQ Allow writes step is required to allow the data to be accessible to users, and applications since it is locked by SyncIQ.
- Issue the SyncIQ isi or OneFS GUI command to allow writes on the AirGap SyncIQ policy path(s).
- Repeat this step on all AirGap policies on the production cluster.
- This will mark the data as writable.
- If SMB shares are in place the data is now accessible and usable by end-users and applications.
- See Dell Documentation if you are unfamiliar with these commands or steps.
- Issue the SyncIQ isi or OneFS GUI command to allow writes on the AirGap SyncIQ policy path(s).
- Recovery of all fault data is now complete. Note: To reconfigure the AirGap policies to re-protect production data, open a Support case to get the best method to re-configure the AigGap policies. It might be best to re-sync a full copy into the vault.
DR Vault Data Access Scenario - Rapid Recovery
- Unlike backup strategies that use a backup and restore workflow, the Ransomware Defender AirGap 2.0 PowerScale Vault solution stands as the only rapid recovery solution. The PowerScale Vault can vault and lock data in an immutable state and restore data with replication. It is the only AirGap solution that can avoid data recovery completely by using the PowerScale as the file serving device.
- It is recommended to build a RunBook for the steps below based on your production cluster. A well-documented recovery process would allow full data recovery and user/application access in less than 2 hours. NOTE: It is possible to pre-configure most of the steps below to save time during a recovery.
- Benefits of Rapid Recovery
- Eliminates the data copy step by converting the vault into the file severing device. This is the fastest possible recovery option available to customers, that need to get operational in the shortest possible time frame.
- If a DR license key is purchased Rapid Recovery allows syncing production shares, exports and quotas.
- Integrates file serving and vaulting in a single device.
- Supports partial recovery scenario with in-band or out of band recovery options.
- Supports immutable locked data.
- Supports data integrity during copy operations.
- Supports versioning of data that provides multiple recovery time periods.
- How to perform a Rapid Recovery
- Vault Cluster Physical Steps
- Connect Ethernet cables from each node to the production network, on the correct ports or VLAN's needed to reach production networks used by the production cluster.
- Configuration Data Sync Steps Eyeglass:
- SSH to Eyeglass and run the open AirGap command for 1 hour.
- Physically connect the vault PowerScale management interface to the network.
- Login to the production protected cluster and disable the airgap SyncIQ policies
- In Eyeglass, add the vault PowerScale using the Add Network Element menu option (note this requires a DR license for the vault).
- Enter the management IP address, and supply the eyeglass user name and password. Wait for inventory to complete by viewing the Inventory icon.
- Open the Airgap Icon in Eyeglass
- Select the Configuration Migration tab
- Complete the Access zone source and Target path fields
- Once ready to copy the configuration, Click the Submit button to start the copy function.
- Select the Configuration Migration tab
- Data Write Access Steps
- Data on the Vault PowerScale is locked by SyncIQ and will need to be unlocked to provide access to users and applications.
- Login to the OneFS management IP address connected in the previous steps. Navigate to Data Protection SyncIQ menu, select the local targets tab, and select the More button and allow writes option on each of the AirGap policy paths. This will allow the locked copy to become the writable copy of the data.
- Authentication Providers, Access Zones, IP Pools
- Verify all the Access Zones were created on the Access Zone tab in Onefs GUI
- Create all IP pools that existed on the production cluster
- Assign the SmartConnect names to each pool that existed on the production cluster.
- Assign nodes to each pool as required.
- Configure new IP ranges or re-use production cluster ip ranges (NOTE: this will require removing interfaces on the production cluster IP pools, so that IP addresses can be re-used on another cluster without IP address conflicts in the network). Set other settings on the pool as needed.
- Edit each IP pool and assign the correct Access Zone to each IP pool and save the pool.
- DNS - Update DNS SmartConnect name delegations to point at the vault PowerScale subnet service IP.
- Active Directory - To speed up the SPN recovery steps, the fastest method is to delete the production cluster AD computer object that will remove all SPN's (Service Principal Names) from AD and the global Catalog. This is required to allow the Vault cluster to register all the SmartConnect name SPN's to its own AD computer object.
- Active Directory AD Providers - Add the AD provider(s) required for your AD configuration that was used on the production cluster. AD providers cannot be added in advance since SPN registration conflict would occur with the production cluster. This step must be done at this phase of recovery to simplify SPN bulk registration in AD.
- Add each AD provider with AD administrator credentials. This will create the computer object and register all SmartConnect names currently configured on the IP pools.
- Add each Authentication provider to each Access Zone that exists on the vault cluster and set the order with AD provider listed first in the list for each Access Zone.
- Test Data Access
- At this phase of the recovery, sufficient cluster configuration has been completed to start testing SMB and NFS data access over IP and SmartConnect names.
- Attempt IP mount of an SMB share first before testing SmartConnect name access. Then test NFS mount via IP and then SmartConnect names. It is likely debug efforts will be required before going into production.
- All teams should be involved AD administrators, DNS administrators, Network Administrators, NAS administrators.
- Recovery Complete
- This configuration is temporary until a production cluster can be assessed for production use. The Vault PowerScale is expected to operate at lower throughput levels and is designed to provide critical application recovery while planning the full recovery of production systems.
- Vault Cluster Physical Steps
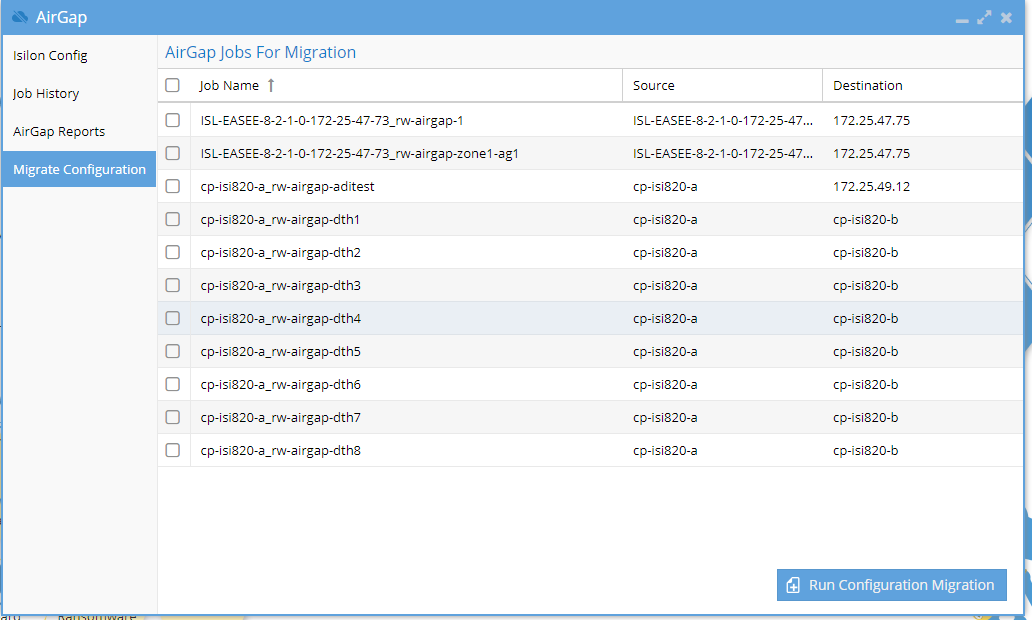
Airgap Virtual Clean Room
Overview
A clean room allows for data testing , modification within a cyber vault. This solution allows cyber practise exercises in data recovery, documentation of operating procedures and escalation planning.
Key Values
- The Airgap Clean Room solution is a best in class solution that
- minimizes costs with copy on first write usage for data modifications. Does not require unlocking immutable data and does not require any type of restore operation.
- retains production look and feel with SMB and NFS exports mirrored into the clean room using the PowerScale config export xml file format.
- Allows on demand use from within the vault
Requirements
- Eyeglass release 2.5.9 or later
- Eyeglass DR license for the vault cluster
- Eyeglass VM deployed inside the vault on a vmware host used for the clean room operations
- Enterprise Airgap License
- Active Directory available within the Clean Room and auth provider created on the vault cluster to use the Clean Room Active Directory
Configuration
- Sync production configuration data to vault continuously from the production clusters.
- Login to a protected source cluster over ssh as root user or user with permissions to the command below.
- isi cluster config exports create
- isi cluster config list
- Copy the export file to a path that is protected by an airgap policy (default path /ifs/data/Isilon_Support/config_mgr/backup/) NOTE: directory below will be unique on each cluster
- scp -r /ifs/data/Isilon_Support/config_mgr/backup/onefs93-20221019210036/*.* /ifs/data/<path protected by airgap policy>
- The configuration file will be copied into the vault cluster on the next scheduled airgap incremental job configured in Eyeglass Airgap icon policy schedule
- Import Configuration Data on the Vault cluster to prepare the clean room
- Open a maintenance window using the Airgap CLI commands to allow ssh access to the vault cluster (cli guide)
- ssh to the production cluster
- Open a new ssh session to the vault cluster from the production cluster ssh session (NOTE: you may need to ssh to a specific node that has physical connection to the vault cluster)
- Login as the eyeglassvault user
- su admin (become admin user on the vault cluster)
- On the vault cluster run (change subfolder to match your export id folder name)
- scp -r /ifs/data/<path protected by airgap policy>/*.* /ifs/data/Isilon_Support/config_mgr/backup/onefs93-20221019210036
- Make sure the folder is created under /ifs/data/Isilon_Support/config_mgr/backup/ matches the folder name on the production cluster. in this example the folder name is onefs93-20221019210036
- isi cluster config imports create <export-id> (get export ID with isi cluster config exports list)
- In this example: isi cluster config imports create onefs93-20221019210036
- The import command will create all the SMB shares and exports that have valid paths that match the configuration on the source prod cluster.
- Verify output that configuration data is created.
- NOTE: configuration data that points at paths that are not synced into the vault will not have config created.
- done
- Login to a protected source cluster over ssh as root user or user with permissions to the command below.
- Install Eyeglass VM into the Clean Room VMware environment
- License Eyeglass
- Add Vault cluster using eyeglass service account to the Clean Room Eyeglass
- Create Test Access Zone for Clean Room
- Onefs GUI or CLI create an access zone called Clean-Room-Testing
- Add clean room AD auth provider to this new zone
Virtual Clean Room OnDemand Operations
- Testing with any quantity of data from the vault while leaving the source data locked, immutable and protected only takes seconds to test using writeable snapshots that minimizes disk space usage to only the blocks that are modified or created within files.
- Test TB's of data and fire-drill end to end recovery procedures with "Real Data" while fully preserving the security and protection of the vault data.
- Simply follow the steps in Live OPS DR test mode 2.0 feature to instantly create SMB shares, NFS exports inside the clean room access zone and selecting any source path to test with.
- Create more than one Virtual clean room is as simple as creating more access zones on different paths, this could be done per application or business unit.
- Done. That's it simple, low cost, fast and industry leading vault solution.