Custom email or Webhook routing by application or alarm subject contents
- Overview
- Limitations and Unsupported Configurations
- Requirements
- How to switch to Eyeglass mail routing based on postfix OS SMTP Relay
- Eyeglass - Switch to use postfix SMTP local OS mail relay service no Authentication
- Adding Filtering and Forwarding Rules to Postfix
- Example 1: Send All Ransomware Alarms to a specific email (person or group email) AND Discarding Or Redirecting Security Guard daily Self Test Emails:
- Example 2: Send Only alarms when a user is locked out by Ransomware Defender to a specific email (person or group email) but will not be sent to the Eyeglass admin defined to receive all alarms
- Example 3: Send Easy Auditor Reports to a specific user or group email , note only this user or group will receive report emails
- Example 4: Drop all Easy Auditor Report emails
- Example 5: Send Easy Auditor Triggers to a specific email OR send a specific search report to a specific user
- Mandatory Step - Activate Filtering Rules for subject or body of email rules
- Advance Filter Configuration
- Examples of setup
- How to edit Filter rules
- How to Test your new filter or forwarding rule
- How to convert previous Opensuse OS postfix main.cf to Opensuse 15.3 or later Postfix format
- Advanced Postfix Configuration For SMTP Authentication and TLS Configuration
- How to Debug Postfix mail relay Issues
- Ransomware Defender & Easy Auditor Webhooks - Alarm Integration
- Overview
- How to Configure Zero Trust Webhook Alarm forwarding
- How to view the payload of webhooks for integration or automation within your Sec Ops Tools
- Ransomware Defender & Easy Auditor ServiceNow Webhook alarm to Incident Integration
- Sample Scripted REST API Webhook
- Steps to use the endpoint with Defender Webhooks
- Production Integration Steps
- Example Incident Created with Zero Trust Webhook and ServiceNow Scripted REST API Capability
Overview
This solution guide explains how to configure custom email routing of specific alarms or notifications within Eyeglass. This is most commonly used for Easy Auditor or Ransomware Defender to route email notifications to a specific email or group distribution email. This also ensures other system level alarms are not sent to these emails. The steps below explain how to setup postfix email routing options. It is also possible to drop emails silently but the alarm is still visible in the GUI Alarms Icon.
Limitations and Unsupported Configurations
- When a rule matches your criteria it will exit and no longer match any other rules listed in the configuration files.
- Redirection - Multiple emails on a rule or multiple rows with different emails is unsupported. Redirecting emails should always use a group email.
- Requires an email to be configured in Notification Center > Managed Recipients, containing ALL alerts for it to function properly (this can be a dummy email)
- If a configuration is NOT listed below is not supported.
Requirements
- Opensuse 15.3 OS Latest OS is recommended .
How to switch to Eyeglass mail routing based on postfix OS SMTP Relay
- Most Eyeglass deployments use Notification center to enter SMTP details of your mail server. These steps will switch to a local SMTP engine in the operating system.
- Requirements:
- This example assumes you are using anonymous non authenticated SMTP over port 25.
- The advanced section below covers authentication + TLS configuration
- Steps
- Setup Eyeglass OS SMTP to Send mail to your mail server
- ssh to Eyeglass as admin
- sudo -s (enter admin password)
- Edit the postfix setting: nano /etc/postfix/main.cf
- control+w to search for the word relayhost , to locate the correct instance without a comment. To find the line that is not commented (no # at the front of the line). You will need to press control+w [enter], repeat this 8 times to find the very last occurrence of relayhost that does not have the # comment in-front of the line.
- Edit the relayhost parameter (NOTE: leave the square brackets are required as per example below)
- relayhost = [DNS or ip of your SMTP mail server]:25 (leave the square brackets)
- To specify the from email address used on ALL outbound emails
- nano /etc/postfix/sender_canonical
- On a new line add the source email entered into the Eyeglass GUI notification center from field and desired outbound FROM email to be used on all emails. In the example below eyeglass@redacted.gz is the email entered into Eyeglass gui.
- eyeglass@redacted.gz eyeglass@quazar.redacted
- control+x answer y and enter to save and exit
- Restart postfix service
- systemctl restart postfix
- Checked that postfix service is running: systemctl status postfix
Eyeglass - Switch to use postfix SMTP local OS mail relay service no Authentication
- From Eyeglass UI => Notification Center => Configure SMTP => Outgoing Email Server Information
- Host Name change to: localhost
- Port should stay set to: 25
- From email can stay the same or change: [any e-mail address] e.g. eyeglass@<your domain>
- Specify test e-mail recipient and click TEST E-mail Setting. Expect to receive test e-mail successfully.
- Do not proceed until this step is successful with a test email being received.
- For Advanced email configuration with authentication and TLS cipher control.
- Done - No further steps are required unless email redirect rules are needed.
Adding Filtering and Forwarding Rules to Postfix
- This requires adding rules for filtering and forwarding emails based on the subject of the alert email or the body. These are provided as common examples below.
- login as admin user over ssh
- sudo -s (enter admin password to become root user)
- Preparing Configuration files for Content Filtering Rules (Mandatory Step)
- Run these commands to enable content filtering on both subject of emails and the body of emails.
- touch /etc/postfix/body_checks
- touch /etc/postfix/header_checks
- postconf -e "body_checks = regexp:/etc/postfix/body_checks"
- postconf -e "header_checks = regexp:/etc/postfix/header_checks"
- Run these commands to enable content filtering on both subject of emails and the body of emails.
- How to Edit the Rules files for email header_checks and for email body_checks
- This section explains which files to edit depending on how you want to filter or forward alarm or report emails. See specific examples in the sections below that you can use for specific scenarios.
- Type the command below to edit email subject filter file
- nano /etc/postfix/header_checks (Use this file for email subject line filtering)
- nano /etc/postfix/body_checks (only edit this file if you need email content filtering rules)
- To check for specific patterns in the email body, in the body_checks file use a FILTER like in the example below:
- /Configuration Replicat/ FILTER userFilter:127.0.0.1:10025
- The
userFilteris the service name, it needs to match the name we set in master.cf. After the service name, is the local address 127.0.0.1, it’s fixed. The port number at the end is also necessary. The data will be sent through this port to theuserFilterservice. It can be any available number.
- Requirements for email Filtering Rules
- Under line 1 hit enter a few times to make space to add filters. Note:you can add more than one filter with different emails and conditions
- Each rule must be on its own line.
- Rules are processed in the order listed in the file and the first match will exit the filtering logic.
- The syntax uses regex syntax when creating filters and actions. A full list is defined here on the postfix man pages.
Example 1: Send All Ransomware Alarms to a specific email (person or group email) AND Discarding Or Redirecting Security Guard daily Self Test Emails:
- The example will send all Ransomware alarms to a specific email regardless of the configured Notification center alarm configuration and allow discarding or redirecting Security Guard test emails. This example requires body content matching.
- Prerequisite: Switch Eyeglass to use post fix and add your mail server to the relayhost property. See instructions above.
- NOTE: this will match the string in bold and will send to a different email address.
- This also means that alarms for this product will not be sent to the Eyeglass administrator.
- Security Guard emails will be discarded or forwarded
- Example assumes Security Guard Cluster user name is "igls-sg," change this value depending on the name of the Security Guard user configured in Ransomware Defender.
- Discard Security Guard and Forward all other Ransomware Alarms to an specific email
- nano /etc/postfix/body_checks (place each value below on it's own line the order matters to correctly discard first)
- /igls-sg/ DISCARD
- /Ransomware Defender/ REDIRECT customer_email@domain.com
- nano /etc/postfix/body_checks (place each value below on it's own line the order matters to correctly discard first)
- OR to Forward Security Guard emails to email A and forward All other Ransomware Alarms to Email B
- nano /etc/postfix/body_checks (place each value below on it's own line)
- /igls-sg/ REDIRECT customer_email_A@domain.com
- /Ransomware Defender/ REDIRECT customer_email_B@domain.com
- nano /etc/postfix/body_checks (place each value below on it's own line)
- control+x answer y and the enter key to save and exit
- Continue to activate step
- The example will send all Ransomware alarms to a specific email regardless of the configured Notification center alarm configuration and allow discarding or redirecting Security Guard test emails. This example requires body content matching.
Example 2: Send Only alarms when a user is locked out by Ransomware Defender to a specific email (person or group email) but will not be sent to the Eyeglass admin defined to receive all alarms
- Prerequisite: Switch Eyeglass to use post fix and add your mail server to the relayhost property. See instructions above.
- nano /etc/postfix/header_checks (this file for email subject line filtering)
- /^Subject: .*Locked/ REDIRECT xxxx@domain.name
- control+x answer y and the enter key to save and exit
- Continue to activate step
Example 3: Send Easy Auditor Reports to a specific user or group email , note only this user or group will receive report emails
- Prerequisite: Switch Eyeglass to use post fix and add your mail server to the relayhost property. See instructions above.
- nano /etc/postfix/header_checks (this file for email subject line filtering)
- /^Subject: Easy Auditor Report/ REDIRECT xxxx@domain.name
- control+x answer y and the enter key to save and exit
Example 4: Drop all Easy Auditor Report emails
- Prerequisite: Switch Eyeglass to use post fix and add your mail server to the relayhost property. See instructions above.
- nano /etc/postfix/header_checks (this file for email subject line filtering)
- /^Subject: Easy Auditor Report/ DISCARD
- control+x answer y and the enter key to save and exit
- Continue to activate step
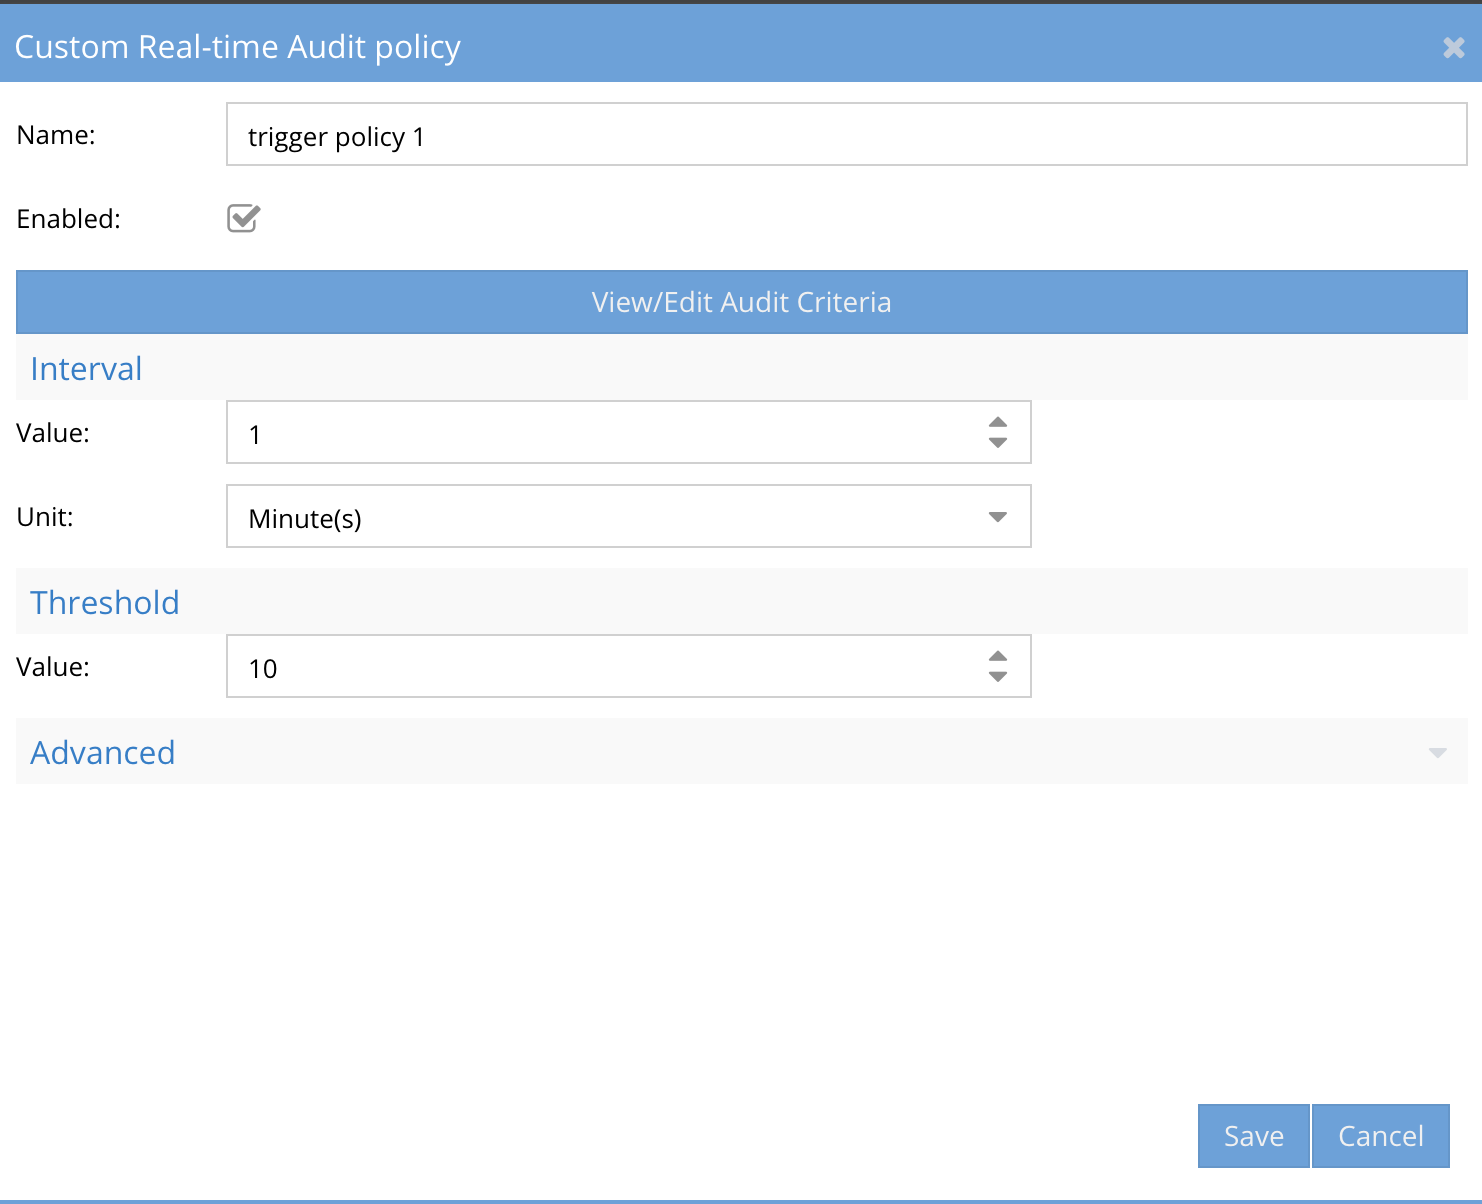
Example 5: Send Easy Auditor Triggers to a specific email OR send a specific search report to a specific user
- Prerequisite: Switch Eyeglass to use post fix and add your mail server to the relayhost property. See instructions above.
- If you want to send a custom trigger or a saved report to a specific user email or group email, you first need the saved report name or the trigger name.
- Get trigger names. We recommend using the word trigger in all triggers and then a name after to make matching alerts easier. Alerts will include the trigger name in the body of email.
- For a content filter you must add the rule to the body_check file. See 3 different examples below.
- nano /etc/postfix/body_checks (only edit the file if you need content filtering rules, see examples below)
- /trigger/ REDIRECT xxxx@domain.name (sends all triggers with the name trigger in the name)
- /trigger policy 1/ REDIRECT xxxx@domain.name (sends all triggers with a specific name of a trigger in this example the trigger name is "trigger policy 1")
- /departmentXReport/ REDIRECT xxxx@domain.name (sends all Easy Auditor report results with a saved report run manually or on a schedule with a name of "departmentXReport")

Mandatory Step - Activate Filtering Rules for subject or body of email rules
- Reload the rule set to take effect and restart postfix process
- postfix reload
- systemctl restart postfix
- done
- Reload the rule set to take effect and restart postfix process
- Setup Eyeglass OS SMTP to Send mail to your mail server
- Requirements:
Advance Filter Configuration
- Open /etc/postfix/master.cf file and add the following services
- userFilter unix - n n - 10 pipe flags=Rq user=sca argv=/opt/superna/bin/email_filter.py ${sender} user_1@superna.net,user_2@superna.net
- 127.0.0.1:10026 inet n - n - - smtpd -o content_filter= -o receive_override_options=no_unknown_recipient_checks,no_header_body_checks -o smtpd_helo_restrictions= -o smtpd_client_restrictions= -o smtpd_sender_restrictions= -o smtpd_recipient_restrictions=permit_mynetworks,reject -o mynetworks=127.0.0.0/8 -o smtpd_authorized_xforward_hosts=127.0.0.0/8
The first part it the filter service, userFilter is the service name, it needs to match the name we configure in the body_checks or anywhere it’s used. The user has to be sca otherwise it is going to be a permission issue. The script path is fixed to /opt/superna/bin/email_filter.py . The first argument has to be ${sender} and the second argument is the recipient address that we want to forward to. It can be multiple addresses as long as it is separated by a comma without space. The second part is used to re-inject the email back to postfix smtp pipeline after filtering. It needs to stay exactly the same.
- Restart postfix service
- systemctl restart postfix
- Checked that postfix service is running: systemctl status postfix
NOTE: Filter configuration can send emails to multiple addresses, and multiple rules can be configured (the BEHAVIOUR changes, , it is a FILTER to redirect to multiple emails) (ALL THE USERS WILL RECEIVE THE ALERTS)
Examples of setup
/etc/postfix/master.cf
(Add the following lines and replace user_1@superna.net,user_2@superna.net with the emails you want to use):
userFilter unix - n n - 10 pipe flags=Rq user=sca argv=/opt/superna/bin/email_filter.py ${sender} user_1@superna.net,user_2@superna.net
127.0.0.1:10026 inet n - n - - smtpd
-o content_filter=
-o receive_override_options=no_unknown_recipient_checks,no_header_body_checks
-o smtpd_helo_restrictions=
-o smtpd_client_restrictions=
-o smtpd_sender_restrictions=
-o smtpd_recipient_restrictions=permit_mynetworks,reject
-o mynetworks=127.0.0.0/8
-o smtpd_authorized_xforward_hosts=127.0.0.0/8
/etc/postfix/body_checks
/igls-ra/ FILTER userFilter:127.0.0.1:10025
/Ransomware Defender/ FILTER userFilter:127.0.0.1:10025
/etc/postfix/header_checks
/^Subject: .*Locked/ FILTER userFilter:127.0.0.1:10025
main.cf (required):
body_checks = regexp:/etc/postfix/body_checks
header_checks = regexp:/etc/postfix/header_checks
Postfix reload and restart are required after any change.
Reload the rule set to take effect and restart postfix process
postfix reload
systemctl restart postfix
systemctl status postfix
Done
How to edit Filter rules
- Each time you edit the filter files
- nano /etc/postfix/body_checks (email body rules)
- OR
- nano /etc/postfix/header_checks (email header rules)
- You must restart postfix before any changes will take effect.
- Activate filter rules
- nano /etc/postfix/body_checks (email body rules)
How to Test your new filter or forwarding rule
- The examples that use Easy Auditor reports or Ransomware Defender can be tested using Security Guard and Robot Audit run now option to trigger a new alarm.
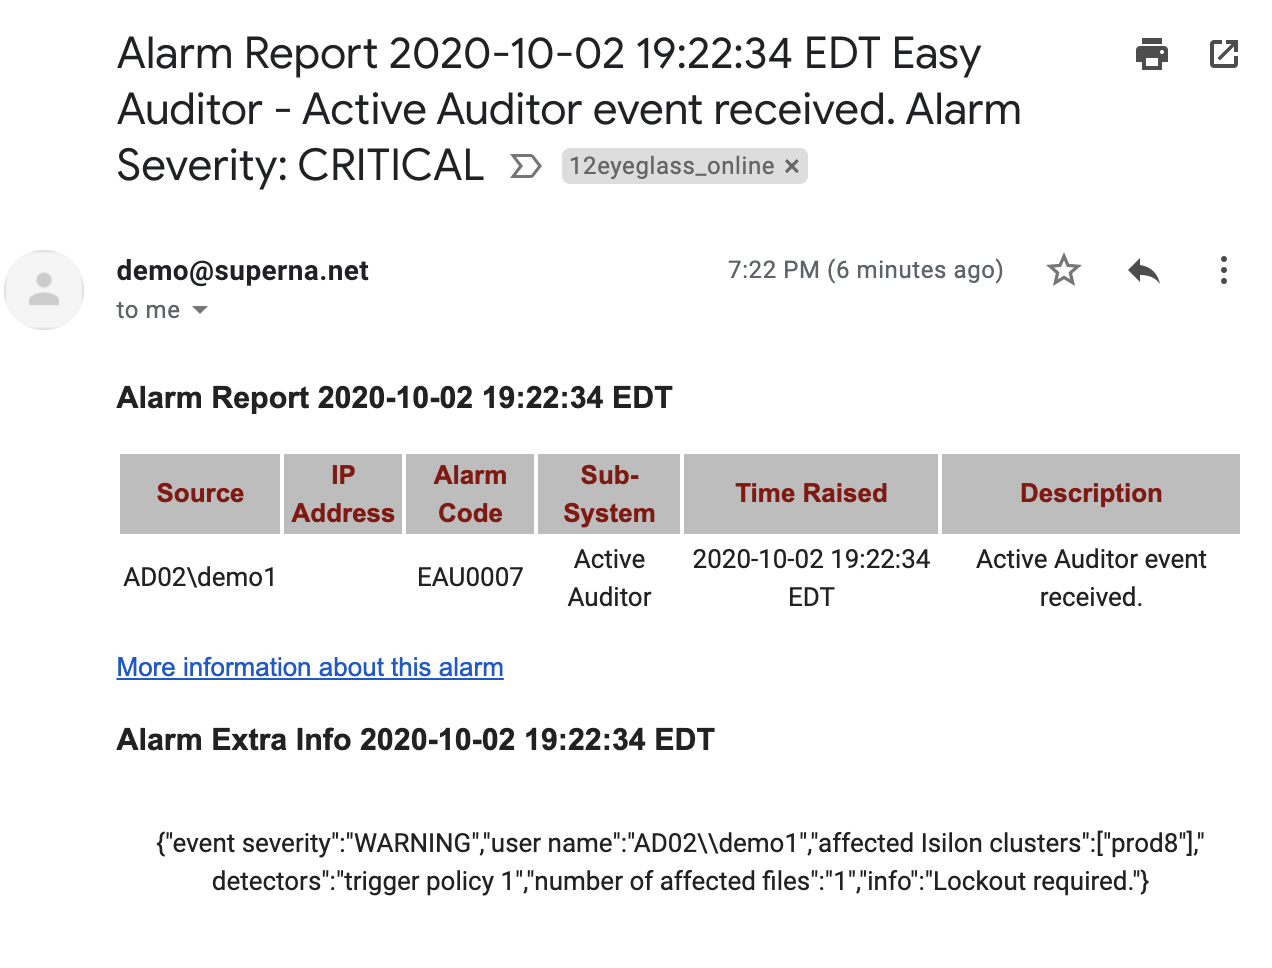
- To verify your rule worked you can tail the mail routing log to see the rule rewrite the original email recipient with new email address.
- tail -f -n 100 /var/log/mail (this command will monitor the mail log during the test)
- or you can search the log
- grep orig_to /var/log/mail* (this will locate all entries that the redirect rule triggered and shows the original email and new email used)
- Example output shows to original email and the new to email as per below.
- Done

How to convert previous Opensuse OS postfix main.cf to Opensuse 15.3 or later Postfix format
- This procedure is for backup and restore of an appliance running 15.1 or 15.2 to a 15.3 or later OS that had postfix configured. Release 2.5.8 backup includes the main.cf, body and header check files. NOTE: You may need to get these file from your old appliance if the old appliance release is < 2.5.8
- Login to the new appliance and follow the steps below.
- ssh admin
- sudo -s
- unzip the Eyeglass backup used to restore the new appliance configuration on a Window PC , locate the postfix backup files and open main.cf in notepad and locate the relayhost line that includes your mail server.
- Edit the postfix file on the new appliance
- nano /etc/postfix/main.cf
- control + w enter relayhost press enter, you will need to search 8 times to find the the line without # comment
- Fix the relayhost field with the values from the main.cf opened in notepad from the backup file.
- Add the value from the backup to the relayhost = line in the file opened from the ssh session with nano editor
- relayhost = [DNS or ip of your SMTP mail server]:25 (leave the square brackets)
- Re-apply body and header checks prepare new appliance
- Open the header_checks and body_checks files from the backup zip file in notepad
- From ssh session to new appliance
- touch /etc/postfix/body_checks
- touch /etc/postfix/header_checks
- postconf -e "body_checks = regexp:/etc/postfix/body_checks"
- postconf -e "header_checks = regexp:/etc/postfix/header_checks"
- Re Apply previous forwarding filtering rules
- nano /etc/postfix/body_checks (paste body_checks from notepad to this file)
- control + x answer yes to save and exit
- nano /etc/postfix/header_checks (paste header_checks from notepad to this file)
- control + x answer yes to save and exit
- Activate the configuration
- postfix reload
- Test email in Eyeglass and test your rules
Advanced Postfix Configuration For SMTP Authentication and TLS Configuration
- This section allows configuration of authentication to your mail system and control of TLS options.
- NOTE: Authentication + TLS is the only supported configuration.
- NOTE: This assumes you have configured the relay and basic settings in the section above for switching to postfix MTA.
- ssh as admin user
- switch to root
- sudo -s (enter admin password)
- Fix the host file to provide a host name for localhost used by postfix mail relay
- nano /etc/hosts file, add the Eyeglass hostname fqdn in the localhost section. example:127.0.0.1 localhost igls01 igls01.ad1.test
- Edit the postfix setting for Authentication.
- nano /etc/postfix/main.cf
- Verify the relayhost parameter is set already following steps in the basic configuration section above and change the port to use the TLS port. control-w type relayhost [enter] and repeat 8 times to find the correct entry.
- relayhost = [x.x.x.x]:587 (leave the square brackets)
- Replace x.x.x.x with your mail relay host IP or FQDN
- Configure Authentication
- edit the following parameters for TLS
- nano /etc/postfix/main.cf
- press control+w enter sasl [enter] to locate the section for authentication configuration. Set the settings as per below
- smtp_sasl_auth_enable = yes
- smtp_sasl_security_options = noanonymous
- smtp_sasl_password_maps = lmdb:/etc/postfix/sasl_passwd
- smtpd_sasl_auth_enable = no
- Create the password file /etc/postfix/sasl_passwd replace the yellow values to match your environment before creating the file.
- nano /etc/postfix/sasl_passwd (enter the line below and change the yellow highlights to match your environment.
- [x.x.x.x]:587 user:password
- x.x.x.x is replaced with the ip address or host name of your mail relay host
- This assumes port 587 is used on your mail relay host which is the default TLS SMTP port. Change the port to match your mail server.
- User is the user name for authentication. Example user@domain.com
- Password is the password for this service account user.
- Convert /etc/postfix/sasl_passwd into a format that Postfix can read and remove clear text password file:
- postmap lmdb:/etc/postfix/sasl_passwd
- This creates a file /etc/postfix/sasl_passwd.lmdb
- You can now delete or remove the clear text password in the /etc/postfix/sasl_passwd
- rm /etc/postfix/sasl_passwd (removes clear text password file, since it is not used by postfix. The DB file is used to read the user and password.
- Secure the /etc/postfix/sasl_passwd.lmdb file.
- The file must be owned by root, and no one else should have read access to that file
- chown root:root /etc/postfix/sasl_passwd.lmdb
- chmod 600 /etc/postfix/sasl_passwd.lmdb
- The file must be owned by root, and no one else should have read access to that file
- Restart postfix service
- systemctl restart postfix
- TLS Configuration for Secure SMTP
- nano /etc/postfix/main.cf
- Control+w type tls [enter]
- Locate these sections and configure them to match
- smtp_use_tls = yes
- smtp_tls_loglevel = 1
- Done
- This configures authenticated TLS SMTP relay. Continue with the steps below to debug and test the mail is correctly forwarding from Eyeglass to your SMTP mail system.
How to Debug Postfix mail relay Issues
- Verify the mail is correctly being forwarded with authentication by tailing the mail log.
- tail -f /var/log/mail
- Open the Notification Center Icon in Eyeglass from the main menu options, and send a test email to verify authentication and TLS connections are successful.
- Example of a successful TLS SMTP message relay from Eyeglass to external SMTP host with TLS 1.2 enabled. the 250 OK code indicates successful delivery. The SMTP error or TLS errors will be visible in this log for debugging.

- Check for any queued mail that failed
- sudo mailq
- any queued mail that failed will be listed with a reason code
- To reattempt delivery of the mail use the command below
- sudo postfix flush
- To provide support with configuration of your postfix configuration use this command
- postconf -n
Ransomware Defender & Easy Auditor Webhooks - Alarm Integration
Overview
This new solution only exists with Ransomware Defender to integrate alerts with real-time webhooks with customization of the webhook data that allows SIEM and service automation to consume this alert data. Security Operations teams can now get Defender alert data sent to 1 or more webhook endpoints.
How to Configure Zero Trust Webhook Alarm forwarding
- Prerequisites - Eyeglass and Ransomware Defender 2.5.12 or later
- Login to Ransomware Defender and open the Zero Trust menu
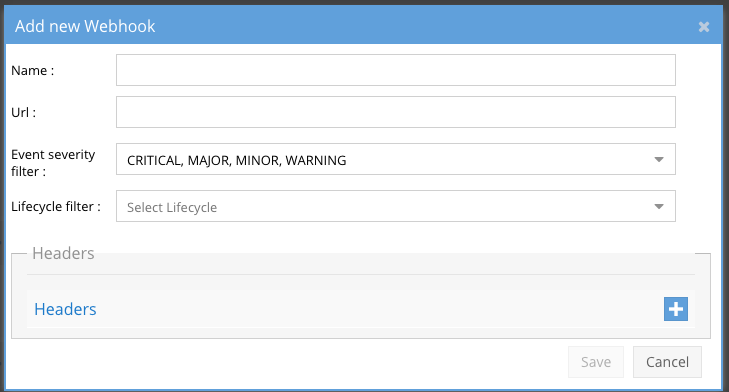
- Click the plus sign to add your first webhook target url.
- Definitions:
- Name: Give this endpoint a name example Splunk
- URL: This is the endpoint url that will receive post messages, consult with your SIEM or security vendor to get this url (see below public website for testing your webhook setup)
- Event Severity Filter: Select one or more severities that you want to be forwarded to the webhook. Example if you only wanted Critical events then only select Critical.
- Lifecycle filter: Each security event has a life cycle stages from the beginning of the event until it is acknowledged and cleared. Each lifecycle change can trigger a post message to the webhook. This can useful for downstream applications to trigger different actions depending on the stage the security event is currently displaying in Ransomware Defender. Select 1 or more lifecycle stages and ensure to select all stages that you want sent to the webhook
- Headers - If your endpoint requires authentication header values or custom headers to be processed successfully you can enter key value pairs to add to the webhook headers in addition to the payload.
- Click Save to save the webhook definition.
- Test your webhook
- Click the test webhooks button to test all listed webhooks. This will send a post message with a sample payload to validate your endpoint can process the webhook.


How to view the payload of webhooks for integration or automation within your Sec Ops Tools
- NOTE: This procedures requires direct Internet access or Proxy access to the webhook.site url over port https 443.
- Click this url to go to the test webhook.site webpage https://webhook.site/
- Copy to clipboard the url that is displayed
- Paste this url into the endpoint of a test webhook in Ransomware Defender.
- Click the test webhooks button and verify that POST command is displayed on the URL page of the webhook.site page.
- Now that your test webhook is working, run Security guard to see the full payload available in the webhook payload.
- See below the payload available that includes the user, snapshots, shares and affected files.

Ransomware Defender & Easy Auditor ServiceNow Webhook alarm to Incident Integration
- This integration examples shows how to configure Ransomware Defender Webhook alarms to create an incident in ServiceNow and include the details of the alert in the description. NOTE This is a basic example only and would need to be customized further to map fields in the webhook payload to specific ServiceNow fields.
- Using this guide (How to Integrate Webhooks Into ServiceNow) create a ServiceNow Scripted Rest Resource Webhook
- Example Scripted REST
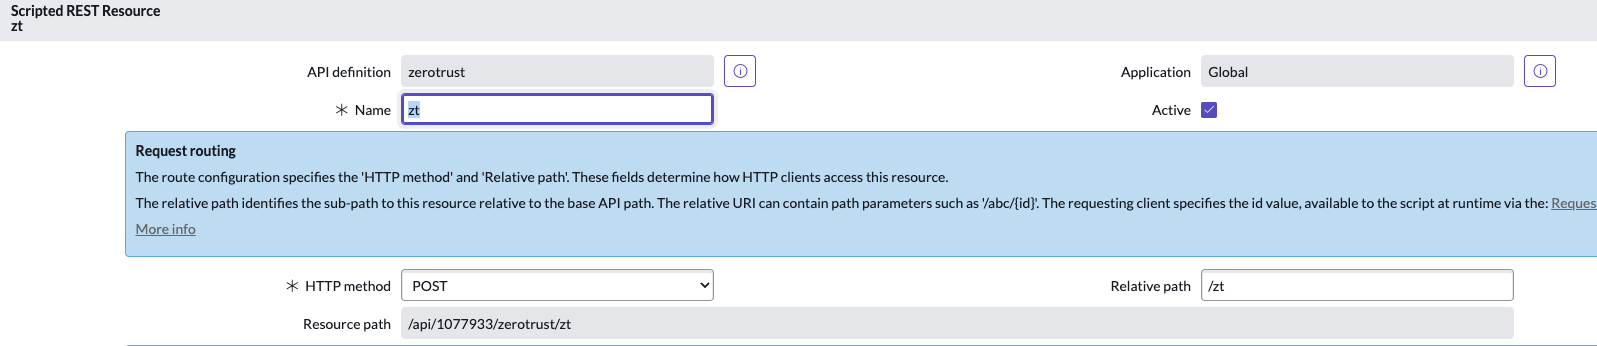
- In the script section
- Example Scripted REST
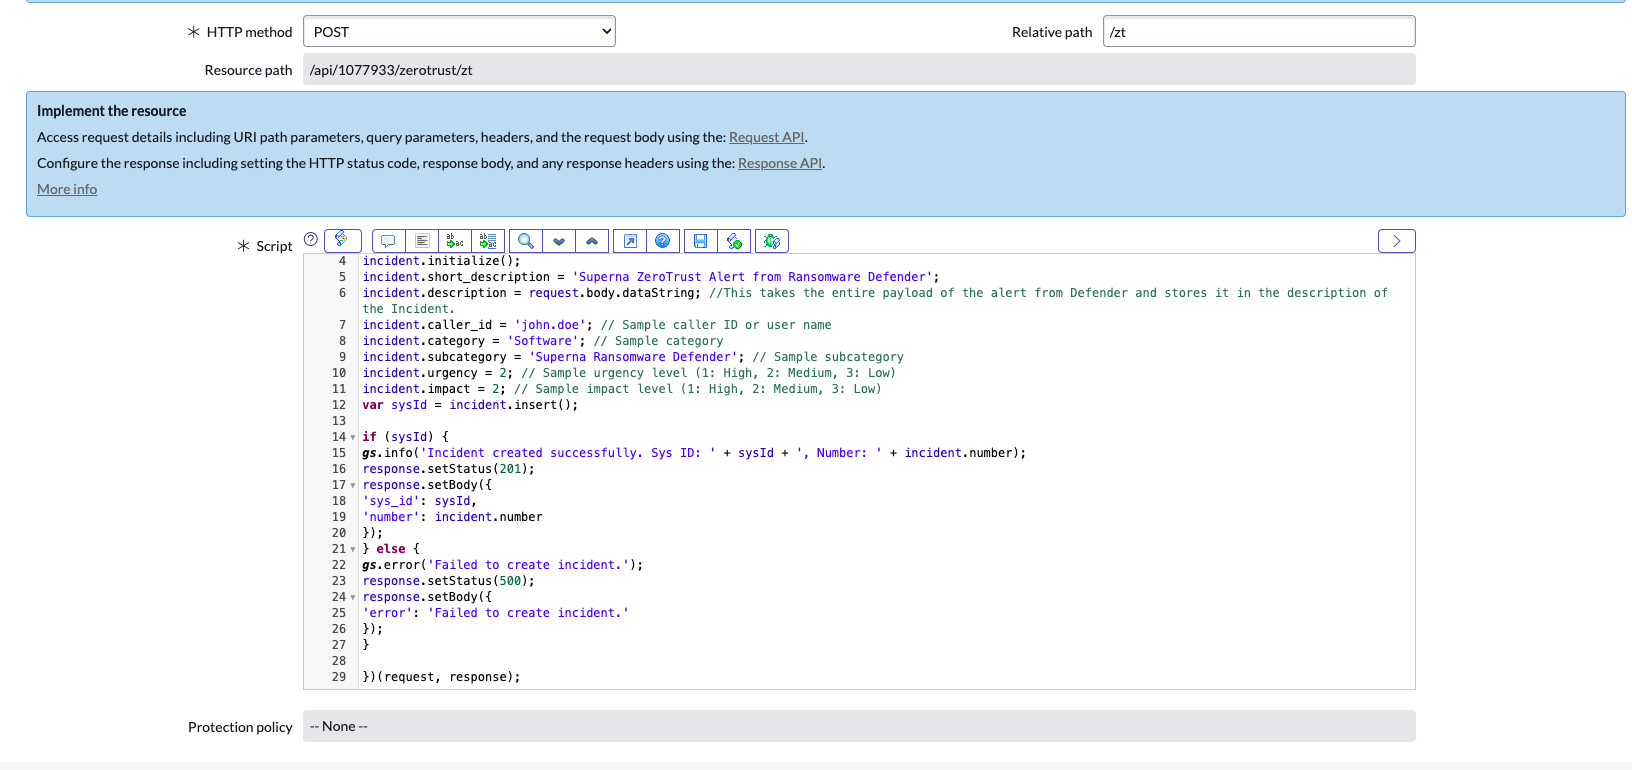
Sample Scripted REST API Webhook
Cope Code below and paste it into the Script editor.
See example below
Steps to use the endpoint with Defender Webhooks
- Save the Resource script after you paste it
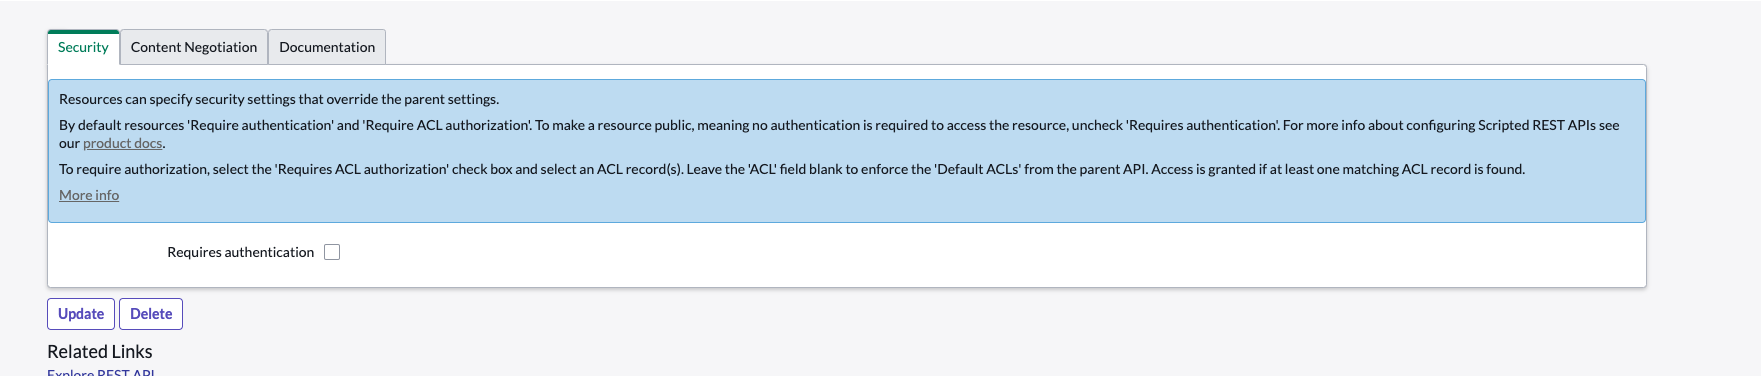
- Disable Security for testing.
- Get the endpoint url for the webhook in Defender
- The resource would be https://yourInstance.service-now.com/<resource_Path>
- In this example the resource path is displayed in the editor

- Configure the Webhook in Ransomware Defender Zero Trust UI
- See guide above for more details
- See below with head added for Content-Type and value application/json
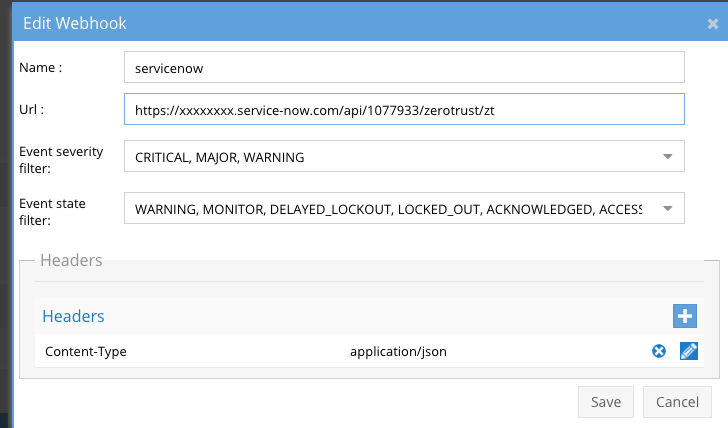
- Save and click the test button
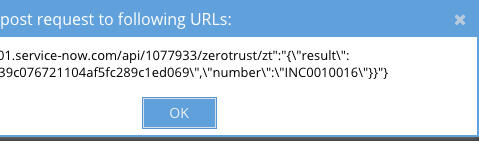
- If successfully configured you will recieve an Incident number back see below.
- Done
Production Integration Steps
- The code sample above includes logic to extract variables from the payload of the Zero trust Ransomware Defender and maps the Severity fields in the Superna alarm to map to the ServiceNow Impact and Urgency incident fields. This code can be modified to change the mapping as required.
- The short description was used to summarize the key data in Security events. This can also be customized further.
