Eyeglass Administration guides Publication
Ransomware Defender for AWS Admin Guide
Home
- Overview
- How to Configure Real time Security triggers
- Overview
- How to configure Data Loss Prevention Trigger
- How to configure Mass Delete Trigger
- How to configure Untrusted network access Trigger
- How to configure Untrusted user access trigger
- How to configure object delete trigger
- How to configure Security Guard Feature
- How to manually unlock a user account in IAM
- How to monitor audit event performance and back log in AWS Console
- How to Plan and Configure DR solution for CloudFormation Stack
- How to Configure Eyeglass Automated Backup to AWS S3 Bucket
- How To Enable Centralized AD authentication
- How to login to Active Directory
- How to enable AD user and group collection for Role Based Access Control
Overview
Ransomware Defender for AWS has some unique administration requirements that is separate to the on premise deployment.
How to Configure Real time Security triggers
Overview
The Defender for AWS product merges Easy Auditor features into the data protection solution. This allows the following data protection features:
- Data Loss Prevention - monitor S3 buckets for high rate of reads indicated data is being read at high rate from the bucket. This feature calculates the bucket capacity and measures % of data read over y minutes.
- Mass Delete - monitors high rate of object deletes on a bucket indicated a suspicious IO pattern on a bucket that should not have a high rate of deletes.
- Customer Security Triggers - This allows powerful field baed rules with both AND and OR logic that can combine fields with equals, contains or less than or greater than logic to build powerful real time monitoring. Examples in this guide.
- Untrusted network access
- Untrusted user access
- Object delete on read only data
- The custom real time triggers allows advanced AND OR combinations and listing of multiple buckets to protect and monitor your data. A common use case is to monitor buckets from application servers that use them and alert when any IO outside the application server subnets is processed. This can also be done by monitoring IAM users with expected IO and flag or alert when IO other than the application appears in the bucket(s).
- Cyber Recover Manager Support
How to configure Data Loss Prevention Trigger
- Open Ransomware Defender Icon
- Click Active Auditor

- Click Data loss prevention Configure
- Click new trigger
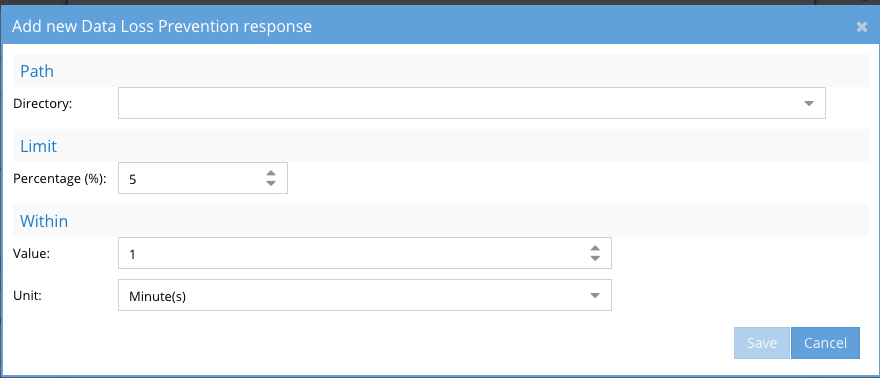
- Click Directory and select a region and S3 bucket and optionally add a prefix
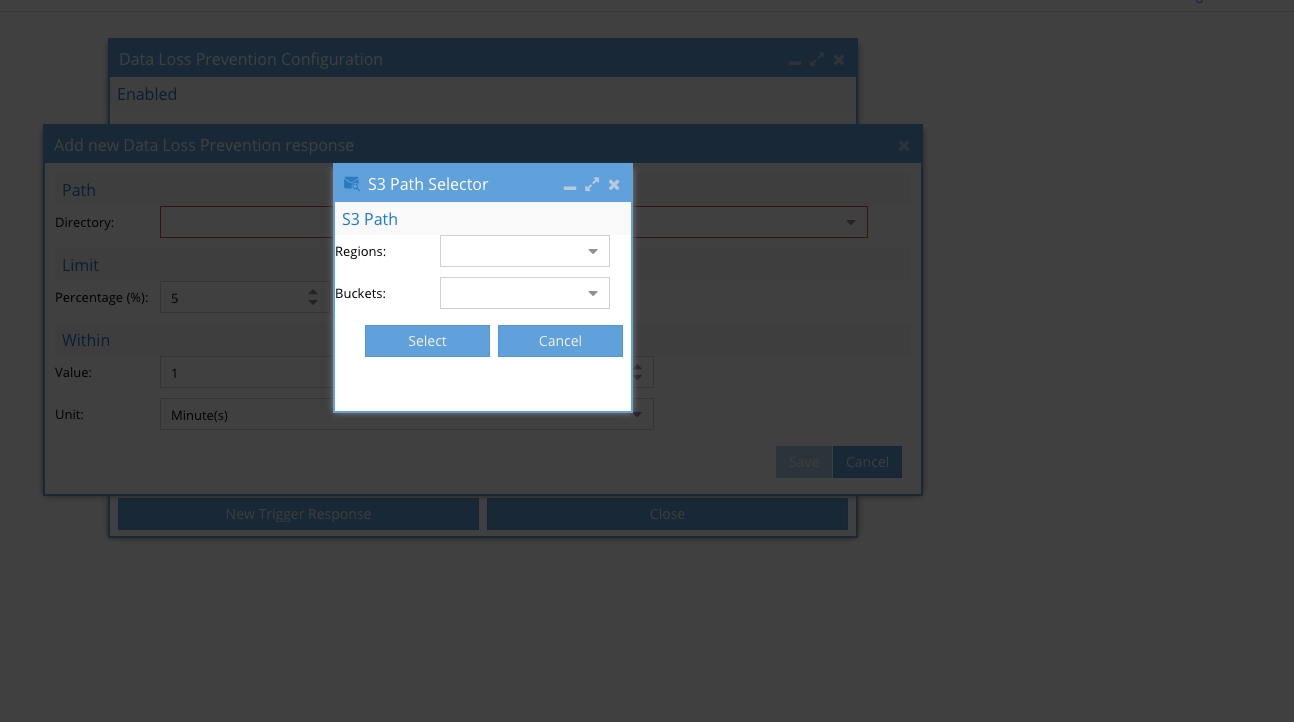
- Enter the % of the data that will trip the detector and enter the number of minutes over which the % of data is measured
- Click save
- Repeat to protect more buckets
How to configure Mass Delete Trigger
- Open Ransomware Defender Icon
- Click Active Auditor
- Click Mass Delete Configure
- Click new trigger
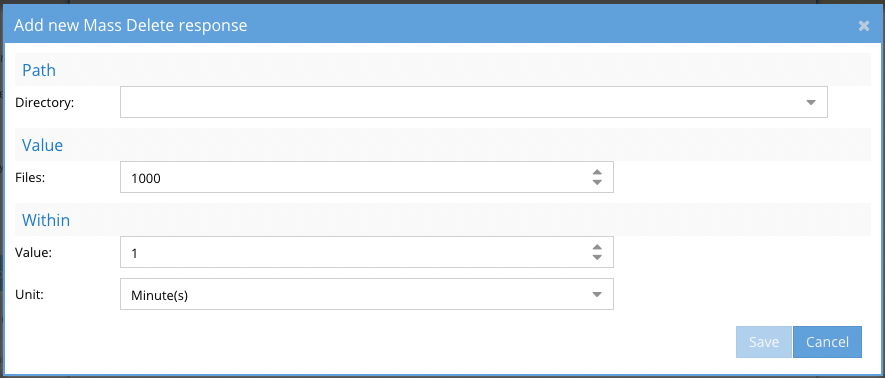
- Click Directory and select a region and S3 bucket and optionally add a prefix
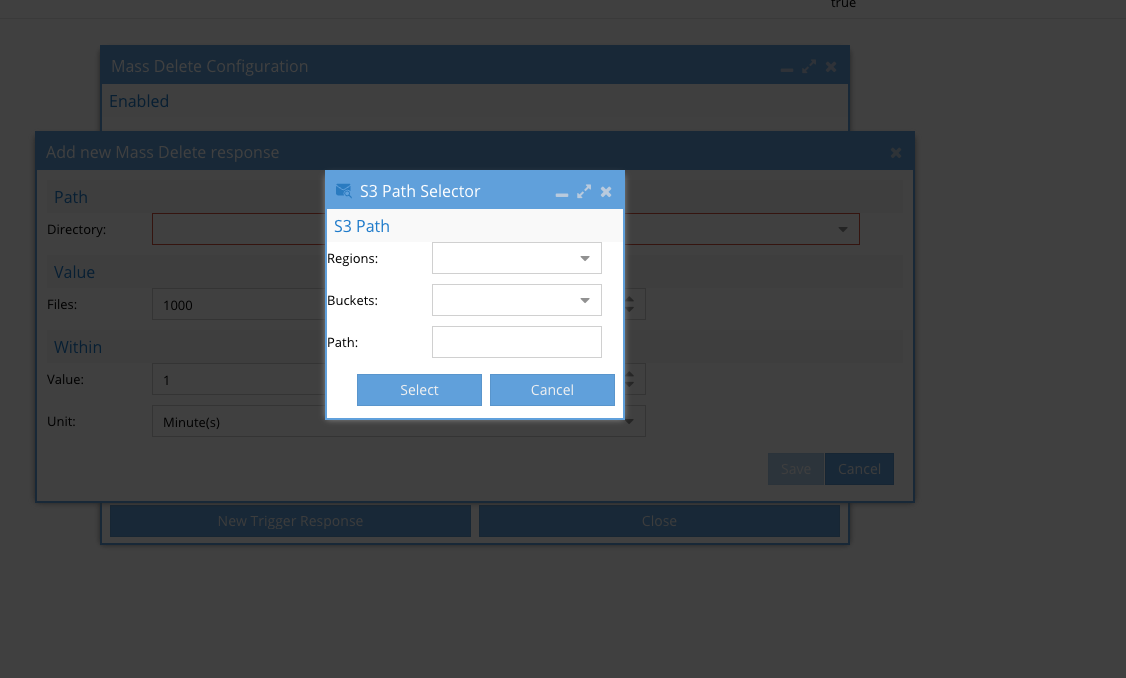
- Select the number of objects that must be deleted over x minutes to trip the detector
- Click save
- Repeat for to protect other buckets
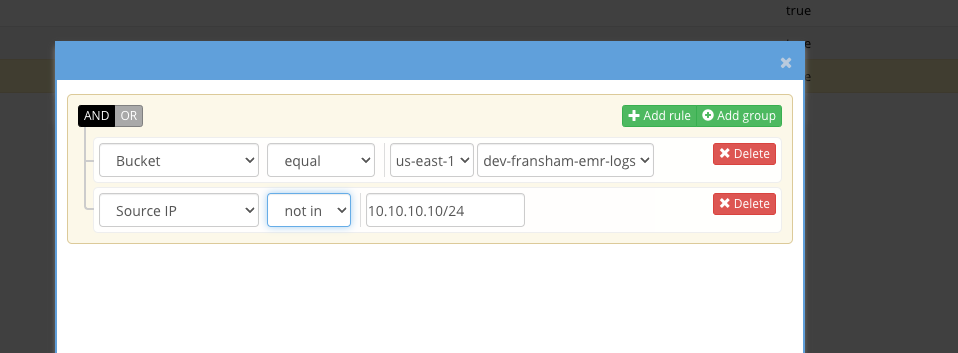
How to configure Untrusted network access Trigger
- Open Ransomware Defender Icon
- Click Active Auditor
- Click Custom Real-time policy Configure button
- Click New Response
- Provide a name for the trigger. NOTE: emails and syslog messages will contain this name and can be used to setup additional triggers in SIEM or SOAR products
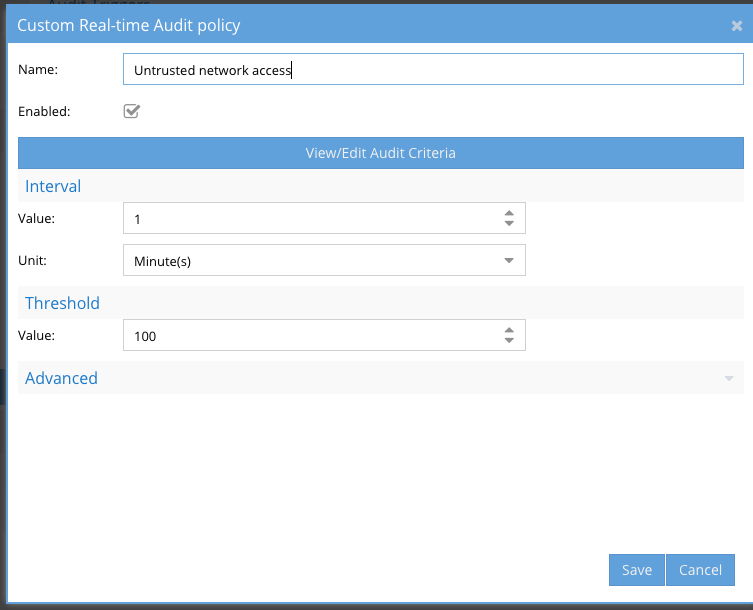
- Click View/Edit Audit Criteria
- Click Add rule

- Fill in the rule to match below by selecting a region/bucket and then add another rule for source ip not in xxxx and specify the network that you expect IO to enter the bucket from
- Click save and save agin to save the trigger
- This trigger will now alert if any IO enters the bucket from an untrusted network
- NOTE: You can use the OR logic to specify a list of buckets.
How to configure Untrusted user access trigger
- Open Ransomware Defender Icon
- Click Active Auditor
- Click Custom Real-time policy Configure button
- Click New Response
- Provide a name for the trigger. NOTE: emails and syslog messages will contain this name and can be used to setup additional triggers in SIEM or SOAR products
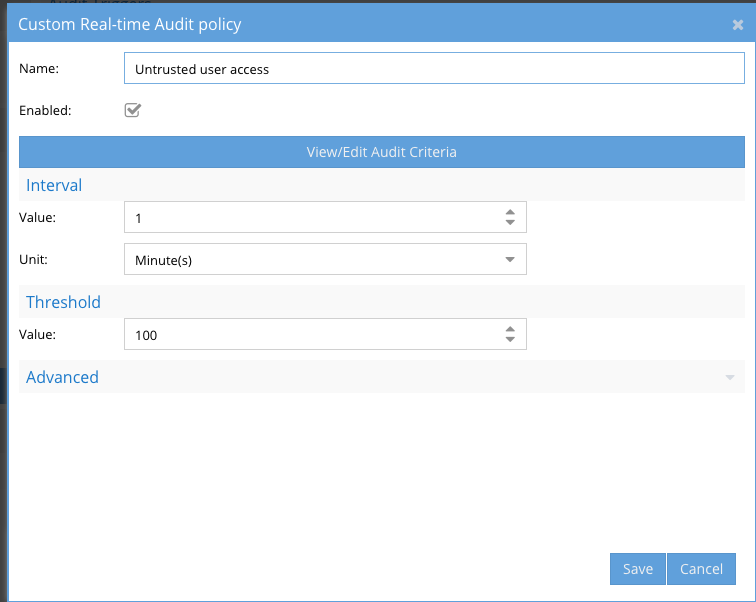
- Click View/Edit Audit Criteria
- Click Add rule and complete as shown below.
-
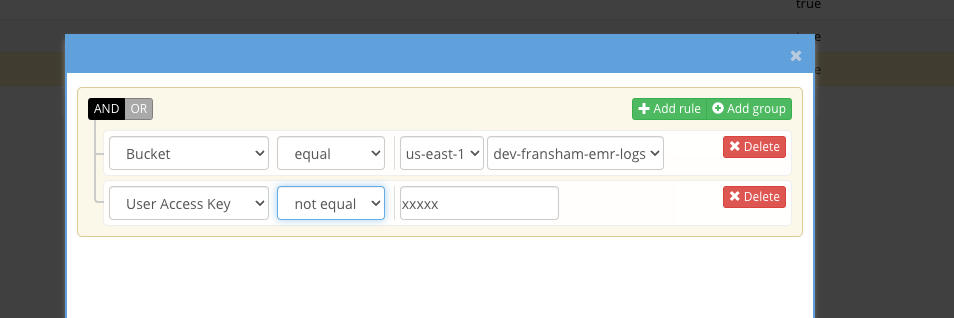
- Enter the IAM user name that should be using the bucket.
- This trigger will alert when another users does any IO in the bucket.
- Repeat to protect other buckets.
How to configure object delete trigger
- Open Ransomware Defender Icon
- Click Active Auditor
- Click Custom Real-time policy Configure button
- Click New Response
- Provide a name for the trigger. NOTE: emails and syslog messages will contain this name and can be used to setup additional triggers in SIEM or SOAR products
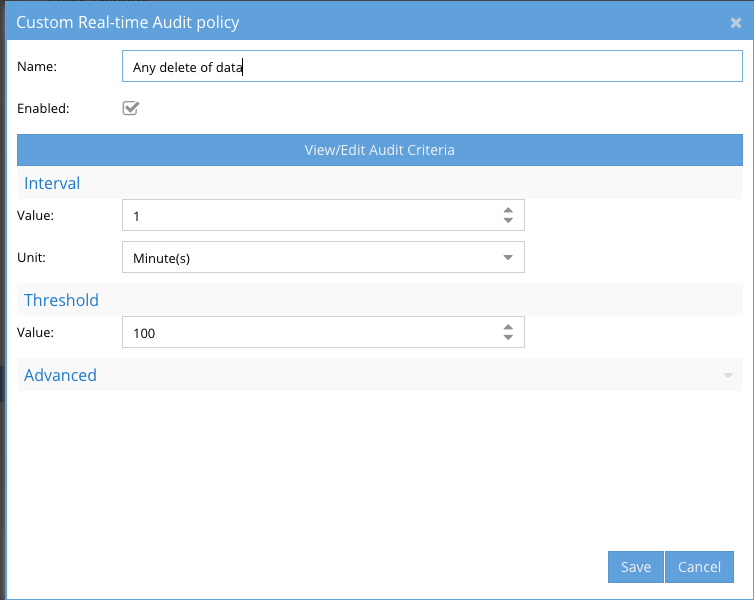
- Click View/Edit Audit Criteria
- Click Add rule and complete as shown below.
-
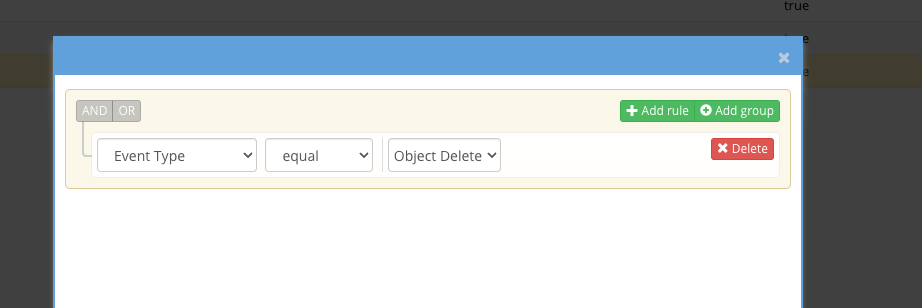
- This rule will trip when a delete occurs in the bucket and will send an alert.
- Done.
How to configure Security Guard Feature
-
Requirements:
- an IAM account
- S3 bucket for Security guard in the Region where you have S3 buckets to be protected
-
Login to the S3 landing page
- Create an S3 bucket in the region where other S3 buckets exist for data protection
- The S3 bucket will be assigned to the IAM user in the next step, the bucket does not require ACL security and does not need to be public.
- Recommended bucket name: ransomware-defender-security-guard
-
Login to IAM landing page
- Create a new user with access and secret keys to be the service account used for the Security guard self test feature.
- The user does not need to be in any special groups but needs to be assigned to a security guard S3 bucket as owner to be able to create objects
- Retain the access and secret keys after creating the IAM user.
-
Login to the Eyeglass VM
- Open the Ransomware Defender Icon
- Click the security guard tab
-
Click Enable Task and select the Network Element AWS and interval should be 1D (daily)
-
-
Now scroll down to the bottom of the UI to the AWS Setup section
-
Requirements:
- Security Guard service account IAM user name
- Access and secret keys for the security guard IAM user
- The region where the S3 bucket is located
-

- Click the Submit button when done and the inputs will be validated
- If successful click the Run now button.
- Open the Jobs Icon and monitor the job steps from the running Jobs tab.
-
Requirements:
- Done

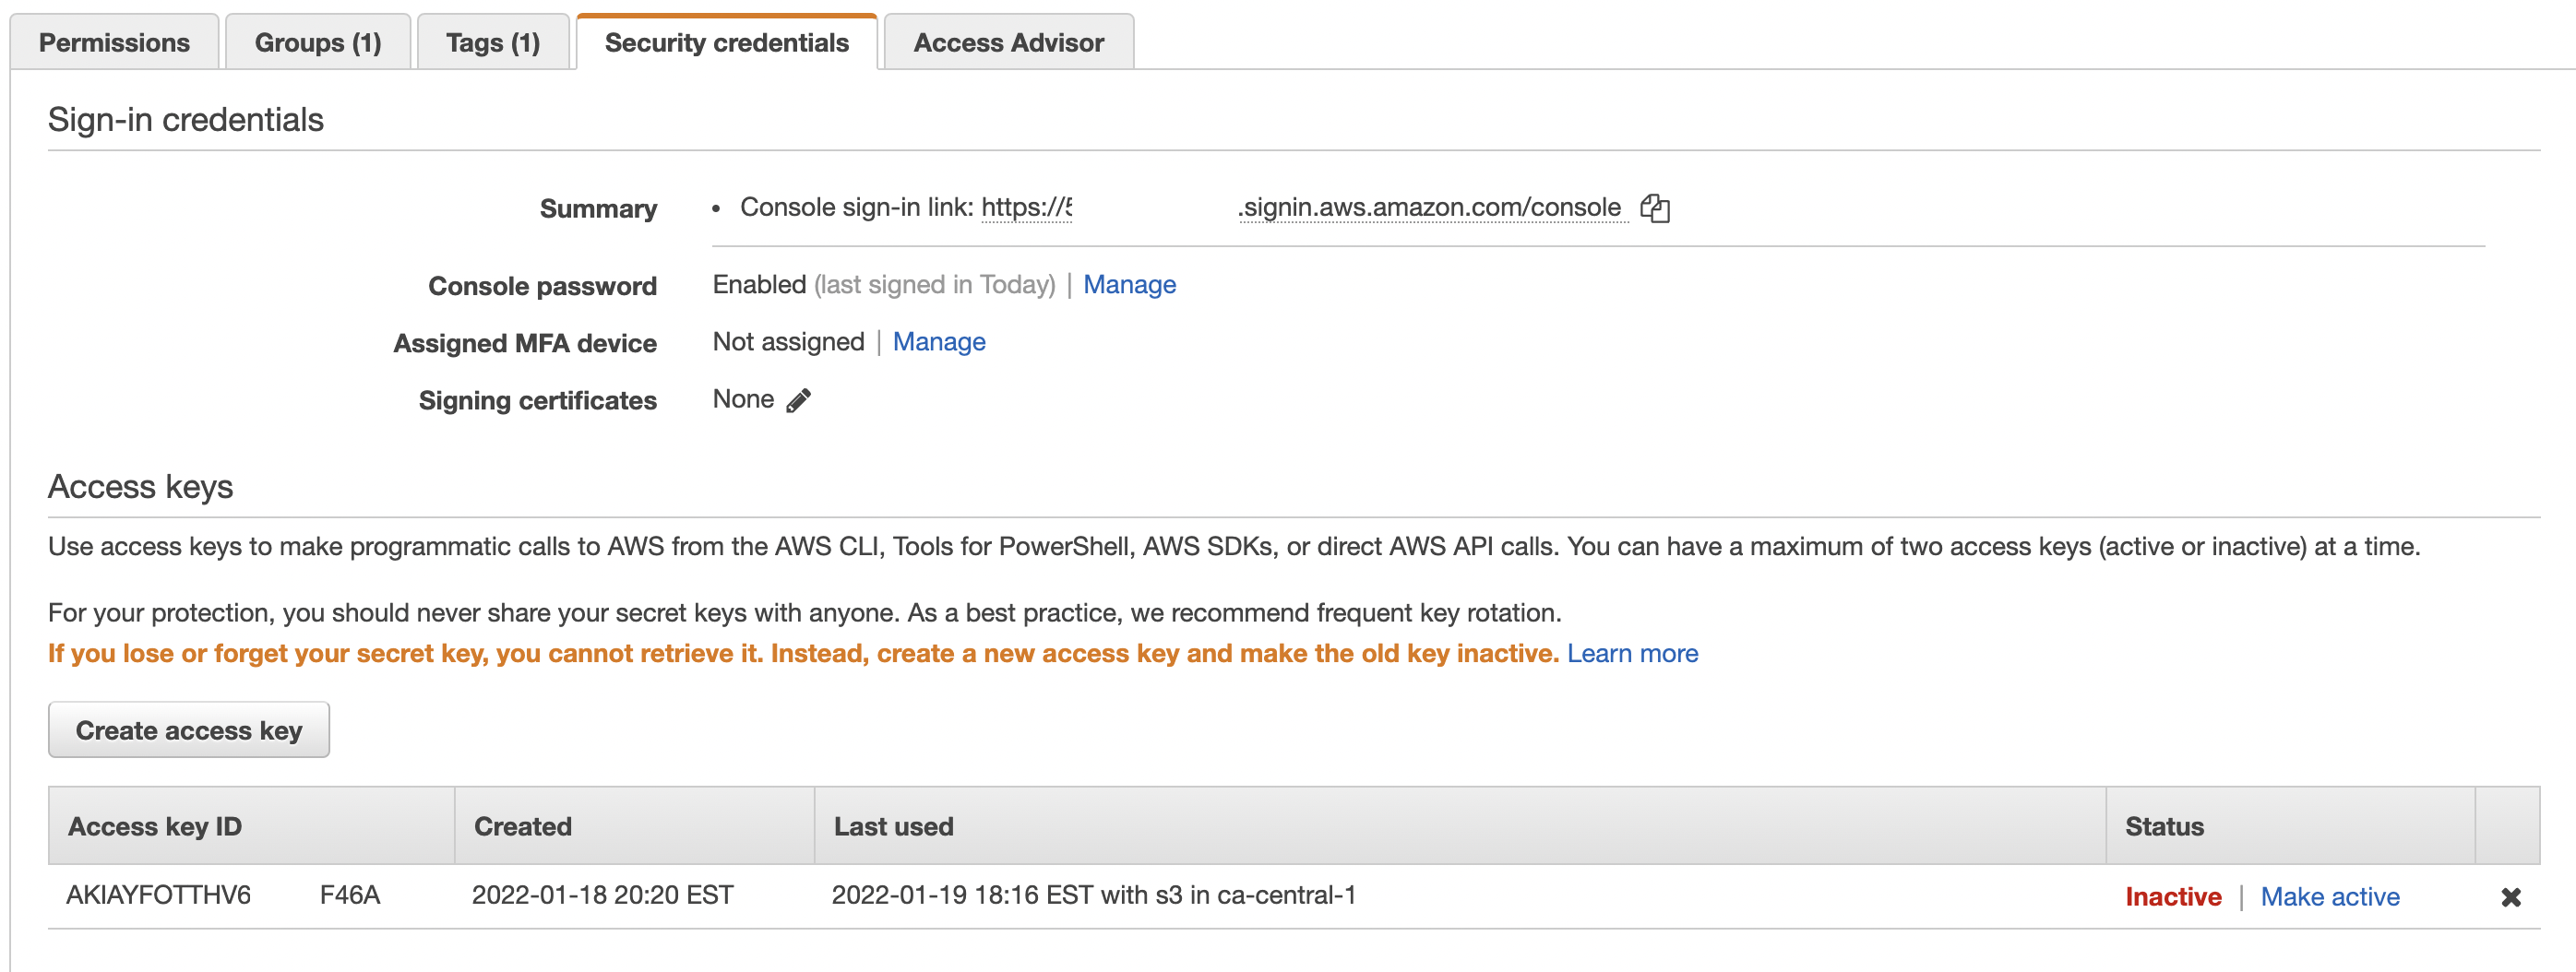
How to manually unlock a user account in IAM
- If you need to manually unlock a user account that was locked out by Ransomware Defender follow these steps.
- Open the IAM landing page
- Click the users option on the left menu
- Select the user and click on the Security Credentials tab
- You will see one or all access key's and the status will show Inactive when locked out.
- Click the Make Active link to unlock the user to regain access to S3 buckets
-
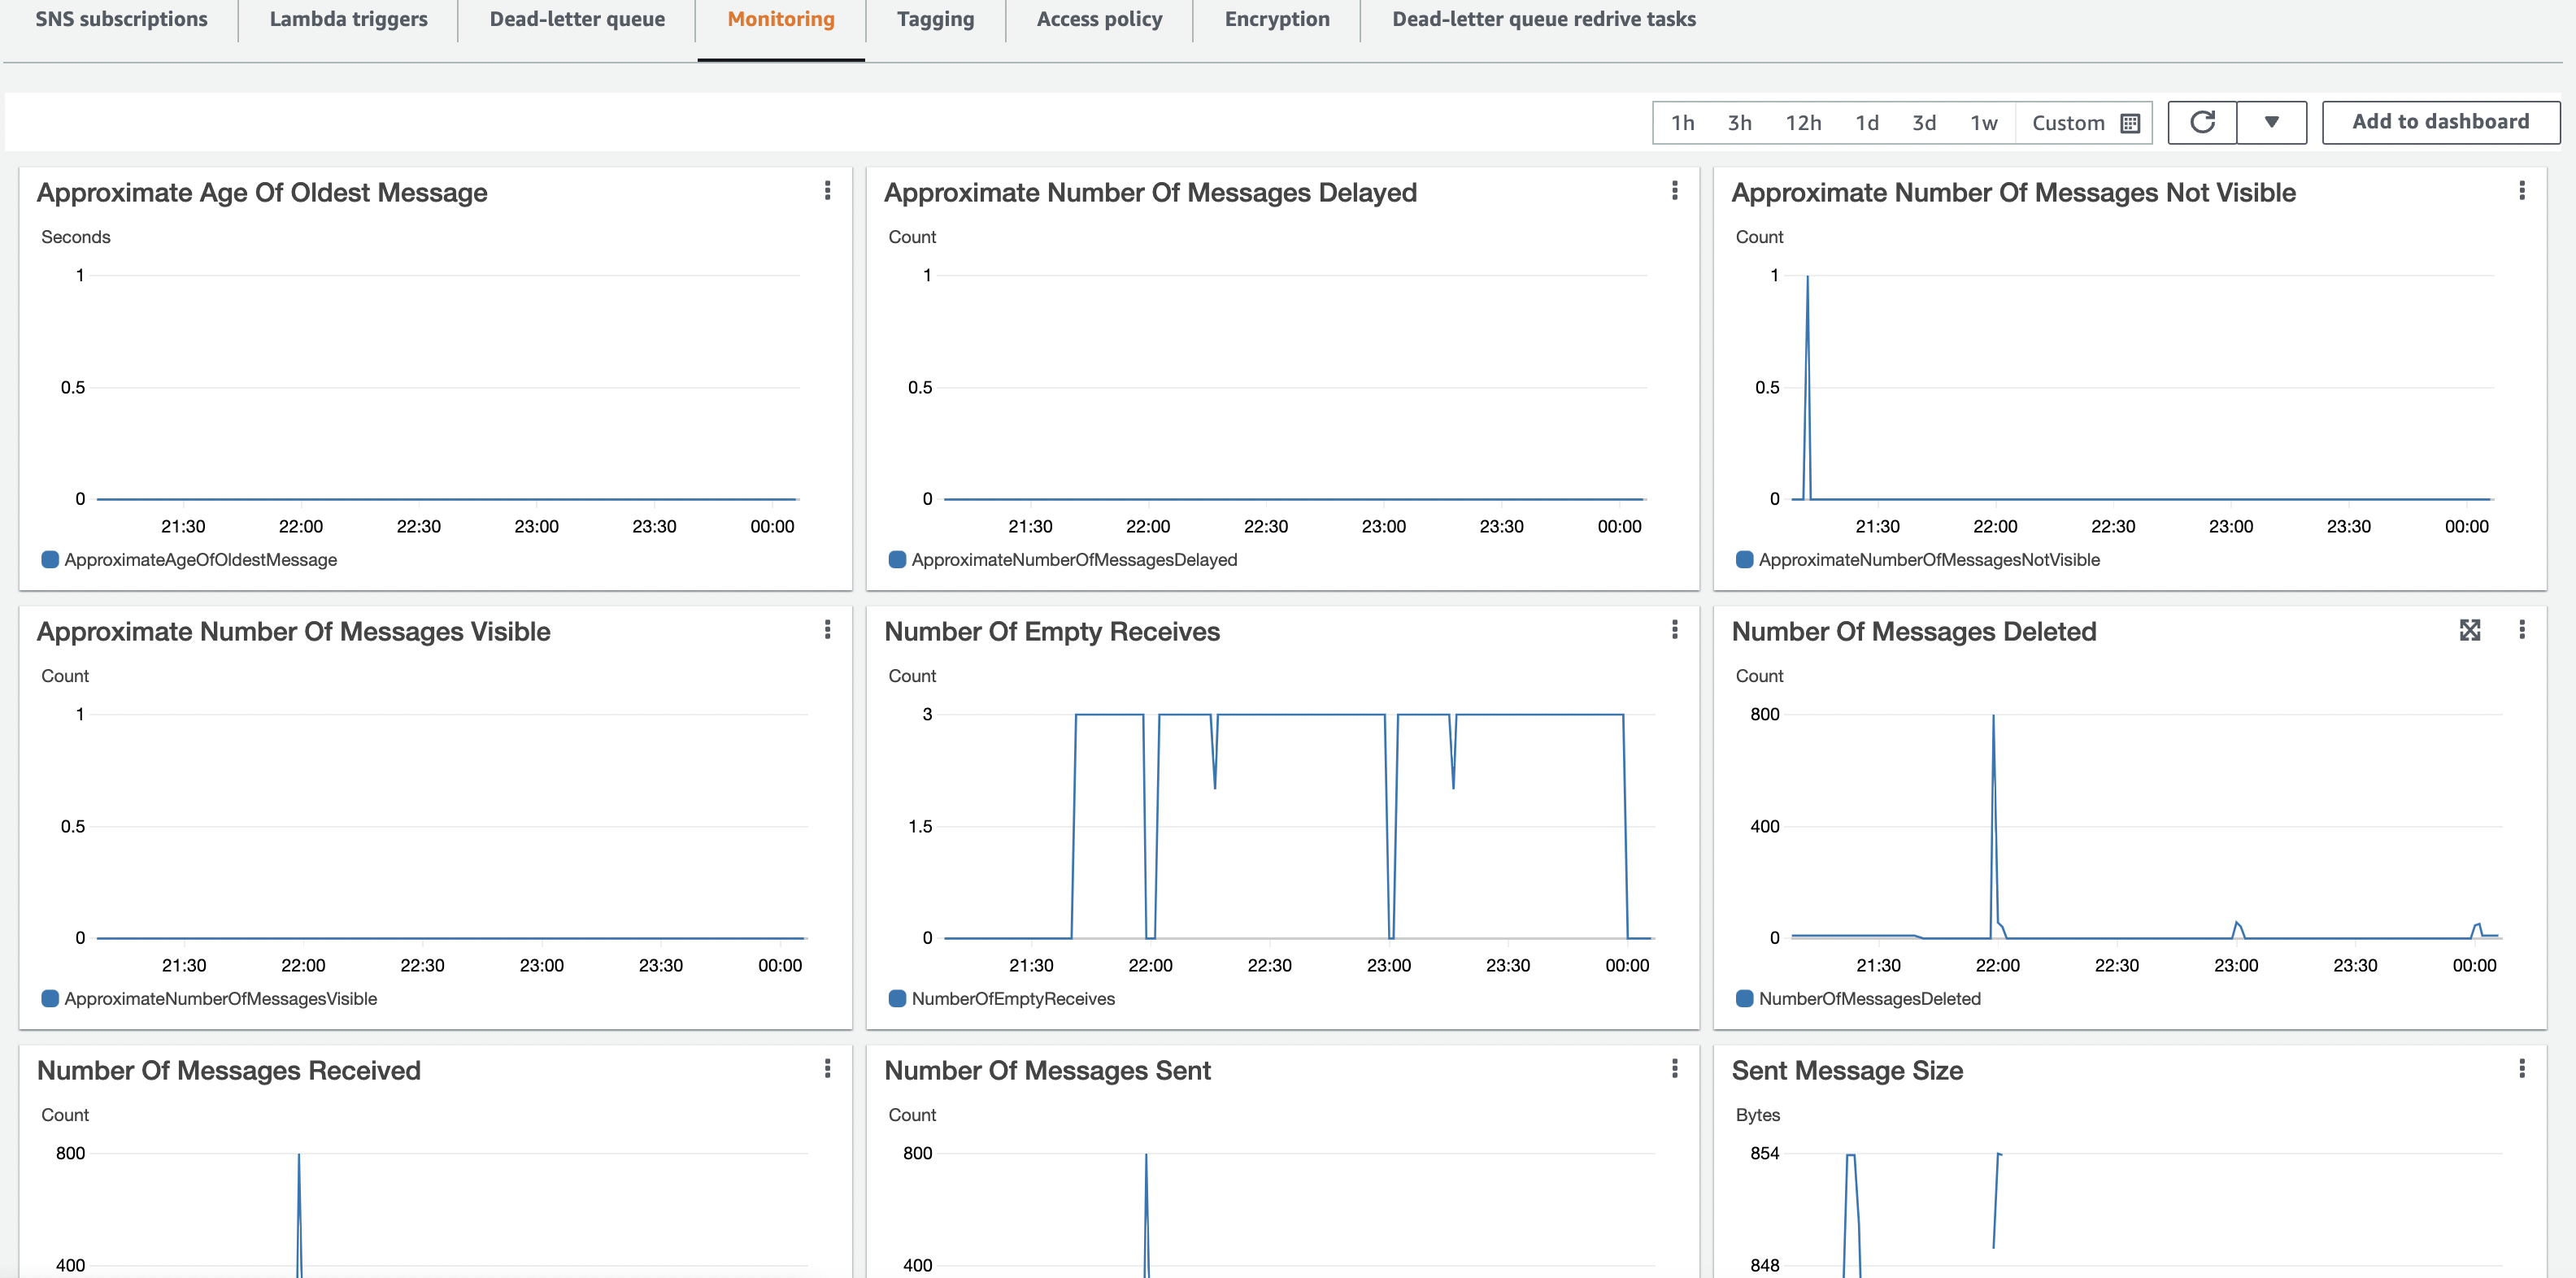
How to monitor audit event performance and back log in AWS Console
- Ransomware Defender has audit event monitoring and alarming features in the Managed Services Icon. It may be desirable to see audit data performance from within the AWS Console SQS landing page.
-
Open the SQS landing page
- Select the region that has S3 buckets under protection
-
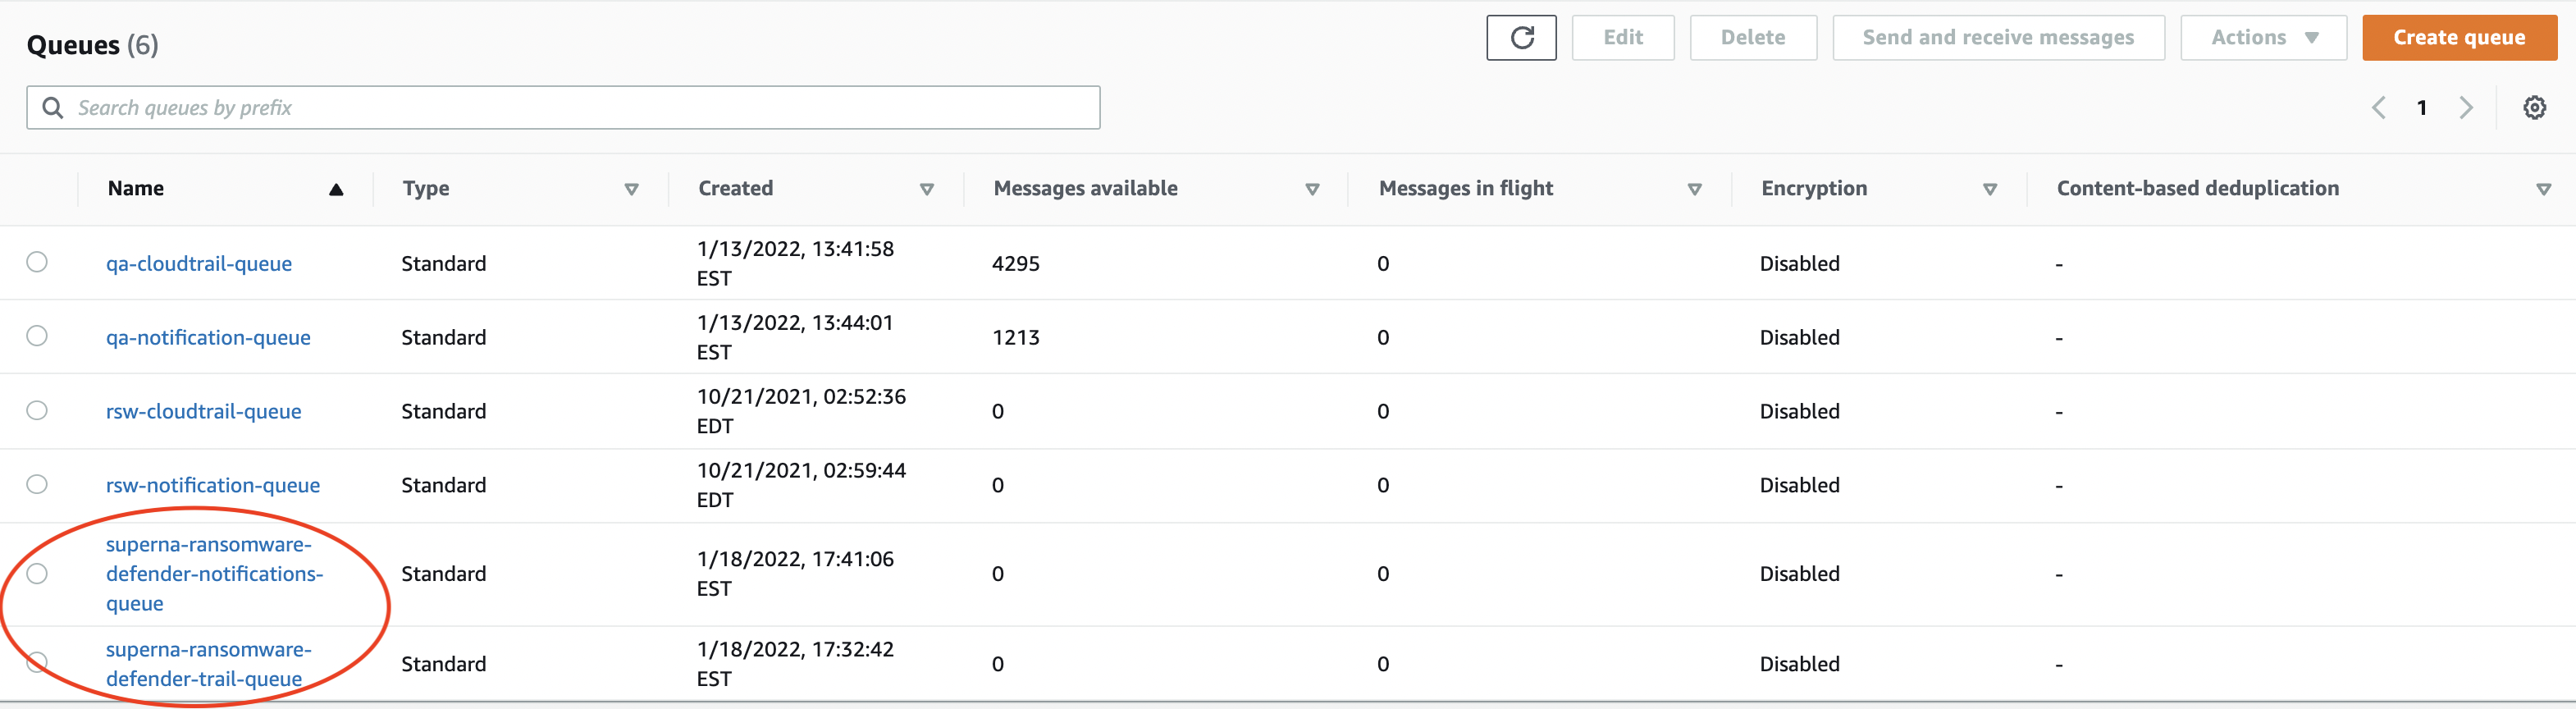
- The first quick check is the messages available column. It should be zero which means Ransomware Defender is processing messages as fast as they are published to the queue.
- Click on the SQS topic for more detail in this example click on superna-ransomware-defender-notifications-queue. This queue typically has a higher rate of messages
- Click on the Monitoring tab, you can see the rate of message received, and age of oldest message to get detail performance statistics over time and the ability to add to a dashboard.
-
- done
How to Plan and Configure DR solution for CloudFormation Stack
-
Overview
- The solution uses AWS services like Cloudtrails, SQS queues ,Eventbridge and Managed Kafka cluster service are defined with per region rules and are highly available services. The Managed Kafka Service uses HA cluster to process events and allows scaling up or down. The Cloudformation stack runs in a region and offers in region HA solution with an autoscaling group for event processing. In the event that a region's EC2 service was impacted. The following steps can be used to deploy the Cloudformation stack in a different region.
- RTO is 1 hour to deploy and configure the Stack in a new region and connect the Stack back to the HA services above that are used by Ransomware Defender for AWS.
-
Deploy a new Cloudstack in another AWS Region
-
Use the instructions here (Installation Procedures CloudFormation Deployment of Ransomware Defender Stack ) to complete this step.
- NOTE: You will need to create a new key pair in the new region and adjust the CLI command to deploy the Cloud stack in the new region.
- Time to complete approximately 45 minutes (this is Cloudformation automation time with no customer steps to execute while waiting for the Stack to deploy.)
-
Validate the Stack deployment with instructions here (Installation Procedures - Ransomware Defender Instance and CloudFormation Stack Validation).
- Time to complete approximately 5 minutes.
-
Restore Backup
- Time to complete approximately 10 minutes.
- Download the latest 7 day backup from the configured S3 backup bucket configured in the Eyeglass GUI. 7 daily backups are stored external to the Eyeglass appliance instance in an S3 bucket.
- Follow the appliance backup restore steps in this guide
- Login to Eyeglass GUI with the new IP address in the new region. (See Stack validation step above to get the new Eyeglass appliance IP address, make sure the firewall subnet range used in the Cloud stack deployment includes your administration PC ip range)
- Open the Managed Services Icon - verify the services show green
- Open the inventory icon - verify all previously entered AWS regions that were protected are showing in the inventory tree.
-
Open Ransomware Defender Icon
- Select the Security Guard tab
- Click run now to run the self test operations and monitor from the running jobs Icon --> running tabs.
- DR failover complete
-
Use the instructions here (Installation Procedures CloudFormation Deployment of Ransomware Defender Stack ) to complete this step.
How to Configure Eyeglass Automated Backup to AWS S3 Bucket
- In order to export the 7 day backup created daily to an S3 bucket follow these steps. This guide assumes AWS S3 is used. Only tested with AWS S3. All other S3 targets are not supported. Reference FAQ.
-
Requirements:
- Internet Access to the AWS S3
- Internet access to opensuse repository
- an S3 bucket: recommended name eyeglass-backups
- get access keys for a user with access to write to the bucket and delete
-
Login to Eyeglass over ssh
- sudo -s (enter admin password)
-
Install fuse s3 file system
- zypper install s3fs
- answer yes to install the packages
-
Create the password file with access keys
- echo ACCESS_KEY_ID:SECRET_ACCESS_KEY > /etc/passwd-s3fs
-
NOTE replace access and secret with correct values
-
chmod 640 /etc/passwd-s3fs
-
Configure the backup folder
-
rename current backup folder
-
mv /opt/data/superna/var/backup/ /opt/data/superna/var/backup.bak
- mkdir -p /opt/data/superna/var/backup
- chown sca:users /opt/data/superna/var/backup
-
-
Test the mount to AWS S3 bucket
-
s3fs eyeglass-backups /opt/data/superna/var/backup
-
If it fails use this command to debug the reason whey
-
s3fs eyeglass-backups /opt/data/superna/var/backup -o dbglevel=info -f -o curldbg
-
s3fs eyeglass-backups /opt/data/superna/var/backup -o dbglevel=info -f -o curldbg
-
If it fails use this command to debug the reason whey
- no response will be returned if it is successful
-
test the mount
- touch /opt/data/superna/var/backup
- This command should succeed to create a test file. now test deletes
- rm /opt/data/superna/var/backup/test
-
s3fs eyeglass-backups /opt/data/superna/var/backup
-
Copy previous backups to the new S3 mounted path (and maintain owner and group of the files). This step copies current backups to the S3 bucket.
- cp -rp /opt/data/superna/var/backup.bak/* /opt/data/superna/var/backup
-
Configure fstab to mount at boot time
- nano /etc/fstab
-
Paste this to a new line (assume the s3 bucket name is eyeglass-backups)
-
eyeglass-backups /opt/data/superna/var/backup fuse.s3fs _netdev,allow_other 0 0
-
control+x (to save and exit)
-
-
Done. The daily backup script will now place backup files in the eyeglass-backups bucket in S3 and manage 7 files.
-
NOTE: To adapt these steps to use an S3 compatibly target other than AWS change the mount syntax to the following below.
-
s3fs eyeglass-backups /opt/data/superna/var/backup -o passwd_file=/etc/passwd-s3fs -o url=https://url.to.s3/ -o use_path_request_style
-
s3fs eyeglass-backups /opt/data/superna/var/backup -o passwd_file=/etc/passwd-s3fs -o url=https://url.to.s3/ -o use_path_request_style
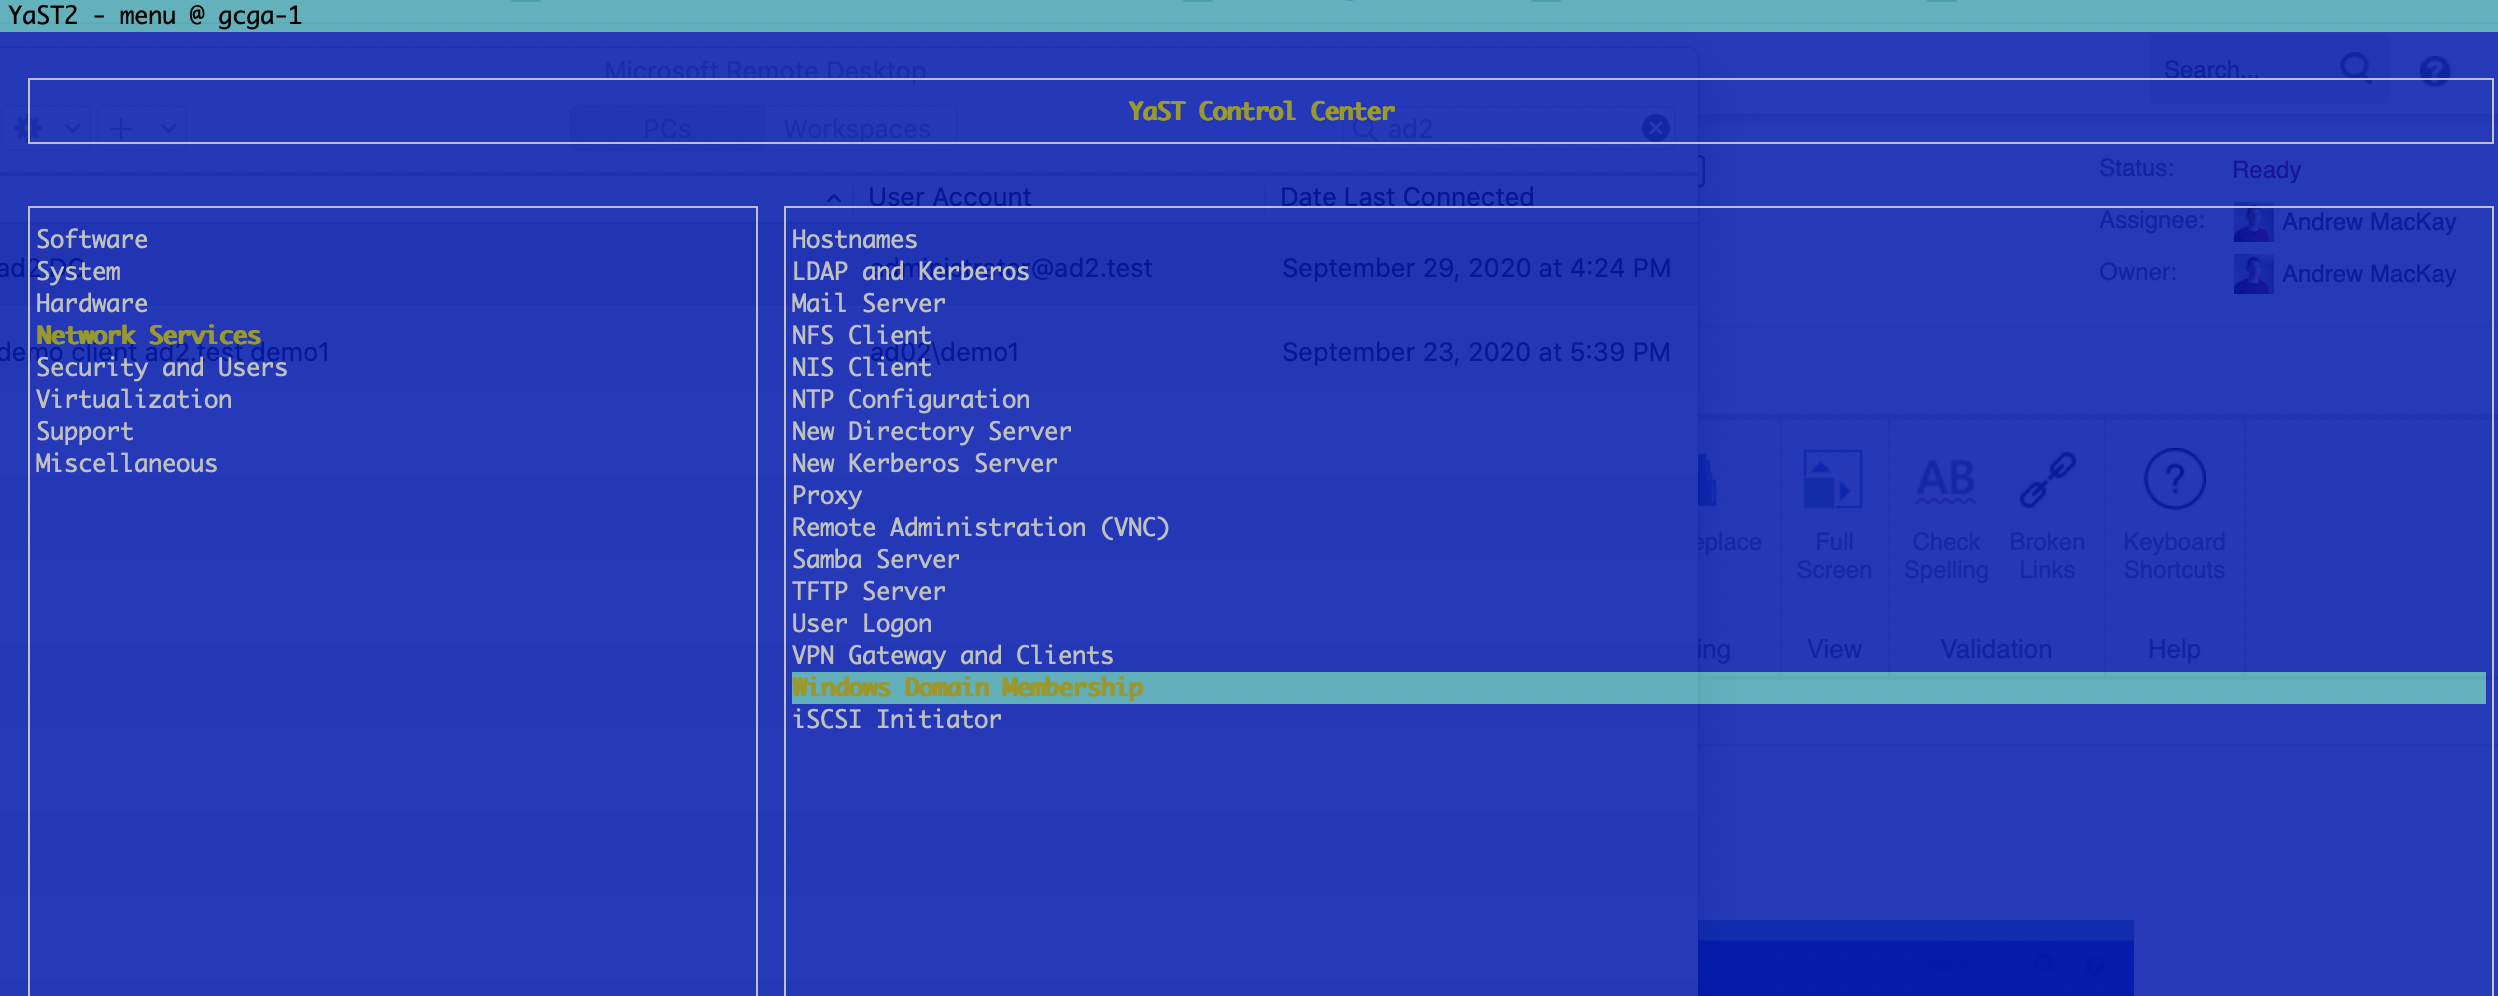
How To Enable Centralized AD authentication
- Overview: To enable Centralized AD authentication it is typical to have an AD domain or domain controller in AWS synced or joined to an on premise AD forest. This assumes an AWS AD domain is available within AWS account.
- Login to the eyeglass VM with SSH keys created with the Cloud stack.
- sudo - (enter the admin password)
-
zypper install samba-winbind
- Type yast
- Navigate to Windows Domain Membership
-
- Enter your AD domain and select options as per the screenshot below
-
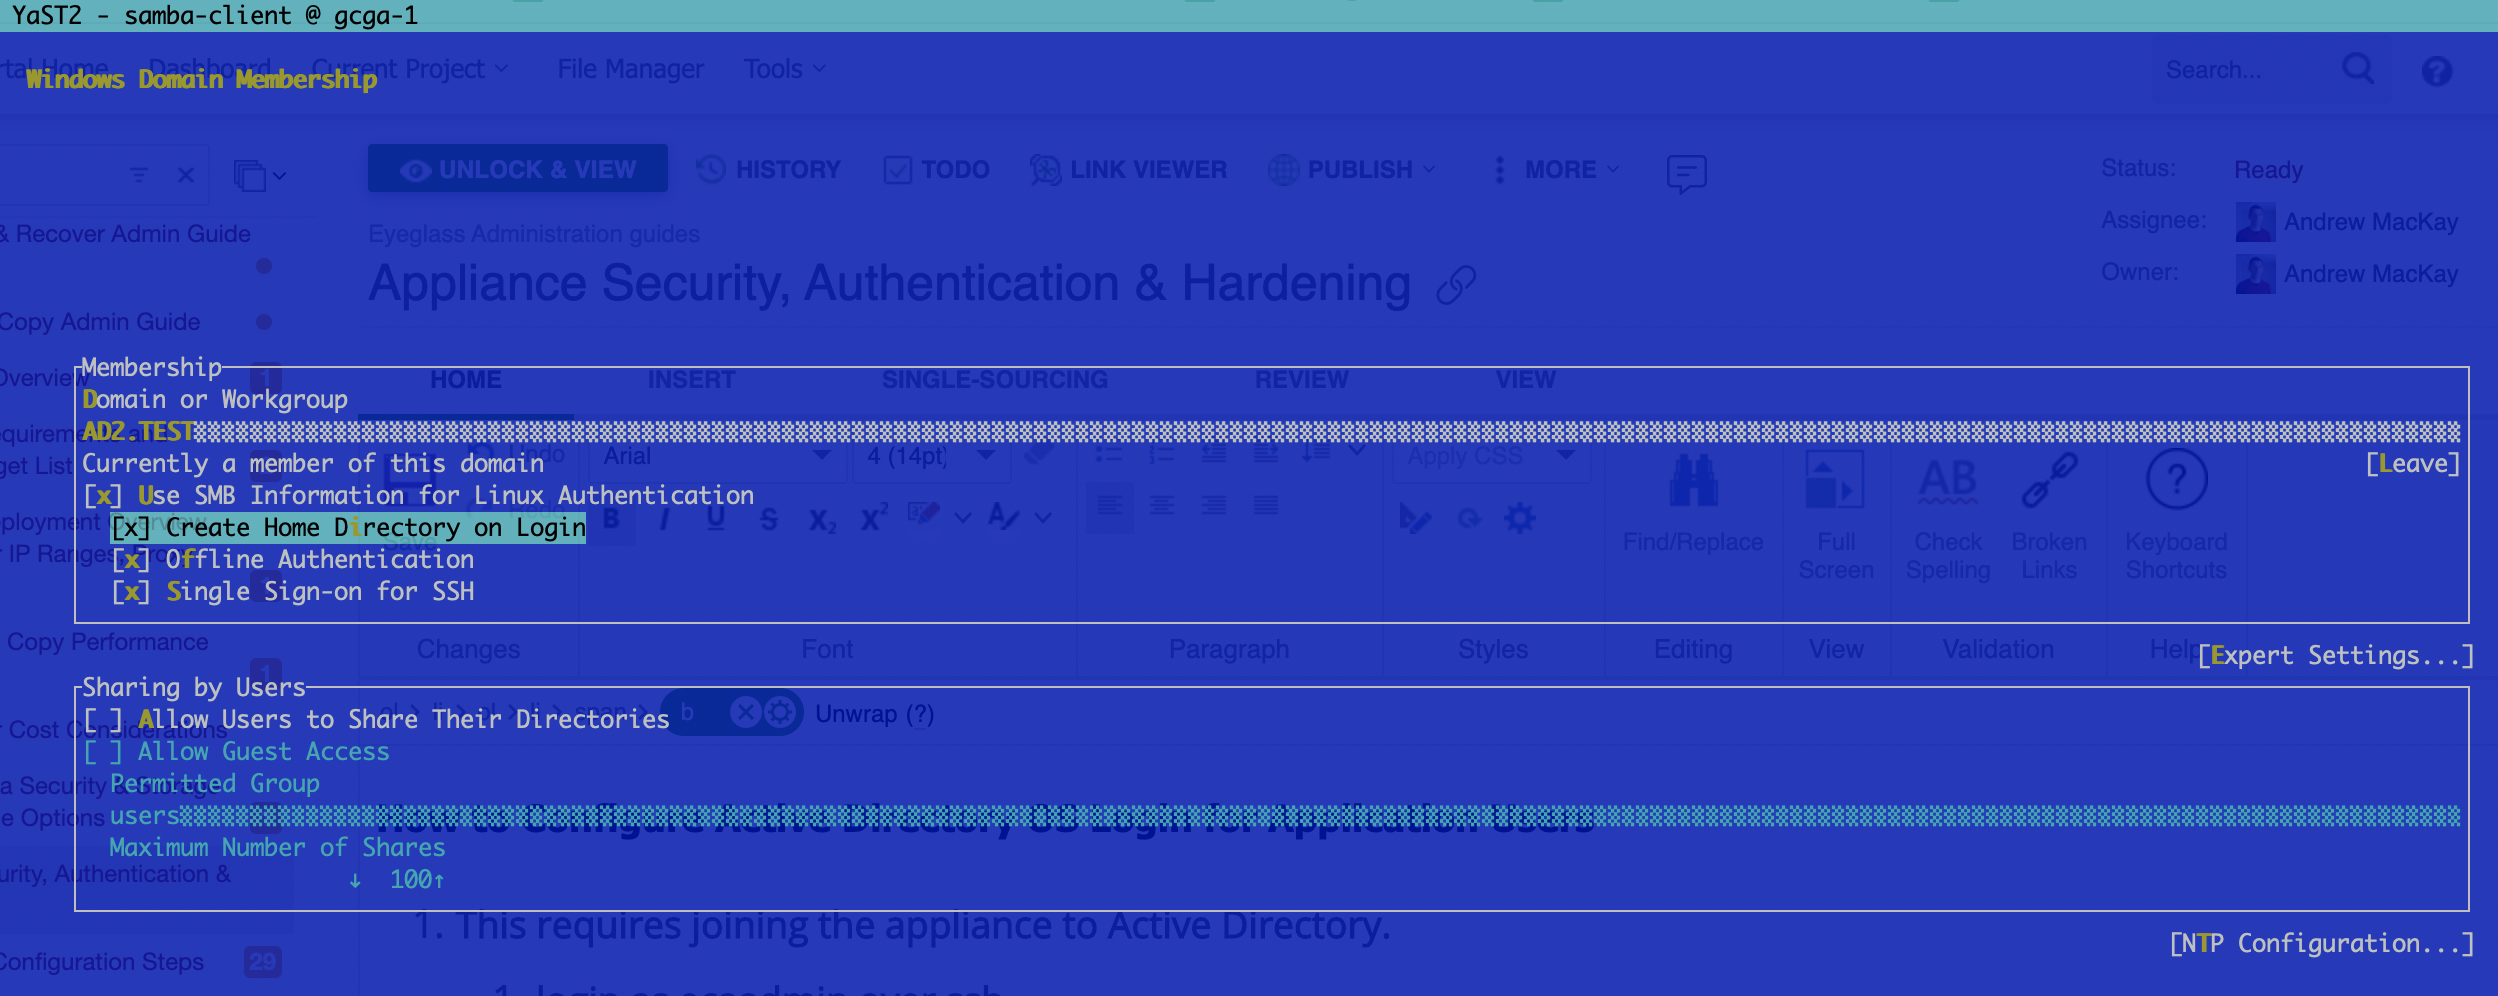
- Enter domain admin or an account that allows computers to be joined to the domain.
- Once joined successfully, exit YAST using tab to select quit.
- Test ssh login with AD
- example login syntax for an AD domain called ad2.test with user demo1. NOTE: the double slash is required to escape slash character
- Linux ssh client login ssh -i <key file> ad2.test\\demo1@x.x.x.x OR ssh -i <key file> demo1@ad2.test@x.x.x.x
- done
How to login to Active Directory
- Prerequisites
- Complete the Join AD steps in the section above.
- Open the webUI
- Login syntax is user@domain.com (NOTE: This can the domain hosted in AWS or a trusted domain of the AWS hosted AD)
- Done
How to enable AD user and group collection for Role Based Access Control
- In order to support role based access controls we recommend integration with AD using LDAP caching feature. This uses an AD service account with read permissions to the directory to collect users and groups for use with RBAC feature.
- Configure LDAP AD user and group collection is covered in this guide.
- Once completed you can now follow the RBAC guide here.