Security Guard - Automated Security Testing
- Overview
- Simulated Attack
- Prerequisites (Isilon Powerscale and ECS)
- Security Guard Lockout Behavior (Isilon Powerscale)
- Configuration (Isilon PowerScale)
- How to Run on Demand Security Guard Penetration test (Isilon Powerscale)
- How to Review Security Guard Penetration test history and logs (Isilon Powerscale)
- How to test Ransomware Defender with your own Custom File Extension (Isilon Powerscale)
- Configuration (ECS)
- Security Guard Lockout Behavior (ECS)
- How to Run on Demand Security Guard Penetration test (ECS)
- Advanced Configuration Security Guard CLI Commands (Isilon Powerscale)
- Prerequisites - Qumulo
- Qumulo Configuration
- Add ECA node 2 as syslog consumer
- Prerequisites - VAST
- VAST Configuration
- Enabling VAST on ECA
- Mount the Audit Path to the ECA node
- Update Eyeglass
Overview
Ransomware Defender monitors cluster IO for suspicious user behaviour. Under normal day-to-day conditions, no actions are required since alerts are sent in the event of a Warning, Major or Critical security event.
The Security Guard feature simulates a Ransomware attack on a daily basis to validate all components are functioning, including alerting and lockout of user sessions. Once configured administrators get daily updates that Ransomware Defender is actively monitoring and responding to Ransomware events.
This offers you the highest level of confidence that your environment is ready in the event a malicious virus is inside your network and finds shares to attack data.
The feature will create a “honeypot share with name igls-securityguard” in the System Zone of each cluster managed by a Ransomware agent license key. The feature can simulate an attack on demand or on a scheduled interval.
Simulated Attack
- Creates share automatically secured to the service account.
- Share name igls-securityguard. (Isilon)
- ECS Bucket name xxx. (ECS)
- Cleans up old files from the last execution.
- Creates test files using a well-known extension to trigger a simulated attack response from Ransomware Defender Clustered agent.
- Verifies the user lockout occurs by checking that files cannot be written to the share.
- Initiates the recovery of the user and verifies access to the share again.
- Reports success and failure per step.
- Emails administrator results.
Prerequisites (Isilon Powerscale and ECS)
- Service Account Test User (Isilon Powerscale)
- NOTE: Security Guard service account must be unique and MUST NOT be shared with Robo Audit service account used in Easy Auditor
- A local PowerScale user created in the system zone local provider example igls-securityguard
- NOTE: for multi-cluster set up, we recommend enabling one cluster with a local account since the feature tests end-to-end functionality and not the cluster itself. For cluster validation, we recommend the honeypot feature be used and tested within your InfoSec team using a simulated attack on a monthly basis
- Licensed for security guard. The best practice for a single cluster is a local account.
- Security guard Service Account Test User (ECS)
- Create a bucket object user
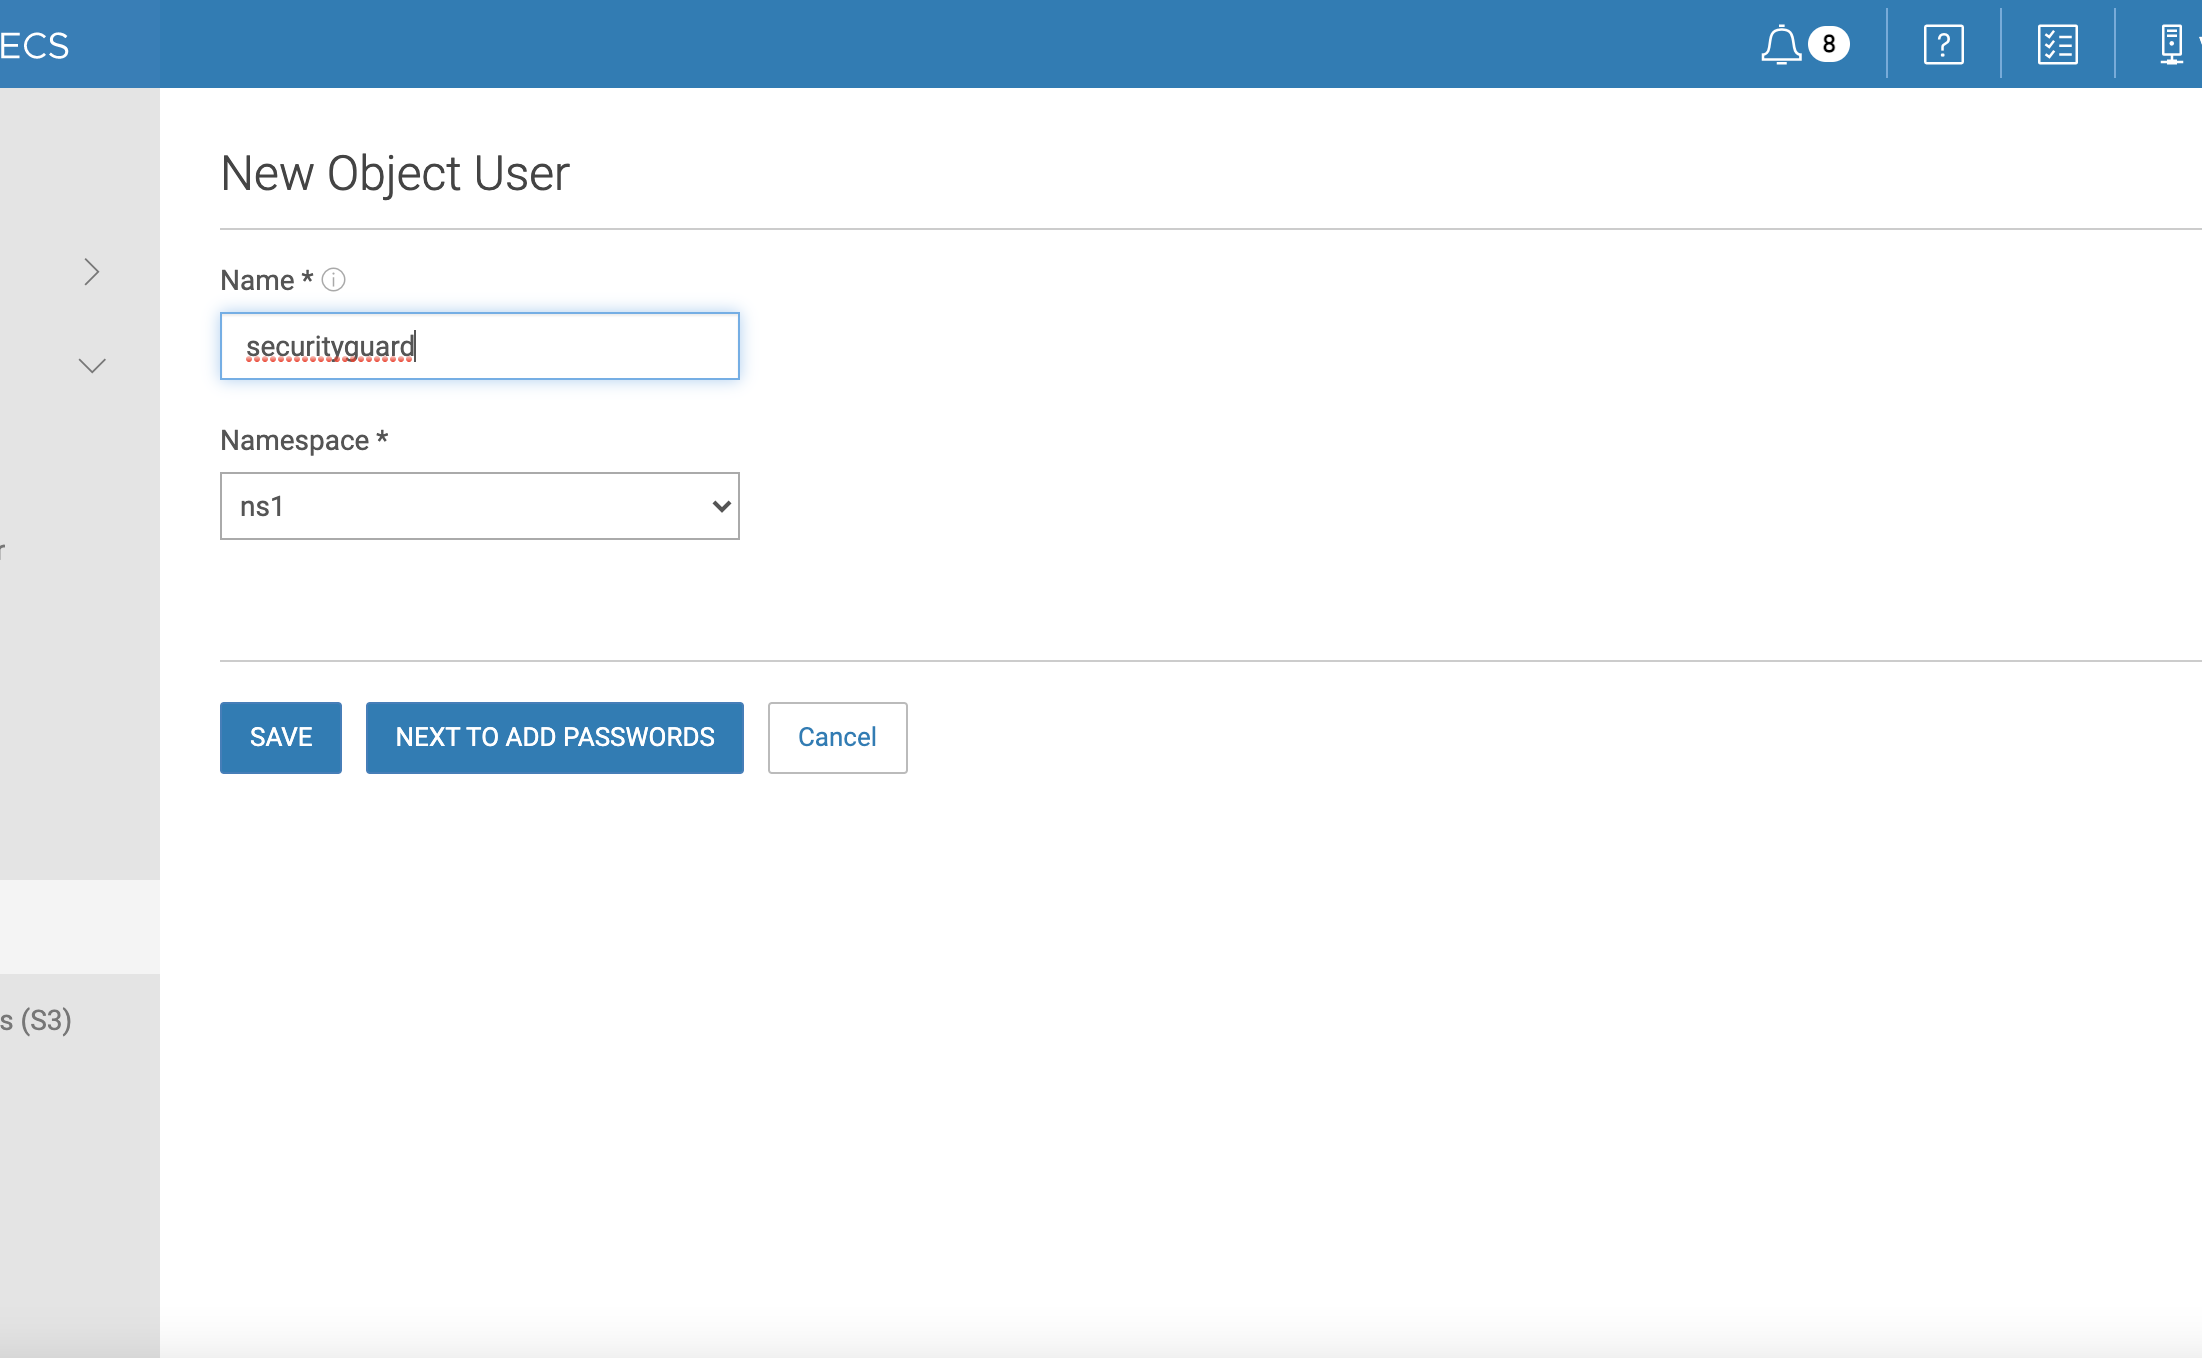
- Click next to add passwords
- Use the Generate and add keys button
- Record the secret key to enter into the security guard configuration.
- Repeat the steps above to create the Bucket version service account user that is used to leverage bucket versioning to protect buckets that are under an attack. Bucket versioning will protect objects using version feature on the ECS cluster.
- Create the bucket version user eyeglassversions
- save the secret key to update to the ECS cluster
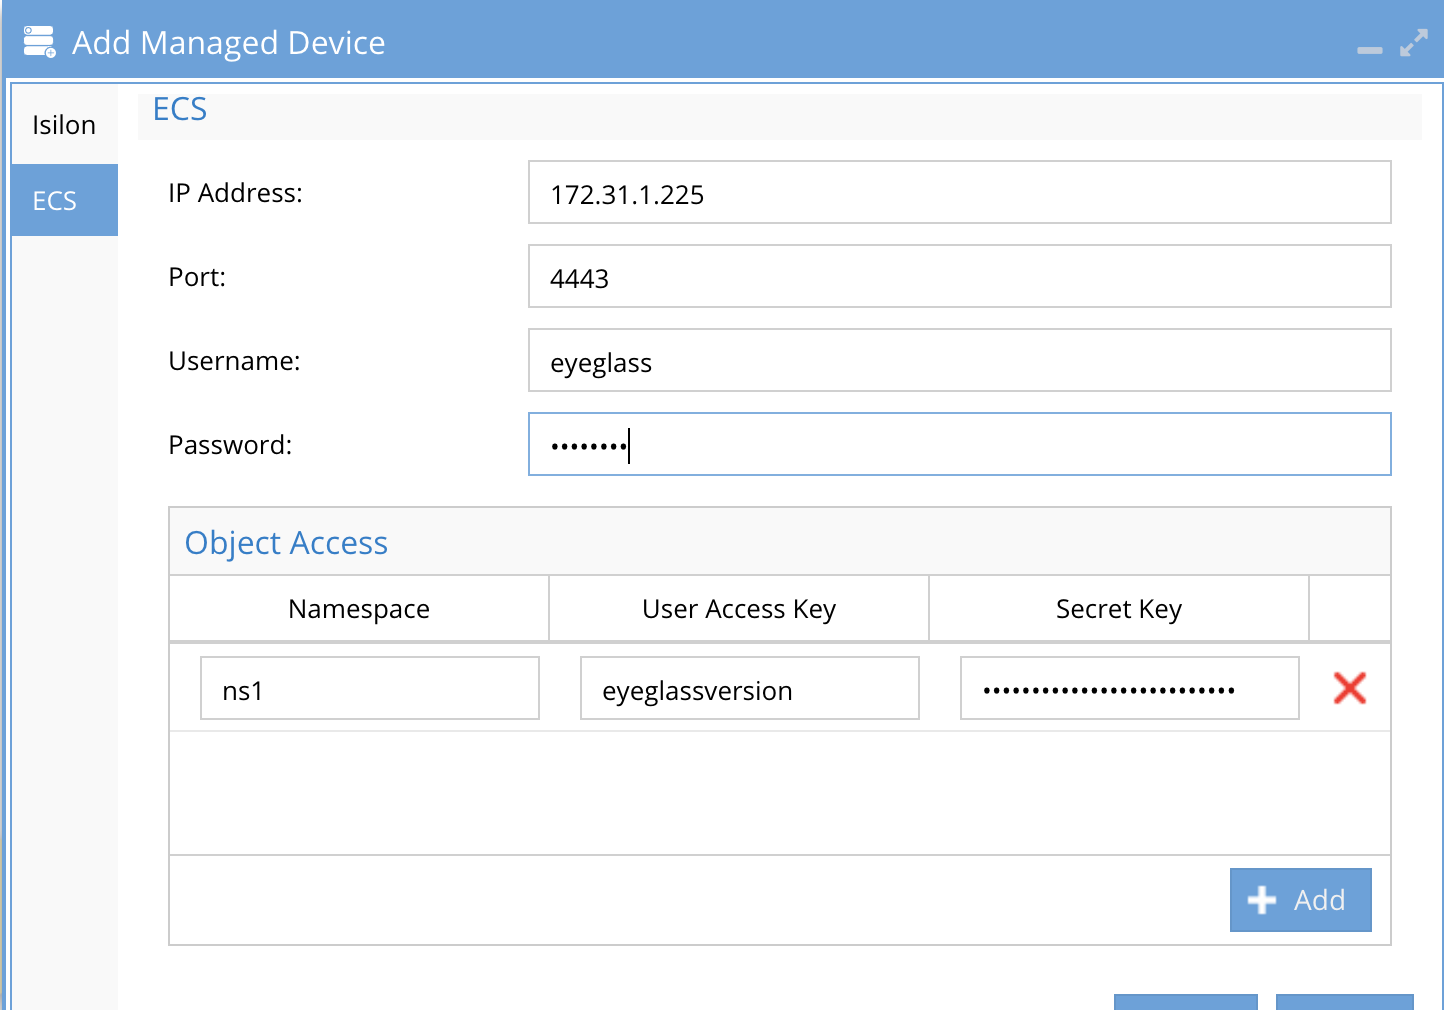
- Open the Inventory Icon
- Right-click the ECS cluster
- Click add to and fill in the namespace, user and secret key and click Submit to save. See the bucket version configuration in the ECS section of the guide. NOTE: one eyeglassversions user per name space must exist if buckets are protected in different name spaces.
Security Guard Lockout Behavior (Isilon Powerscale)
- The user does not need to be added to any shares. The Security Guard will create its own share in System Zone called igls-securityguard, and add the service account user to the share.
- If you add the service account user to other shares, only the igls-securityguard share will have files written during the execution of a simulated attack.
- Additional shares that have the service account added to the share permissions WILL have the service account access locked out during simulated attacks.
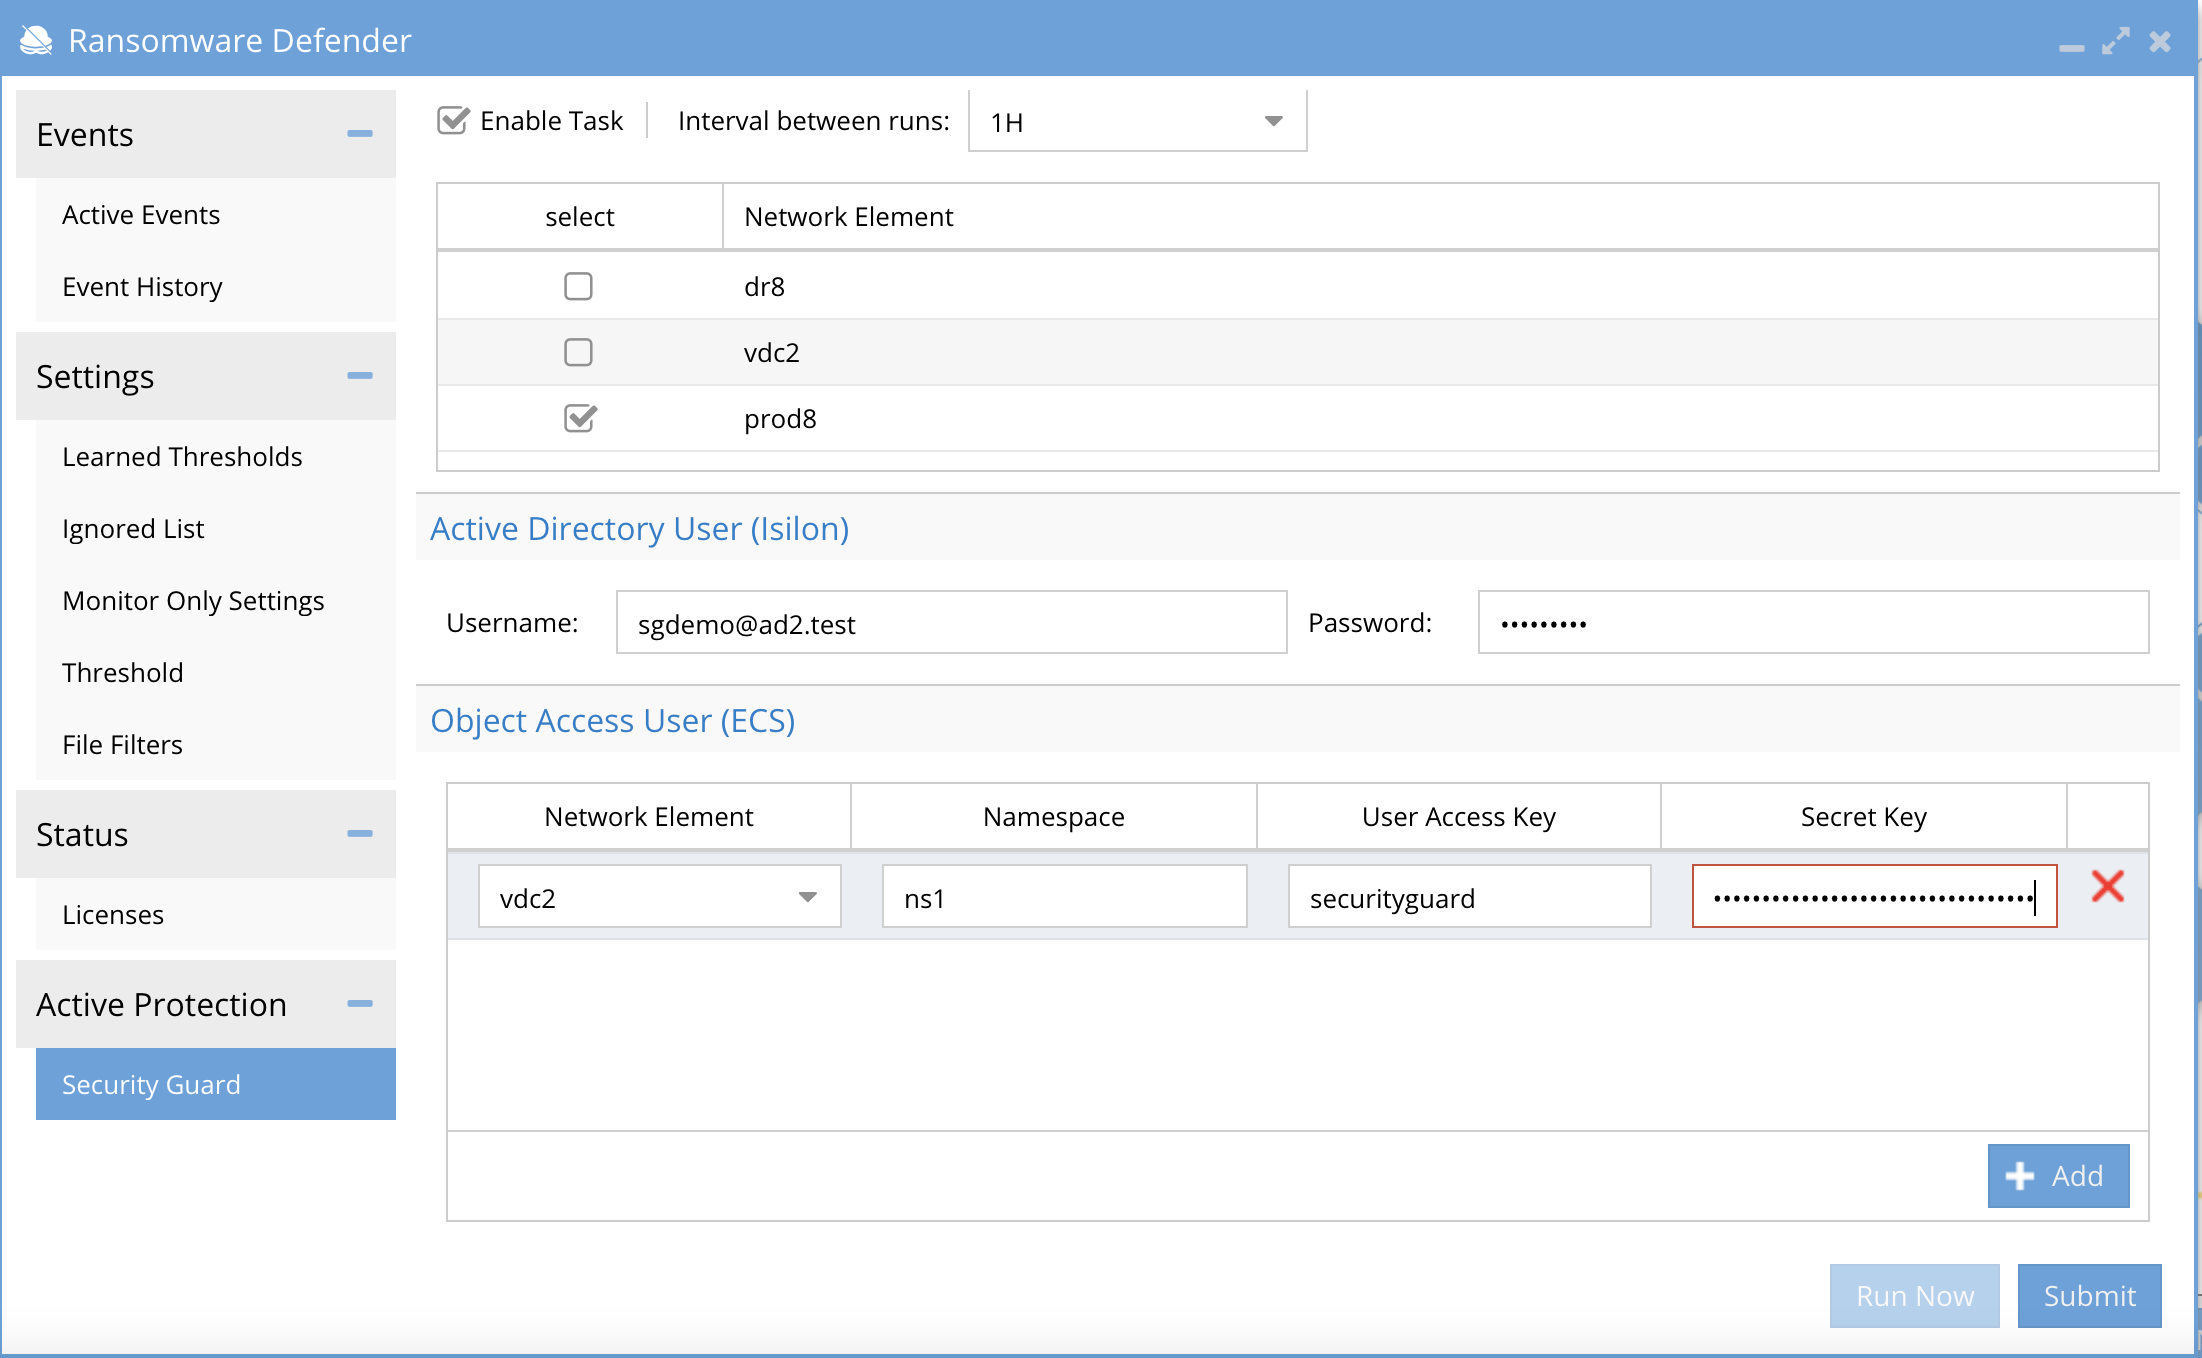
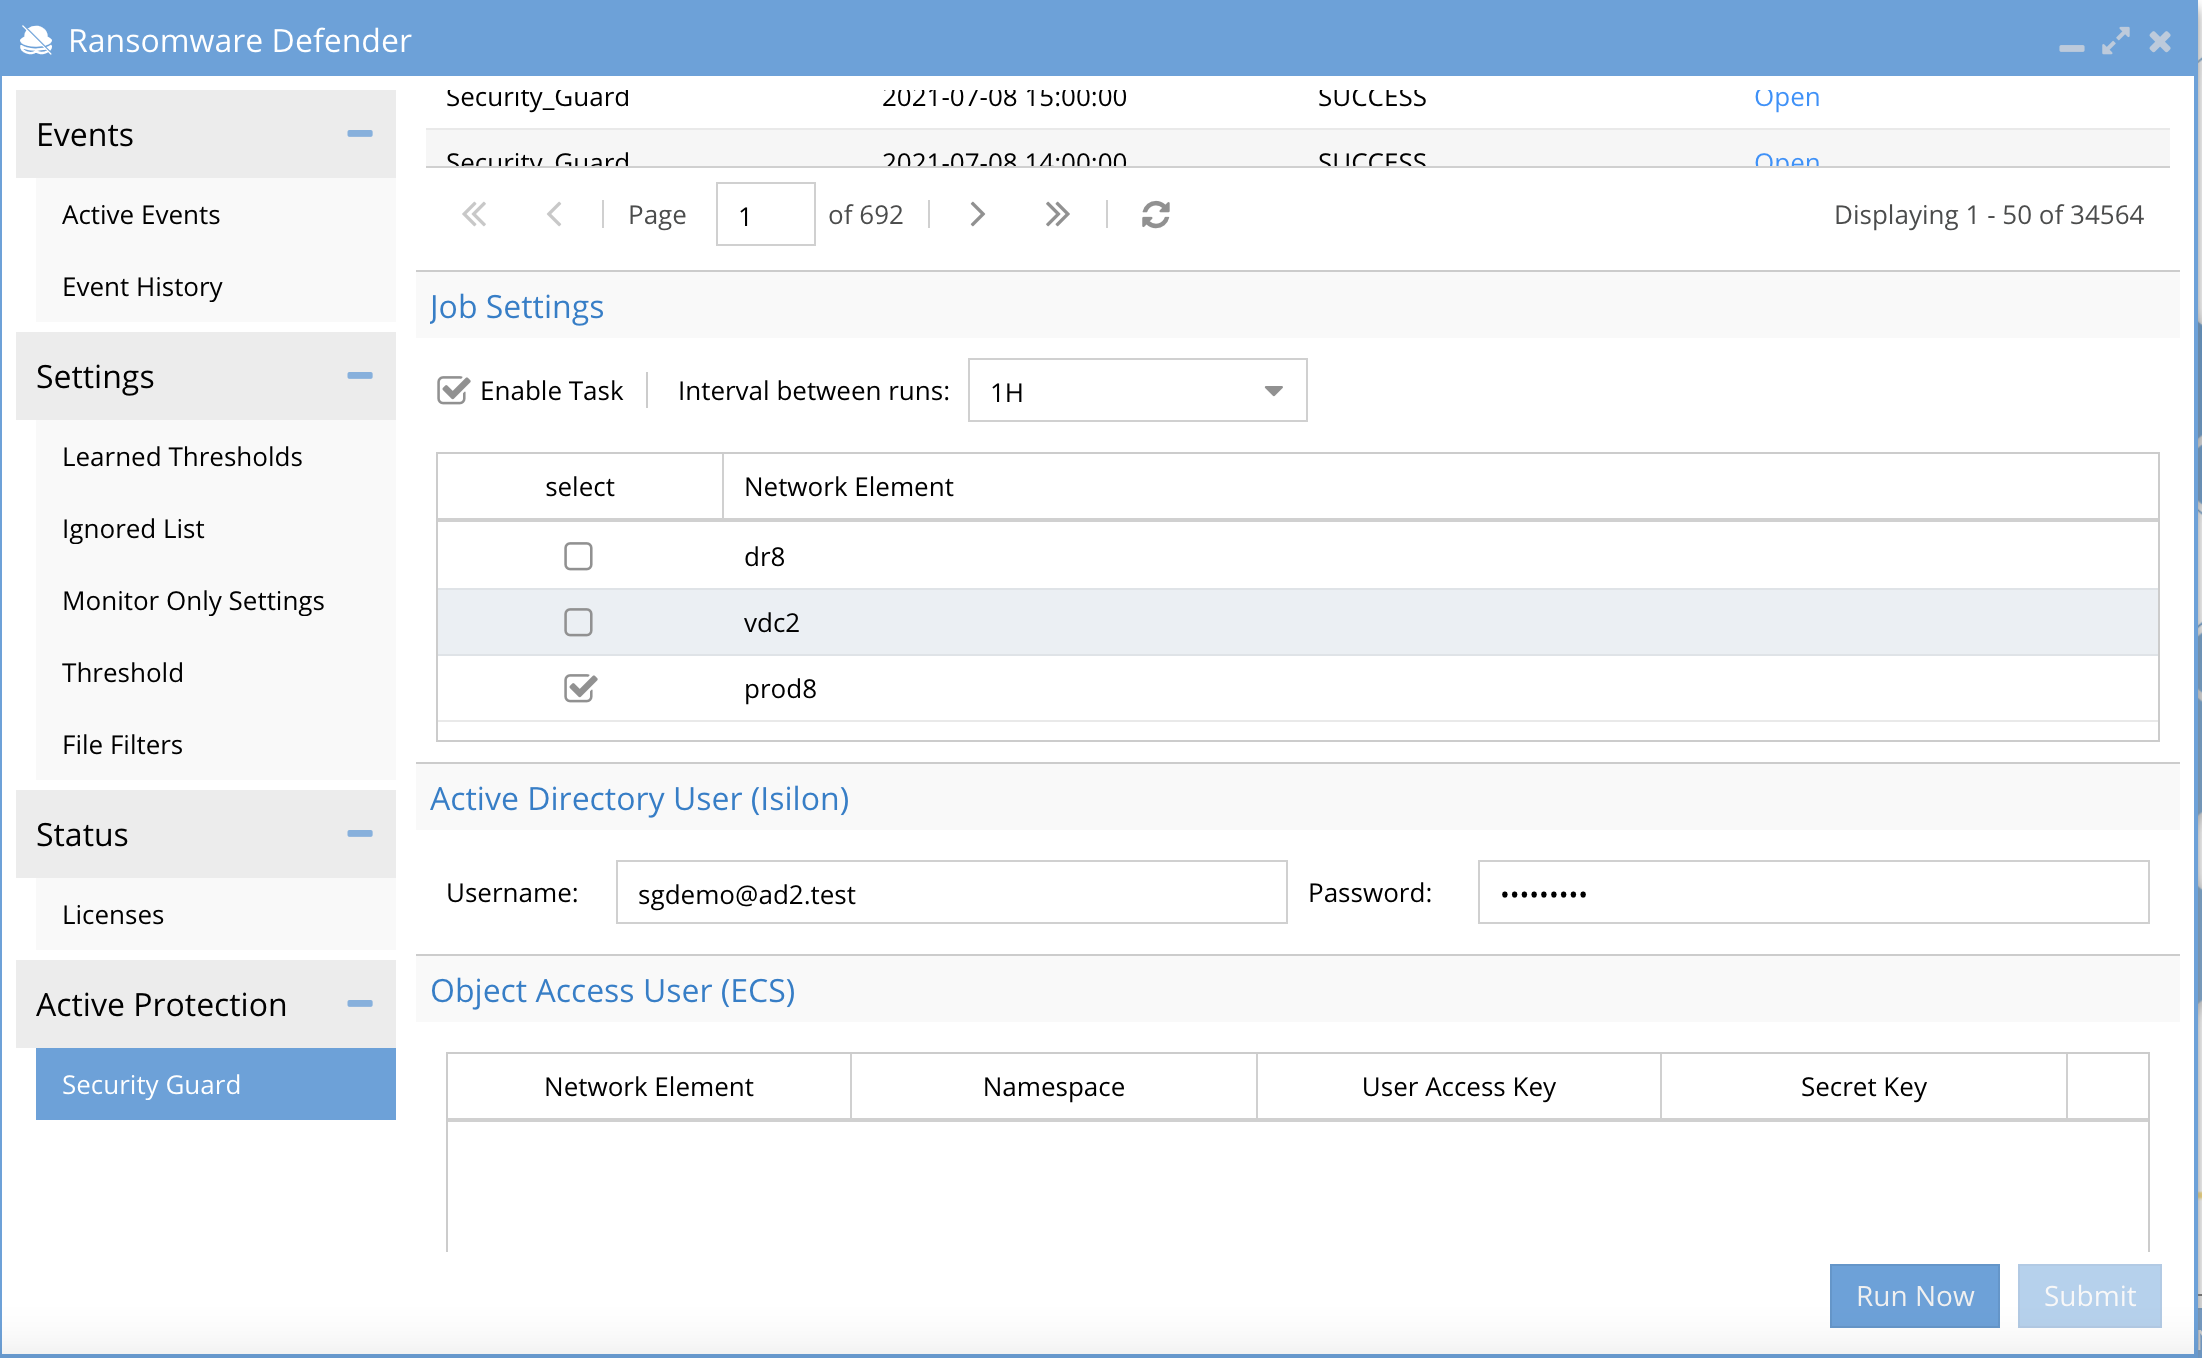
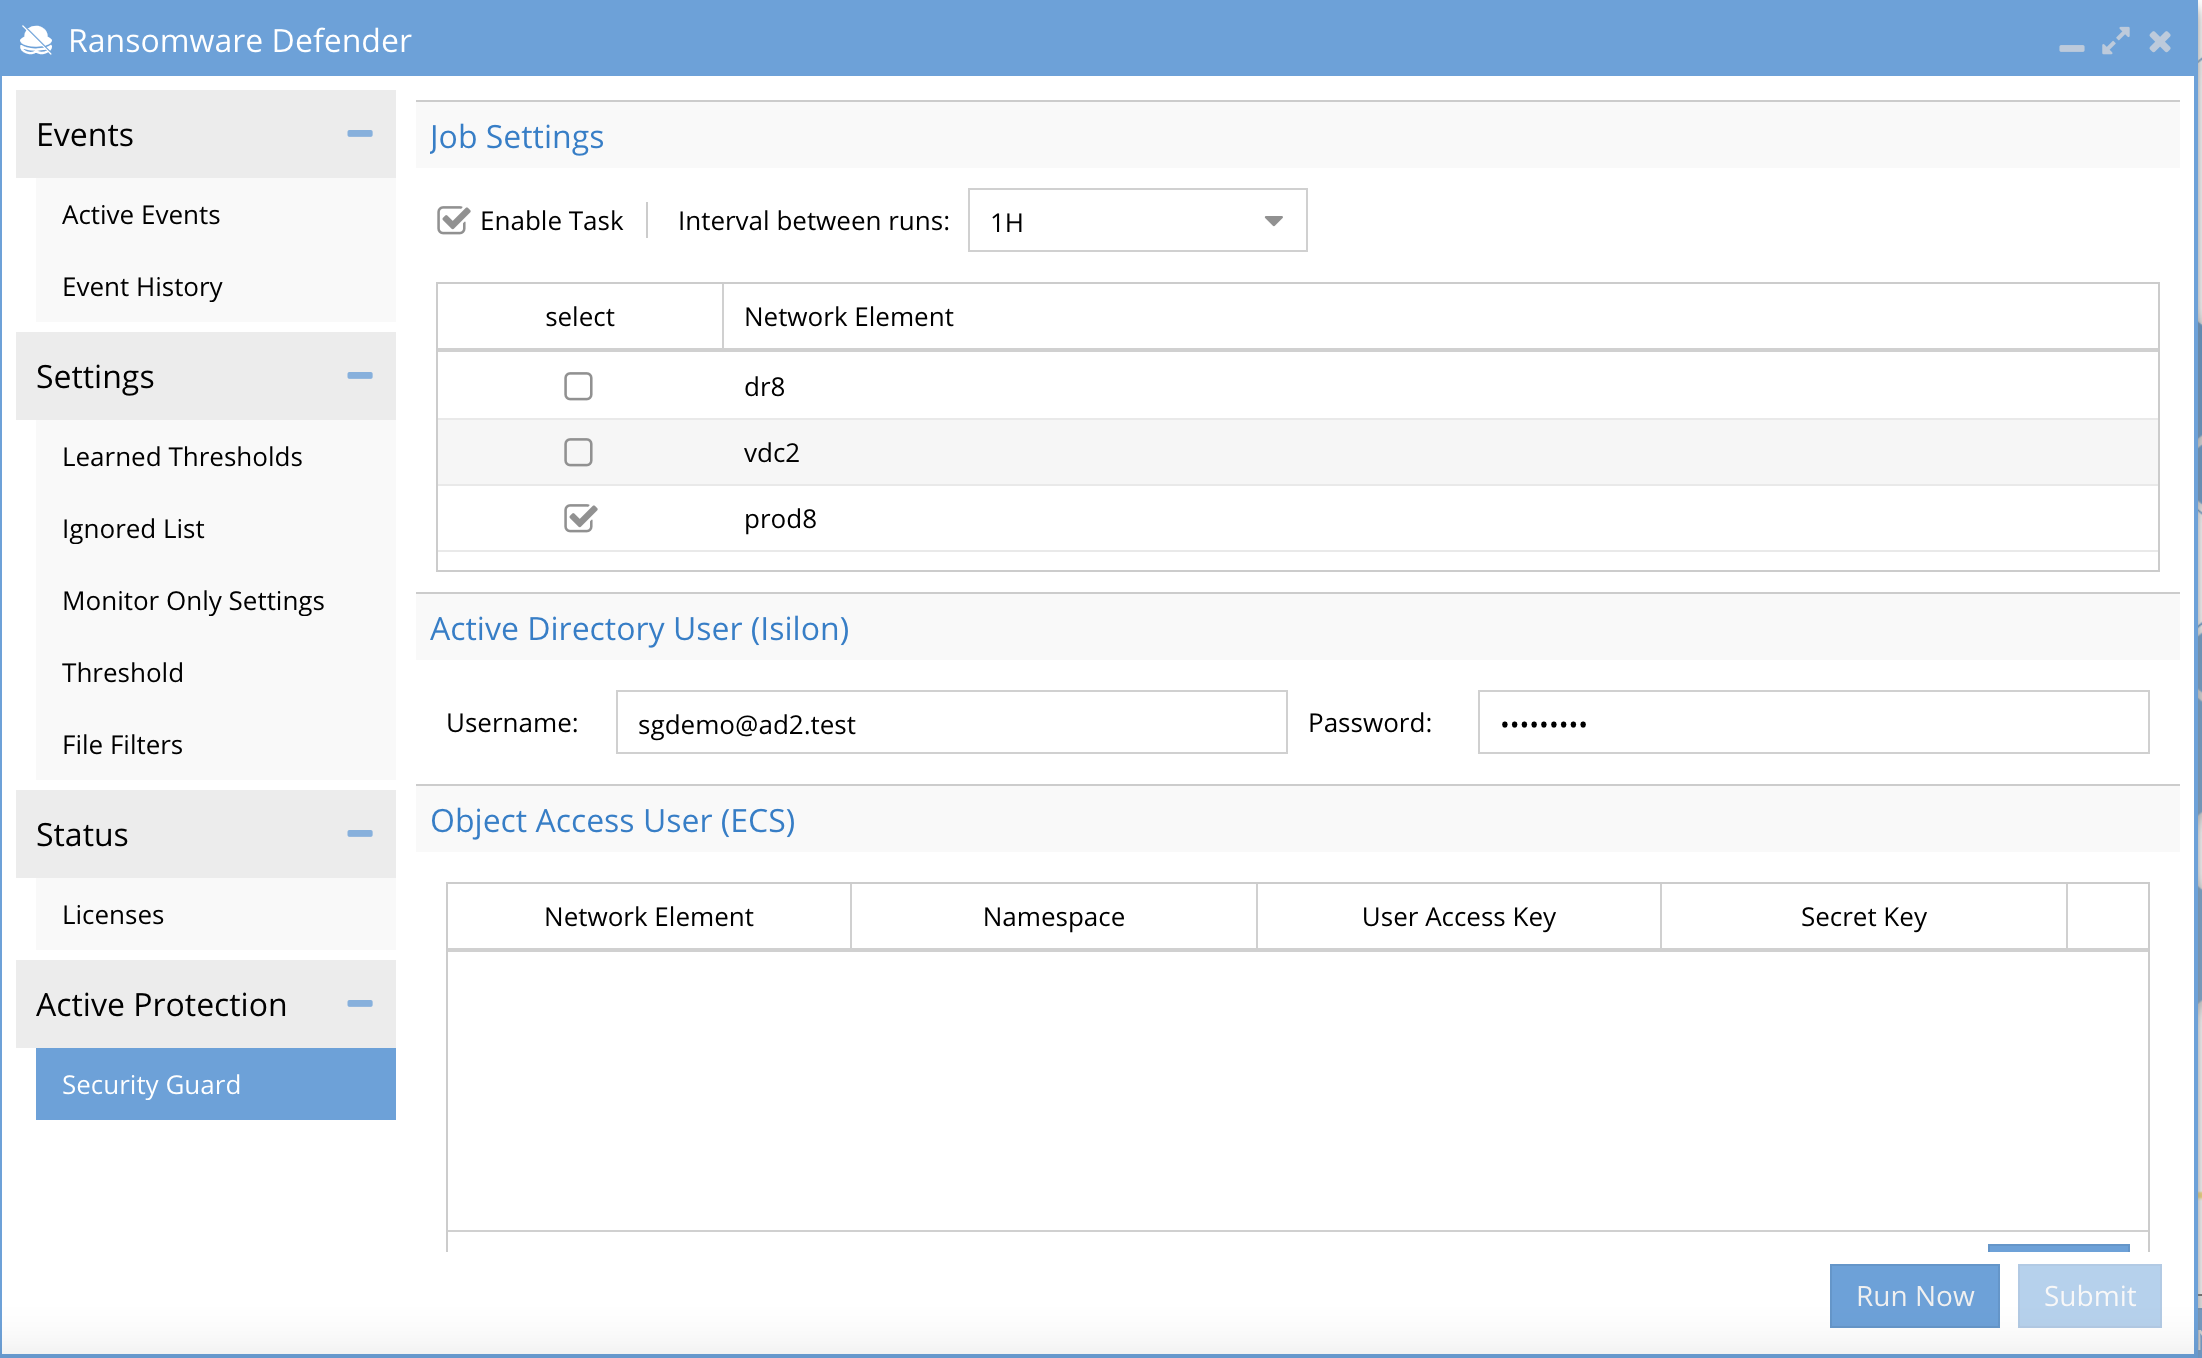
Configuration (Isilon PowerScale)
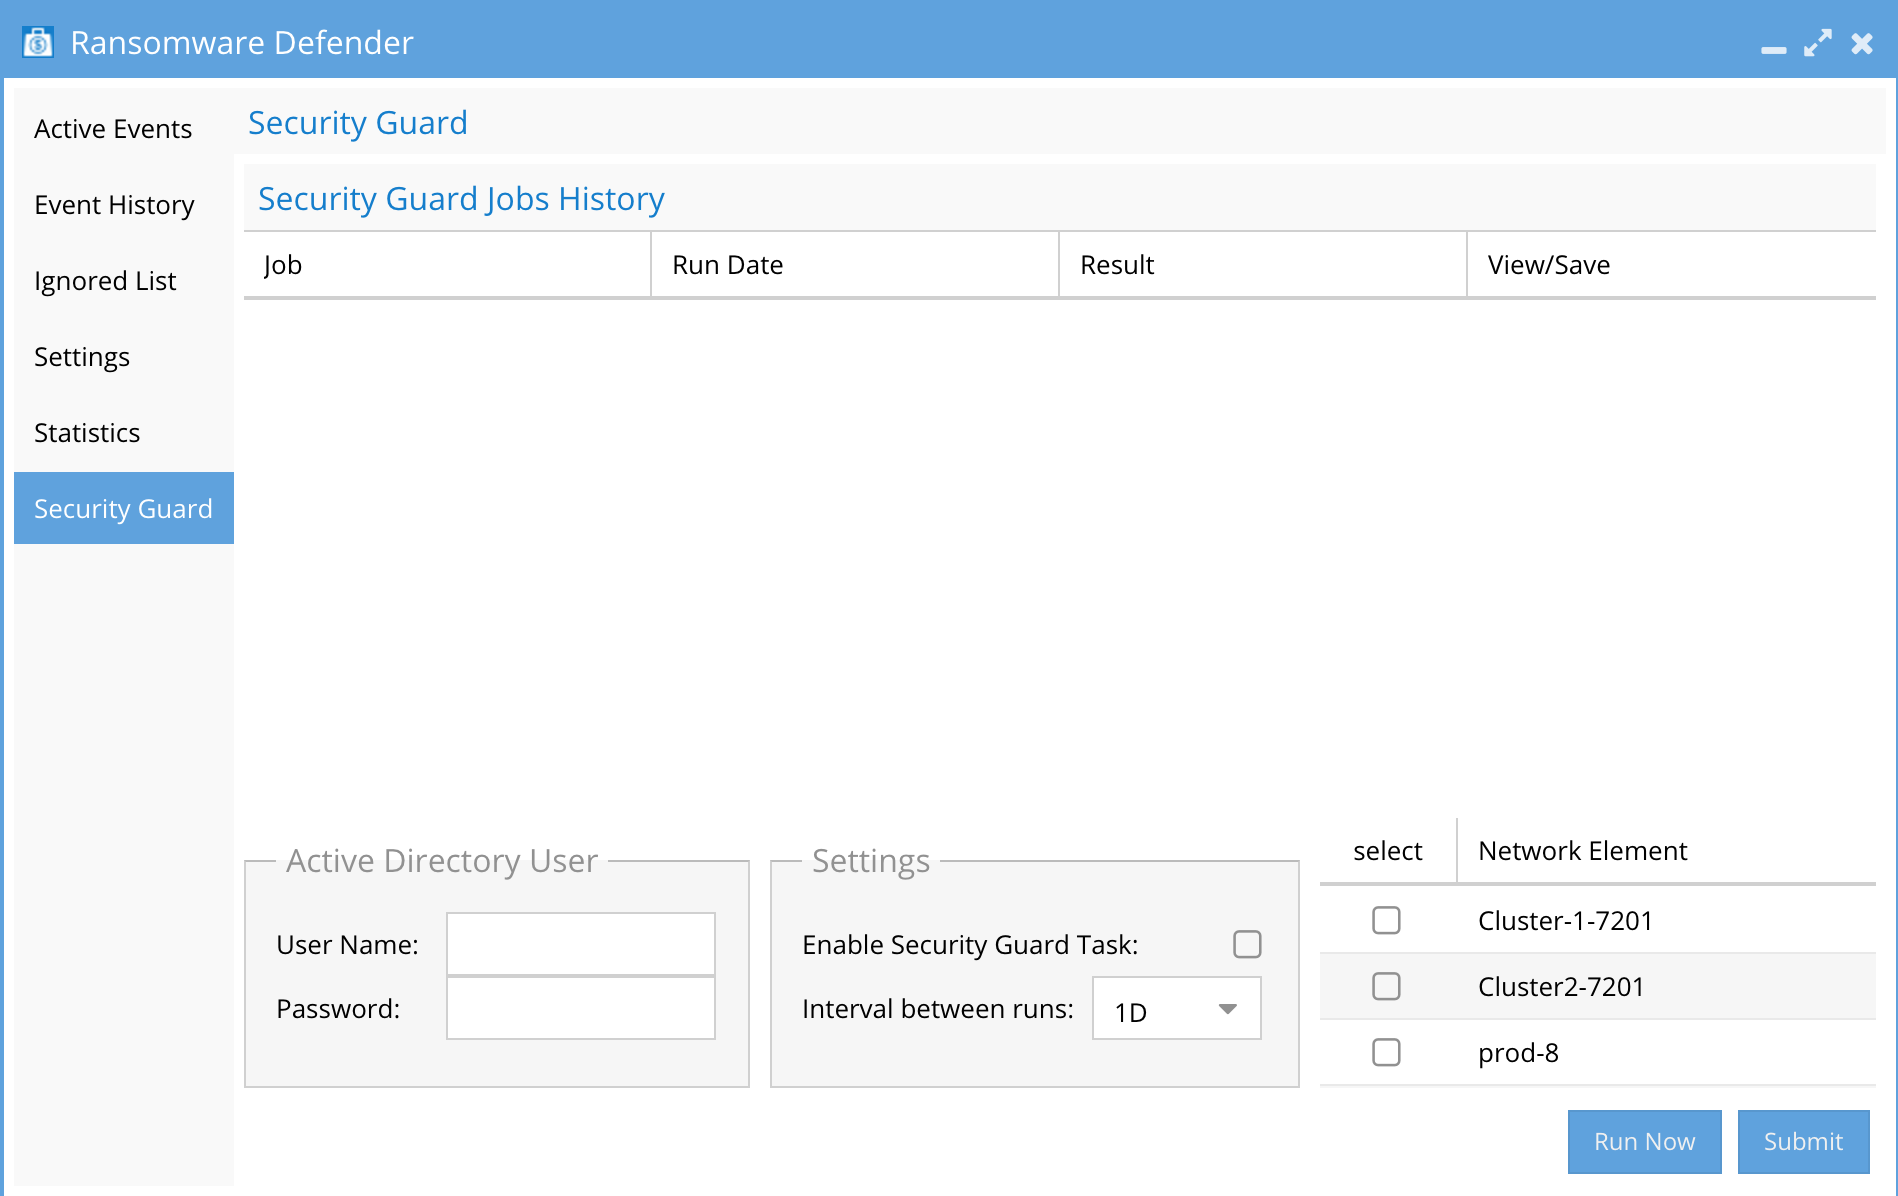
- Open the Ransomware Defender window on the desktop and select the Security Guard.
 |
- Best Practise: Use local PowerScale user enter username@clustername
- NOTE: for multi cluster setup we recommend enabling one cluster with local account since the feature is testing end to end functionality and not the cluster itself. For cluster validation we recommend the honeypot feature to be used and tested within your InfoSec team using a simulated attack on a monthly basis.
- Settings:
- Enable Security Guard Tasks.
- Interval Between Runs - Set interval to schedule simulated attacks.
- Select the checkbox of each cluster to simulate the attack.
- Submit - Saves settings.
- Run Now - Tests Security guard on demand.
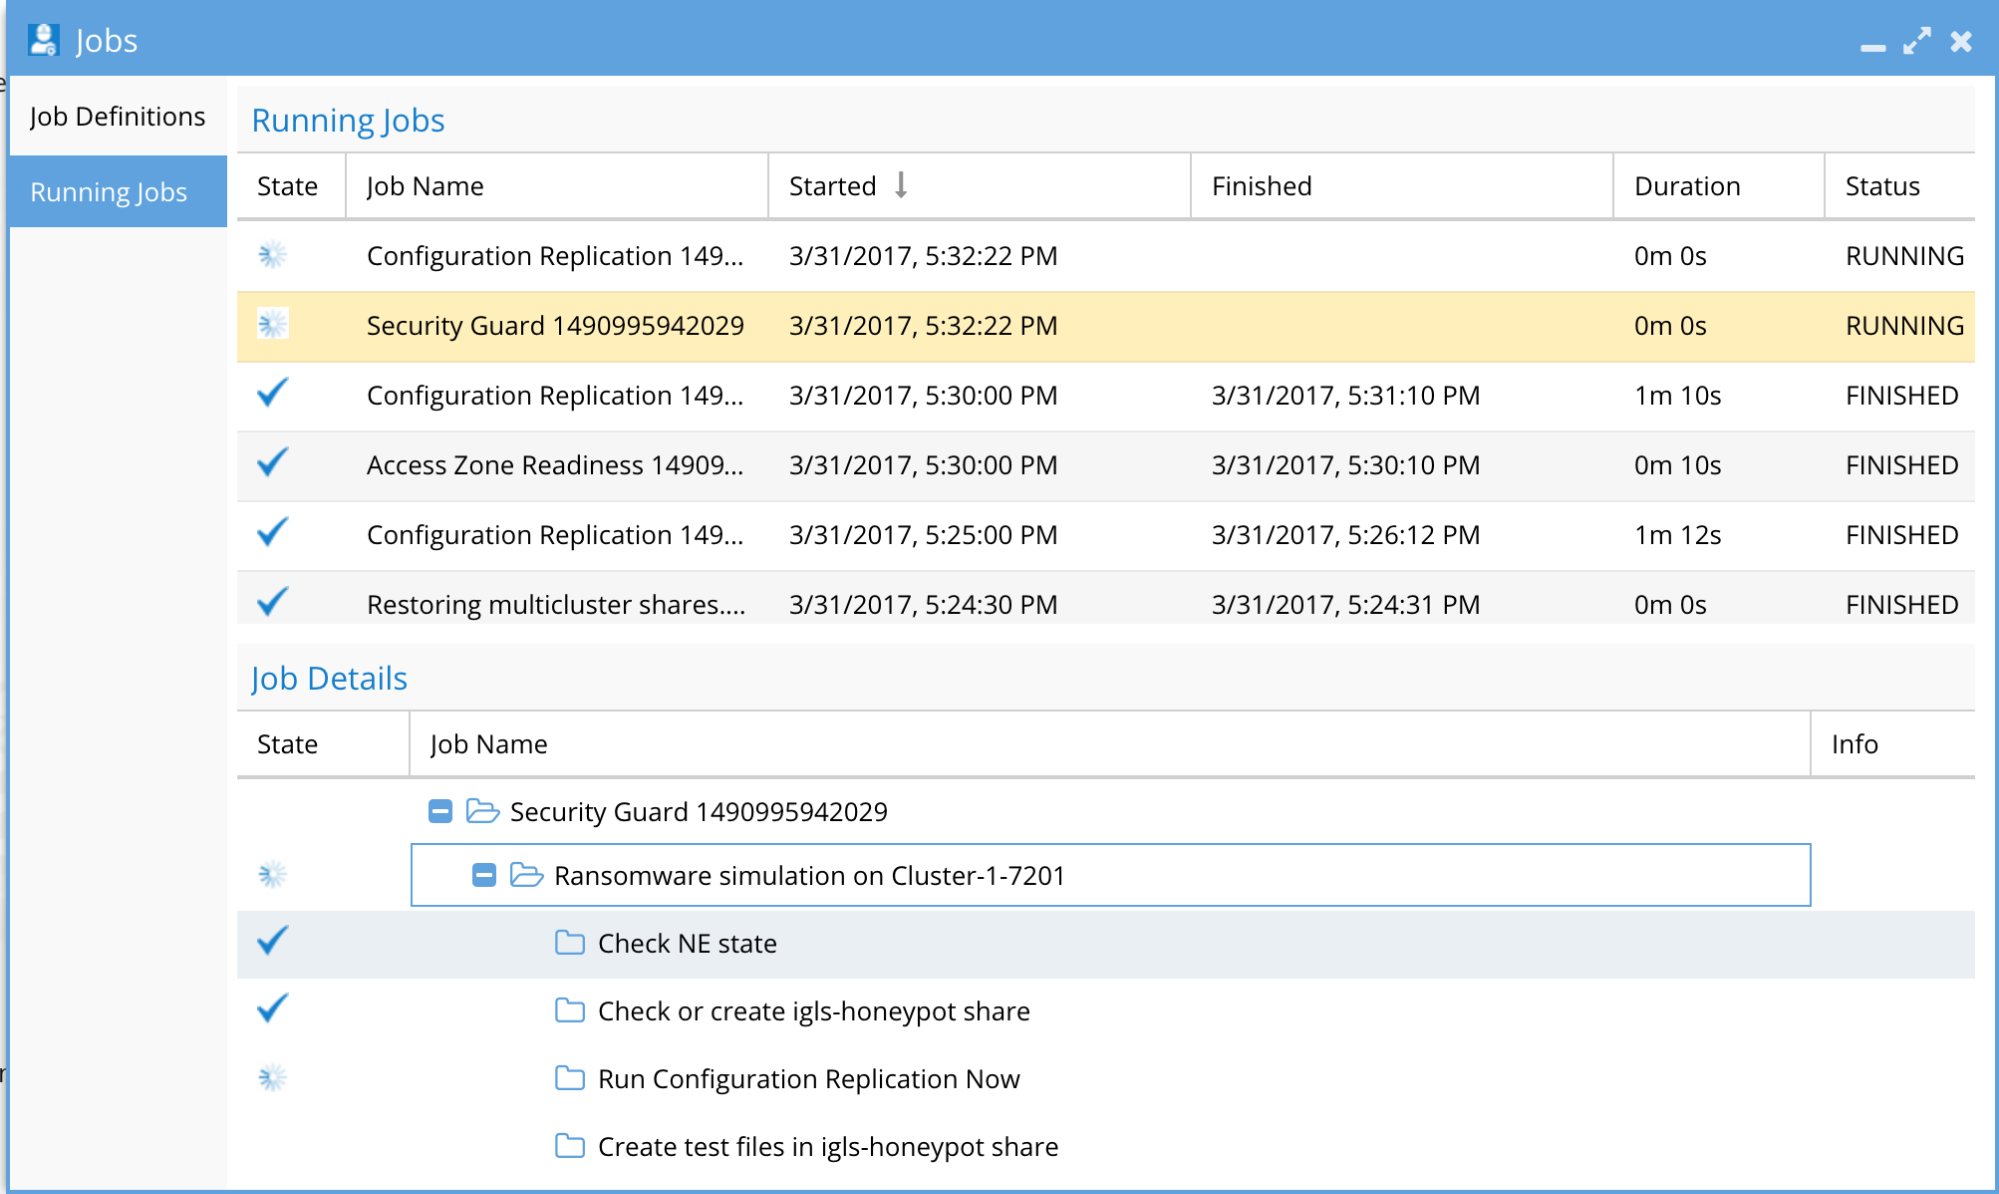
How to Run on Demand Security Guard Penetration test (Isilon Powerscale)
- Open the Ransomware Defender window (see screenshot below).
- Select Security Guard tab.
- Select each licensed cluster to test.
- Select Run Now (see screenshot below).
- Open Jobs window.
- Running Jobs tab to monitor progress (see screenshot below).
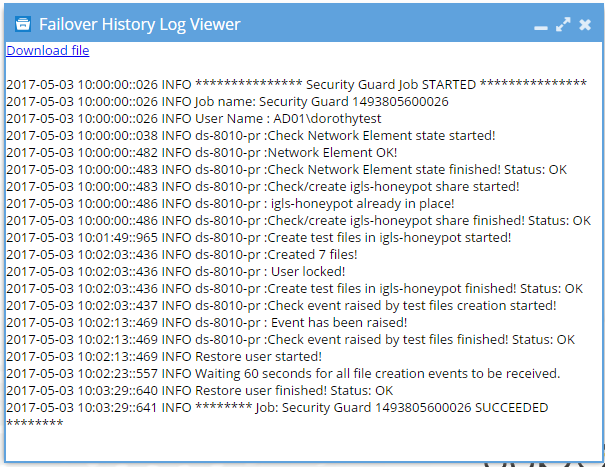
How to Review Security Guard Penetration test history and logs (Isilon Powerscale)
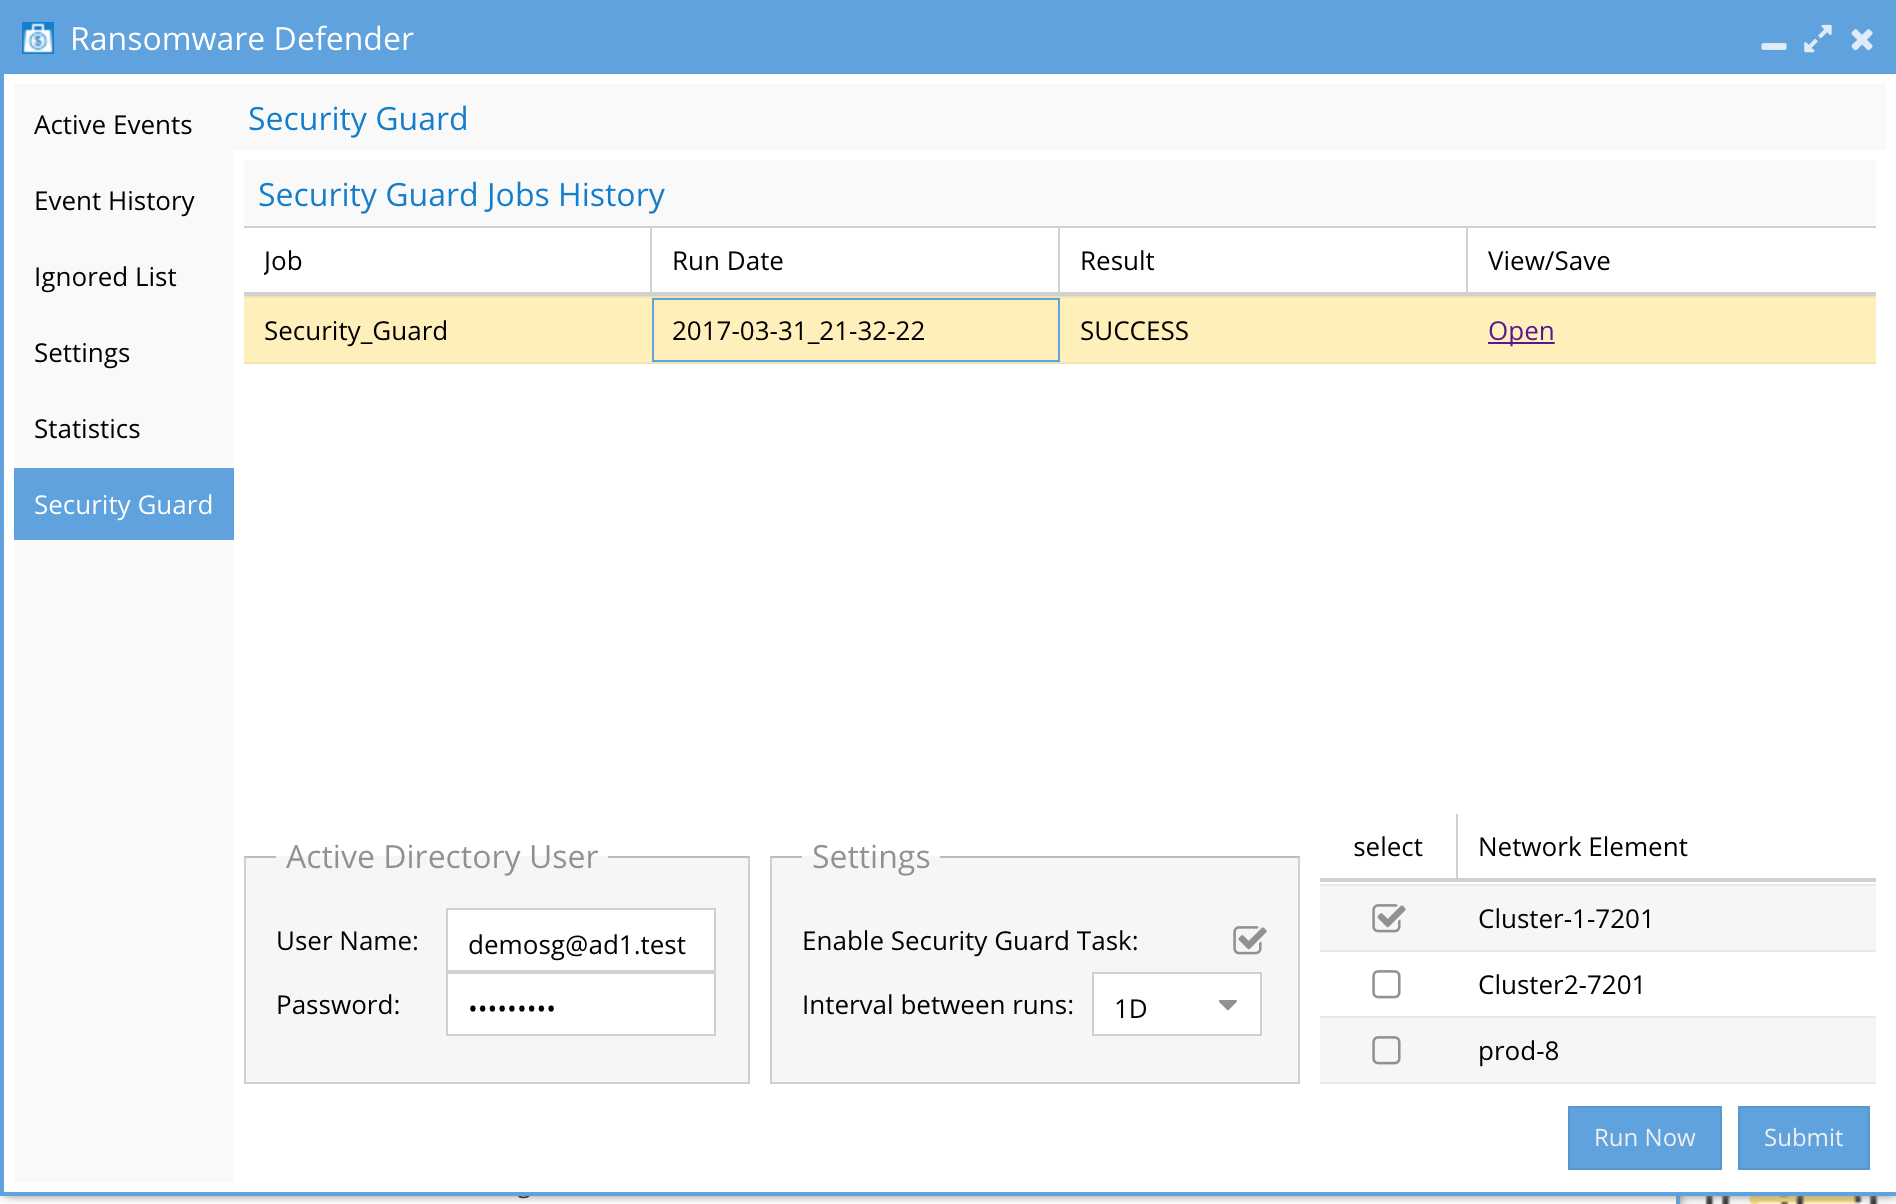
- Open the Ransomware Defender window.
- Select Security Guard tab.
- Select each licensed cluster to test
- Select Run Now (see screenshot below).
- Click Open link to review results.
How to test Ransomware Defender with your own Custom File Extension (Isilon Powerscale)
- Use this feature to test with your own file extension to allow testing complete user lockout and recovery.
- Requirements:
- 2.5.7 or later release
- Configuration:
- Open the Ransomware Defender Icon
- Click the File Filters tab
- Click Add file extension button
- Add a customer file extension that is unique for testing and not used in your environment. (This is an important step). Select the Enable option to add the extension.
- Now check your critical threshold values on the Thresholds tab and record this value.
- How to test:
- Mount a smart connect the name and share in an access zone with auditing enabled. example \\fqdn\smb-share-name
- Create more files with your custom file extension than the Critical Threshold value to trigger a lockout
- You can now test creating files with this extension to trigger a lockout action and restore workflow. This can also be used to test alarm creation for integration with SEIM tools.
Configuration (ECS)
- Requirements
- Release 2.5.8 or later
- ECS added to inventory
- securityguard object user service account is created.
- Open the Security Guard tab and scroll to the bottom.
- Fill in the fields for the ECS cluster, the namespace for the bucket and the object user and secret key.
- Click Submit.
- Now select the ECS cluster in the job settings area and click Enable Task and set the security guard interval to 24 hours and click the submit button to save settings.
Security Guard Lockout Behavior (ECS)
- The bucket is created automatically, and the object user is added to the bucket for testing.
- The object user should not be used for any other purpose, and the user should not be assigned to any other buckets.
How to Run on Demand Security Guard Penetration test (ECS)
- Open the Ransomware Defender window (see screenshot below).
- Select Security Guard tab.
- Select the licensed ECS cluster to test in the Job settings section.
- Select Run Now (see screenshot below).
- Open Jobs icon window.
- View the Running Jobs tab to monitor progress (see screenshot below).
Advanced Configuration Security Guard CLI Commands (Isilon Powerscale)
In some environments, audit events are delayed before they are sent to the ECA for processing. The security feature writes 100 files, one per second. If the detection of events does not occur before this 100 seconds, the Security Guard will fail the test.
The second phase of the Security Guard will restore user permissions and test write access again to the share. This can also have a timer applied to extend the time between the lockout and restore steps to allow authentication and share settings to replicate to the cluster.
Note: if there are security guard events that are being raised within minutes after the previous event was archived, then extend the lockout time as per the CLI guide.
Use commands to change the security timer. For commands, visit the Eyeglass CLI Commands.
These advanced settings can be configured from the CLI to check the timers and set new higher values.
Consult the Ransomware CLI guide.
Prerequisites - Qumulo
The Security Guard appliance requires a dedicated AD user account and a network share where that AD user has access permissions.
Eyeglass must be operational on the cluster.
Qumulo Configuration
To launch Qumulo, use the IP address or open it from the Inventory View.

Add ECA node 2 as syslog consumer
On the Qumulo interface, go to Cluster -> Audit.

Enter the IP address of ECA node 2, and save
Prerequisites - VAST
Install Eyeglass version 2.7.0. Request a valid license from Superna
The Security Guard appliance requires a dedicated AD user account and a network share where that AD user has access permissions.
Eyeglass must be operational on the cluster.
VAST Configuration
Enabling VAST on ECA
The initial step in configuring Vast auditing involves verifying that the Auditing feature is enabled on the Vast machine.
Step 1: Auditing must be enabled on VAST, and the root user must be added to the read-access user

Global audit settings set, OR specific view policy auditing set
In ECA:


In eca-env-common.conf:
export TURBOAUDIT_VAST_ENABLED=true
export VAST_LOG_MOUNT_PATH="/opt/superna/mnt/vastaudit"
In /opt/superna/eca/data/audit-nfs/auto.nfs:
/opt/superna/mnt/vastaudit/vast-superna/vast-superna --fstype=nfs <vip-pool>:/.vast_audit_dir After that do ecactl cluster up
Step 2: Create a view for the audit directory

Mount the Audit Path to the ECA node
To establish the connection between the Audit Path and the Turboaudit-equipped ECA node (e.g., node 2), follow these steps:
Before you begin, ensure you have the following information:
- VAST cluster name (Infrastructure → Clusters)
- IP address from the Vip Pool created earlier
- SSH into ECA node 2
- Execute the command sudo su - Create the necessary directory:
mkdir -p /opt/superna/mnt/vastaudit/<cluster_name>/<cluster_name> - Change the current directory to
/opt/superna/mnt/vastaudit/<cluster_name> - Mount the audit path using the following command:
mount -t nfs <protocols_vip>:/.vast_audit_dir <cluster_name> - Confirm the successful mounting of the path by checking the status with:
df -h
Update Eyeglass
Updating Parameters in /opt/superna/eca/eca-env-common.conf
To incorporate the latest configurations, add and modify the following parameters in the /opt/superna/eca/eca-env-common.conf file:
Enable Turboaudit for VAST
export TURBOAUDIT_VAST_ENABLED=true

Set the VAST Log Mount Path
export VAST_LOG_MOUNT_PATH="/opt/superna/mnt/vastaudit/"

Use RSW-only Configuration
export RSW_ONLY_CFG=true
By making these adjustments, you ensure that the specified parameters are correctly defined within the configuration file, contributing to the effective functioning of the ECA environment.