Golden Copy Configuration Steps
- Supported S3 Protocol Targets
- How to prepare a Cluster for Golden Copy Management
- Quick Start Steps for Golden Copy Setup
- Prerequisites:
- License Keys
- How to Add a cluster to Inventory
- Adding Folders with Golden Copy GUI
- Archiving to a Dell ECS CLI
- Archiving to AWS CLI
- Archiving to Google Cloud Storage CLI
- Archiving to Azure Blob Storage CLI
- Archive to Cohesity CLI
- Archive to BackBlaze CLI
- Most Common Every Day CLI Commands to Manage Archive jobs
- How to Test Data Copy and Start the copy Job for a folder that has been added to Golden Copy
- How to test file copy target permissions before starting a copy job:
- How to Modify the Cluster service account or password
- How to add folders to be copied or synced
- Overview of Archive Job Types
- Concurrent Job Prioritization Incremental vs Full
- How to configure Incremental jobs to Sync Deleted Files to S3 Object Store
- How to start a Full or Incremental Archive Job
- How to Schedule Jobs on Folders (Full Archive, Incremental Archive or Archive Data Audit jobs)
- Overview of Archive Job Types
- Configuring Archive Job Schedules on Folders
- Add an Incremental Schedule to a folder
- Modify a Schedule on a Folder
- Disable a Schedule on a folder
- Add a Data Audit job Schedule to a folder
- Monitor, View running Jobs, show Job History, Show folder job history, Summarize Job stats, Monitor Progress, Auto Email Progress and Cancel a Copy Job
- How to Enable Auto Progress Emails for copy Jobs
- How to Manage Folders (List , Modify and Remove)
- list (list configured folders)
- modify (change configuration of an existing folder)
- How to remove an archive folder
- How to Re-run Only Failed Files from a Copy Job or Recall job
- How to Re-run Only Failed Tree Walk from a Copy Job
- How to Pause all Scheduled jobs on a folder
- How to Recall Data from Object Back to File
- Overview:
- Backup and Restore Use Cases
- License Key Dependencies
- Limitations:
- Best Practice Configuration
- Requirements:
- Prerequisite NFS Export Configuration Steps
- Logical Diagram of a Recall
- Recall command syntax and options
- How to recall object data to the Recall Staging Area
- How to Monitor Copy Job Performance and Job Summary logs and Error Logs
- Stats Command for real time job throughput monitoring
- Job View command monitors progress in MB and file count with % completion
- How to Monitor file copies in progress on each node
- How to Monitor Ethernet Interface Mbps during a Copy Job
- How to view the Detailed json Copy Job Logs
- How to expand Disk space for large file system json reports
- Requirements
- Procedure
- Expand Kafka report Topic Data Retention GB's
- How to create json exports
- How to view copy job errors on failed copies
- How to Manage File Copy Performance
- How to Increase Copy Performance with concurrent file and large file thread count
- How to Shape Bandwidth of Archive Jobs
- Overview:
- How to Monitor Network bandwidth Usage from the appliance
- How to Copy a Snapshot to S3 Storage
- How to Configure Delayed Deletes with Sync Mode
- Overview
- Requirements:
- How to Configure Delayed Delete Mode
- How to list and change System Scheduled Tasks
- How to Configure a Folder Alias to Handle: Cluster Decommission Use Case, Source Cluster Name Change, Switch to DR cluster as data source and Data full Copy
- Storage Target Configuration Examples
- Dell ECS S3 bucket creation steps
- Amazon AWS Bucket Creation Walk Through
- How to setup minimum permissions in AWS for Golden Copy
- S3 Policy Permissions Requirements
- Quick Start Method
- Complete Steps to Create User and Policy Following All Steps (skip if you used quick start above)
- How To restrict S3 Bucket Access by Source Public IP of your Data Center
- How to Enable and Use Accelerated Transfer Mode on a bucket
- Google Cloud Storage Creation Walk Through
- Azure Blob Storage Creation Walk Through
- How to create Azure Storage Account
- How to create an Azure Blob Container in a Storage Account
- Cohesity Walk Through Example
- How to Create the Storage View and Service Account User on a Cohesity Storage Array
- Appliance Global Settings Configuration
- How to set Default Settings for Snapshot Expiry for all Folders
- How to set File Checksum Global Settings for All Folders
- Advanced Configurations to Appliance Configuration
Supported S3 Protocol Targets
Review supported S3 Targets and limitations here.
How to prepare a Cluster for Golden Copy Management
- Mandatory Step - Create the service account for the Search & Recover/Golden copy products on the source cluster, and configure the sudo file on the source cluster.
- Mandatory Step Time Sync:
- Time sync of the cluster and Golden Copy must have accurate time sync and be within 15 minutes of NTP synced time source. If this is not done then S3 targets will reject all uploads with an error message due to time skew too great.
- Setup NTP on your source Isilon/Powerscale cluster and Golden Copy to ensure accurate time.
Quick Start Steps for Golden Copy Setup
This quick setup guide provides the steps to get configure a folder for archive copy or sync jobs and a link to learn more detailed CLI options.
Prerequisites:
- All searchctl commands must be run as the ecaadmin user from Golden Copy node 1
- Adding the PowerScale by IP address is recommended.
- The eyeglassSR service account must be created following the minimum permissions guide for Golden Copy. The guide is here.
- Default login is user ecaadmin and password 3y3gl4ss
License Keys
- Copy license zip file to Search node /home/ecaadmin directory and change permissions chmod 777 .
- searchctl licenses add --path /home/ecaadmin/<name of zip>.zip .
- Verify the license is installed.
- searchctl licenses list
- Get help on licenses
- searchctl licenses --help
- searchctl licenses applications list (Lists all the application types that are licensed on the System, used on the unified Search & Recover and Golden Copy cluster).
- searchctl isilons license --name NAME --applications APPLICATIONS - Use this command to assign a license key to a cluster. Example of assigning the advanced license key
- searchctl isilons license --name <cluster name> --applications GC [ or GCA - Advanced license - GCP - Pipeline]
- searchctl isilons license --name <cluster name> --applications GC [ or GCA - Advanced license - GCP - Pipeline]
How to Add a cluster to Inventory
- searchctl isilons add --host < ip address of Isilon in system zone> --user eyeglassSR --applications {GC, SR} [--recall-sourcepath RECALLSOURCEPATH]
- [--applications APPLICATIONS] This is required parameter to assign the cluster to the search application or the Golden copy application. For Golden Copy products enter GC
- [--recall-sourcepath RECALLSOURCEPATH] - Optional only used for Pipeline feature that requires a subscription license. This path should be /ifs/fromcloud
- NOTE: Once a license is assigned to a cluster, it is locked and cannot be removed. An unlock license key must be purchased to be able to re-assign a license.
Adding Folders with Golden Copy GUI
- Enable GUI login
- ssh to node 1 of the Golden Copy cluster as ecaadmin
- searchctl settings admins add --name ecaadmin --local
- Login https:x.x.x.x to node 1 of the Golden Copy cluster
- login as ecaadmin (default password 3y3gl4ss)
- click the Folders icon on the left panel
- click + to add new folder definition
- follow the Wizard
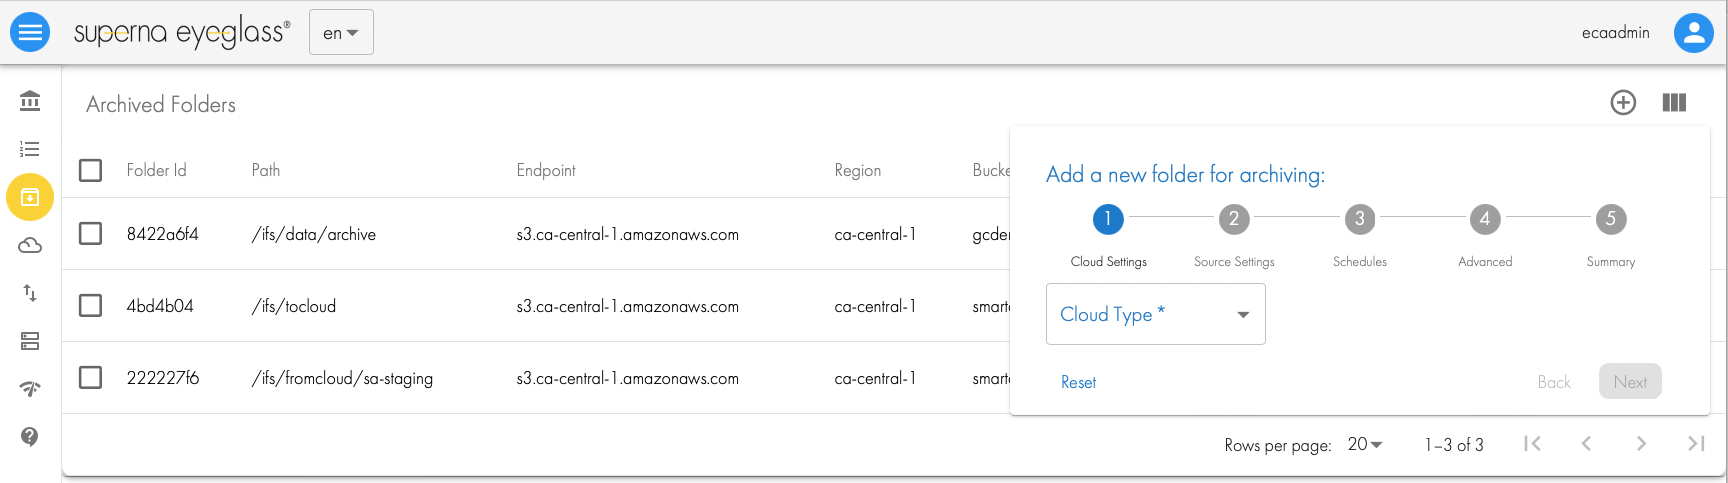
- Once the folder is added successfully you can run a test feature to create an object and delete it again to verify your users permissions.

Archiving to a Dell ECS CLI
- searchctl archivedfolders add --isilon gcsource --folder /ifs/archive --accesskey CqX2--bcZCdRjLbOlZopzZUOsl8 --secretkey zZMDh3P7fcMD2GUvLNK5md7NVk --endpoint https://x.x.x.x:9021 --bucket <bucket name> --cloudtype ecs --endpoint-ips x.x.x.x,y.y.y.y,k.k.k.k
- See Dell Documentation to Create a bucket and local user with S3 Keys.
- NOTE: --isilon is the name of the cluster not the ip address. Get the name using searchctl isilons list
- NOTE: change the yellow highlights with correct values.
- Supports a load balance option with health check of ECS nodes + load balancing copies evenly to ECS nodes provided. Requires the --endpoint-ips flag and specify data ECS ip addresses.
- NOTE: The following settings are needed in the /opt/superna/eca/eca-env-common.conf. The S3 heartbeat is enabled by default and will remove an ECS node from load balance table if it becomes unreachable. This setting enables round robin load balance algorithm. A future release to support alternate load balancing mode for even connections.
- ssh to node 1
- nano /opt/superna/eca/eca-env-common.conf
- paste the setting below
- Control+x answer yes to save
- Cluster down up is required.
- export ARCHIVE_ENDPOINTS_ROUND_ROBIN=true
- NOTE: A service account user should be created with a secret and access key
- NOTE: replace endpoint-IPS with data nodes on ECS that can receive copied data. Alternate syntax is x.x.x.x-y.y.y.y to use a range of IP's.
- NOTE: A dedicated View should be created for S3 storage without any other protocols enabled.
Archiving to AWS CLI
- searchctl archivedfolders add --isilon prod-cluster --folder /ifs/data/policy1/aws --accesskey AKIAIs3GQ --secretkey AGV7tMlPOmqaP7k6Oxv --endpoint https://s3.ca-central-1.amazonaws.com --region ca-central-1 --bucket mybucketname --cloudtype aws
- NOTE: The region is mandatory field with Amazon S3 .
- NOTE: The endpoint must use the region encoded URL. In the example above the region is ca-central-1 and is used to create the end point URL.
Archiving to Google Cloud Storage CLI
- Get the Google authentication key following the Google Cloud Storage Walk Through Guide. Copy the key to the node 1 of Golden Copy using winscp and copy the file to /home/ecaadmin
- searchctl archivedfolders add --isilon gcsource --folder /ifs/archive --secretkey /home/ecaadmin/ <service account gcs keyname.json> --bucket mybucketname --cloudtype gcs
- Change all yellow highlights to the correct value for your environment
Archiving to Azure Blob Storage CLI
- searchctl archivedfolders add --isilon gcsource --folder /ifs/archive --secretkey NdDKoJffEs9UOzdSjTxUlaE9Xg== --endpoint blob.core.windows.net --container gc1 --accesskey <storage account name> --cloudtype azure
- NOTE: The storage account name is used as the access key with Azure.
- NOTE: Get the access keys from the Azure console.
- NOTE: The container name must be added with the --container flag.
- NOTE: cloudtype flag must be azure.
Archive to Cohesity CLI
- searchctl archivedfolders add --isilon gcsource --folder /ifs/archive --accesskey CqX2--bcZCdRjLbOlZopzZUOsl8 --secretkey zZMDh3P7fcMD2GUvLNK5md7NVk --endpoint https://x.x.x.x:3000 --bucket <bucket name> --cloudtype other
- See Walk through on Setting up the S3 Bucket here.
- NOTE: change the yellow highlights with correct values.
- NOTE: A service account user should be created.
- NOTE: A dedicated View should be created for S3 storage without any other protocols enabled.
- NOTE: the access key and secret key can be found by logging into the console select Admin menu --> Access Management -->, click on your user id and record the access ID and secret ID. You need to login to the console as the user configured for authentication to get the S3 keys.
Archive to BackBlaze CLI
- searchctl archivedfolders add --isilon gcsource --folder /ifs/archive --accesskey 000257a71c6ed0001 --secretkey K000xlgzxveQ --endpoint https://s3.us-west-000.backblazeb2.com --bucket gctest --cloudtype other
- NOTE: the URL may be different for your bucket, replace all highlighted settings
Most Common Every Day CLI Commands to Manage Archive jobs
- These commands are most commonly used for day to day. Many advanced flags exist on commands that should be reviewed. The commands below are the minimum flags needed to complete the task.
- Listing running jobs
- searchctl jobs running
- Listing history of all previous jobs
- searchctl jobs history
- Listing all configured folders and the folder ID's and paths
- searchctl archivedfolders list
- How to run an archive job on a folder
- NOTE: This will not recopy everything, it will check the target if the file exists and will skip it and only copy new files missing from the target or update the target if a file changed. It will not detect deleted files. This requires an incremental job to be configured on the folder. Steps in this guide to configure.
- searchctl archivedfolders archive --id xxx (xxx is the folder ID found using the list folders command above)
- Follow the progress of a running job
- searchctl jobs running (get list of running job ID's)
- searchctl jobs view --follow --id xxxxx (xxxx is the job ID name from the step above)
- View active file copies on all Golden Copy nodes, shows real time list of files that are being copied by each Golden copy node
- searchctl jobs activecopies
- Get the processing rates of a folder that has a running job
- searchctl archivedfolders list (get the folder ID)
- searchctl stats --folder xxxx (folder ID of the path with a running job from the above step)
- Get reason for errored files on a job
- searchctl archivedfolders error --id xxxx --count 25 --tail (xxxx is the job name NOT the folder ID, and returns the most recent 25 errors on the job)
How to Test Data Copy and Start the copy Job for a folder that has been added to Golden Copy
How to test file copy target permissions before starting a copy job:
- Before starting a copy job, it is best practice to test file copy permissions with the test feature.
- searchctl archivedfolders test --id <folderID> (list folder ID searchctl archivedfolders list) The command must pass all tests before starting an archive job. Resolve all issues.
- This command will complete the following validations:
- Isilon/PowerScale S3 connectivity test (port test)
- File upload to S3 target test
- Validation this file was copied to S3 target
- Deleting this file from S3 test
How to Modify the Cluster service account or password
- searchctl isilons modify
- --name NAME (name of cluster to modify)
- [--ip IP] (change ip in system zone to another cluster node)
- [--user] (service account name change , should always use eyeglassSR unless directed by support)
- [--update-password] (service account password)
- [--recall-sourcepath RECALLSOURCEPATH]
How to add folders to be copied or synced
- searchctl archivedfolders [-h] [-h] --isilon HOST (--folder PATH | --backup-isilon) [--accesskey ACCESSKEY] [--secretkey SECRETKEY] [--endpoint ENDPOINT][--bucket BUCKET] [--region REGION] [--container CONTAINER] --cloudtype {aws,ecs,azure,other,gcs,blackhole}[--recyclebucket TRASHBUCKET] [--skip-s3-file-exists {True,False,true,false}] [--endpoint-ips ENDPOINT_IPS][--meta-prefix METAPREFIX] [--includes INCLUDES] [--excludes EXCLUDES] [--incremental-schedule INCREMENTALCRON][--full-archive-schedule FULLCRON] [--archive-data-audit-schedule ARCHIVEDATAAUDIT] [--tier TIER] [--backup-num BACKUPNUM][--cluster-name CLUSTERNAME] [--source-path SOURCEPATH] [--recall-schedule RECALLCRON][--apply-metadata {True,False,true,false}] [--delete-from-source] [--paused] [--customMetaData] [--trash-after-recall][--storeFileHistory] [--recall-from-sourcepath] [--smart-archiver-sourcepaths SMARTARCHIVERSOURCEPATHS requires Smart Archiver license][--smart-archiver-recall-bucket SMARTARCHIVERRECALLBUCKET, requires Smart Archiver license] [--type {None,smartArchiverStaging,smartArchiverRecall}]
- add (add a folder for ECS, AWS, Azure)
- --path (PowerScale path to copy or sync example /ifs/data/projectx )
- --force (used to add AWS Snowball device and bypass connectivity checks to AWS, only use when following the Snowball guide)
- [--tier] default is standard (AWS), Cool (Azure)
- Requires Golden Copy Advanced license or Backup Bundle license
- Requires 1.1.6
- Azure
- flag to specify the tier the API calls are sent to, this should match the container tier configuration options are Access tier for Azure e.g. hot, cool, archive) Without this flag the default is cold.
- AWS
- specify AWS tier using (standard (default), standard_IA, glacier, deep_archive(glacier_deeparchive), Glacier_IR (instant access )
- specify AWS tier using (standard (default), standard_IA, glacier, deep_archive(glacier_deeparchive), Glacier_IR (instant access )
- --cloudtype {aws,ecs,azure,other, gcs, blackhole} (type of target storage)
- the Other type can be used to add S3 storage targets for testing before it is qualified formally and some S3 targets will require other.
- other - AWS v4 S3 authentication signature
- otherv2 - AWS v2 S3 authentication signature
- [--region REGION] (required for AWS)
- --bucket BUCKET (required for all storage targets, except Azure which uses the --container flag)
- --container <container name> (Azure only requires the container flag)
- --endpoint ENDPOINT (required for ecs to include URL and port used for storage buckets, for azure the URL needs to include the storage account name example blob.core.windows.net)
- --secretkey SECRETKEY (required for all storage targets)
- --accesskey ACCESSKEY (required for all storage targets for Azure this is the storage account name)
- [--skip-s3-file-exists] {true, false} (this option defaults to false which means S3 is checked first to verify if the file to be copied already exists in the S3 bucket with the same last modified date stamp. If set to true this check will be skipped and all files will be copied to the S3 bucket in a full copy mode. This will overwrite all files in the storage bucket even if they already exist in the Storage bucket.
- Use this option to avoid AWS or Azure fees for issuing LIST, Get commands if you have a large number of files in the path
- [--recyclebucket TRASHBUCKET Name] - Enter the storage bucket name to store deleted files detected during sync mode operations. The deleted files will be copied to the recycle bucket where a TTL can be set on the bucket to keep deletes for a period of time before they are deleted permanently . example --recyclebucket mytrashbucketname
- [--prefix xxx] This is an option allows Copy Mode to run but insert a prefix into the storage bucket path when the copy runs. This would be useful to make a copy into a new location in the storage bucket without updating the existing path.
- <bucket_root>/<cluster_name>/[optional prefix]/ifs/
- example --prefix temp will insert temp into the path when you want a temporary copy in the S3 bucket.
- [--endpoint-ips] (list of ip or range to load balance ECS nodes, only used for ECS targets or Other targets that support multiple endpoints). Check Limitations and Requirements for S3 Targets that support load balancing of multi part uploads.
- NOTE: replace endpoint-IPS with data nodes that can receive copied data. Alternate syntax is x.x.x.x-y.y.y.y to use a range of IPS.
- [--meta-prefix METAPREFIX] - The default prefix is x-amz-meta- for storing meta data properties on objects. Some S3 targets require custom meta data in the http headers to be used. Example open-io requires oo- to be used. This flag allows changing the meta data http header tag for S3 targets that require this.
- Checksum control on upload is now managed globally. This will calculate a checksum to include in the headers to be validated by the target before confirming upload was successful. See link here to configure.
- Scheduling jobs
- The syntax for the Cron for all jobs see scheduling examples here.
- [--incremental-schedule INCREMENTALCRON]
- [--full-archive-schedule FULLCRON]
- [--archive-data-audit-schedule ARCHIVEDATAAUDIT] - compares the file system data to the target bucket and will ensure they are in sync with add new files, upload modified or delete files on the target. This is a long running job and should be scheduled at most weekly or monthly.
- --storeFileHistory - This flag stores the history of a files movement and is used with Smart archiver and incrementals to show update history of the object in a custom property. This traceability provides data history tracking of the lifecycle of the file
- --paused - this flag pauses all jobs on the folder until the pause is disabled
- --customMetaData - This requires the pipeline license and extracts file metadata from the 1500 file types and adds the metadata to the object properties providing content aware backup and searching with an index of the custom metadata properties. NOTE: This flag is not supported with Archive Engine.
- [--includes INCLUDES] [--excludes EXCLUDES] - These optional flags allow including files or folders with pattern matching to either include files and folders or exclude from the copy process. (Release 1.1.4 or later)
- --includes - File paths matching this glob will be included in the archiving operation. If not specified, all files will be included.
- --excludes - File paths matching this glob will be excluded from archiving. This flag only applies to those files that are included by the --include flag. If not specified, no files will be excluded.
- Examples:
Exclude everything in the user’s appdata profile:
--exclude ‘/ifs/home/*/AppData/**’Only archive docx and pdf files, and exclude everything in a tmp directory:
--include ‘*.pdf,*.docx’ --exclude ‘/ifs/data/home/tmp/**’Only archive docx, pdf and bmp files
--include ‘*.pdf,*.docx,*.bmp’Archive all files except those in AppData, but only do full content for pdf and docx
--exclude ‘/ifs/home/*/AppData/**’
- add (add a folder for ECS, AWS, Azure)
Overview of Archive Job Types
2 types of folder modes exist full archive and incremental.
- Full Archive: The full archive will tree walk a folder identify which files already exist on the target object store and skip them or copy new files or update modified files. It will not delete files that exist on the target but do not exist on the source file system path.
- If you run a Full archive job multiple times it will only copy new files, modified files detected on the tree walk. This acts like an incremental and can locate missing data in the S3 target.
- Incremental Archive: This mode is enabled with a schedule on the folder. This mode uses the change list and creates snapshots that are compared to detect created, modified and deleted files to copy to the target S3 object store. This mode will default to a mode that will note delete files from the object store if files are found to be deleted on the file system.
- See the procedure below to enable deleting files from S3 storage during incremental sync jobs.
- An alternate delete mode exists called delayed deletes. This mode allows a folder to be configured with a second storage bucket to hold deleted objects when they are deleted from the file system. This can be reviewed here.
- The default setting will sync deletes from the file system to the S3 target during incremental.
Concurrent Job Prioritization Incremental vs Full
- When full and incremental jobs run at the same time a QOS setting can be a changed to prioritize one job type over the other.
- The default setting will prioritize incremental jobs over full archive jobs.
- This means resources will used to archive incremental queues at the cost of copying any files from backlog in the full archive jobs. The full archive job may stop completely or progress very slowly until the incremental backlog is completely copied. This process will repeat each time an incremental job starts.
- How to change the default to prioritize full archive jobs.
- Login to node 1 as ecaadmin
- nano /opt/superna/eca/eca-env-common.conf
- add these variables to the file
- export ARCHIVE_FULL_TOPIC_REGEX="archivecontent-*"
- export ARCHIVE_INCREMENTAL_TOPIC_REGEX="nomatch"
- save with control+x answer yes to save
- Restart cluster for the change to take effect
- ecactl cluster down
- ecactl cluster up
How to configure Incremental jobs to Sync Deleted Files to S3 Object Store
- This is a global setting for all incremental jobs and will detect deleted files on the file system and will delete the object in the S3 target storage.
- NOTE: The default wil sync deletes.
- Login to Golden Copy as ecaadmin
- nano /opt/superna/eca/eca-env-common.conf
- add a line to this file by copying and pasting the line below
- export ARCHIVE_INCREMENTAL_IGNORE_DELETES=false (this is the default change to true to leave deleted files as objects)
- save the file with control+x answer yes
- Shutdown the cluster and start up again to take effect
- ecactl cluster down (wait until it finishes)
- ecactl cluster up
- done
How to start a Full or Incremental Archive Job
- searchctl archivedfolders archive
- --force (used to add AWS Snowball device and bypass connectivity checks to AWS, only use when following the Snowball guide)
- --id ID (folder id)
- --uploads-file (requires 1.1.6 build > 21124) accepts a file with full path to files with one file per line (carriage return after each file). A text file with a path per line will be accepted and each file will have it's meta data queried and included with the copied object.
- NOTE: file path must be full path to file example /ifs/xxx path to file and is a case sensitive file path. The case must match the actual file system case for path and file name.
- NOTE: The search export file format has been deprecated for a flat file format with only file path.
- NOTE: Make sure only 1 file per line with a carriage return at the end of each line.
- --incremental (requires 1.1.4 build > 21002) This option will run an on demand snapshot based changelist to detect created, modified and deleted files since the last incremental job ran and copy these changes to the S3 target configured.
- --follow (Requires 1.1.4 build > 21002) the archive job will be started and will move directly to a monitor UI to view progress without needing to use searchctl jobs view.
- --auto-rerun this will queue all failed copies into a new job to automatically retry all failed copies. Requires 1.1.4 or later
- [--recursive {true,false}] (can be used to update a single path only or recursive update to copy all data under a path to the storage bucket, this is optional and the default without using this flag is recursive copy of all data under the archived path entered)
- [--subdir SUBDIR] (if a recopy of some data is required under an existing archived folder, or a new folder was added under an archived folder, this option allows entering a path under the archived path to copy only this subfolder, this can be combined with --recursive option if required.)
- [--s3update] File System to S3 Audit Feature compares S3 bucket to PowerScale path and fixes any differences between the folders and files and will delete files in the S3 bucket that no longer exist in the file system path.
- NOTE: Use this to audit the file system path to the S3 bucket to remove files from S3 that do not exist in the file system. This can be used on folders configured for copy mode versus sync mode that will sync deleted files into the storage bucket.
- NOTE: Should not be used to compare the file system to the bucket, run a full archive to validate all data is copied. This command is only needed to handle delete syncing and note this is a very slow process and will cost S3 API's to use this feature.
- --snapshot <snapshotName> if the name of the snapshot is added with this option, then no new snapshot will be created for the archive path and the snapshot name path will be used as the source of the file copy. Normally, a snapshot is created when a folder archive job is started and data is copied from snapshot. This option allows existing snapshots to be used as the source of an archive job.
- When to use this option:
- This option allows an existing snapshot to be used. This option would be used to copy a previous snapshot of a path to S3 storage for long term storage and allow deletion of the snapshot to free up usable space on the PowerScale once the file copy completes.
- The path referenced by the snapshot name must match exactly the folder path added to Golden Copy
- The path copied in the S3 bucket will match the folder path added to Golden Copy
- NOTE: The full inflated size of the path the snapshot is protecting will be copied. Snapshot copies are not space efficient when copied from the PowerScale to external storage.
How to Schedule Jobs on Folders (Full Archive, Incremental Archive or Archive Data Audit jobs)
Overview of Archive Job Types
- 2 scheduled job types for backup
- --full-archive-schedule Use this flag to identify this job type. This will walk a file path copy all files and will check the S3 target if the file already exists and will skip files if needed while copying. The comparison is done using the last modified date stamp on a file.
- --incremental-schedule Use this flag to identify this job type. This job will use the Isilon/Power Scale change list API to snapshot that folder path and offload the comparison to the cluster to return file system changes for incremental always syncing. The created, modified files will be synced to the S3 target.
- NOTE: The default behavior will NOT sync deleted files to the S3 target. This means deleted files will be detected but will remain on the S3 target. To change this default behavior see the advanced configuration here.
- --archive-data-audit-schedule Use this flag to identify this job type. This job will audit the file system path and the S3 bucket to identify files that are missing in S3 but it will also identify files that no longer exist no the file system but also exist on the S3 target. This will delete objects when a file has been deleted from the file system. Recommendation: Run this job on demand or on a schedule to audit the S3 object store data.
Configuring Archive Job Schedules on Folders
- This feature requires 1.1.4 build > 178
- NOTE: times scheduled will be in UTC time zone.
- The input is a cron string to create the interval for the schedule. See the cron web site for assistance in creating a cron string https://crontab.guru/examples.html
- The (other parameters) is a placeholder for any other options being added or modified in the examples below)
Add an Incremental Schedule to a folder
- Run Every Hour
- searchctl archivedfolders add (other parameters) --incremental-schedule "0 * * * *"
- Run Every 2 hours
- searchctl archivedfolders add (other parameters) --incremental-schedule "0 */2 * * *"
- Run Every 6 hours
- searchctl archivedfolders add (other parameters) --incremental-schedule "0 */6 * * *"
- Run Once a Day at midnight
- searchctl archivedfolders add (other parameters) --incremental-schedule "0 0 * * *"
Modify a Schedule on a Folder
- This command uses a different syntax see below
- Once per day examples of incremental and data audit job types
- searchctl archivedfolders modify --id <folder id> (other parameters)--incremental-schedule "0 0 * * *"
- searchctl archivedfolders modify --id <folder id> (other parameters)--archive-data-audit-schedule "0 0 * * *"
Disable a Schedule on a folder
searchctl archivedfolders modify --id <folder-id> --full-archive "NEVER" --incremental-schedule "NEVER"
Add a Data Audit job Schedule to a folder
- searchctl archivedfolders add (other parameters)--archive-data-audit-schedule "0 0 * * 0"
- Suggested schedule is weekly on Sunday
Monitor, View running Jobs, show Job History, Show folder job history, Summarize Job stats, Monitor Progress, Auto Email Progress and Cancel a Copy Job
- These commands will show progress of files as they are copied, with real-time updates every few seconds.
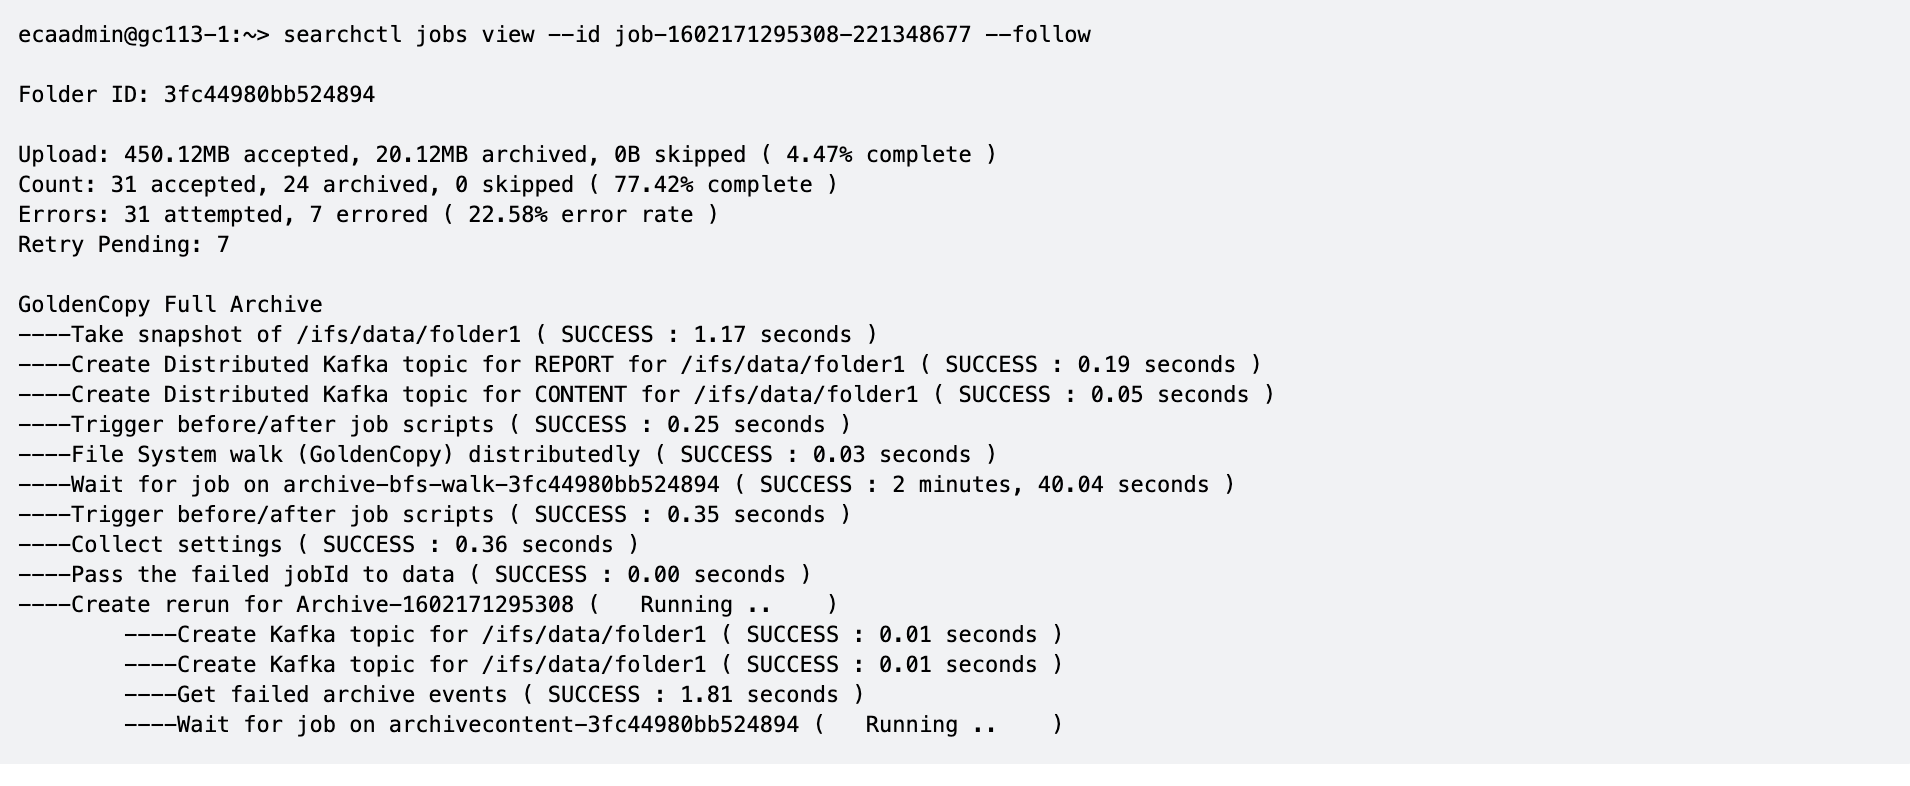
- searchctl jobs view --id job-1574623981252553755794 --follow (replace the job name with the name returned from the archive command).
- searchctl archivedfolders stats --id <folder ID> (NOTE: replace <folder ID> with ID from step #3, for example only: 3fe1c53bdaa2eedd).
- searchctl stats --folder xxxx
- Learn more about - Monitoring Copy Jobs, View Job History, Viewing folder job History:
- searchctl jobs running (shows running jobs).
- searchctl jobs view --id (id is returned from the command above, monitors progress).
- searchctl jobs history (shows the history of previous jobs including incremental sync jobs, inventory jobs).
- [--folderid] - allows filtering the history to a specific folder to list the jobs
- [--type TYPE] - allows filtering to show a specific job type "Incremental", "Full Archive", "Inventory"
- [--output OUTPUT] - Json format output of the history data
- [--tail x ] where x is last x jobs executed example --tail 100 (100 last jobs executed)
- Example command
- searchctl jobs history --folderid <folderid> - this command can very useful to list all the jobs that have run against a single folder. This allows viewing the history of all jobs on a single folder.
- searchctl jobs history --tail 100 (return the most recent 100 job executions)
- searchctl jobs cancel --id (with a job ID provided a copy job can be canceled. Note: it takes time for a cancel to take effect).
- Show job , all folders and golden copy node Summary statistics
- This command will provide stats of all jobs executed on all defined folders or all golden copy nodes or summary of all jobs.
- This provides a global view statistics based on each of the view options. This command provides live updates to the CLI based on active jobs.
- searchctl jobs summary [-h] [--no-stream] (--nodes | --folders | --jobs)
- searchctl jobs summary --folders (shows the summary of all jobs stats for all folders)
- searchctl jobs summary --nodes (shows the summary of all jobs stats for all golden copy VM's)
- searchctl jobs summary --jobs (shows the summary of all job stats for all nodes and all folders
- Export a completed job into an HTML report with steps here.

How to Enable Auto Progress Emails for copy Jobs
This feature allows administrators to monitor copy job progress from their email. Once enabled, running job progress will be emailed every 24 hours (this can be changed). This avoids the need to login to simply monitor progress. It can also assist with support since the emails can be attached to a support case. The feature allows a group email to be configured.
Prerequisite:
- Enable a notification channel with SMTP see guide here.
- Search & Recover Cluster Operations
- Get the email channel groups with this command
- searchctl notifications groups list
- searchctl notifications groups list
- searchctl archivedfolders notifications addgroup --isilon [host] --group [notification-group-name]
- Adds a group email to be notified with job progress summary reports
- Defaults to disabled status
- Enable the notification with:
- searchctl archivedfolders notifications modify --isilon <cluster name> --enabled true
- Adds a group email to be notified with job progress summary reports
- searchctl archivedfolders notifications list
- lists all notifications that are configured
- searchctl archivedfolders notifications removegroup --group [notification-group-name]
- removes the email group
- searchctl archivedfolders notifications modify --isilon [host] --enabled [true or false] --groups [group-names-comma-separated]
- The modify command allows the option to disable the notifications without removing it.
- The default interval to receive updates is 24 hours. To change this default.
- Use the schedules CLI to changes the frequency , this examples shows 5 minutes
- searchctl schedules modify --id JOBS_SUMMARY --schedule "*/5 * * * *"
- searchctl schedules list
How to Manage Folders (List , Modify and Remove)
- List , modify and remove commands and examples
list (list configured folders)
- searchctl archivedfolders list
- searchctl archivedfolders list --verbose (adds all flags to the output)
modify (change configuration of an existing folder)
- --id ID (folder id)
- [--cloudtype {aws,ecs,azure, gcs, other,blackhole}] (type of target storage)
- [--region REGION] (Required for AWS)
- [--tier] specify storage tier (Advanced license or backup bundle required)
- [--bucket BUCKET] (Required for all storage targets, except Azure)
- --cluster-name - Allows creating an alias for the root folder name in the storage bucket. Use a string to replace the actual cluster name in the folder used to copy all the data under this root folder name. See the use cases for this feature here.
- [--container CONTAINER] (Required for Azure only and should list container name).
- [--endpoint ENDPOINT] (Required for Azure, AWS, ECS).
- [--secretkey SECRETKEY] (Required for all storage targets).
- [--accesskey ACCESSKEY] (Required for all storage targets, for ECS this is the user id name, for Azure this is the storage account name) .
- [--skip-s3-file-exists {true, false}] (Optional: see explanation of this in above) .
- [--recyclebucket TRASHBUCKET ] (See create explanation in the "How to add folders to be copied or synced" section above) .
- [--meta-prefix xxx] - (See add folder in the "How to add folders to be copied or synced" section for explanation ).
- [--endpoint-ips] (List of ip or range to load balance ECS target only).
- [--includes INCLUDES] [--excludes EXCLUDES] - (see the "How to add folders to be copied or synced" section for detailed explanation and examples ).
- Scheduled jobs - See job schedule examples here.
- [--incremental-schedule INCREMENTALCRON] - incremental sync job
- [--full-archive-schedule FULLCRON] - full copy job
- [--archive-data-audit-schedule ARCHIVEDATAAUDIT] - data audit source and target comparison
How to remove an archive folder
- searchctl archivedfolders remove --id ID (folder id)
- [-h] get help
How to Re-run Only Failed Files from a Copy Job or Recall job
- This feature allows a retry of only the failed files listed in a copy or recall job, versus running the entire copy job again. This is a more efficient and faster process than running the entire job again.
- List the job history for an archive folder.
- searchctl job history
- Then select the job to re-run with a status of failed to get the job ID, then run the command below:
- searchctl job rerun --id xxxxx (where xxxx is the job-xxxxxx)
- This will locate all the filed files in the last job and reattempt to copy these files in a new job. This will generate a new summary and progress report.
- Then select the job to re-run with a status of failed to get the job ID, then run the command below:
How to Re-run Only Failed Tree Walk from a Copy Job
- This feature allows re-walking folder paths that generate an error caused by an API failure returning folders or files from the file system. You can determine if tree walk errors occurred using the stats command. See example below.
- searchctl stats view --folder xxx (replace xxx with the folder id, use searchctl archivedfolders list to get the folder ID)
- Requirements:
- Release 1.1.9 or later
- NOTE: Run this command after the job has completed and appears in job history. It should not be a running job.
- How to re-attempt tree walk on failed folders
- searchctl jobs history (use this to get the job history)
- Run this command and replace xxx with the job name that generated tree walk errors
- searchctl archivedfolders rerun --id xxx --only-folders
- How to view the treewalk failure log on each Golden Copy node
- Use this log to view reasons why the treewalk failed. The folder stat bfs rest api failure also counts api failures to get files and folders from the cluster. When this stat has a positive value view the error log on each node
- ecactl cluster exec cat /opt/superna/var/logs/indexworker/folders_processing.log
How to Pause all Scheduled jobs on a folder
- Requirements: 1.1.9 or later
- Usage: Can be used with active running jobs to pause them to prioritize another job that need cluster resources.
- Apply pause job to a folder will pause and active job and block future scheduled jobs from starting
- searchctl archivedfolders modify --id xxxx --paused true (pauses active and future jobs)
- searchctl archivedfolders modify --id xxxx --paused false (removes the pause on the folder)
- To View all currently paused folders
- searchctl archivedfolders viewPaused
- searchctl archivedfolders viewPaused
How to Recall Data from Object Back to File
Overview:
Once data is archived to objects, you may need to recall some or all the data, to the same or different cluster. This section covers how that is done from the CLI. All recalls job recall data to a staging recall path where the administrator would move the tree of data back into the main file system or share the data directly from the recall path.
The recall NFS mount is on /ifs/goldencopy/recall this path is where all recall jobs will recall data. The recalled data will be created as a fully qualified path /ifs/data/datarecalled under the mount path above.
Backup and Restore Use Cases
The backup and restore use case capabilities depends on which licenses are installed. The enhanced recall features require the Backup bundle or upgrade Advanced License key.
License Key Dependencies
- Base Golden Copy License key allows recall of data only, recall data + metadata, recall to same cluster the data was copied from. It also allows the NFS recall mount to be changed to a different cluster. This is a manual process.
- Golden Copy Advanced (Backup Bundle) key allows additional options: object version aware recall based on file metadata date range, redirected recall to an alternate cluster other than the source cluster, storage tier aware recall example archive tier recall before recall to on site storage.
Limitations:
- Golden Copy base license recall to an unlicensed cluster will only recall data, without metadata.
Best Practice Configuration
- If you need to re-run multiple recall jobs of the same data the following variables should be set to skip over data that is already recalled and allows the archive container to be restarted and ensures data that has been processed is not downloaded again. NOTE: The default for checking for the presense of files during treewalking S3 and downloading is disabled by default as this extra step slows down processing and recall performance.
- On GC node 1
- nano /opt/superna/eca/eca-env-common.conf
- export INDEX_WORKER_RECALL_SKIP_EXISTENT_FILES=true. #(skips files during s3 bucket treewalking that already exist on disk)
- export ARCHIVE_WORKER_RECALL_SKIP_EXISTENT_FILES=true # (note requires release 1.1.20 or later)
- Control + X (save and exit)
- save the file
- ecactl cluster down
- ecactl cluster up
- done.
- On GC node 1
Requirements:
- 1.1.4 build 2006x Release or later
- Some recall features require the Advanced license key as explained below. These commands will be identified as requiring the advanced license key.
Prerequisite NFS Export Configuration Steps
- Make sure the NFS export is created on the clusters that are targets of a recall and and the mount is added to Golden Copy and all VAN nodes.
- Basic Golden Copy licenses can switch the NFS mount using /etc/fstab entry to point at a different cluster to recall the data.
- Create NFS mount on the new target cluster. Review installation requirements here.
- Change the mount used for recall
- sudo -s (enter ecaadmin password)
- edit the nano /etc/fstab
- find the recall mount entry '<CLUSTER_NFS_FQDN>:/ifs/goldencopy/recall /opt/superna/mnt/recall/<GUID>/<NAME> nfs defaults,nfsvers=3 0 0
- Replace <CLUSTER_NFS_FQDN> with the ip address or DNS smartconnect name of the cluster target
- control+x to save the file
- Type exit (to return to ecaadmin session)
- unmount the recall mount
- ecactl cluster exec "sudo umount /opt/superna/mnt/recall/<GUID>/<NAME>"
- enter the admin password when prompted on each node.
- ecactl cluster exec "sudo umount /opt/superna/mnt/recall/<GUID>/<NAME>"
- mount new cluster recall mount
- ecactl cluster exec "sudo mount -a"
- enter the admin password when prompted on each node.
- ecactl cluster exec "sudo mount -a"
- The recall job will now recall data to the new cluster target.
- Advanced or Backup Bundle Licensed appliances can use the add cluster target recall only option and create unique NFS recall mounts for each cluster to allow selecting the target cluster when building the recall job.
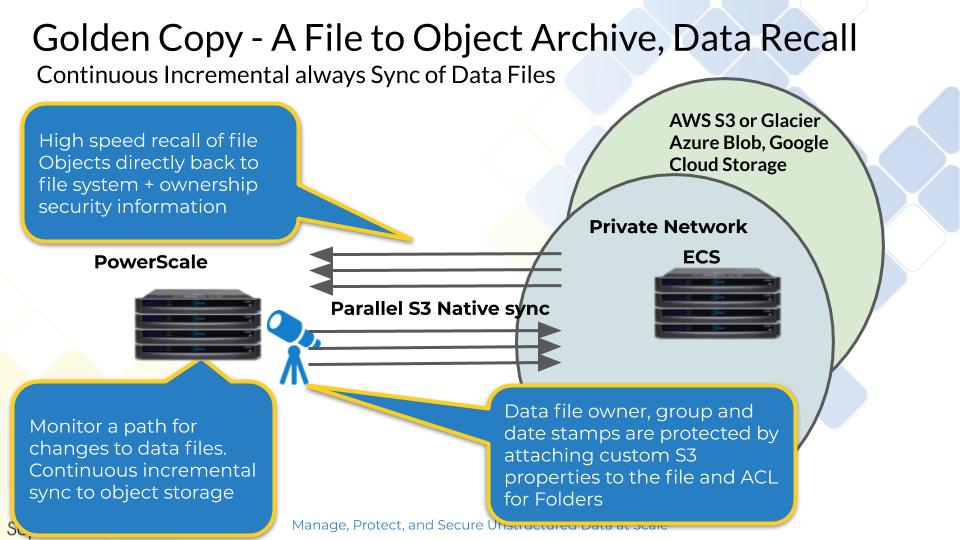
Logical Diagram of a Recall
Recall command syntax and options
- searchctl archivedfolders recall [-h] --id ID[--subdir SUBDIR]
- --ID - Is the folder id.
- [--subdir] - Allows entering a path below the folder path to select a subset of the data example archive folder is /ifs/archive and --subdir can be /ifs/archive/subdirectory.
- [--apply-metadata] If this flag is not used only data will be recalled and the files will not have owner, group or mode bits updated, folders will not have ACL permissions applied.
- NOTE: Skipping metadata will recall data faster.
- (Advanced License) [--target-cluster] - This is the name of the target cluster that the recall will use to store the recalled data. The cluster must be added to Golden Copy first to use this flag.
- (Advanced License) [--start-time STARTTIME] - This allows selection of data to recall based on the meta data stamps on the objects.
- This command is version aware and will check the version of objects to select the best match.
- This is a date format for the beginning of the date range. example start last modified time. Example: "2020-05-21T17:44:40-04:00"
- (Advanced License) [--end-time ENDTIME] - This is used with the --start-time to specify the end date and time or the date range.
- This command is version aware and will check the version of objects to select the best match.
- This uses the same date format. Example: "2020-05-21T17:44:40-04:00"
- (Advanced License) [--timestamps-type {modified,created}] - This flag is used with the date range command to specify which time stamp to use the created time stamp or the modified time stamp stored with the object metadata.
- This command is version aware and will check the version of objects to select the best match.
- Running the job will recall data and re-apply all possible meta data to the file system including ACL's folder and file owner, group and mode bits.
How to recall object data to the Recall Staging Area
- This example will recall data to the staging areas located here /ifs/goldencopy/recall. There are flags to handle overwriting data that already exists on the destination path and applying metadata to files and folders or reapplying metadata.
- Metadata includes the following:
- Files - owner, group, mode bits
- Folders - Owner, group ACL on the folder
- Example command to recall only a specific path
- searchctl archivedfolders recall --id xxxx --subdir /ifs/bigfile --apply-metadata
- NOTE: Recall jobs will always overwrite data in the staging area if a previous recall job had already been executed.
- Recall data and apply metadata to files and folders
- searchctl archivedfolders recall --id <folderid> --apply-metadata
- Metadata includes the following:
How to Monitor Copy Job Performance and Job Summary logs and Error Logs
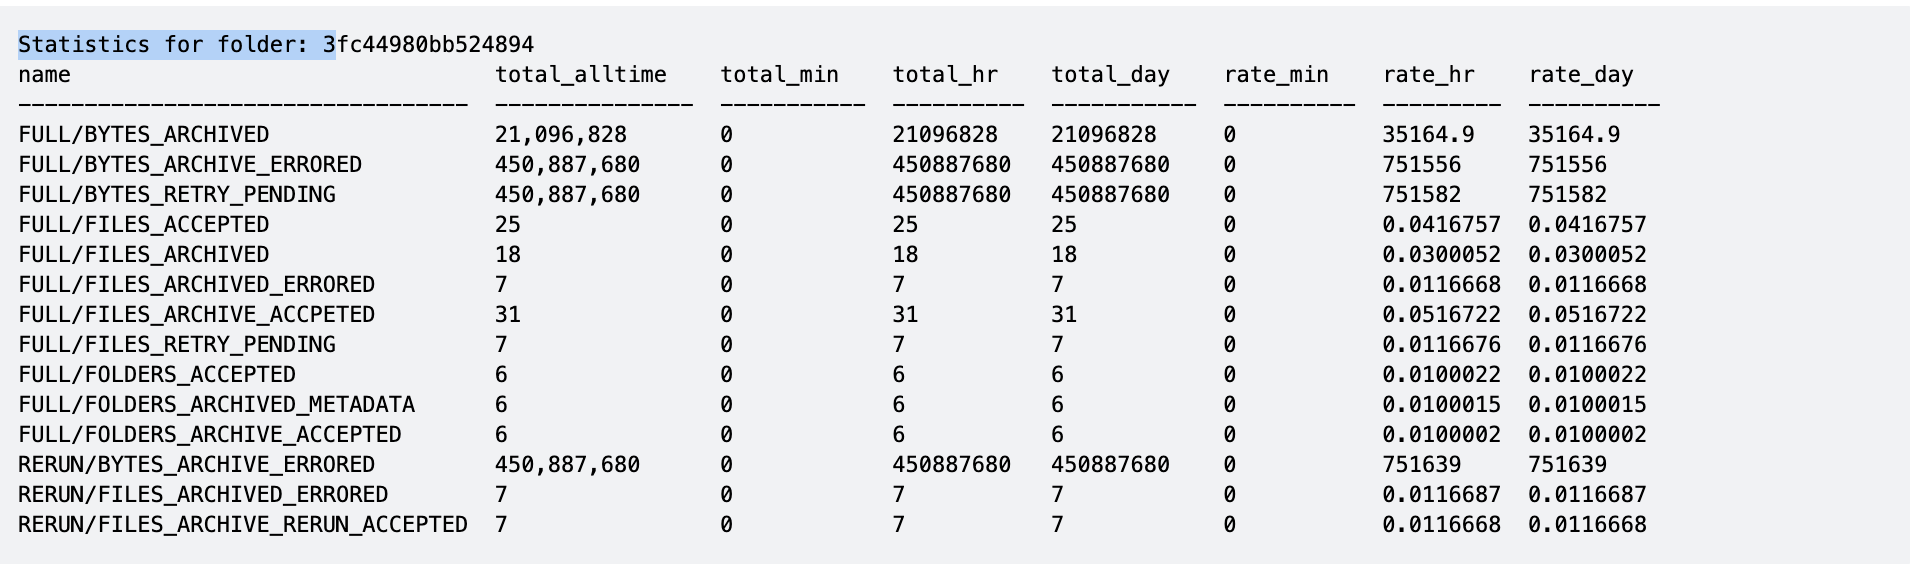
Stats Command for real time job throughput monitoring
- The following command will monitor real time stats for an archive folder with bytes copied, files copied and error rates.
- searchctl archivedfolders stats --id xxx (where the xxx is the folder id found from searchctl archivedfolders list)
- OR use feature rich command searchctl stats --folder xxx
- or use copies in progress command searchctl jobs activecopies [--no-stream] (1.1.7 build 58 or later)
- NOTE: The rate statistics columns are per second but average over the last minute, hour or day.
- NOTE: Files Retry Pending, Bytes Retry Pending requires the --auto-rerun flag on archive jobs to queue failed files to be retried at the end of the archive job. This is available in release 1.1.4 builds > 178.
- NOTE: Rerun stats show files that were retried at the end of the archive job and will only display if --auto-rerun flag was used. This is available in release 1.1.4 builds > 178.
- NOTE: Accepted stats is related to tree walking the folder that is configured for archiving and is based on REST API retrieval of files and folders.
- NOTE: Full statistics are recorded during full archive jobs. Incremental stats will appear if incremental jobs are configured on the folder.
- NOTE: Files and folders have separate statistics
- NOTE: Metadata is (owner, group, mode bits, created, modified, accessed, ACL)
Job View command monitors progress in MB and file count with % completion
- This command can check the progress of a running job, shows the MB of files queued for copy, the MB of files archived, and % completed. The same information is shown for file count queued, archived and %. Error rate is also shown
- searchctl jobs view --id job-1591744261081-1928956557 --follow (use searchctl jobs running to get the job id)
- New in builds > 1.1.4 178 build is the Retry Pending Stat that tracks files that had an error will be queued to be retried at the end of the archive job. This new stat is only active if the --auto-rerun flag is used on the archive job.
How to Monitor file copies in progress on each node
- This command will provide output that shows in instantaneous view of work on hand for each Golden Copy node. Shows all nodes work on hand.
- Requirements: 1.1.7 > build 22085
- searchctl jobs activecopies [--no-stream]
- NOTE: Updates every 5 seconds
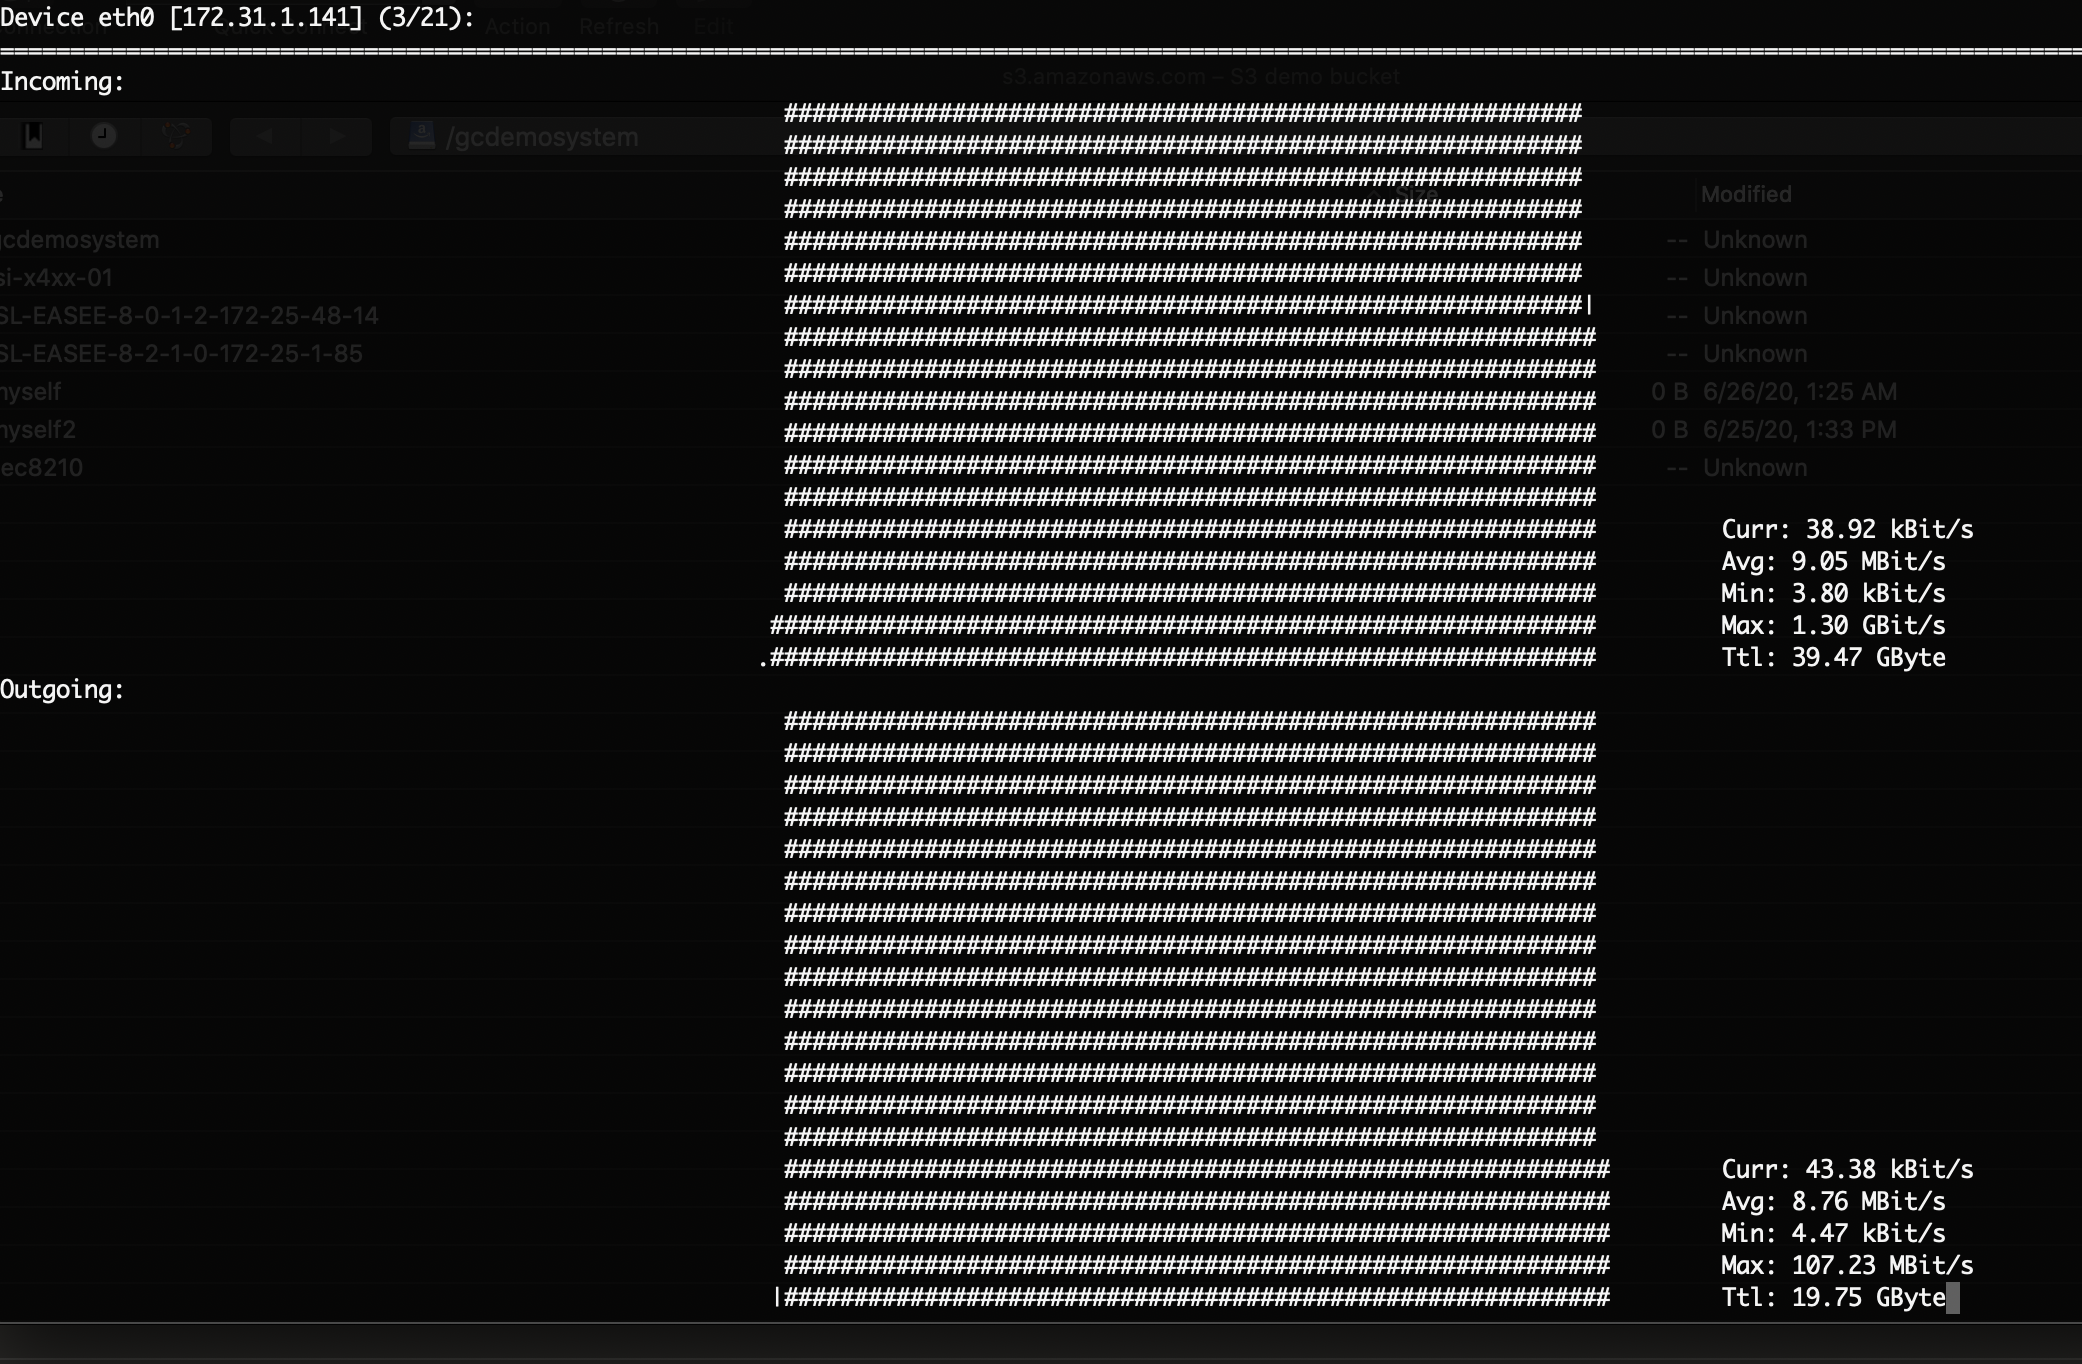
How to Monitor Ethernet Interface Mbps during a Copy Job
- This tool will be available in new OVF builds. In the current product, it must be installed and requires Internet access to repositories
- ssh to the Golden Copy vm as ecaadmin
- sudo -s (enter ecaadmin password)
- zypper install nload (answer yes to install)
- exit
- type nload
- Once the UI loads use the right arrow key until you see Eth0 displayed at the top left of the UI. This will now display TX and RX bandwidth current, average, min and max values with a graph showing relative bandwidth usage.
How to Generate json report of files for an Archive Job
As of 1.1.4 or later it is required to run the export report command to produce the HTML report for a copy job. The recommended method to monitor a copy is using the CLI monitor command. NOTE: This command will only execute when copy job is completed.
- Get the job id "searchctl job history" (Use the job id for the next command) .
- searchctl archivedfolders export --jobid <job-id> --errors-only true
- Recommended to use the --errors-only flag to extract only errors and reasons for the error
- NOTE: The json files created can be very large since they will include each file copied, errored or skipped.
- The report is queued to extract the report data that is stored in the archive report Web folder. Follow the steps below to view the exported HTML report.
- Login to the report page with https://x.x.x.x/downloads/archivereport/<folder name>/Full/ .
- Locate the <folder name>-<date and time>-summary-checkpoint.html and click on this file to view it.
How to view the Detailed json Copy Job Logs
- When to use this feature?
- This is for developers that need a file by file programatic file format using json that describes what files were copied, skipped (already existed on target) or errored.
- This detailed level of reporting requires additional disk space that is not added to the default appliance. Since this feature is typically used for developers or customers that need a file by file report.
- The default appliance allows 10GB of disk space to store reporting data and allows tracking 7 Million files for reporting. This is a very low limit that is insufficient for large file system paths. Follow the steps below to increase the disk space for detailed export of json reports.
- When to use this feature?
How to expand Disk space for large file system json reports
- Disk space per 100 million files added to nodes 1 - N
- Additional 140 GB of disk space is required per 100 Million files that are expected in the folder path. NOTE: This is a per folder requirement to add space.
- Example If you have 2 different folders each with 100 million files you need to add 280 GB of disk to all nodes
Requirements
- Access to VMware vCenter must be available to add disk space to the VM.
- Expand the Kafka topic that stores reporting data to roll over to match the new storage limit.
Procedure
Repeat the steps above on VM 1 to N
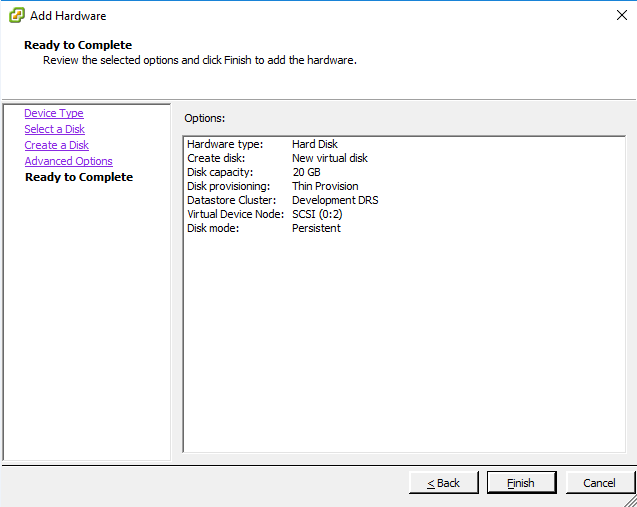
- Create a new virtual disk equal to space needed based on 140GB per 100 million files
- Collect Virtual Device Node i.e.: This example uses `SCSI (0:2)` where `0` is the host node ID
- Login to Golden Copy node 1 through N as ecaadmin .
- Switch to root with sudo -s (enter ecaadmin password) .
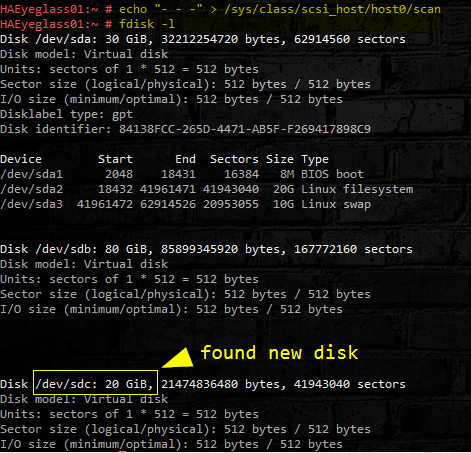
- Scan for the new disk in OS. (host0 should be the default if you do not find a disk contact support).
- echo "- - -" > /sys/class/scsi_host/host0/scan
- Check for new disk:
- fdisk -l
- See image below:
- Add the newly added disk to the /opt/data btrfs filesystem. In our example it is `/dev/sdc` but if you have added disk before you will need to verify the device name from the fdisk -l output. Run the command below to add the new disk to the existing file system.
- btrfs device add -f /dev/sdc /opt/data
- At this point the metadata is only stored on the first disk, to distribute (balance) it across the devices run the following command:
- btrfs filesystem balance /opt/data &
- NOTE: command will run in background [DO NOT REBOOT]
- Check if the File System balancing job is running with command below.
- jobs
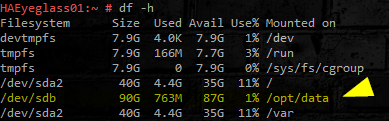
- Check for the newly added disk. Look for `/opt/data` disk size:
- df -h
- Verify the new disk has expanded the capacity of the /opt/data file system.
Expand Kafka report Topic Data Retention GB's
- Open kafkahq https://x.x.x.x/kafkahq (replace xxxx with node 1 ip address,, when prompted enter ecaadmin and default password)
- Get the folder id of the folder
- searchctl archivefolders list
- Locate the report topic with the folder id from step #2
- Click on the topic name
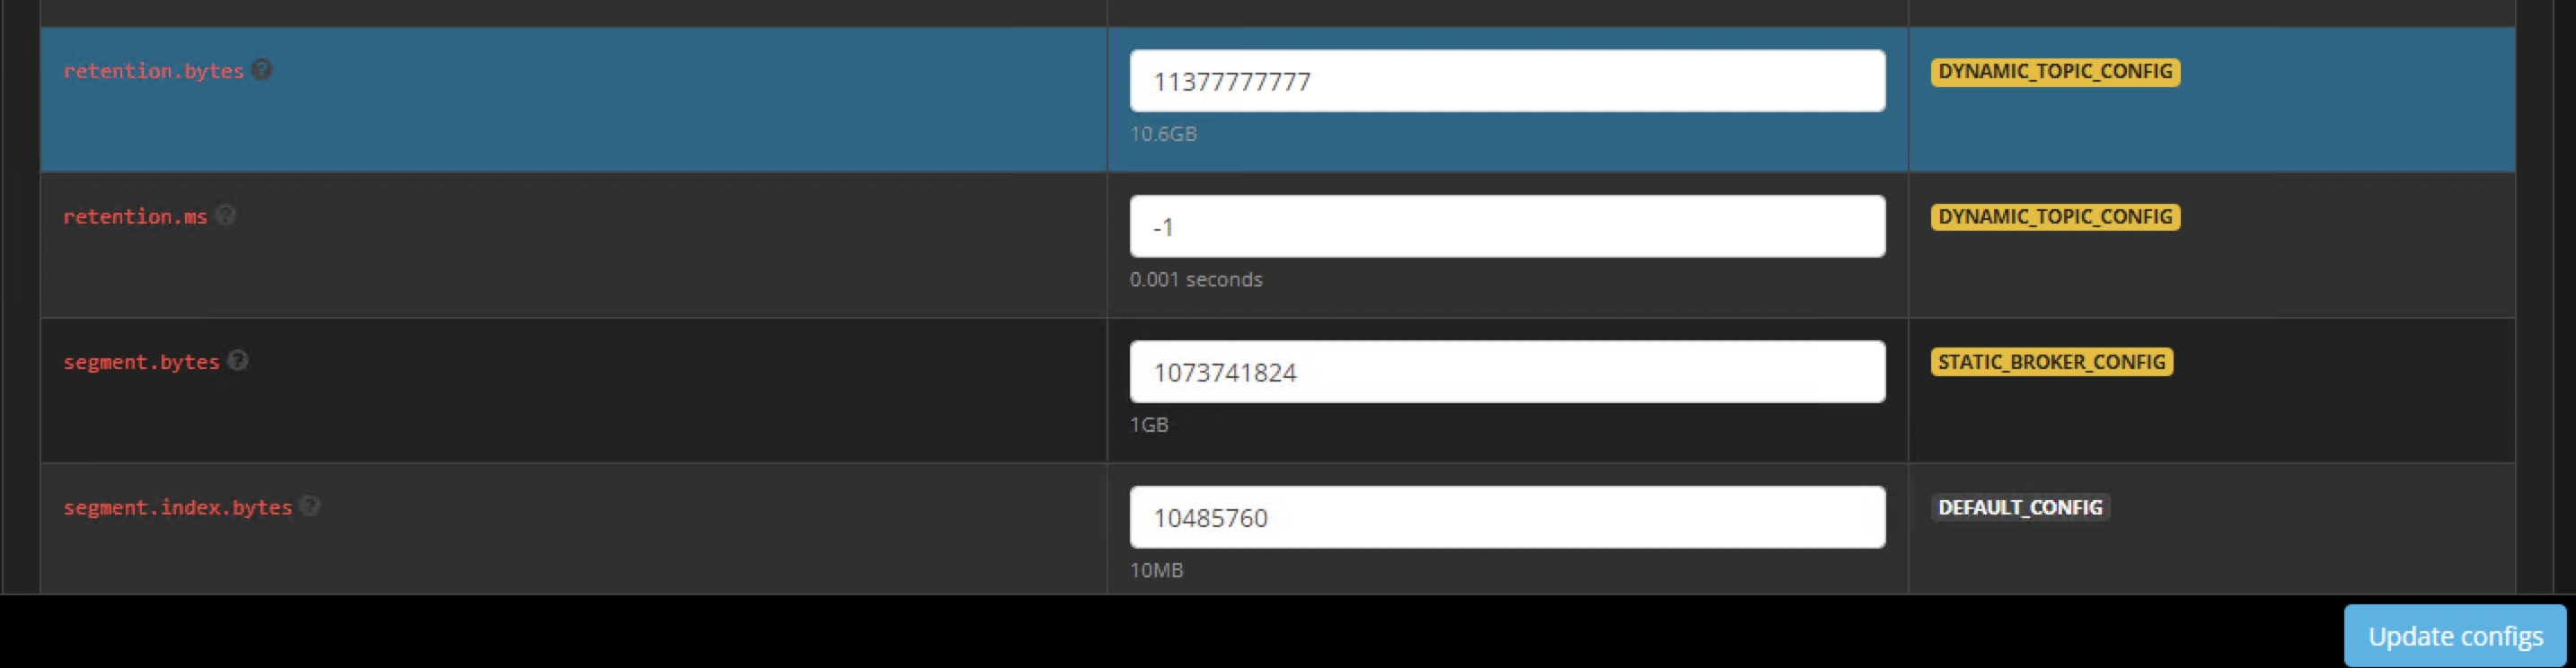
- Then click on the Configs tab
- Scroll down to the section named "retention.bytes"
- Enter a value in bytes to extend data retention to match the added disk space.
- example 140 GB = 150323855360 bytes (use an online calculator to convert GB to bytes)
- Click the update configs button
- Repeat for any other folder report topic
- done


How to create json exports
- The HTML export command also generates detailed json logs that store each file that was copied.
- searchctl archivedfolders export --jobid <job-id>
- This will start a job to generate the json files. These files can be very large and may take many minutes to over an hour to create depending on how many files are tracked in the job.
- The jobs logs can be accessed from https://x.x.x.x/downloads/archivereport (where x.x.x.x is the ip address of the Golden Copy VM).
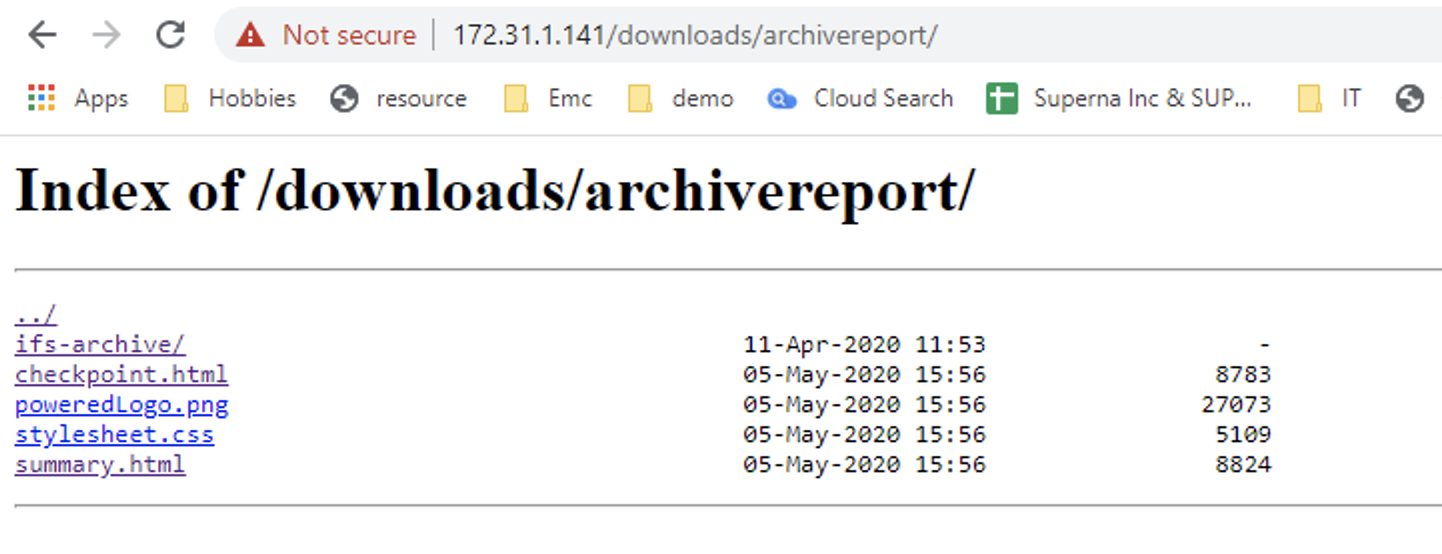
- The default login is: "ecaadmin", with password: "3y3gl4ss".
- The log directory for each execution of a job report export command. It will create a folder based on the path that was archived example ifs-archive:
- The job logs will be contained in the full and incremental folders sorted by date.
- 3 files are created for each copy job. See example screen shot below.
- date-time.JSON (full log with all files that successfully copied, many numbered versions of this file will exist).
- -summary.html (report view that shows the report for the entire job).
- -summary.json (JSON version of the summary report used by the HTML file to display).
- -errors.json (if there are failed copy files this file extension will appear and stores all the files that failed to copy)
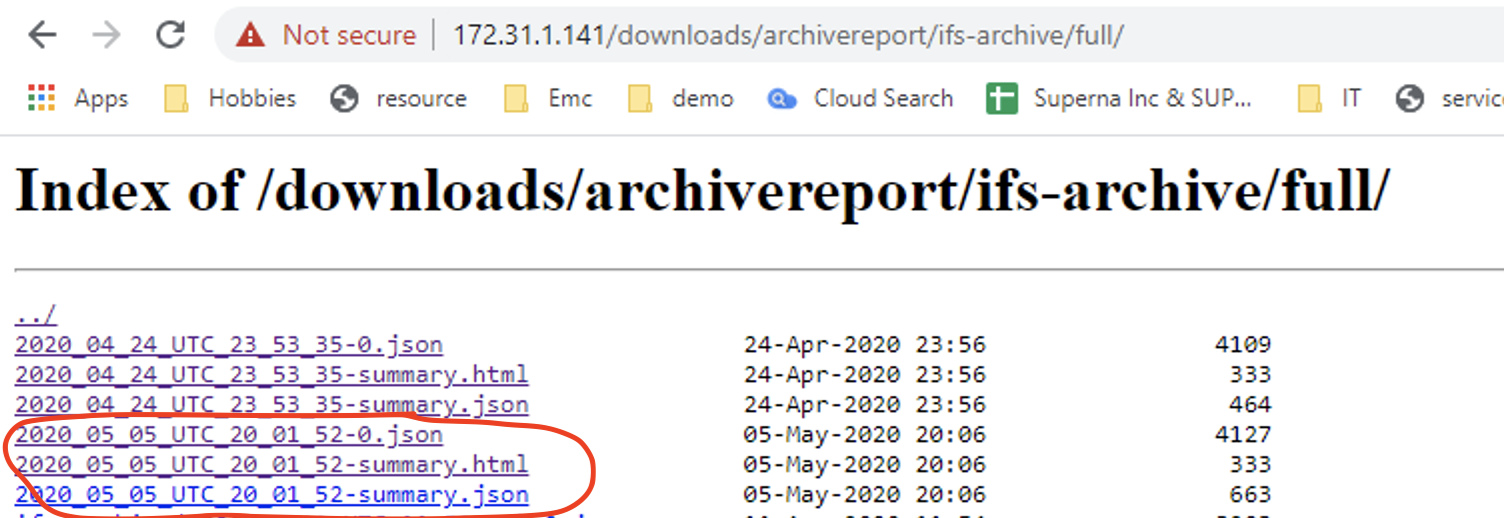
- The job logs will be contained in the full and incremental folders sorted by date.
How to view copy job errors on failed copies
- Use this command to find the reason for the failed copies. The job id can be found with searchctl jobs history. NOTE: Requires 1.1.4 or later.
- searchctl archivedfolders errors <--Id JOBID> [--head | --tail | --at TIME] [ --count N ], where:
- JOBID is the ID of the job that was run--count N prints N records (default 10)--head (default) starts printing from the earliest detected error--tail prints up to the last detected error in the job--at TIME will print errors starting from the given time. Use the same time format as T15023--head, --tail, and --at are mutually exclusive.
- Example command to quickly find that last 20 reasons files failed to copy.
- searchctl archivedfolders errors --Id xxxx --tail --count 20
- JOBID is the ID of the job that was run
How to Manage File Copy Performance
There are 3 methods that can be used to control performance of a copy job.
- The first is the number of virtual accelerator nodes deployed to distribute copy tasks to more virtual machines. See the installation guide on how to deploy virtual accelerator nodes. The guide is here.
- The 2nd parameter that controls how many files will be copied concurrently per Golden Copy VM or per Accelerator node.
- The 3rd option applies to large file copies (greater than 10 MB), and allows increasing the number of threads that copy byte ranges of the file. A large value will increase bandwidth requirements.
Best Practice: Test a copy job and monitor performance statistics command to monitor files per second counter (searchctl archivedfolders stats --id <folder id>. This command shows bytes per second and files per second over the last minute. The higher the value indicates higher performance.
How to Increase Copy Performance with concurrent file and large file thread count
Golden Copy VM defaults to the values shown below for concurrent file copies and threads per large file. This value applies to each VM Golden Copy and Virtual Accelerator nodes. This can be changed globally, following the steps below:
- ssh to Golden Copy VM as ecaadmin .
- nano /opt/superna/eca/eca-env-common.conf
- Add the line to this file and set the number of files to desired concurrent copy limit and the parallel thread count for large file copies. NOTE: Consult with support , increasing these numbers may not increase performance in some scenarios.
- export ARCHIVE_PARALLEL_THREAD_COUNT=100 (number of concurrent files per Golden Copy VM or Accelerator Nodes, increasing this number may not increase performance unless sufficient bandwidth is available)
- export ARCHIVE_PARALLEL_THREAD_SDK=10 (Number of separate threads used to copy a single large file, higher number will increase bandwidth utilization)
- control key + x key to exit .
- Answer yes to save the file .
- ecactl cluster push-config
- ecactl cluster services restart --container archiveworker --all
- done
How to Shape Bandwidth of Archive Jobs
Overview:
- The feature is using Traffic shaping and not rate limiting. Traffic shaping (also known as packet shaping) is bandwidth management technique that delays the flow of certain types of network packets in order to ensure network performance. In the case of Golden Copy the file copies are delayed to ensure that over time bandwidth would average out to the desired configuration.
- NOTE: Monitoring the interface will show the network usage will be above the set shaping value which is expected with traffic shaping. This is because the interface is 10Gbps and allows the data to leave the VM at a high rate for short bursts.
- NOTE: Monitoring the interface will show the network usage will be above the set shaping value which is expected with traffic shaping. This is because the interface is 10Gbps and allows the data to leave the VM at a high rate for short bursts.
- In Release Build 1.1.4 21002
- nano /opt/superna/eca/eca-env-common.conf
- export ARCHIVE_NETWORK_RATE_LIMIT_MB=xx (xx is MB per second value to all copy bandwidth)
- control+x answer yes to save
- ecactl cluster push-config
- ecactl cluster services restart archiveworker
- done
How to Monitor Network bandwidth Usage from the appliance
To monitor utilization of the Ethernet interface in real - time.
- ssh to the appliance as ecaadmin
- sudo -s (enter admin password)
- zypper in nload (requires internet access to the appliance to install the package)
- answer yes to install
- nload -m (this will display tx and rx bandwidth)
- Use the Eth0 values (the other interfaces are the internal docker networks)
- Incoming - From the cluster over NFS mounts
- Outgoing - Leaving the VM towards the S3 target
- Per IP flow tool
- zypper in iftop
- answer yes
- run the tool with as root
- iftop
How to Copy a Snapshot to S3 Storage
Because Golden Copy is logged in via ssh any snapshot can be used as a source path to copy data Therefore, copying a snapshot is no different than any other path on the PowerScale
NOTE: This will not support continuous sync mode since that depends on snapshot change tracking. This mode is a copy of a snapshot for a long term archive.
- Prerequisites
- Add an archived folder with S3 target configuration. See below on path considerations when copying a snapshot.
- If the snapshot is higher up the file system than the folder archive path (i.e. a snapshot on /ifs/data and an archived folder on /ifs/data/toarchive) than the archived folder, then the archived folders' base path will be used for the file system walk of files to copy.
- If the snapshot is lower down the file system (i.e. a snapshot on /ifs/data/toarchive/somesubdir and an archived folder of `/ifs/data/toarchive'), then the snapshot path will be used as the root for the file system walk to copy files.
- Command to specify a snapshot path to be copied:
- searchctl archivedfolders archive --id xxxx --snapshot <snapshotName> (where xxxx is the id of the archive folder ID and snapshot name is the name of the snapshot in the Onefs Gui).
- searchctl archivedfolders archive --id xxxx --snapshot <snapshotName> (where xxxx is the id of the archive folder ID and snapshot name is the name of the snapshot in the Onefs Gui).
- Done.
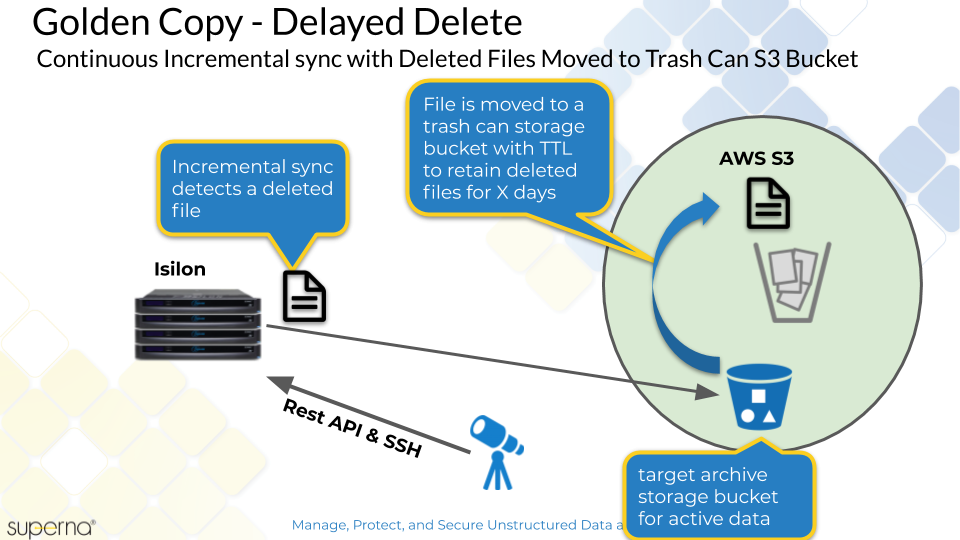
How to Configure Delayed Deletes with Sync Mode
-
This feature allows protecting deleted files that need to be retained for a period of time. This feature uses a 2nd storage bucket to hold deleted files, and uses the time to live feature on a storage bucket to auto delete files created in the bucket after x days. This storage bucket life cycle policy is configured manually on the storage bucket following S3 target documentation.
- This provides a recovery location for deleted data in sync mode and allows a retention period in days to allow recovery using the life cycle management feature of S3 storage buckets.
Overview
Requirements:
- The S3 storage provider must be the same for the target storage bucket and the trash can storage bucket
- The TTL expiry policy must be created on the trash can storage bucket using the S3 target device documentation. This value is generally set in days to retain a file before it is deleted automatically.
How to Configure Delayed Delete Mode
- Add a folder and use the --recyclebucket option to specify the name of the S3 storage bucket that will act as the trash can for deleted files
- Example only: searchctl archivedfolders add --isilon gcsource --folder /ifs/gcdeletetest --accesskey xxxxxxxxx --secretkey yyyyyyyyyy --endpoint s3.regionname.amazonaws.com --region region --bucket targetbucketname --cloudtype aws --recyclebucket name-of-trashcan-bucket
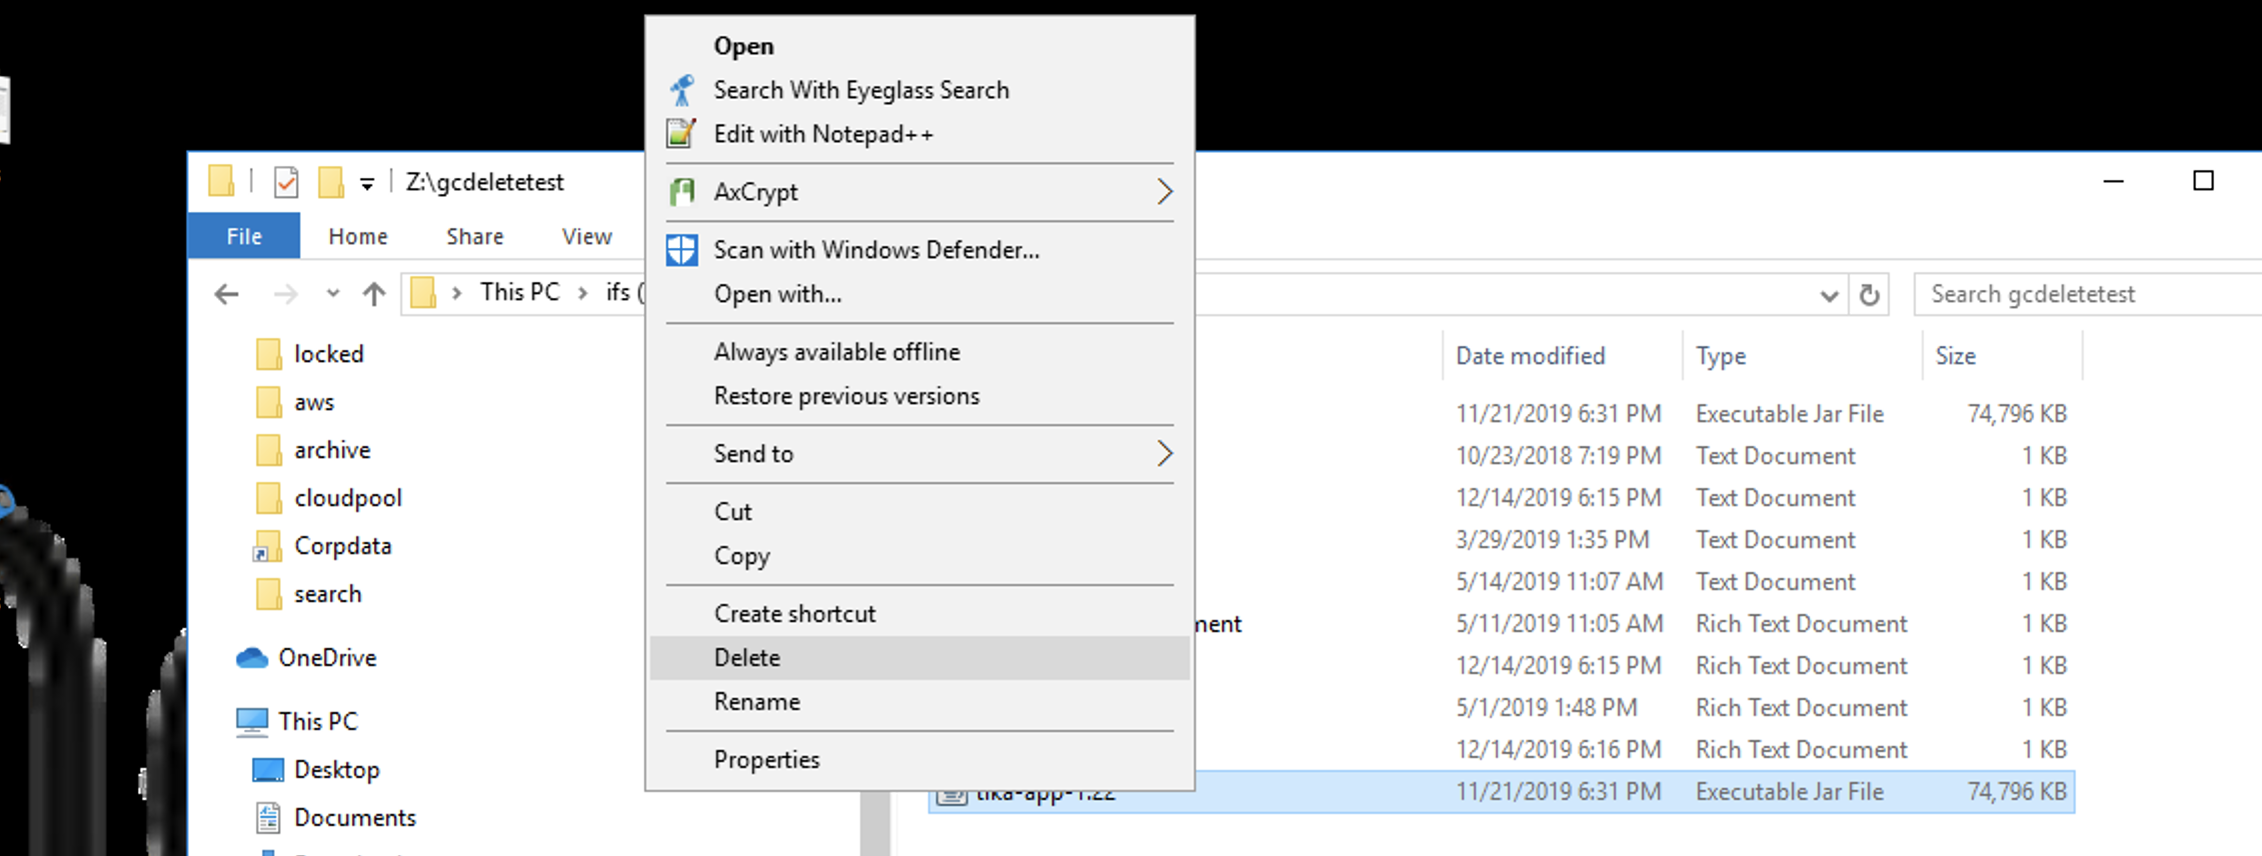
- See Screen shots of a storage bucket source and target after a file is deleted on the source cluster path. NOTE: The incremental job runs to detect file changes to the path including deletes. When a file is detected as deleted and --recyclebucket option is used the file is moved to the trash can bucket and then deleted from the target S3 storage bucket configured on the archive path.
- File is deleted from source path:
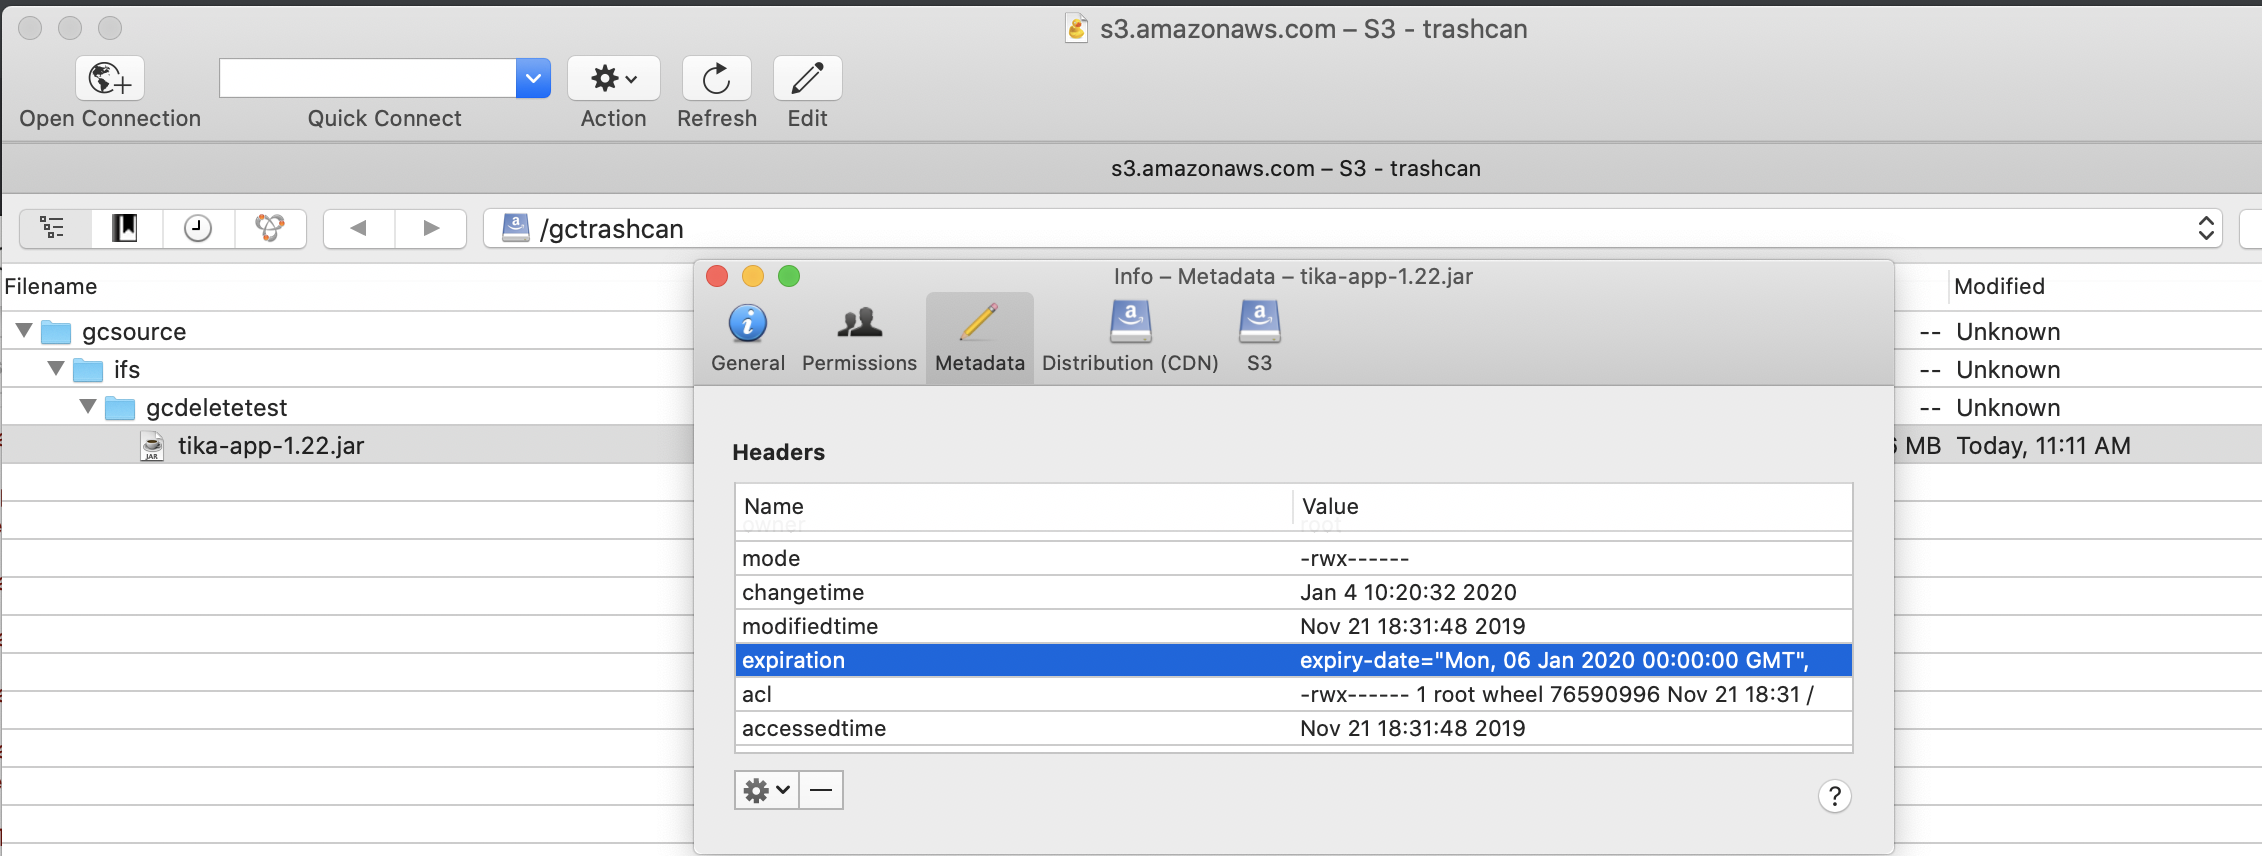
- File in the trash can bucket showing the expiry property is set:
- Done
How to list and change System Scheduled Tasks
- INVENTORY - This collects networking , user information from the cluster
- PERSIST_JOBS_HISTORY - this job syncs job status and history to on disk backup copy
- UPDATE_SNAPSHOTS - Used for Search & Recover 1.1.5 or later releases to make sure content indexing snapshot alias always points to a current snapshot and avoids content ingestion errors due to expired snapshots. Defaults to daily.
- SYNC_ARCHIVEDFOLDER_SCHEDULES - This job polls the the Golden Copy configuration to update the master scheduling container. Consult with support.
- To list all system scheduled tasks
- searchctl schedules list
How to Configure a Folder Alias to Handle: Cluster Decommission Use Case, Source Cluster Name Change, Switch to DR cluster as data source and Data full Copy
- Use Cases: A Cluster is decommissioned, a clusters name is changed, switching to the DR cluster to copy data, or creating a new full copy data under a new the folder.
- Each of these use cases leaves the data in the bucket under the old cluster name folder at the root of the storage bucket. This solution allows creating an alias to override the folder name used to store data in the bucket . The objective is to allow a new cluster to use the older folder name for archive and recall jobs to gain access to data previously copied from another cluster.
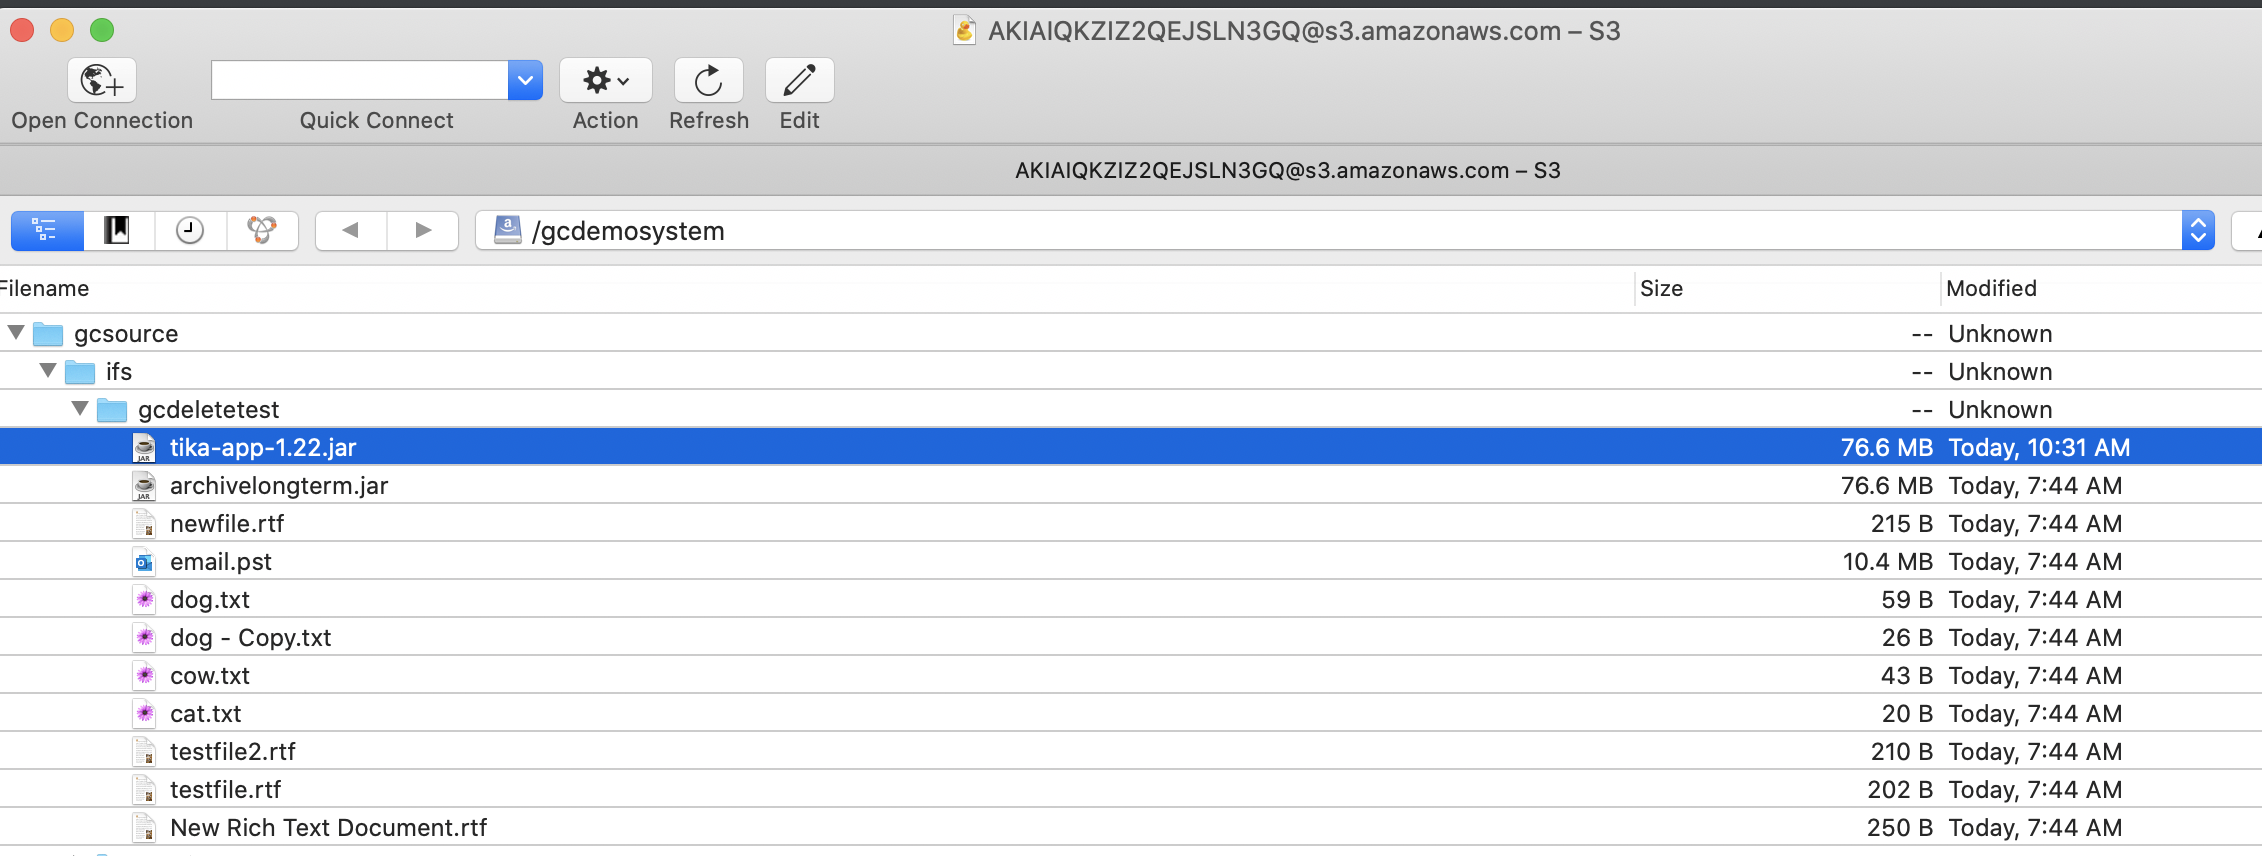
- See screenshot below shows data is stored under a cluster named gcsource
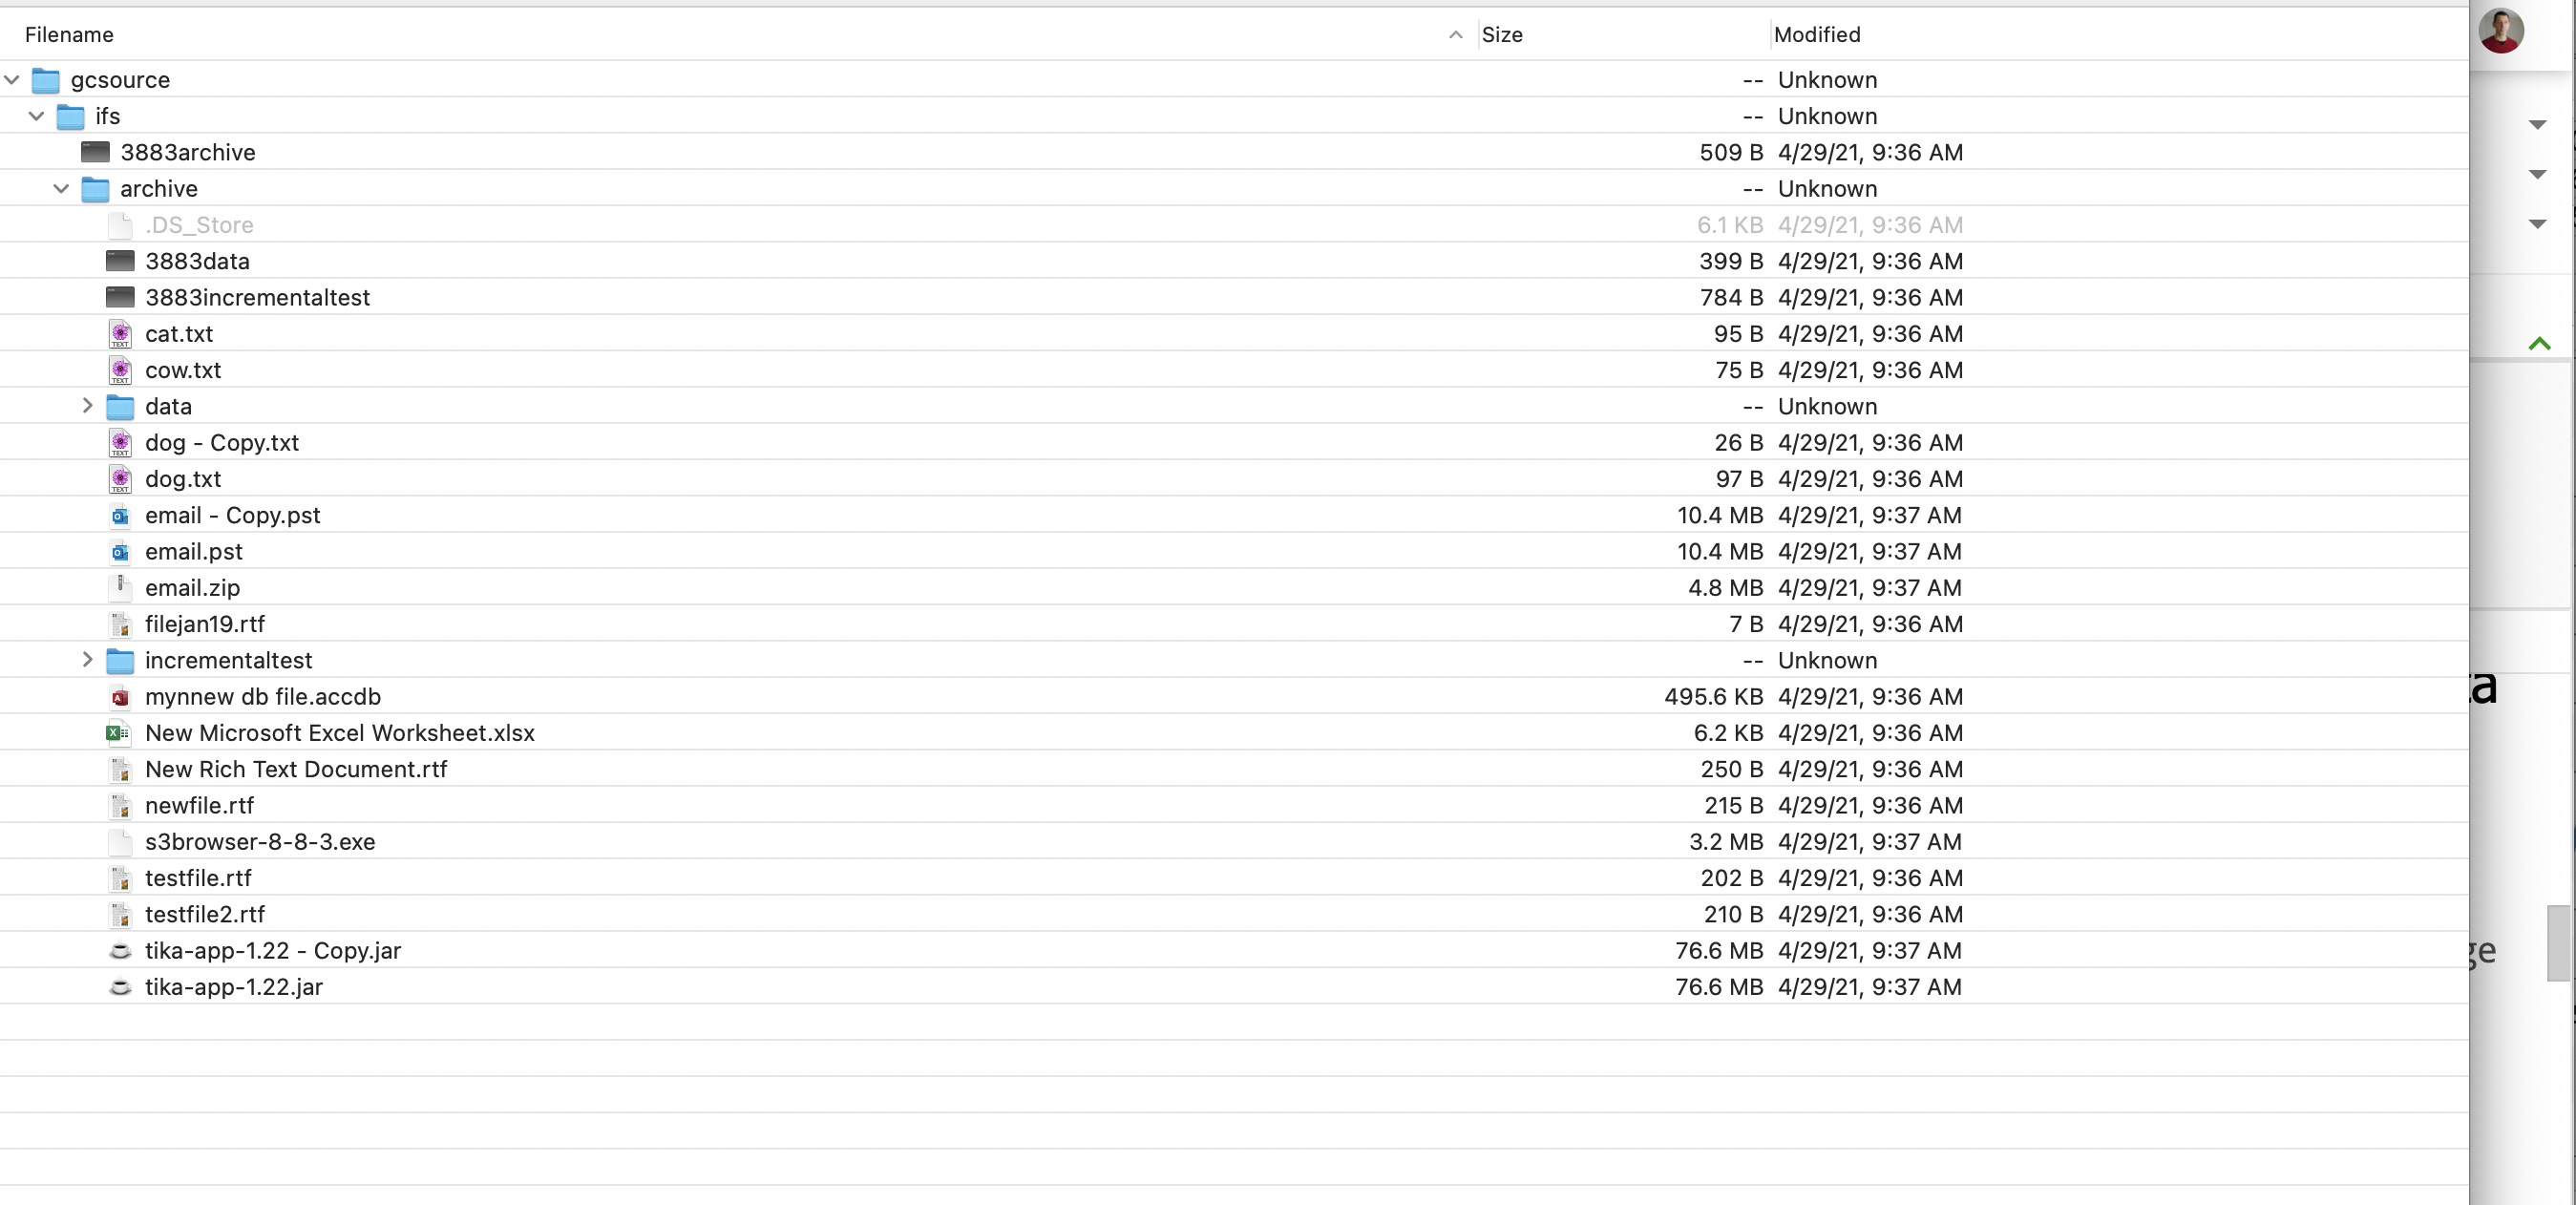
- The solution is to copy data or recall data under the previous cluster folder name of "gcsource" but using data stored on a new cluster . An alias is created on the folder definition to copy data into the same tree structure in the storage bucket when the cluster name and the folder name in the bucket do not match.
- Example 1: old cluster name "gcsource" and new cluster is "gctarget". Use this command to change the folder name used to copy or recall data on a folder definition.
- A new folder definition is created to connect to the new cluster but adds an alias that references the old cluster name.
- searchctl archivedfolders add --isilon gctarget --folder path yyy (add authentication flags, bucket and endpoint flags) --source-path gcsource
- This folder definition is connecting to cluster gctarget but using a folder alias of gcsource, this will copy data into the storage bucket under the folder gcsource where the old data is stored.
- A new folder definition is created to connect to the new cluster but adds an alias that references the old cluster name.
- Example 2: Create a new full copy of data under a new folder alias.
- In this example a folder definition is modified to add an alias for the cluster name, this will cause data to be copied under a new folder at the base of storage bucket.
- searchctl archivedfolders modify --id xxxx --source-path newcopy
- In this example an existing folder is modified to copy data under a new folder root named newcopy. The original data is left under the original folder named after the cluster. All copy and archive jobs will now use the new folder name.
- NOTE: The old data will remain under the old folder name and will not be used for copy or recall jobs.
- Example 1: old cluster name "gcsource" and new cluster is "gctarget". Use this command to change the folder name used to copy or recall data on a folder definition.
- Each of these use cases leaves the data in the bucket under the old cluster name folder at the root of the storage bucket. This solution allows creating an alias to override the folder name used to store data in the bucket . The objective is to allow a new cluster to use the older folder name for archive and recall jobs to gain access to data previously copied from another cluster.
Storage Target Configuration Examples
Dell ECS S3 bucket creation steps
- Login to ECS and open the Manage and then users tab.
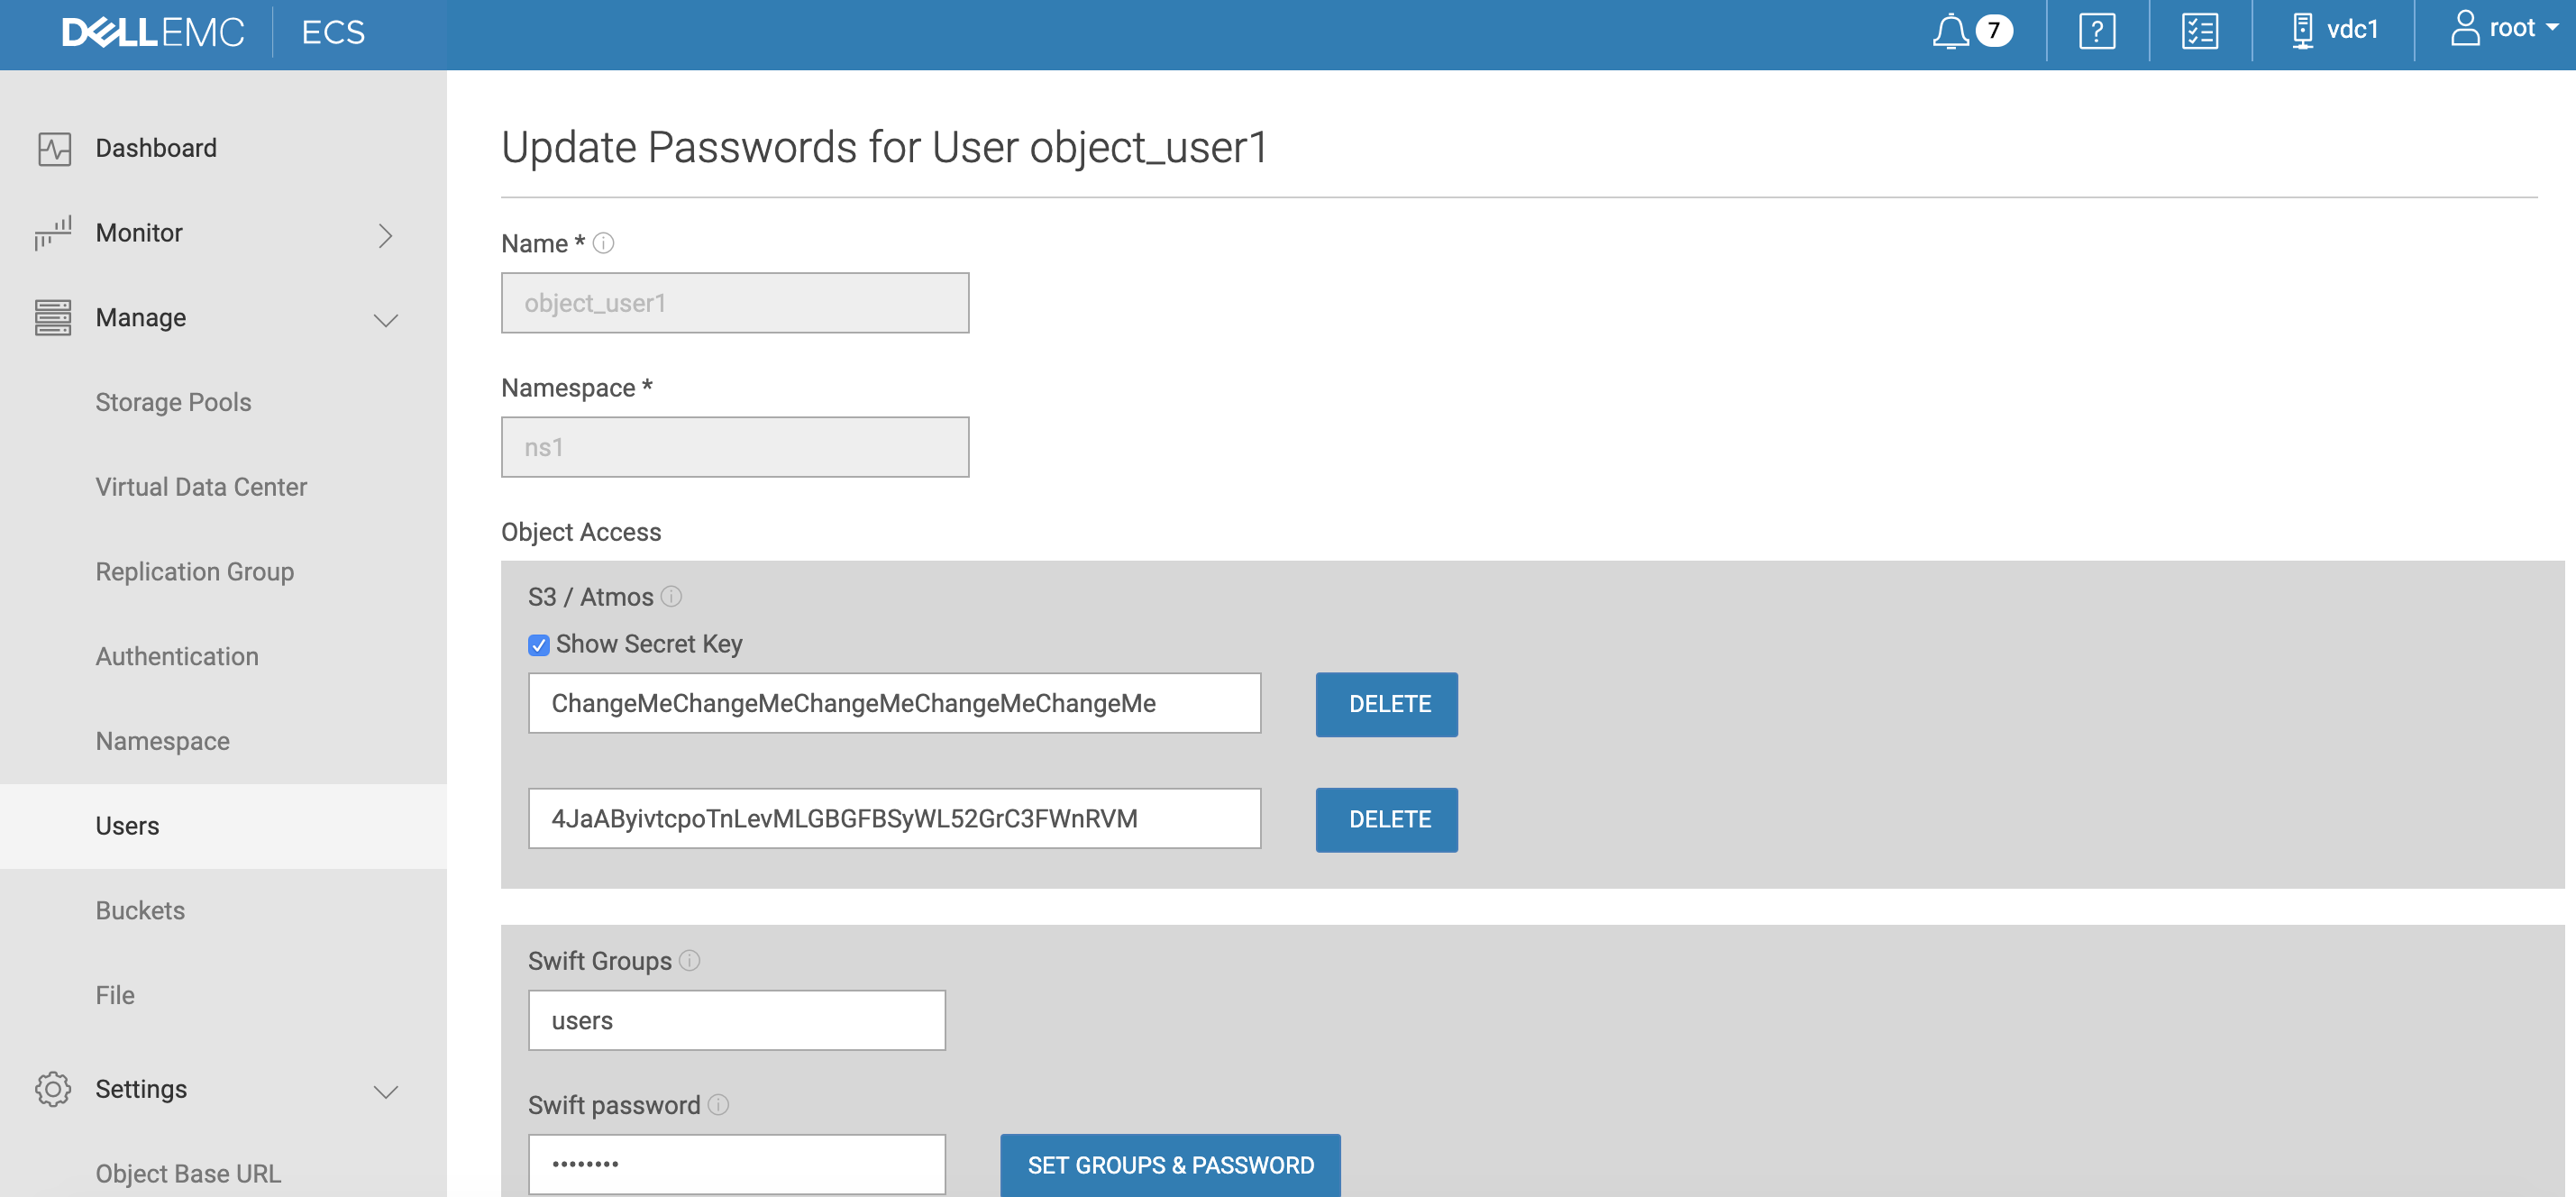
- Edit object_user1 .
- Generate a new secret key :
- Now click on the buckets menu tab.
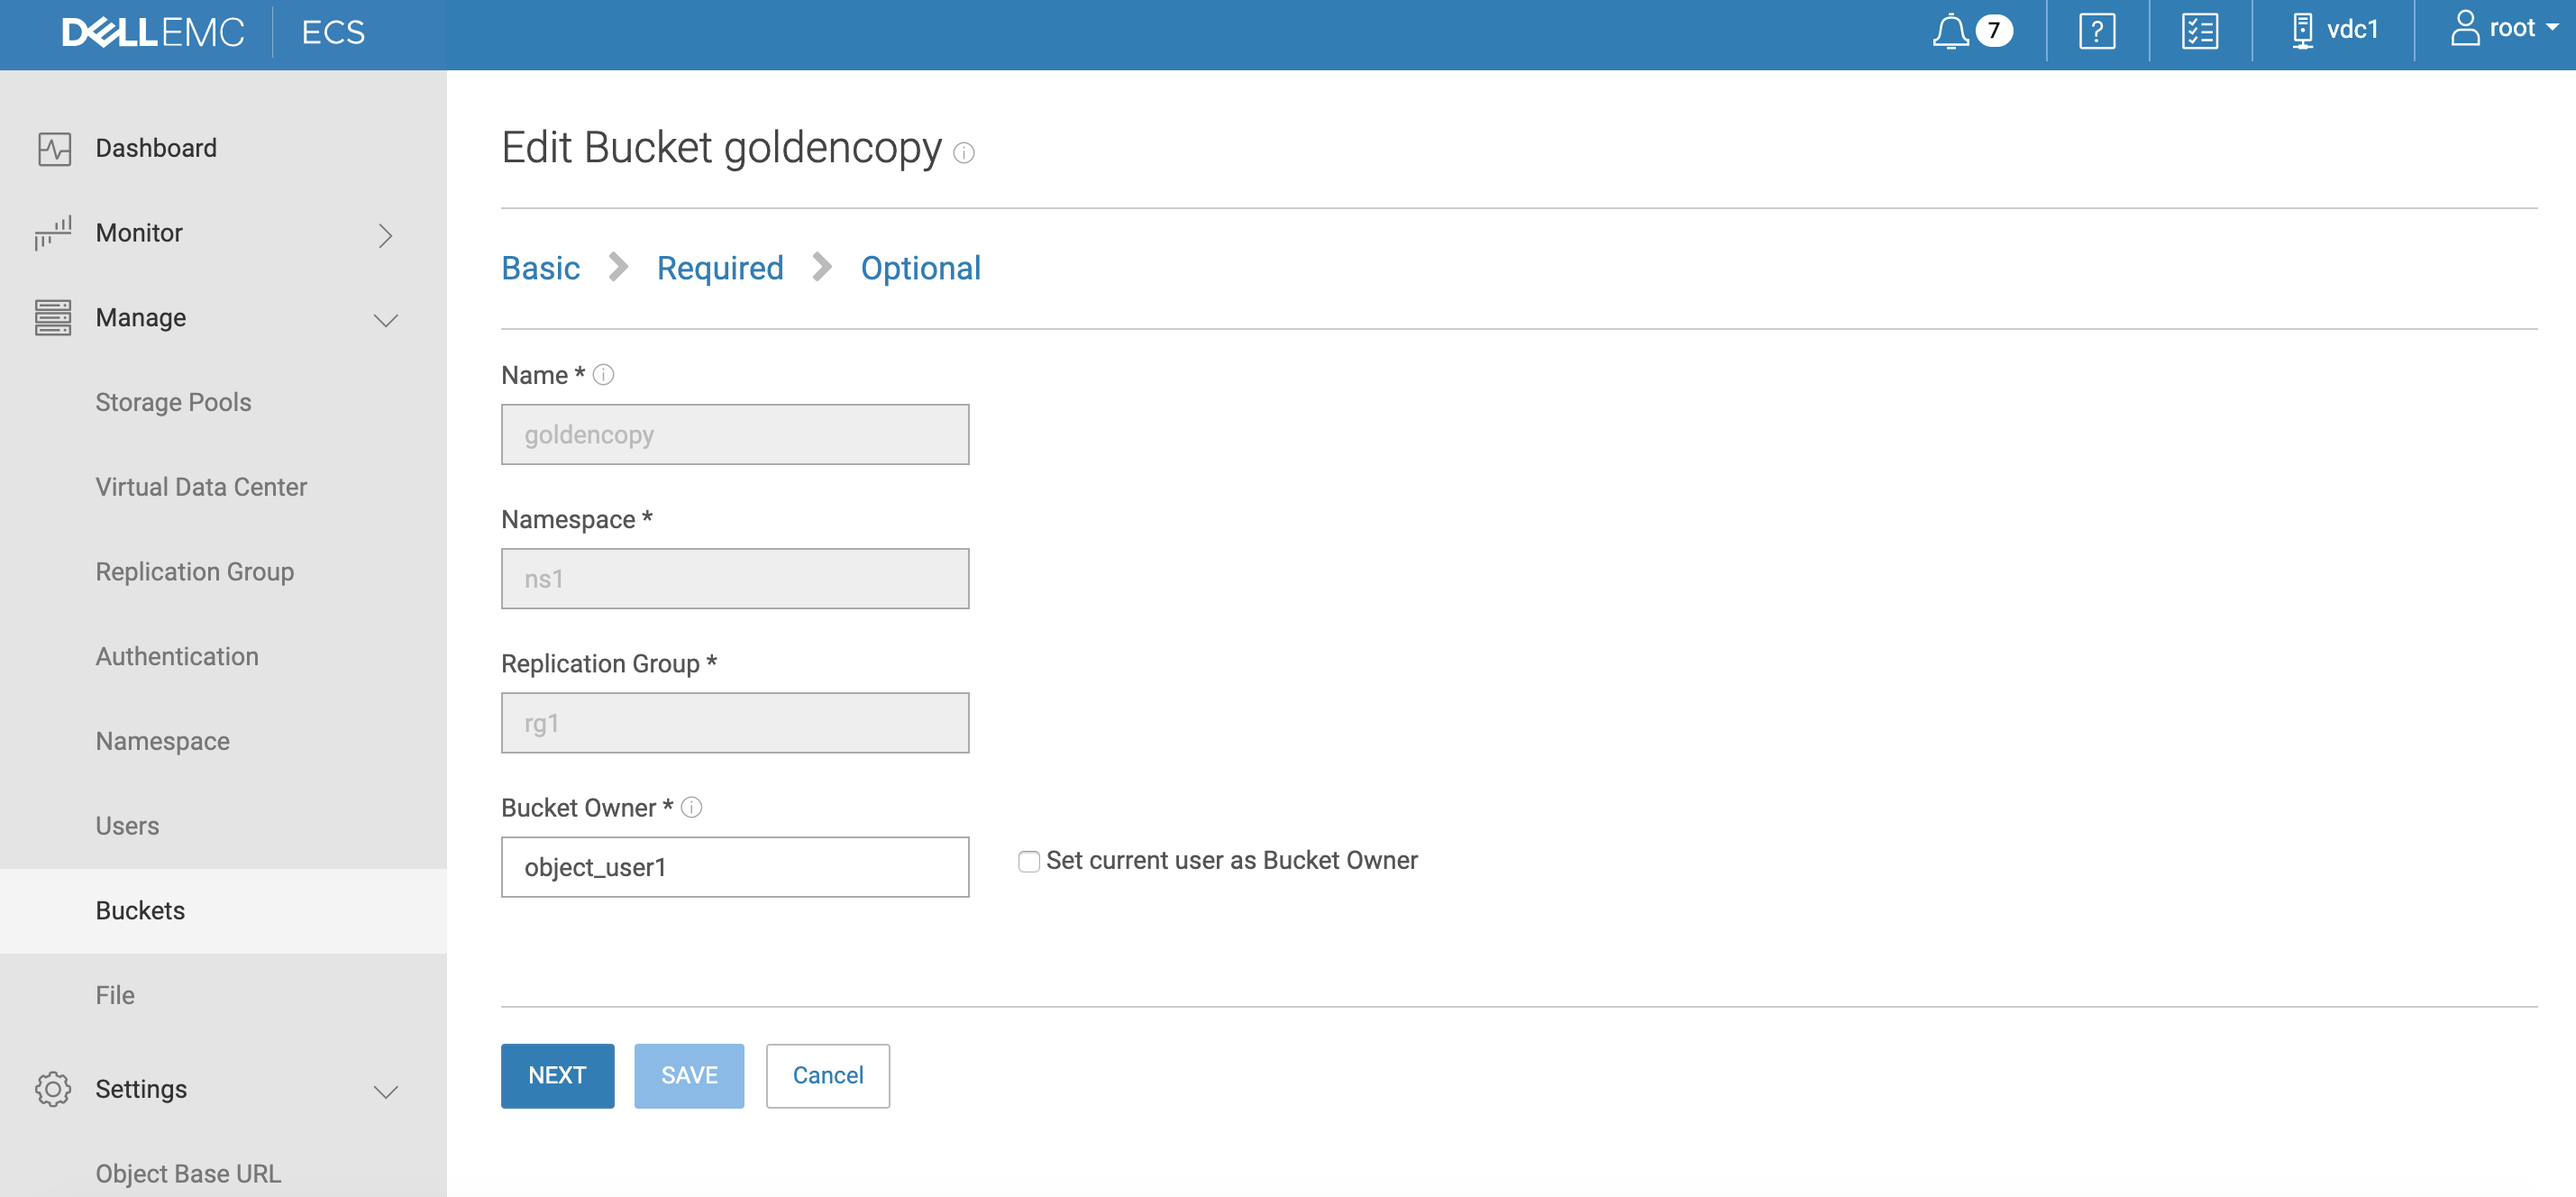
- Create a new bucket and enter a name along with the the owner set to the object_user1 user. Click next .
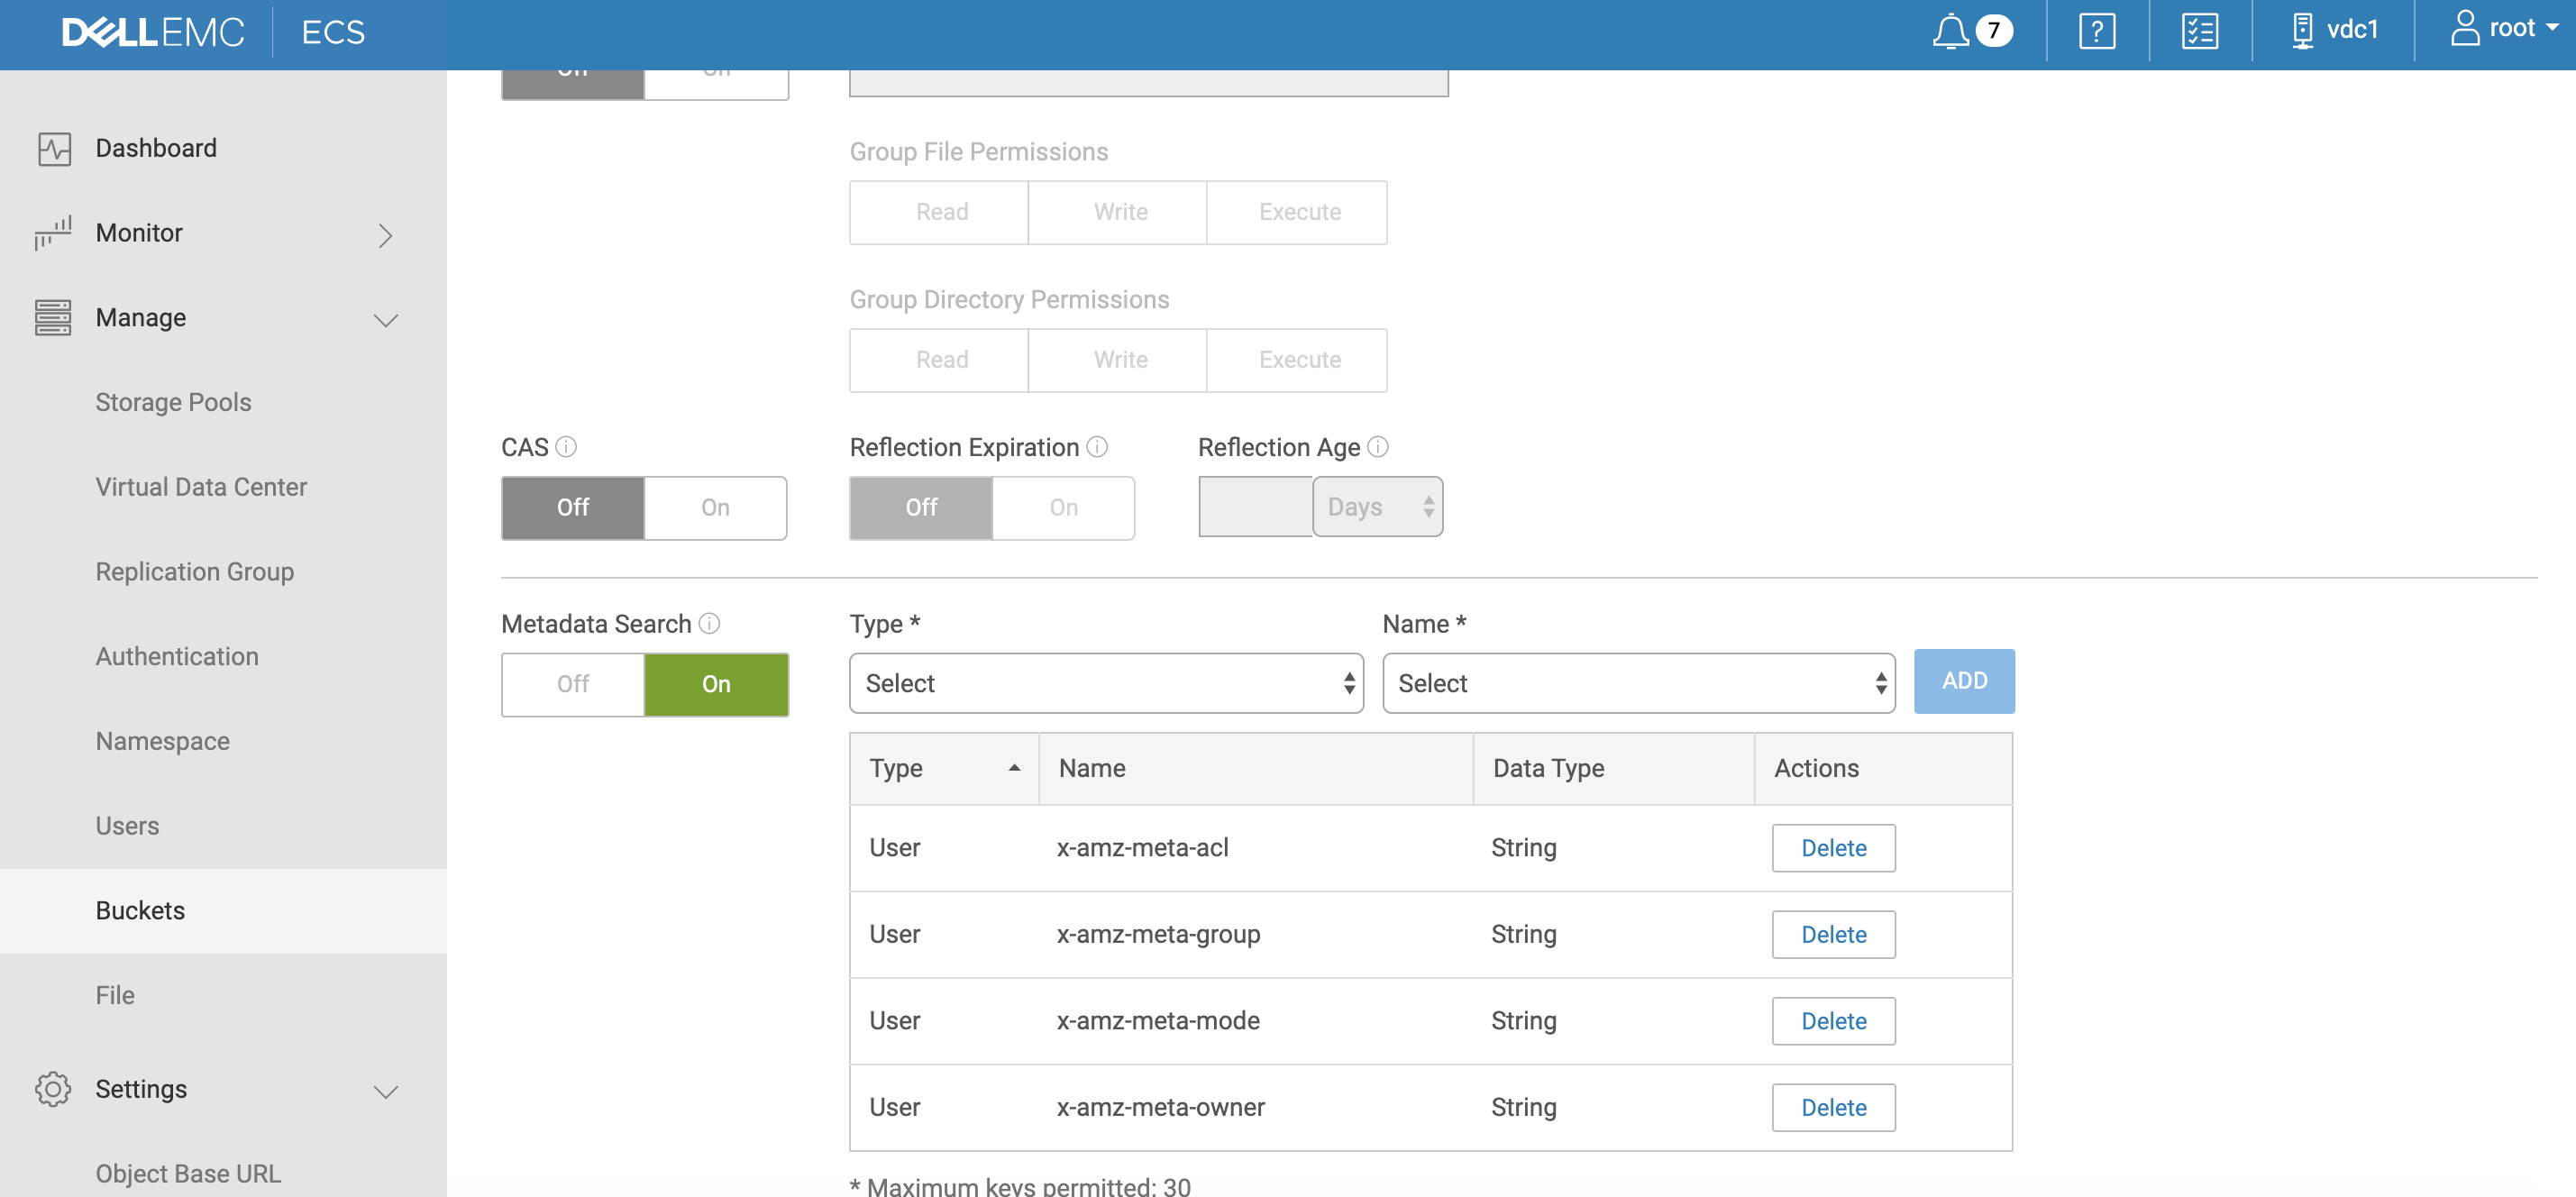
- Enable metadata search and enter metadata tags that will be indexed.
- Click add, select user, and enter tags as per screenshot below with type set to string:
- Done
Amazon AWS Bucket Creation Walk Through
- Complete Steps to the storage bucket
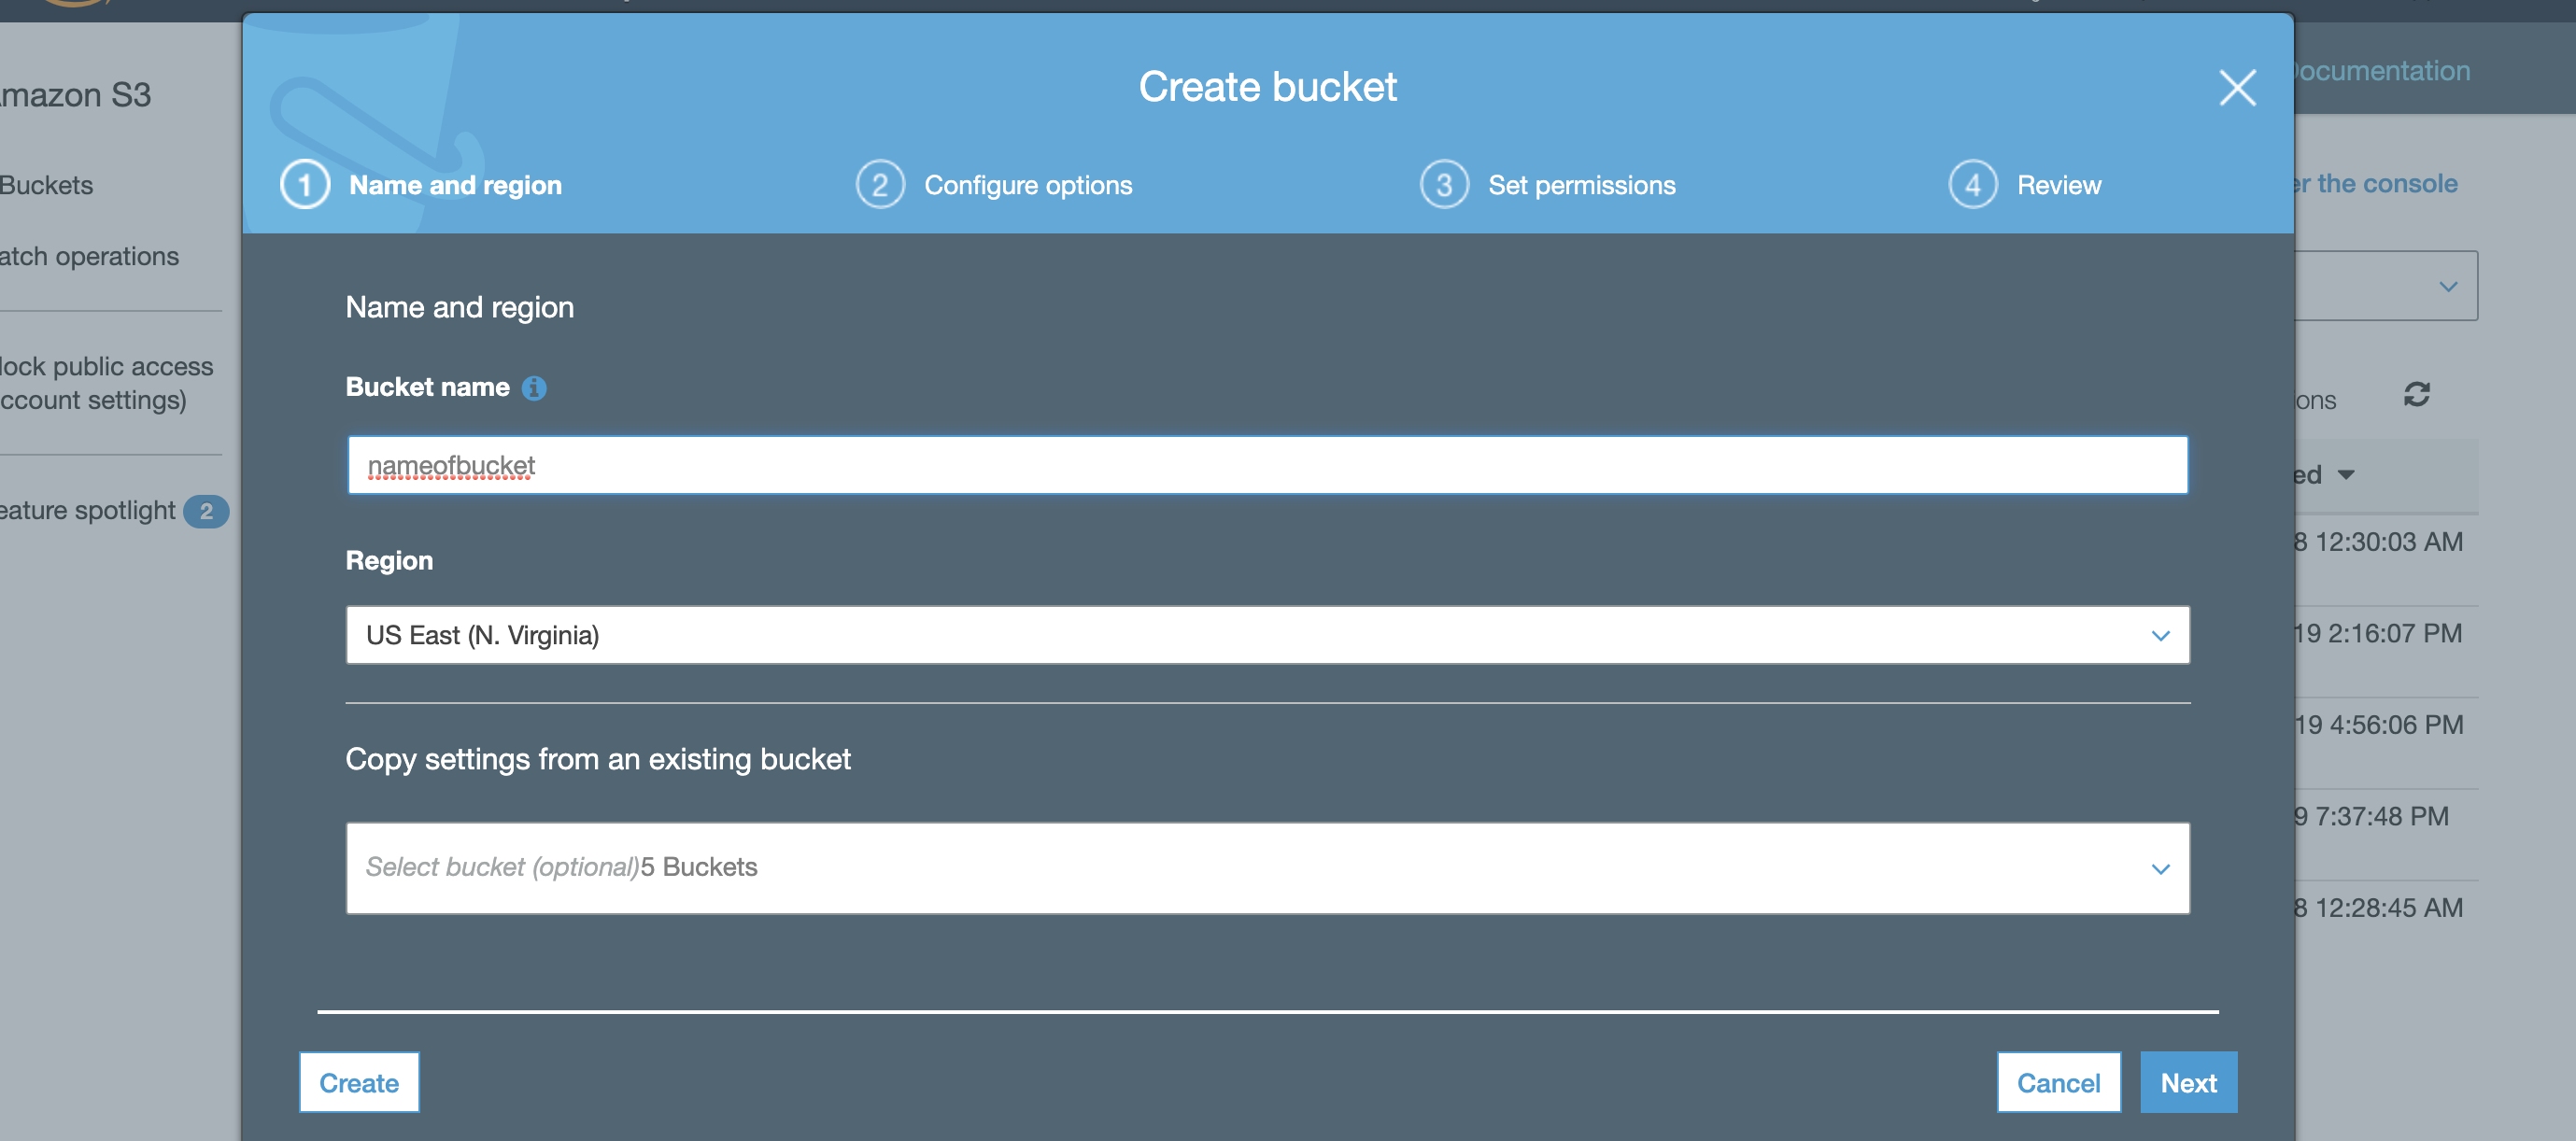
- Login to Amazon web console .
- Select S3 service .
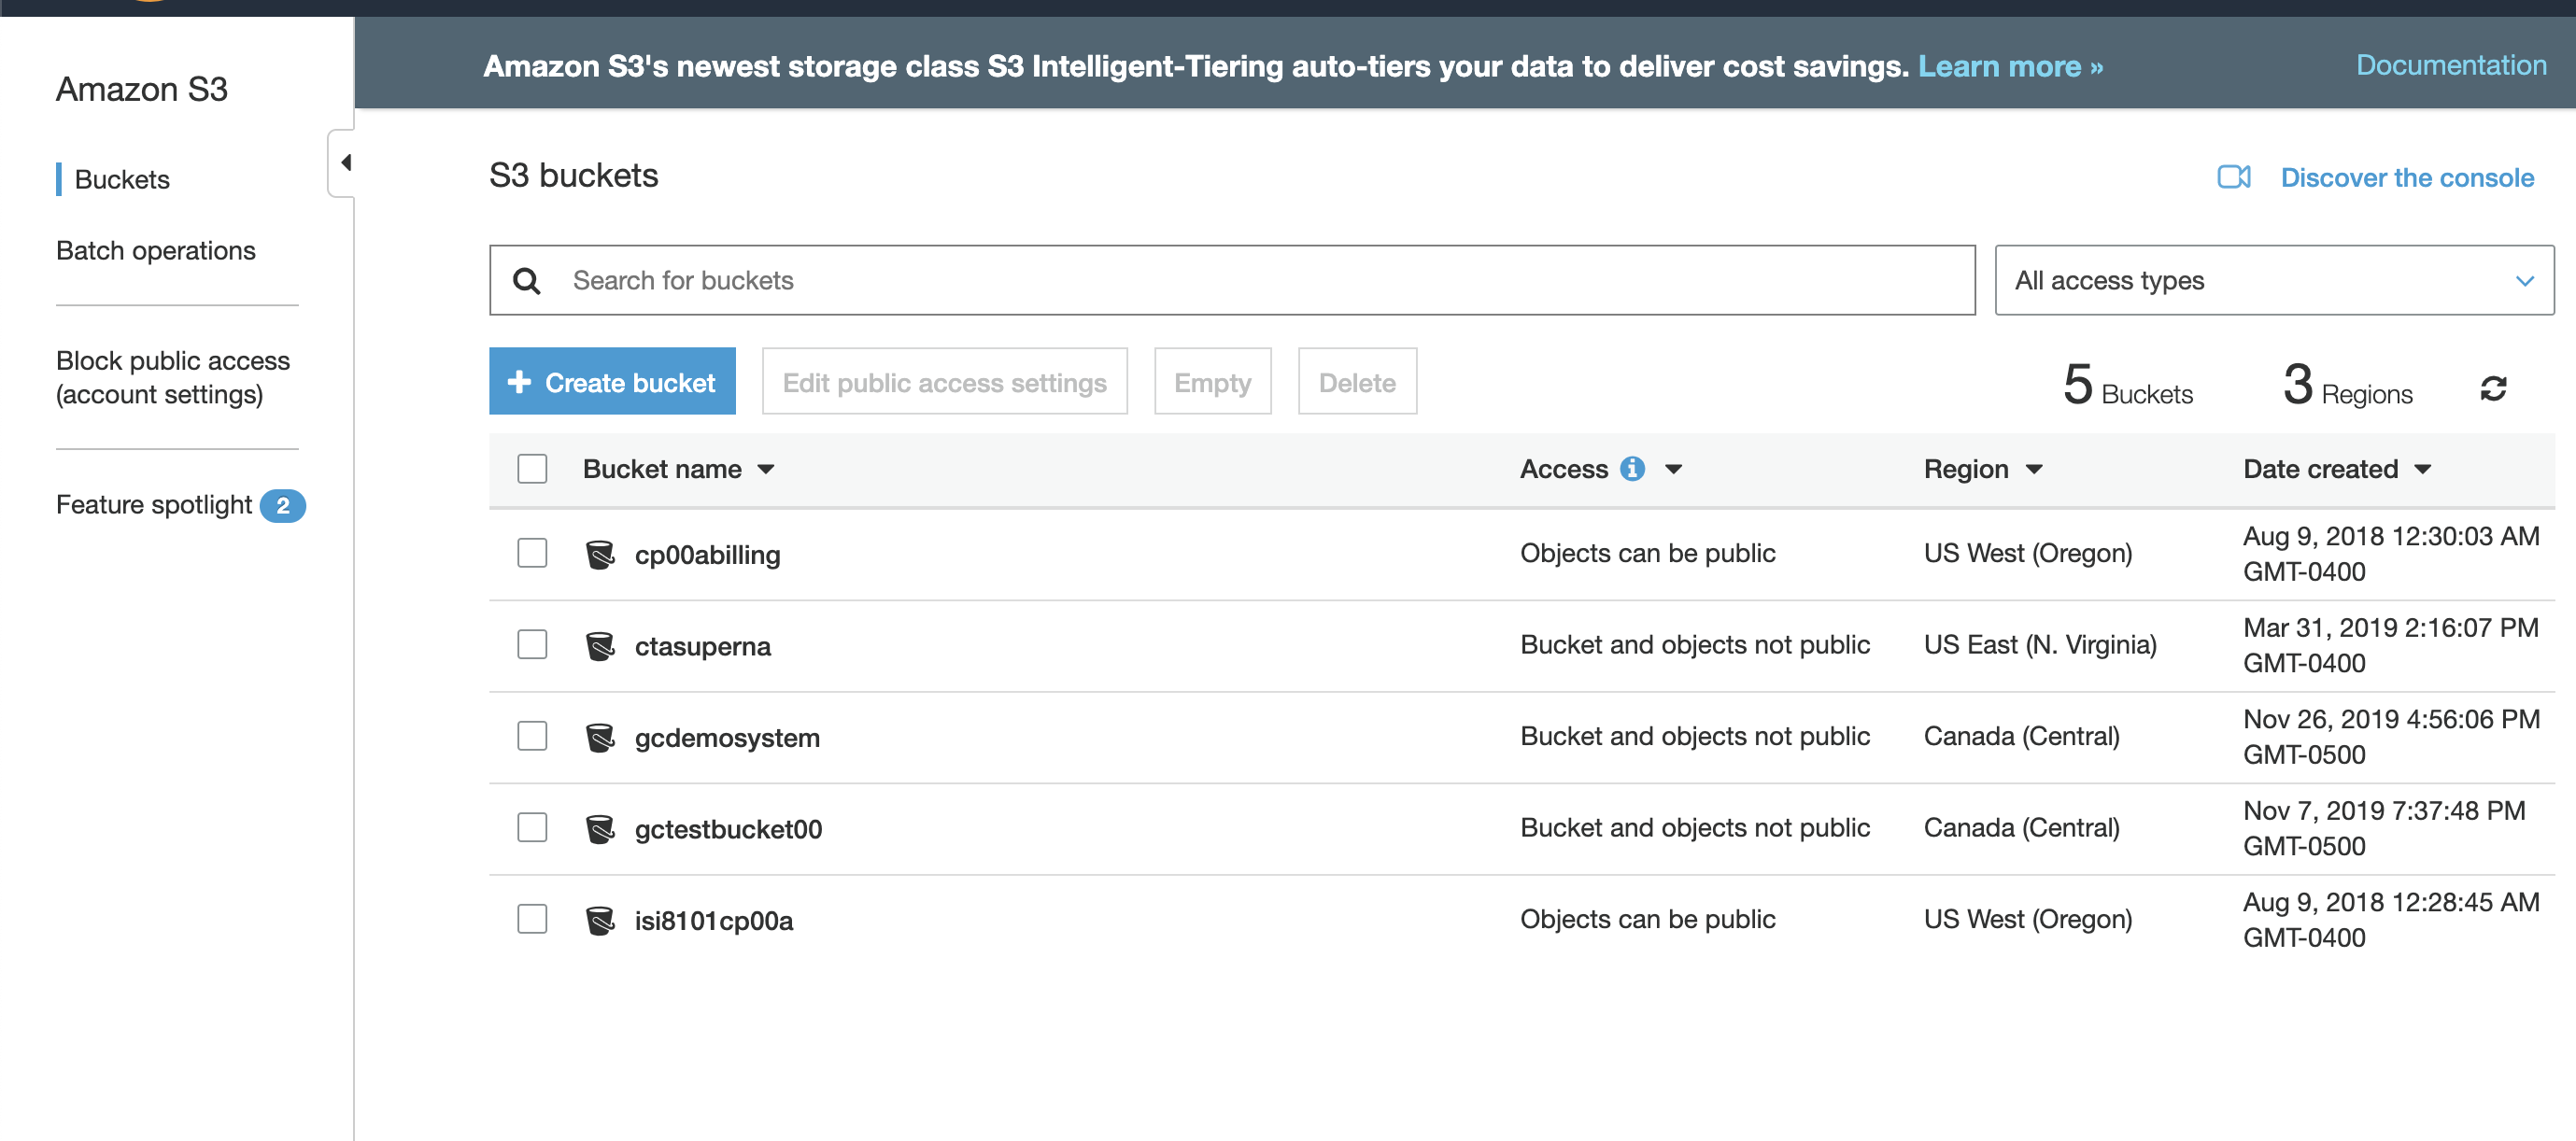
- Click Create bucket.
- Enter the bucket name, select a region for your bucket, and click create.
How to setup minimum permissions in AWS for Golden Copy
S3 Policy Permissions Requirements
- S3 permissions lists the following policy scope options, indicating optional and mandatory resource scope:
- Access Point (Optional) - This is used with AWS SDK, CLI or REST API. Access point create and usage is documented here https://docs.aws.amazon.com/AmazonS3/latest/dev/using-access-points.html If you use Access points you need to specify the access point ARN in the policy, and assign the access point to the bucket (see AWS documentation).
- Example: Access point url has the following syntax
- Access point ARNs use the format
arn:aws:s3:.region:account-id:accesspoint/resource - Example: AWS URL that must be used when adding an archive folder
s3-accesspointname.Region.amazonaws.com
- Access point ARNs use the format
- NOTE: Sample policy sets the Access point to * to all
- Example: Access point url has the following syntax
- Bucket (Mandatory) - The sample policy file includes a sample bucketname that must be replaced with your bucket name. This resource scope is mandatory in a policy.
- Jobs (Optional) - The jobs resource is not used by Golden Copy, is not required and the sample policy file sets this to * to all. Jobs is used to automate tasks against S3 buckets.
- Objects (Mandatory) - Golden Copy requires access to all objects with permissions set in the sample policy file. No restricted access to objects should be applied and this is unsupported to block access to objects in a storage bucket dedicated for Golden copy. (AWS documentation)
- Sample policy sets this resource scope to * to allow access to all objects.
- Access Point (Optional) - This is used with AWS SDK, CLI or REST API. Access point create and usage is documented here https://docs.aws.amazon.com/AmazonS3/latest/dev/using-access-points.html If you use Access points you need to specify the access point ARN in the policy, and assign the access point to the bucket (see AWS documentation).
Quick Start Method
NOTE: We recommend following the guide to learn how to create permissions. AWS supports JSON format policies. The sample policy can be downloaded here and pasted into the JSON tab of the AWS console.
NOTE: You must edit this file and replace the sample storage bucket name gcdemosystem with the name of the storage bucket. Find this string in the file and change the bucket name for your environment "arn:aws:s3:::gcdemosystem"
- Quick start Steps:
- Login to AWS console
- Goto IAM
- Click Policies left side menu
- Click Create policy
- Click JSON tab
- Copy and paste the fixed JSON example file into the policy create
- Click Review Policy
- Give the policy a name example Goldencopy
- Click Create Policy
- Now click Users on left menu
- Click add user add name goldencopy
- Click check box for Access type Programmatic access
- Click Next for permissions
- click Attach existing policies directly, search for the policy name you created above ex goldencopy. Select the check box to assign.
- Click through the rest of the options to create the user and record the access key and secret key needed to add archive folders.
- Done
Complete Steps to Create User and Policy Following All Steps (skip if you used quick start above)
- Open the IAMS User screen in AWS:
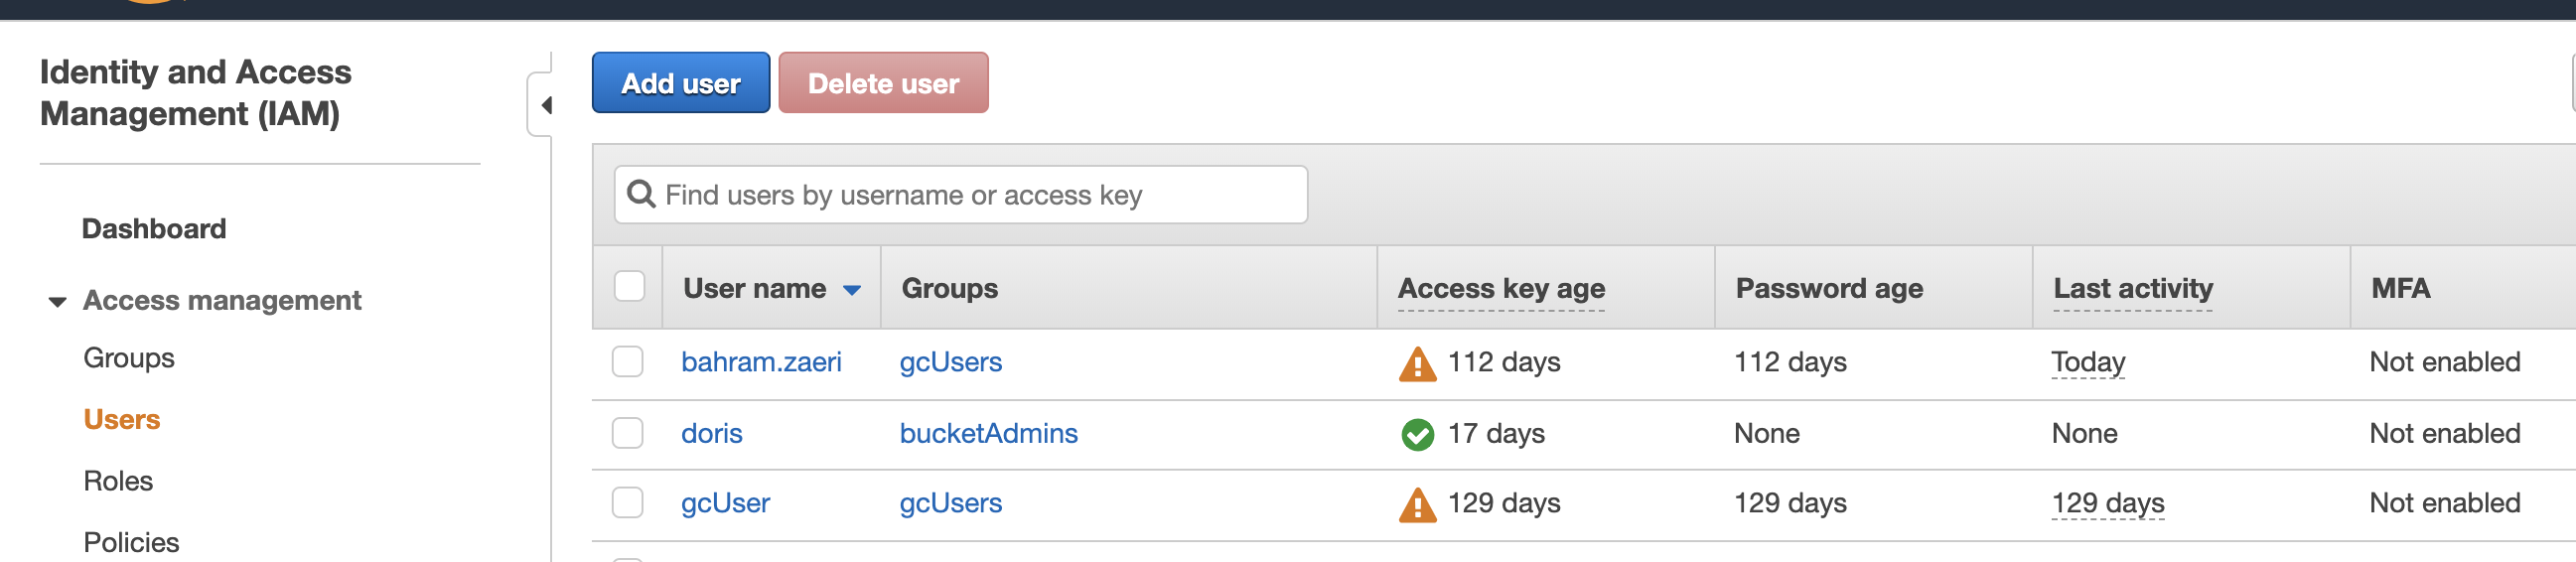
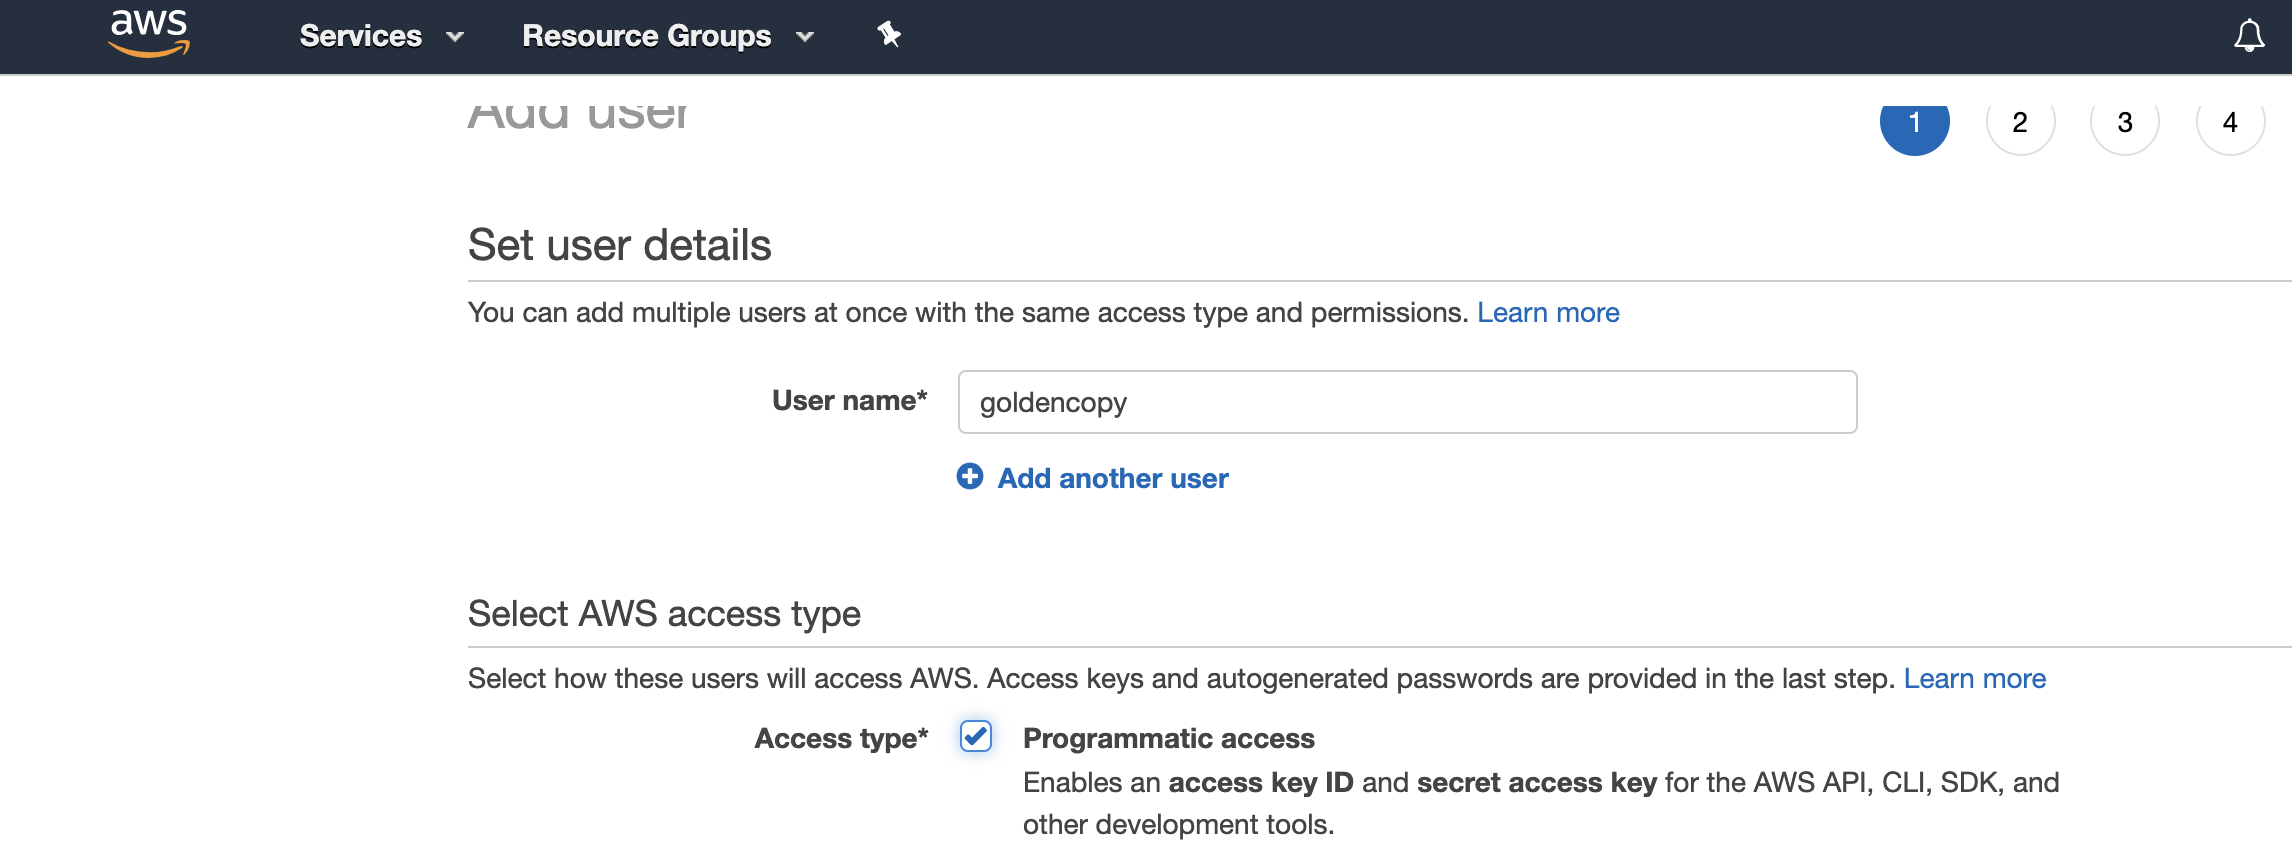
- Create new user with User name "goldencopy" and select the programmatic check box.
- Click Next.
- Change to "Attach existing policies directly" option.
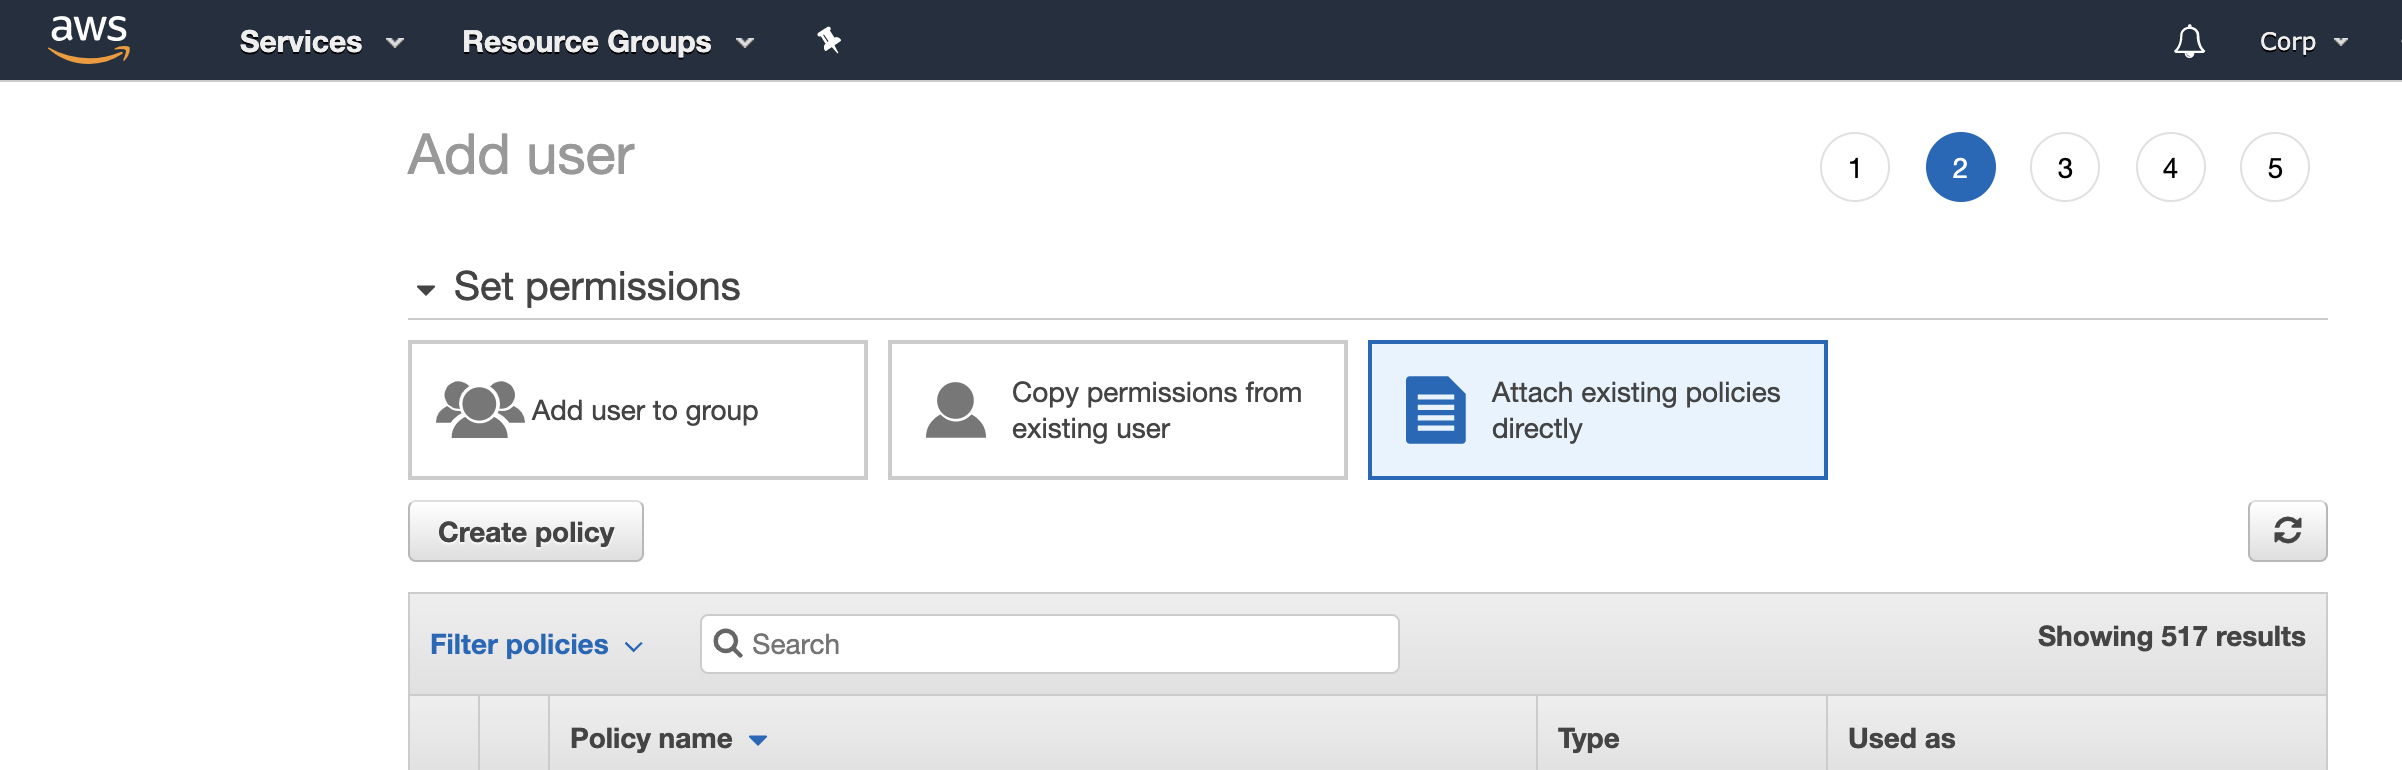
- Click the Create Policy button.
- Click on "Service" and type "S3" and select this service
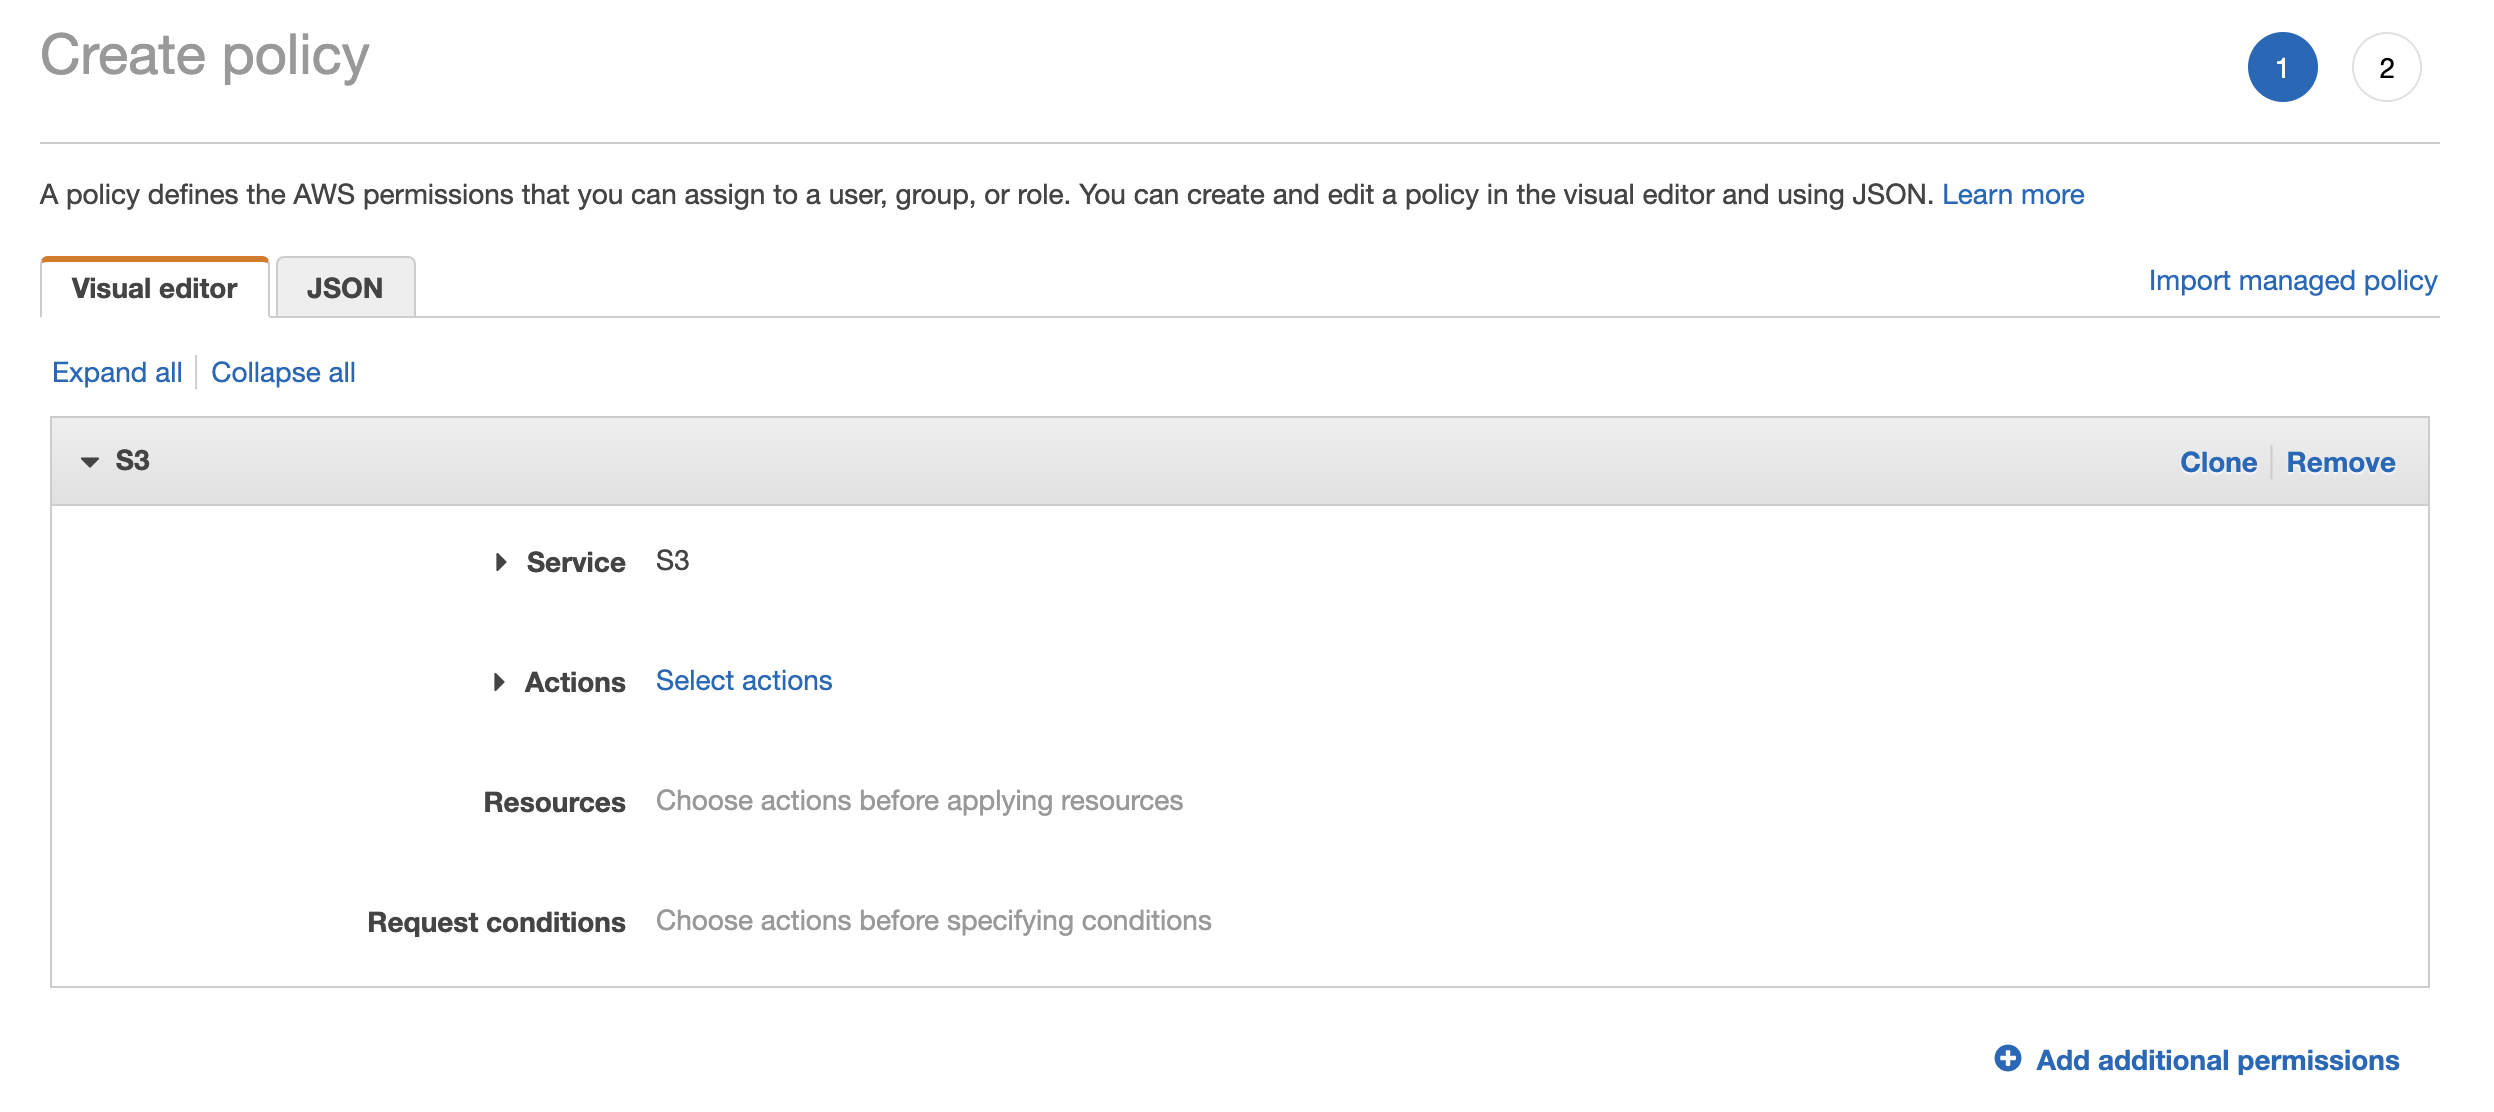
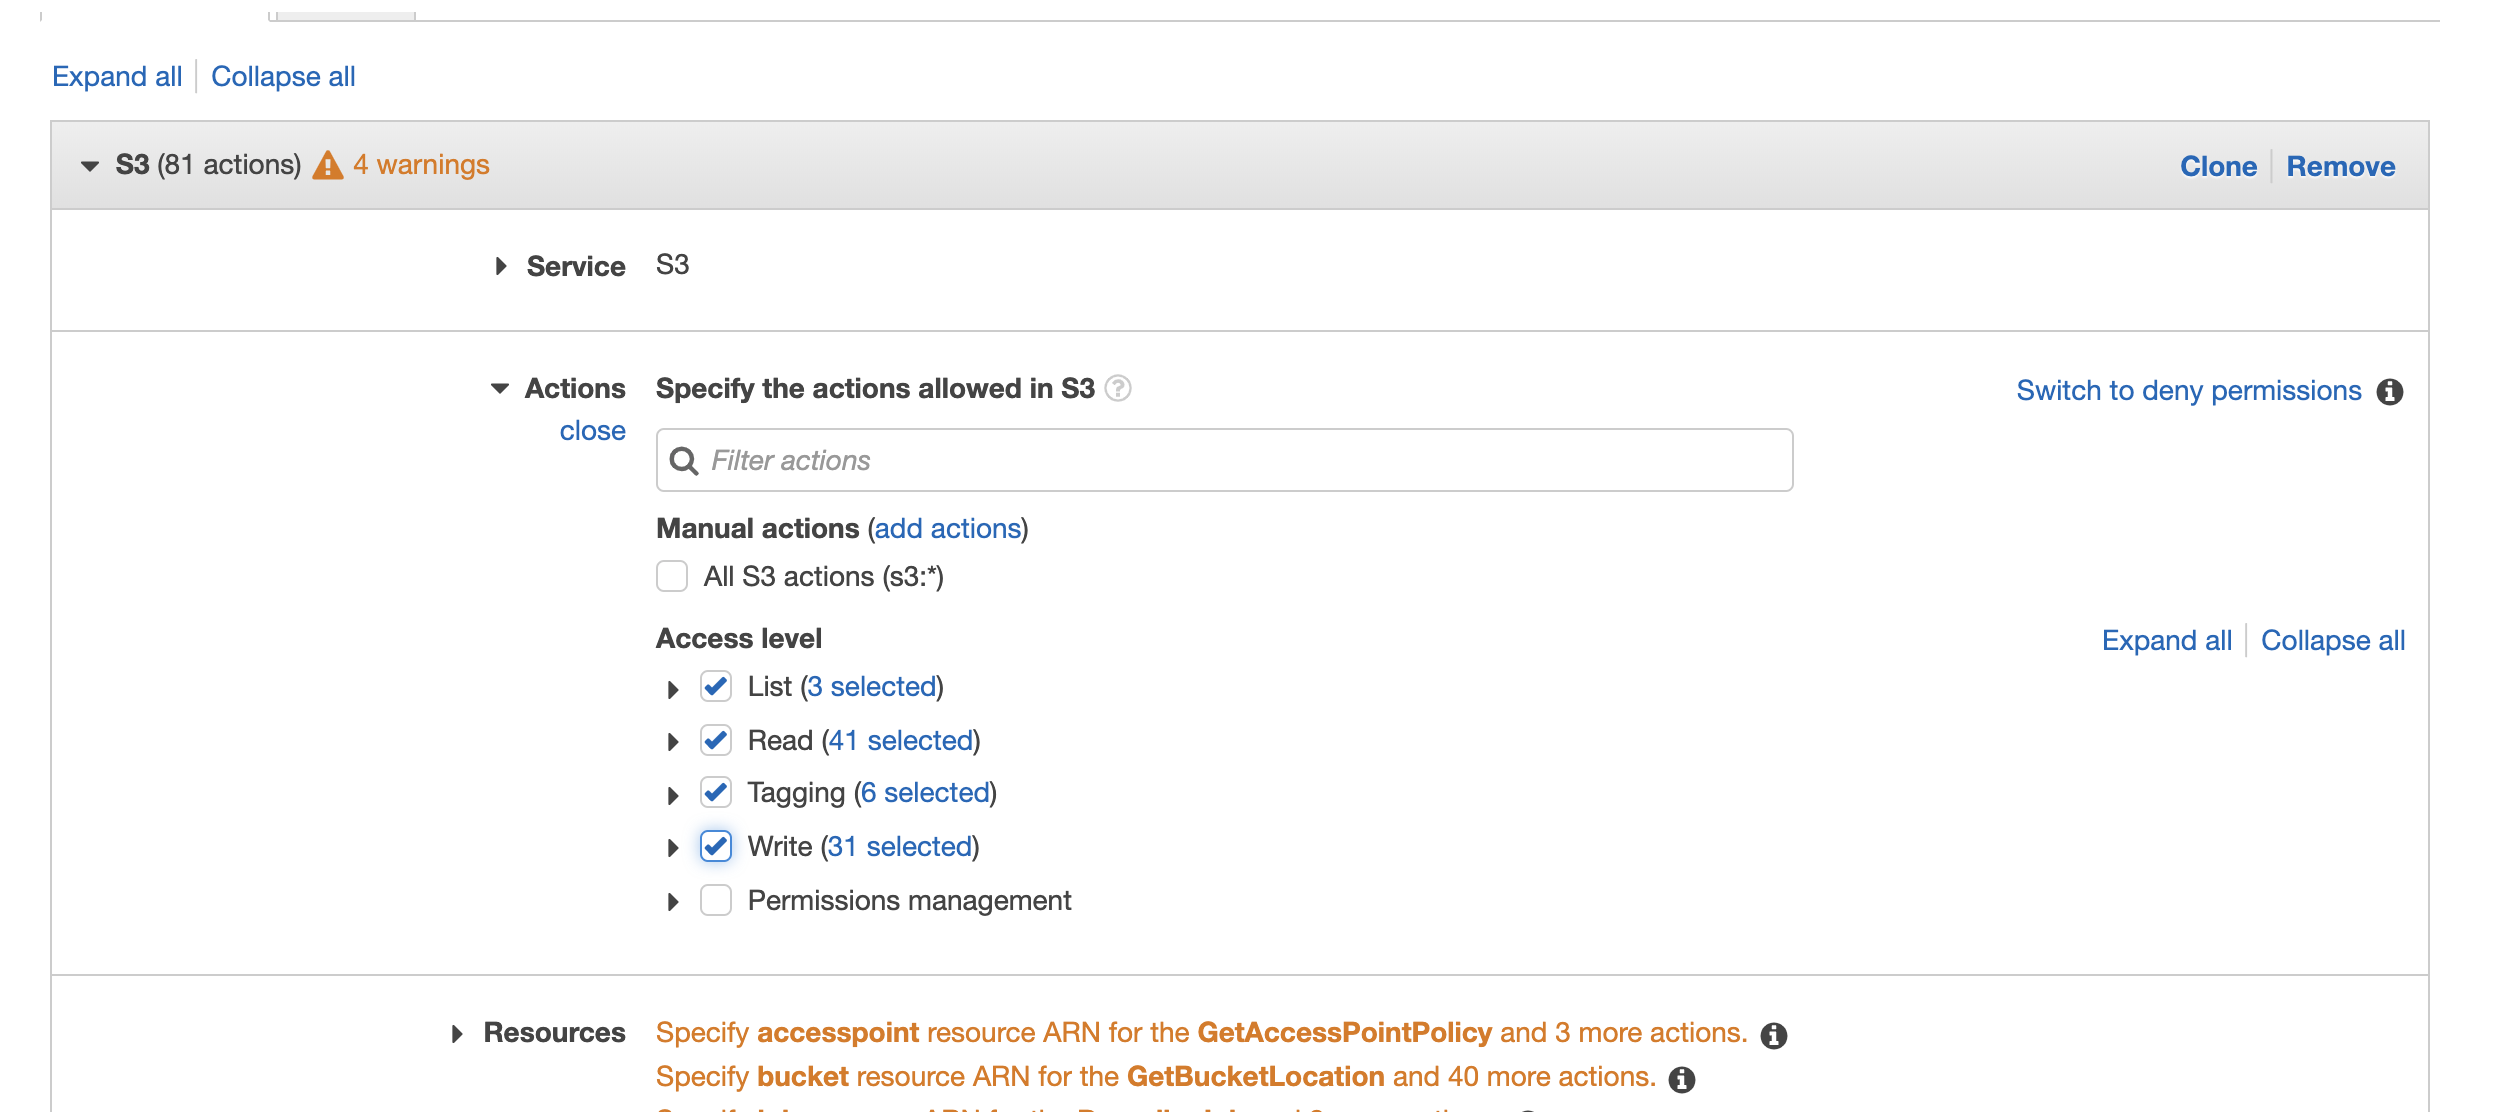
- Now Click "Select Actions".
- Select the permissions as per the screen shot.
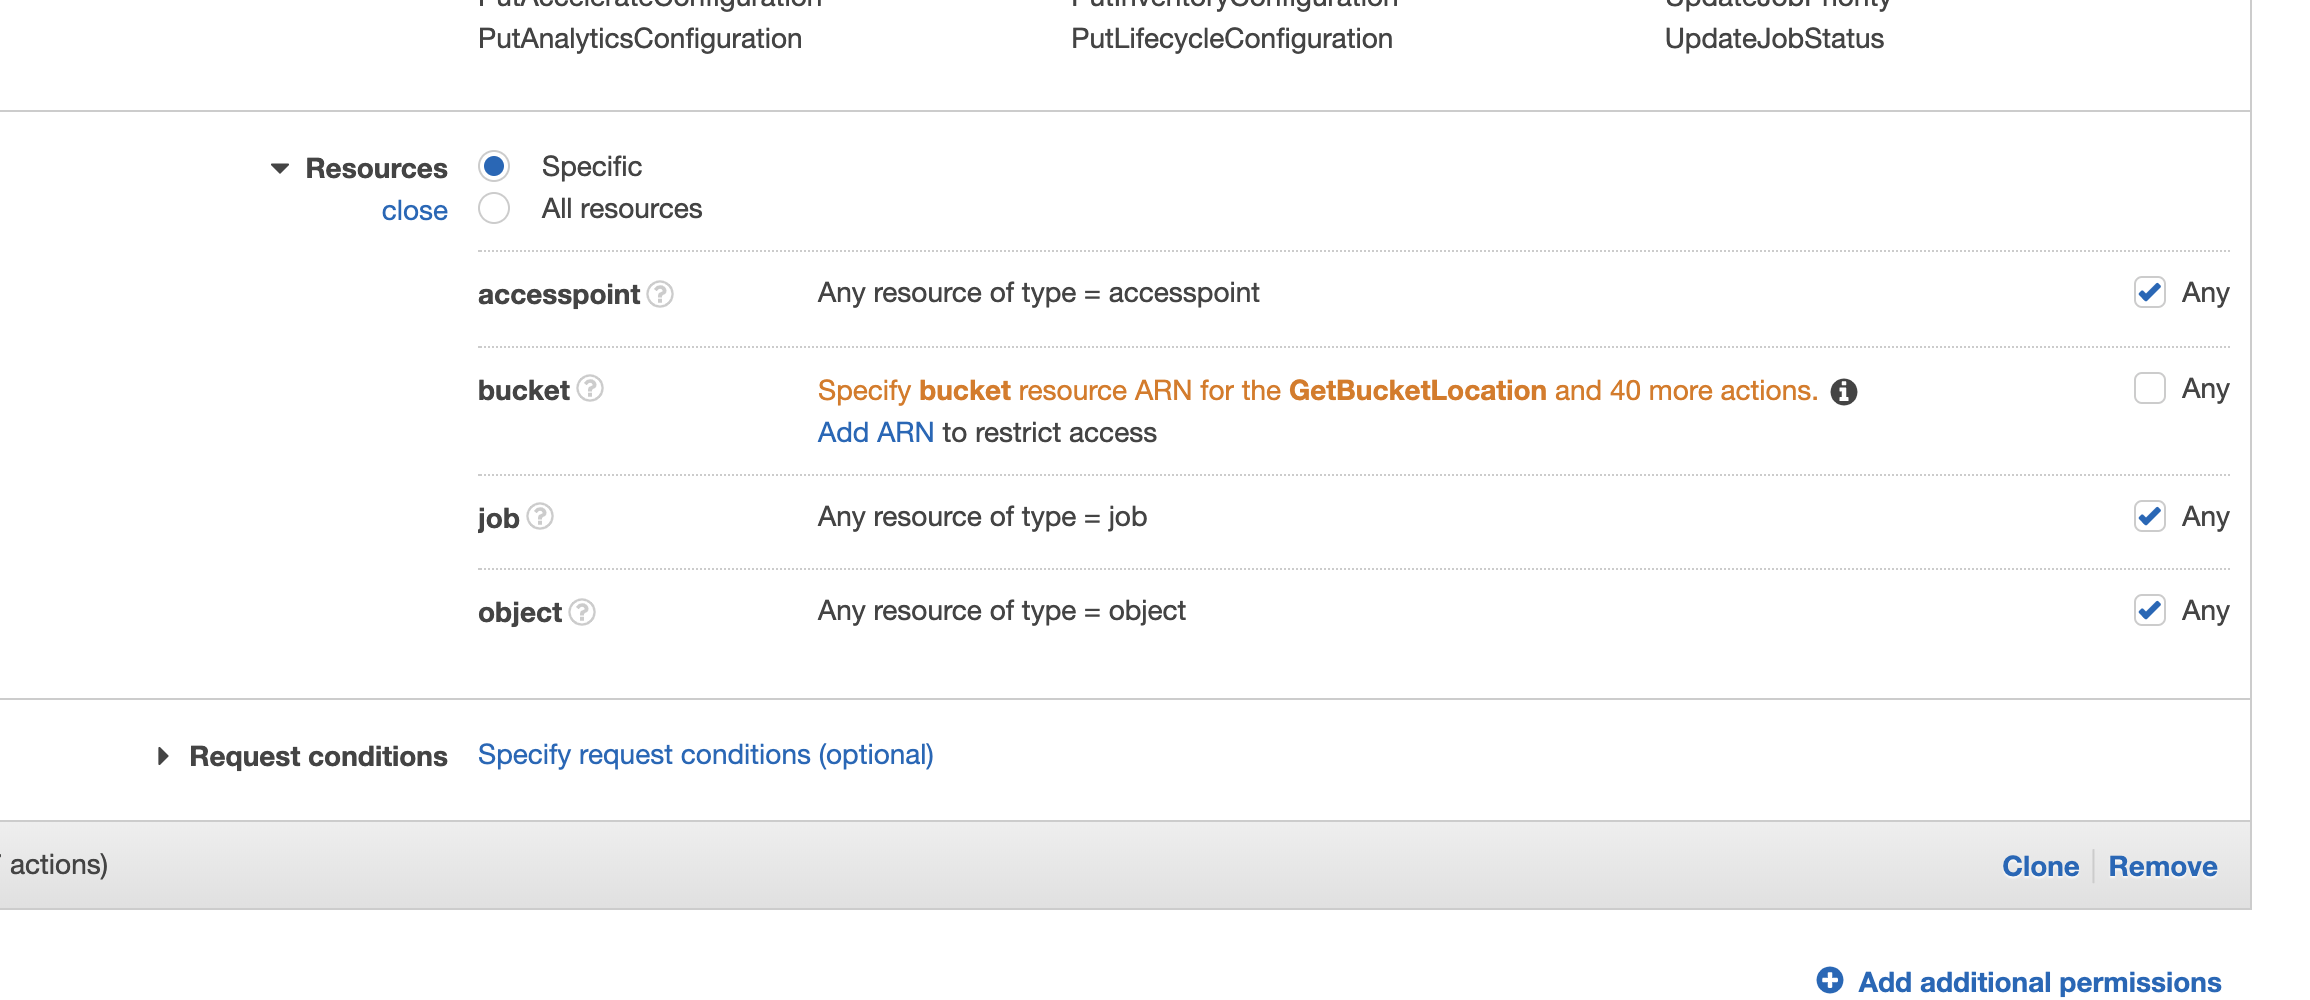
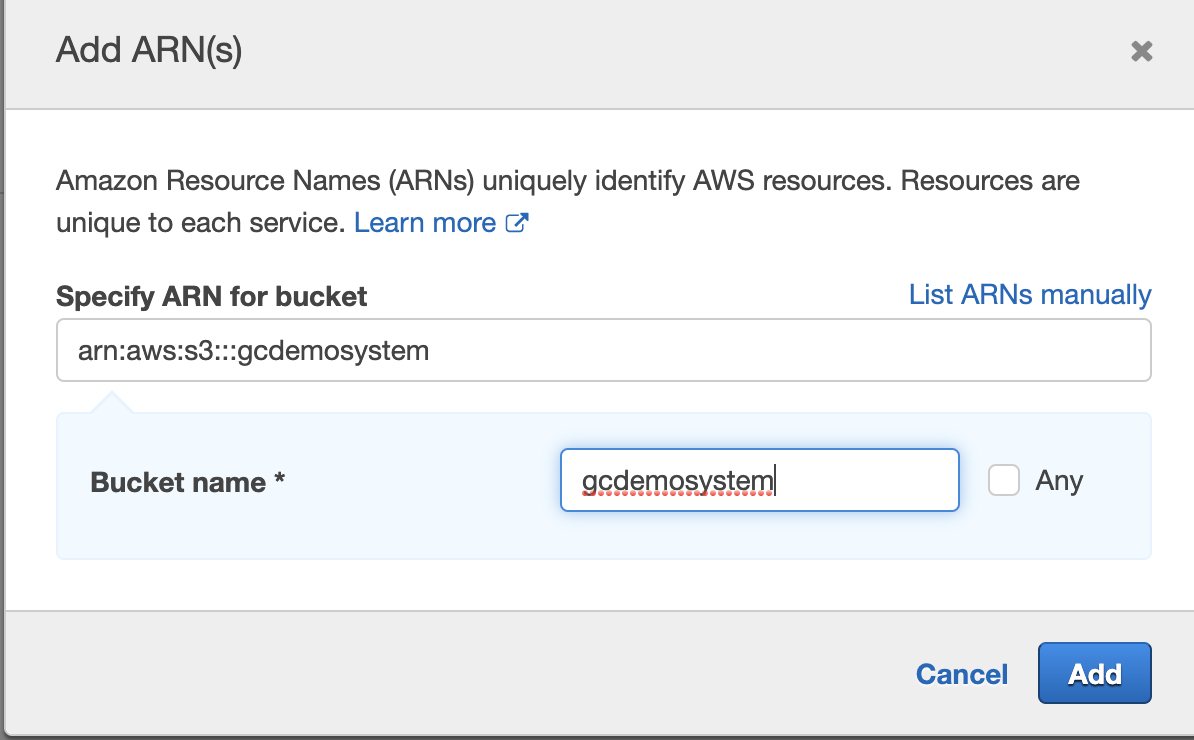
- Now specify the bucket(s) created to store golden copy target data be adding each ARN to the policy. Click on "Add Arn" next to "bucket" .
- The Add ARN window appears, enter the storage "Bucket name" created for Golden Copy (i.e. "gcdemosystem" as shown in the sample screenshot below).
- Optional - Source IP Restriction to the Bucket by Selecting the "Request conditions" option.
- Enter a specific Public IP address or a range of addresses. This would be the public facing IP address used for any Internet access from the Data Center where the PowerScale is located. Example s to a specific IP address but a range can be added.
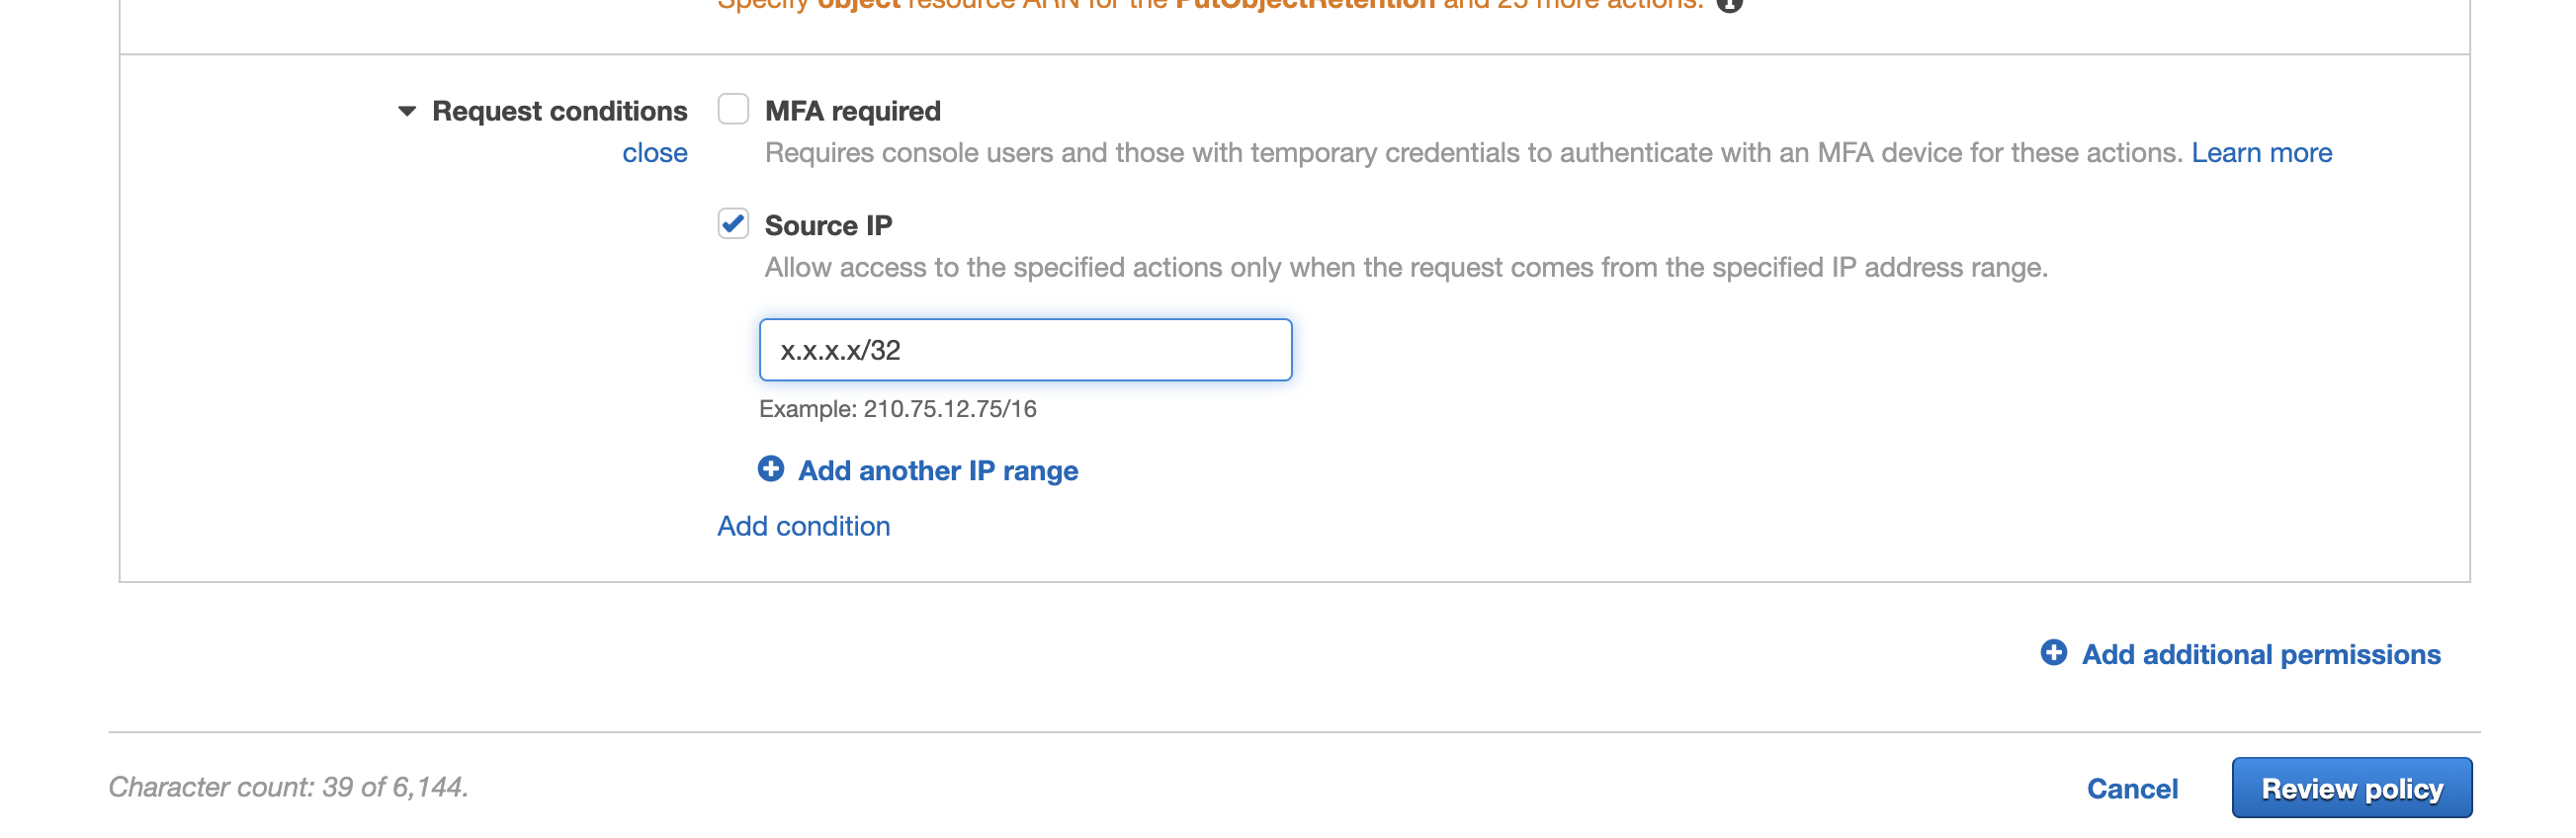
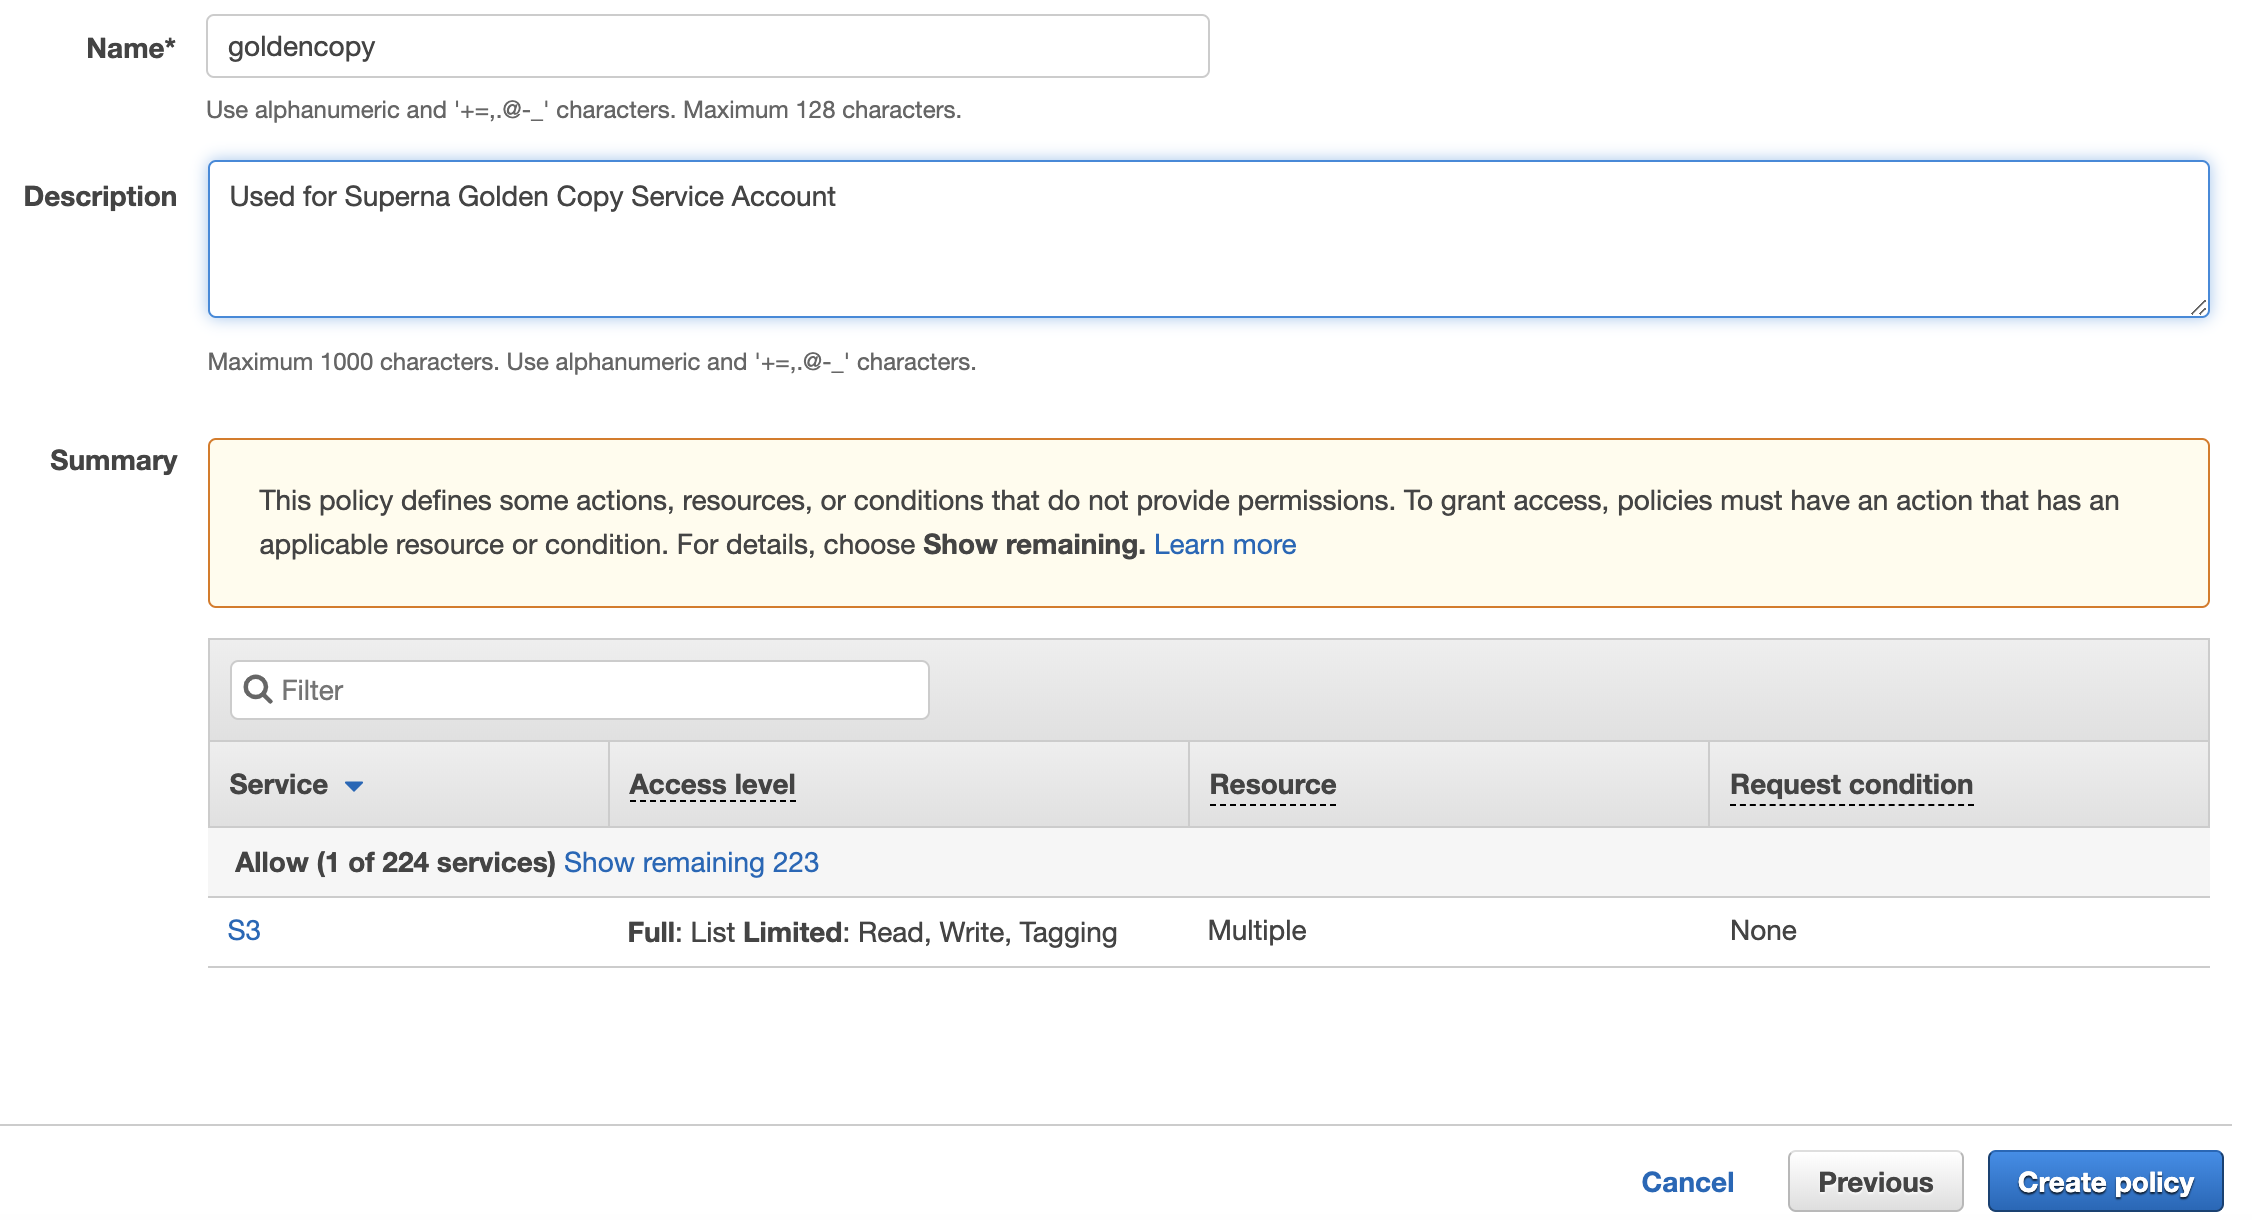
- Now Click the "Review Policy" button bottom right of the UI (shown in the screenshot above).
- Enter the Name of the policy, Description, and click "Create Policy".
- Now return to the IAM Create User browser tab and click the Refresh Icon to reload new policies. Type "Goldencopy" into the "Filter policies" dialog box and select the Goldencopy policy you created above.
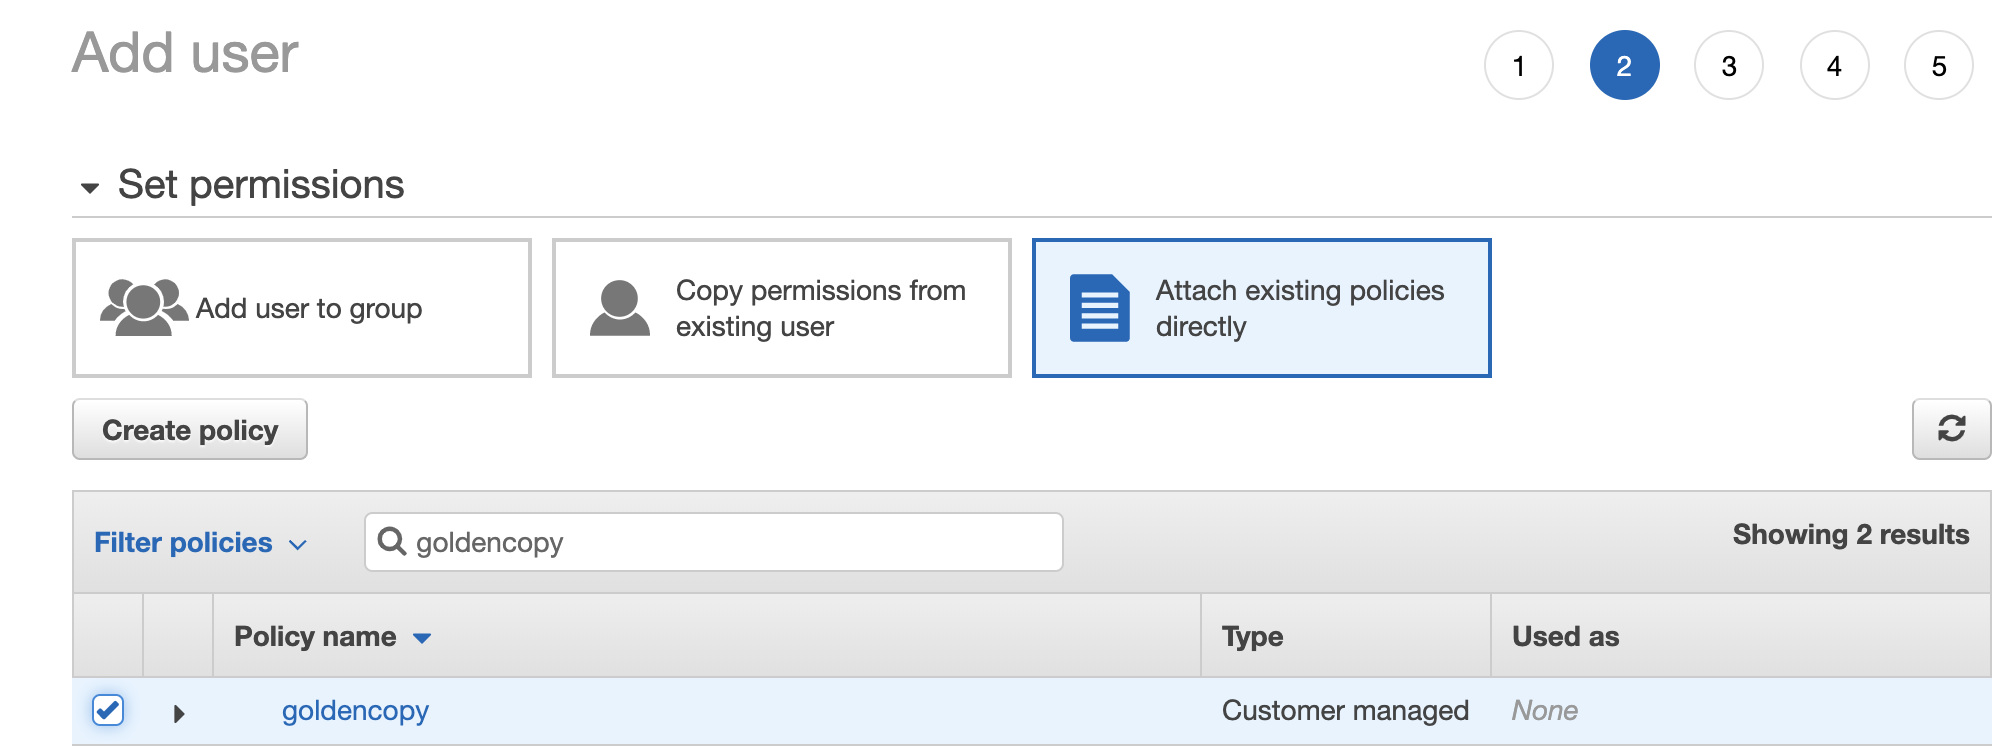
- Click Next, and then click Next on the tags screen .
- Click the "Create User" button .
- On the final screen you need to record the Access ID and the secret key for the Goldencopy user. Record this in a secure location for use when adding archive paths to Golden Copy.
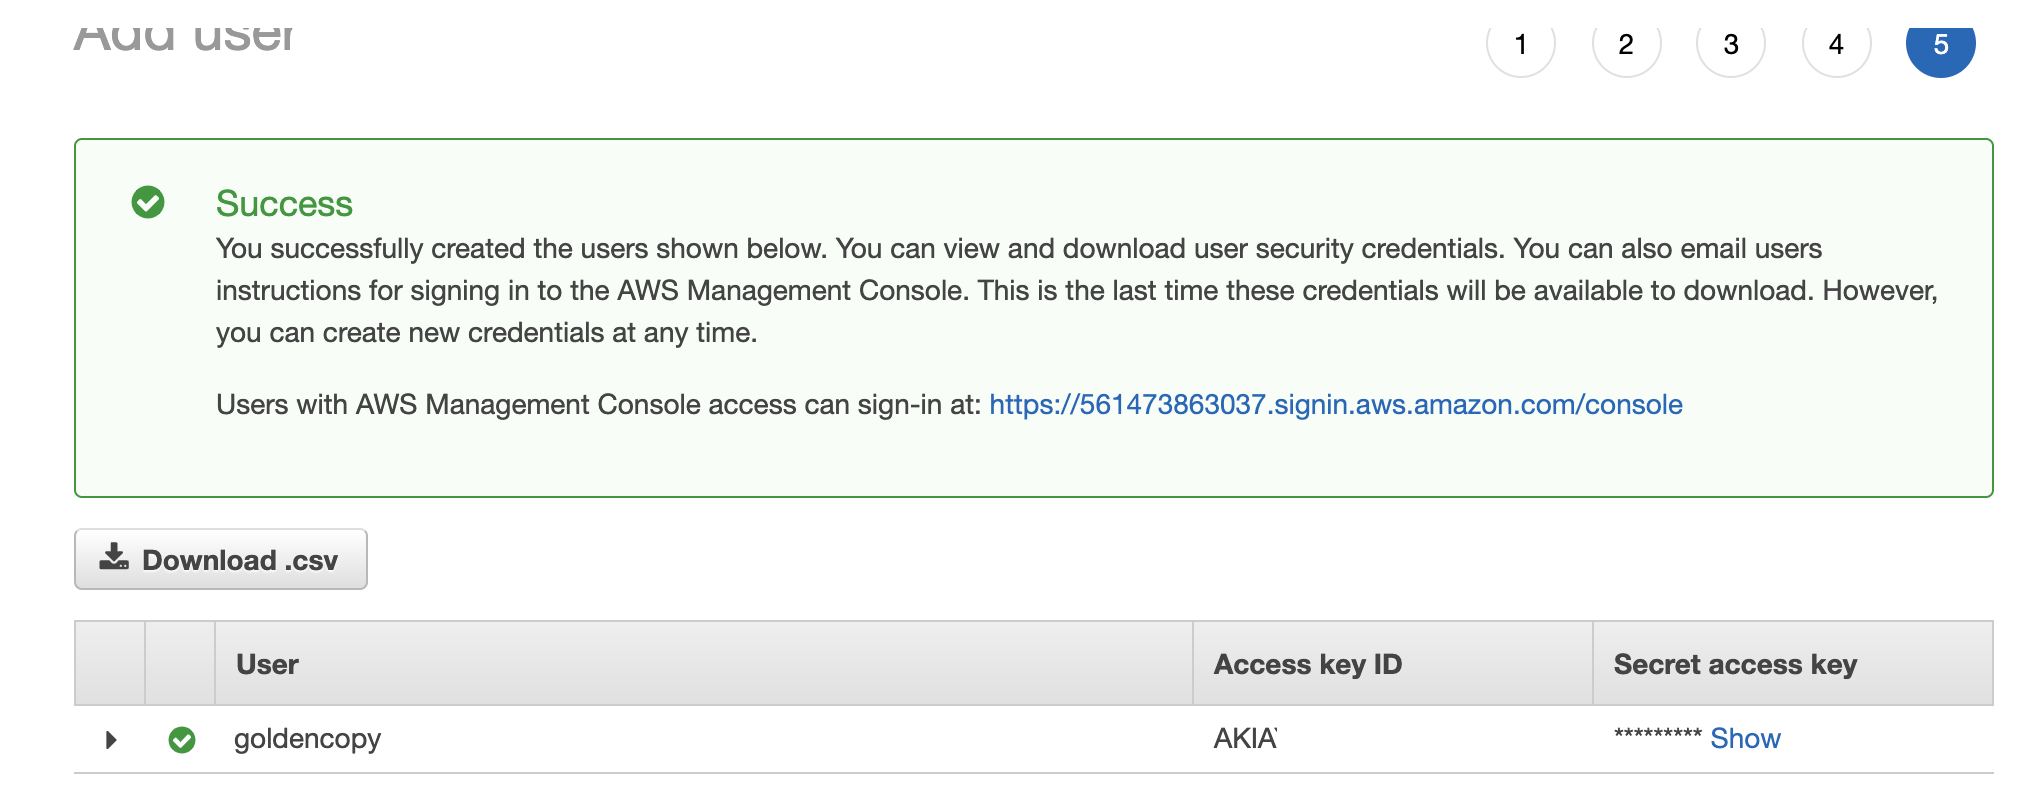
- NOTE: You will need your bucket name, region, access key and secret key to configure Amazon S3 target.
- Done.
How To restrict S3 Bucket Access by Source Public IP of your Data Center
- NOTE The role in IAMS can create a single policy that restricts access to a list of IP addresses. Use 1 method to limit access. This provides a 2nd option to limit using a bucket policy.
- NOTE: This assumes that a proxy or source IP NAT is in use and Cloud provider will only see your public ip address. If you have a range or pool of IP addresses than you need to include all IP addresses used by your NAT or proxy implementation.
- An S3 bucket policy can also be used to allow access from a range of IP's or a specific ip address. Use this example to restrict access to your Data Center public IP address.
- Get your public facing ip address that will be used the by Golden Copy or Virtual Accelerator Nodes.
- Method #1 - curl :
- Login to Golden Copy VM over ssh and run this command "curl ifconfig.io" .
- This should return the IPv4 ip address configured for public Internet access to use with the policy.
- Method #2 - visit an ip locate website from a data center subnet :
- Google for "what is my ip address" to get the IP v4 ip address.
- Method #1 - curl :
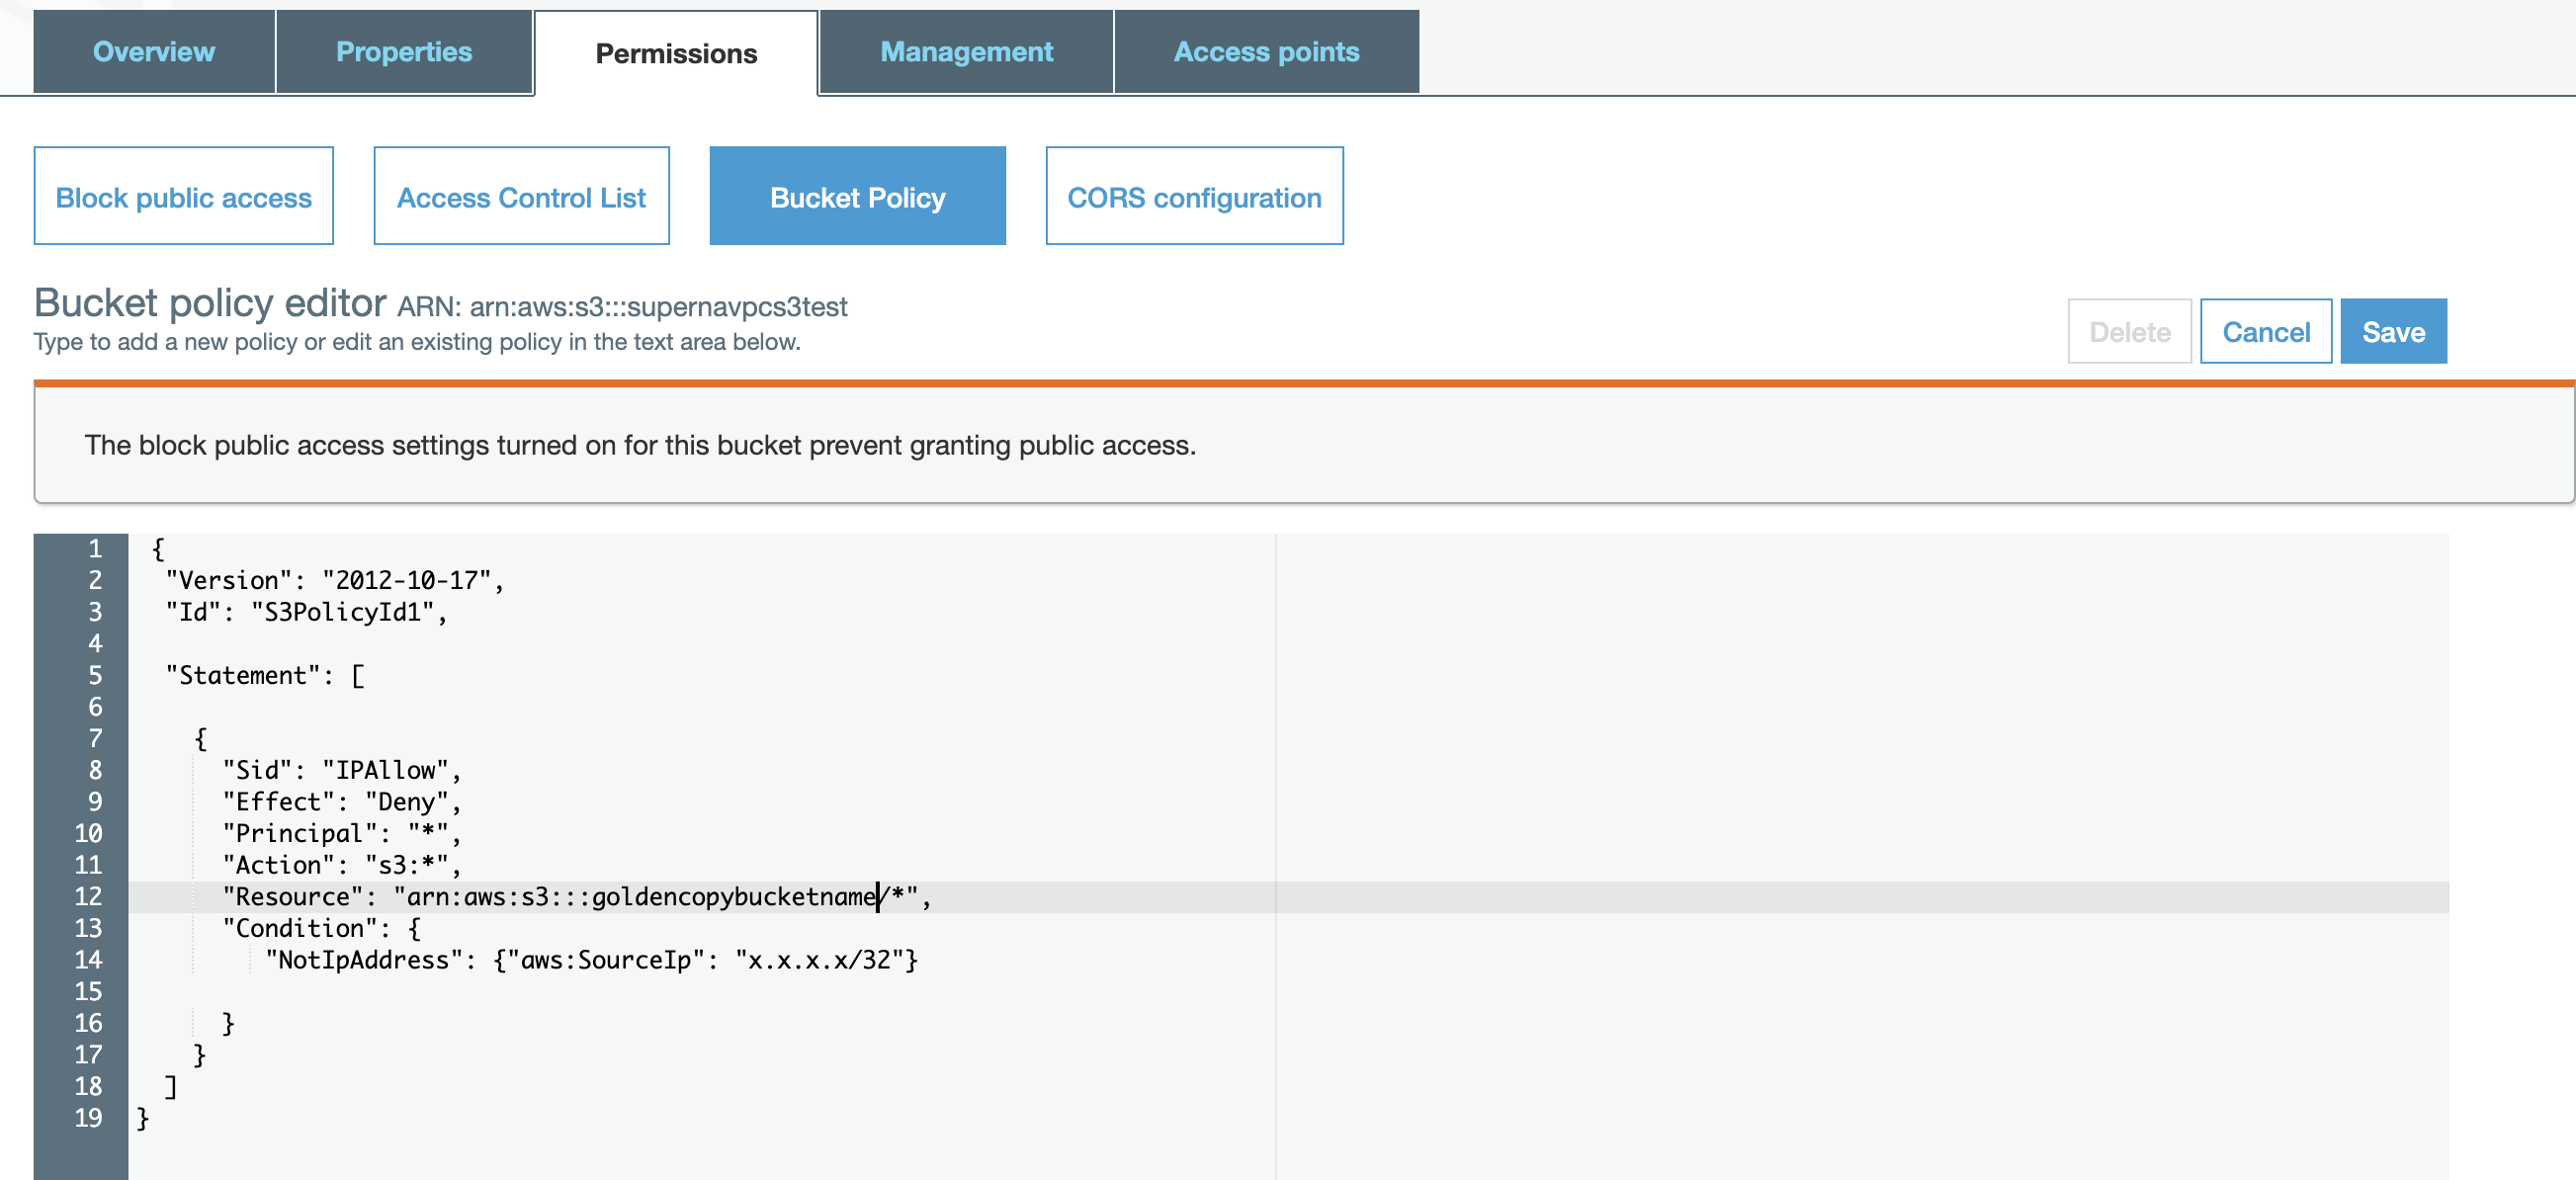
- Replace the x.x.x.x with your ip address in the example policy below.
- In the Amazon S3 service console click on the storage bucket configured for Golden Copy:
- Replace x.x.x.x with your ip address, replace goldencopybucketname with your storage bucket name.
- NOTE: to get the Bucket ARN for the resource property. You can see this next to the Bucket Policy Editor in the screen shot above.
- Edit the policy text shown below and save to the bucket policy .
- Done.
How to Enable and Use Accelerated Transfer Mode on a bucket
- Requirements:
- Release 1.1.6 or later
- Why use this mode? (AWS documentation reference)
You might want to use Transfer Acceleration on a bucket for various reasons, including the following:
You have customers that upload to a centralized bucket from all over the world.
You transfer gigabytes to terabytes of data on a regular basis across continents.
You are unable to utilize all of your available bandwidth over the Internet when uploading to Amazon S3.
Enabling Transfer Acceleration on an Amazon S3 Bucket Guide Link.
- How to Configure in Golden Copy
When adding the folder the --aws-accelerated-mode true flag must be used.
- The endpoint must use the Accelerated endpoint FQDN (i.e bucketname.s3-accelerate.amazonaws.com) to access an acceleration-enabled bucket.
Google Cloud Storage Creation Walk Through
- Requirements:
- Storage Buckets should use the Uniform Access Control method when setting up new storage bucket. See the guide here for details.
- Login to the Google Cloud Platform console and open IAM to create a service account, click create and then Done.
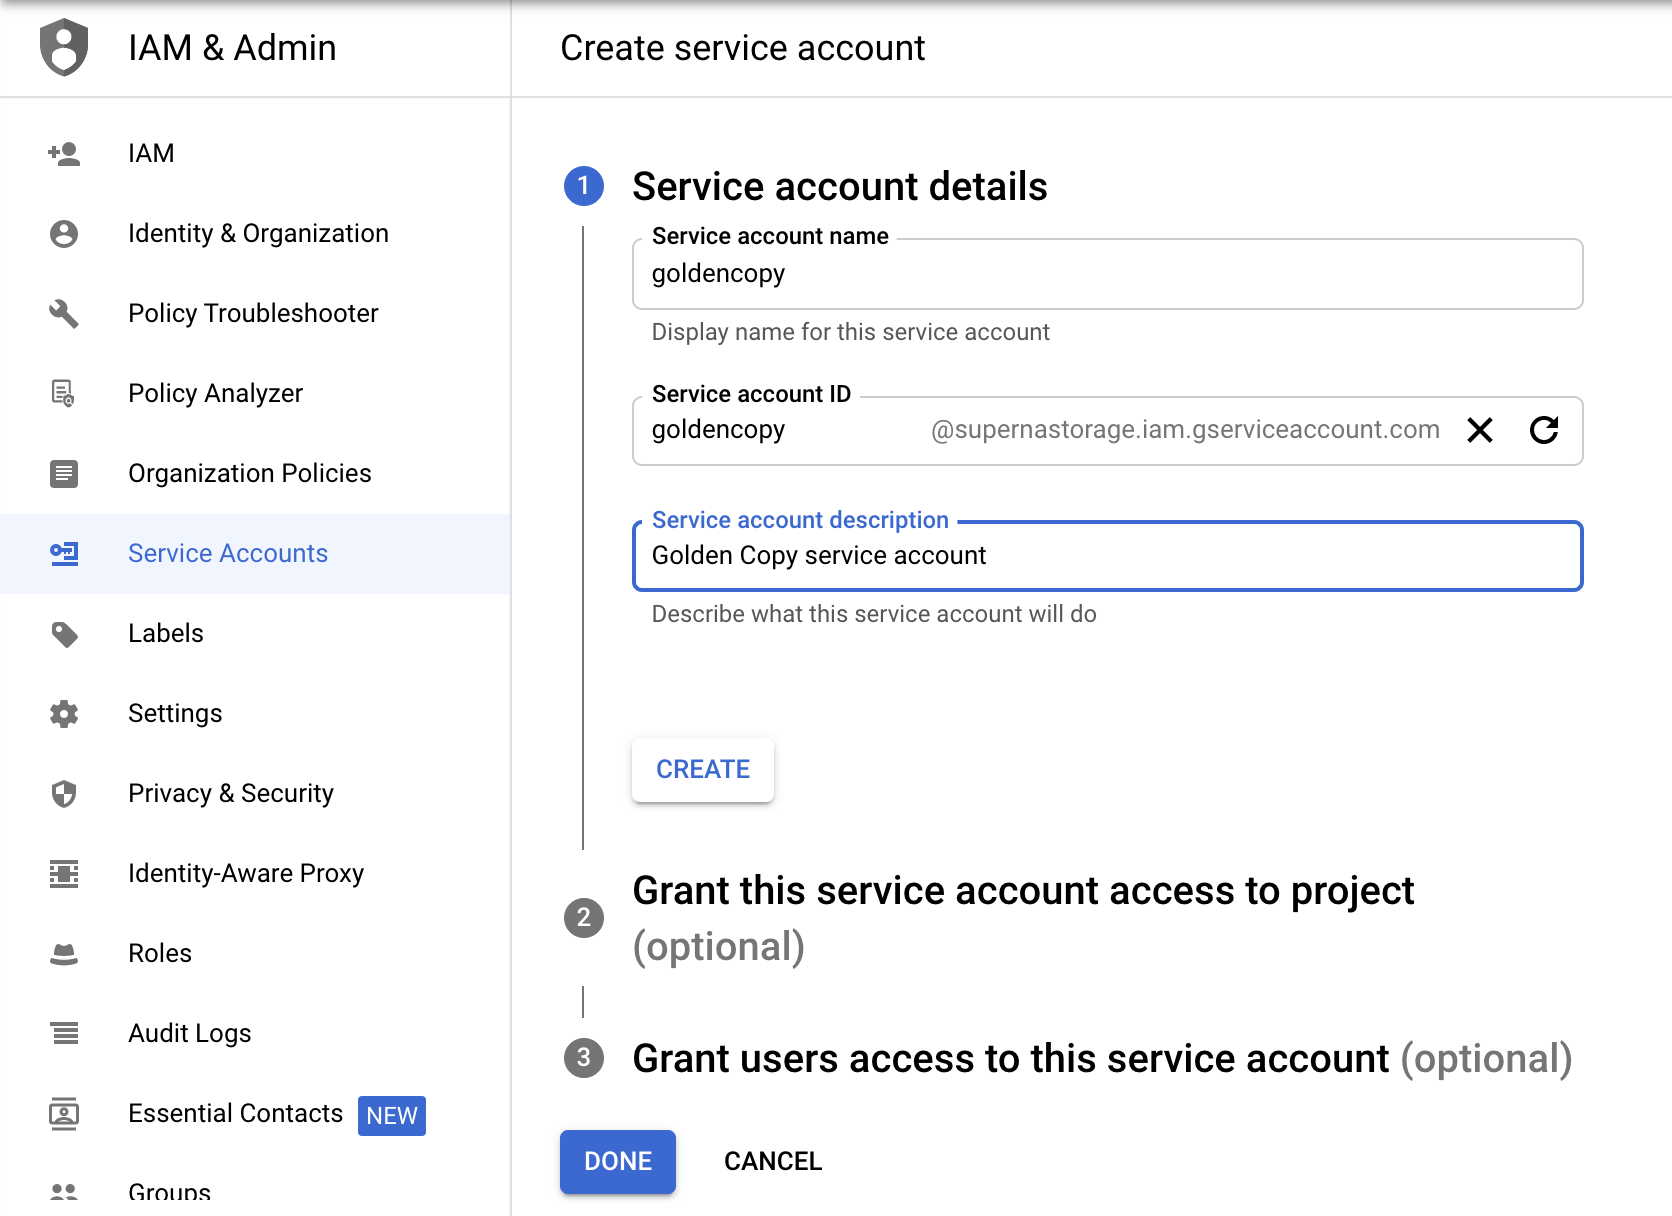
- Click on the created service account to create a json key and click on Create new key select Json
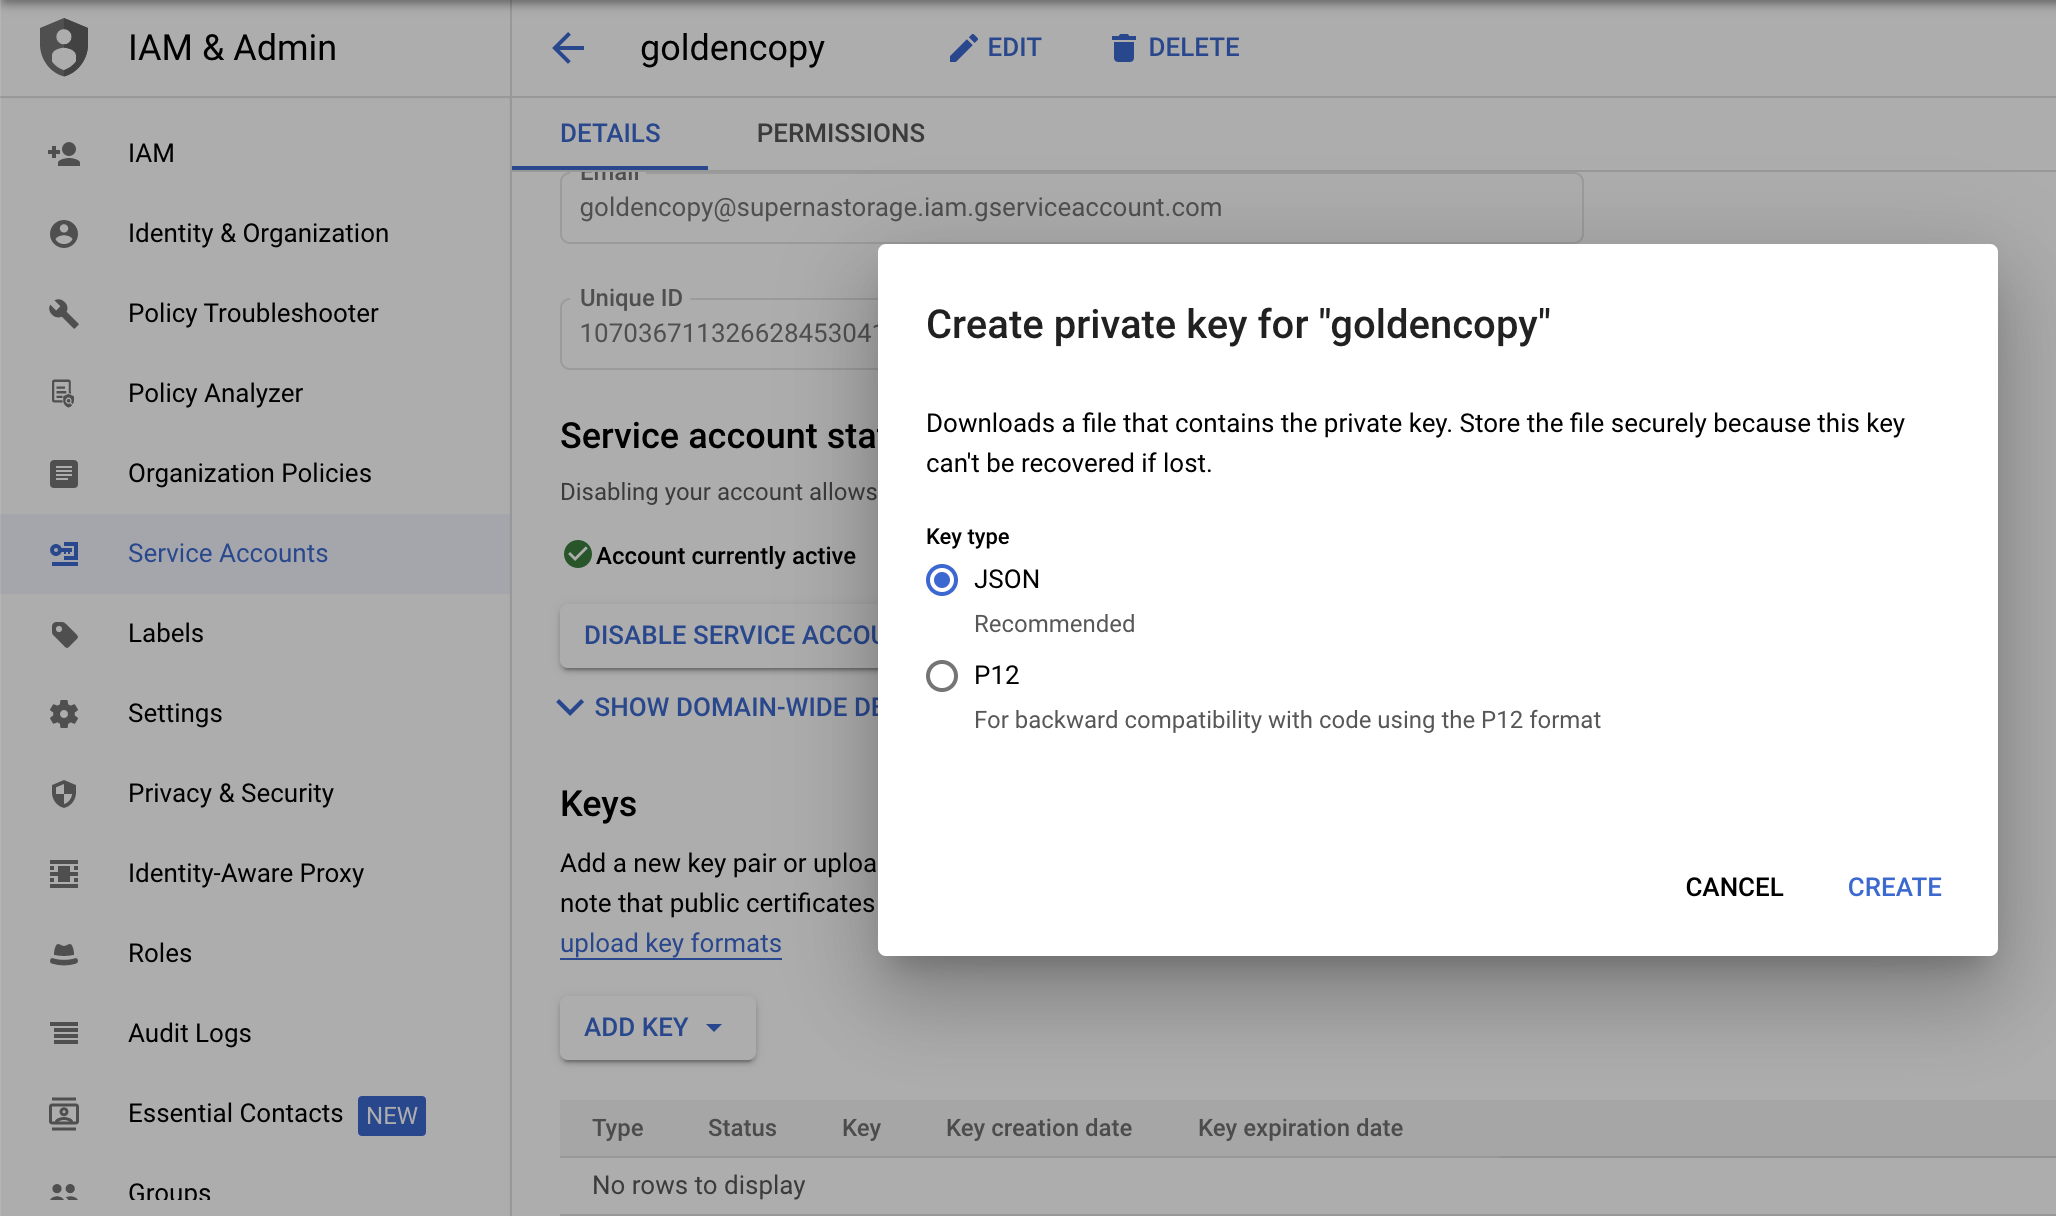
- The file will be downloaded to your pc and used later.
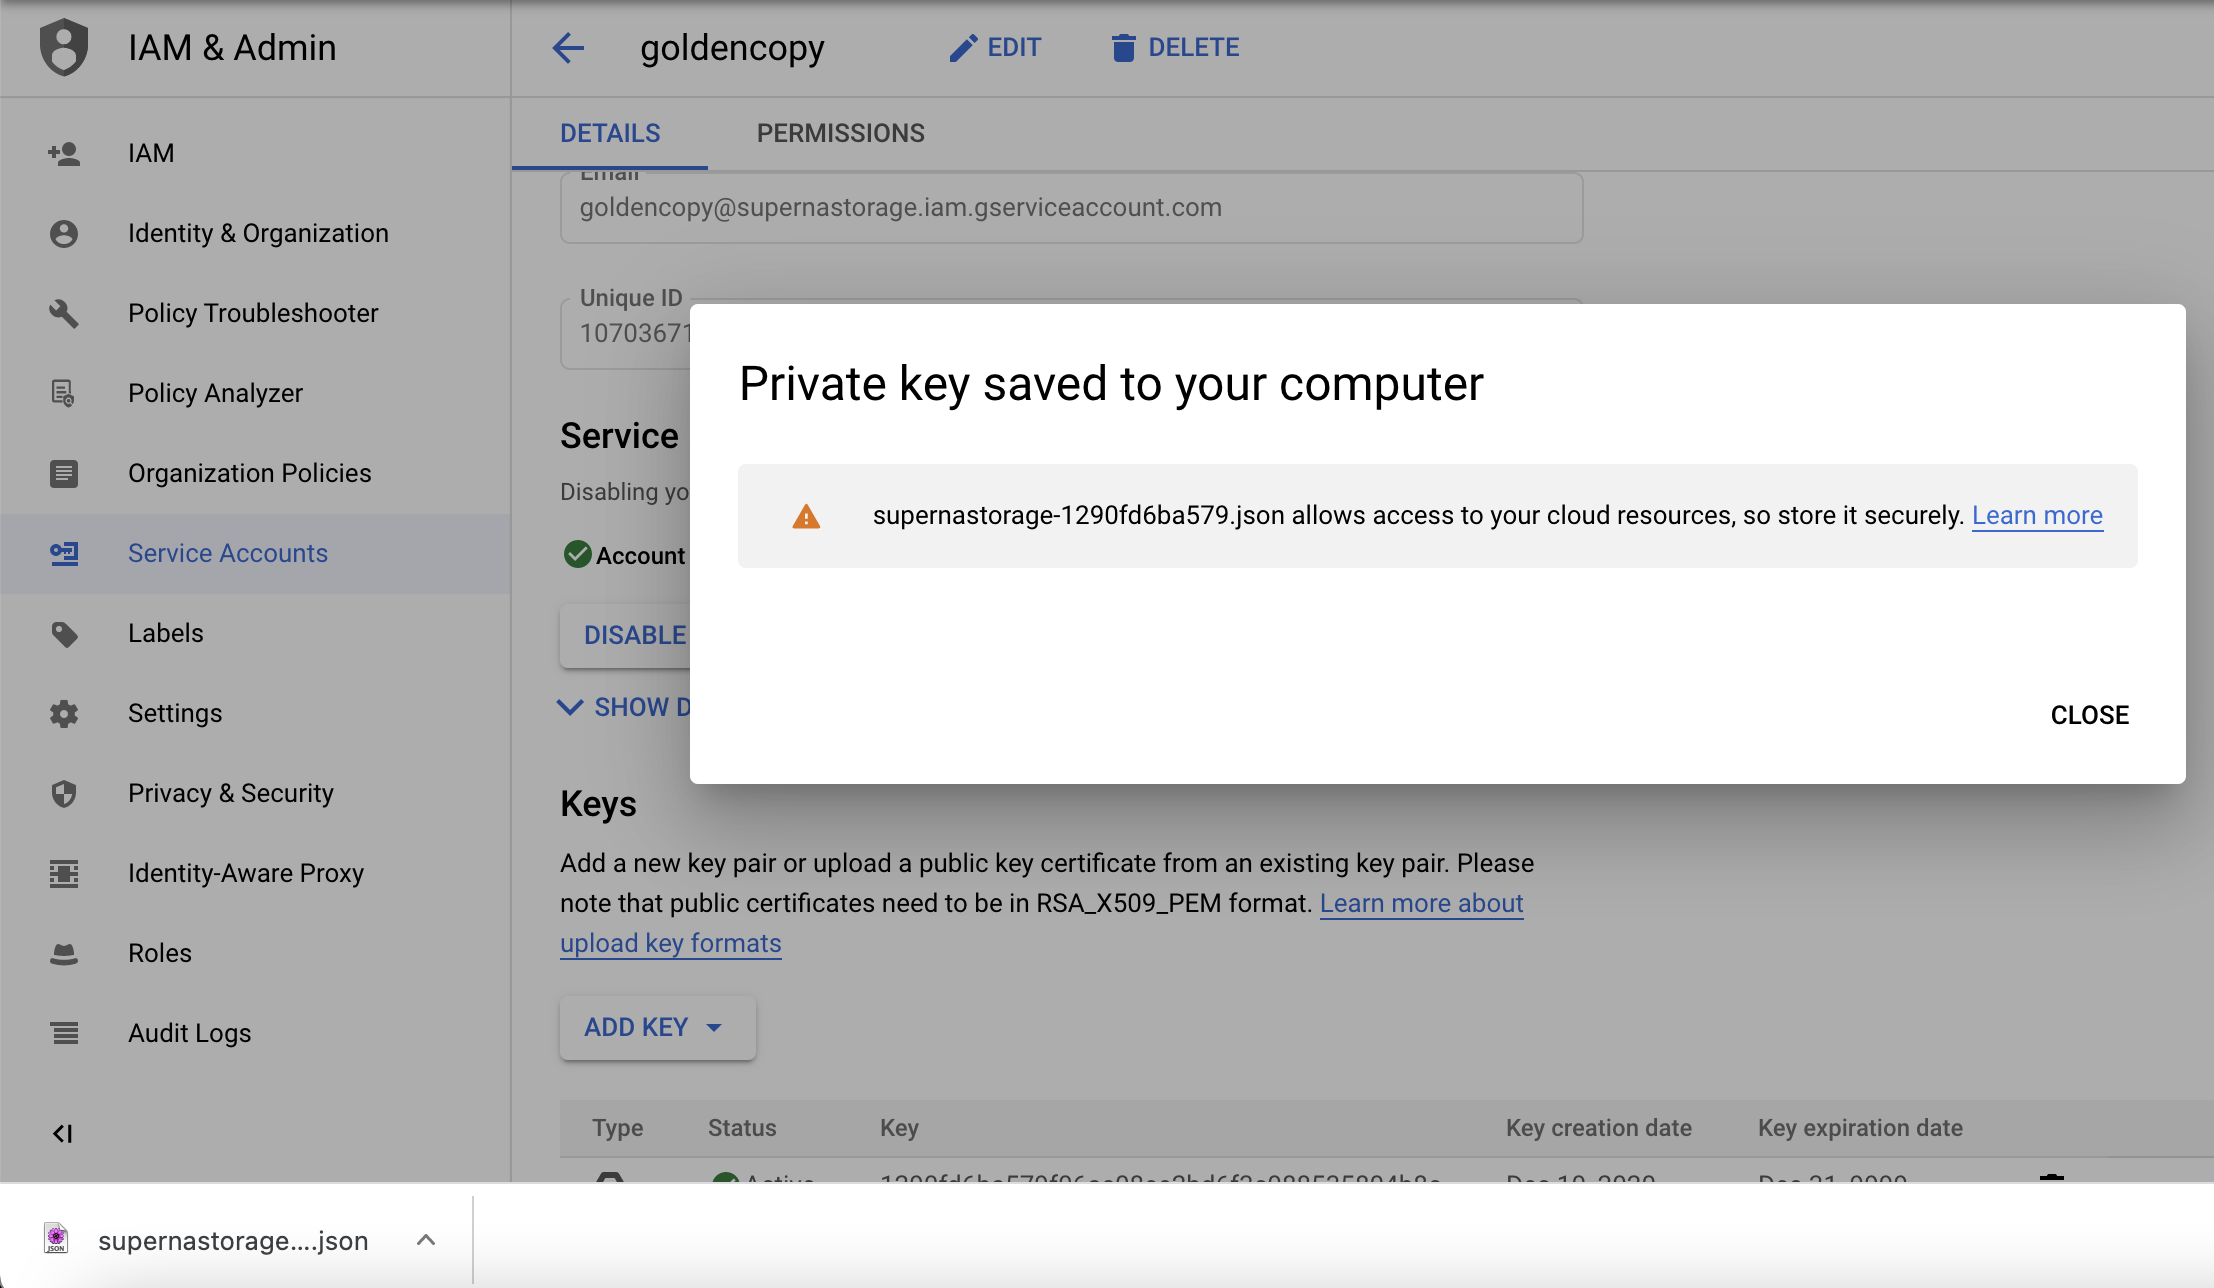
- Locate the Storage bucket created to store Golden Copy data (steps not covered to create buckets, see Google Documentation) and select the permissions tab. Click Add. NOTE: You will need the email ID on the service account created in the step above.

- Use the Storage Object Creator role.
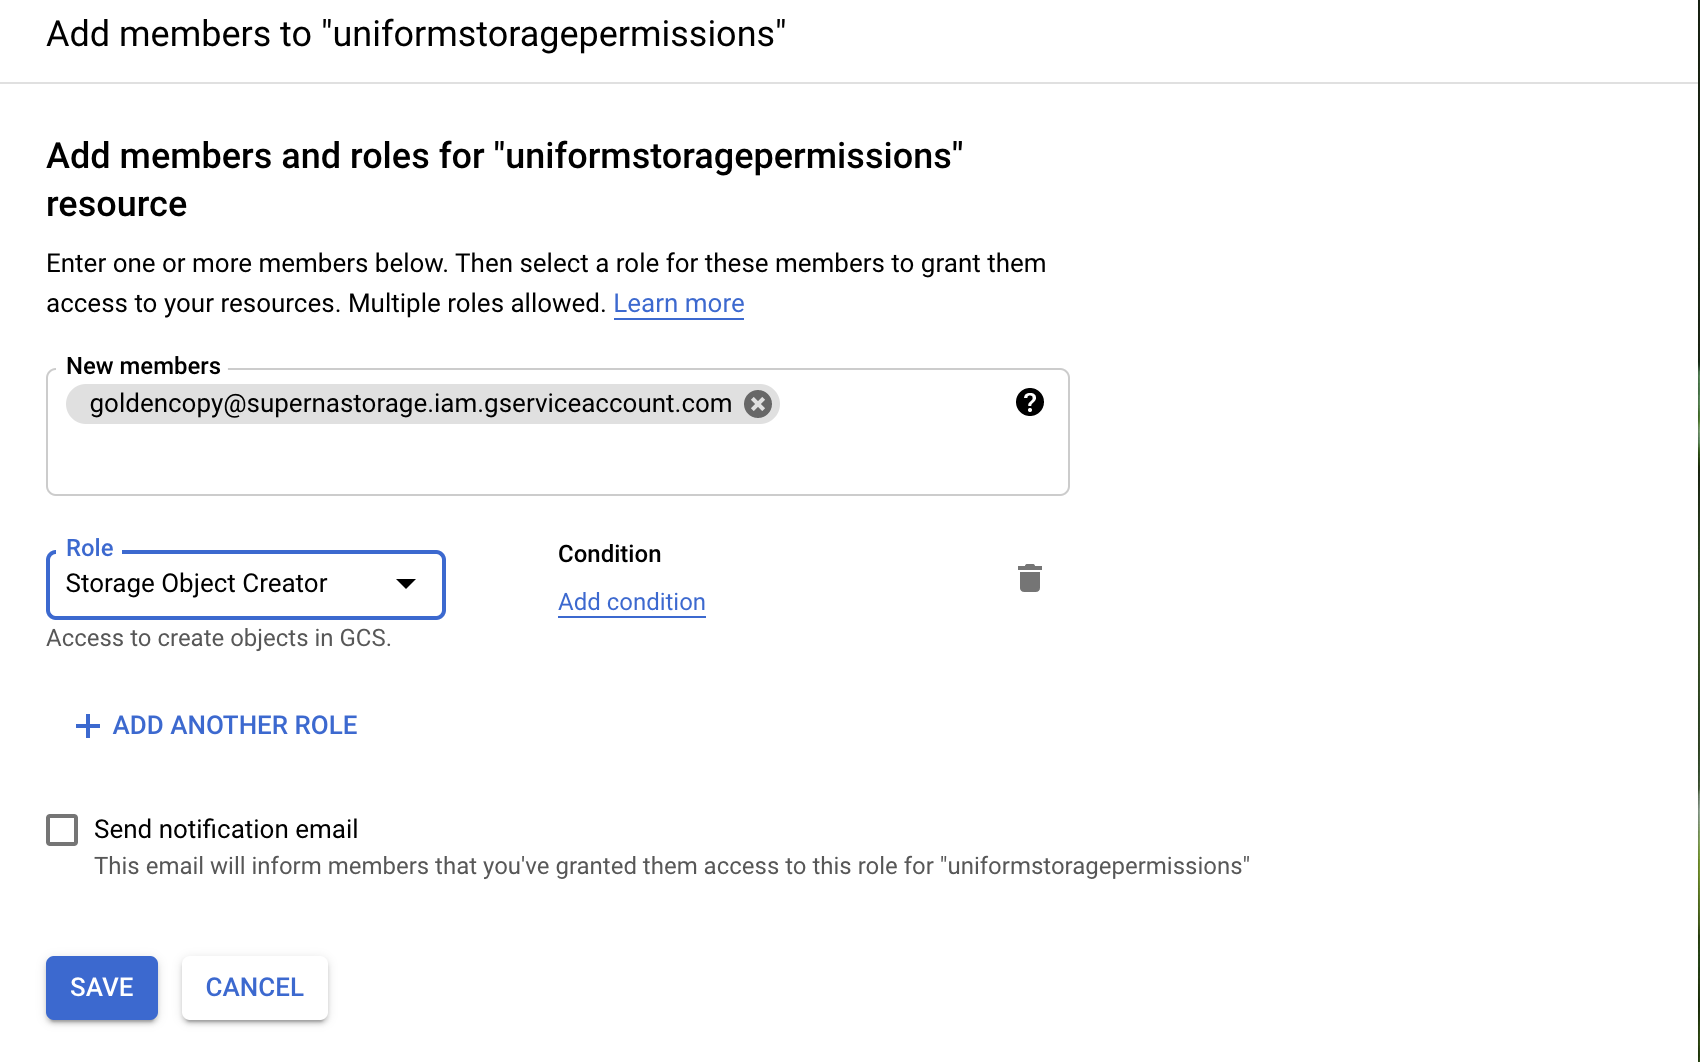
- Repeat these steps on each Storage Bucket that will be used with Golden Copy.
- Copy the json authentication file to Golden Copy node 1 with winscp to the /home/ecaadmin path.
- Authenticate using the ecaadmin user.
- This completes all the Google console steps and the remaining steps will cover how to add a Google Cloud Storage end point in the quick start section of this guide.
Azure Blob Storage Creation Walk Through
Azure Blob Storage is not compatible with S3 protocol and uses a proprietary REST API. The configuration is similar to S3 bucket concepts. A container is similar to a bucket and a blob is the same as an object.
How to create Azure Storage Account
This process creates a storage account if one does not already exist. The storage account contains a Container that will store data copied from Golden Copy.
- Login to Azure console.
- Select Home --> Storage accounts --> Create storage account --> + sign to create .
- Assign or create a "Resource group" (i.e."goldencopy"), enter "Storage account name" (i.e. "goldencopy2"), fill in the remaining fields and click "Next: Networking".
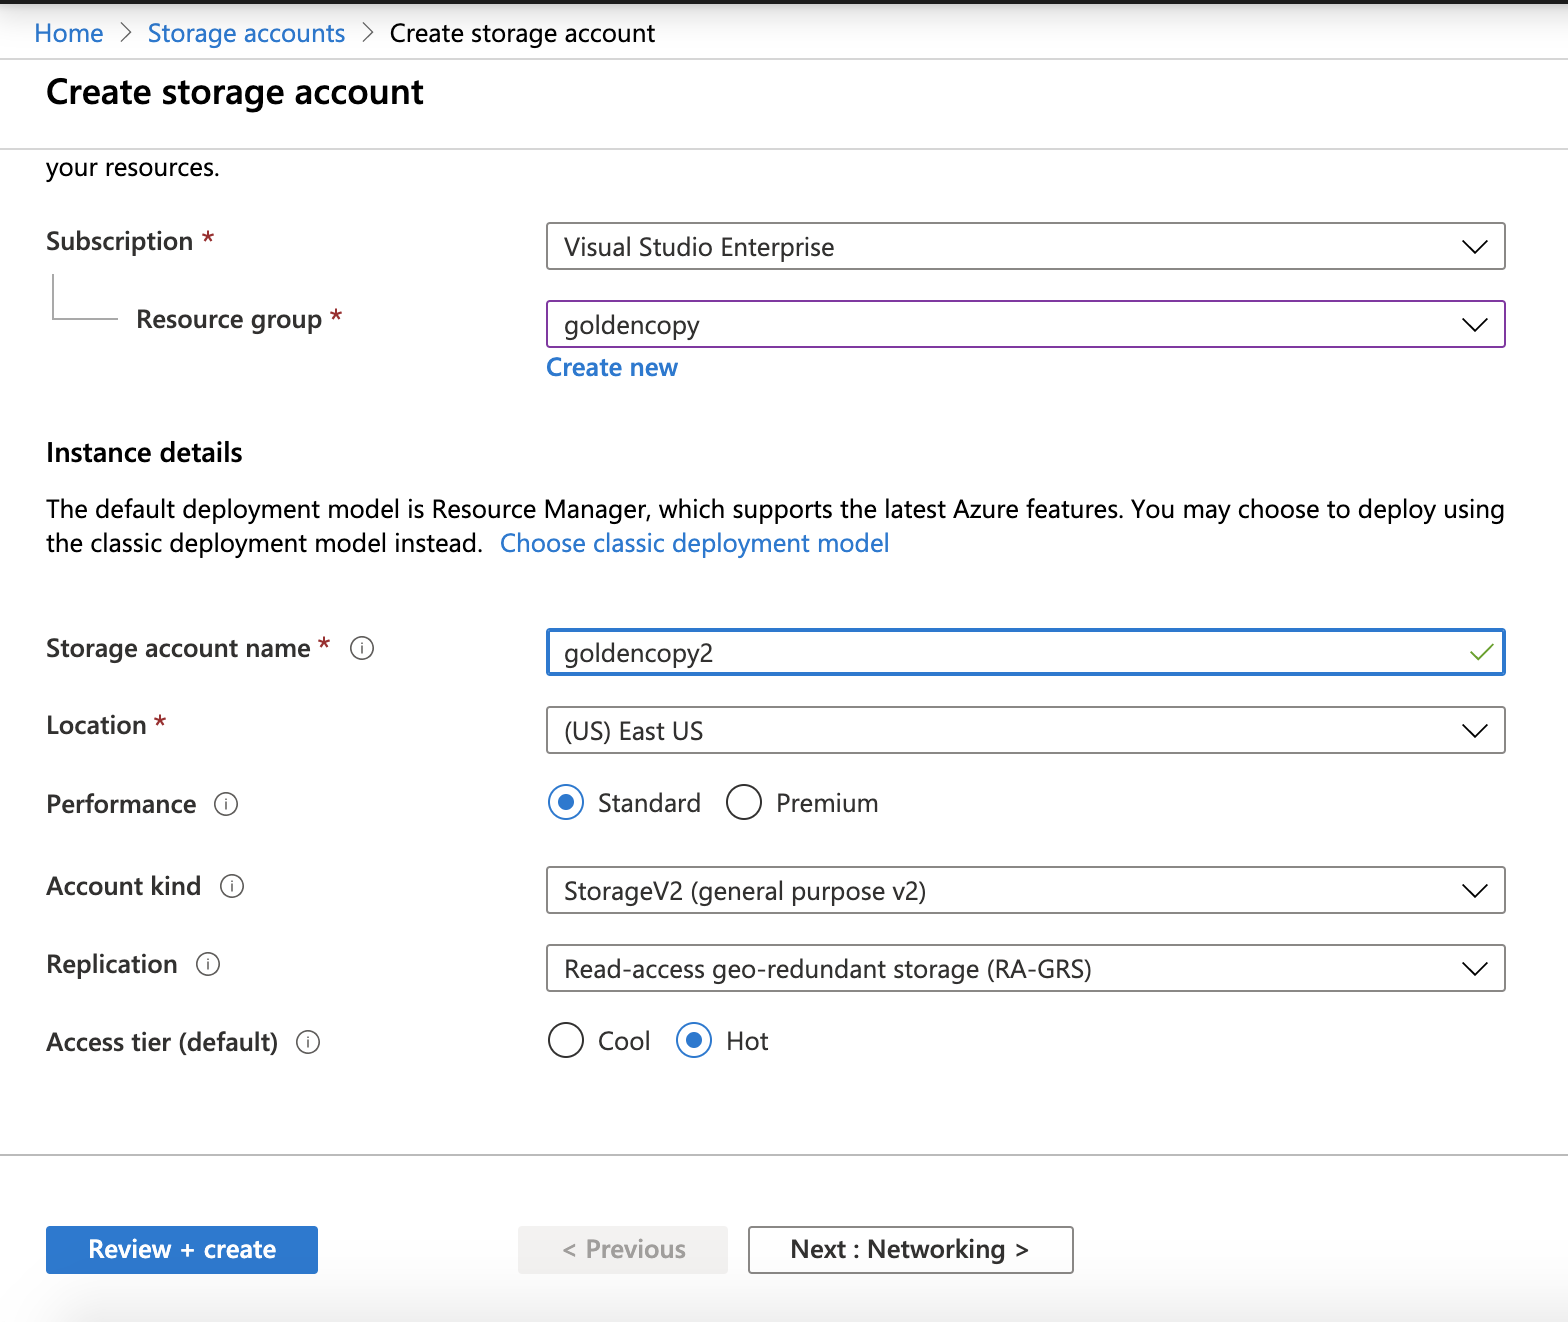
- Select a Networking configuration, note authentication will be used. This section limits the networks or virtual networks this blob will be reachable. Configuring networking to allow your on site data center network to be able to reach the endpoints. Consult Azure Documentation on how to secure access from your on premise network to Azure.
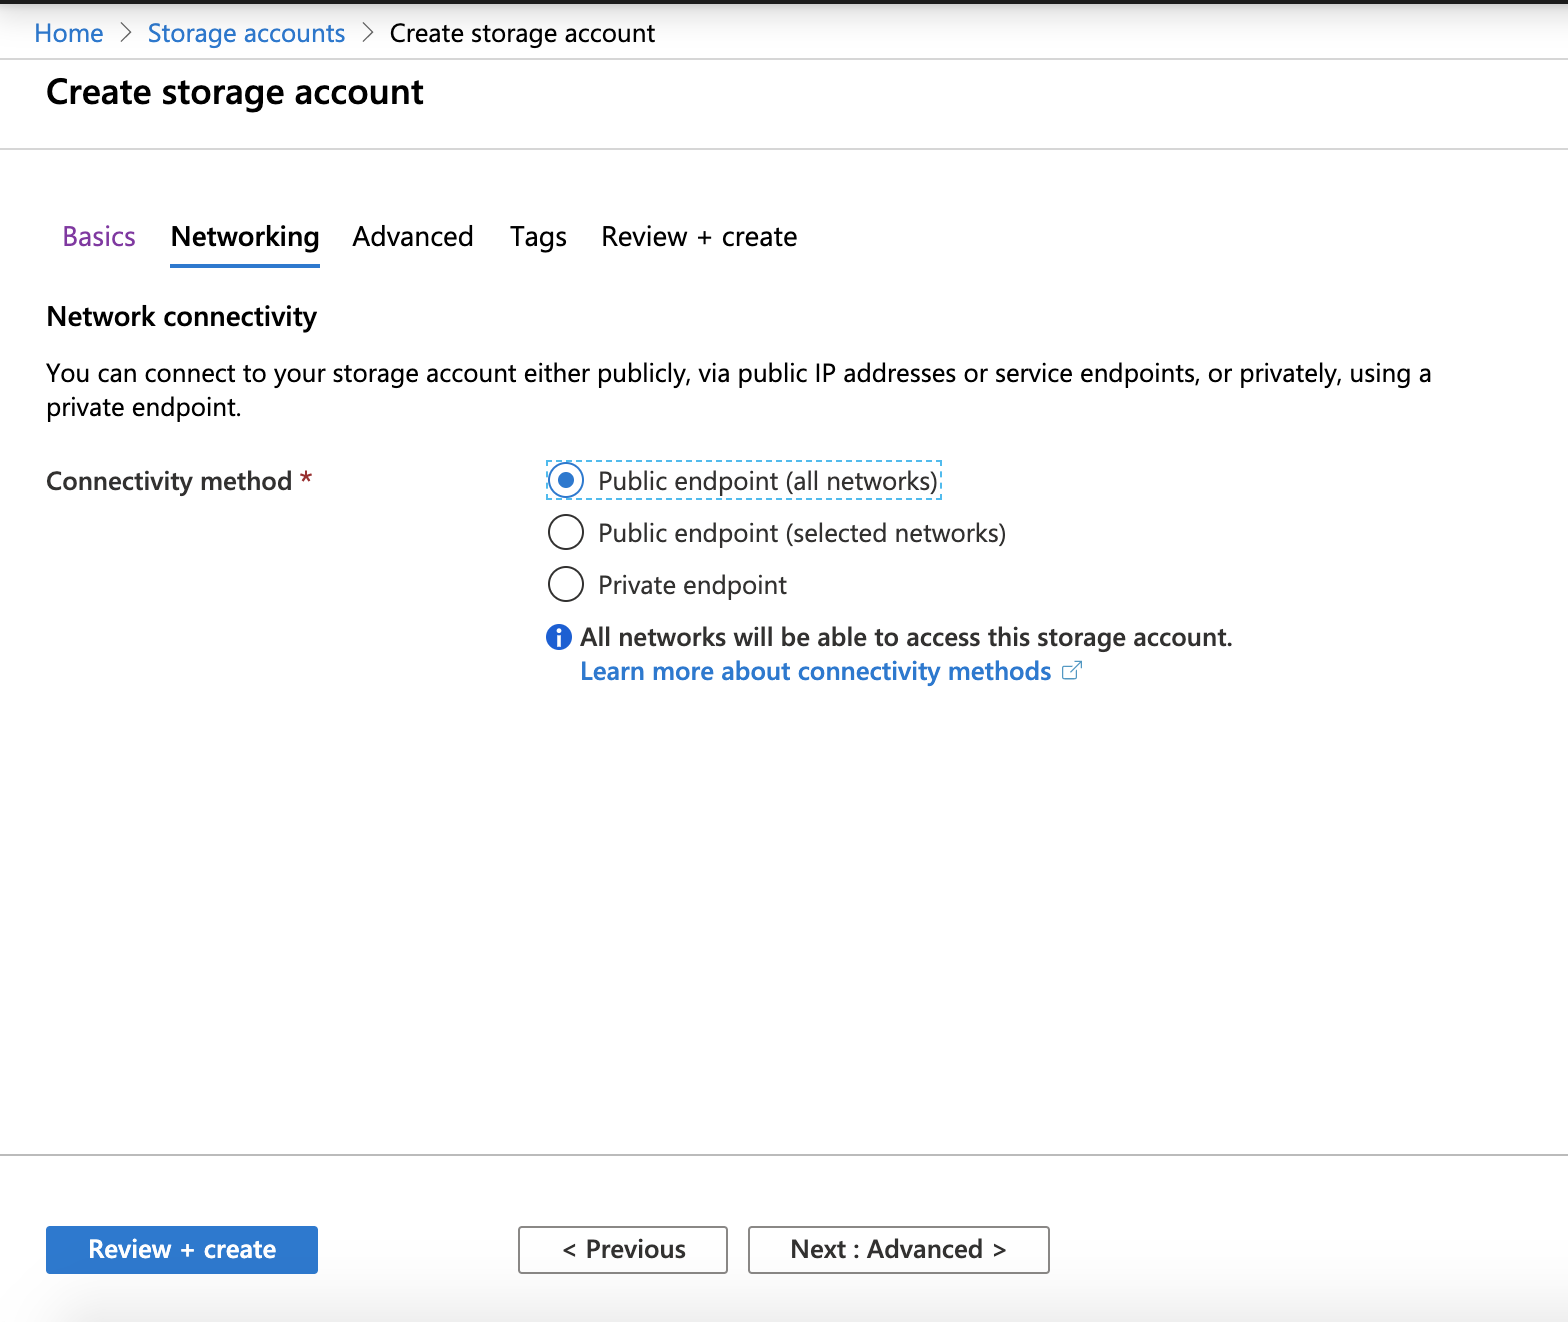
- Click "Next: Advanced" and accept Default settings or change according to your requirements.
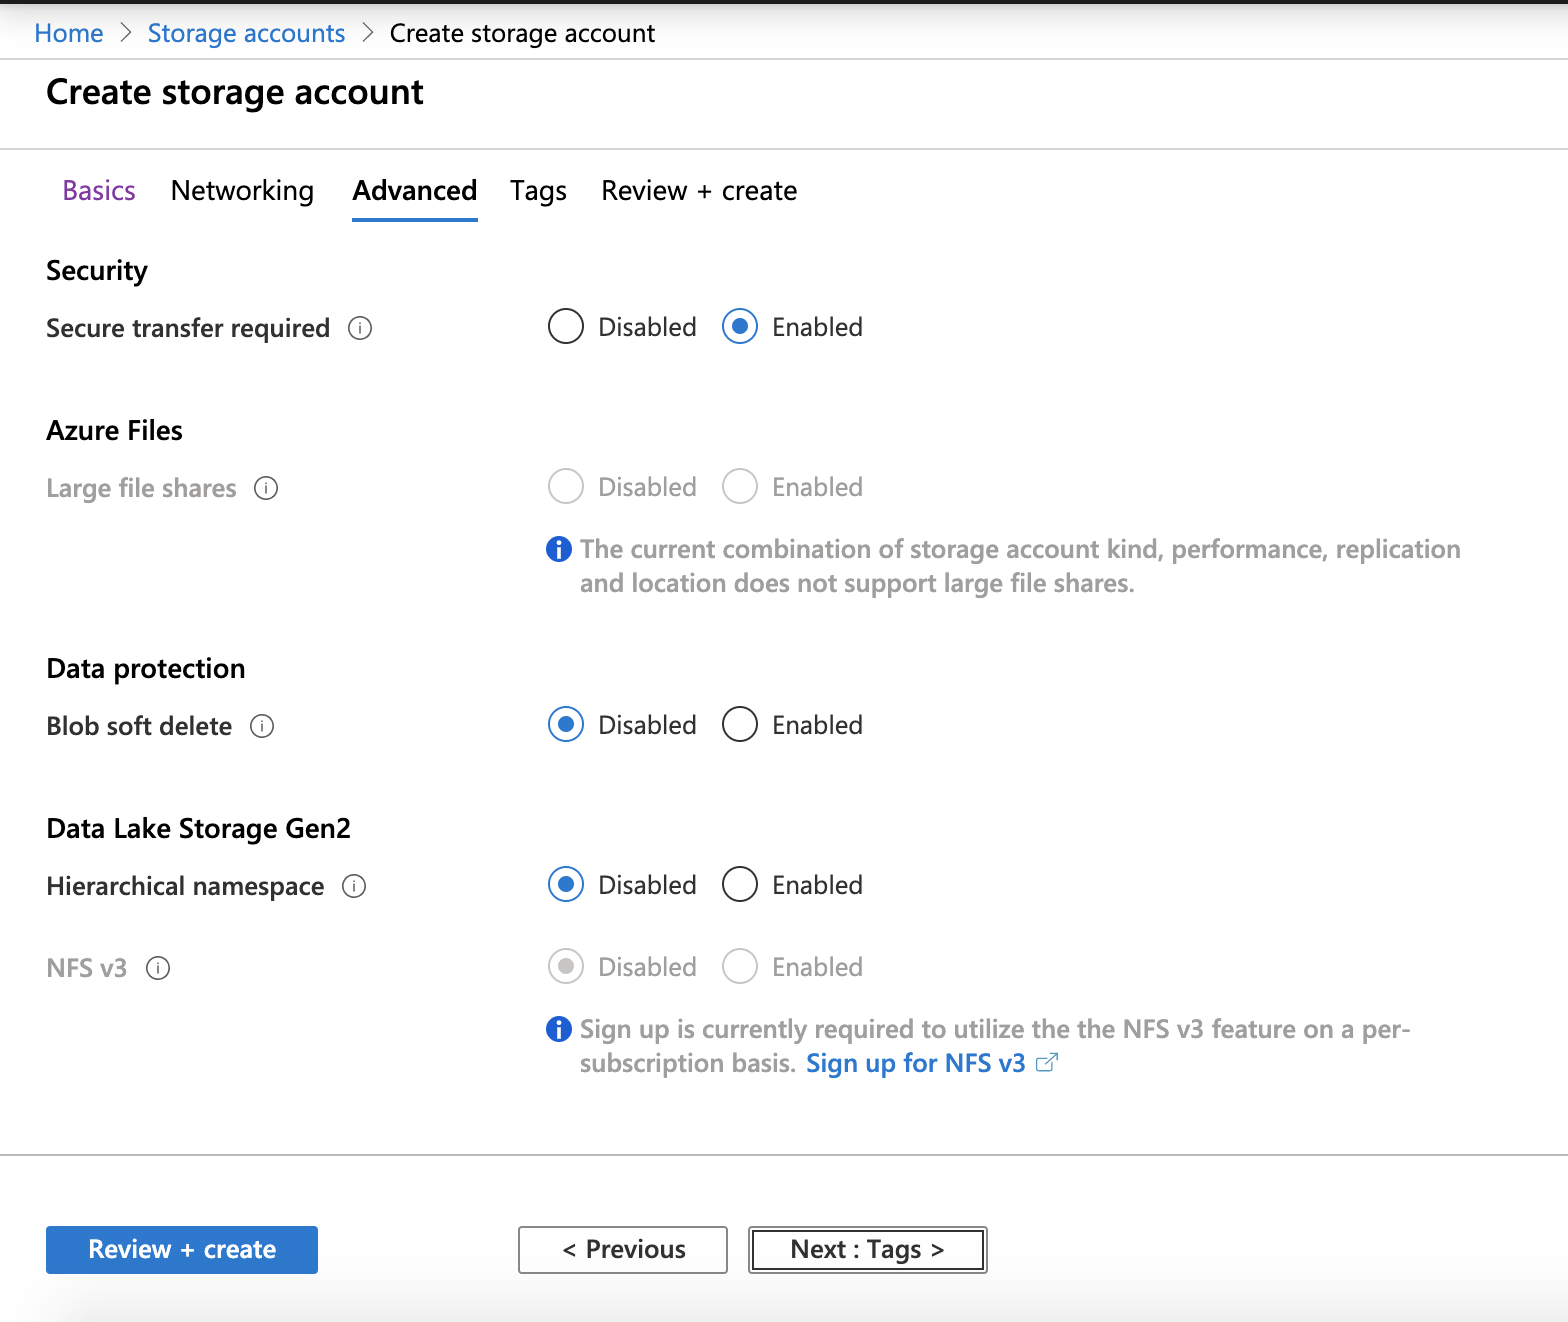
- Click "Next: Tags".
- Leave the Tags Screen at defaults click "Next".
- On the Final screen review all settings and click create.
- The completes the Storage Account Configuration. Continue to the next section to create a container.
How to create an Azure Blob Container in a Storage Account
- Select the Storage Account in the Azure console.
- On the menu on the left, under"Blob service" click on the "Containers" option.
%20(1).png)
- Click the + to create a "New container", under "Name" enter a unique name and leave the default setting as "Private no anonymous access". Click "Create".
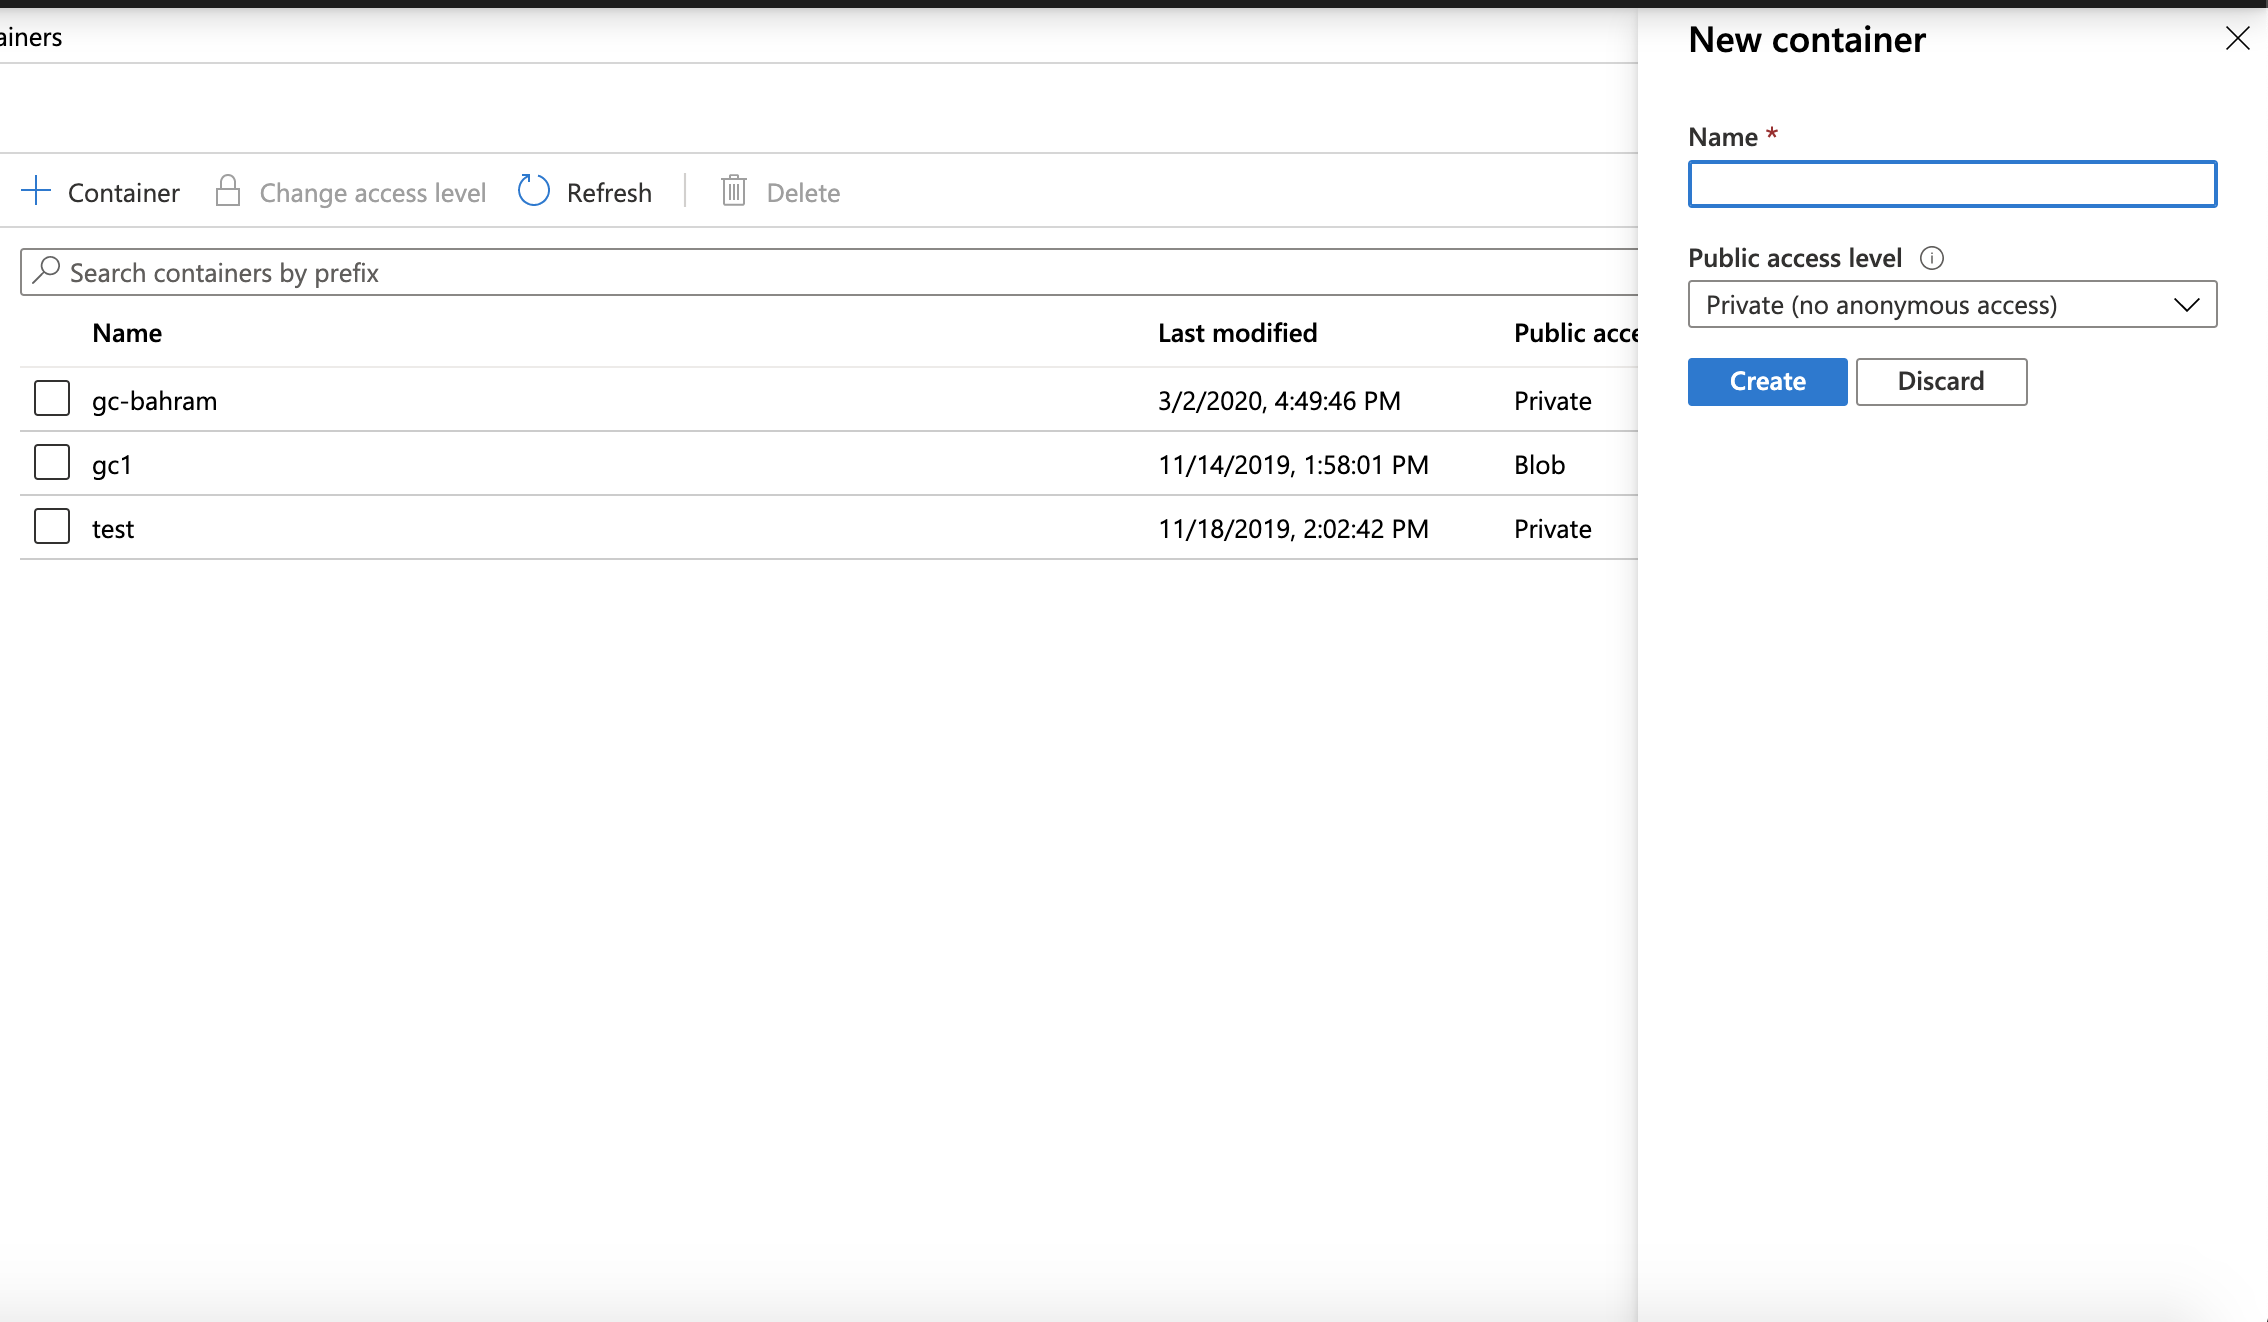
- After creation click on the "Properties" tab and record the URL to the container for use when configuring Golden Copy folders.
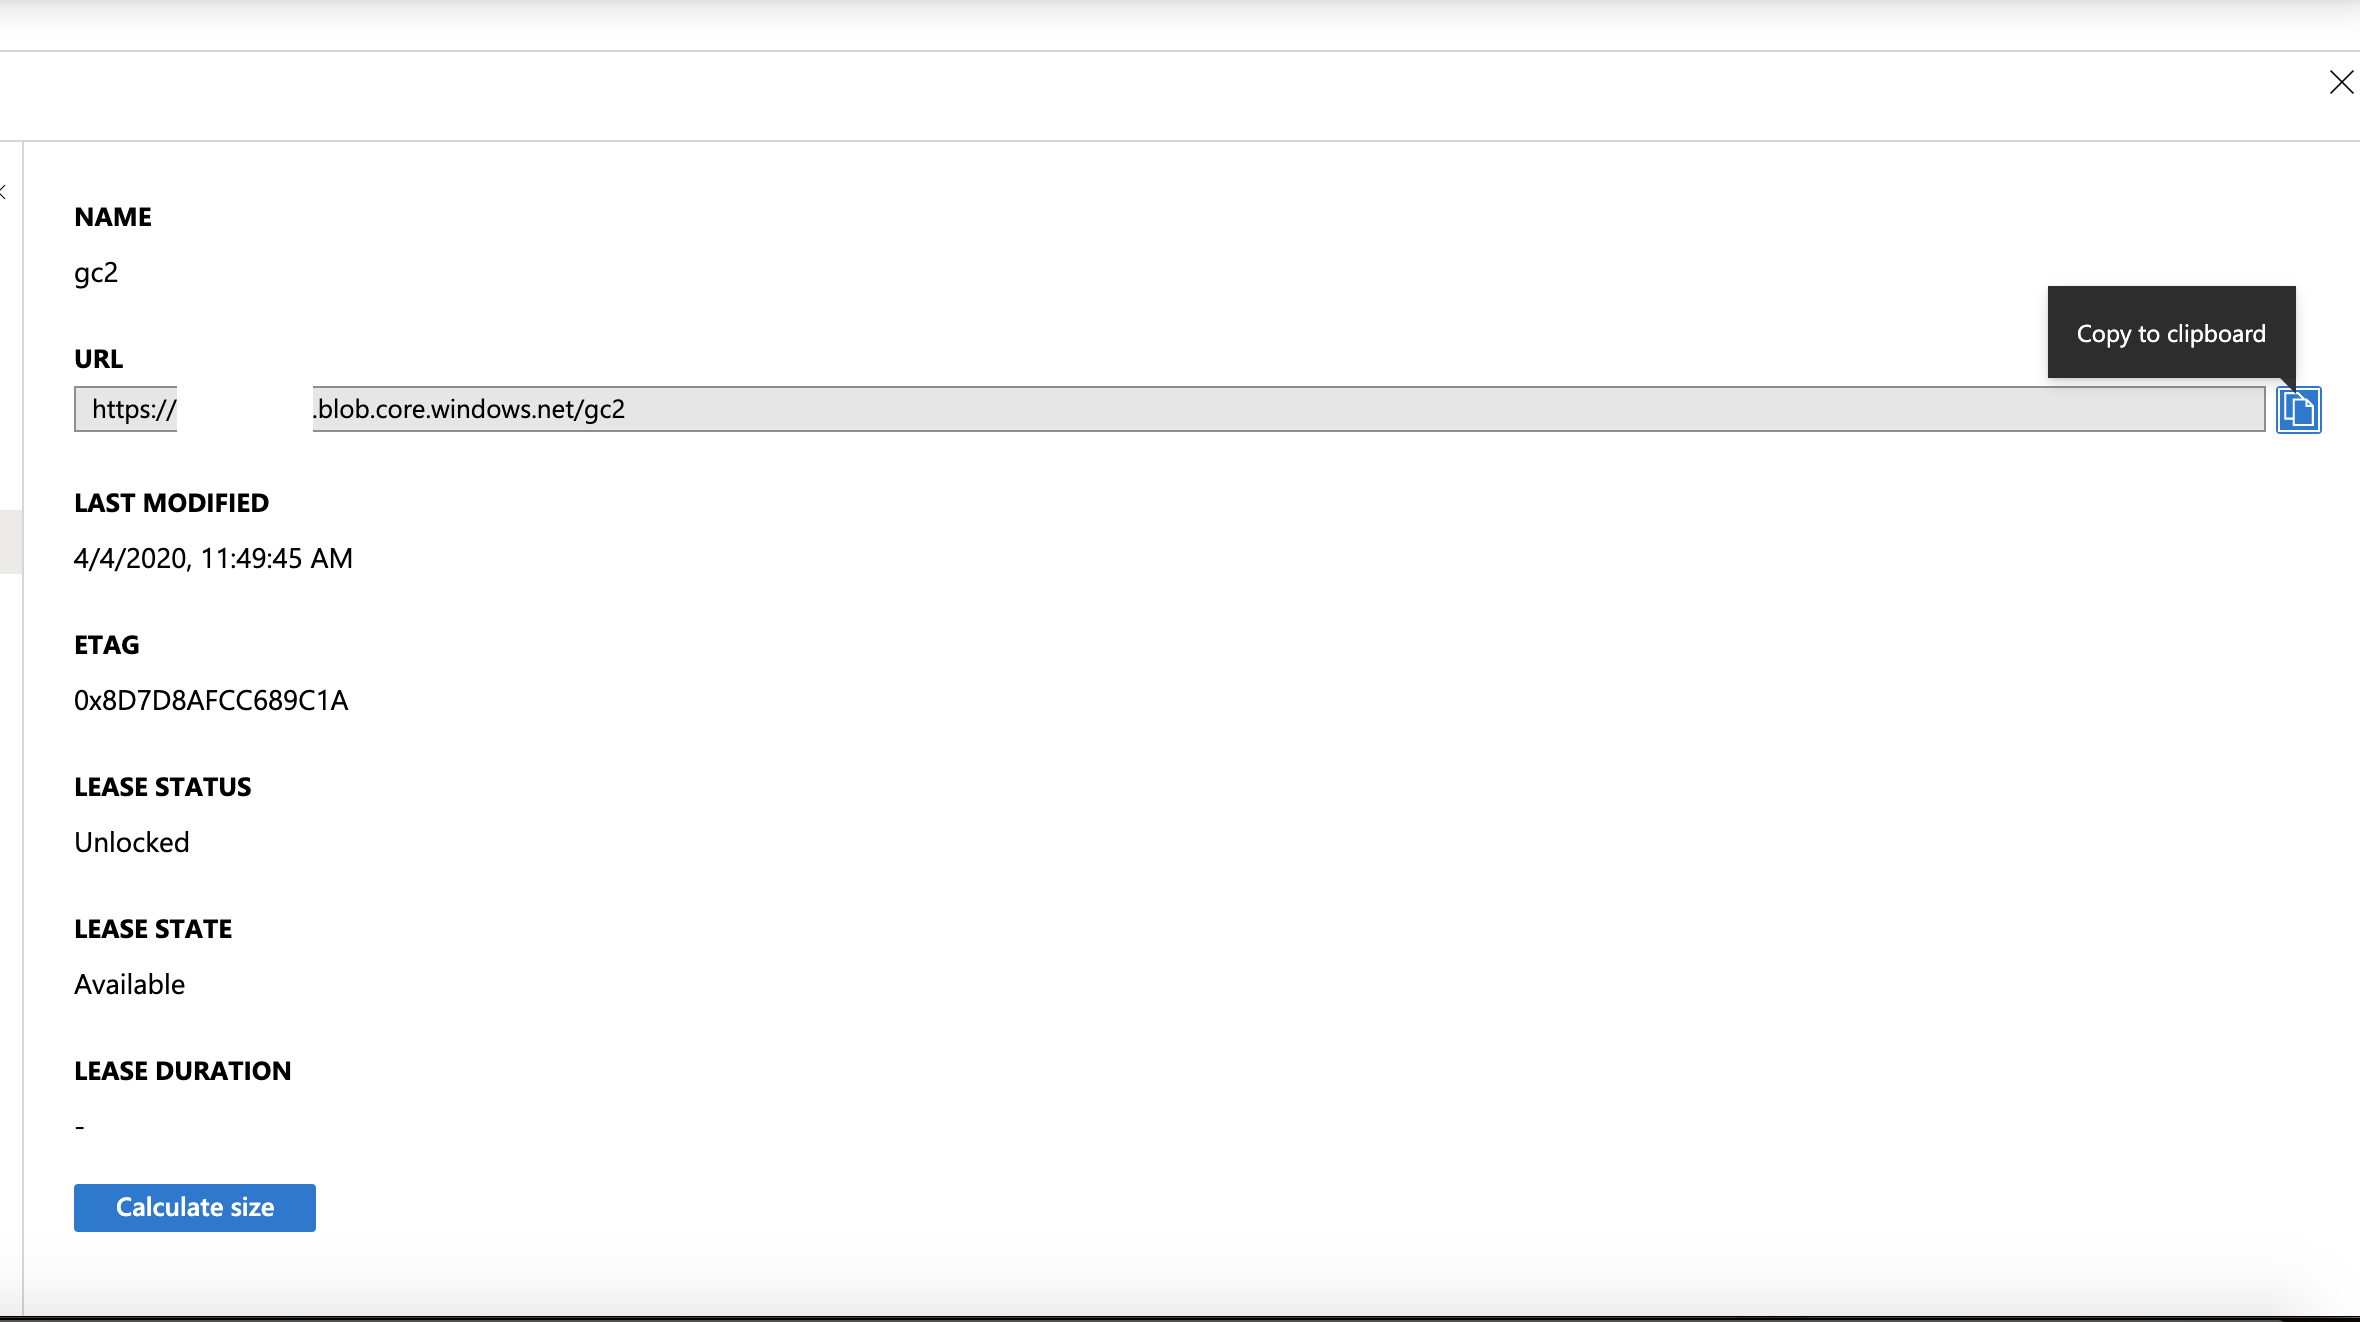
- Authentication keys for Blob access can be found on the Storage account --> Settings --> Access Keys .
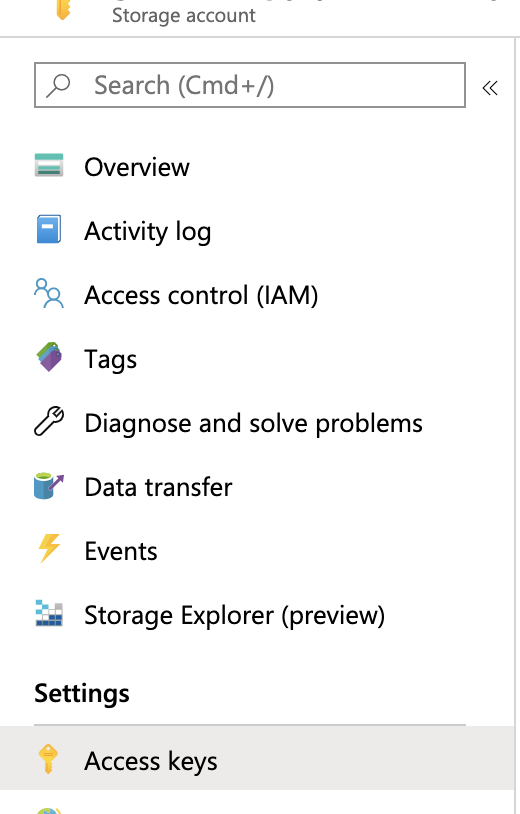
- On this screen record the Key 1 access key for use when configuring Golden Copy .
- Done, you will need the following information from these steps
- Storage Account.
- Container URL.
- Access Key for the Storage Account.
Cohesity Walk Through Example
How to Create the Storage View and Service Account User on a Cohesity Storage Array
- Create Service Account for Authentication with Golden Copy:
- Under the Admin menu --> Access Management.
- Create a new "Service Account User" with local user option with the admin role assigned (i.e. "eyeglassSR").
- NOTE: To ensure the storage view gets the bucket ACL's assigned, it is required to create the storage view logged in as the service account user created in this step.
- Login to the console as the new Service Account User (see note above).
- A Storage View is required with only the S3 protocol enabled for write access over the S3 protocol.
- The name of the view will generate an S3 bucket name. Use all lowercase and no special characters to create the Storage View name.
- This Storage View name will be needed when adding the folder to Golden Copy folder configuration using the bucket parameter.
- In the console use the Platform Menu --> View to create the new Storage view for S3
- Logged in as the new user, view the user in Admin menu --> Access Management --> click on the user and record the access ID and the secret ID.
- Use the values shown on the step above when adding the folder using the example above.
- Done.
Appliance Global Settings Configuration
How to set Default Settings for Snapshot Expiry for all Folders
Folders have default settings that can be viewed and set using commands in this section.
- How to set the Global Default snapshot Expiry for long running copy jobs
- searchctl archivedfolders configure --full-copy-snap-expiry x (where x is in days)
- NOTE: Use this command to extend the source snapshot taken for a long running copy job that could take many days to complete. The default is 10 days unless changed.
- How to view the Global Default settings on folders
- searchctl archivedfolders getConfig
- NOTE: Each folder add command also allows a per folder override , see folder add command to set per folder.
How to set File Checksum Global Settings for All Folders
- This option enables software MD5 checksum and includes the checksum in the S3 headers to allow the AWS, ECS or other S3 targets to recompute the MD5 checksum before saving the object. NOTE: Enabling checksum will have a performance impact, this impact will be higher on file systems with smaller files.
- Commands
- checksum property is controlled by searchctl archivedfolders configure -h
- searchctl archivedfolders configure --checksum <ON | OFF | default>
- value ON computes the checksum and adds a visible metadata property for files and folders. NOTE: This requires a file to be read twice, once for the checksum and a 2nd time to upload it with the checksum visible on the metadata This option is preferred since independent data integrity is now possible for stored objects after they have been copied.
- value OFF does not compute the checksum and avoids any in-built default checksum computing
- value DEFAULT is the default behavior for each cloud target
- OFF for Azure and partial ON
- AWS/ S3 Targets of type other, which means it is calculated but no visible property on the object)
- Google Cloud - TBD
- searchctl archivedfolders configure --checksum <ON | OFF | default>
- checksum property can be viewed with
- searchctl archivedfolders getConfig
Advanced Configurations to Appliance Configuration
The parameters allow advanced changes to the appliance and should only be changed when directed by support.
- Release 1.1.19 or later
- Alternate Data Stream option to drop them from incremental changelists. ADS are hidden metadata inside files using ADS file access. This data is not supported when the parent file is copied. The ADS is added to the changelist using filename:label syntax and generates an error when processing the changelist since the ADS is not an actual file. This option drops ADS only entries from the PowerScale Changelists so they will not generate an error
- nano /opt/superna/eca/eca-env-common.conf
- add this variable
- export IGNORE_ADS_FILES=true
- control +x to save and exit
- ecactl cluster down
- ecactl cluster up
- Release 1.1.19 or later
- AWS only transfer manager 2.0 parameters to control network pipe size and concurrent threads.
- export AWS_TRANSFER_MANAGER_V2_TARGET_THROUGHPUT_GBPS=
- export AWS_TRANSFER_MANAGER_V2_MAX_CONCURRENCY=
- AWS only transfer manager 2.0 parameters to control network pipe size and concurrent threads.
- Release 1.1.9
- Walk once feature
- nano /opt/superna/eca/eca-env-common.conf
- export ECA_ENABLE_PATH_CACHE=true
- control +x to save and exit
- ecactl cluster down
- ecactl cluster up
- Release 1.1.9
- New Stats Engine Database based on Redis. Follow these steps to enable.
- nano /opt/superna/eca/eca-env-common.conf
- export ECA_STATS_USE_REDIS=true
- control +x to save and exit
- ecactl cluster down
- ecactl cluster up
- Release 1.1.9
- How to enable walk once for files and folders
- nano /opt/superna/eca/eca-env-common.conf
- export ECA_ENABLE_PATH_CACHE=trueexport REDIS_PATH_CACHE_FOR_FILES=trueexport REDIS_PATH_CHECK_LIMIT=3000000
- control +x to save and exit
- ecactl cluster down
- ecactl cluster up
- Other advanced settings Note: Only make changes if advised by support!
- nano /opt/superna/eca/eca-env-common.conf
- export ARCHIVE_PARALLEL_MULTI_UPLOAD=True (this enables multi part upload for files over a certain size)
- export ARCHIVE_MAX_PART_SIZE= (10MB default for larger files , leave at default)
- export ARCHIVE_PARALLEL_THREAD_COUNT=10 (sets the number of concurrent files to copy across all PowerScale nodes in the pool)
- export ARCHIVE_S3_PREFIX="igls-" OneFS 9 requirement example: to replace xxx with string to prefix folder objects that store ACL information and avoids a collection with directory names on NAS devices example "igls-"
- Each folder object will have this prefix applied to avoid the collection with duplicate folder names. This flag will apply a prefix to folders that are uploaded that are stored to retain ACL's on folders. You will see for each folder uploaded, one folder stores files, and an additional object with the same name as the folder. This is where the ACL is stored for the folder that contains files.
- When using the file system based S3 target storage example, OneFS 9 with S3 support, 2 folders with the same name are not supported. This requires the folder object to have a different name. This prefix will be applied to folder objects when the target storage enforces unique object keys and object names. Consult support before using this flag.
- export ARCHIVE_ENABLE_SDK=true (Enables Native SDK mode - default mode as of 1.1.4 > 178 build)
- export ARCHIVE_PARALLEL_THREAD_COUNT=100 (number of concurrent files per Golden Copy VM or Accelerator Nodes, increasing this number may not increase performance unless sufficient bandwidth is available)
- export ARCHIVE_PARALLEL_THREAD_SDK=10 (Number of separate threads used to copy a single large file, higher number will increase bandwidth utilization)
- export ARCHIVE_SMART_INCREMENTAL=false (default value)
- Change the value to true to enable, this will need to be added to common conf file and cluster down and up to take effect.
- This enables a fast incremental feature to skip collecting metadata that requires additional api calls to collect, when this is true ,metadata will not support owner, group , mode bits.
- Folder ACL's are still collected and takes an extra API call for each folder. The file data stamps are available in the change list and are included in the metadata.
- This is only recommended if a very high change rate of files is expected and the performance of fast incremental is required.
- Parallel Incremental Multiple Changelists for Parallel incremental jobs in Onefs - BETA
- Onefs defaults to a single change list at a time. This feature allows running multiple change lists on different paths at the same time in OneFS and Golden Copy support to manage concurrent change list jobs for Fast Incremental.
- Golden copy will now submit 2 changelist jobs in parallel to the cluster.
- How to Configure
- change the allow_multiple_instances flag on isilon by running: # isi_gconfig -t job-config jobs.types.changelistcreate.allow_multiple_instances=true
- On ECA node 1
- nano /opt/superna/eca/docker-compose.overrides.yml
- add the tags below with spacing as shown
version: '2.4'
    services:
        isilongateway:
           environment:
- ISILON_CHANGELIST_PARALLEL_JOBS=2- control + X to save
- ecactl cluster down
- ecactl cluster up
- export ARCHIVE_BLOCK_PARALLEL_JOBS=true (default true, Blocking Parallel on single VM Golden copy, multi VM deployments must be used to allow parallel jobs).
- Set to false to allow multi VM deployments to run multiple copy jobs.
- export ARCHIVE_FULL_PARALLEL_JOBS_ALLOWED=x
- Default is 1 change to a value no greater than 30 and requires multi VM deployment for a supported configuration
- export ARCHIVE_INCREMENTAL_PARALLEL_JOBS_ALLOWED=x
- Default is 1 change to a value no greater than 30 and requires multi VM deployment for a supported configuration
- Default is 1 change to a value no greater than 30 and requires multi VM deployment for a supported configuration
- export ARCHIVE_TOTAL_JOBS_ALLOWED=60
- Default 2, for 1 Full and 1 Incremental, Maximum supported value is 60 which allows for 30 folders with full copy jobs and 30 incremental jobs
- Special character encoding for some S3 targets that do not support special characters in metadata tags. Set to true and cluster down and up to take effect. the User and group metadata will be base64 encoded into the metadata tags.
- export ENCODE_OWNER_GROUP=true
- Consumer group per folder option is designed for environments with many folder definitions and folders are created , deleted or jobs canceled. This isolates the copy function to ignore kafka rebalance requests from other topics that are created. This will be the default mode in a future release.
- export ECA_KAFKA_USE_STATIC_ASSIGNMENT=true
- How to Increase HTTP API Timeout
- Use these steps when the cluster cannot return API requests under the default 30 seconds. It is abnormal for a cluster to take longer than 30 seconds. Only apply if directed by support.
- on node 1 add this variable below and save the file. The value is in ms and this adds timeout of 5 minutes
- nano /opt/superna/eca/eca-env-common.conf
- export HTTP_TIMEOUT_MS=300000
- control+x (save the changes)
- ecactl cluster push-config
- ecactl cluster services restart isilongateway