Search & Recover Cluster Operations
- Cluster Operations CLI commands
- How to Initialize Cluster Management Across all nodes
- How to List all Kafka topics and definitions
- How to Start and Stop the Cluster
- How to Change the IP address of an PowerScale Cluster
- How to change TLS security settings when connecting to clusters that do not support the highest security algorithms
- How to Enable and Use PhoneHome support
- How to Upgrade the cluster Online
- How to change the downloads and Admin tool UI password
- How to collect support logs and submit a support case
- Backing up and Restore the Cluster Configuration
- How to Configure Automated backups to store on External Storage and protect the appliance Configuration
- How to check for Alarms
- How to configure Alarm notification
- Quick Start SMTP Configuration for Notifications :
- Setup Syslog channel for Notifications:
- Setup an SMTP or Syslog Channel for Notifications:
- Create a Notification Group:
- Manage Recipients for SMTP and Syslog channels:
- Manage Notification Suppression Alarm Configurations:
- How to force commit indexed files to the Index
- Index Weekly Maintenance Task Schedule
- How to factory reset an installation ( Warning this deletes the index)
- How to delete a path of data folders and files from the Index
- How to Expand the Capacity of the Index Path on each VM
- How to change the TLS Certificate for the WebUI with a new Self Signed Cert
- How to change the TLS Certificate for the WebUI with a Customer Signed Certificate
- Content Indexing Performance Advanced Configuration Settings
- Scale Out Content Indexing & Classification Only VM Deployment Option
Cluster Operations CLI commands
The following sections cover cluster operation commands.
How to Initialize Cluster Management Across all nodes
Use this command once after installation to setup ssh keys and SSL certificate for the web UI as well sync key files to all nodes.
- ecactl components install eca .
How to List all Kafka topics and definitions
- searchctl topics list
- searchctl kafka describe --topic <topic_name>
How to Start and Stop the Cluster
- ecactl cluster up - starts up cluster services on all nodes .
- ecactl cluster down - stops all cluster services on all nodes.
How to Change the IP address of an PowerScale Cluster
- Use this command to change the ip address of a cluster that has already been added to the Search & Recover appliance.
- searchctl isilons modify --name NAME --ip IP (name is the cluster name as reported by searchctl isilons list, IP is node ip in system zone in a an IP pool with dynamic mode enabled) .
How to change TLS security settings when connecting to clusters that do not support the highest security algorithms
- In some cases it is required to change the TLS security settings used to connect to clusters or other devices.
- The java security file can be found here /opt/superna/eca/conf/java.
- Edit this file with vim to make changes to the settings.
- To apply the settings restart the isilongateway container.
- ecactl cluster containers restart isilongateway.
- done.
How to Enable and Use PhoneHome support
To enable remote log collection for faster support of cluster issues, enable the phonehome feature.
- ecactl phonehome now .
- If the appliance has a valid license key and the following whitelisted urls below, the registration will succeed. If an Internet proxy is required then configure the proxy .
- Proxy configuration.
- sudo -s (enter admin password).
- Type yast.
- Enter proxy configuration under network services menu and proxy and save.
- whitelist urls
- The Monitoring service requires the following URL's allowed:
- See Here for details on whitelist
- How to Disable phonehome:
- ecactl phonehome stop
- How to upload logs directly to support:
- ecactl phonehome logsupload
How to Upgrade the cluster Online
This command will check for new code online and download the code, and requires Internet access from the appliance to *.superna.net URL over HTTPS.
- Each login to the cluster will check for new software upgrades.
- The command to run the upgrade:
- ecactl cluster upgrade.
- ecactl cluster upgrade.
- NOTE: This will download the new code, shutdown the cluster, upgrade the cluster code.
- Verify if any upgrade was successful and look for errors.
- Start up the cluster:
- ecactl cluster up
- verify no startup errors are visible.
How to change the downloads and Admin tool UI password
Installation requires the WebUI password to be set. To reset or change this password follow these steps:
- Login to node 1 over ssh as ecaadmin user and run the command below
- NOTE: Replace <password> with the password
- ecactl cluster exec "htpasswd -b /opt/superna/eca/conf/nginx/.htpasswd ecaadmin <password>"
- done. The new password is active immediately on all nodes.
How to Display Cluster Diagnostic and Cluster Version
- ecactl cluster diagnostics - use this command to display cluster wide health and diagnostic data (FUTURE)
- ecactl version - (shows the current code version).
- ecactl zk - (advanced support only commands for zookeeper).
How to collect support logs and submit a support case
- ecactl cluster loggather --tail 5000 - Use this command to collect logs and create support zip. --tail option specifies how many lines are collected for certain logs and will reduce file size. Suggested value 5000 for support.
- To get the appliance ID required to upload support data:
- run the command ecactl version .
- Record the appliance ID value. This is required to upload support logs.
- Download the support zip from:
- https://x.x.x.x/downloads/loggather/
- Then follow normal support backup upload instructions located here.
Backing up and Restore the Cluster Configuration
To protect the configuration of the search cluster, the backup should be created and and stored off the appliance.
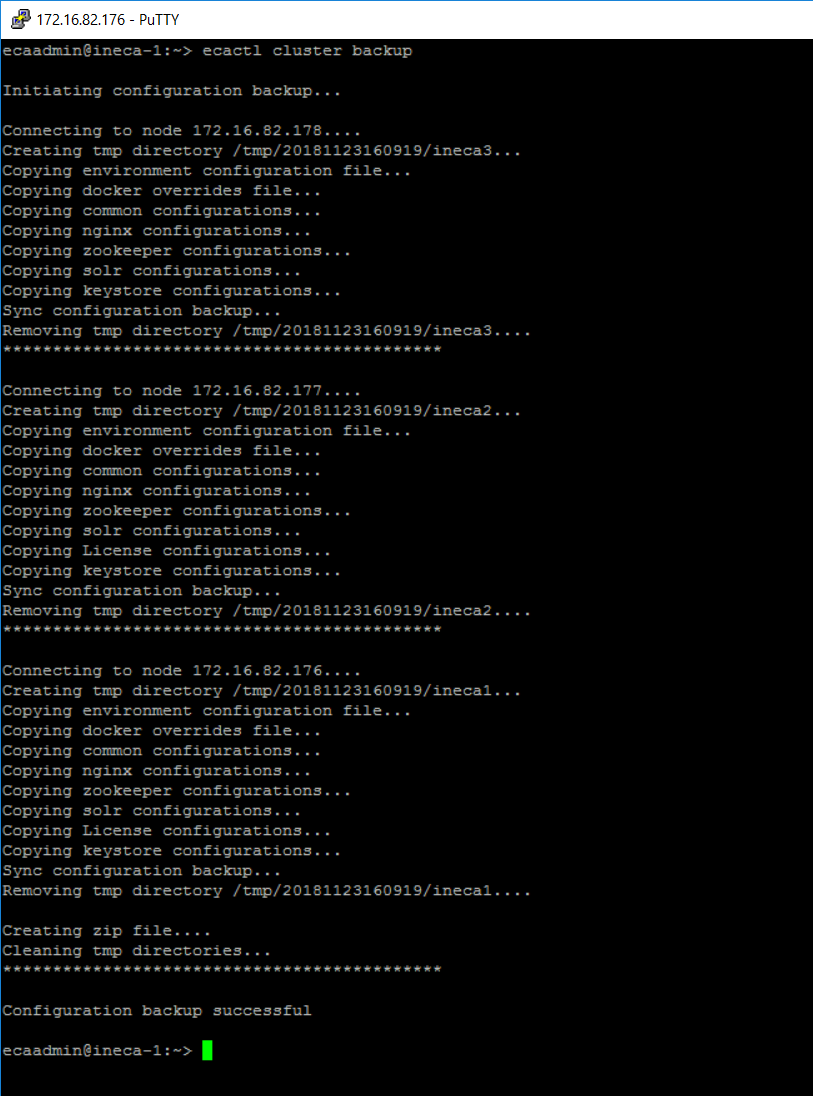
Backup command
- ecactl cluster backup .
- Results are stored in /opt/superna/var/search/downloads/archive/ .
- To access the downloads page open a browser and enter https://x.x.x.x/downloads/ of node 1 ip address. This will require the administrator WebUI user and password set up during installation. User name is ecaadmin and password used during setup.

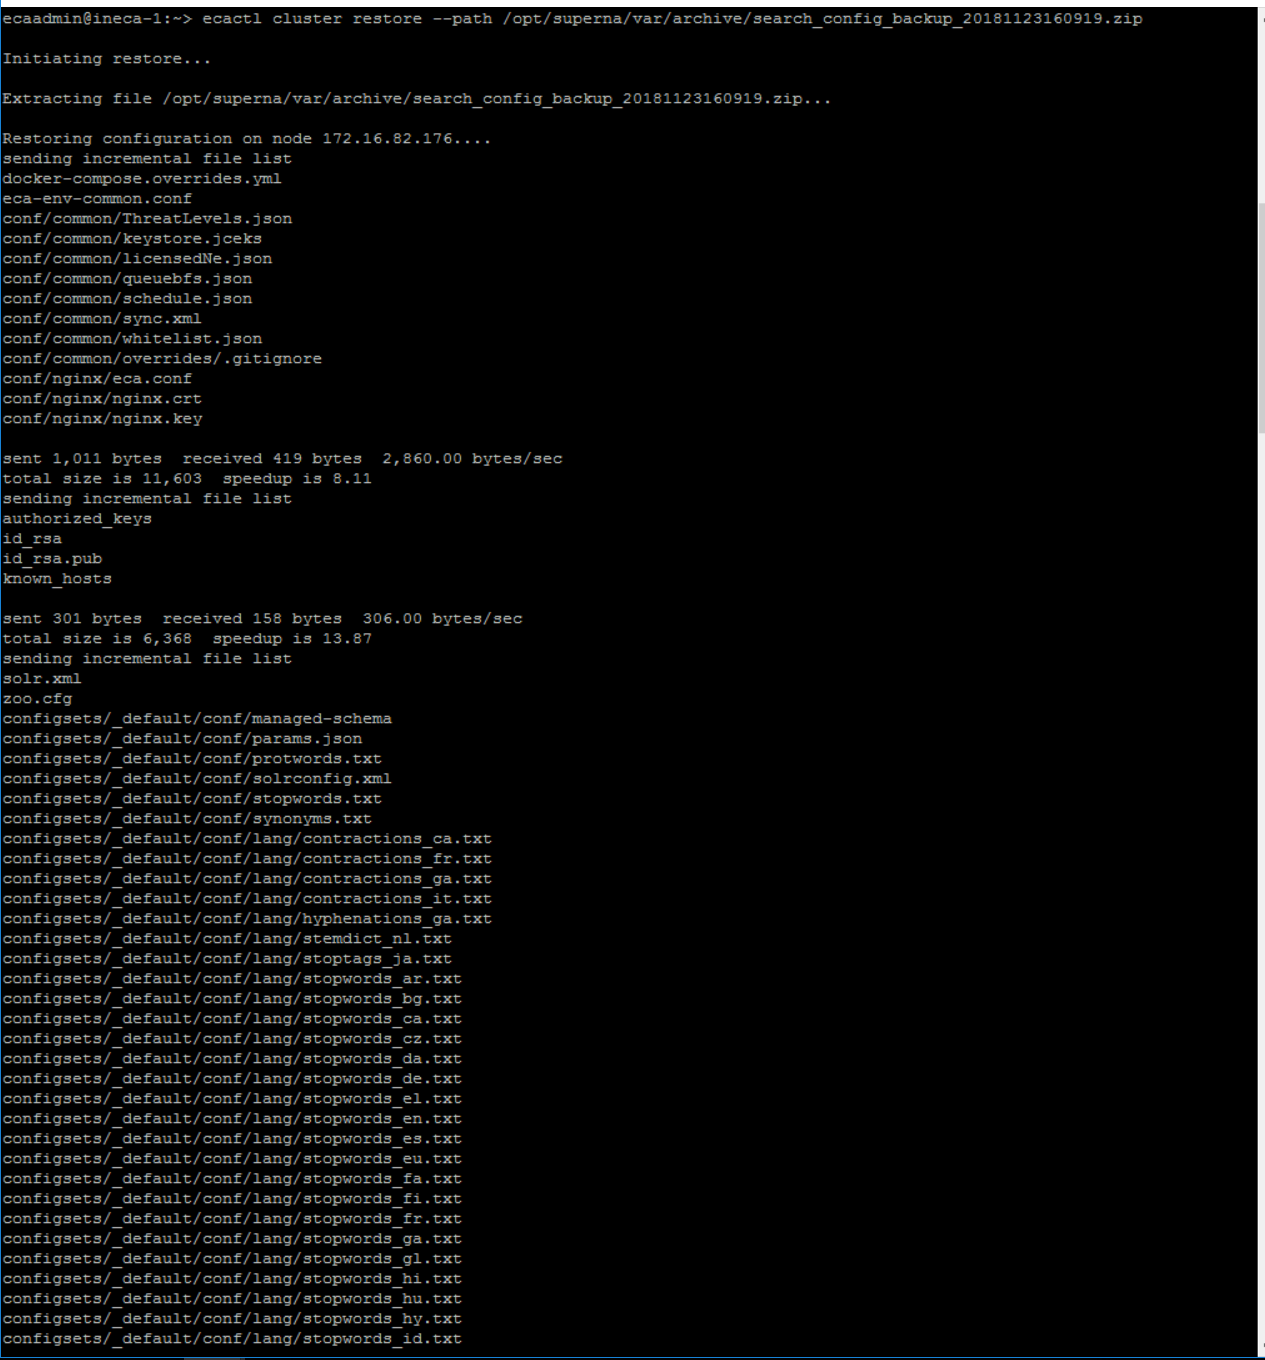
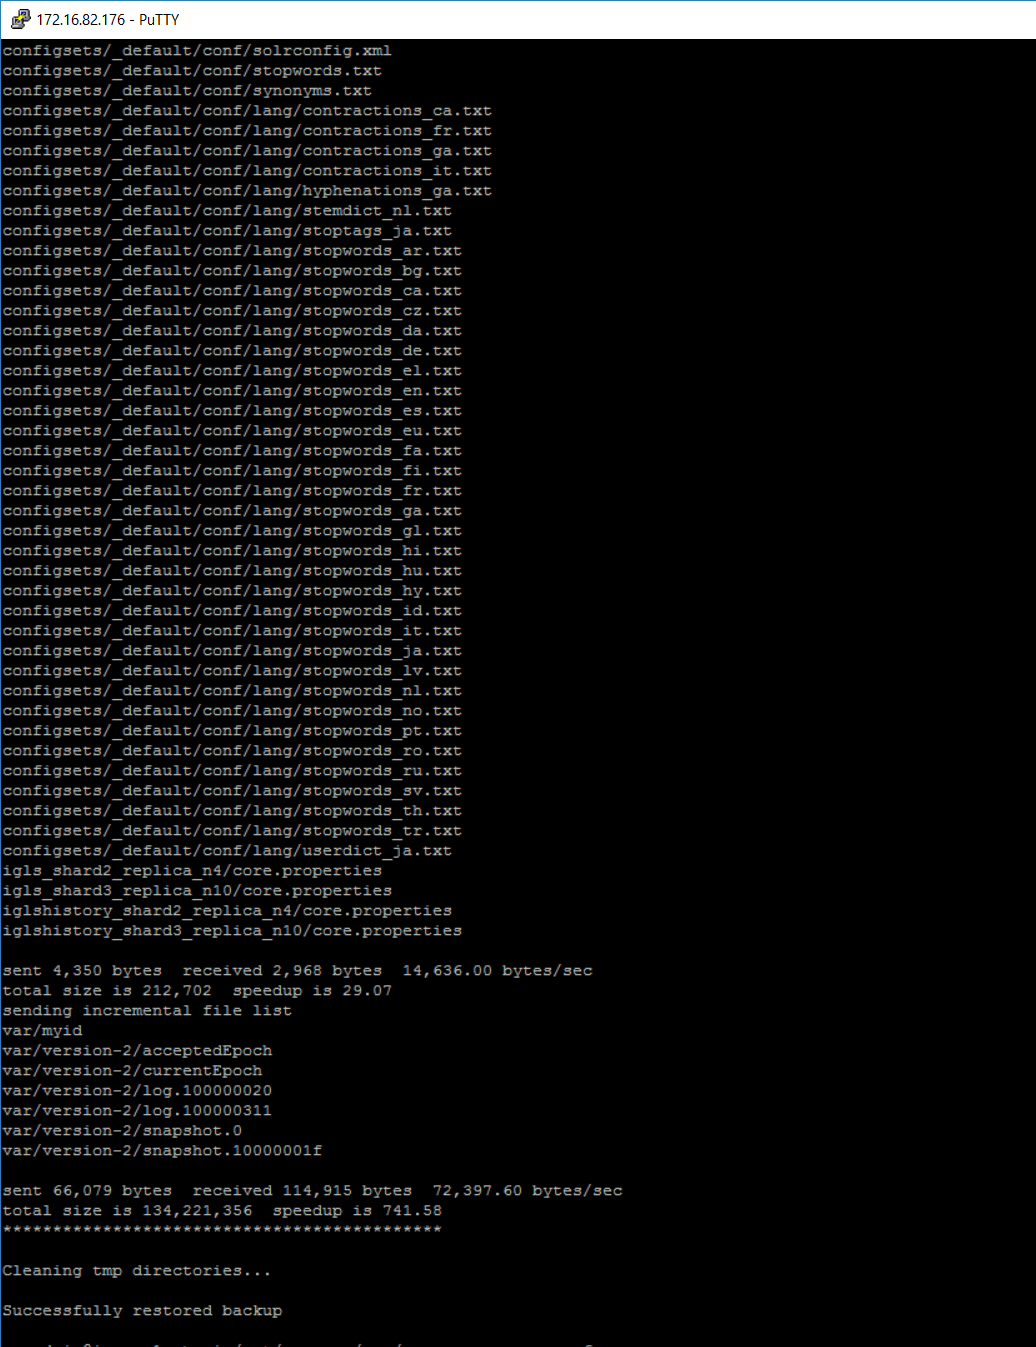
Restore Command:
- NOTE: The cluster must be shut down first to restore. ecactl cluster down
- ecactl cluster restore --path /opt/superna/var/search/downloads/archive/<name of backup file>.zip
How to Configure Automated backups to store on External Storage and protect the appliance Configuration
- The appliance will create a daily backup and keep 7 backups without any configuration.
- The auto backups are stored here: /opt/superna/var/search/downloads/archive/auto .
- Create an NFS export on Isilon to store these backups. Example: /ifs/goldencopy/dailybackup with read/write permissions
- Edit /etc/fstab to mount this Isilon export and save the daily backup external to the appliance. Example: fstab entry located below can be customized for your environment.
- Example fstab entry
- FQDN:/ifs/goldencopy/dailybackup nfs nfsvers=3 0 0 (where FQDN is the DNS name to connect to the cluster) save the file .
- mount -a (will mount the exports in fstab)
- mount (to check the mount was successful)
How to check for Alarms
This command is used to check overall system events:
- searchctl notifications list
- The data returned includes the error code , severity of the event, the time of the event, subsystem involved and a description. Depending on the event type additional fields may be populated as well.
How to configure Alarm notification
The alarm system supports channels with smtp and syslog as available choices. The alarm system supports groups of recipients that can be added to a channel. A suppression feature allows rate limiting events or disabling them.
usage: searchctl notifications [-h]
{list,channels,groups,recipients,suppkeys}
optional arguments:
-h, --help show this help message and exit
operations:
{list,channels,groups,recipients,suppkeys}
list Lists notifications
channels Commands for adding/removing/viewing notification
channels
groups Commands for adding/removing/viewing notification
groups
recipients Commands for adding/removing/viewing notification
recipients
suppkeys Commands for adding/removing/viewing suppression keys
suppkeys
Quick Start SMTP Configuration for Notifications :
- Create a notification channel.
- Test the notification channel.
- Create notification channel group.
- Add recipients to the channel group.
- Create a notification group and add recipients :
- Examples:
- Anonymous SMTP example:
- searchctl notifications channel addsmtp --host x.x.x.x --port 25 --sender fromemail@domain.com --tlsEnabled false
- Authenticated connection example:
- searchctl notifications channel addsmtp --host x.x.x.x --port 25 --sender fromemail@domain.com --tlsEnabled false --user supernacorp (NOTE this will prompt for password, --user is only required authenticated SMTP connection)
- Test the channel Configuration with a test email:
- Test the configuration (replace yellow highlighted with values from your environment).
- searchctl notifications channels testsmtp --id A5tNdkgIT --recipient fromemail@domain.com (--id is the channel id found from searchctl notifications channels list
- The response will return diagnostic information of the test send message.
- Add Notification Group (optional step):
- Optional step - a default group exists called default that is set to INFO level. Only create a group if you want to set the severity filter to a higher level.
- searchctl notifications groups add --name alerts --severity MAJOR(The severity option will send alarms and reports with a severity of INFO or higher, a value of MAJOR will only send MAJOR and CRITICAL alarms)
- Add Recipients to the Channel group:
- Get the channel ID using this command for the next step: searchctl notifications channel list
- searchctl notifications recipients addsmtp --group default --channel xxxxxxx --to targetemail@example.com
- Modify the yellow highlights for your environment (assumes default group is used) .
- Done.
Setup Syslog channel for Notifications:
- Create the notification channel:
- searchctl notifications channels addsyslog --logger SYSLOG .
- searchctl notifications channels addsyslog --logger SYSLOG .
- Configure and test a Syslog channel:
- edit /opt/superna/var/notification/log4j2.xml .
<Syslog name="SupernaSyslog" format="RFC5424" facility="LOCAL0" host="172.25.8.25" port="5140" protocol="UDP" appName="EyeglassSearch" messageId="SystemEvent" id="Event" connectTimeoutMillis="10000" newLine="true" mdcId="mdc" includeMDC="true" enterpriseNumber="18060"> </Syslog>
- Locate the host and change the ip address to the ip of the syslog server you want to send events.
- searchctl notifications channels testsyslog --id MMhjYPd0e (get the channel id by running searchctl notifications channels list) .
- This will send a test syslog entry to the syslog to verify communications.
- Optionally add a suppression key see below.
- Done.
Setup an SMTP or Syslog Channel for Notifications:
- Configuration :
- searchctl notifications channel addsmtp --host x.x.x.x --port 25 --sender fromemail@domain.com --tlsEnabled false --user supernacorp .
- This example assumes user is required for authentication and prompt for password is required to complete the command.
- searchctl notifications channel addsyslog --logger SYSLOG (enter SYSLOG for logger) .
- searchctl notifications channel addsmtp --host x.x.x.x --port 25 --sender fromemail@domain.com --tlsEnabled false --user supernacorp .
- List :
- searchctl notifications channel list --verbose .
- searchctl notifications channel list --verbose .
- Remove configuration:
- searchctl notifications channels remove --id xxxxxx (use list command for id) .
Create a Notification Group:
A notification group is a channel plus alarm severity and receipts. This allows different emails to receive different severity alerts
- Create Notification group and assign receipts:
- searchctl notifications groups add --name INFO --severity INFO (name is any name you want to assign, severity is the minimum alarm level that will be sent on this channel {CRITICAL,MAJOR,MINOR,WARNING,INFO,TRACE}).
- Assign recipients to the SMTP channel group (see recipients commands below):
- searchctl notifications recipients addsmtp --group INFO --channel xxxxxxx --to targetemail@example.com (note channel id can be found listing all the configured channels).
- Done - emails will now be sent.
- searchctl notifications recipients addsmtp --group INFO --channel xxxxxxx --to targetemail@example.com (note channel id can be found listing all the configured channels).
- Group commands:
- searchctl notifications groups add .
- searchctl notifications groups list (list existing).
- searchctl notifications groups remove --name xxxx (name of the group).
- searchctl notifications groups add .
Manage Recipients for SMTP and Syslog channels:
Use these commands to add recipients for channel groups.
- Assign recipients to a channel and group:
- searchctl notifications recipients addsmtp --group NAME --channel xxxx --to email@example.com (add group name, channel ID see above for list channels to get the ID , email target)
- searchctl notifications recipients addsyslog --group NAME --channel xxxx (add group name, channel ID see above for list channels to get the ID)
- searchctl notifications recipients addsmtp --group NAME --channel xxxx --to email@example.com (add group name, channel ID see above for list channels to get the ID , email target)
- Manage recipients commands
- searchctl notifications recipients list --group xxxxx --verbose (xxxxx is the group name)
- searchctl notifications recipients remove --id --group (ID is the channel ID and group is group ID, use the list command to get both ID's)
- searchctl notifications recipients list --group xxxxx --verbose (xxxxx is the group name)
Manage Notification Suppression Alarm Configurations:
Use this optional configuration to rate limit a specific alarm code for a specific recipient group to only receive a certain alarm once per hour, day or never. This can be useful for notifications that are reoccurring and need to be rate limited.
- Add a suppression key:
- searchctl notifications suppkeys add --group GROUP --code CODE --frequency {ONE_PER_HOUR,ONE_PER_DAY,NEVER}
- group is the group name, code is the alarm code, frequency is used to ensure the rate of the alarm never exceeds the values of once per hour, once per day or never).
- searchctl notifications suppkeys list --group name (enter a group name to list the group with an assigned suppression configuration).
- searchctl notifications suppkeys remove --group GROUP --id ID (group and supresskey id, use the list command for the group to get the suppression key ID) . This will remove the suppression key configuration from the group.
- searchctl notifications suppkeys add --group GROUP --code CODE --frequency {ONE_PER_HOUR,ONE_PER_DAY,NEVER}
How to force commit indexed files to the Index
The files that are processed by a full index or incremental scan job are not committed to the index until a threshold in time or number of files is crossed. For testing purposes or when using the path level re ingestion cli command the commit command will force the processed files into the index. NOTE: This is an expensive disk operation and should not be used frequently unless required.
- searchctl solr commit
Index Weekly Maintenance Task Schedule
Every Saturday a task runs on each indexed folder to remove files and directories that have been moved. This process compares the index to what PowerScale is showing on a folder by folder basis, and issues deletes to the index based on orphaned folders in the index. This process runs at midnight and can take several hours to complete.
The schedule can be changed setting a cron string in the /opt/superna/eca/eca-env-default.conf file and locate this variable export FULL_INGESTION_TASK_CRON="0 0 * * 6"
A cli command allows running this job on demand as well. See the CLI guide for folders here.
How to factory reset an installation (Warning this deletes the index)
Do not execute this command unless directed by support. This will delete all configuration settings including the index.
- ecactl cluster down .
- ecactl cluster factory-reset .
- Enter the ecaadmin password and wait for the commands to finish.
- To restart with a fresh configuration start up the cluster to create an empty index:
- ecactl cluster up .
How to delete a path of data folders and files from the Index
Sometimes it may be desired to remove data in bulk from the index. This procedure allows a delete from the index using a path based solution that deletes all files and folders.
- Login to the Solr index .
- https://x.x.x.x/solr (x.x.x.x is node 1 of the Search & Recover appliance) .
- Enter the ecaadmin user name and password set during installation .
- On the left hand menu select the collection option and pick igls .
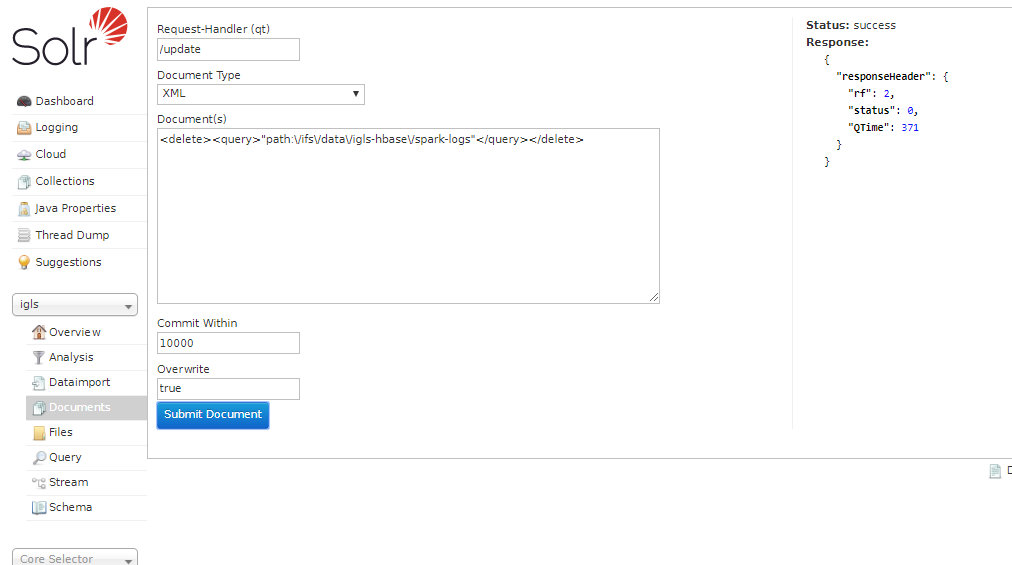
- Then select the documents menu option .
- Complete the screen as shown and enter the path with the exact characters as shown in the screenshot and click submit the document. Note: The delete can take hours to take affect in search results. The delete will delete all files that begin with the path that was entered.
- Text to copy and paste note the slashes are required as shown: <delete><query>"path:\/ifs\/data\/somepath"</query></delete>
- Now login to Search & Recover node 1 as ecaadmin.
- Commit index changes with this command
- searchctl solr commit
How to Expand the Capacity of the Index Path on each VM
If the index disk gets up to 80%, space must be added. Space is consumed if the number of files consuming metadata space uses up available space, or if content indexing is enabled. Content indexing space consumption is expected and will require expanding the disks on all virtual machines 2 through N, where N is the last VM in the cluster.
Requirements:
Access to VMware vCenter must be available to add disk space to the VM.
Procedure:
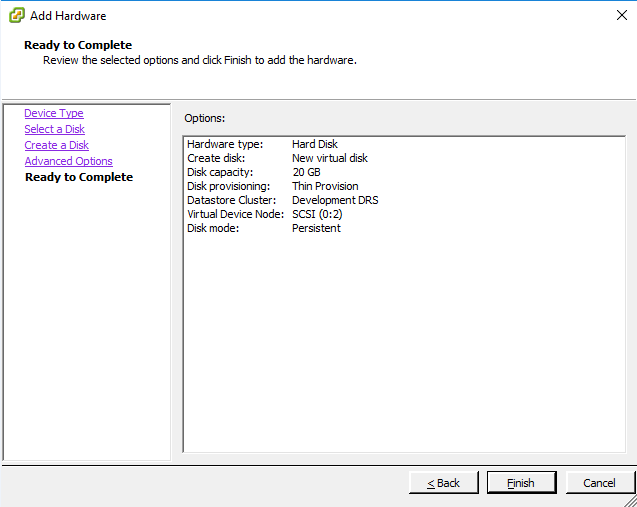
- Create a new virtual disk of at least 200GB
- Collect Virtual Device Node i.e.: This example uses `SCSI (0:2)` where `0` is the host node ID
- Login to Search & Recover node 2 through N as ecaadmin .
- Switch to root with sudo -s (enter ecaadmin password) .
- Scan for the new disk in OS. (host0 should be the default if you do not find a disk contact support).
- echo "- - -" > /sys/class/scsi_host/host0/scan
- Check for new disk:
- fdisk -l
- See image below:
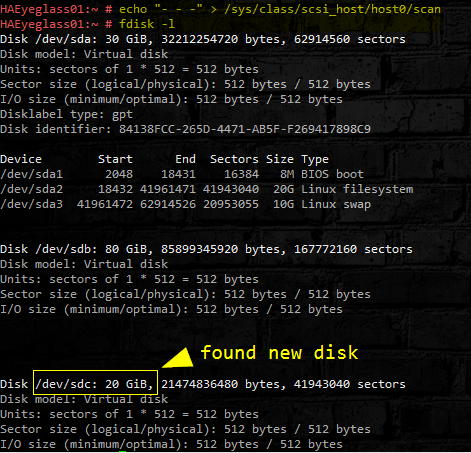
- Add the newly added disk to the /opt/data btrfs filesystem. In our example it is `/dev/sdc` but if you have added disk before you will need to verify the device name from the fdisk -l output. Run the command below to add the new disk to the existing file system.
- btrfs device add -f /dev/sdc /opt/data
- At this point the metadata is only stored on the first disk, to distribute (balance) it across the devices run the following command:
- btrfs filesystem balance /opt/data &
- NOTE: command will run in background [DO NOT REBOOT]
- Check if the File System balancing job is running with command below.
- jobs
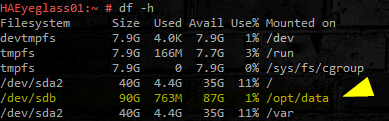
- Check for the newly added disk. Look for `/opt/data` disk size:
- df -h
- Verify the new disk has expanded the capacity of the /opt/data file system.
Repeat the steps above on each VM 2 to N, where N is the last VM in the Search & Recover cluster.
Done.
How to change the TLS Certificate for the WebUI with a new Self Signed Cert
- Access the WebUI from node 1 and create a DNS entry for node to create a FQDN to create a signed cert.
- The objective is to install the signed cert for nginx ECA Node-1
- Create A record in DNS name for ECA Node-1 and verify with nslookup. Example search.domain.com
- SSH to ECA Node-1 as ecaadmin
- cd /opt/superna/eca/conf/nginx
- Verify that the nginx.key is there with ls -la
- Create csr with that key file. Then create self-signed cert to replace nginx cert.
- cp -p nginx.crt nginx.cert.bak
- openssl req -key nginx.key -new -out nginx.csr
- openssl x509 -req -sha256 -days 365 -in nginx.csr -signkey nginx.key -out nginx.crt
- When it is asked about the Common Name: provide the fqdn of ECA Node-1 (the name registered in DNS e.g. search.domain.com)
- Restart nginx
- echo y | ecactl cluster push-config
- ecactl cluster service restart nginx --all
- Verify the certificate when accessing the UI (e.g. https://FQDN)
How to change the TLS Certificate for the WebUI with a Customer Signed Certificate
- Access the WebUI from node 1 and create a DNS entry for node to create a FQDN to create a signed cert.
- The objective is to install the signed cert for nginx ECA Node-1
- Create A record in DNS name for ECA Node-1 and verify with nslookup. Example search.domain.com
- SSH to ECA Node-1 as ecaadmin
- cd /opt/superna/eca/conf/nginx
- Create csr with the key file on the appliance.
- cp -p nginx.crt nginx.cert.bak (makes backup)
- Create CSR request for signing
- openssl req -key nginx.key -new -out nginx.csr (Answer all the questions to create, NOTE When it is asked about the Common Name: provide the fqdn of ECA Node-1 (the name registered in DNS e.g. search.domain.com)
- Copy the CSR file to your security team to sign it with a corporate CA. The format of the certificate must be the CRT format.
- Copy the newly signed certificate named ngnix.crt to /opt/superna/eca/conf/nginx
- Restart nginx
- echo y | ecactl cluster push-config
- ecactl cluster service restart nginx --all
- Verify the certificate when accessing the UI (e.g. https://FQDN)
Content Indexing Performance Advanced Configuration Settings
The following settings require a cluster restart to take effect. These should not be changed unless confirmed by support.
These variables should be set on node 1 of the cluster by editing /opt/superna/eca/eca-env-common.conf .
- export INGESTION_WORKER_PARALLEL_LIMIT=5
- Number of threads to submit documents per ingestionworker container, higher number increases concurrent work processing but will also increase CPU utilization of the indexing container.
- export INGESTION_WORKER_MAX_FILE_SIZE_MB=100
- Sets the max file size in MB to index, files over this limit will be skipped during indexing, larger file sizes will consume more cpu utilization and reduce indexing performance.
- export INGESTION_WORKER_MIN_FILE_SIZE_MB=0
- Sets the min file size to index default is all files regardless of size, this may consume too much size in the index with many small files that have no content.
- export INGESTION_WORKER_FULL_PRIORITY=10
- Default ingestionworker container will round robin between indexing incremental changes to the file system and full scan indexing. Increasing the priority number for full will change the ratio to prefer more indexing of full scan files versus changed files.
- export INGESTION_WORKER_INCREMENTAL_PRIORITY=10
- See above. Changing this to a higher value than the full indexing priority will mean more incremental file changes are processed versus full scan files.
- export INVENTORY_TASK_CRON="* * * * *"
- The inventory task collects users share permissions and cluster inventory needed to index.
- export INCREMENTAL_INDEX_TASK_CRON="* * * * *"
- This determines how often file system paths are monitored for changes for incremental re-indexing .
Scale Out Content Indexing & Classification Only VM Deployment Option
- Overview: This option can expand a Search & Recover clusters content ingestion workers with a small foot print VM using only 4G RAM and a small disk without an index to focus entirely on content ingestion analysis.
- Additional VM's can be added one by one to focus only content indexing tasks. This will also be used in feature 1.1.5 content classification feature that does not store the indexed document in the index saving space on disk.
- This requires deployment of the Search & Recover single VM content only OVF, configuration by support to join this VM to your existing cluster.
- Download the Search & Recover zip file and deploy the OVF for content only (download instructions for all products https://www.supernaeyeglass.com/downloads
- Once the VM is deployed with an IP address and all firewall rules are in place. Contact Support to join this to your existing cluster.