- Solution Description
- Microsoft Cluster Network Load Balancing with Autonomous Storage Failover
- NLB Cluster Host Setting
- Autonomous Storage Failover
- Solution Diagram
- Solution Overview
- System Information Gathering
- Solution Diagram
- Solution Overview
- PowerScale System Information
- Linux Server System Information
- Windows Server System Information
- Firewall Requirements
- Microsoft Cluster Network Load Balancing
- Requirements
- Hardware requirements
- Software requirements
- Installation Procedure
- Installation with Server Manager
- Alternative Installation using PowerShell Command
- Application Server : Microsoft Internet Information Services (IIS) Installation
- Eyeglass Installation
- Python3
- Additional Python Module
- OpenSSH on Windows installation
- Start SSH services on windows
Solution Description
This solution consists of two modules:
- Microsoft Cluster Network Load Balancing with autonomous Failover
- System Information Gathering
Microsoft Cluster Network Load Balancing with Autonomous Storage Failover
The Microsoft Network Load Balancing (NLB) manages two or more servers as a single virtual cluster. Typical use cases of NLB enhance the availability and scalability of Internet server applications such as those used on web, FTP, firewall, proxy, virtual private network (VPN), and other mission-critical servers.
The NLB feature distributes traffic across several servers by using the TCP/IP networking protocol. By combining two or more Windows Servers that are running applications into a single virtual cluster, NLB provides reliability and performance for web servers and other mission-critical servers.
NLB Cluster Host Setting
The servers in an NLB cluster are called hosts, and each host runs a separate copy of the server applications. NLB distributes incoming client requests across the hosts in the cluster. We can configure the load that is to be handled by each host. We can also add hosts dynamically to the cluster to handle increased load. NLB can also direct all traffic to a designated single host, which is called the default host.
NLB allows all of the computers in the cluster to be addressed by the same set of IP addresses, and it maintains a set of unique, dedicated IP addresses for each host. For load-balanced applications, when a host fails or goes offline, the load is automatically redistributed among the computers that are still operating. When it is ready, the offline computer can transparently rejoin the cluster and regain its share of the workload, which allows the other computers in the cluster to handle less traffic.
Autonomous Storage Failover
NLB provides high availability and redundancy from application server perspective but it does not include the mechanism to handle Storage Failover. Additional solution is needed to include the mechanism to handle storage failover automatically. This solution guide is based on the integration of Superna Eyeglass DR Edition - DFS Mode failover and Dell EMC PowerScale.
Solution Diagram
Example of the solution for Internet Web Server application that consists of the following:
- Microsoft
- Network Load Balancing (NLB) Cluster with minimum 2 Windows Servers as Windows Cluster Nodes
- Internet Information Services (IIS) is running on each Windows Cluster nodes with data directory structure stored on the storage Production PowerScale cluster (SMB Share)
- DFS Server - data on the PowerScale is accessed through DFS namespace
- Dell EMC
- 2 PowerScale Clusters: Production and DR clusters
- Superna
- Eyeglass DR
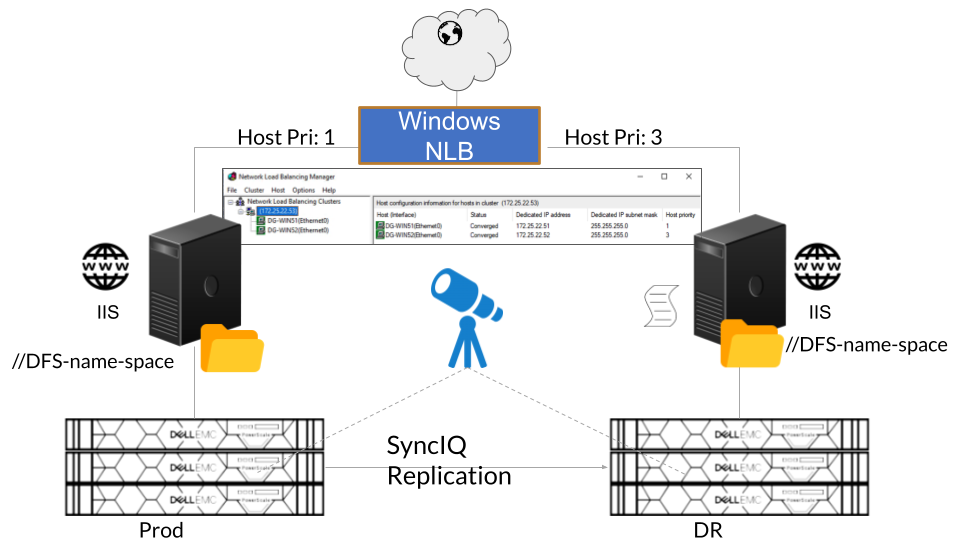
Solution Overview
- Internet Information Services (IIS) is running on both Windows Servers. The data for this application is stored on the PowerScale Cluster (Prod) and accessed through SMB Share via DFS Namespace.
- Microsoft Network Load Balancing (NLB) Cluster is configured by adding both Windows Servers as member servers of NLB. Host priority value is set for assigning Windows Servers as Primary and Secondary server.
- Stored data on the Prod PowerScale storage is replicated to DR PowerScale storage through SyncIQ Policy replication
- Eyeglass DR is configured to replicate PowerScale Cluster configuration (e.g. SMB Share configuration), provide Failover Readiness status, and manage storage failover (DFS mode failover)
- PowerShell code is configured to monitor NLB node status and Data accessibility from Production PowerScale. This PowerShell code is running on the Secondary NLB node.
- PowerShell code
- Upon detecting Primary NLB node not converged or no longer part of NLB, it will send alert
- Upon detecting Production PowerScale not accessible, it will send alert and initiate Eyeglass DFS mode failover automatically
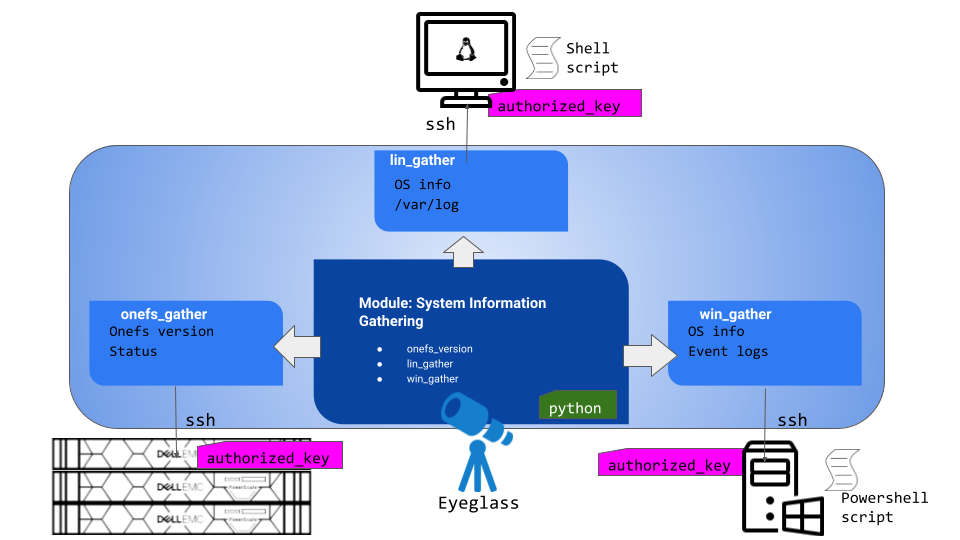
System Information Gathering
The second module is System Information Gathering. System Information is a collection of technical information on the overall system and resources that also includes diagnostic and troubleshooting information related to the system.
The common use case is for collecting system information of remote systems from a local management system for inventory collection tasks and troubleshooting.
Solution Diagram
Solution Overview
This module is to gather system information of remote machines from a local management system (Eyeglass appliance).
This module is based on Python3 code that calls and executes Operating System command / script remotely over SSH. It consists of 3 sub-modules to gather system information from three different components: Powerscale cluster, Linux server, Windows server.
The current module consists of 3 sections that collects the following information (can be added with additional information gathering):
| Section | System Information Gathering |
| PowerScale |
|
| Linux Machine |
|
| Windows Machine |
|
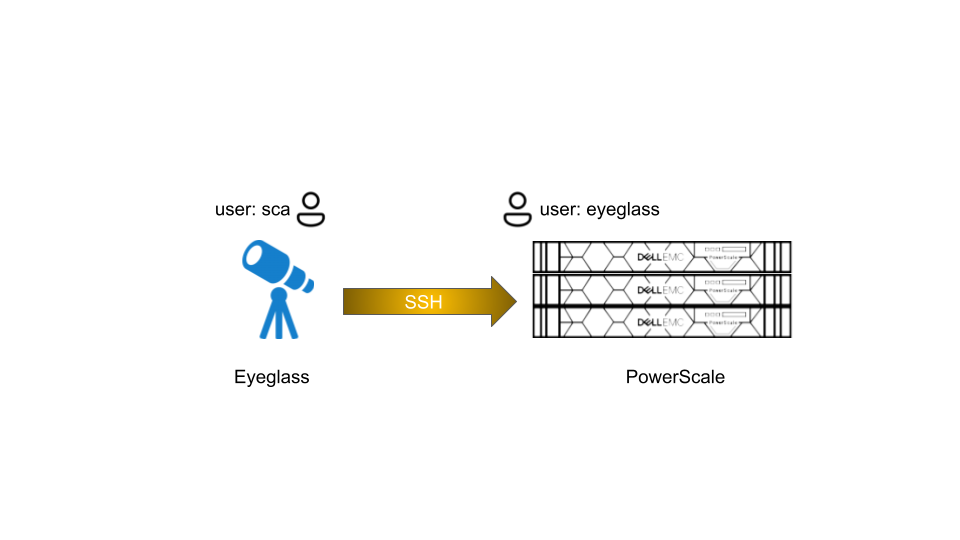
PowerScale System Information
Two information is gathered from PowerScale Cluster:
| System Information | Command |
| OneFS version | isi version |
| PowerScale status | isi status -v |
The SSH session from Eyeglass to PowerScale is using eyeglass service account that has been configured on the PowerScale with permissions and privileges by following this Eyeglass documentation
If need additional command to run on PowerScale using eyeglass service account, we need to update the permissions and privileges accordingly
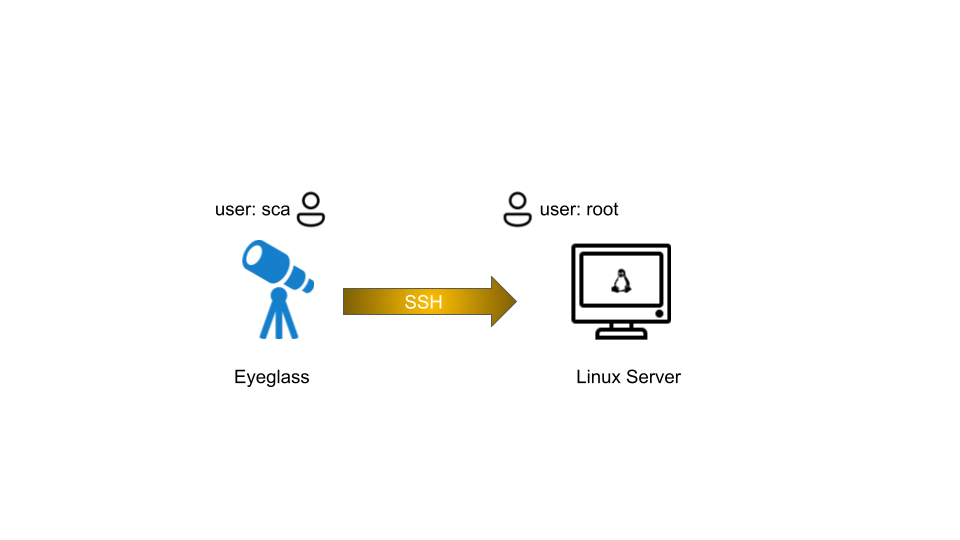
Linux Server System Information
The following information is gathered from Linux Server:
| System Information | Command |
| Linux OS version | cat /etc/os-release |
| Python version | python3 -V |
| Network information | Ifconfig |
| Log | zip /var/log and copy zip file to local |
Hostname` uptime Manufacturer Product Name Version Serial Number Machine Type Operating System Kernel` Architecture Processor Name Active User System Main IP | hostname uptime cat /sys/class/dmi/id/chassis_vendor cat /sys/class/dmi/id/product_name cat /sys/class/dmi/id/product_version cat /sys/class/dmi/id/product_serial lscpu hostnamectl uname -r arch /proc/cpuinfo w hostname -I |
Memory Usage Swap Usage CPU Usage | free free cat /proc/stat |
The SSH session from Eyeglass to Linux Server is using root account
Using a non root account on the linux server might require additional sudo privileges configuration.
Windows Server System Information
The following information is gathered from Windows Server:
| System Information | Command |
| Event Log | wevtutil epl |
| Overall System Information | msinfo32 |
| Network information | Get-NetAdapter |
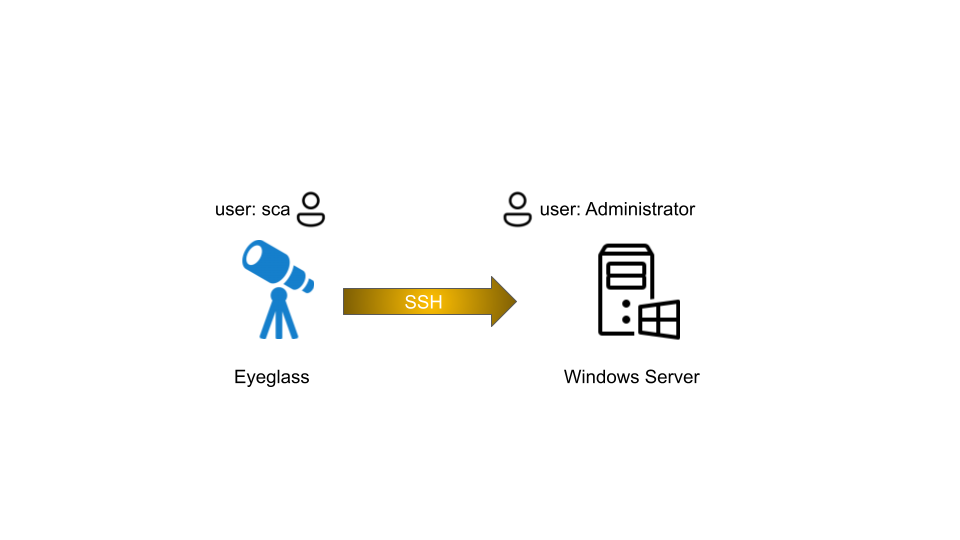
The SSH session from Eyeglass to Windows Server is using Administrator account
Using a non Administrator account on the Windows server might require additional permission configuration on Windows server.
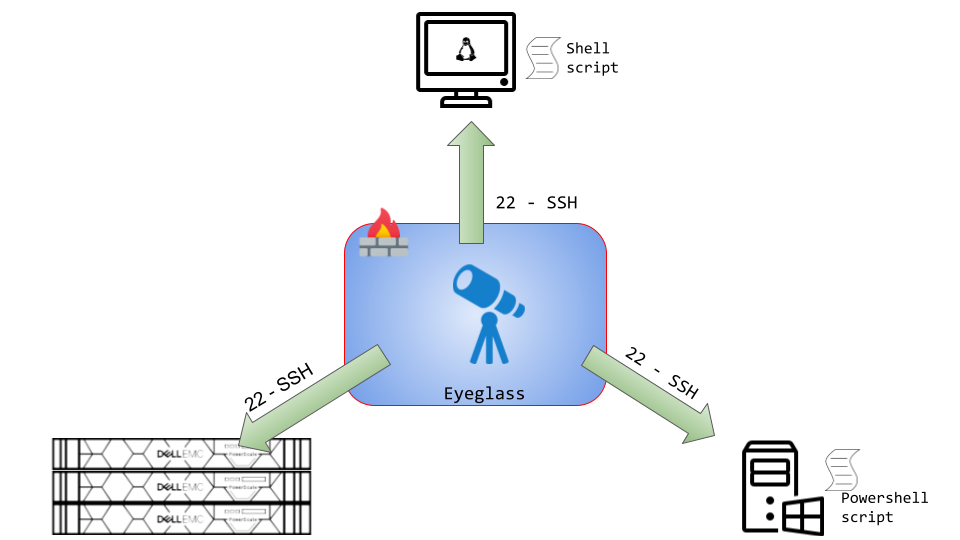
Firewall Requirements
SSH connections need to be established from Eyeglass Appliance to PowerScale, Linux Servers, and Windows Servers.
| Port | Protocol | Direction | Function |
| 22 | TCP | Eyeglass appliance → Isilon/PowerScale cluster | SSH |
| 22 | TCP | Eyeglass appliance → Linux machines | SSH |
| 22 | TCP | Eyeglass appliance → Windows machines | SSH |
Installation
Microsoft Cluster Network Load Balancing
Reference:
Microsoft Documentation
https://learn.microsoft.com/en-us/windows-server/networking/technologies/network-load-balancing
We can use Microsoft Network Load Balancing (NLB) NLB to manage two or more Windows servers as a single virtual cluster. NLB enhances the availability and scalability of Internet server applications such as those used on web, FTP, firewall, proxy, virtual private network (VPN), and other mission-critical servers.
Requirements
Hardware requirements
Following are the hardware requirements to run an NLB cluster.
- All hosts in the cluster must reside on the same subnet.
- There is no restriction on the number of network adapters on each host, and different hosts can have a different number of adapters.
- Within each cluster, all network adapters must be either multicast or unicast. NLB does not support a mixed environment of multicast and unicast within a single cluster.
- If you use the unicast mode, the network adapter that is used to handle client-to-cluster traffic must support changing its media access control (MAC) address.
Software requirements
Following are the software requirements to run an NLB cluster.
- Only TCP/IP can be used on the adapter for which NLB is enabled on each host. Do not add any other protocols (for example, IPX) to this adapter.
- The IP addresses of the servers in the cluster must be static.
Installation Procedure
We can install NLB by using either Windows Server Manager or the Windows PowerShell commands for NLB.
Optionally we can install the Network Load Balancing Tools to manage a local or remote NLB cluster. The tools include Network Load Balancing Manager and the NLB Windows PowerShell commands.
Installation with Server Manager
Note : We need to perform the following steps on each member server that are going to participate in the NLB cluster.
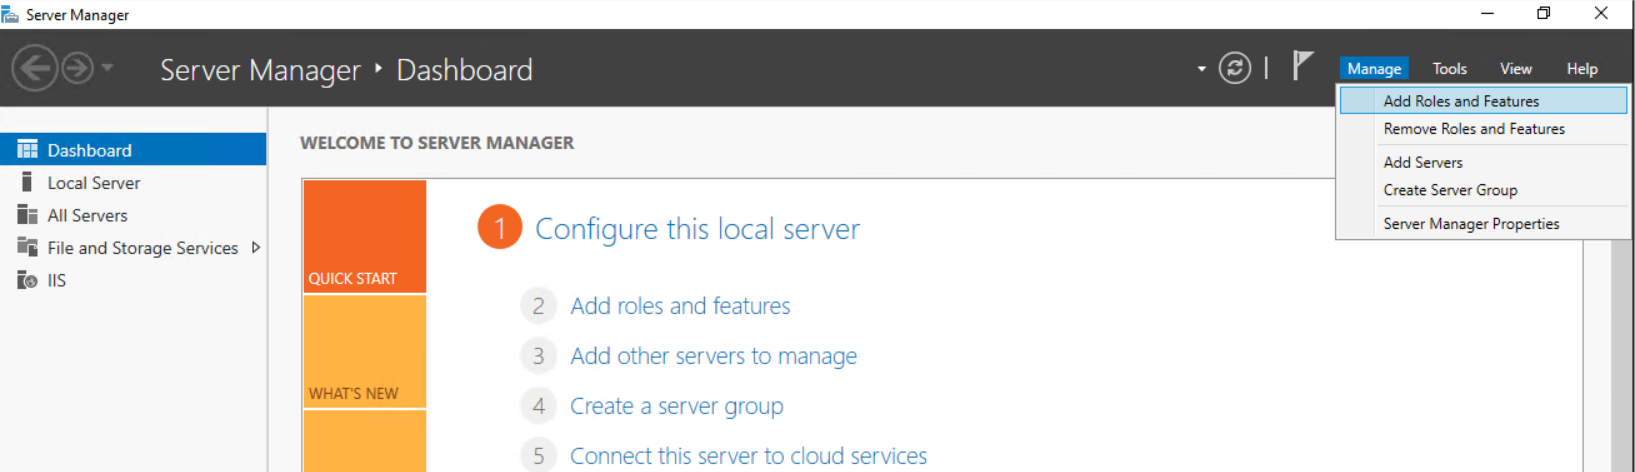
- On the Member Server, open Server Manager. Click on Manage Menu and select Add Role and Features.
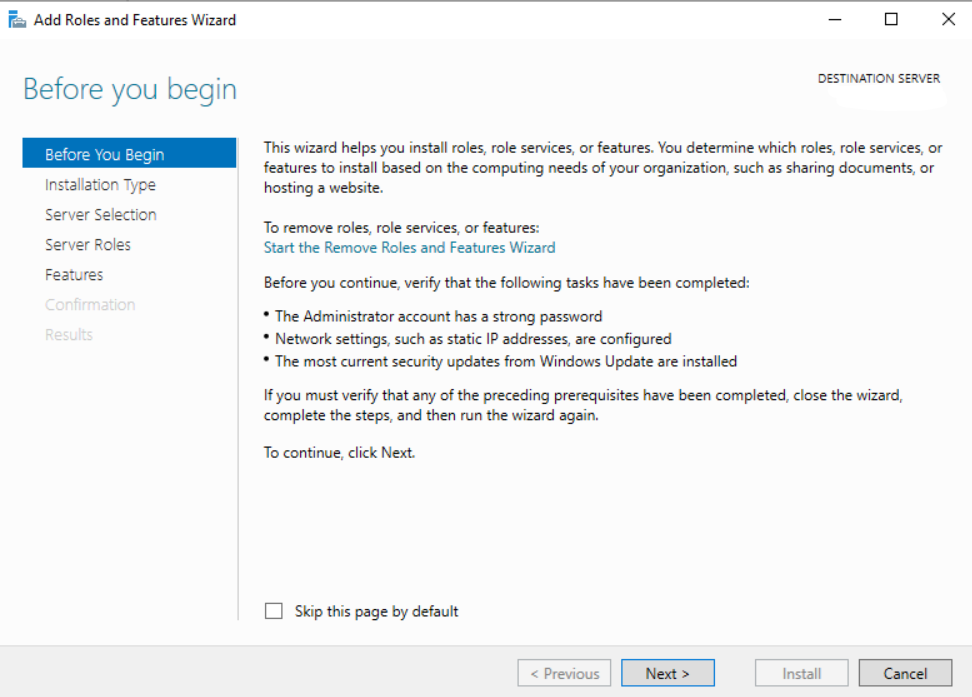
- On the Before you begin page, click Next.
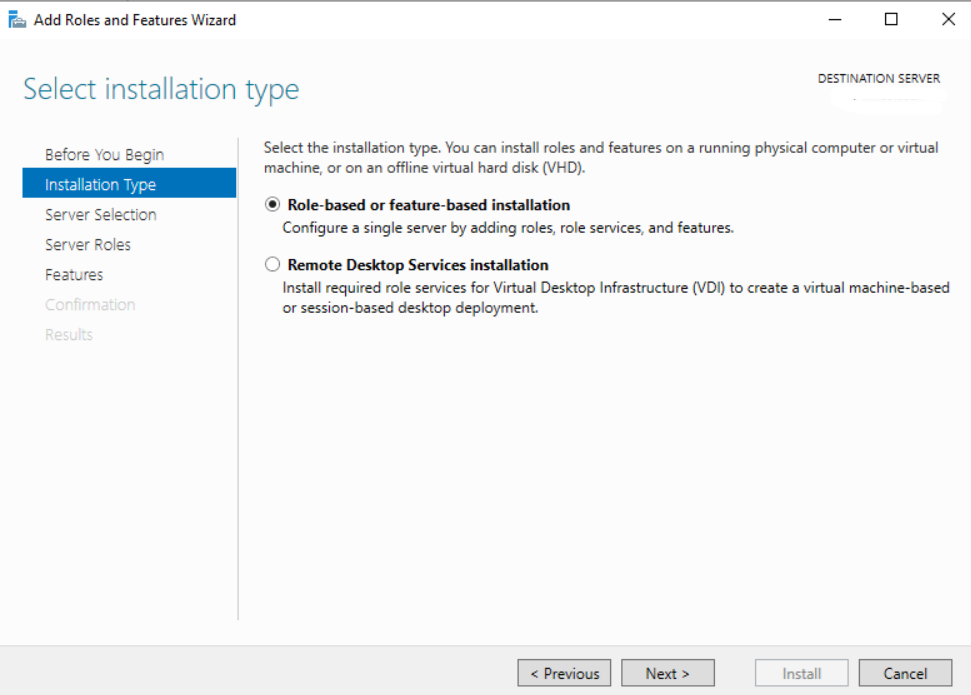
- Select Role-based or feature-based installation and click Next
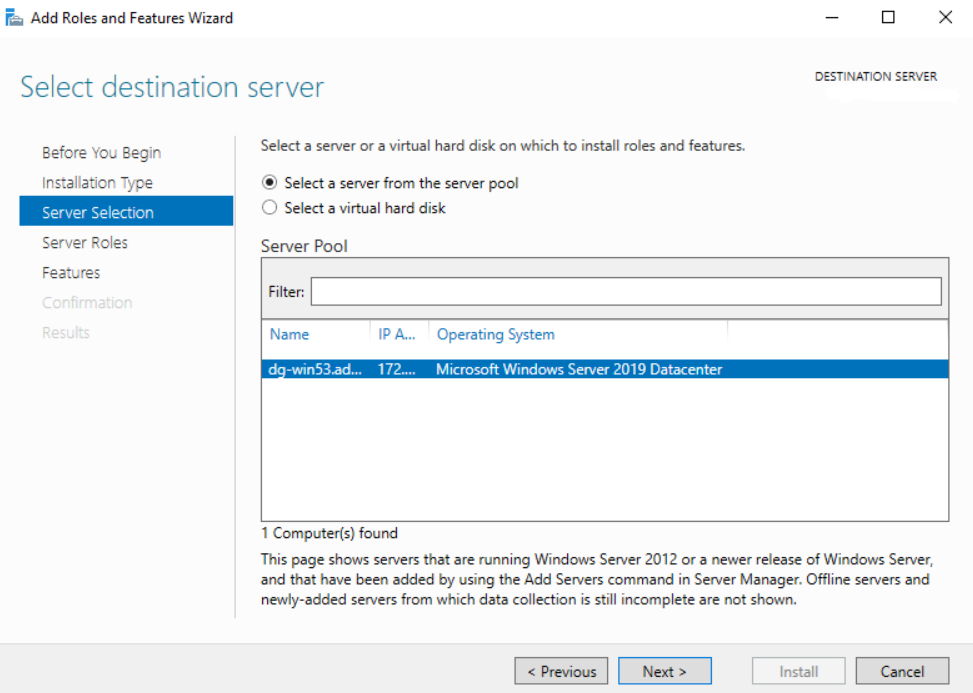
- Select a server from the Server Pool on which we want to install the Network Load Balancing feature, click Next.
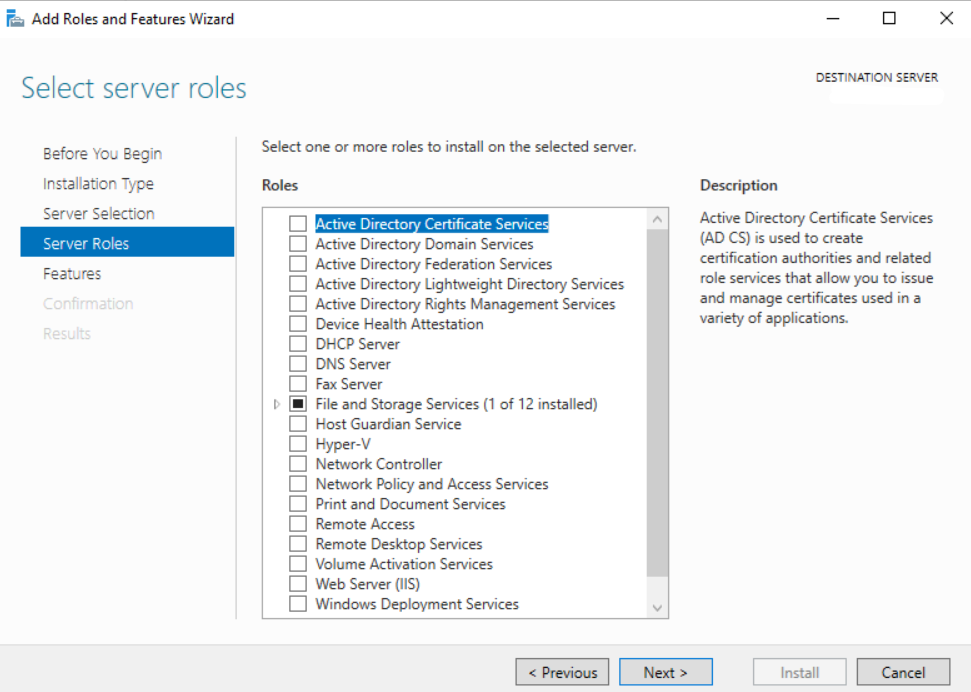
- On the select Server Roles page, click Next
- On the select Features, select Network Local Balancing checkbox.
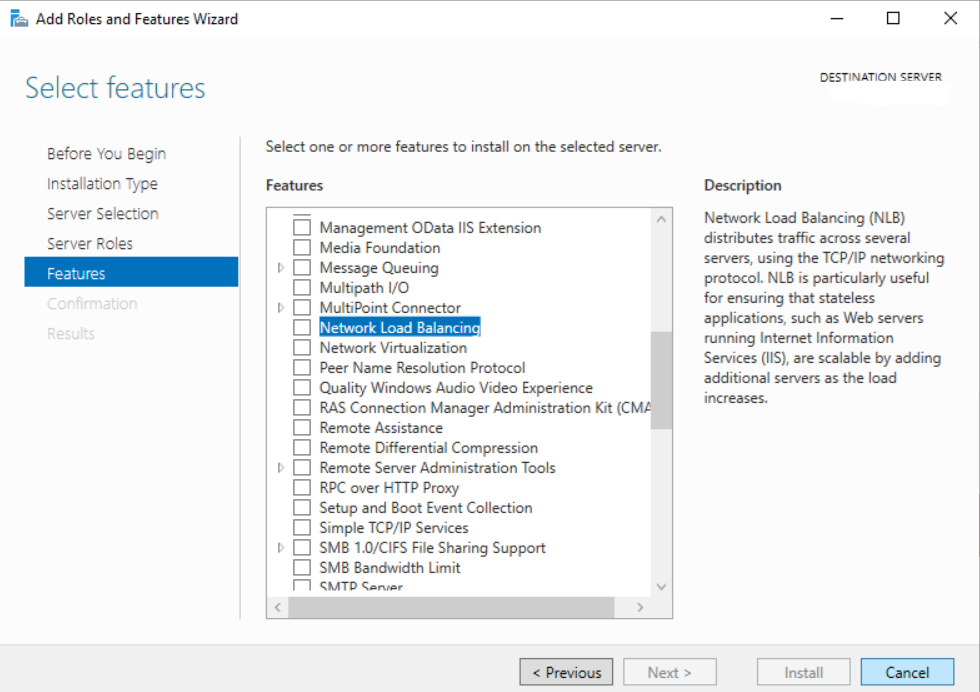
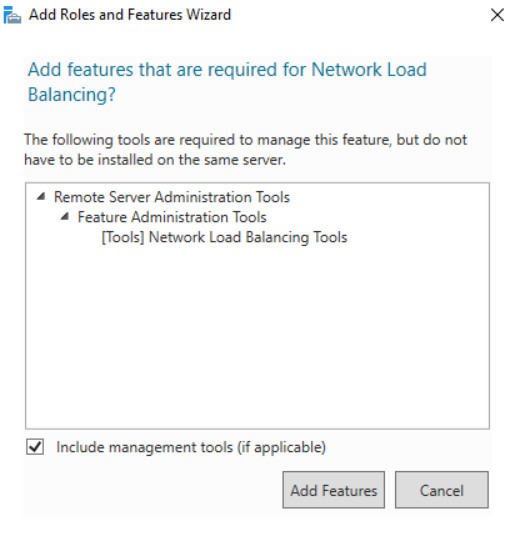
- A new window will pop up, click on Add Features to include required features and management tools for Network Local Balancing work properly.
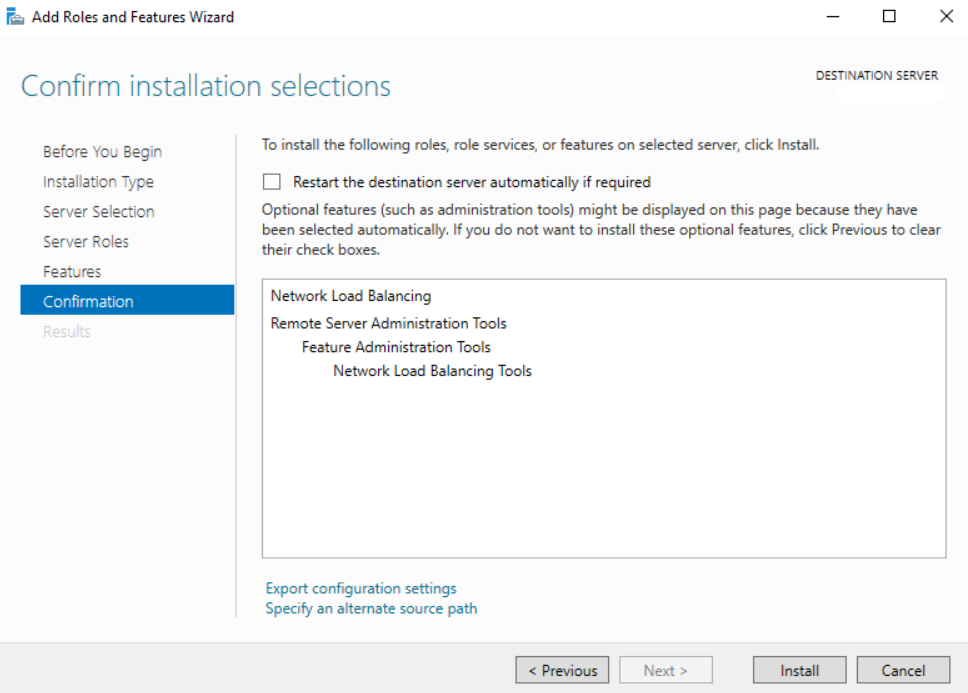
- Click Next to proceed with confirmation

- Click on the Install button to start the installation process
Alternative Installation using PowerShell Command
To install NLB by using Windows PowerShell, run the following command at an elevated Windows PowerShell prompt on the computer where you want to install NLB.
Install-WindowsFeature NLB -IncludeManagementTools
Example:
Windows PowerShell
Copyright (C) Microsoft Corporation. All rights reserved.
PS C:\Users\Administrator> Install-WindowsFeature NLB -IncludeManagementTools
Success Restart Needed Exit Code Feature Result
------- -------------- --------- --------------
True No Success {Network Load Balancing, Remote Server Adm...
Application Server : Microsoft Internet Information Services (IIS) Installation
Microsoft IIS needs to be installed on each member server of NLB.
The procedure to install IIS by using PowerShell command:
- Open PowerShell with administrative privileges and run the Install-WindowsFeature cmdlet:
Install-WindowsFeature -name Web-Server -IncludeManagementTools
Example:
Windows PowerShell
Copyright (C) Microsoft Corporation. All rights reserved.
PS C:\Users\Administrator> Install-WindowsFeature -name Web-Server -IncludeManagementTools
Success Restart Needed Exit Code Feature Result
------- -------------- --------- --------------
True No Success {Common HTTP Features, Default Document, D...
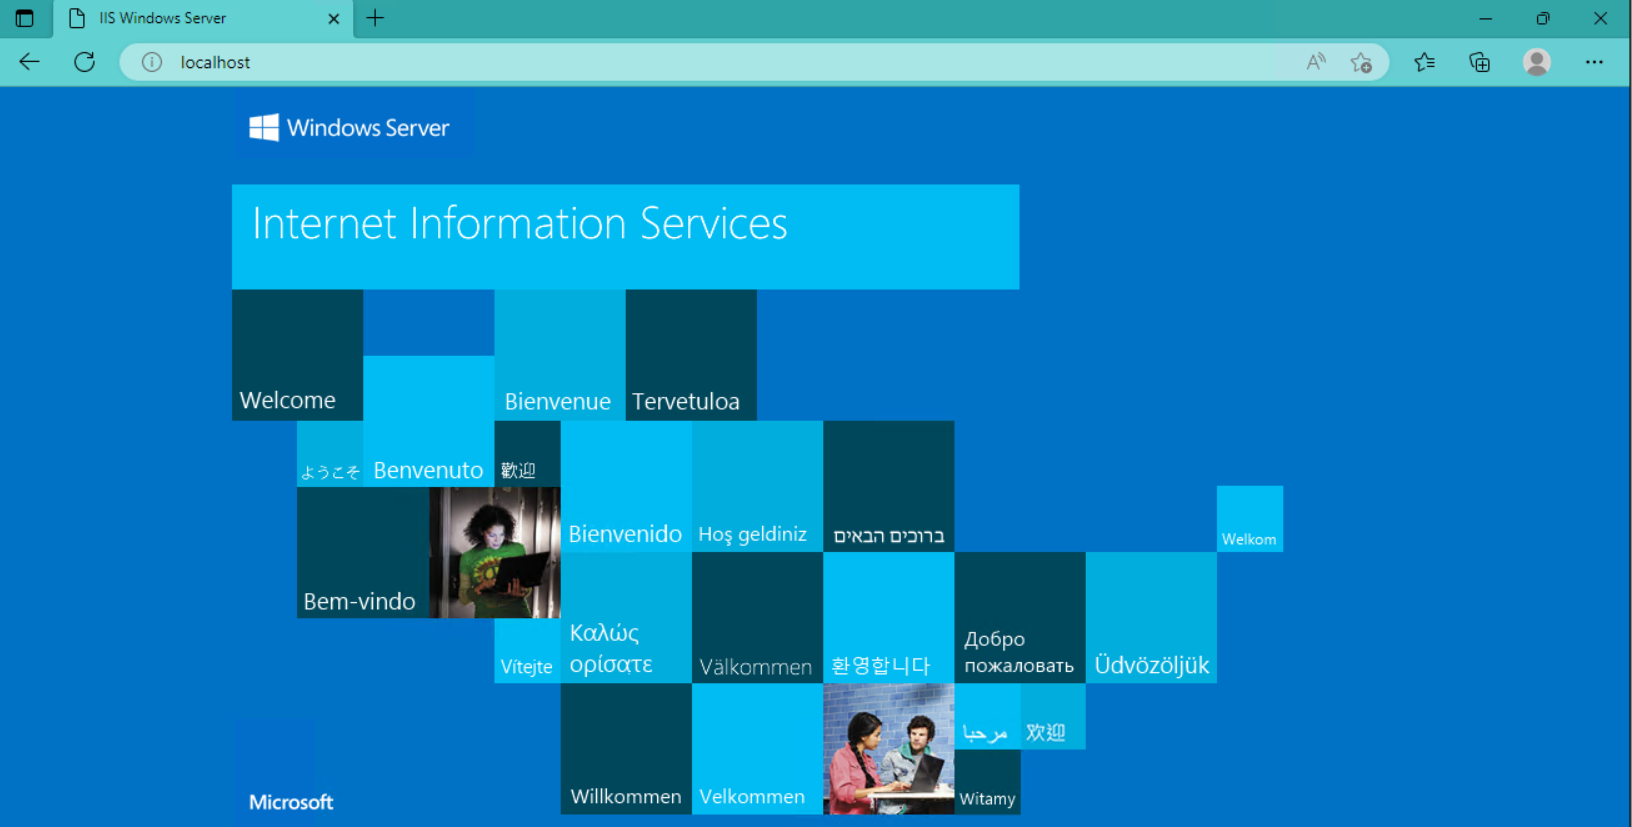
- Once the installation has succeeded, IIS should be running on port 80 by default with the firewall rule “World Wide Web Services (HTTP Traffic-In)” enabled in Windows firewall automatically.
- We can perform a simple test by opening up a web browser and browsing to the server that we have installed IIS on. We should see the default IIS page
Eyeglass Installation
Refer to Eyeglass Installation Document
Python3
We can use the default python3 that is already installed on the Eyeglass appliance.
Additional Python Module
The following additional Python module is required:
- urllib3
To install this additional module on the Eyeglass we can use this command:
pip install urllib3
OpenSSH on Windows installation
We need to install OpenSSH Server on the Windows servers to allow Eyeglass to establish SSH sessions to those servers for command execution. For installation OpenSSH on Windows, refer to Microsoft documentation
Example for installing OpenSSH Server on Windows Server 2019
- Open Settings, select Apps, then select Optional Features.
- Scan the list to see if the OpenSSH is already installed. If not, at the top of the page, select Add a feature, then find OpenSSH Server then select Install
- Once setup completes, return to Apps and Optional Features and confirm OpenSSH is listed.
- Open the Services desktop app. (Select Start, type services.msc in the search box, and then select the Service app or press ENTER.)
- In the details pane, double-click OpenSSH SSH Server.
- On the General tab, from the Startup type drop-down menu, select Automatic.
- To start the service, select Start.
Start SSH services on windows
From PowerShell console, we can use the following command to show the status of the SSHD service:
PS C:\Users\Administrator> get-service | findstr ssh
Stopped ssh-agent OpenSSH Authentication Agent
Stopped sshd OpenSSH SSH Server
To start the service:
PS C:\Users\Administrator> Start-Service sshd
PS C:\Users\Administrator> Start-Service ssh-agent
Once started it should show the running state
PS C:\Users\Administrator> get-service | findstr ssh
Running ssh-agent OpenSSH Authentication Agent
Running sshd OpenSSH SSH Server