- Introduction to this Guide
- System Requirements
- IMPORTANT INFORMATION REGARDING ADDING CLUSTERS TO EYEGLASS READ-ME FIRST
- Supported OneFS releases
- Feature Release Compatibility
- Eyeglass Scalability Limits
- Eyeglass Firewall Port Requirements
- Download Eyeglass (Mandatory)
- Deploy the Eyeglass Appliance (Mandatory)
- Steps to Deploy the OVF with vSphere Client (Mandatory)
- Setup Time zone and NTP (Mandatory)
- Eyeglass Initial Configuration (Mandatory)
- Login to the Eyeglass UI (Mandatory)
- Install License (Mandatory)
- Add PowerScale Clusters (Mandatory)
- NOTE: Password special characters and length.
- NOTE: Cluster DNS Setup and Add Cluster to Inventory:
- IMPORTANT: After Discovery of a Cluster’s SyncIQ policies all Eyeglass configuration jobs are disabled automatically
- Enable Eyeglass Jobs (Mandatory)
- Pre-requisite for Enabling Configuration Replication
- Enable Jobs for Configuration Replication (Mandatory)
- Setup Eyeglass for Email Notification (Mandatory)
- Configure SMTP (Mandatory)
- Configure Email Recipients (Mandatory)
- Protecting the Eyeglass appliance (Optional)
- How to Change Eyeglass Appliance Networking Configuration (yast network utility) after OVA deployment (Optional)
Introduction to this Guide
Use this document to get your new Eyeglass installation up and running fast, with all the best options.
For planning DR and understanding design choices with Eyeglass use the Eyeglass Start Here First Guide
System Requirements
-
vSphere 6.0 ESX host or higher or hyper-v with vhdx appliance appliance requires
-
vcenter supported deployment clients
- vcenter 6.5 Flex or html5
- vcenter 6.7 Flex client (vmware bug broke OVF with html webUI)
- vcenter 7.0.1 Build: 17491160
- NOTE: All other tools are unsupported. Requires vapp property support.
-
vcenter supported deployment clients
- 4 vCPU
- 16 GB RAM (RAM must be upgraded based on the scalability table here)
- 30G OS partition plus 80 GB disk Total disk size in VMware 110G
- Latency from admin PC to Eyeglass VM GUI < 15 ms ping times
- AD Auth provider in System zone for RBAC and other SID to user resolution API requirements
-
Chrome Browser (Required), Browser must support Websockets. Internet Explorer is not supported.
- The browser must not disable 3rd party cookies required for authentication sessions and file downloads.
- Eyeglass Port Requirements: Eyeglass-Ports-Requirements
IMPORTANT INFORMATION REGARDING ADDING CLUSTERS TO EYEGLASS READ-ME FIRST
- ONEFS 8.2 - This release disabled API and SSH access to the SSIP and introduces a range of SSIP addresses in a subnet. IF YOU ARE CURRENTLY USING AN SSIP THE BELOW STEPS ARE MANDATORY. NOTE: Requires Release 2.5.5 or later
- Upgrade to the latest release using this guide.
- Best Practise is to have an dynamic smartconnect IP pool in system zone for the IP used by Eyeglass to provide an HA connection to the cluster
- Login to Eyeglass open the Inventory Icon
- Right click the 8.2 cluster and select the Edit option
- Enter any IP in the dynamic pool range
- Re-enter the password for the eyeglass service account
- Click submit
- Repeat for each 8.2 cluster in the inventory tree.
- Done.
- NOTE: Dynamic IP pools will fail the IP address to a new node if the node fails or is taken down for maintenance.
- NOTE: CSRF patch referenced below still applies to 8.2 clusters, that do not support session based authentication across the cluster and this blocks use for smartconnect for load balancing Eyeglass API's.
- NOTE: For release 2.5.5 and later, you must use a node IP with dynamic IP allocation in subnet with pool in the System Access zone to add PowerScale clusters to Eyeglass (typically the management subnet). Using SmartConnect Zones is no longer supported due to PowerScale CSRF patch which disabled basic authentication and does not share session token between PowerScale nodes. For more details please refer to Technical Advisory #15 and Technical Advisory #17.
Supported OneFS releases
- Please refer to the Release Notes for the Eyeglass PowerScale Edition version that you are installing.
Feature Release Compatibility
- Please refer to the Release Notes for the Eyeglass PowerScale Edition version that you are installing.
Eyeglass Scalability Limits
- Please refer to the Eyeglass Admin Guide Scalability limits.
Eyeglass Firewall Port Requirements
Please refer to the firewall ports table.
Video Tutorial - Installing Eyeglass for PowerScale
The following link provides a video tutorial outlining how to install Eyeglass for PowerScale, add clusters and an overview of features.
New Eyeglass Installation
For a new Eyeglass installation, complete the following steps:
Download Eyeglass (Mandatory)
- Download Eyeglass OVF, VHDX from Superna web site following instructions here Latest Appliance Download
Deploy the Eyeglass Appliance (Mandatory)
Eyeglass is delivered in an OVF format for easy deployment in your vCenter environment. Deploy the OVF and then follow the wizard to setup networking for this Linux appliance. You will need to know:
- subnet and network required so that appliance will have IP connectivity to the PowerScale clusters that it’s managing, and the users that are using it
- IP address for the appliance
- (Optional) SmartConnect Zone for management access to the cluster
- Gateway
- DNS server
- NTP Server

|
IMPORTANT: If you are using hostname or FQDN for the target cluster in your SyncIQ policies or SmartConnect Zone for adding clusters to Eyeglass, the DNS information entered here must be able to resolve back to a discovered cluster IP Address (should resolve to a SyncIQ SmartConnect Zone IP pool IP address), in order for Eyeglass to perform configuration replication. If the hostname cannot be resolved, Eyeglass will not create the associated configuration replication Job. |
Steps to Deploy the OVF with vSphere Client (Mandatory)
OVF Deployment steps :
Step 1 : Download an OVF zip file from Latest Appliance Download.
Step 2 : Unzip the contents of the zip file from Step 1 onto a computer with vSphere web or Windows client installed.
Step 3 : Login to the vCenter with appropriate login credentials.
Step 4 : Single click on VMware vSphere client on the Desktop. Login with appropriate login credentials.
Step 5 : Once logged in to VMware client, you can see different Menus on the top left of the application. Next, go to the File menu and select Deploy OVF Template.
Step 6 : Browse to the location of OVF files you’ve downloaded and unzipped in step 1 and 2. Select OK and then Next.
Next, You will see the OVF template details. Verify the details and proceed by selecting Next. Notice download size to be under allocated disk size limit.
Step 7 : Choose a unique name for the virtual machine and select Inventory location for the deployed template. Once done, select Next.
Step 8 : Select the host/cluster where you want to run the deployed template and then Next.
Step 9 : Select the Resource pool within which you wish to deploy the template.
Step 10 : Select a destination storage for virtual machine files, select Next
Step 11 : Select Disk Format for the datastore you selected in previous step.
Step 12 : Enter the networking properties for the Eyeglass appliance VM in the OVF properties display. Replace with correct settings for your environment.
|
|
IMPORTANT: If you are using hostname for the target in your SyncIQ policies, the DNS information entered here must be able to resolve this host back to the Cluster IP Address in order for Eyeglass to perform configuration replication. If the hostname cannot be resolved, Eyeglass will not create the associated configuration replication Job. |
Step 13 : When done, verify your settings and deploy the OVF
After deployment:
Step 1 : Power On the virtual machine.
- The Eyeglass appliance is deployed with the following default admin user password:
- ssh to eyeglass vm as admin
- sudo systemctl status superna-on-boot (enter admin password and verify the first boot process completes)
- default login and password: admin/3y3gl4ss
- Can also be used to login to the Eyeglass UI or SSH
- NOTE: It is highly recommended to reset the default password after the appliance is deployed.
Setup Time zone and NTP (Mandatory)
- Setup NTP server (published online list here)
- Setup Timezone for log time alignment and SyncIQ operations.
- Follow Animated GIF below to set using YAST
- ssh as admin user,
- sudo -s
- Enter admin password
- yast
-
Eyeglass Initial Configuration (Mandatory)
Your Eyeglass initial configuration steps are:
- Login to the Eyeglass UI
- Install License
- Create Eyeglass service account first for each PowerScale cluster with Minimum Privileges (if not done configure Clusters in Eyeglass using root user)
- Add Clusters
Login to the Eyeglass UI (Mandatory)
To login to the Eyeglass web UI, enter the following URL into your browser (Chrome preferred), replacing <Eyeglass IP address> with the real IP address assigned to the appliance:
- https://<Eyeglass IP address>
- You have 2 options for login authentication:
- Login with appliance credentials - use the admin user and password configured on the appliance
- Default user/password: admin / 3y3gl4ss
Install License (Mandatory)
- Retrieve your Eyeglass License keys (instructions provided here).
- Upload the license zip file provided to you by Superna:
- IMPORTANT: Do not unzip the license file. Upload the zip file.
-
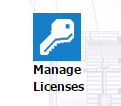
- IMPORTANT: You will be asked to accept the Eyeglass EULA and Phone Home after selecting the Upload button. License will not be loaded unless EULA is accepted.
-
- Done
Add PowerScale Clusters (Mandatory)
- NOTE: No Auto Refresh Inventory View use the refresh button bottom right of the GUI
- This window does not auto refresh after adding a cluster. You must click the refresh button bottom right to verify when a cluster has finished discovery. This process can take 5-10 minutes typically.
NOTE: Password special characters and length.
- These characters cannot be used [ { (any bracket open) , } ] ) (any bracket close), ~ (tilde), ` (back quote), \ (back slash), / (forward Slash), & , *, $ this is not a full list and more special characters may not work. Password length should be < = 20 characters.
NOTE: Cluster DNS Setup and Add Cluster to Inventory:
- If discovery takes a very long time to complete (> 10 minutes), then to check to make sure that cluster configuration data can resolve external URL. Cloud pools use a URL to a storage bucket, and if this URL can not complete a DNS lookup to an IP address, then API calls that discover cloud pools will take too long to complete and will timeout the cluster discovery. Make Sure all URL and DNS resolution is functioning on the cluster.
IMPORTANT: After Discovery of a Cluster’s SyncIQ policies all Eyeglass configuration jobs are disabled automatically
- Configuration Replication Jobs for zones, shares, exports and NFS alias protected by SyncIQ Policy are automatically created and in the USERDISABLED state after successful provisioning in Eyeglass. Enabling these Jobs will be part of the installation steps.
IMPORTANT: Clusters on source target must be in the support feature matrix
- PowerScale cluster replication pairs must be running a supported OneFS version as documented in the System Requirements / Feature Release Compatibility matrix.
IMPORTANT: Before you add a Cluster to Eyeglass verify SyncIQ FQDN Name resolution
- This step is important to allow Eyeglass to automatically build configuration replication jobs correctly. Eyeglass will resolve the FQDN of the SyncIQ policy and then compare the returned ip address to all PowerScale clusters added to the Eyeglass appliance. If no match is found, Config Sync jobs will fail to be added to the jobs window, until name resolution works correctly. A system alarm is also raised that indicates no matching clusters found for the SyncIQ policies on Cluster named X.
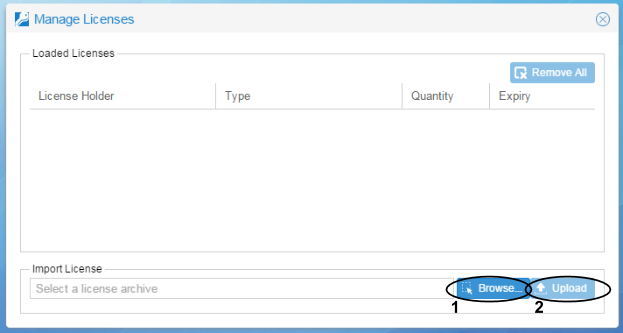
Adding Clusters for Eyeglass
- PowerScale clusters must be added to Eyeglass using a node IP from an IP pool in the System Access Zone. Do not use the SSIP.
- Create the eyeglass service account: To create an Eyeglass service account with minimum privileges follow the instructions provided in Eyeglass Service Account Minimum Privileges.
-
To verify SyncIQ target host FQDN:
- Login to Eyeglass via ssh
- Validate that the FQDN of SyncIQ policy targets will resolve correctly on Eyeglass
- nslookup <FQDN>
- NOTE: If it does not resolve validate DNS and make sure DNS can resolve this FQDN or Eyeglass will not auto detect SyncIQ replication relationships
- From the Eyeglass UI add the PowerScale Clusters between which Eyeglass will be replicating the share and export configuration data
-
-
Note:
- If you get authentication failure when clicking submit. It can be one of these issues:
- Bad password (make sure before looking at next causes)
- SmartConnect Service must be IP address format. Also it must be an IP pool from System Access zone for PAPI API calls to be supported.
-
If your cluster is running original 7.2.x.x, 8.0.0.0, 8.0.0.1, 8.0.0.2 the TLS security protocols allowed weaker security algorithms and key sizes. Eyeglass 1.9 OVF and later has hardened security settings. In this case you may need to edit /opt/superna/java/jre1.8.0_05/lib/security/java.security and comment out the line “jdk.tls.disabledAlgorithms=MD5, SHA1, DSA, RSA keySize < 2048, SSLv2Hello, SSLv3, TLSv1, TLSv1.1”
- After editing this file an Eyeglass sca service restart is required
- systemctl restart sca
- Maximum RPO Value is the Recovery Point Objective for the cluster in minutes. If you are using the RPO feature, this target is used during RPO analysis. More information about Eyeglass RPO analysis can be found in Feature Overview - RPO Trending and Reporting.
- After the cluster(s) are added successfully passing the authentication validation verify Inventory collection
Inventory Collection After Clusters are added
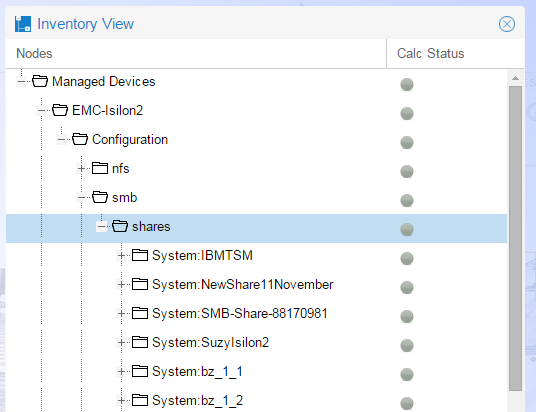
- Once the PowerScale is added, Eyeglass will automatically run an inventory task to discover the PowerScale components. When completed, the discovered inventory can be seen in the Inventory View.
-
Click the Inventory Icon and verify the inventory completes as per below
-
Enable Eyeglass Jobs (Mandatory)
- Newly discovered SyncIQ policies will now appear as unconfigured in the Jobs Icon. You must set the job type as auto (mirrors configuration data between clusters) DFS (only used for DFS mounted SMB shares), and Skip config (special case when no configuration sync is required). NOTE: Once you set the type they will be userdisabled and must be enbled for production use.
- Enable the jobs in the auto or DFS sections of the jobs icon with check box and bulk action menu to enable them. See section below on the steps.
- Optional:
- Enable File system job to sync snapshot schedules to DR
- Zone job to sync access zones to DR (consult support before enabling not required in most cases)
- Zone and Pool Failover Readiness job is disabled and only enabled if you plan to use IP Pool or Access Zone failover feature. Consult the Getting started guide to decide on the failover mode.
- NOTE: Do not enable or run quota jobs, these are managed automatically by the failover process. These jobs should not be enabled or run.
Pre-requisite for Enabling Configuration Replication
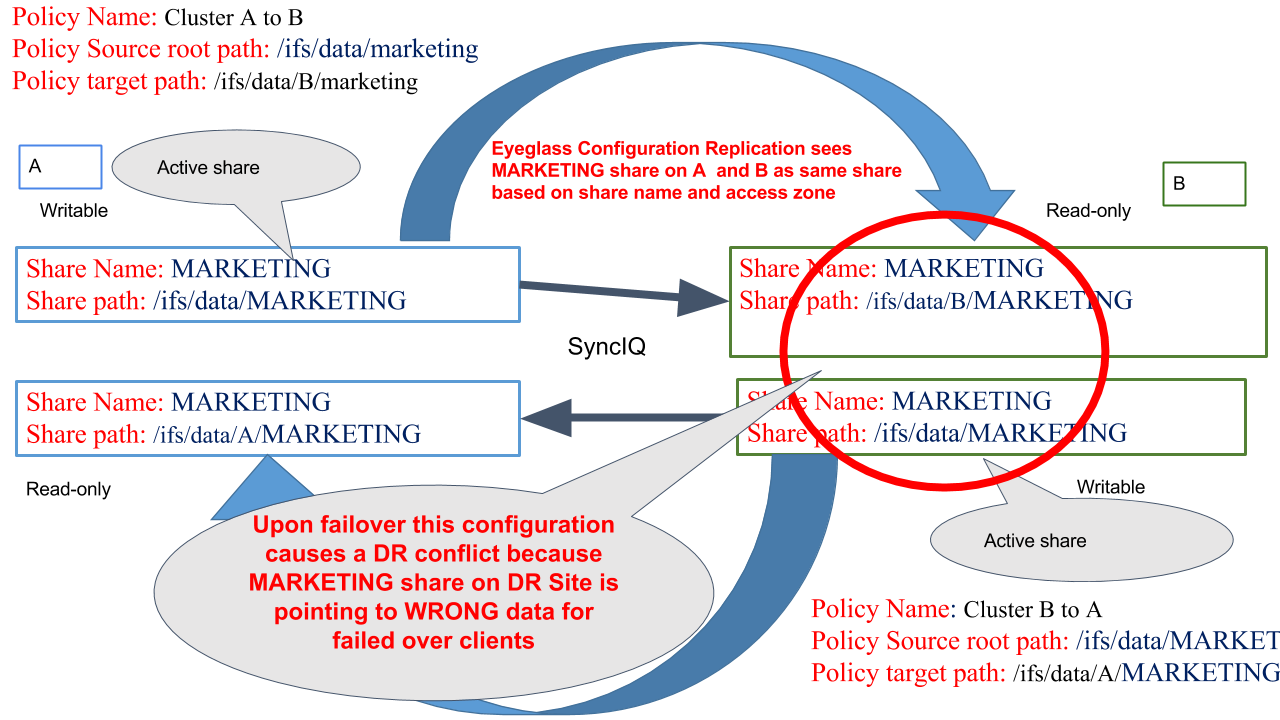
- If you have an Active - Active Replication Topology (for data), confirm that you do not have an unsupported share or NFS Alias environment described in the diagram below:
-
- Review Eyeglass Admin Guide Jobs description to understand what the Configuration Replication Jobs will do
- Review Eyeglass Admin Guide for Configuration Replication Pre-requisites
- Review how Eyeglass determines uniqueness for configuration items and what properties are replicated.
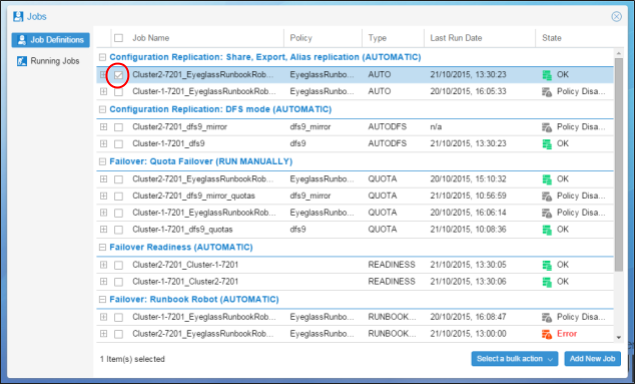
Enable Jobs for Configuration Replication (Mandatory)
- Next step is to enable your Share, Export, NFS Alias (AUTO) Jobs for Configuration Replication. This can be done on a Job by Job basis by following these steps:
-

- Select the Configuration Replication Job to be enabled.
-
- Select a bulk action and then select the Enable/Disable option.
-
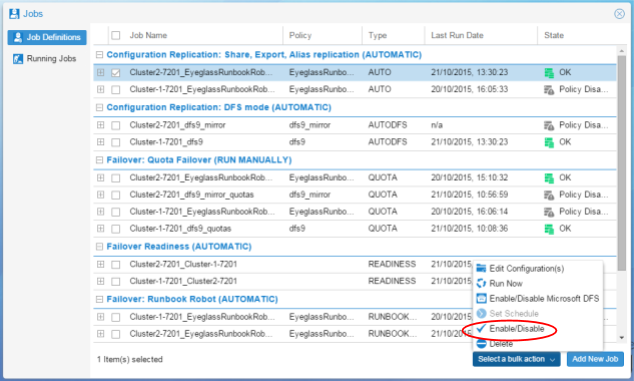
- On the next Configuration Replication cycle, the enabled Job will be run.
Setup Eyeglass for Email Notification (Mandatory)
- Configure SMTP
- Configure Email Recipients
Configure SMTP (Mandatory)
- Enter the information for your email server in the Notification Center / Configure SMTP tab.
-
-
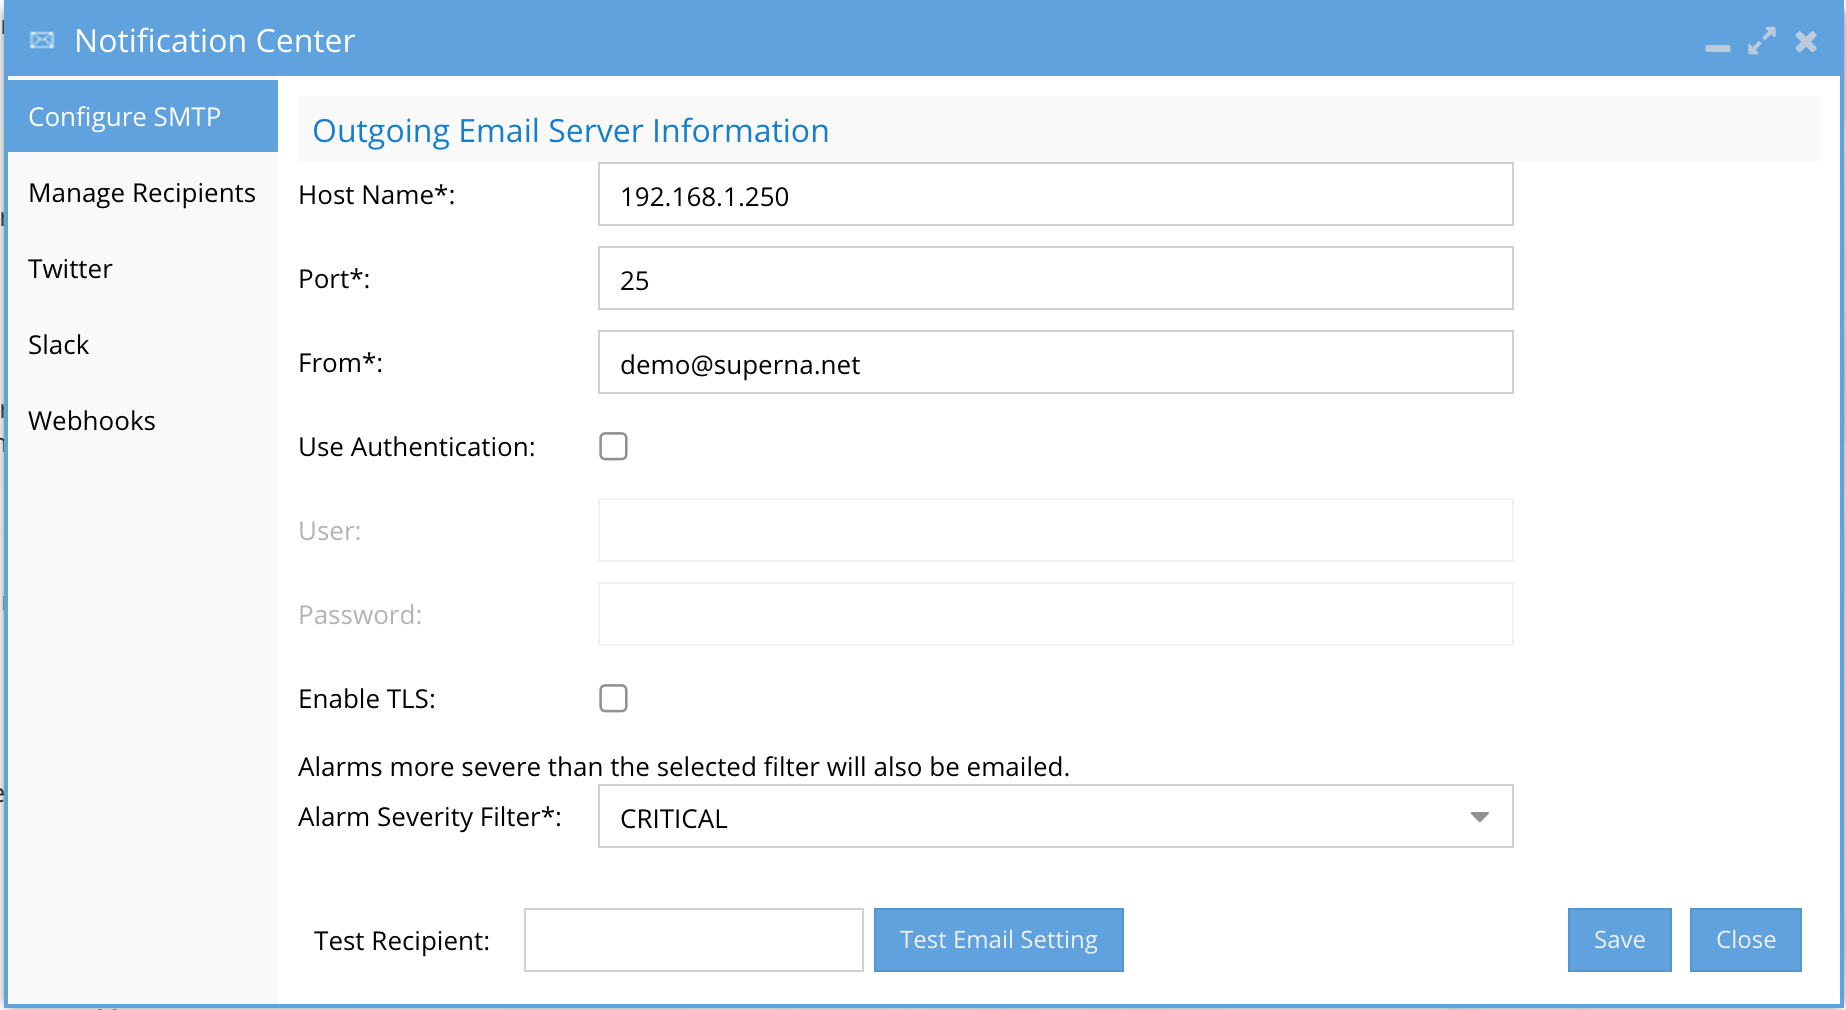
- Host name: Enter the host name for your email server
- Port: Enter the port which should be used for sending email
-
From: Enter the email address of the sender of the email. Any String before and after @ is accepted
syntax: xx@y , xx@y.z acceptable
eg: alerts@eyeglass, alerts@eyeglass.com etc
- Use Authentication: Select if email server requires an authenticated login
- User: User or email address for authentication
- Password: Password for authentication
- Enable TLS: Select the Enable TLS check box if your email server expects TLS communication.
- Alarm Severity Filter: Select level of alarms for which you would like to receive email.
- Use the Test Email Setting button to check that the email server information added is correct. If an error occurs, you will get error codes from the SMTP connection. The "no error" response indicates successful connection. If an error is returned the debug response should be sent to support.superna.net.
- Save your changes.
Configure Email Recipients (Mandatory)
- Enter the information for your email server in the Notification Center / Manage Recipients tab.
- Email Recipient: Enter the email address that emails will be sent to.
-
Select the report type this user receipt
- All
- Reports (RPO, cluster configuration)
- Easy Auditor product (All reports and email notifications)
- Cluster Storage Monitor product reports (quota usage)
- Cluster Storage Monitor product Data recovery portal emails)
-
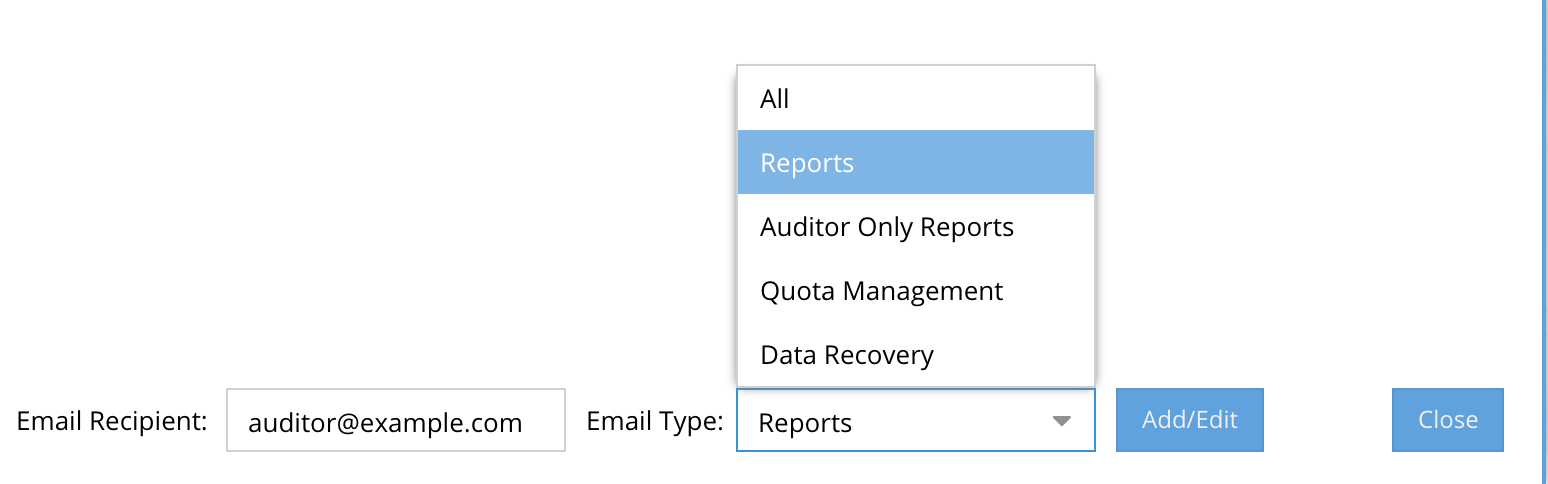
- Select the Add button.
-
-
For other Notification center configuration options see the admin guide topic.
Protecting the Eyeglass appliance (Optional)
How to Change Eyeglass Appliance Networking Configuration (yast network utility) after OVA deployment (Optional)
|
|
Note: if you need to update the configuration at any time, ssh to the appliance admin user and then sudo su - to root and use the yast2 command to open the wizard. |
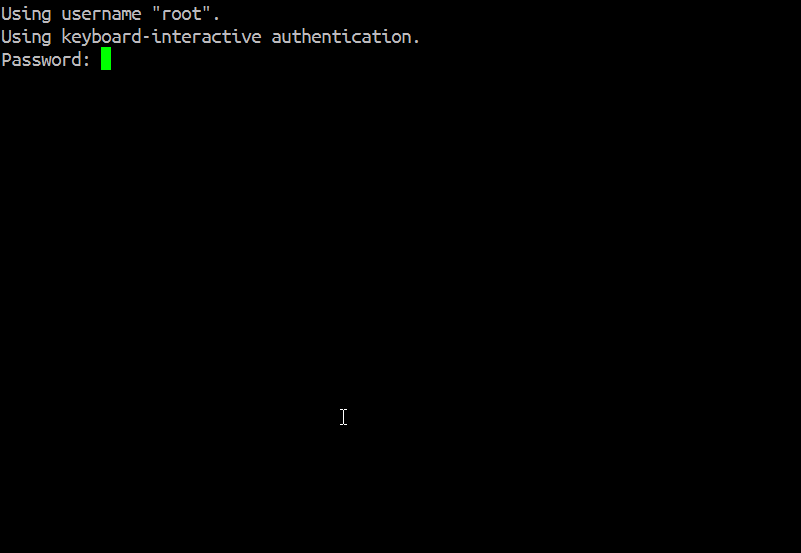
Step 1: sudo su - to root
Root user password is unique to the appliance and has no default. Use the “sudo su” command to change to root user if desired.
Step 2: Type yast2 lan at the prompt.
Now follow steps to setup IP information on the appliance.
Notes on Using yast2
The yast2 interface is a generic text based user interface (TUI) that predates modern mouse and windows desktop environments. The downside of TUI’s are that they can be tricky to navigate if you’ve never used them before - the benefit of TUI’s is that they are widely compatible across platforms and do not require any graphical user interface to be deployed.
yast2 navigation Tips
Use the 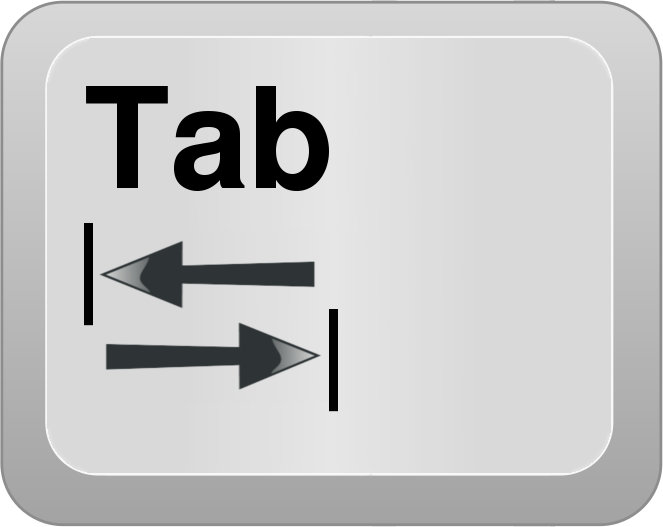 (TAB)key to move from one field to the next.
Use  + (SHIFT TAB) key combination to move backwards
Use the 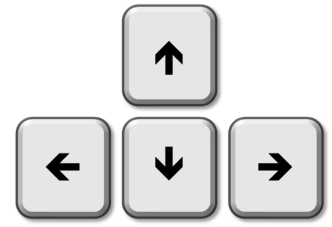 (ARROW) keys to move around within a field
Use the 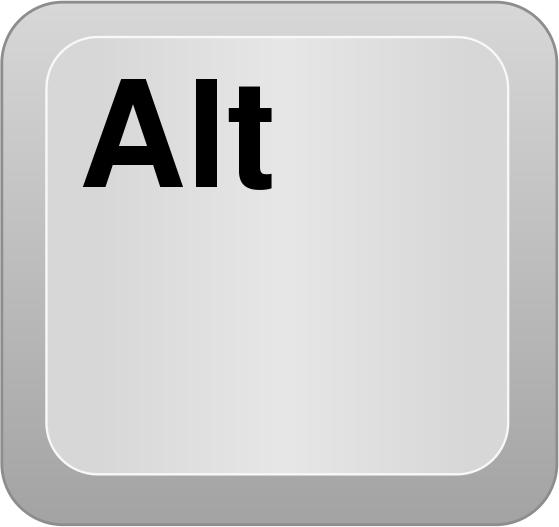 (ALT) key, along with the bold letter in the interface to select that specific field, tab or option
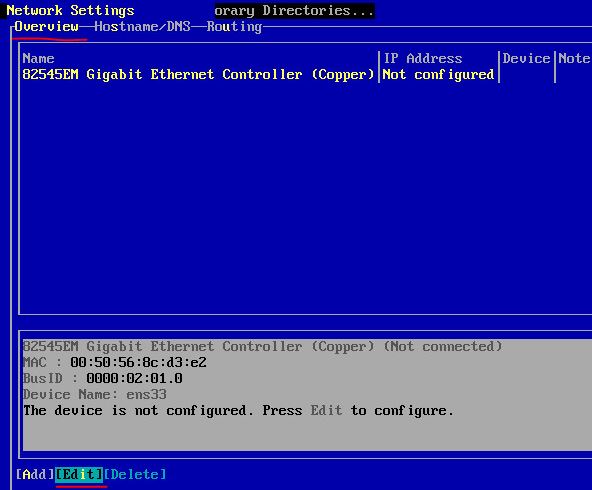
- The Network Devices / Network Settings window is open.
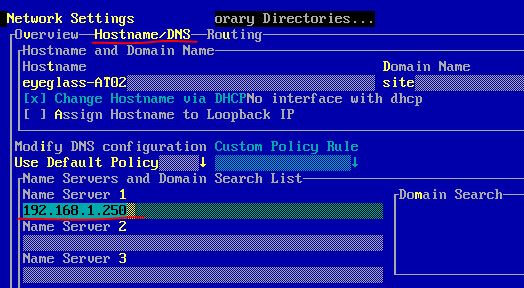
- In Network Settings screen open second tab: Hostname/DNS.
- Type Hostname for your Eyeglass appliance
- Type DNS server IP. In this example: 192.168.1.250
|
|
IMPORTANT: If you are using hostname for the target in your SyncIQ policies, the DNS information entered here must be able to resolve this host back to the Cluster IP Address in order for Eyeglass to perform configuration replication. If the hostname cannot be resolved, Eyeglass will not create the associated configuration replication Job. |
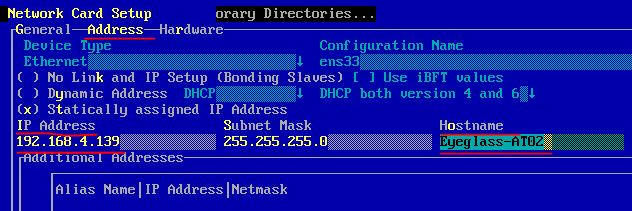
- In Network Settings screen open first tab: Overview. Choose Edit.
- In Network Card Setup screen, choose 2nd tab: Address. Type the same Hostname you entered when deploying the Eyeglass OVF..
- Next - OK - Next