Product Information
Disclaimer:
Location of sensitive data
Superna Defender for AWS stores information about object accesses by users in kafka topics. The information is kept local to the customer’s environment in a managed kafka service that’s completely private and managed as part of the application stack. The data is retained in kafka topics for up to 48 hours, whereby kafka purges the data. When the customer decommissions the application, the managed kafka service is completely deleted, and the data is no longer accessible.
Information about detected ransomware or other events on the system is stored in a database local to the eyeglass appliance. This is in the /opt/superna/db directory on the main eyeglass appliance and can be purged if required. Contact customer support for assistance if required.
Data Encryption Configuration and cryptographic keys
Superna Defender for AWS does not encrypt or decrypt any customer data. The main UI is accessible through HTTPS, and the process to change the SSL certificate is described here: TLS Certificate Procedures for Eyeglass
Assessing the health of the application
The health of Superna Defender for AWS can be assessed by configuring and monitoring the Security Guard function. This provides an end-to-end check of the configuration and availability of all components involved in the active defence of data. The configuration of this feature is documented here: Ransomware Defender for AWS Admin Guide
Revision histor
This section provides a description of document changes.
- Revision 1.0
Product Description
Real-time security for object data in AWS S3 services. Provides monitoring, alerting and automated lockout of accounts with malicious object data IO patterns. Licensed by bucket and available only as a subscription option with bundles of buckets available.
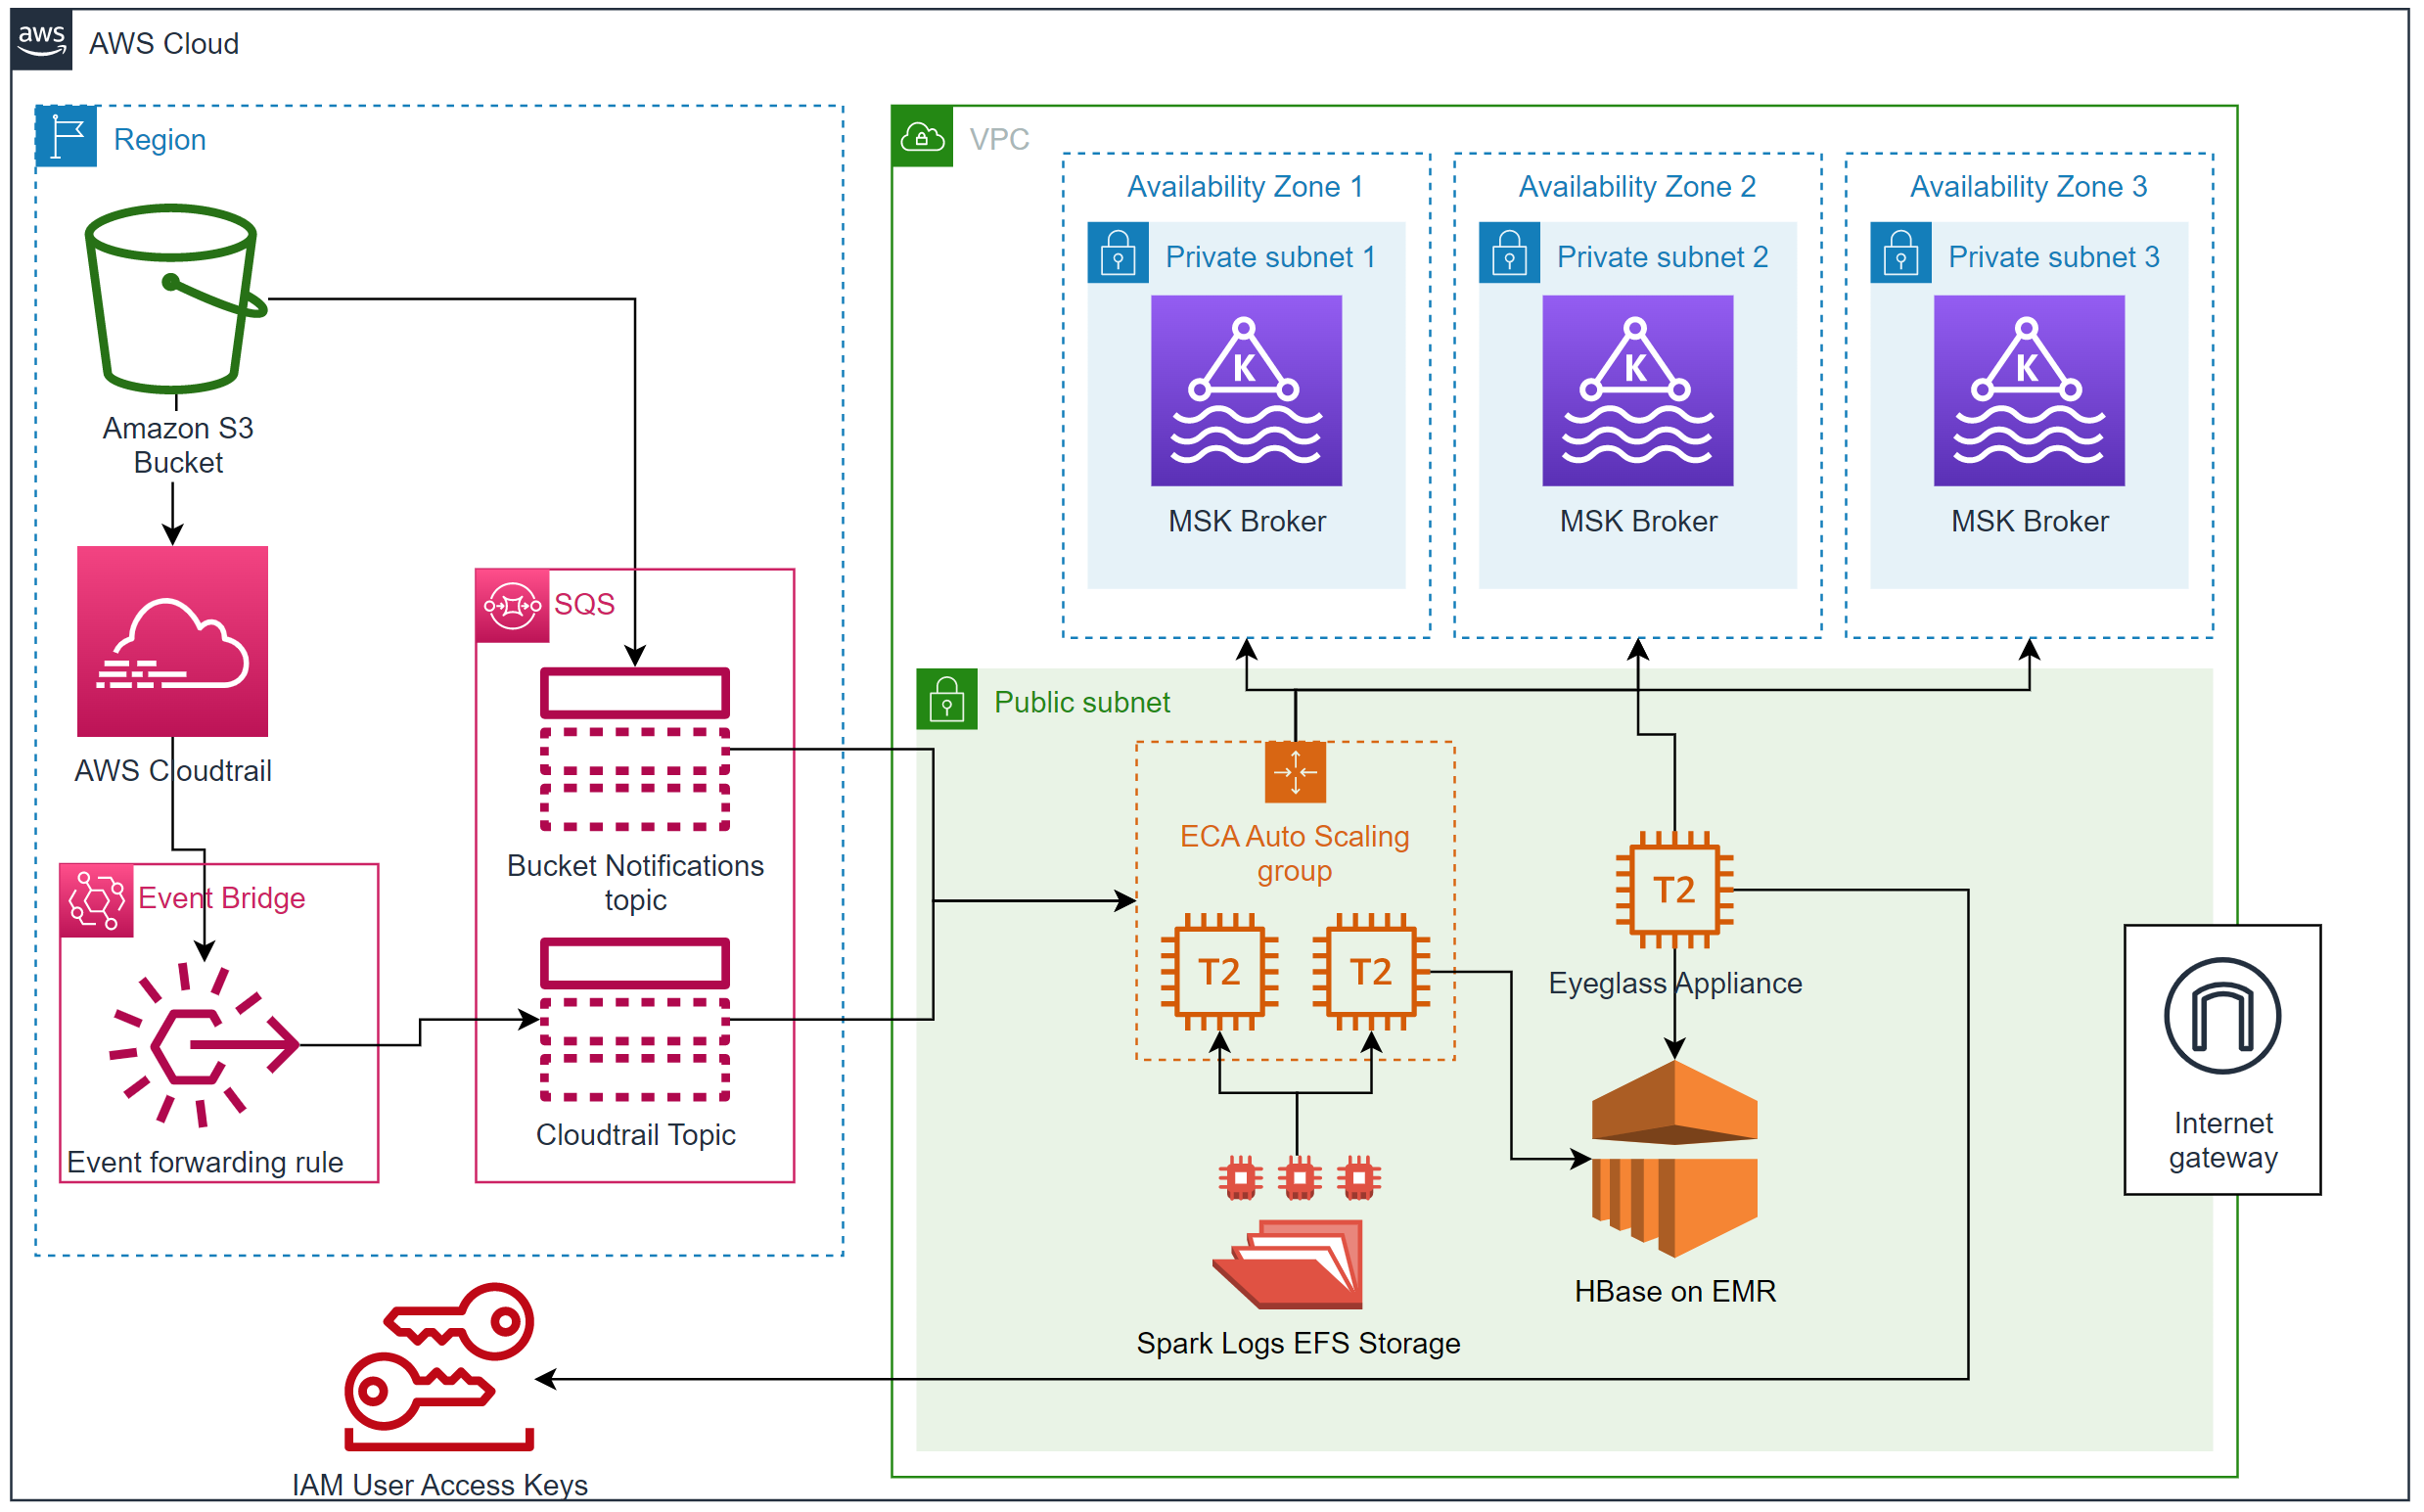
Product Architecture
The diagram below outlines the services consumed and the data flow for Ransomware Defender to protect S3 buckets. Cloudtrail, SQS queues, Managed Kafka and autoscaling group is used.
Product License
- Licensed per 50TB per hour of protected data.
Product Firewall Requirements
Product Usage Ports
| Port | Direction | Purpose |
|---|---|---|
| SMTP port 25 TCP | Eyeglass VM --> SMTP server | Send email alerts to an SMTP server |
| SYSLOG UDP, TCP 514 | Eyeglass VM -->> syslog server | Send alarms over syslog to a syslog server |
| HTTPS TLS 1.2 or 1.3 443 | Administrator to WebUI | Administrator to login WebUI |
| SSH TCP port 22 | administrator --> instances | SSH access access to CLI |
Product VPC Internal Firewall Ports
 |
NOTE: Do not modify any security group firewall settings. All ports are required for product usage. |
| Port | Security Group | Direction | Purpose |
|---|---|---|---|
| TCP HTTPS 443 | Eyeglass | Inbound | web GUI |
| TCP SSH 22 | Eyeglass | Inbound | SSH to Eyeglass |
| TCP 2013 | Eyeglass | Inbound | Websock |
| UDP 5514 | Eyeglass | Inbound | syslog forwarding from ECA instances |
| TCP 9092 | Eyeglass | Inbound | Kafka MSK service port |
| TCP 2181 | Eyeglass | Inbound | Zookeeper MSK service port Kafka |
| TCP 9094 | Eyeglass | Inbound | Kafka MSK service port |
| TCP 9092 | Eyeglass | Inbound | Kafka MSK service port |
| TCP HTTPS 443 | ECA instance | Inbound | management UI's for debugging only |
| TCP SSH 22 | ECA instance | Inbound | SSH for CLI access to the ECA instances |
Product Requirements
-
The following services are required for this product
- EC2 - default configuration 1 GUI VM (Eyeglass), 2 - Analysis VM's (ECA VM's)
- AWS Managed Kafka - MKS Service
- CloudFormation Templates
- Cloud trails - Used to log S3 protocol operations on S3 buckets and used as the primary input for behavioural analysis
- SNS Service
- S3 buckets - Select one or more bucket to be protected
- Eyeglass IAM service account to be able to shutdown and stop attacks
Simple Deployment of Defender into your AWS Account
Steps to deploy Ransomeware Defender stack from AWS Marketplace
1. Pre-requisites:
- Decide which region the stack will be deployed in. Currently, stack deployment is supported for these three regions only: US EAST(N. Virginia), US East (Ohio), Canada (Central)
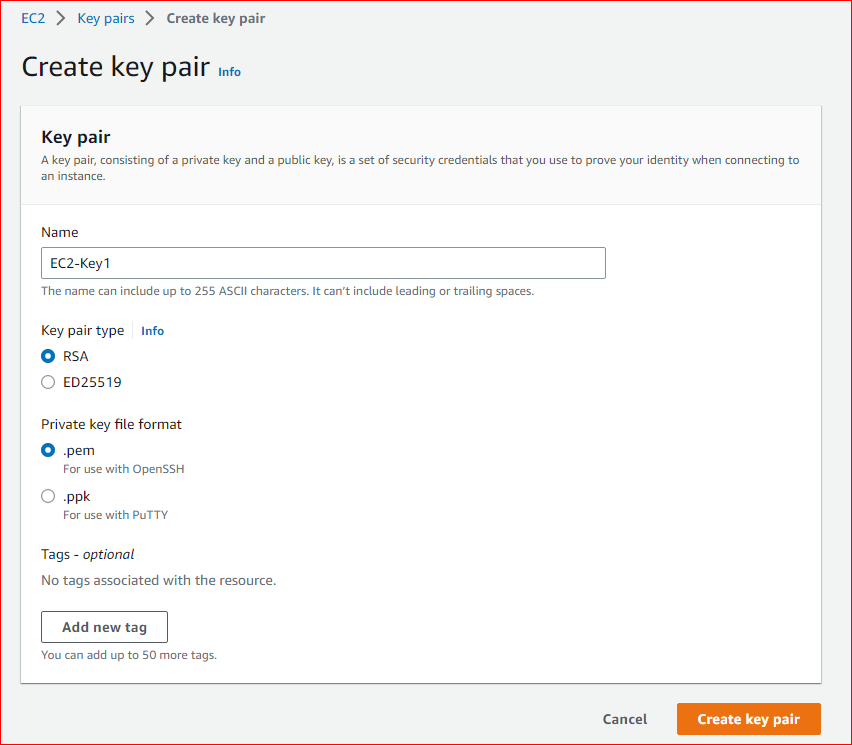
- Create <EC2-KEY> in the region where the stack will be deployed. Download and save the .pem keys, which will be used to access all deployed EC2 instances via ssh. The name of the key pair will be required during the deployment
2. Deploy from Marketplace in AWS: Click here for the Defender for AWS marketplace product;
3. Subscribe above product, and select continue to configuration;
4. Select Fulfillment Option - Superna Defender for AWS, Software Version and Region;
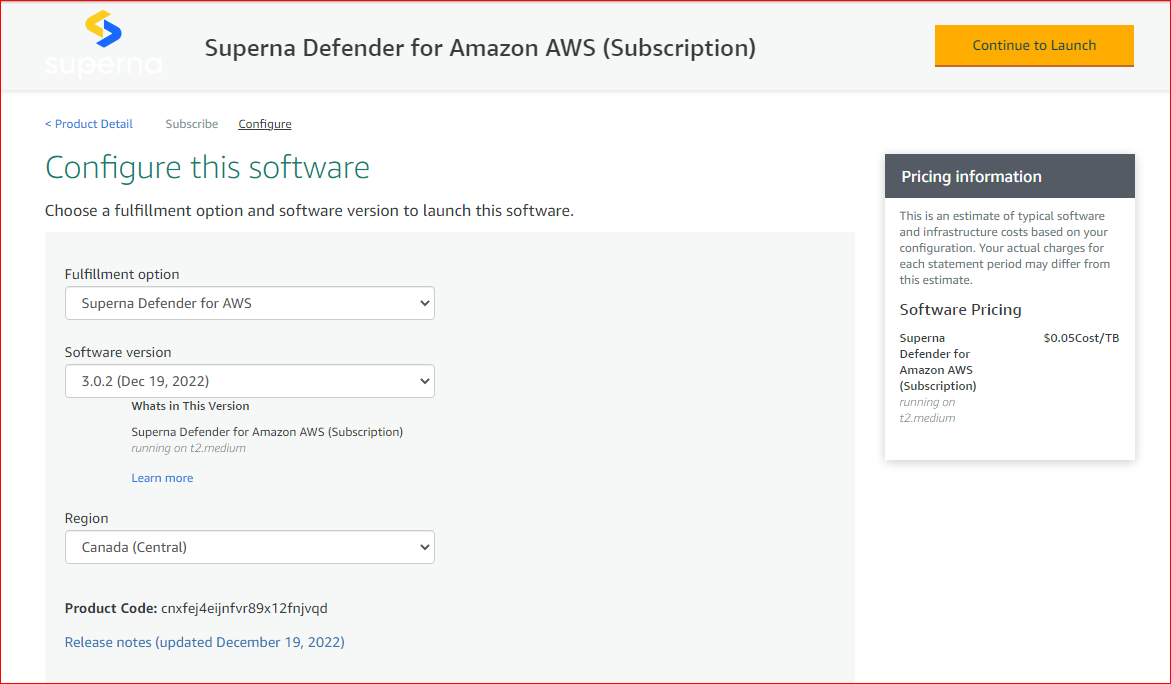
5. Click Continue to Launch;
6. On the next page, review the configuration details, select action - Launch Cloudformation, then select launch;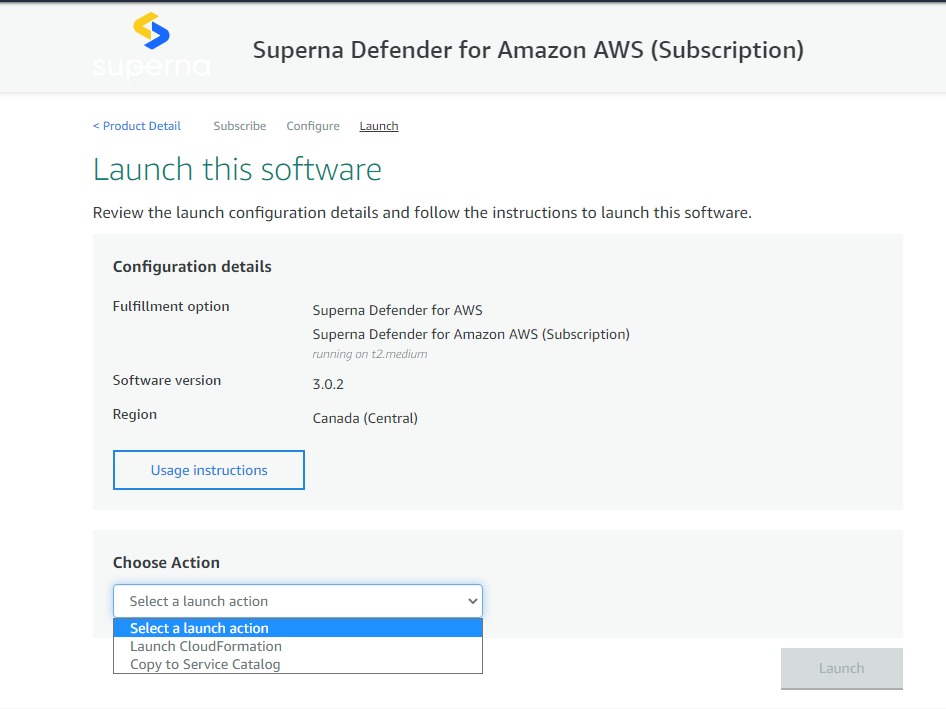
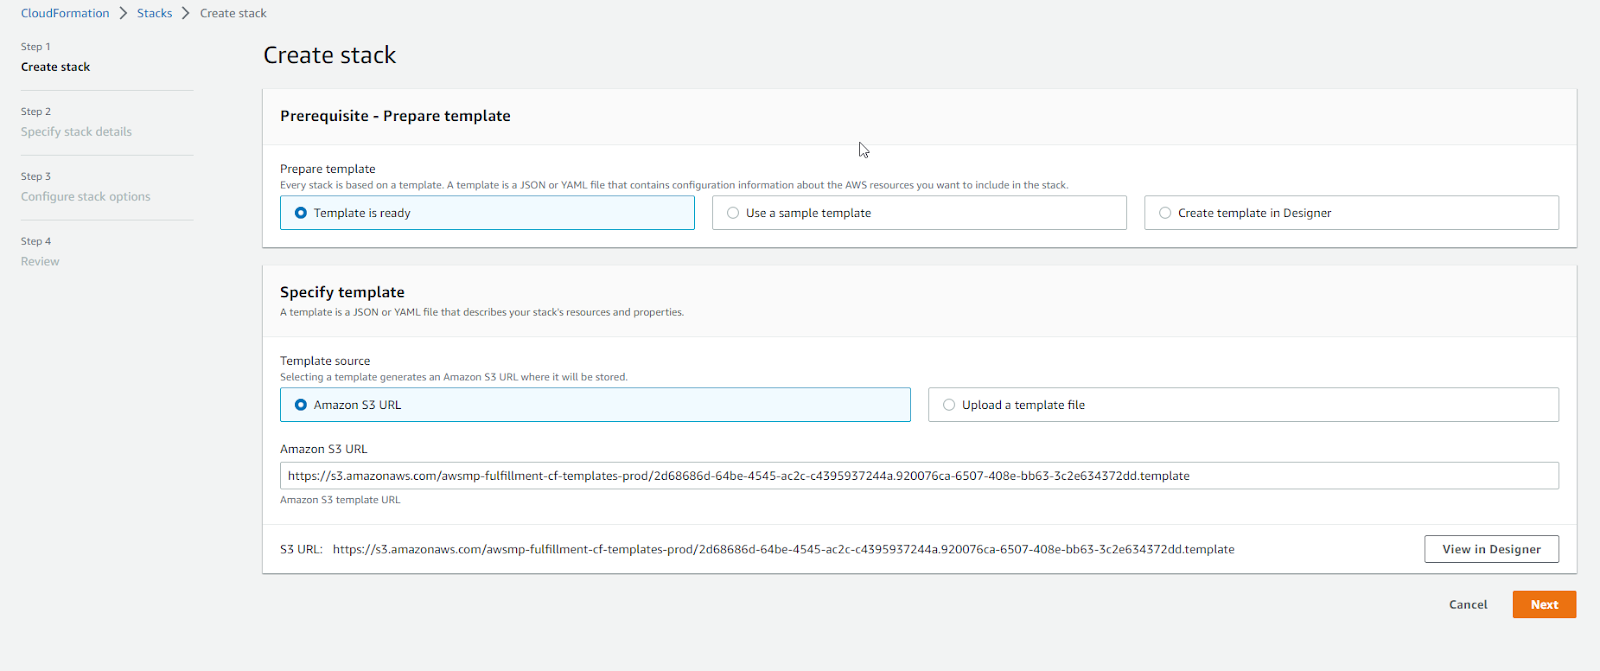
7. On the Create Stack page, choose the below options and then click next:
Prepare template - The template is ready
Template Source - Amazon S3 URL
8. On the next page, specify stack details:
Stack name - enter the unique name for the stack;
Enter/verify parameters:
AccessLocation - IP address range that can be used to access all EC2 instances
AccessLocation2 - The IP address range that can be used to access all EC2 instances. (Optional)
KeyName - enter the name of an existing EC2 KeyPair to enable SSH access to the instance (eg: EC2-key1)
OperatorEMail - Email address to notify if there are any scaling operations. (Optional)
9. Click Next and leave everything as default on Configure stack options page;
10. Click Next, review the details provided for the stack;
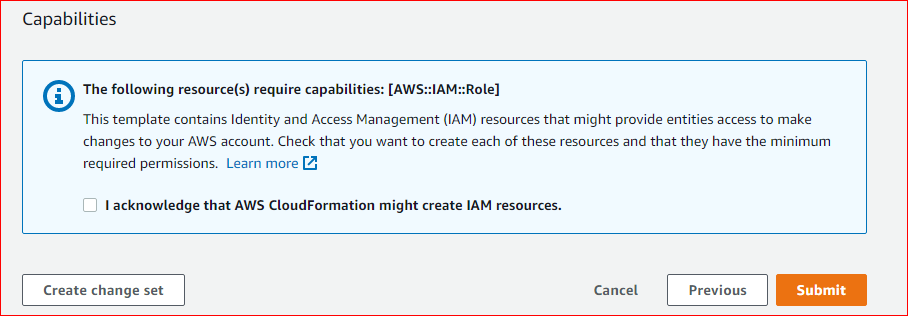
11. Accept the IAM role permission under Capabilities, and submit the stack for deployment;
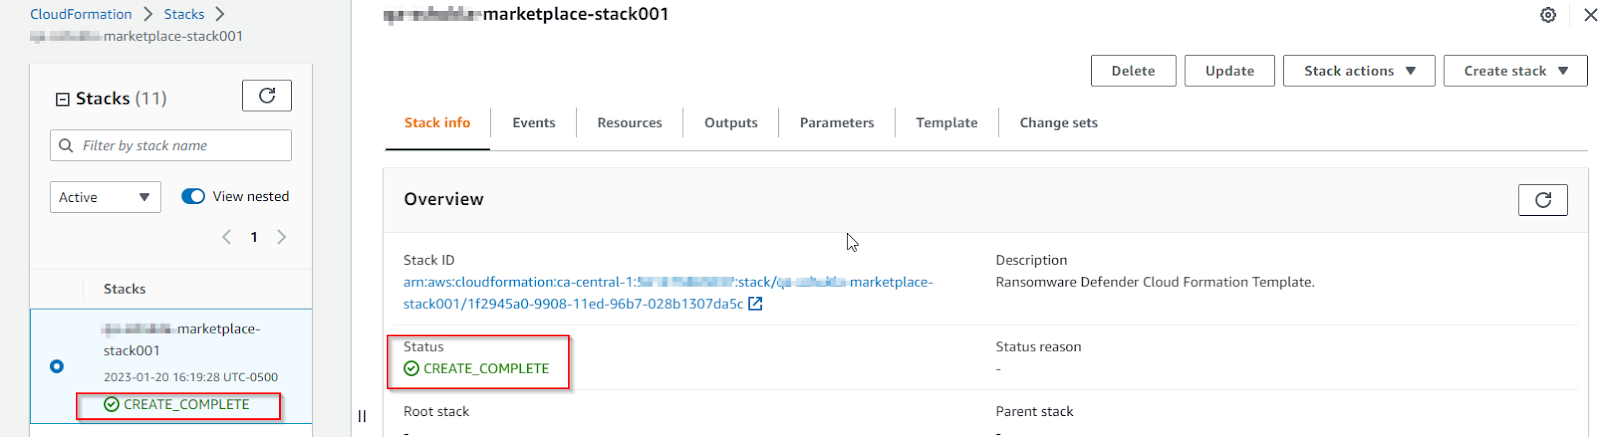
12. The stack deployment process may take up to an hour or more to finish. To view the progress of stack resources being deployed, go to the Coudformation page and check the status;

13. Once the deployment is completed, the stack will have CREATE_COMPLETE status;
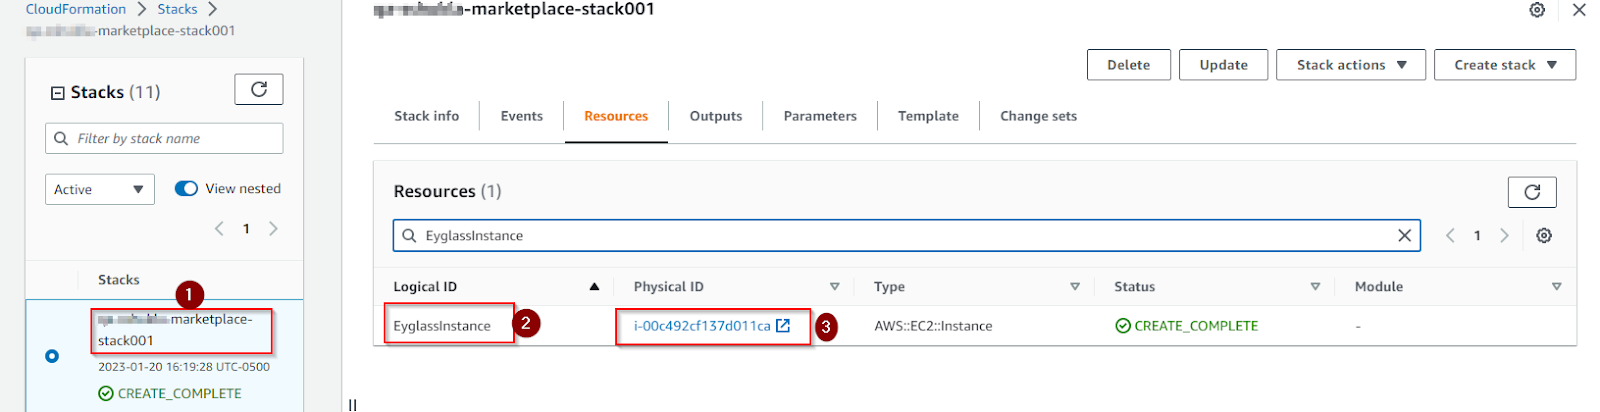
14. Get the public IP’s of eyeglass and ECA EC2 instances using the steps below. The public IP’s will be used to log in to the eyeglass GUI. Also, to access eyeglass and ECA VM’s via ssh.
Eyeglass: on the CloudFormation page, select your stack, click the Resources tab -> search for EyglassInstance -> click physical id -> instance id -> copy public IP
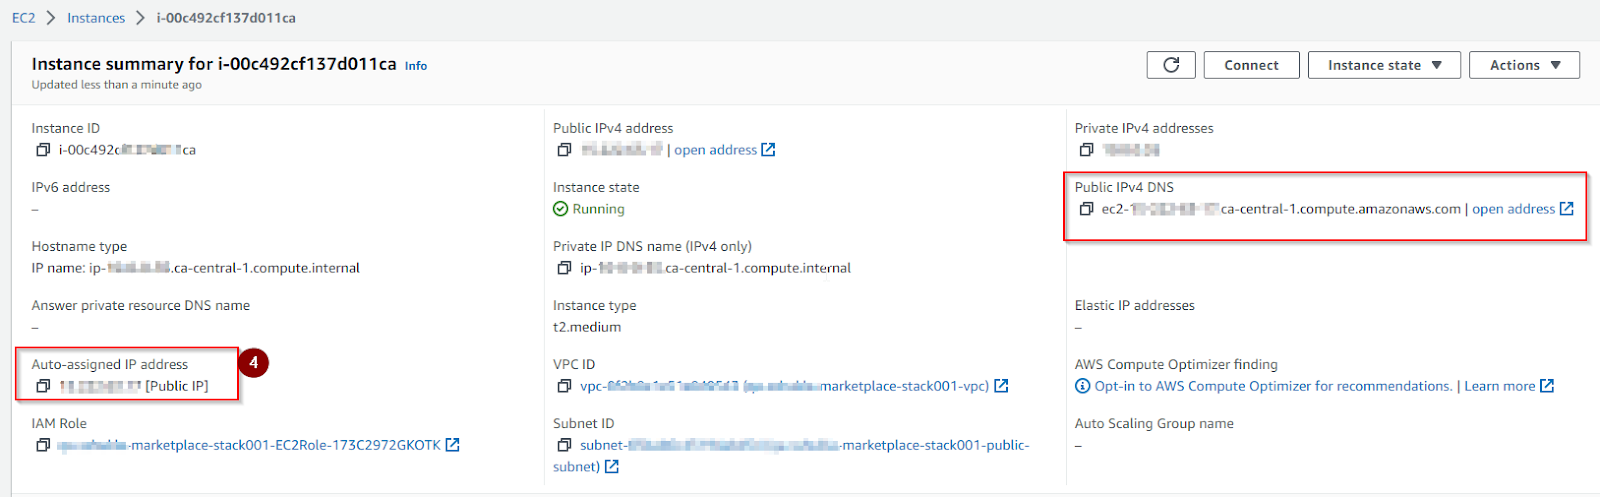
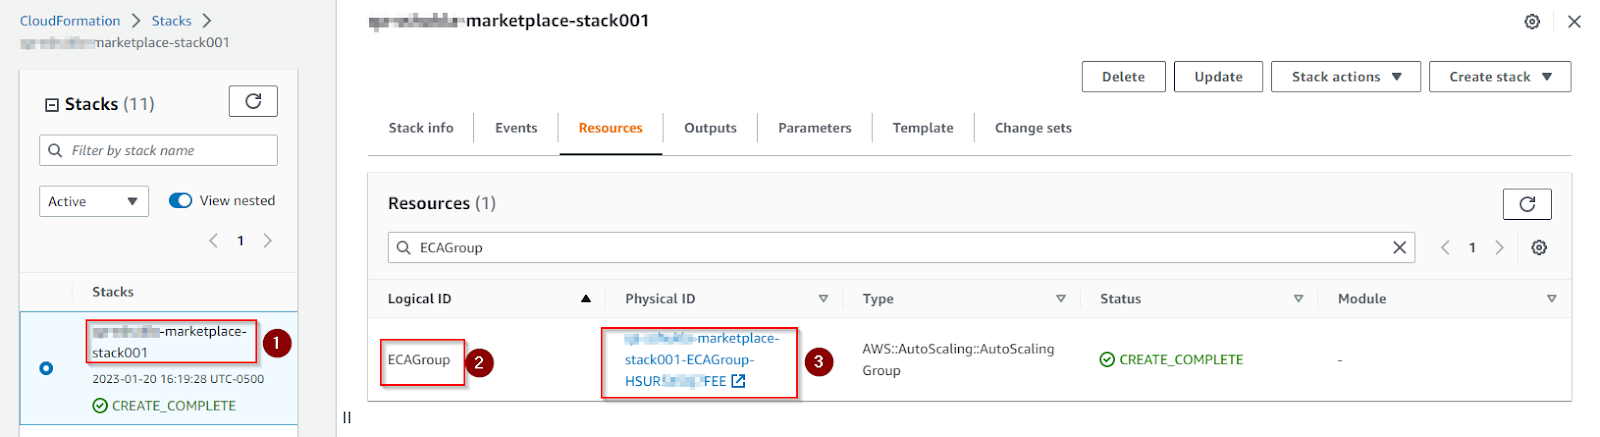
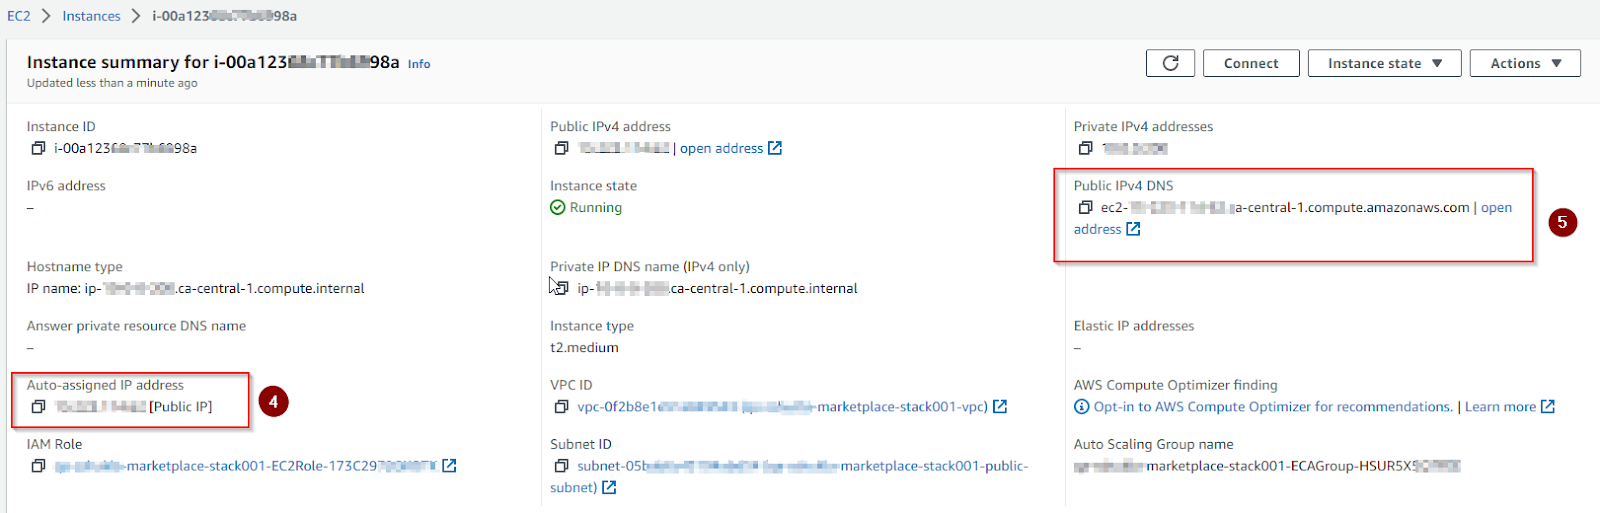
- ECA: click the Resources tab -> search for ECAGroup -> click physical id -> Instance Management -> instance id -> copy public IP
15. After that:
a. SSH to the eyeglass appliance at <public dns> using the ec2-user ->ssh -i <path/to/.pem keys> ec2-user@<eyeglass_instance_public_ip>
b. Execute 'sudo passwd admin' to change the password of the admin user
c. Switch to the admin user, if want to check eyeglass conf files or logs for troubleshooting -> sudo su - admin
d. Using a browser, access the eyeglass application at: https://<public_dns>/eyeglass/e. Login as admin user, with the password that was modified in the previous step b
16. To access ECA VM's via ssh to view logs and conf files, follow the steps below:
a. SSH to the eyeglass appliance at <public dns> using the ec2-user -> ssh -i <path/to/.pem keys> ec2-user@<eca_instance_public_ip>
b. Execute 'sudo passwd ecaadmin' to change the password of the ecaadmin user
c. Switch to ecaadmin user -> sudo su - ecaadmin
See the guide below to set up minimum permissions.
Steps to configure AWS from eyeglass
1. Login to eyeglass GUI as an admin user: https://<public_dns>/eyeglass/.
2. From the main menu, select Add Managed Devices. This UI will help add AWS s3 to the eyeglass inventory and select S3 buckets to protect.
The marketplace deployment applies IAM role permissions to the instances during the deployment
The default deployment requires no additional credentials to protect data; if you want to override the defaults and use a custom IAM role, you can uncheck Use current EC2 instance credentials option

|
|
Note: Selecting the option Preserve failed resources on deployment failure is recommended. When checked, if the event-capture stack fails to deploy in AWS, the stack won’t be deleted, and users can easily track the reason for failed deployment from the CloudFormation page |
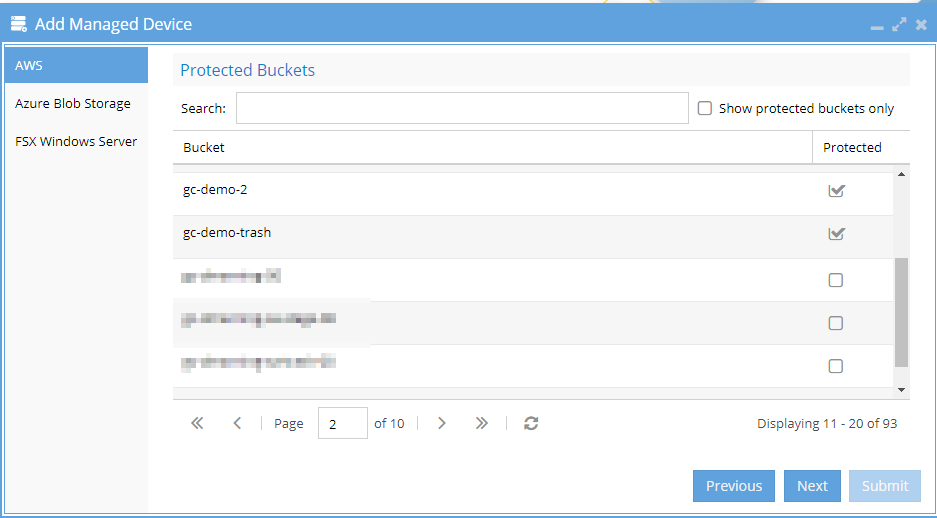
3. Click next to select S3 buckets to protect.
You can search or scroll through the list of S3 buckets and select the check box to protect the bucket(s)
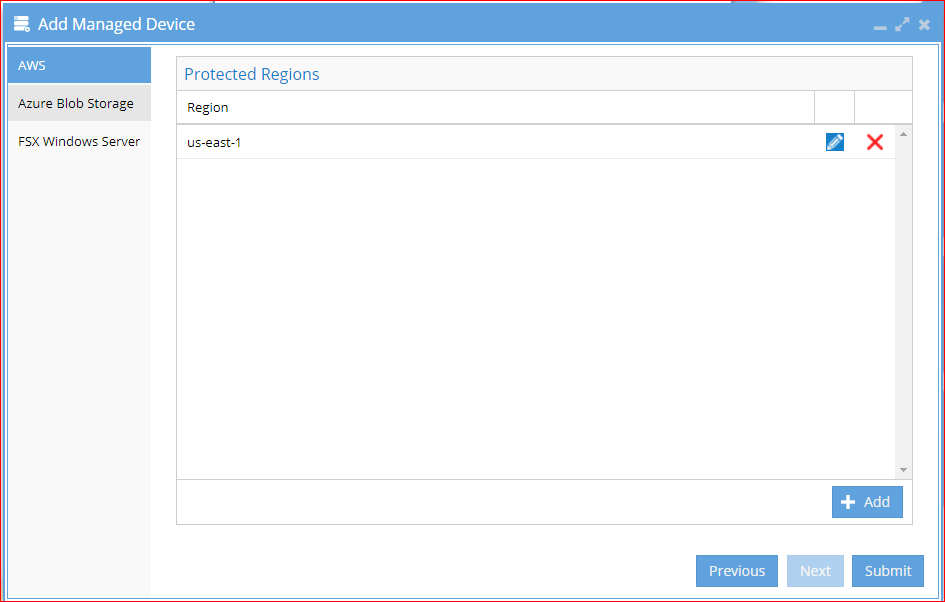
4. On the next page, the regions are auto-detected based on the S3 buckets that were selected.
|
|
NOTE:
|
5. Click the submit button.
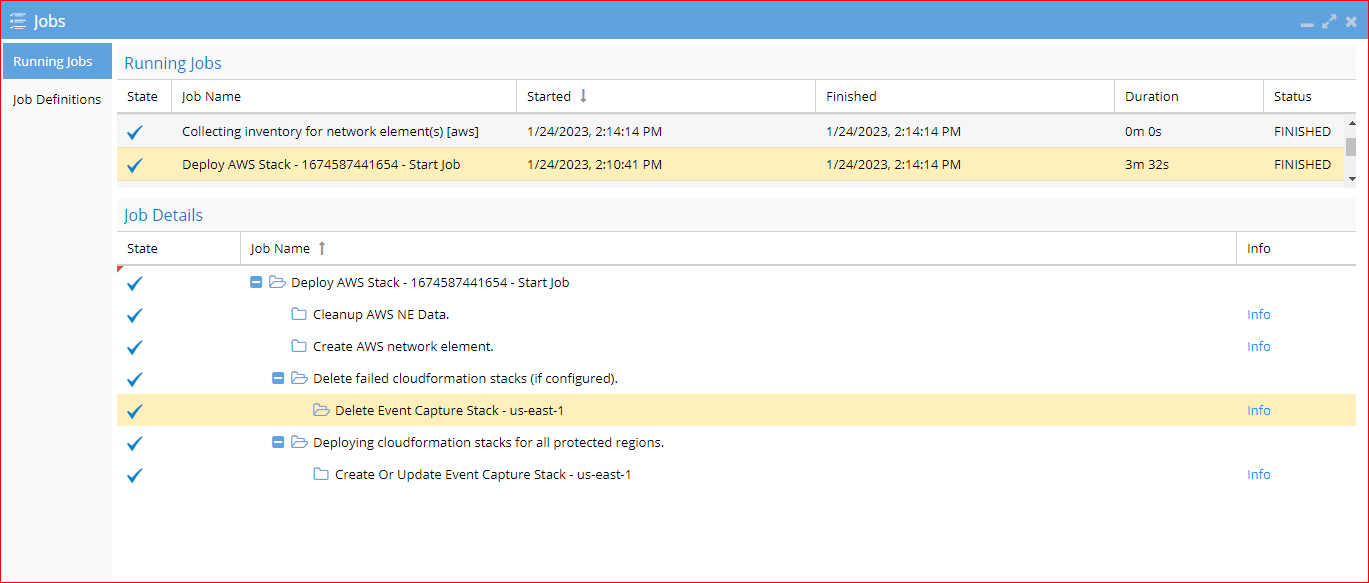
Here eyeglass submits a job to deploy superna-event-capture stack (in the same region as the s3 bucket) using cloudformation template. This will create the required SQS queues, cloudtrails, and eventbridge settings as needed
Open the job icon and click the running jobs to monitor the deployment process; once it completes, your buckets will be protected
6. You can see the changes made to your account by going to the cloudformation section of the AWS console and viewing the outputs tab to see all the changes and new configurations created to protect S3 buckets.
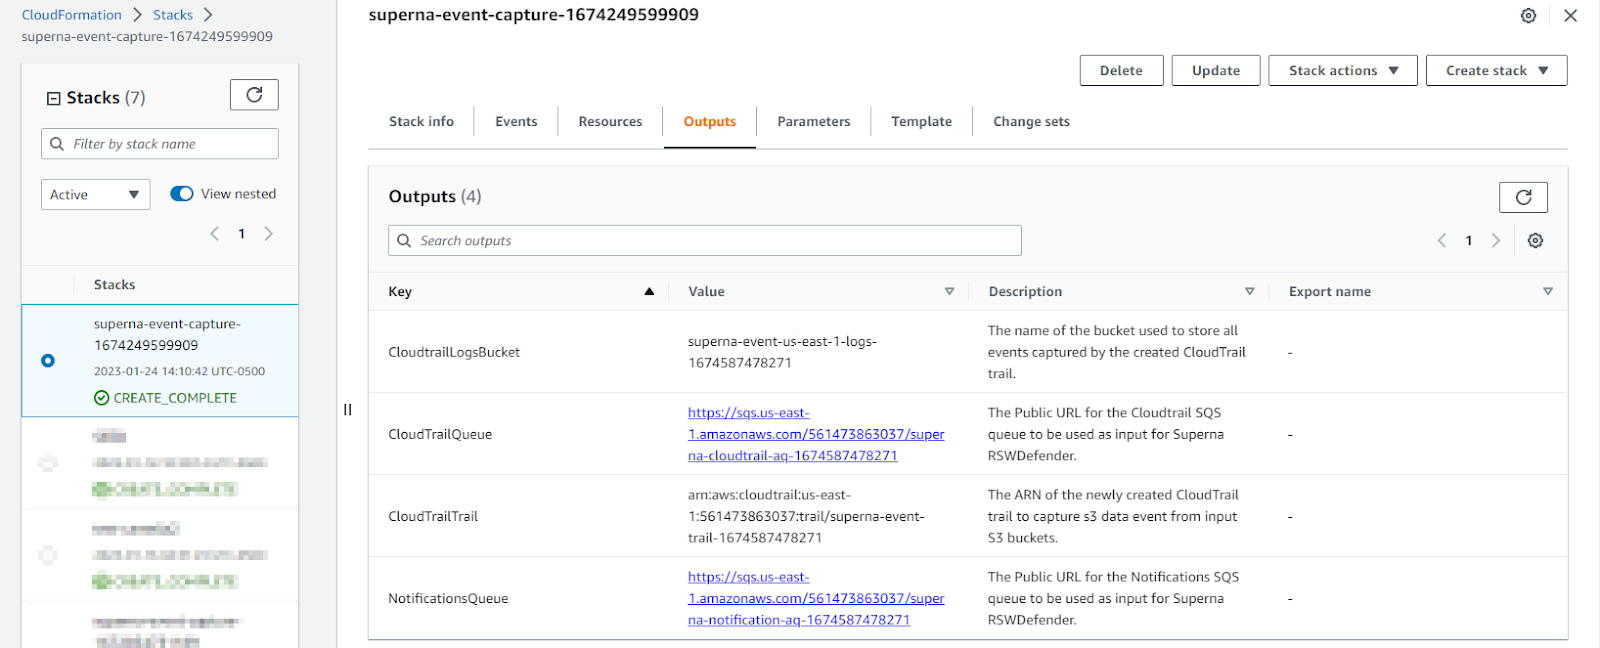
7. Done - deployment is completed
How to see the protected buckets list from within eyeglass GUI
1. To see the protected buckets list from inside the eyeglass GUI
Check Inventory View
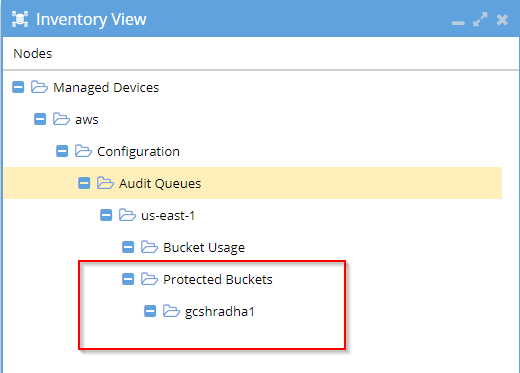
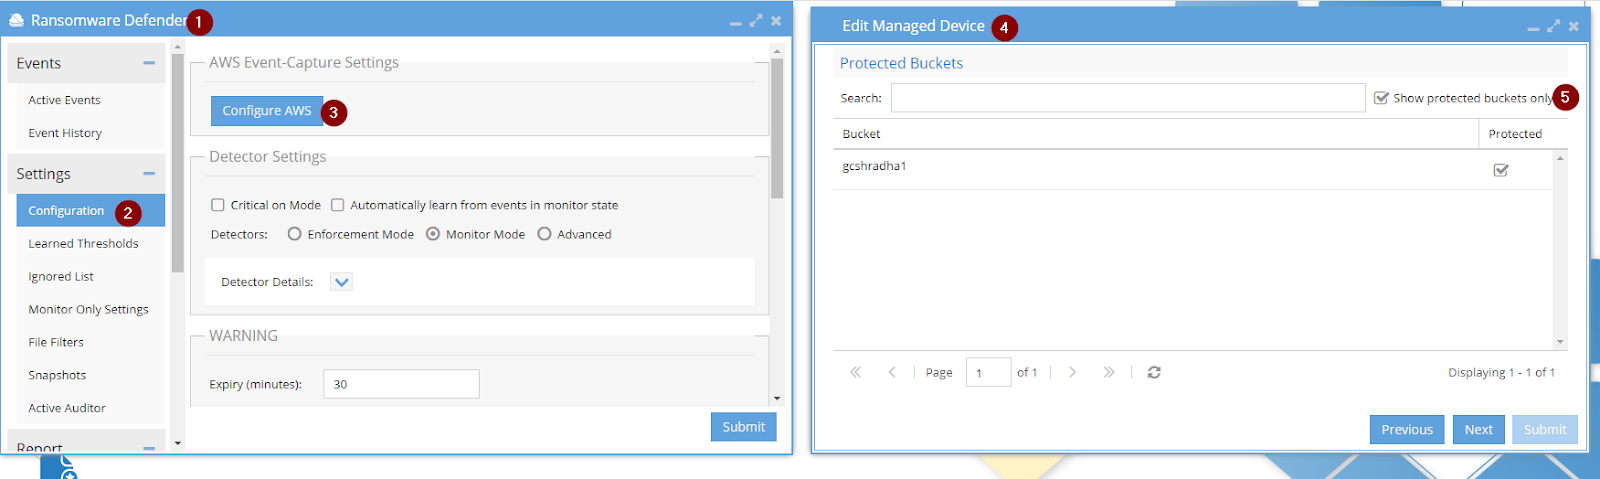
- OR it can also be checked from Ransomware Defender GUI -> Configuration tab -> Configure AWS -> select show protected buckets only
How to add more S3 buckets for protection to already deployed stack
To add more buckets to the current deployment, open Ransomware Defender UI -> Configuration tab -> Configure AWS -> select bucket(s) to add -> submit.
Here eyeglass will submit a new job to update the protected buckets list for already deployed event-capture-stack in AWS if buckets are from the same region
If the newly added bucket belongs to a different region than the one provided during the first deployment, in this case, eyeglass will deploy a new ‘event-capture-stack’ in the region the new bucket belongs to.
Add managed devices
Use add managed devices from the main menu to add AWS s3 to inventory and select S3 buckets to protect.
|
|
NOTE: The marketplace deployment applies IAM role permissions to the instances during deployment |
- The default deployment requires no additional credentials to protect data; if you want to override the defaults and use a custom IAM role, you can uncheck "Use current ECS instance credentials"
- Click next to select S3 buckets to protect
- Search or scroll through the list of S3 buckets and select the check box to protect the bucket(s).
|
|
NOTE: Billing collection will begin once the job is submitted |
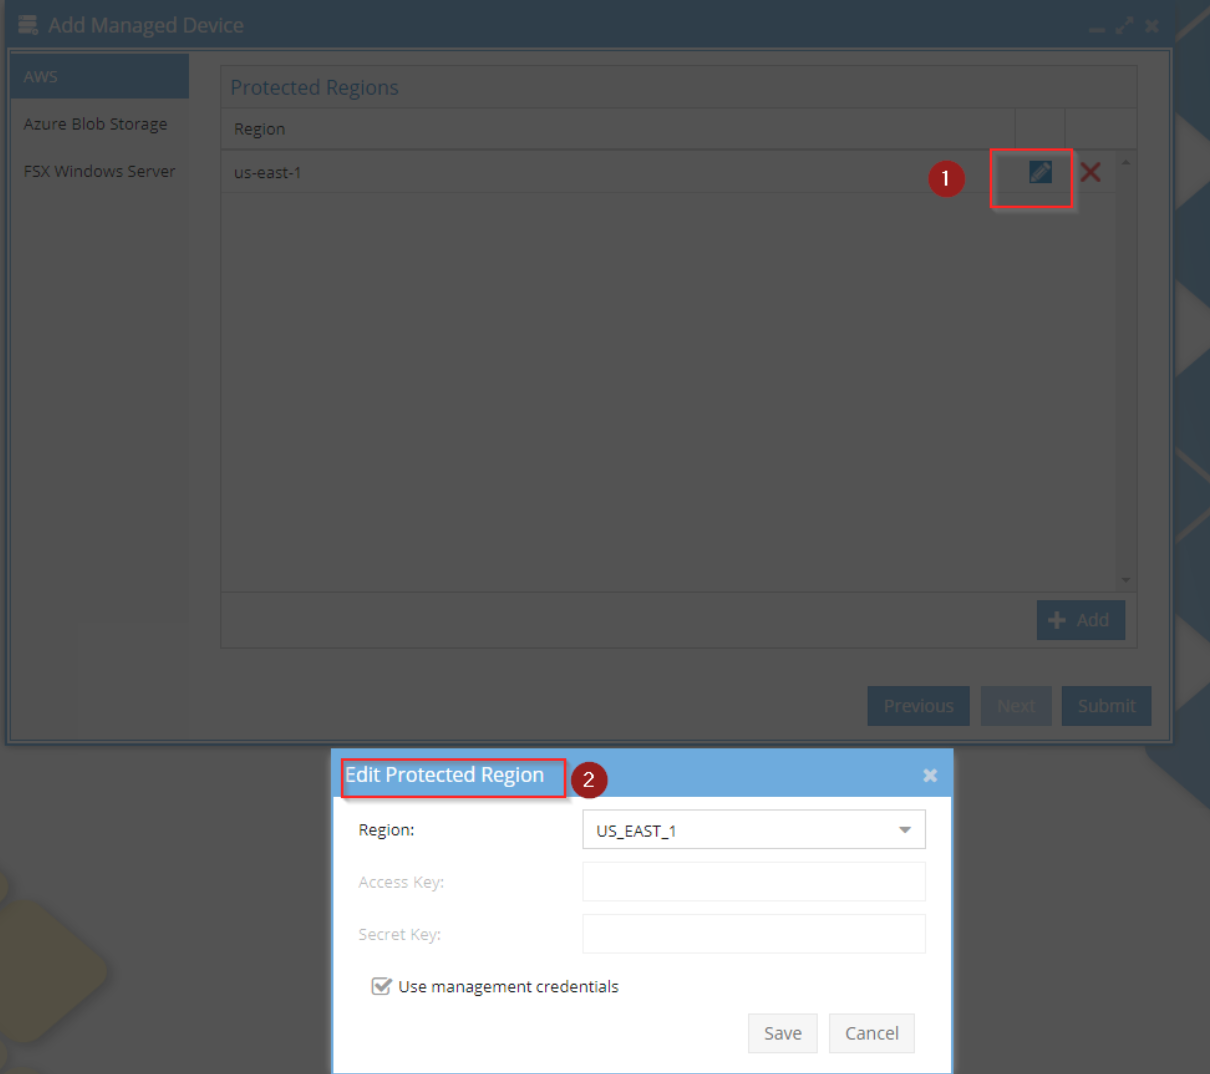
4. The regions are auto-detected based on the S3 buckets that were selected. NO action is needed on this screen unless you need to edit the IAM access and secret keys for the selected buckets.
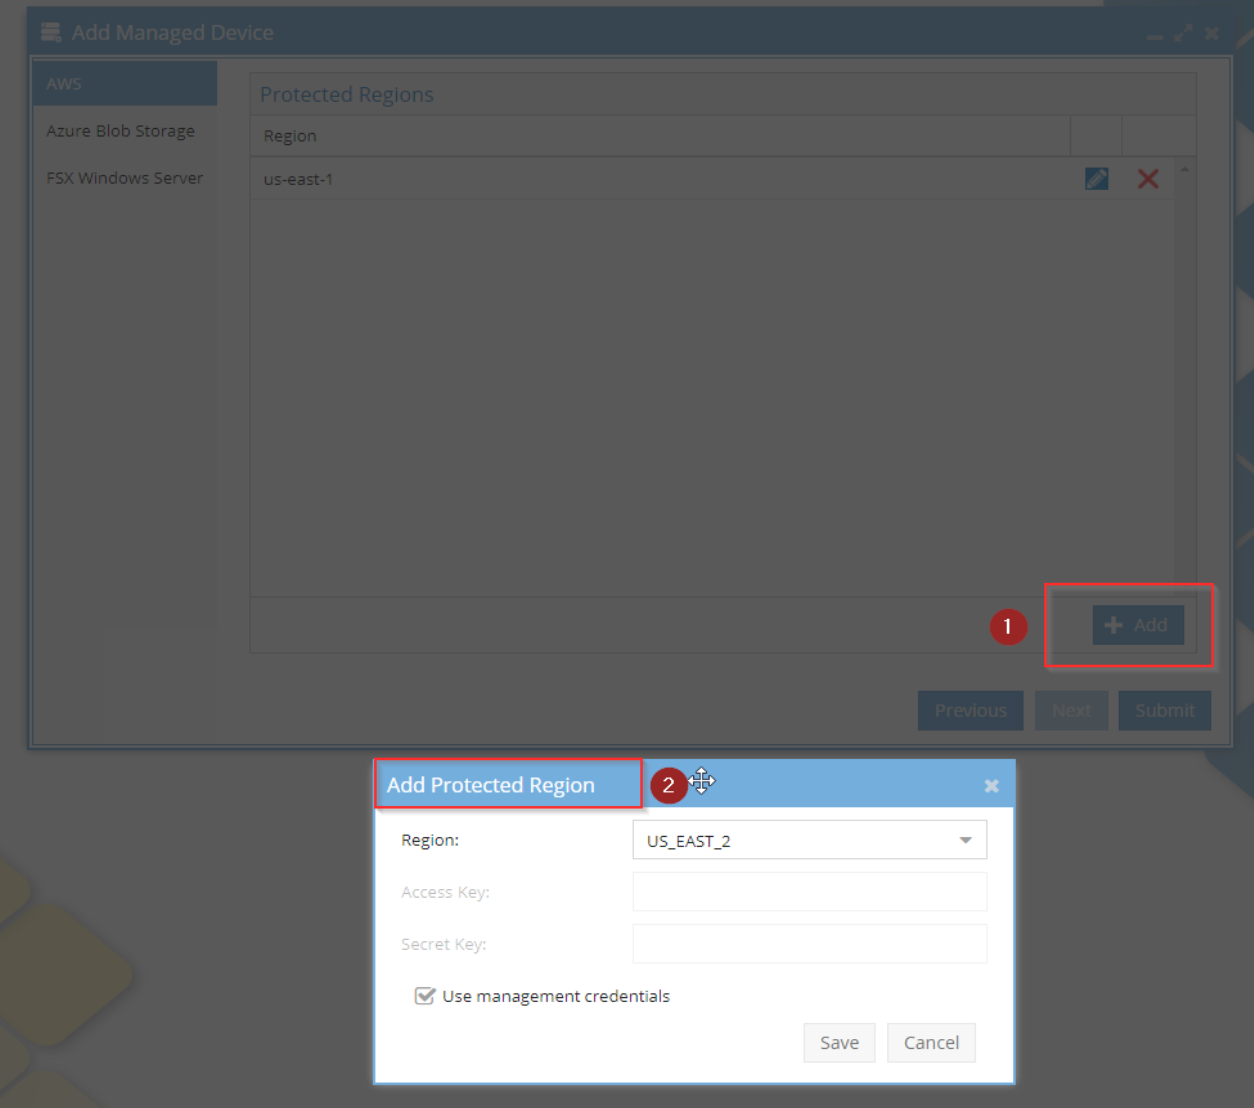
5. If you need to customize the access and secret keys for a bucket, click edit or the add button.
a. Click the submit button. Defender submits a cloudformation template that will create the required SQS queues, cloudtrails, and eventbridge settings needed. Open the job icon and click running jobs to monitor the template deployment process, once it completes, your buckets will be protected.
|
|
NOTE: You can see the changes made to your account by going to the cloudformation section of the AWS console and view the output tab to see all the changes and new configurations created to protect S3 buckets |
j. Done
k. see the guide here Defender for AWS admin guide.