TLS Certificate Procedures for Eyeglass
- How to replace self signed certificate on Eyeglass Appliance GUI - Quick Replace
- Details:
- Prerequisites:
- Configuration Steps:
- How to Create Certificate Authority Root Cert on the Eyeglass appliance to Sign a Cert Request for the Eyeglass Appliance
- How to create a certificate Request in the Eyeglass Appliance for signing by an External Certificate Authority Server
- How to Install a signed certificate in an Eyeglass Appliance.
- How to Sign a Cert Request and Export a Certificate with Microsoft CA Server
How to replace self signed certificate on Eyeglass Appliance GUI - Quick Replace
Details:
The following procedure can be used to generate a new self signed certificate and apply it on the Eyeglass appliance.
Prerequisites:
NOTE: This only replaces the 443 main cert, if you want to replace the cert used for websockets and the WebUI self signed cert, follow the instructions here for an external CA signing process.
Configuration Steps:
Note: There will be an Eyeglass service interruption when performing this procedure.
- SSH to the Eyeglass as admin
- Default password is 3y3gl4ss
- sudo su (to root)
- Default password is 3y3gl4ss
- systemctl stop sca
- systemctl stop lighttpd
- mv /opt/superna/sca/.secure/ssl.pem /tmp/ssl.pem.old
- /opt/superna/bin/create_ssl_keys.sh /opt/superna/sca/.secure/ssl
- chown sca:users /opt/superna/sca/.secure/*
- systemctl start sca
- systemctl start lighttpd
- Done.
How to Create Certificate Authority Root Cert on the Eyeglass appliance to Sign a Cert Request for the Eyeglass Appliance
- This procedure can be used if you do not have an external CA within your organization, and need to sign a Cert to change the certificate on Eyeglass without needing use an external CA. These steps will create a CA Root key, and CA Root cert on the appliance, and create a CA signing cert to be used for signing requests for the appliance.
- ssh to Eyeglass as admin user
- sudo -s (enter admin password)
- mkdir -p /opt/ca
- cd /opt/ca
- Create Root CA Key for Signing other Certificates
- openssl genrsa -passout pass:foobar -out rootCA.key 2048 (change the yellow highlight passphrase and store this value for use to sign certificates in the future. This is required to gain access to the CA key for signing)
- Now we have a private root key(rootCA.key), and a root CA(rootCA.pem). If you want all the clients/PC/browsers to accept your authorized certificate, you need to put your root CA in their local trusted stores (e.g. OS's trusted certificates repositories)
- Self-sign the CA's signing certificate
- openssl req -x509 -new -nodes -key rootCA.key -days 3650 -out rootCA.pem
- You will be prompted to enter information about the Root CA certificate and you should enter information for country, province, city etc. specific to your organization
- This CA Root Cert will be valid for 10 years , change yellow highlighted value for a different expiry.
- Create the appliance Certificate Request and Sign it with the Root CA Certificate
- Create the private key
- openssl genrsa -out eyeglass.key 2048
- Create the Certificate Request
- openssl req -new -key eyeglass.key -out eyeglass.csr
- NOTE: You will be required to enter information about your environment country, city, company, email, optionally enter a passphrase to protect the request.
- Sign the Request with the root CA certificate key and signing certificate created in the steps above
- openssl x509 -req -in eyeglass.csr -CA rootCA.pem -CAkey rootCA.key -CAcreateserial -out eyeglass.cer -days 365
- NOTE: Change days to allow extend how long the cert is valid
- check the cert
- openssl x509 -in eyeglass.cer -text -noout
How to create a certificate Request in the Eyeglass Appliance for signing by an External Certificate Authority Server
NOTE: Use this procedure when you have an External CA server to sign certificates for your organization.
-
First create a configuration file inside /tmp directory. You can named it "iglscert.cnf" in Eyeglass Appliance. Below is an example: NOTE: the FQDN of the appliance should be used for the CN = property in the cnf file. NOTE: The alt DNS section should be setup to match the FQDN of the appliance and use * to wildcard the host name. Look at the yellow section below. It is also possible to add the ip address here if you want to access by IP address use IP.1 = x.x.x.x syntax in the CNF file.
[ req ]
default_bits = 2048
prompt = no
encrypt_key = no
default_md = sha256
distinguished_name = dn
req_extensions = v3_req
[ dn ]
CN = iglscert.superna.local
emailAddress=support-team@superna.net
O = SUPERNA
OU = Support Team
L = Ottawa
ST = Ontario
C = CA
[ v3_req ]
subjectAltName = @alt_names
[ alt_names ]
DNS.1 = iglscert.superna.local
DNS.2 = *.superna.local
-
Now, create a CSR (Certificate Signing Request) file and a server key file in /tmp directory using the following command in Eyeglass Appliance: NOTE: The path to the private .key file will be needed when installing the signed certificate in the next section.
-
openssl req -new -config /tmp/iglscert.cnf -keyout /tmp/iglscert.key -out /tmp/iglscert.csr
-
-
Use the following command to verify the certificate information:
-
openssl req -text -noout -verify -in /tmp/iglscert.csr
-
-
Take the verified CSR file to your Windows Server CA or other CA and get it signed [ Signed certificate must be in Base-64-encoded X.509 format] and have the CER extension. Once you have the file signed, copy it back to Eyeglass Appliance using WinSCP, and install it using the steps below.
-
See the section at the end on how to use Microsoft Certificate Authority to sign a CSR request and download and exported CER formated x.509 certificate. This is an example only consult vendor documentation for signing certs with your organizations CA server.
-
After receiving the CER format certificate signed by your CA server follow the instructions here to install a signed certificate.
How to Install a signed certificate in an Eyeglass Appliance.
- Get your certificate in .cer format to complete this procedure. Follow the steps here to create a certificate request.
-
Locate the private key (.key file in the tmp directory on Eyeglass from the steps completed above) and certificate (.cer file from the CA used to sign the CSR request). The file should have a private X.509 key and certificate signed by a trusted certificate authority. It must be X.509 Certificate CER format.
-
Example: iglscert.key (created from CSR steps above) and iglscert.cer (exported signed certificate file) from Microsoft CA or 3rd party CA.
-
-
Login to Eyeglass
ssh as admin user
sudo -s (enter the admin password)
Copy the certificate file to Eyeglass using a tool like WinSCP tool
- Follow these instructions if you used the Eyeglass Root CA procedures to Generate the Self Signed Cert for the Appliance
- type whoami (make sure you are the root user before proceeding)
- Verify the CER file format is correct with this command
- openssl x509 -in /tmp/iglscert.cer -text
- NOTE: If you get this error message your file is not in CER format "unable to load certificate" , do NOT continue with steps unless this step passes. All further steps WILL fail unless the file is CER format.
- scacli replace-certificate --privateKey=/opt/ca/eyeglass.key --certificate=/opt/ca/eyeglass.cer
- Skip to step #6
SKIP If External CA was not Used: Follow these Steps if you had the Certificate Request Signed by an External CA Server, otherwise
- Strip the key file and convert it to PEM format by executing below command (note the .key is the private key created from the create CSR request completed in the steps above and stored in /tmp/iglscert.key path when creating the CSR request and private key)
- openssl rsa -in /tmp/iglscert.key -out /tmp/iglscert.pem
- Now replace the certificate with existing Eyeglass cert:
- scacli replace-certificate --privateKey=/tmp/iglscert.pem --certificate=/tmp/iglscert.cer
-
Browse the Eyeglass certificate directory:
-
cd /opt/superna/sca/.secure
-
-
Move the existing .pem file:
-
mv ssl.pem ssl.pem.orig
-
-
Concatenate the new key file information into a single private key + certificate needed for lighttpd web server:
-
cat ssl.pem.orig ssl > ssl.pem
-
- change file ownership:
- chown sca.users /opt/superna/sca/.secure/*
- Restart Lighttpd and sca service:
- systemctl restart lighttpd sca
- Now, login to Eyeglass Web UI and use the FQDN to access and verify the Certificate in a Browser. Use any browsers view certificate feature to verify the correct certificate and expiry dates and showing correctly. NOTE: the FQDN used to access Eyeglass should be the value set in the CSR request fields under [ alt_names ] )
- done
How to Sign a Cert Request and Export a Certificate with Microsoft CA Server
Follow this procedure if you are using a Microsoft CA for signing certificates.
- ssh to Eyeglass as admin user
- sudo -s (enter admin password)
- cat /tmp/iglscert.csr
- Copy all of the text in this file from the ssh session, and create a file on the PC that has access to the Microsoft Certificate Authority administration GUI. Name the file "iglscert.req", paste the contents of the iglscert.csr to this file and save it.
- Right click the CA server name and Select Submit New Request:
-
- Browse to the file you created iglscert.req and submit the request.
-
- Click on the pending folder for the Certificate Authority.
-

- Right Click the pending request All Tasks and click the Issue option.

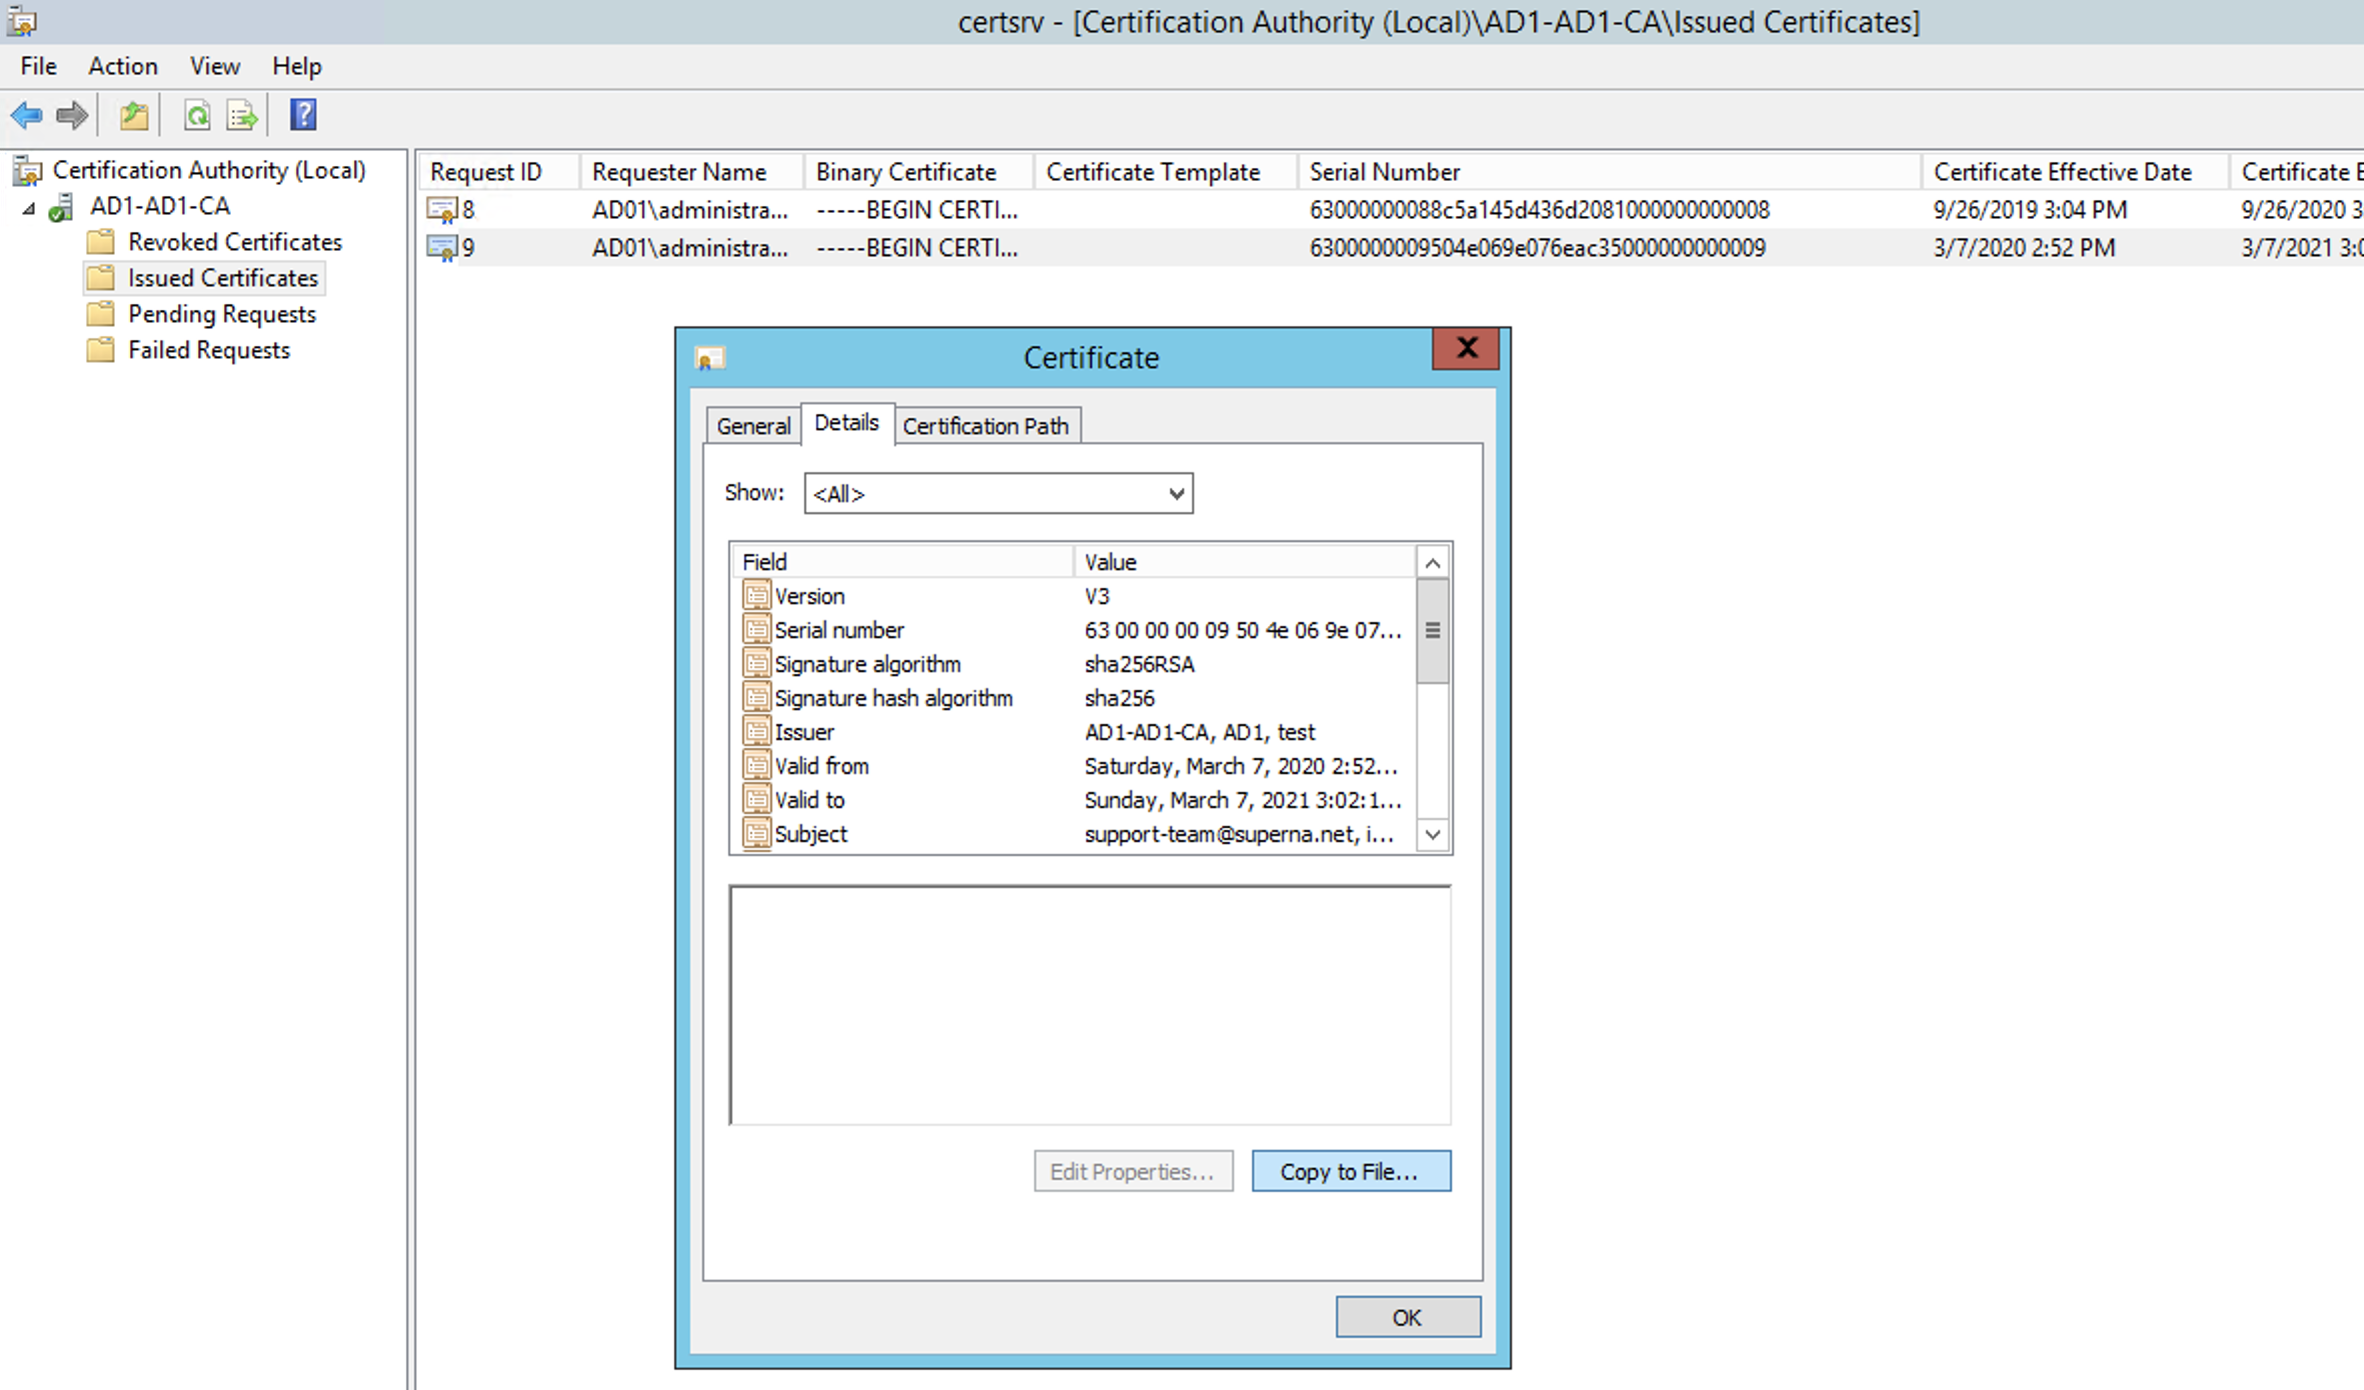
- Now click on the Issued Certificates folder. Find the Issued Certificate and double click the Cert to display the cert, then select the Details tab.
-
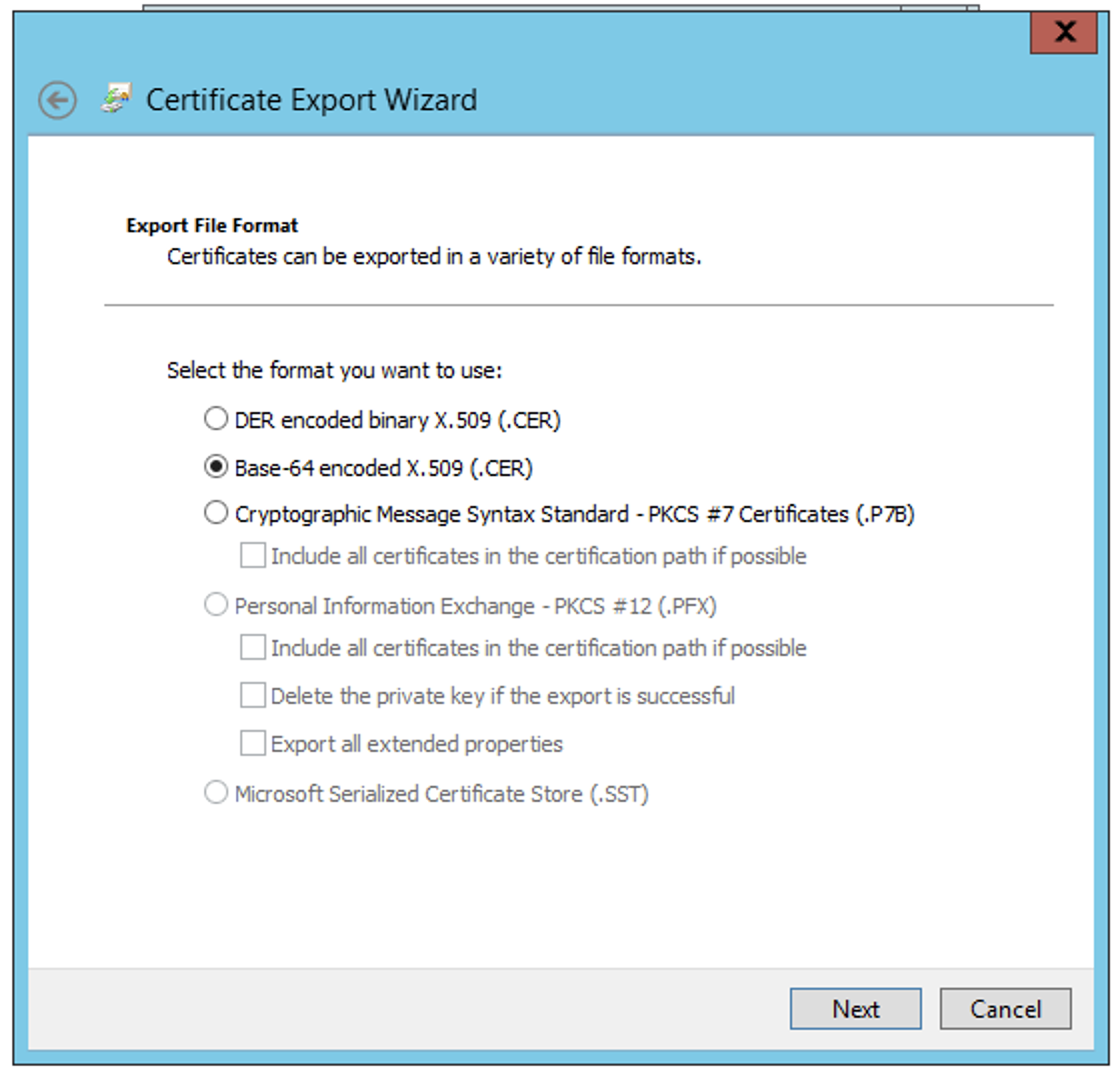
- Click the Copy to File option to open the export Cert Wizard. Select the Base 64 x.509 CER format option
-
- Save the CER file iglscert.cer. Then follow how to install a signed cert instructions above.