File System Analytics with Quick Reports - Guide
- Overview
- Common Tasks
- How to Enter Paths to narrow results
- How to Target Data with Advanced Options for Quick Reports
- Who Owns what?
- Use Cases
- Show me the File types
- Use Cases
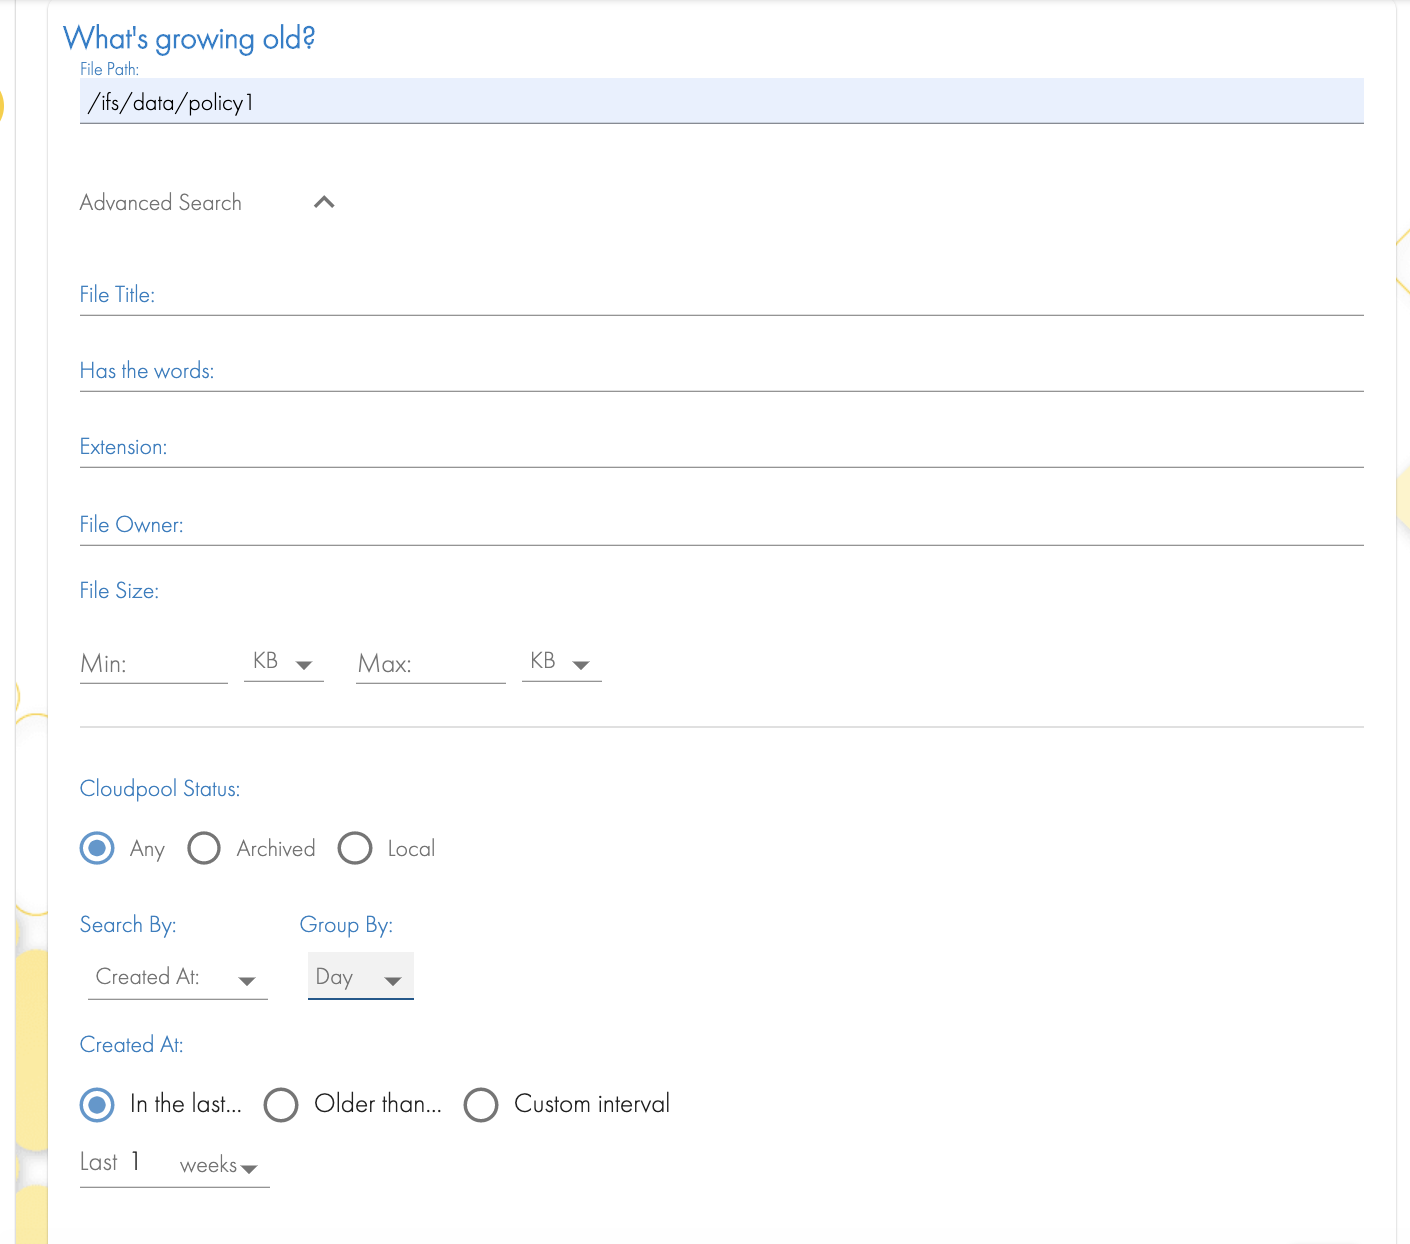
- What's growing old?
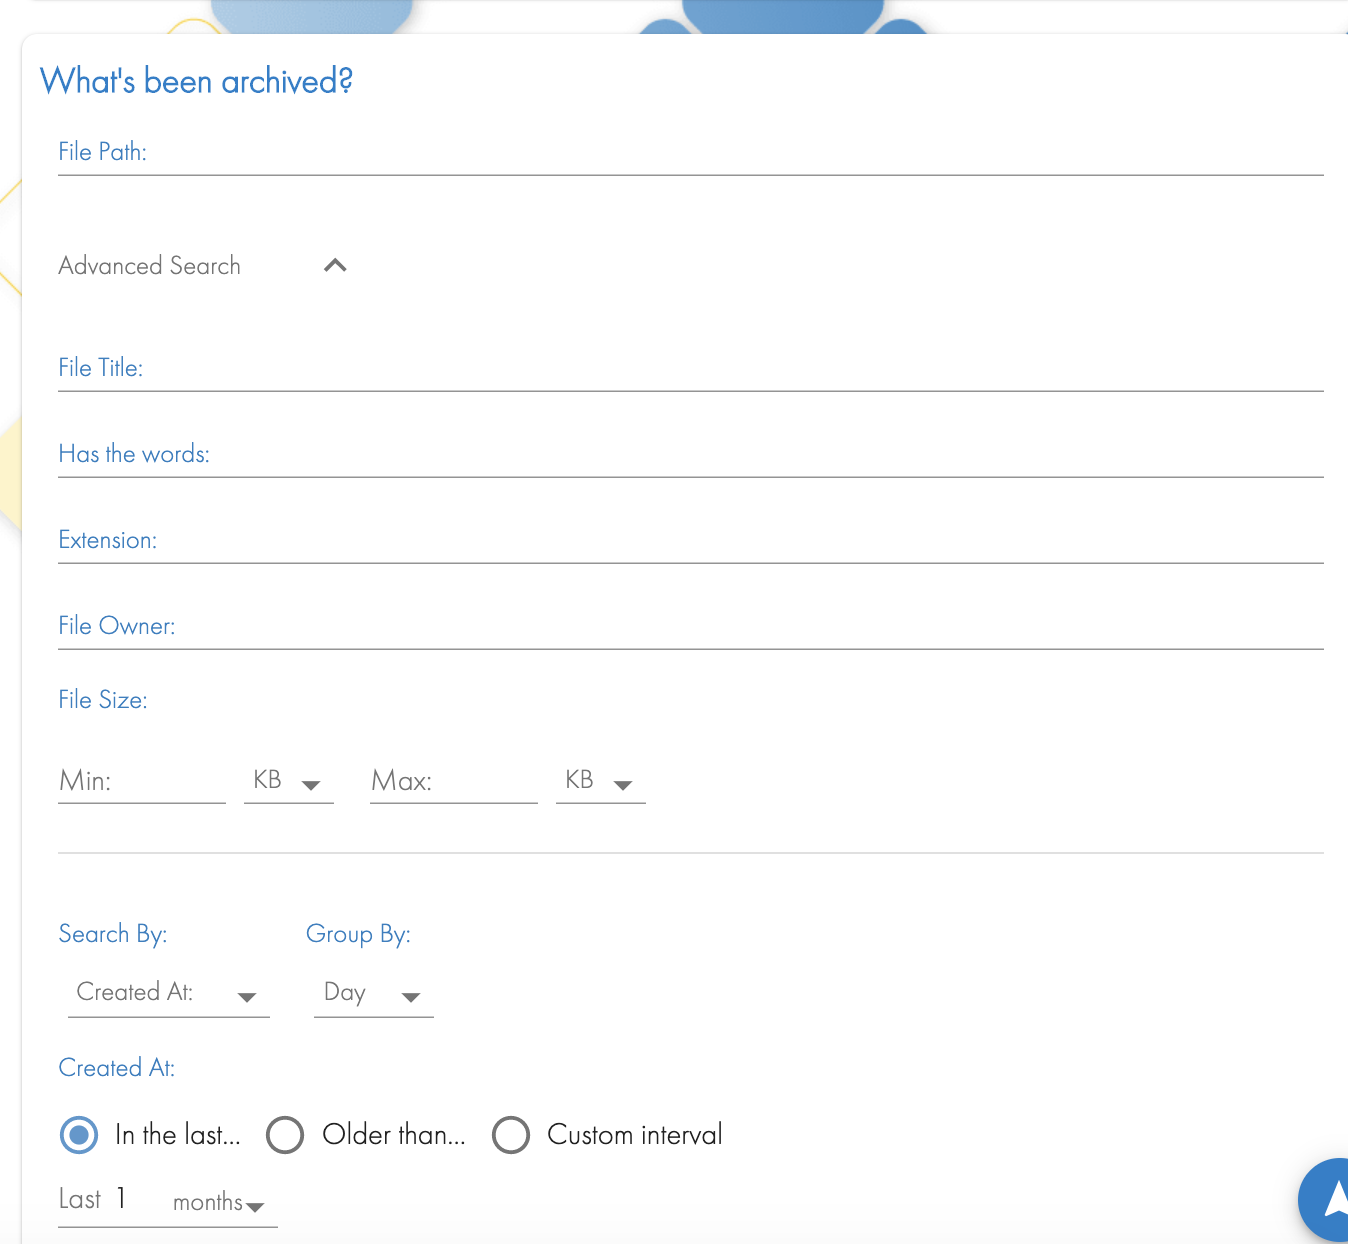
- What's Been Archived?
- Who used the space?
- How to read and use the What's Growing Old? Reports
- Use Cases
- What's in the File Pool?
- When can I delete my worm lock data?
- How Fast is My Data Growing?
- How to drill into Quick Reports to identify the files behind the results
- How to Schedule Quick Reports and email results
- How to edit or delete Scheduled Reports
Overview
Quick reports provide various summaries of file system data. Quick reports are end user aware which means the logged in user sees reports relevant to their security access to data. Each quick report has advanced options to narrow the report to a path, extension, file size of the files.
Quick reports return a graph or chart to simplify data analysis, along with a table format of the results that can be downloaded to a CSV file.
Quick reports are more than just reports, they allow selecting a subset of the data in the report, and drilling into the results to identify the exact files from the table results. This means you can locate the exact data easily, and more importantly the script automation feature is available to automate some task.
Common Tasks
- Automate a file system action with the file results from Quick Reports. See Script examples that cover many common tasks covered in the Search & Recover Solutions Guides chapter.
- Learn more about the files in the quick reports to manage the file system. See how to use the Drill in Actions menu option on search results later in this guide.
How to Enter Paths to narrow results
- The path input fields must be absolute paths .
- The syntax is /ifs/data/somepath .
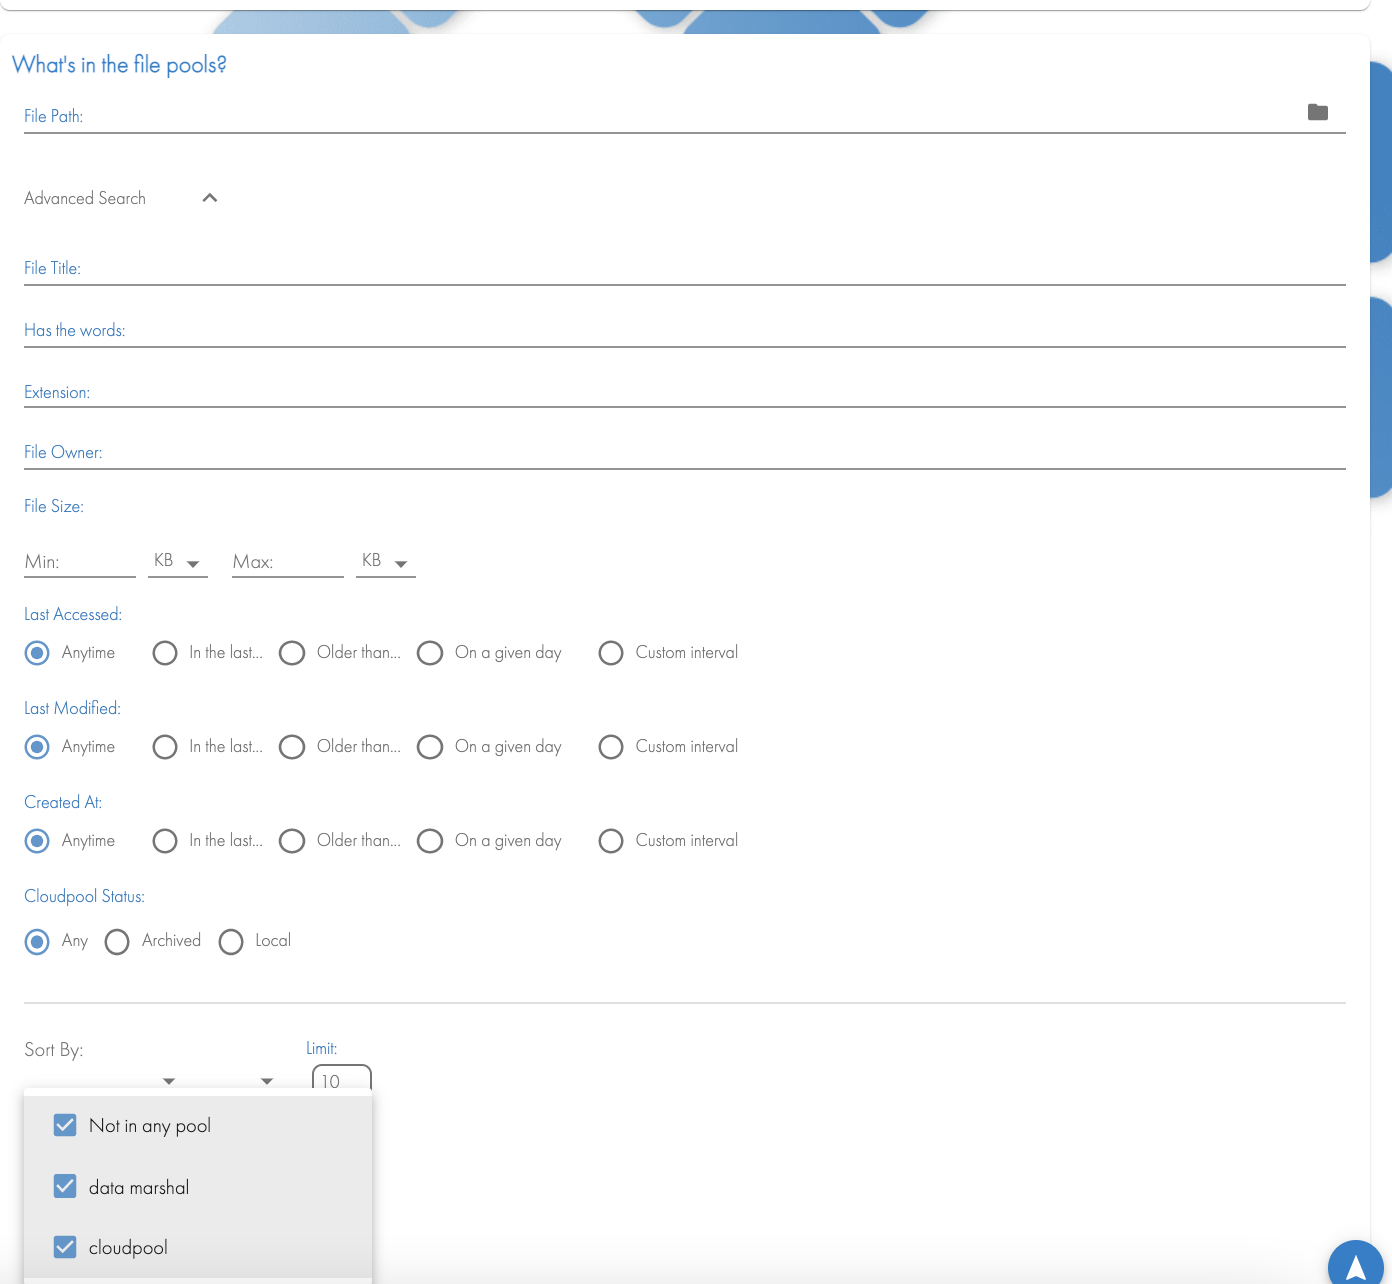
How to Target Data with Advanced Options for Quick Reports
All quick reports support options to target data in the file system. The options below can be combined to build a targeted report on any criteria. See the options to target data with advanced options.
- Path .
- file size or file size range .
- file extension
- Date Stamps - Supports a range, specific day or In the last Days options:
- Created Date stamp .
- Modified date stamp .
- Last Accessed (if enabled on the file system).
- File Owner:
- Note use this to bound a search by a specific AD user. Syntax must be upper case domain name with double slash. Example: "AD01\\userx", and the user is case sensitive match.
- Date Search Options:
- Any Time - Includes all possible dates in the index and does not narrow the search results.
- In the Last - Allows selecting a time period that starts with today and includes dates stamps in the last x days, minutes, or seconds in the passed using today's date.
- Older than - This option allows a search that starts in the past using today's date. The choice is older than x weeks, months or years. Example: Older than the last 6 months, will start the search 6 months in the past starting from today's date and will locate files from the beginning of time or the oldest file time stamp
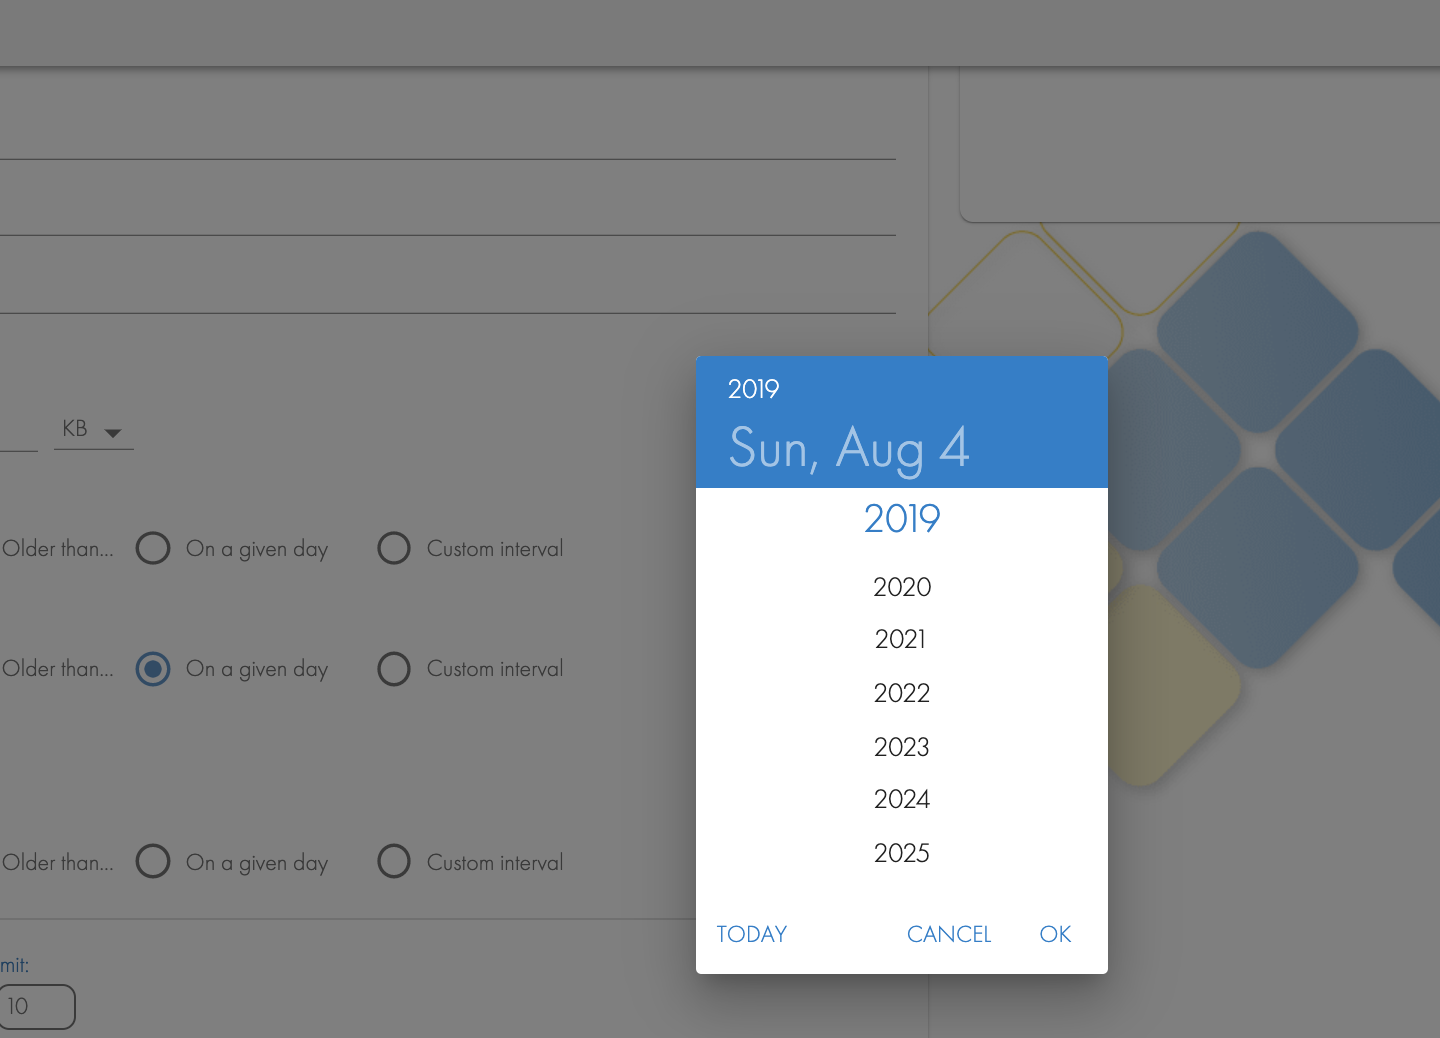
- On a given Day - Selects a single day with a calendar pop up to select a day, can be any day in the past. Click the date icon and use the arrow to change the month. Click on the year at the top of the window to select the year.
- Custom Interval - Pick an exact date range with a start date and time and end date and time.
- Sort by - returns the table data sorted by:
- Total file size sum by user.
- Total file count.
- Average file size.
- Largest file size.
- Sort by Ascending or Descending - applies to the sort by option, not available on all reports.
- Limit is the number or rows of data to return to the UI results screen:
- If a user report it will only return a sorted top 10 users.
- if an extension report it will only return a sorted 10 file extensions.

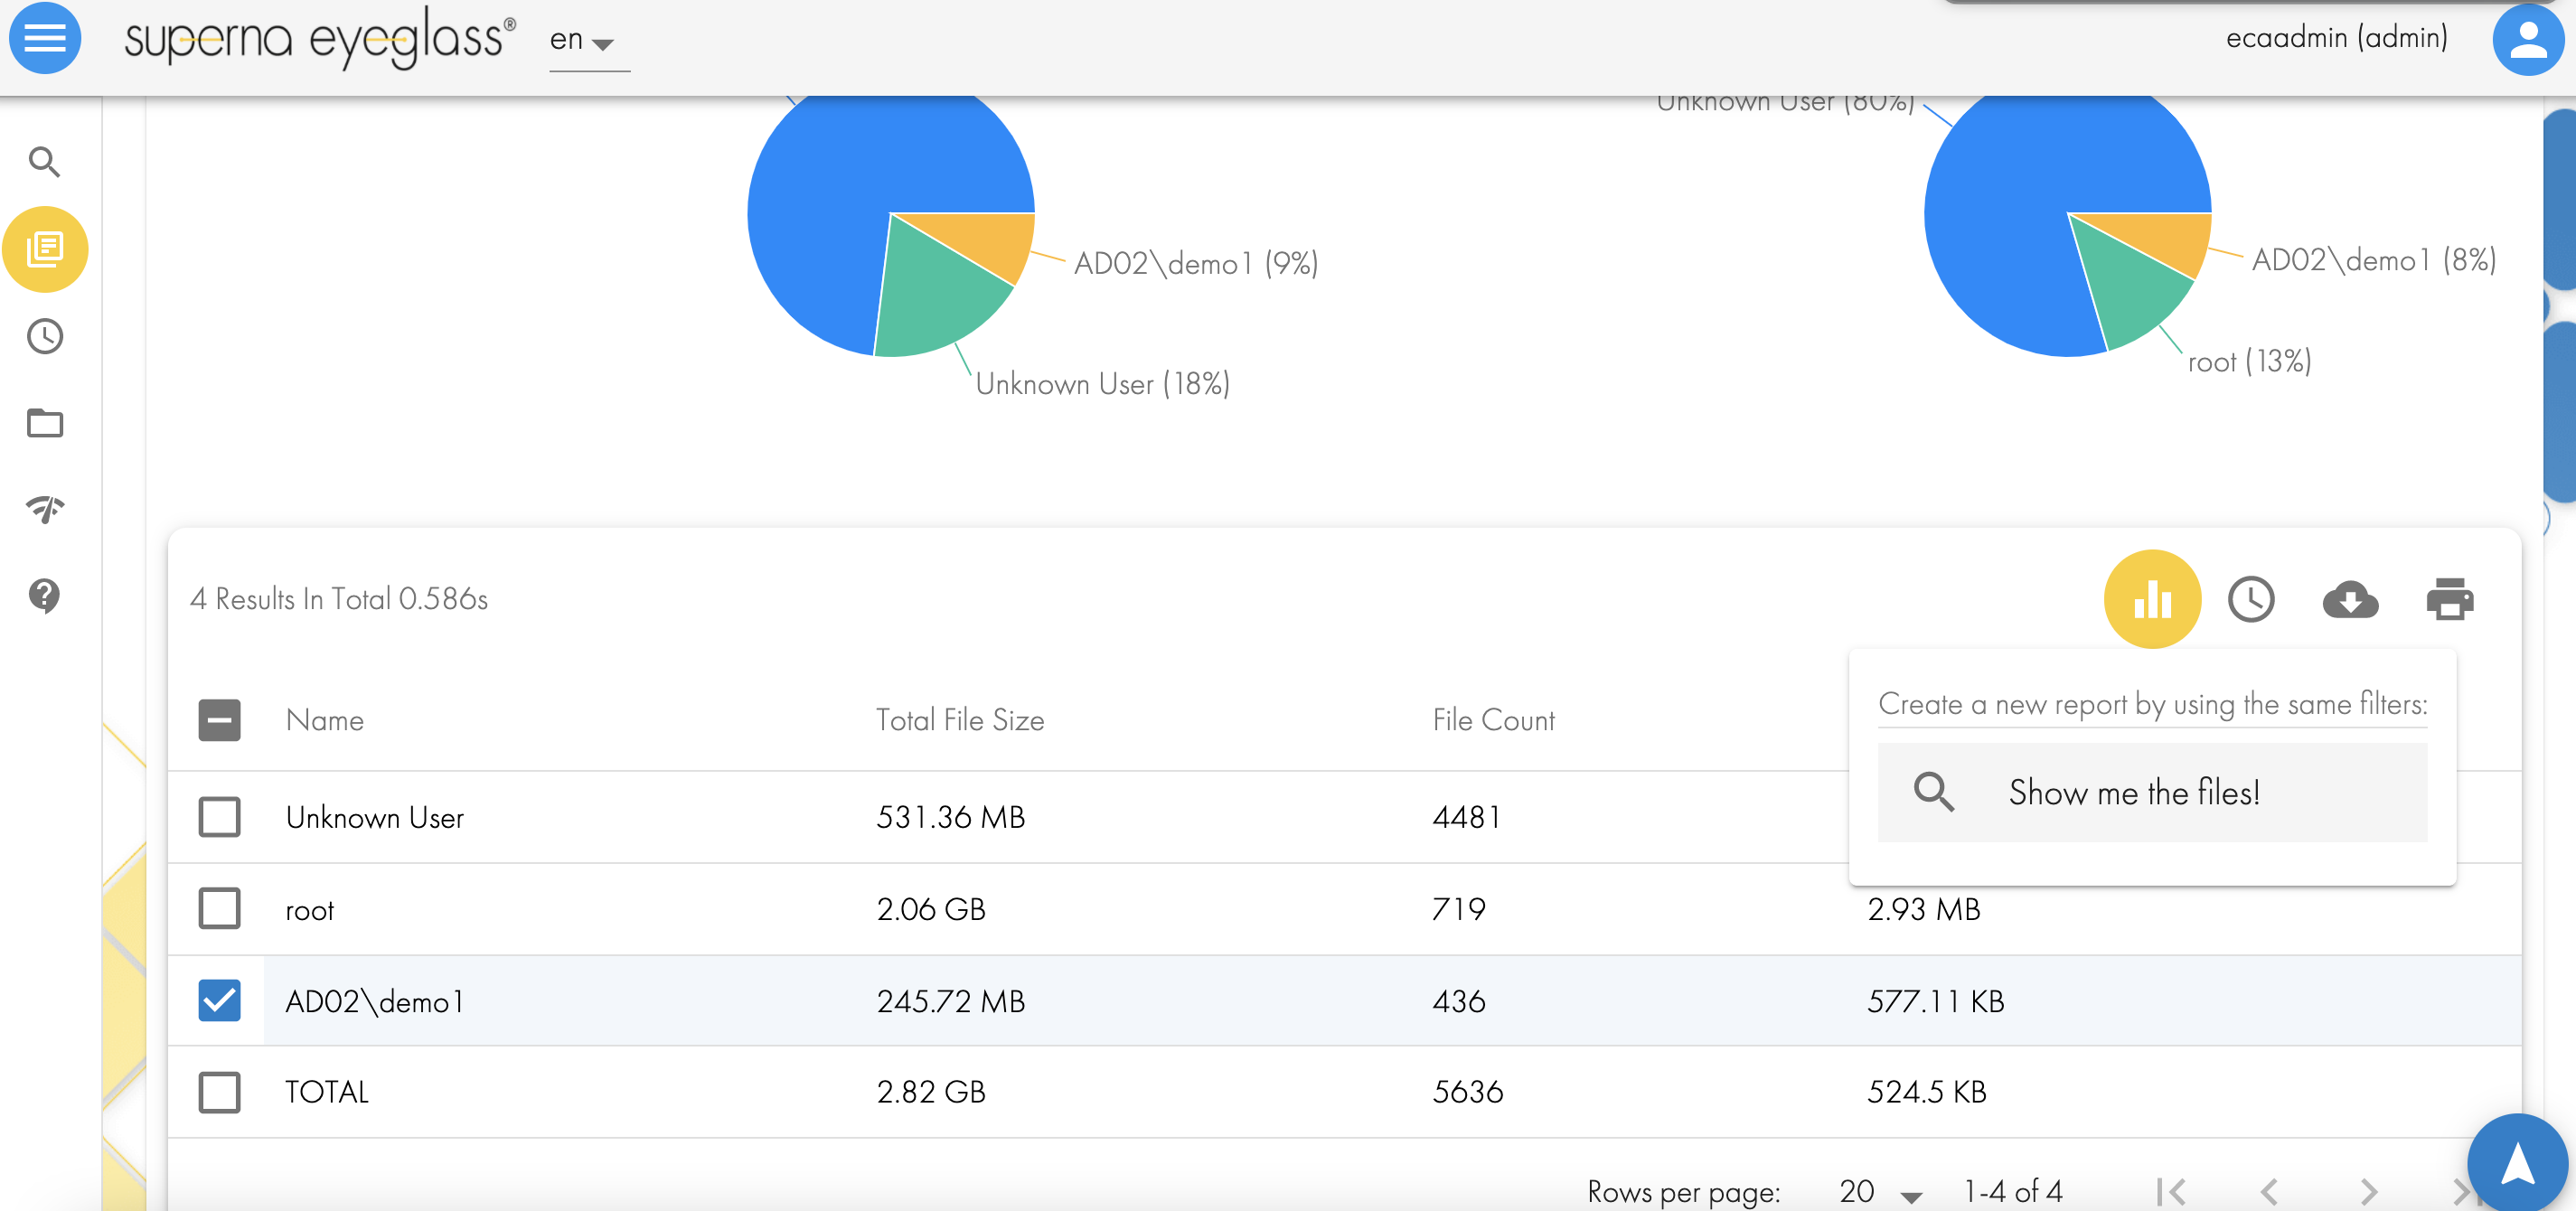
Who Owns what?
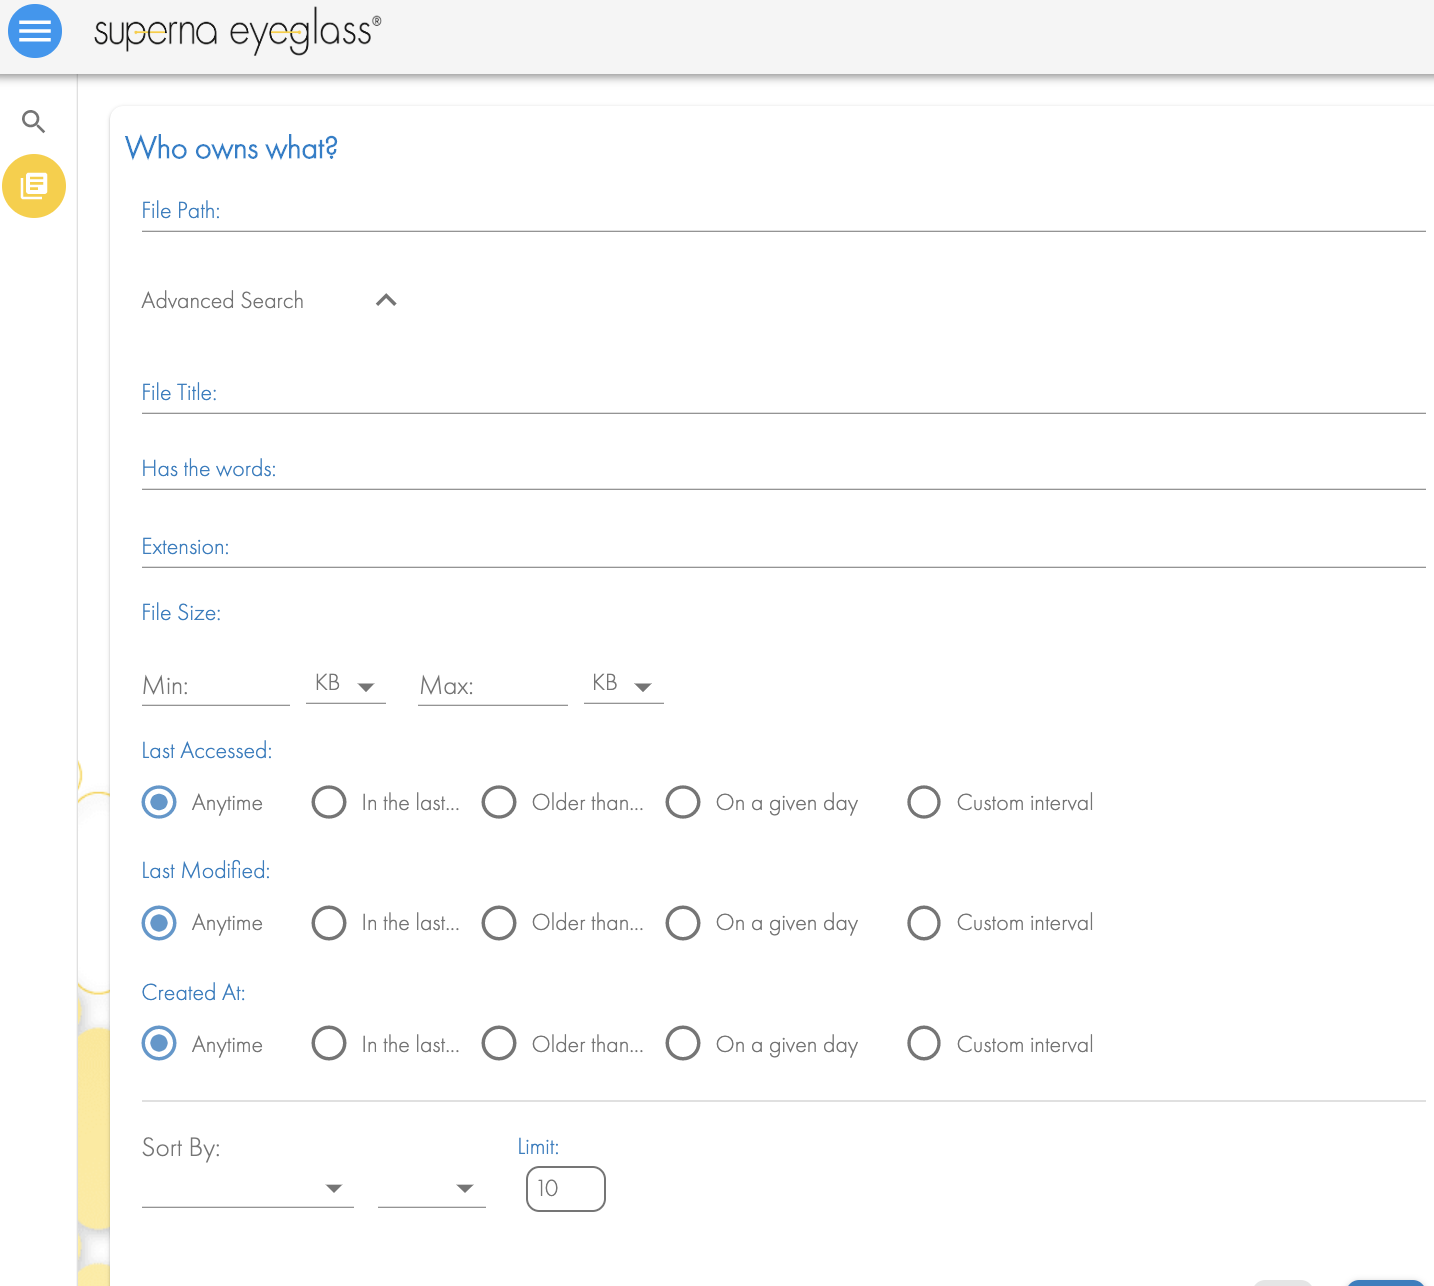
This report summarizes files the ownership of the files and sums the file sizes by user. The report will sum the file size, file count and average file size by user id, using the if ownership attribute of the files. This report can be narrowed by path to identify owner summary for a specific path, and all data under this path. NOTE: the default only returns the top 10 results sorted highest to lowest. See limit advanced option to get more results returned.
Use Cases
- Identify project data owners at a path and below, can be achieved by entering a path to the search
- Dynamic quota - to report on usage by month, path using date range filters for a user
- Example: Add a path where the search should start, the results will sum all users that own files at or under this path. Find the user name in the results, and download the CSV report.
- Disk space Rapid Growth To determine "Who" created data within a specific time period. Example: A month where usage on a path spiked unexpectedly.
- Enter the path.
- Enter a custom interval for Created time stamp and use the first day of the month and the ending date of the month.
- This will return all files created in that month summing file sizes by user . This will identify who is responsible for the data growth on that path for that month.
Show me the File types
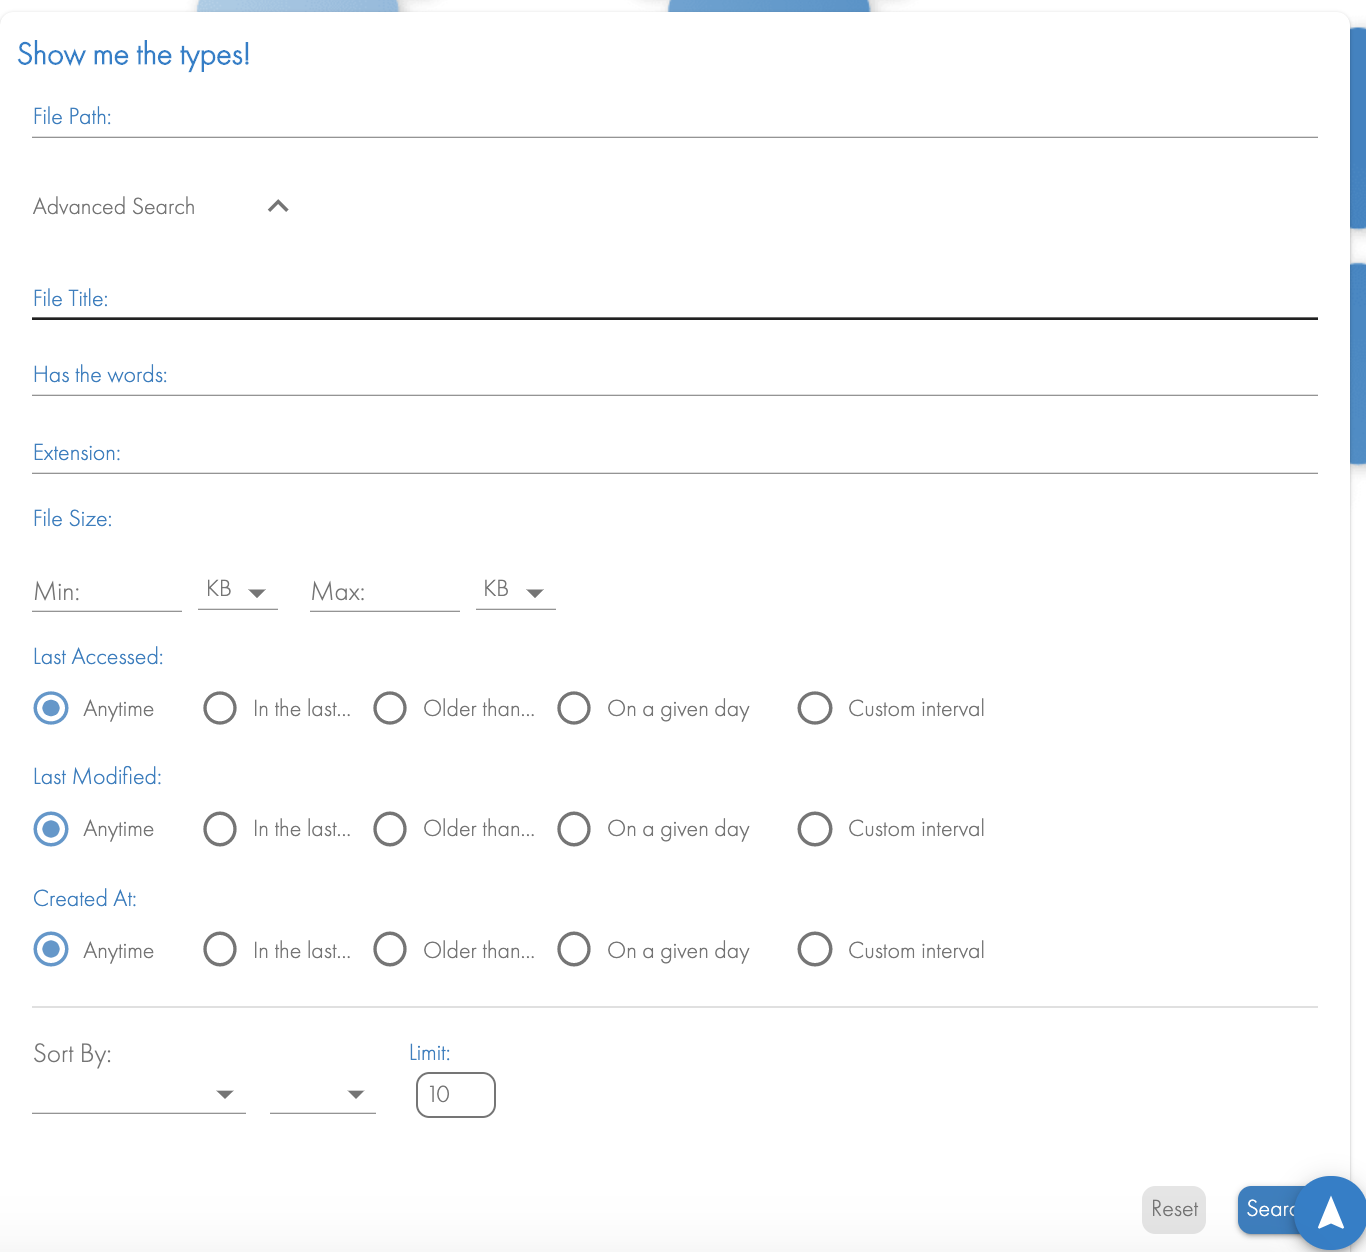
Use Cases
- Data Classification - This report can help classify data to find file types that might be candidates for deletion. Example: .tmp, mp3, .avi or identify unknown file types on the cluster. This can be narrowed down by path, dates as mentioned above to focus the results to a specific location.
- File pool policy Design - The file types and quantity of data by type can allow file pool policies to place low IO file types onto slower media. Examples may include pdf's that are commonly copies of other files in pdf format.
- Acceptable Use Security Report - Some file types might be banned. For example avi, mpeg, mp3 or mp4 are examples of files that should not be stored on corporate storage.
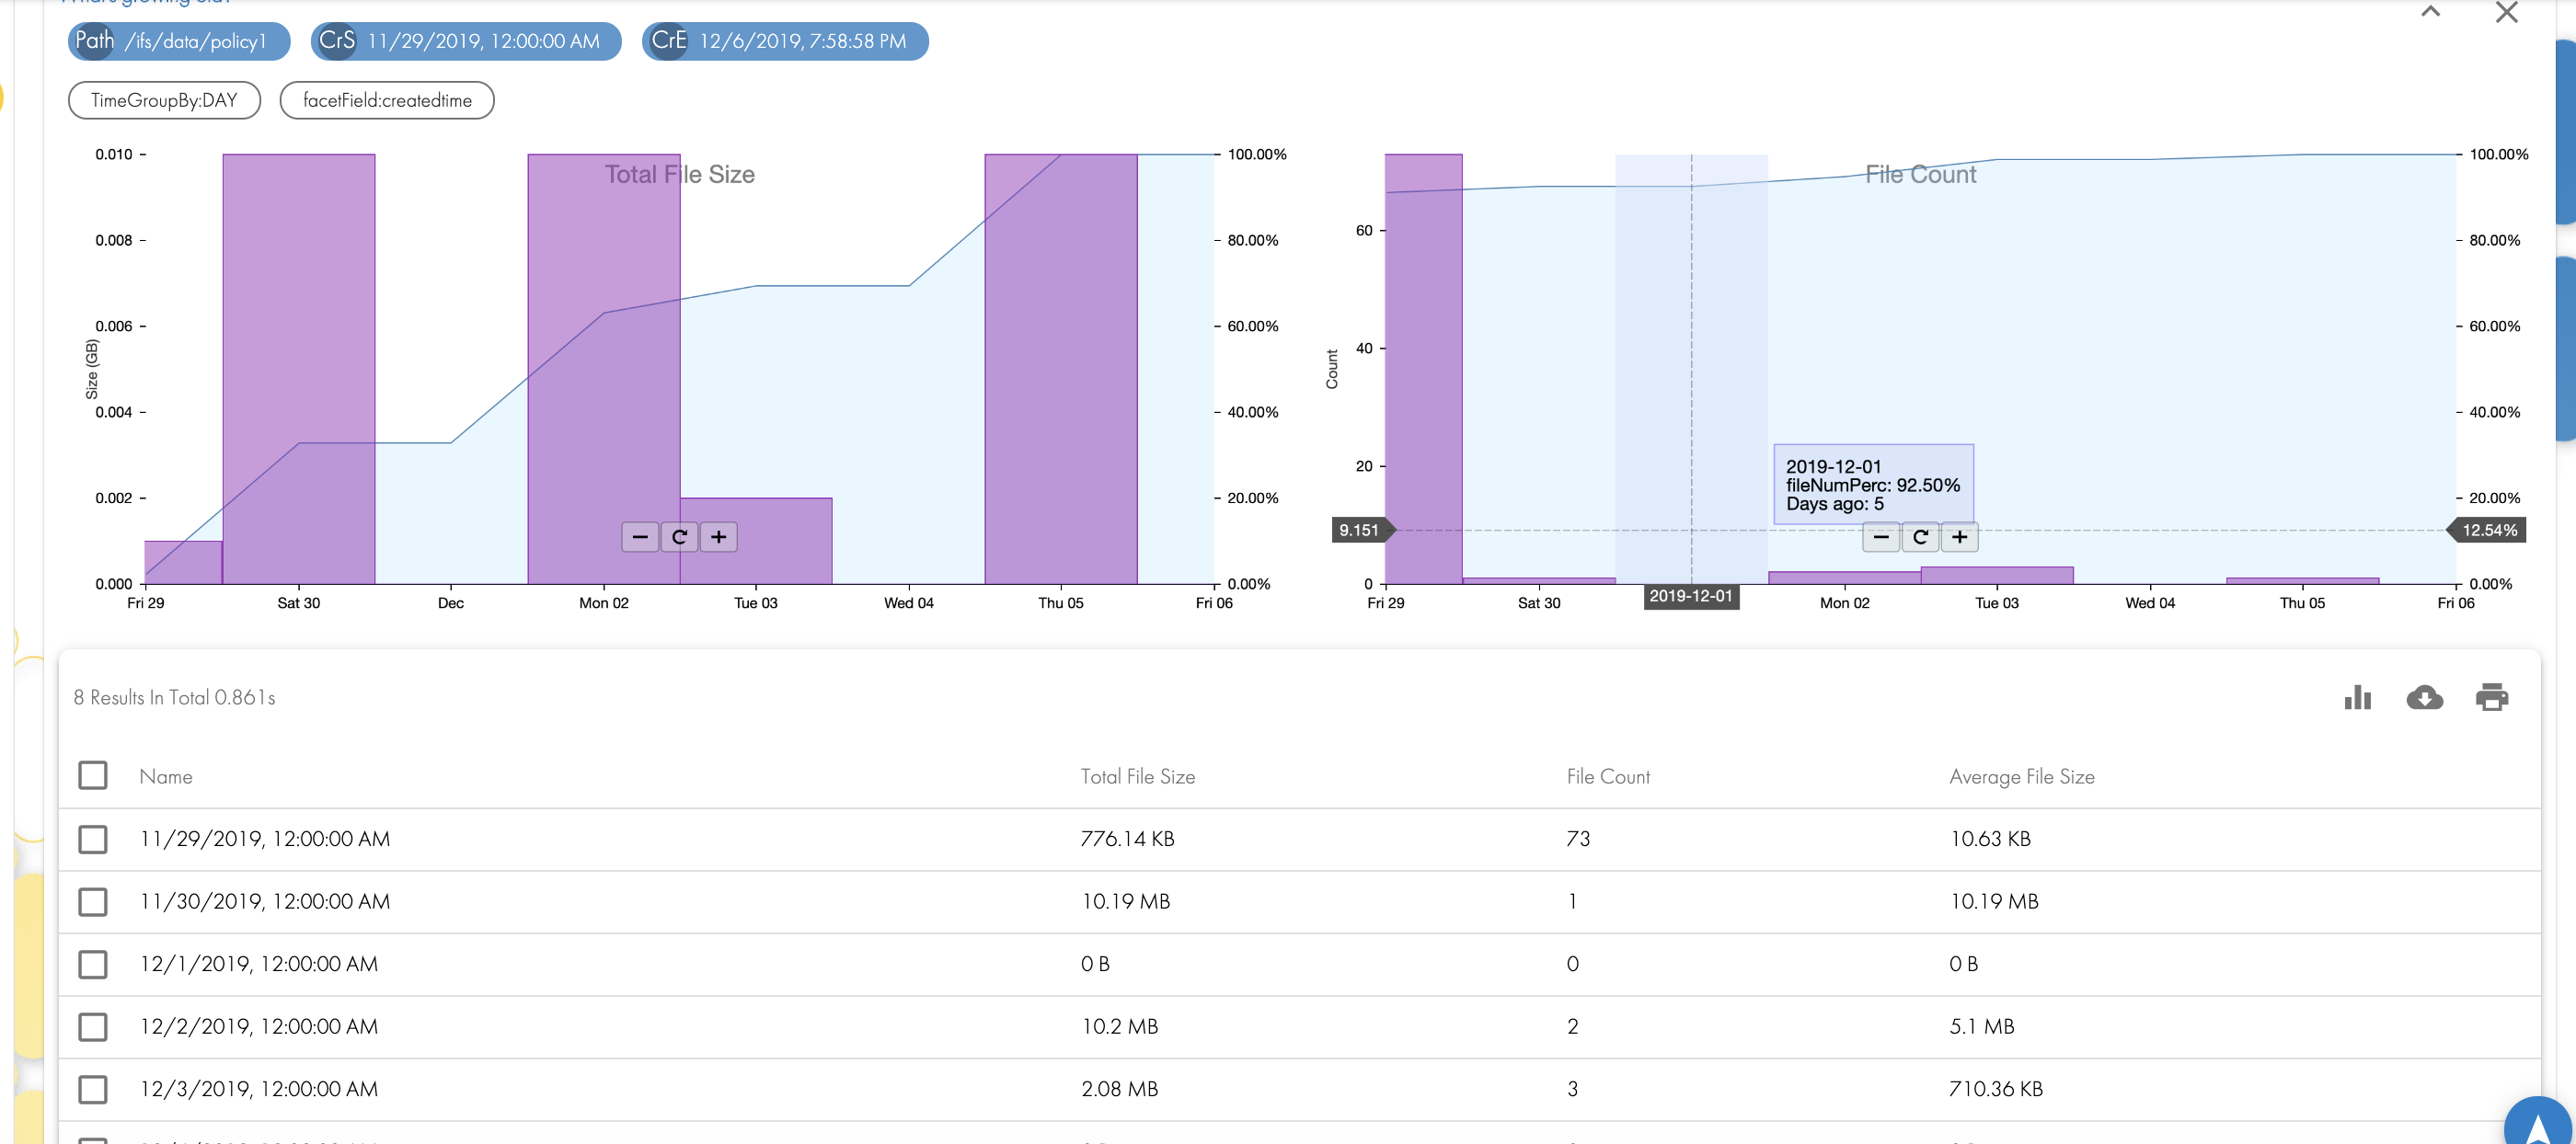
What's growing old?
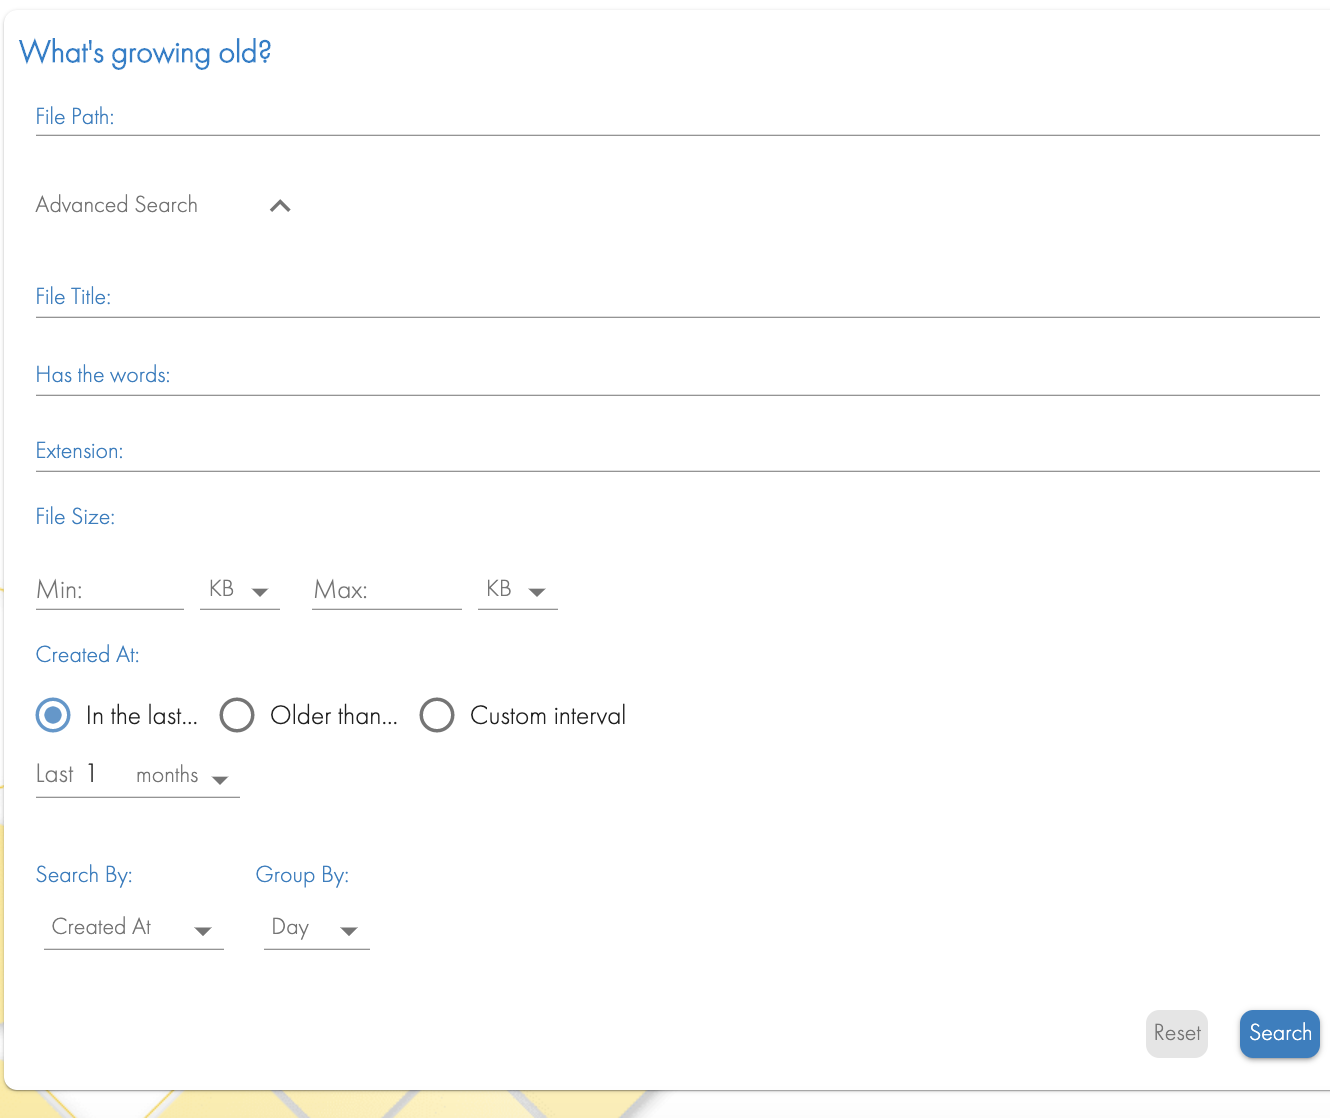
This report will assist with locating data based on age of the file or access time stamps (if enabled on the cluster). This will help identify data for archive or deletion based on age. This report can use creation date, modified date, or last accessed date stamps to locate data. In addition the advanced options narrow the search by path, and file size. The report can identify data in the last X days, month, years, or custom date ranges. The key search criteria is data older than x months. This will simplify locating data.

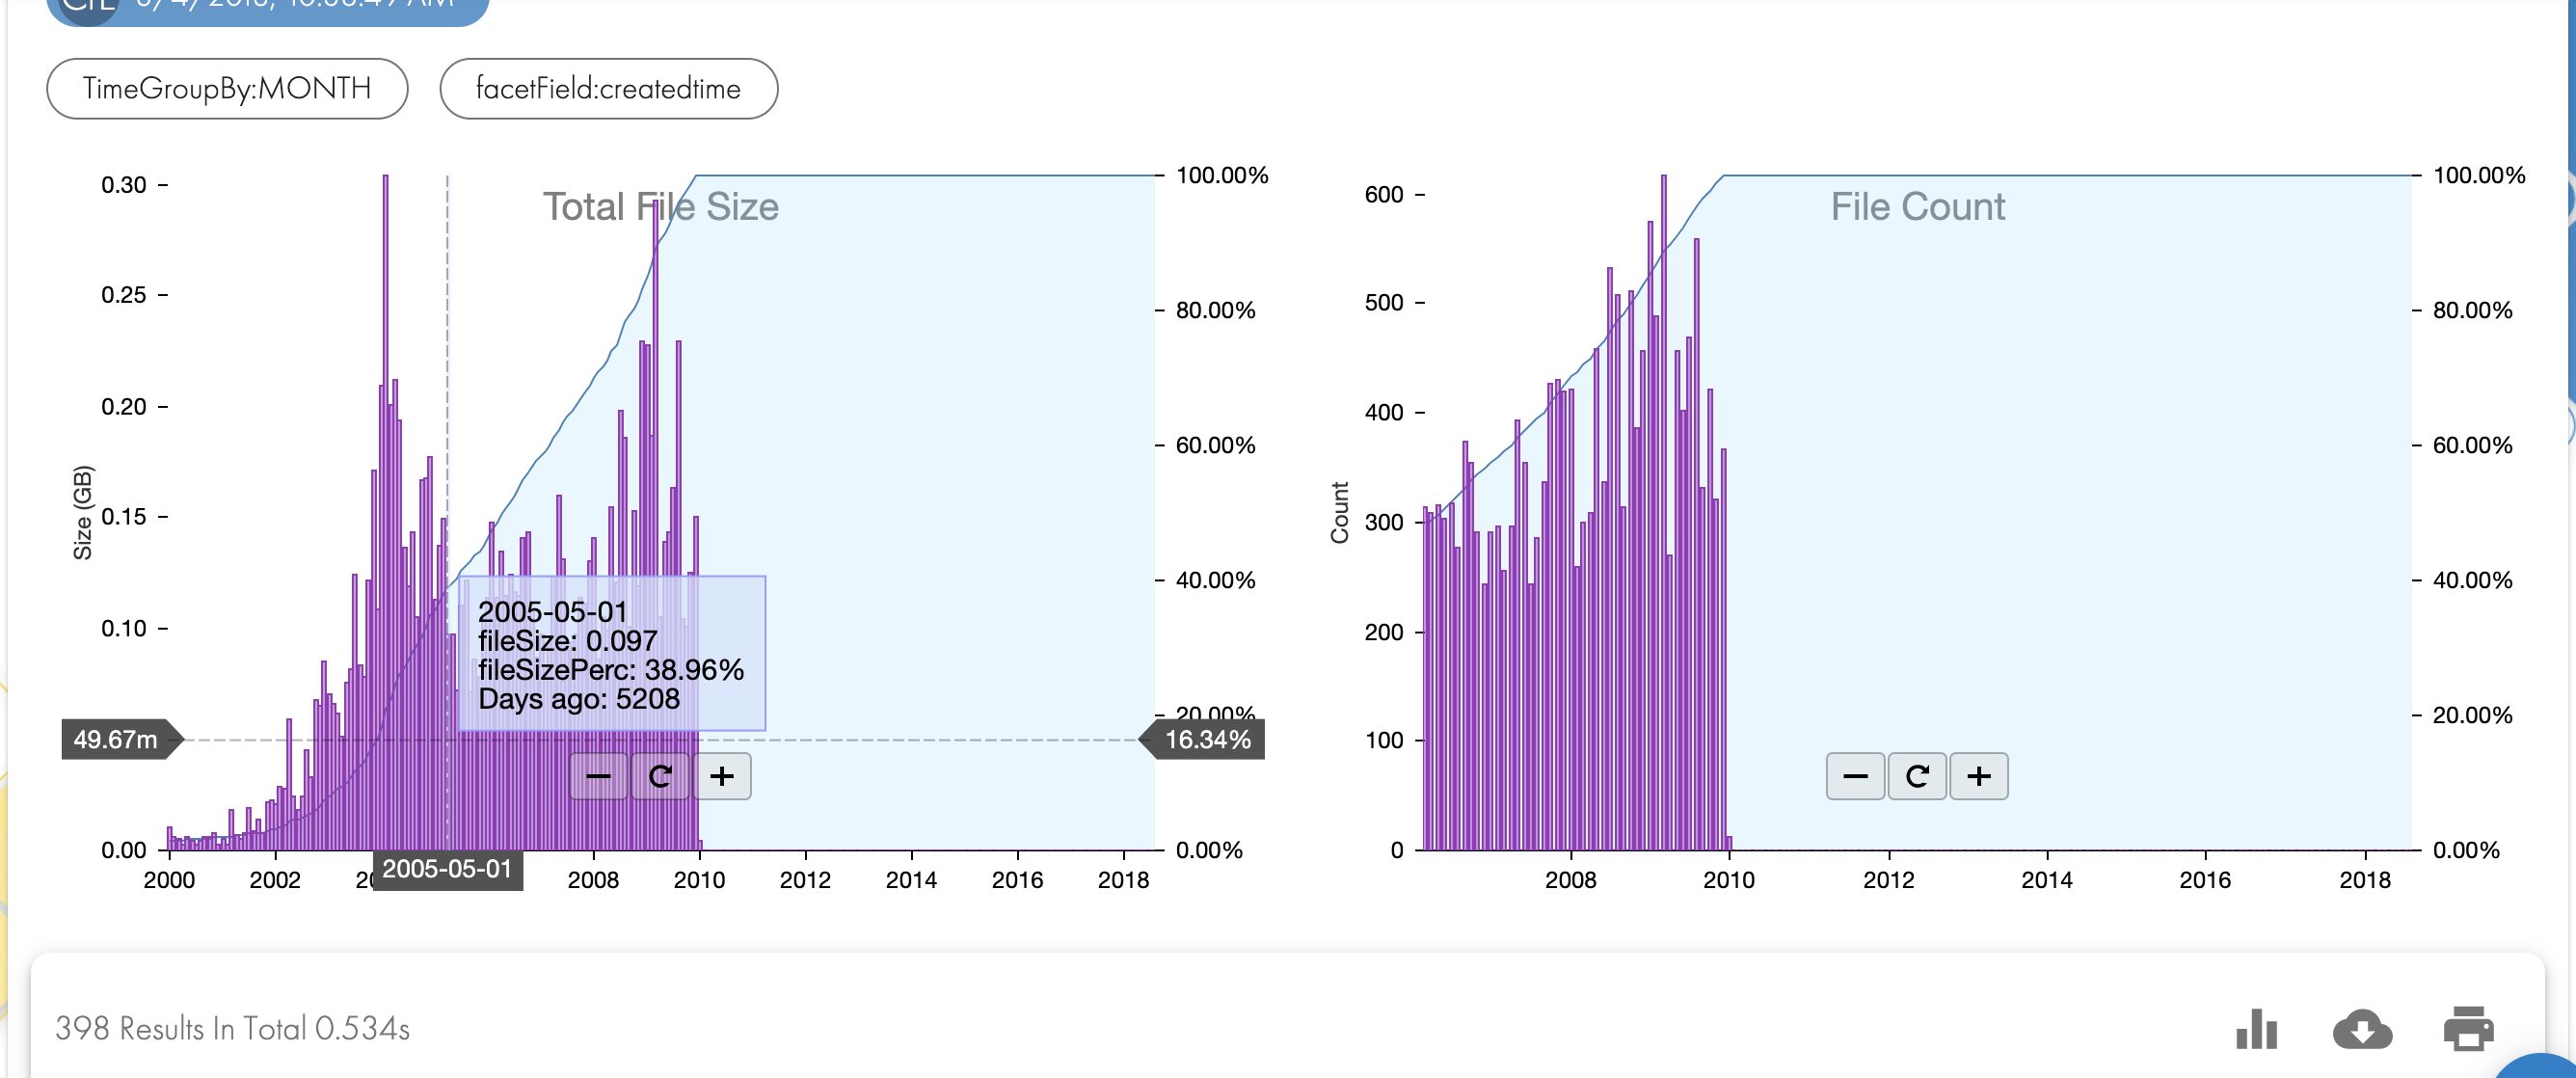
What's Been Archived?
Search & Recover is PowerScale cloudpool aware and indexes the stub status during indexing. This allows a report that shows users what % of the data they have access to is archived as a stub, versus in the file system. This report also supports advanced options to narrow the results down to a path.
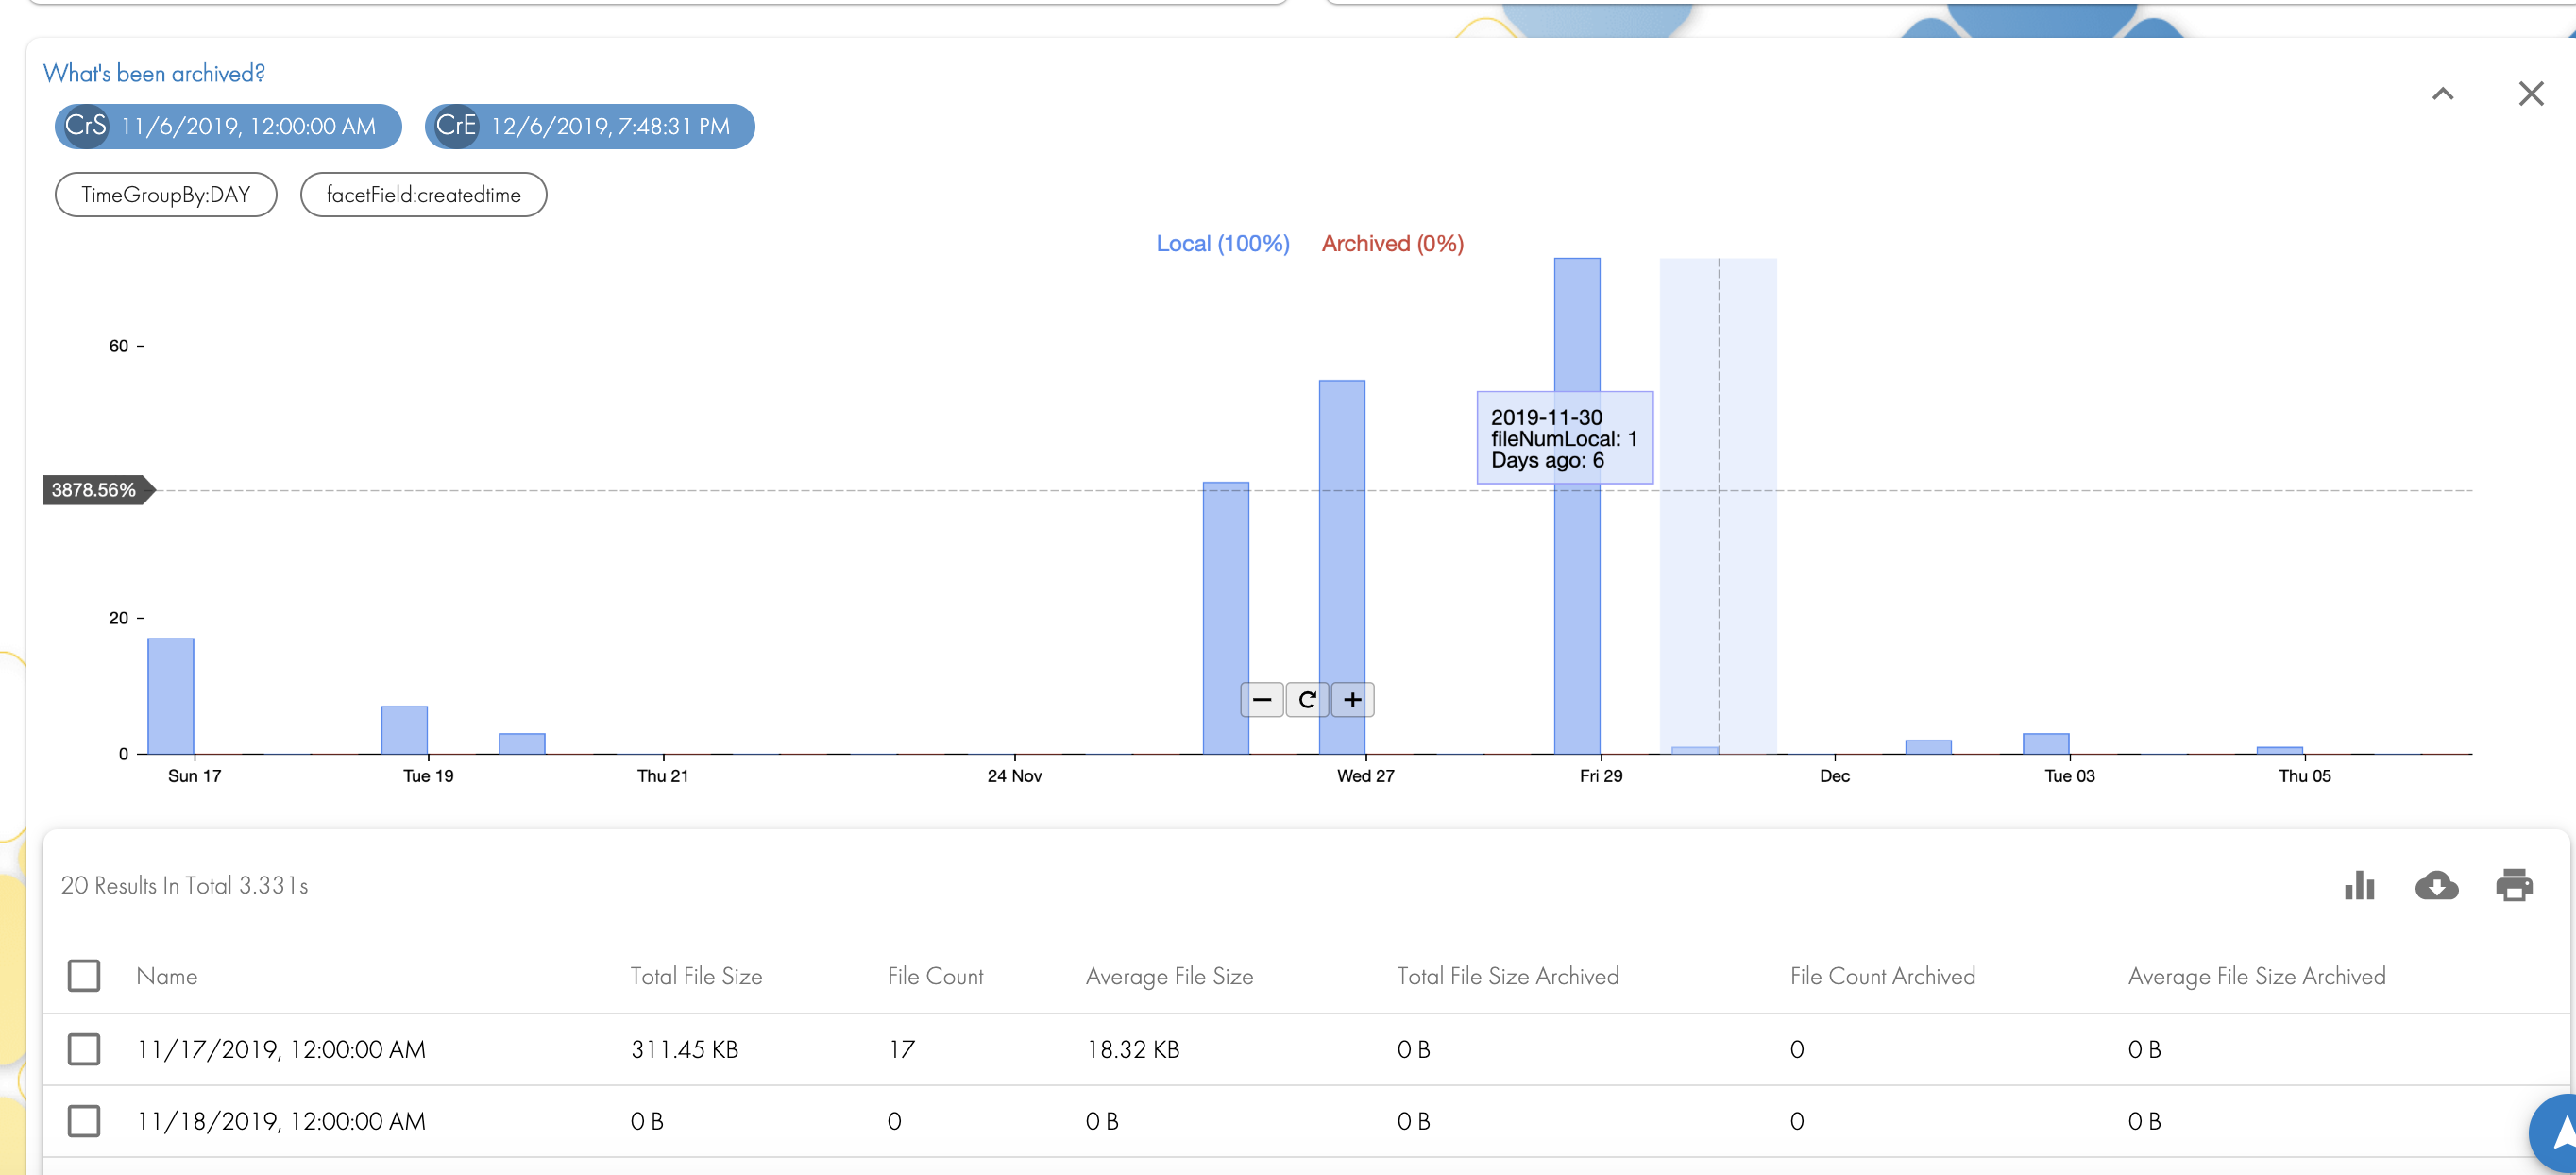
The image below shows results that indicates the % of archived versus file system data. The table below the graph shows the date range where data was found based on the file date stamp used to run the search, each column indicates file summary stats for that day or month depending on the report settings. Use the option to drill in to the results as needed using the icon on the report menu bar.
Who used the space?
A common issue is identifying repaid disk usage on a path in the file system, and identify who is responsible for this growth. Quotas can indicate the used space but not who is responsible for the growth over time.
This can be done using the What's Growing Old? Quick report and setup with a schedule in release 1.1.5.
Example below:
- Identify who used space in a path over the last week.
- Enter the path to the top level folder you want to analyze .
- Use the Search by "Created At" date stamp and group by Day.
- Created At section change to In the last to weeks and enter 1 week.
- See screenshot below.
The search results shows the data created by day in the table and graphs.
Select all days in the table (check box at the top of the table) or select individual days that show a lot of data was created.
Use the scheduled report feature to schedule this quick report.
In the example below select the day with the most data created with the check box then select the drillin "Who Owns that?"
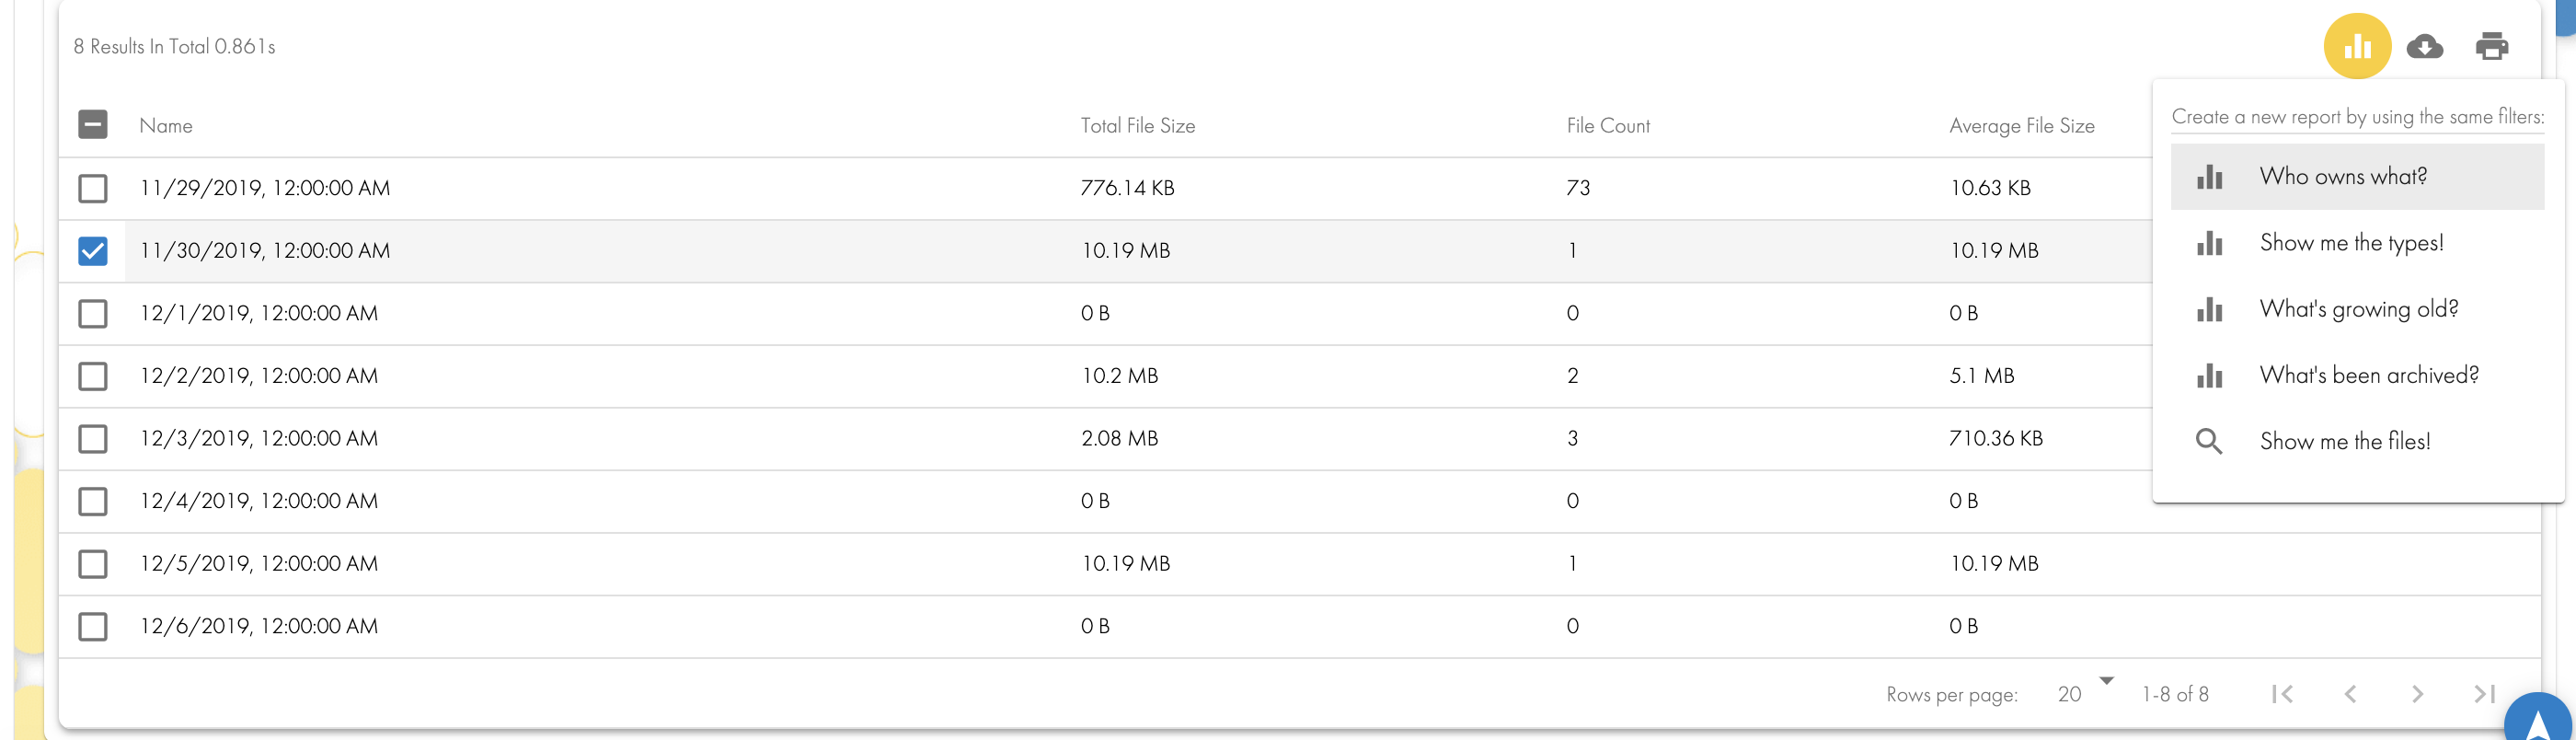
A pop up window will appear to further select what data you want returned.
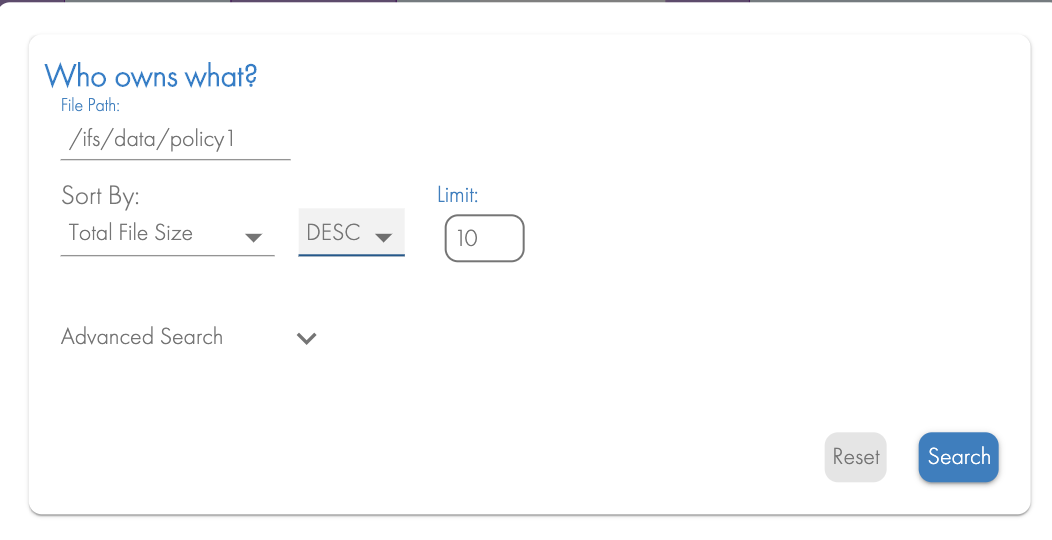
Select "Total file Size" to get the sum of all data owned by users on this day. Set Ascending or Descending sort and the number of users to return in the search.
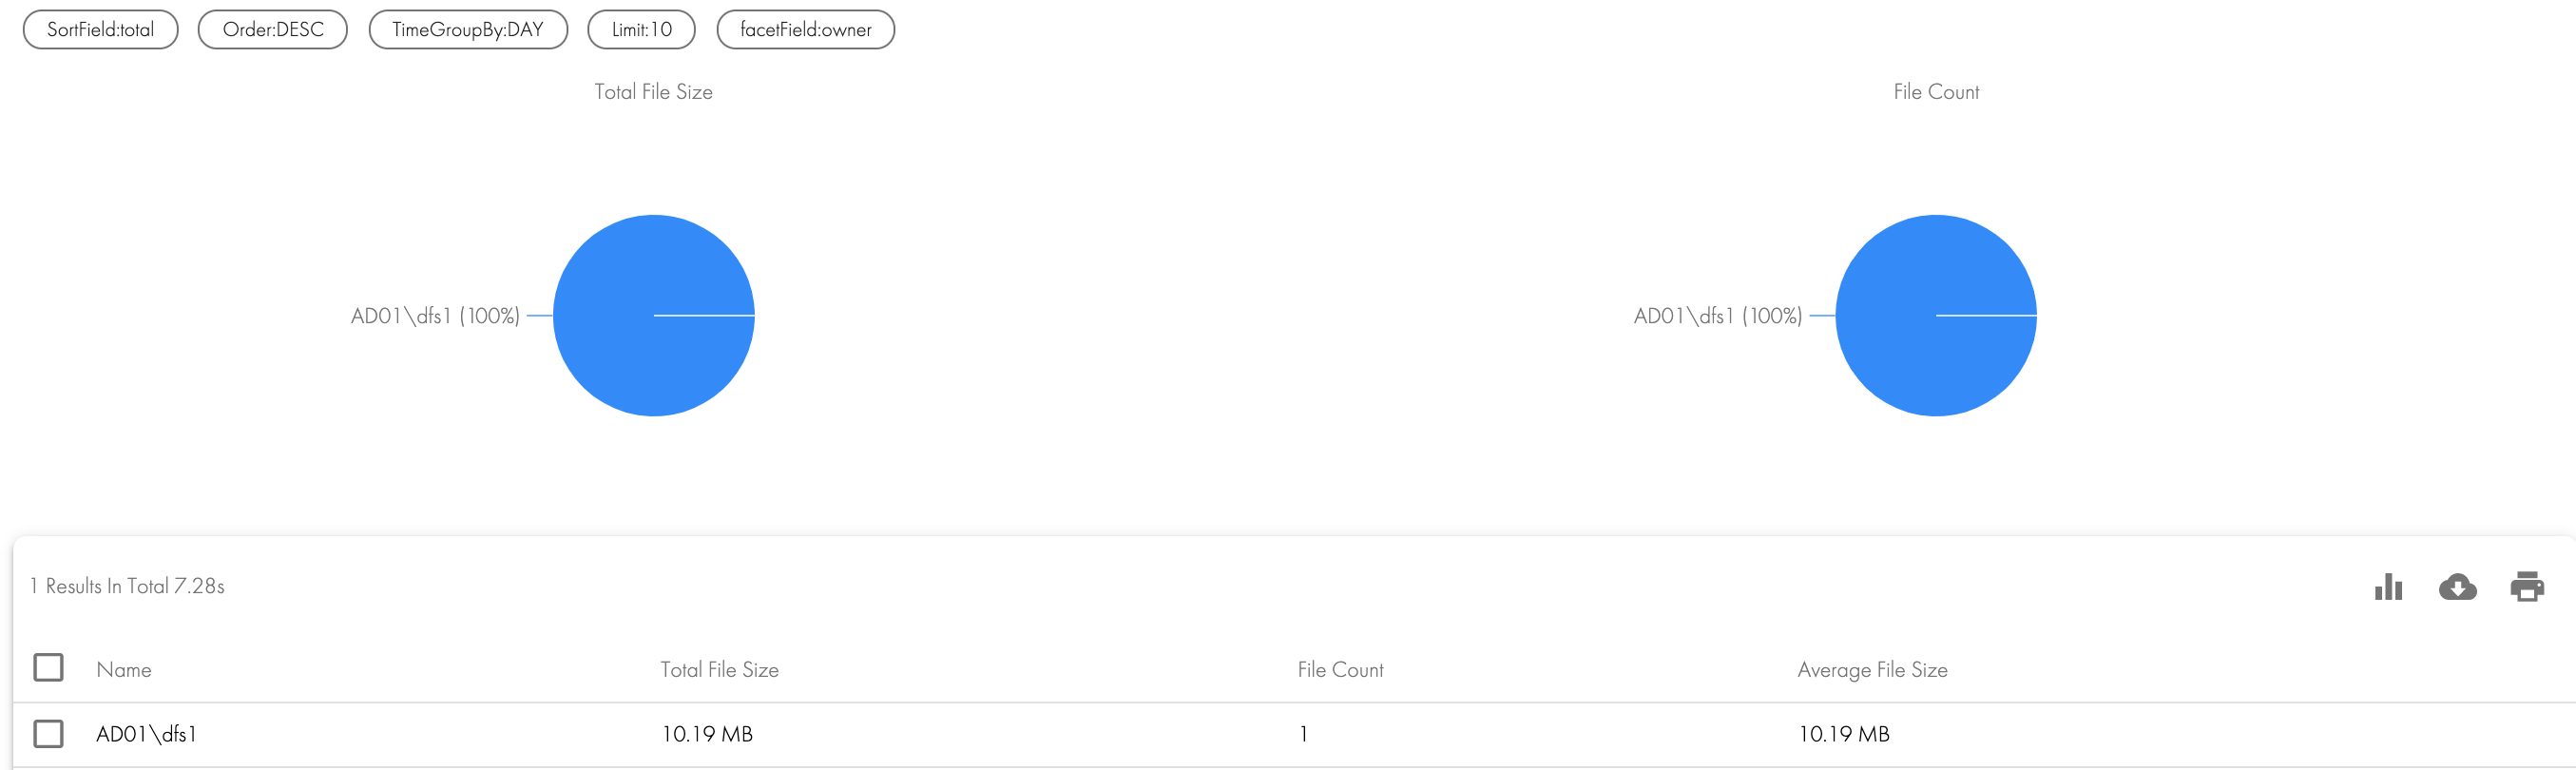
The results below shows the user responsible for the data created in the last week:
How to read and use the What's Growing Old? Reports
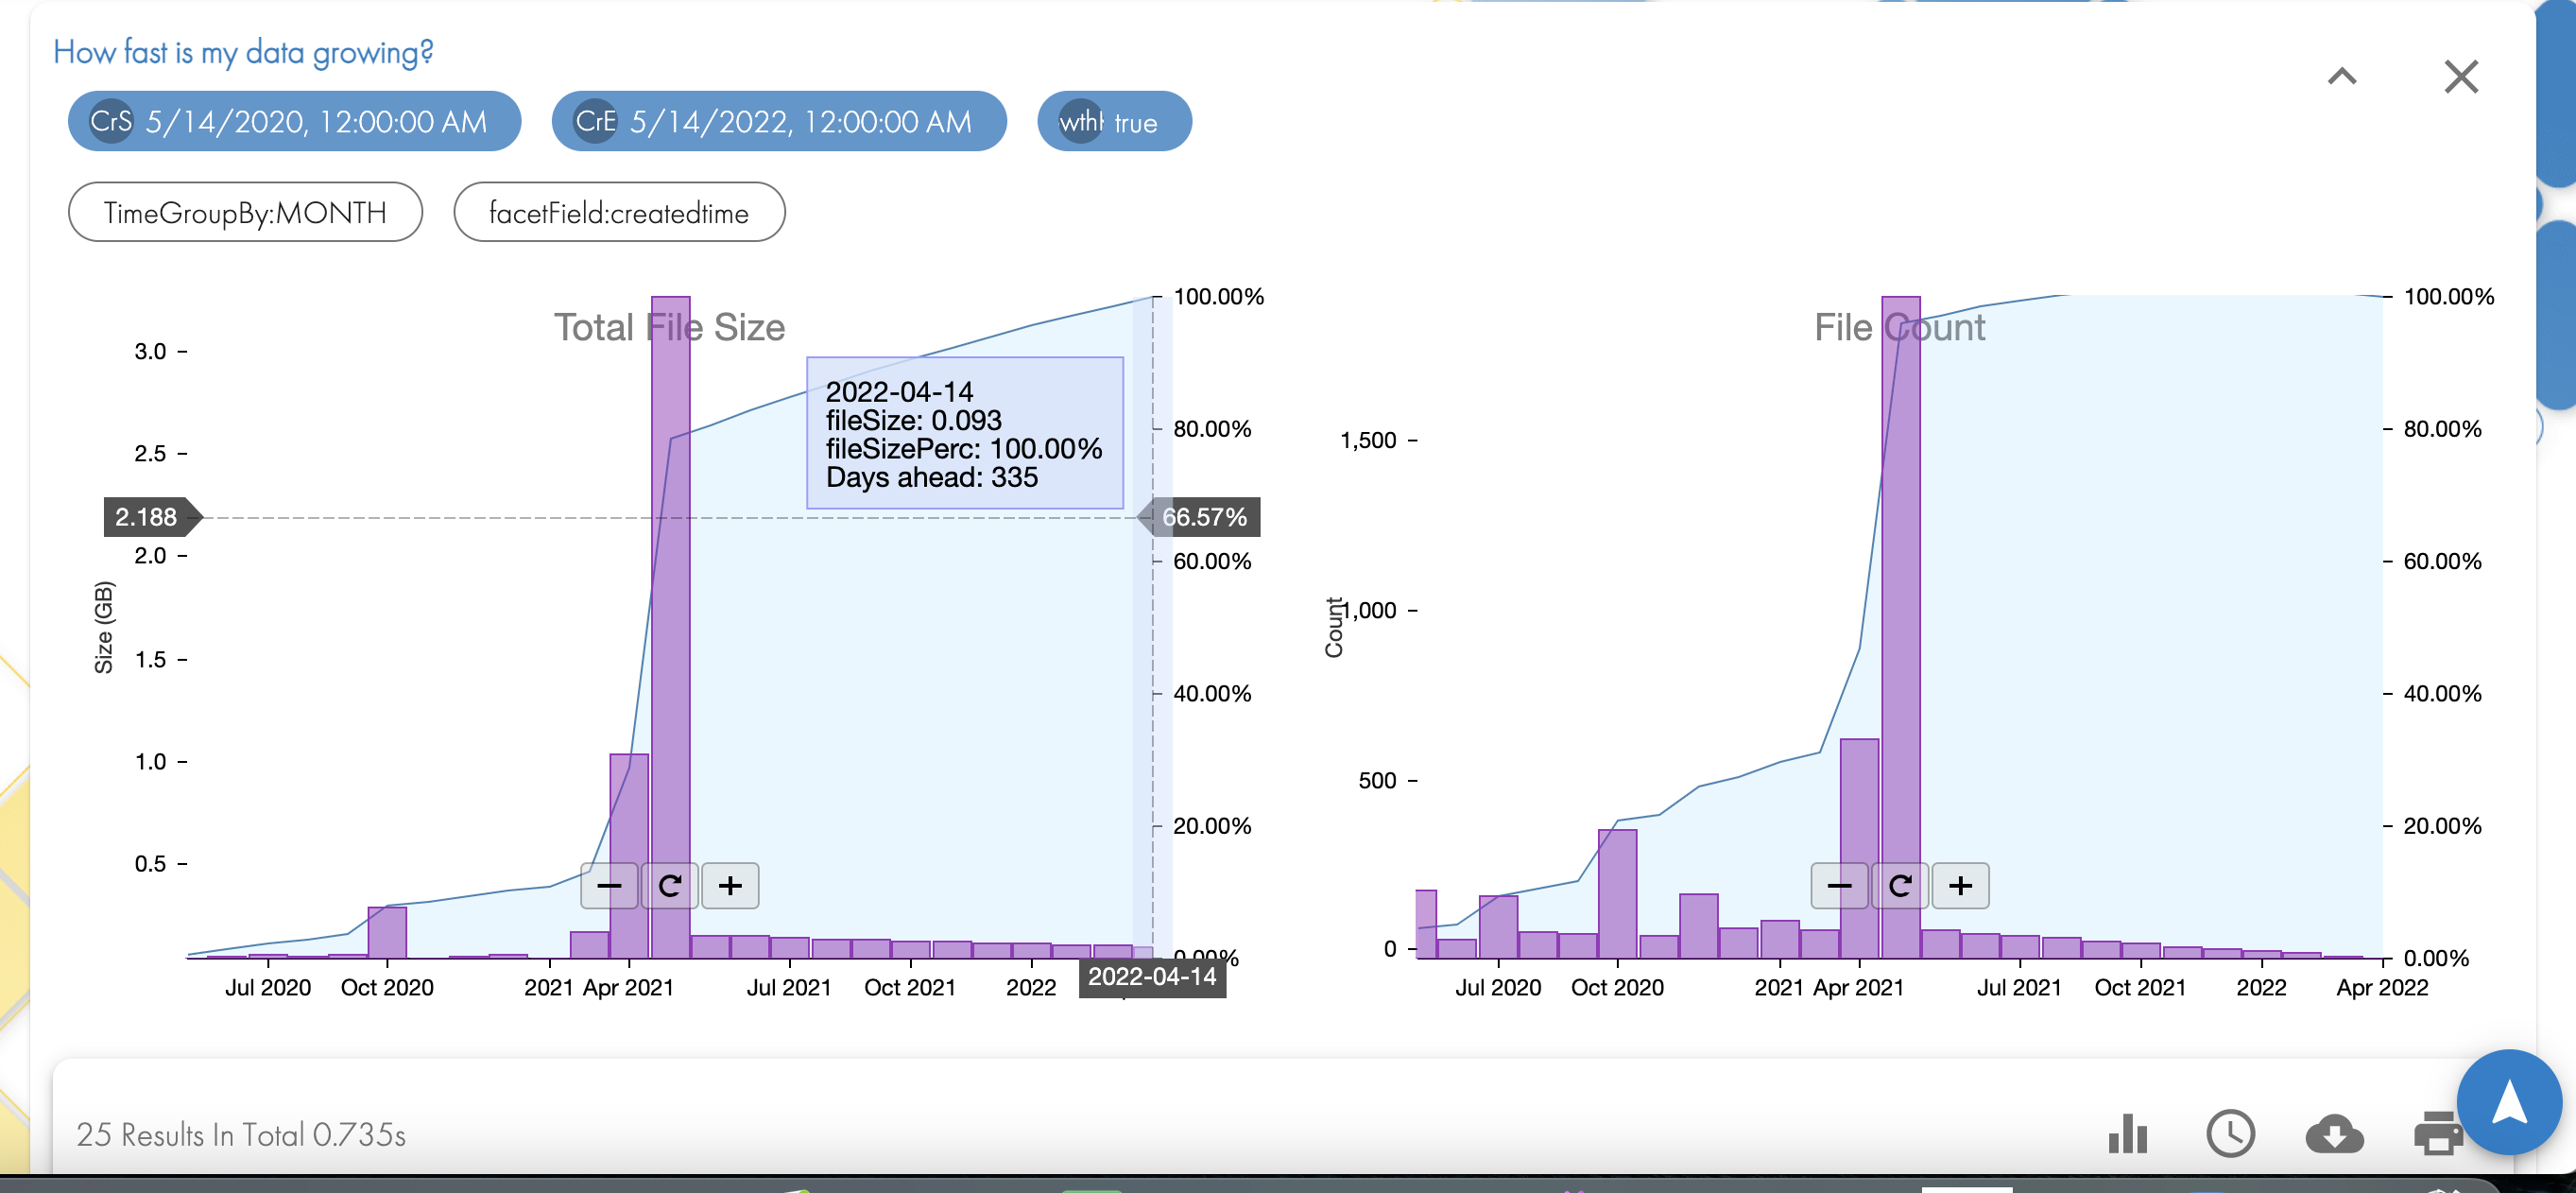
Mouse over the left graph and review the Context Box , that shows the following:
- The File Size percentage value shows the percent of data this file date represents of the Total sum of all data returned by the search criteria. For example in the graph below the Context Box shows that 38.96% of the data was May of 2005 and older.
- As the mouse moves to the right the % will increase until you get to 100% of the data in the search results.
- Total File Size shows the sum of all the files in GB that has a date stamp equal to or older than the date shown in the Context Box. This allows you to see how much data could be archived or deleted and what % this represents.
- Days Ago - indicates how many days in the past using today's date to calculate this age.
Use Cases
- Locate data for Archive, Deletion.
- Identify storage space consumed by age of files (using created, modified or last accessed time stamps).
- File System Analytics - Manage by path by age for departments or project data.
- File policy design can use the results to move files to archive based on age.
- Identify the quantity of data that will be moved to archive is easy. To identify the GB that will be moved to archive, mouse over the graph to determine the sum of the data in GB on a given vertical graph.
- Use the % option to determine your objective for data reduction.
- Use the Date of the final selected % for archive or delete.
- Edit the search using the custom interval option and a start date many years in the past (i.e. 1970 January 1st to locate all files). Enter the end date from Step #4 above.
- When the results are returned you can now use the "Show my the files" option to get a full list of all the files location in the files system and download a csv, or use the script option to assist with delete, archive or move to staging area before deleting. See next section.
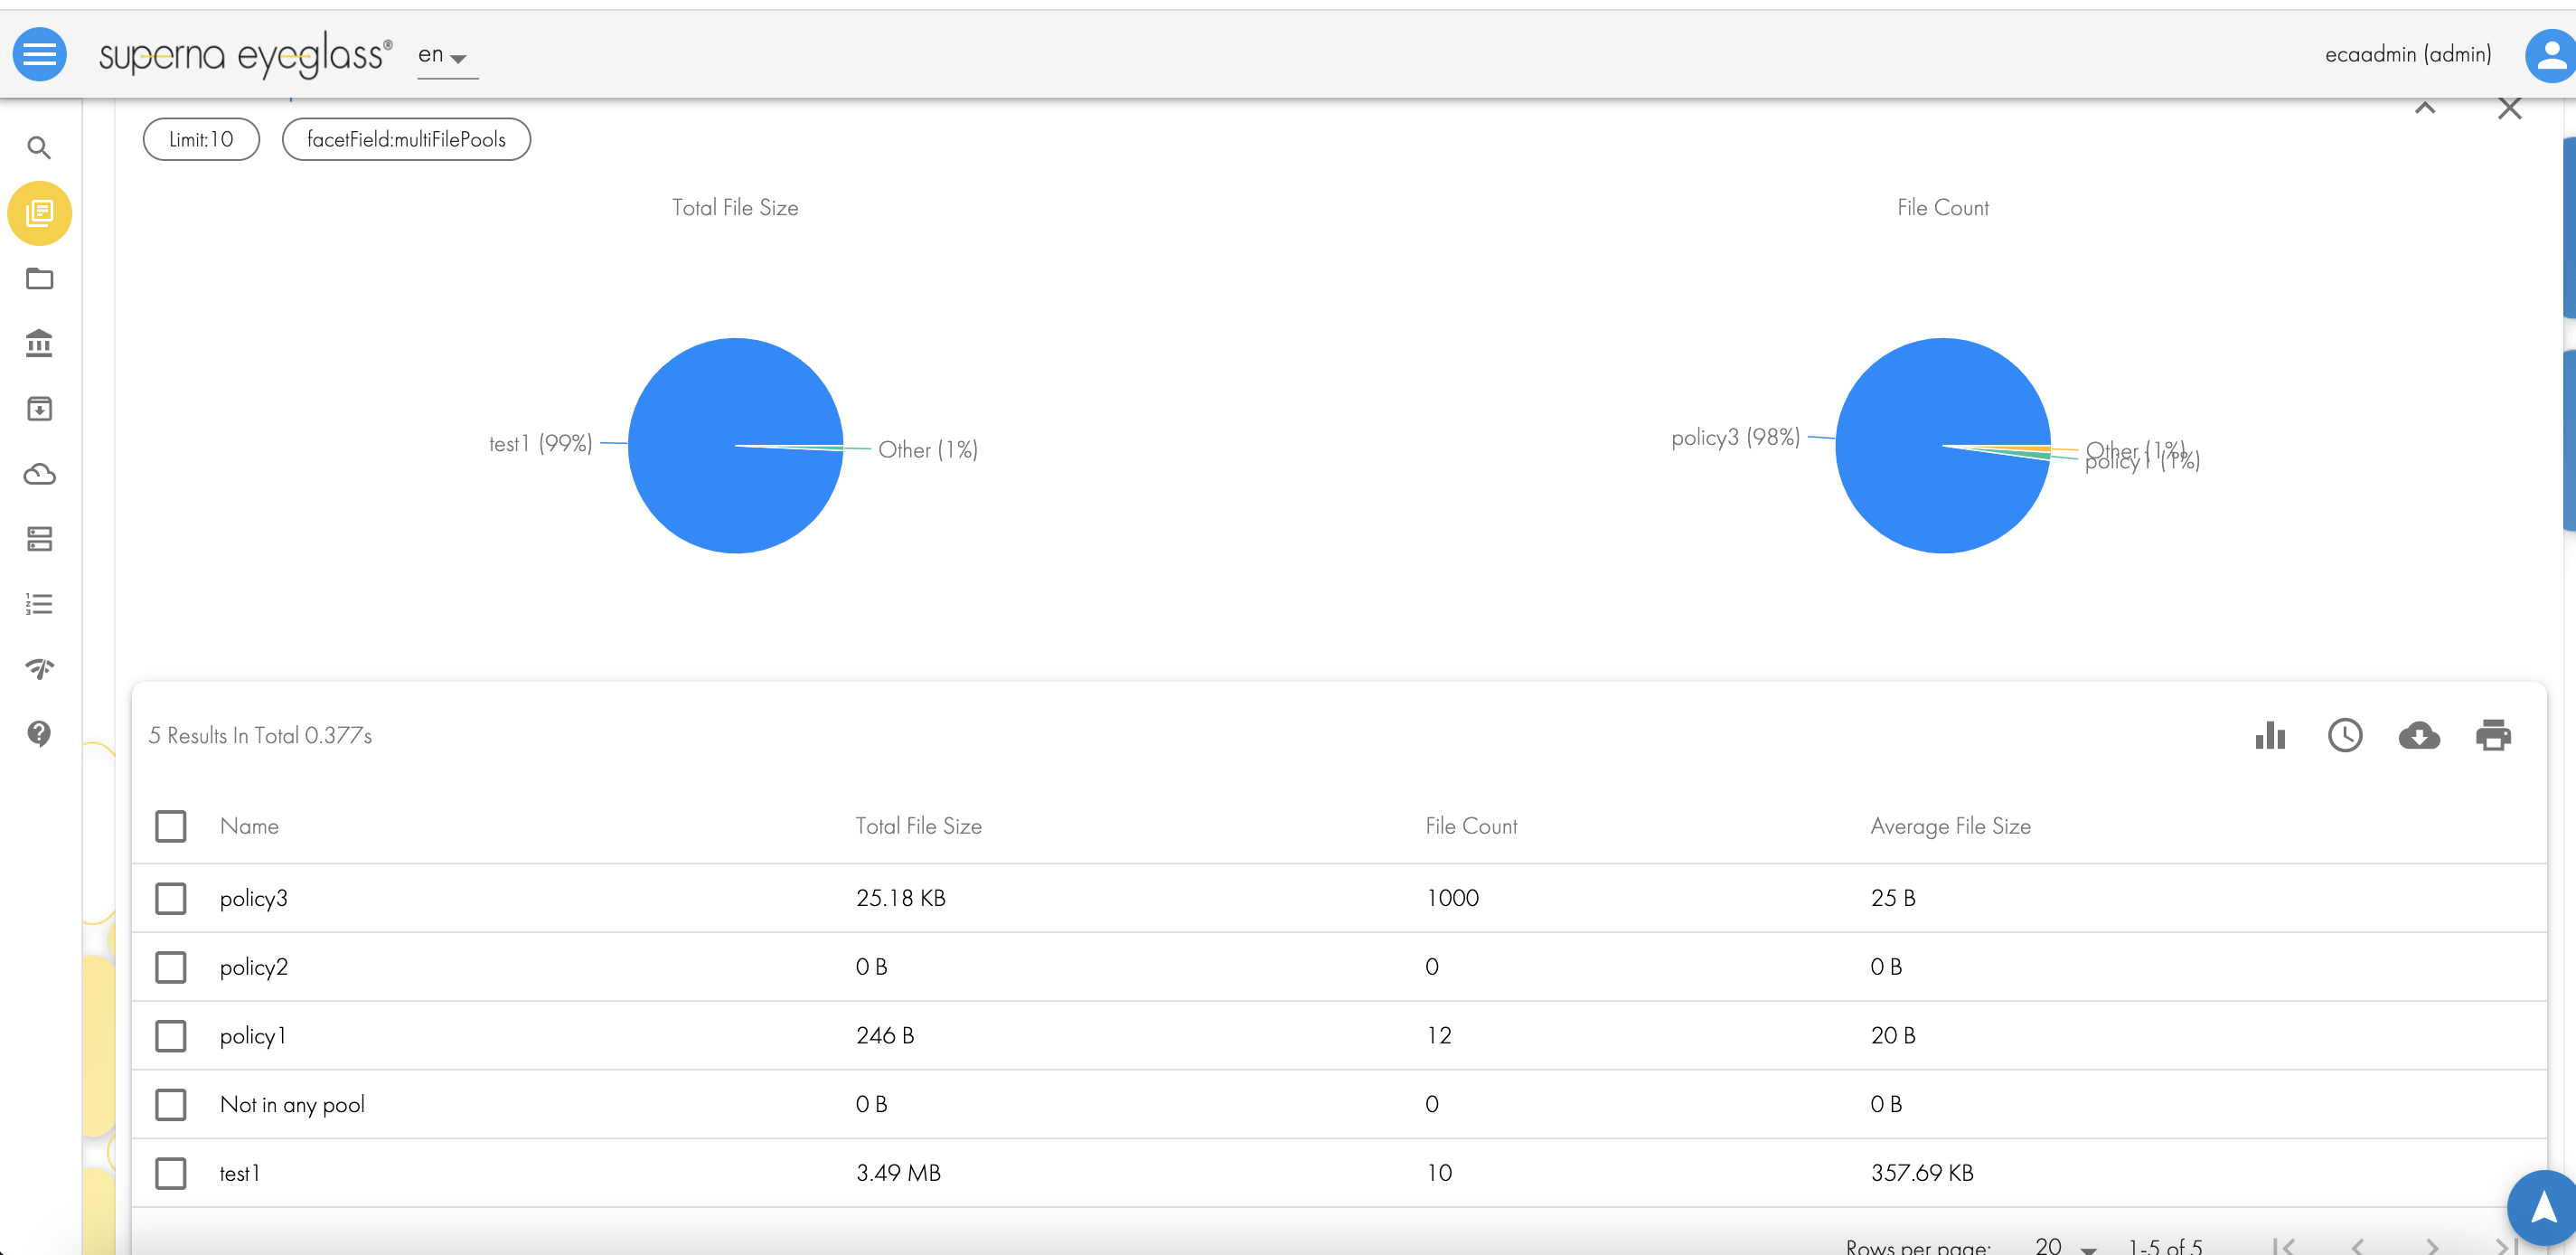
What's in the File Pool?
- This quick report allows reporting on which files exist in a file pool example archive tier, fast tier or a cloudpool tier. This is typically needed for show back and charge back reporting.
- Requirements: Release 1.1.5 or later
- This quick report will report on 1 or more pools that are auto detected from the cluster and selected in the advanced area of the report UI.
- See the example below. If you select multiple pools the repot area will show the sum of all data in each pool. you can also drill in to a pool to locate the files within that pool.
- Example Report showing each File pool policy usage graph and table.
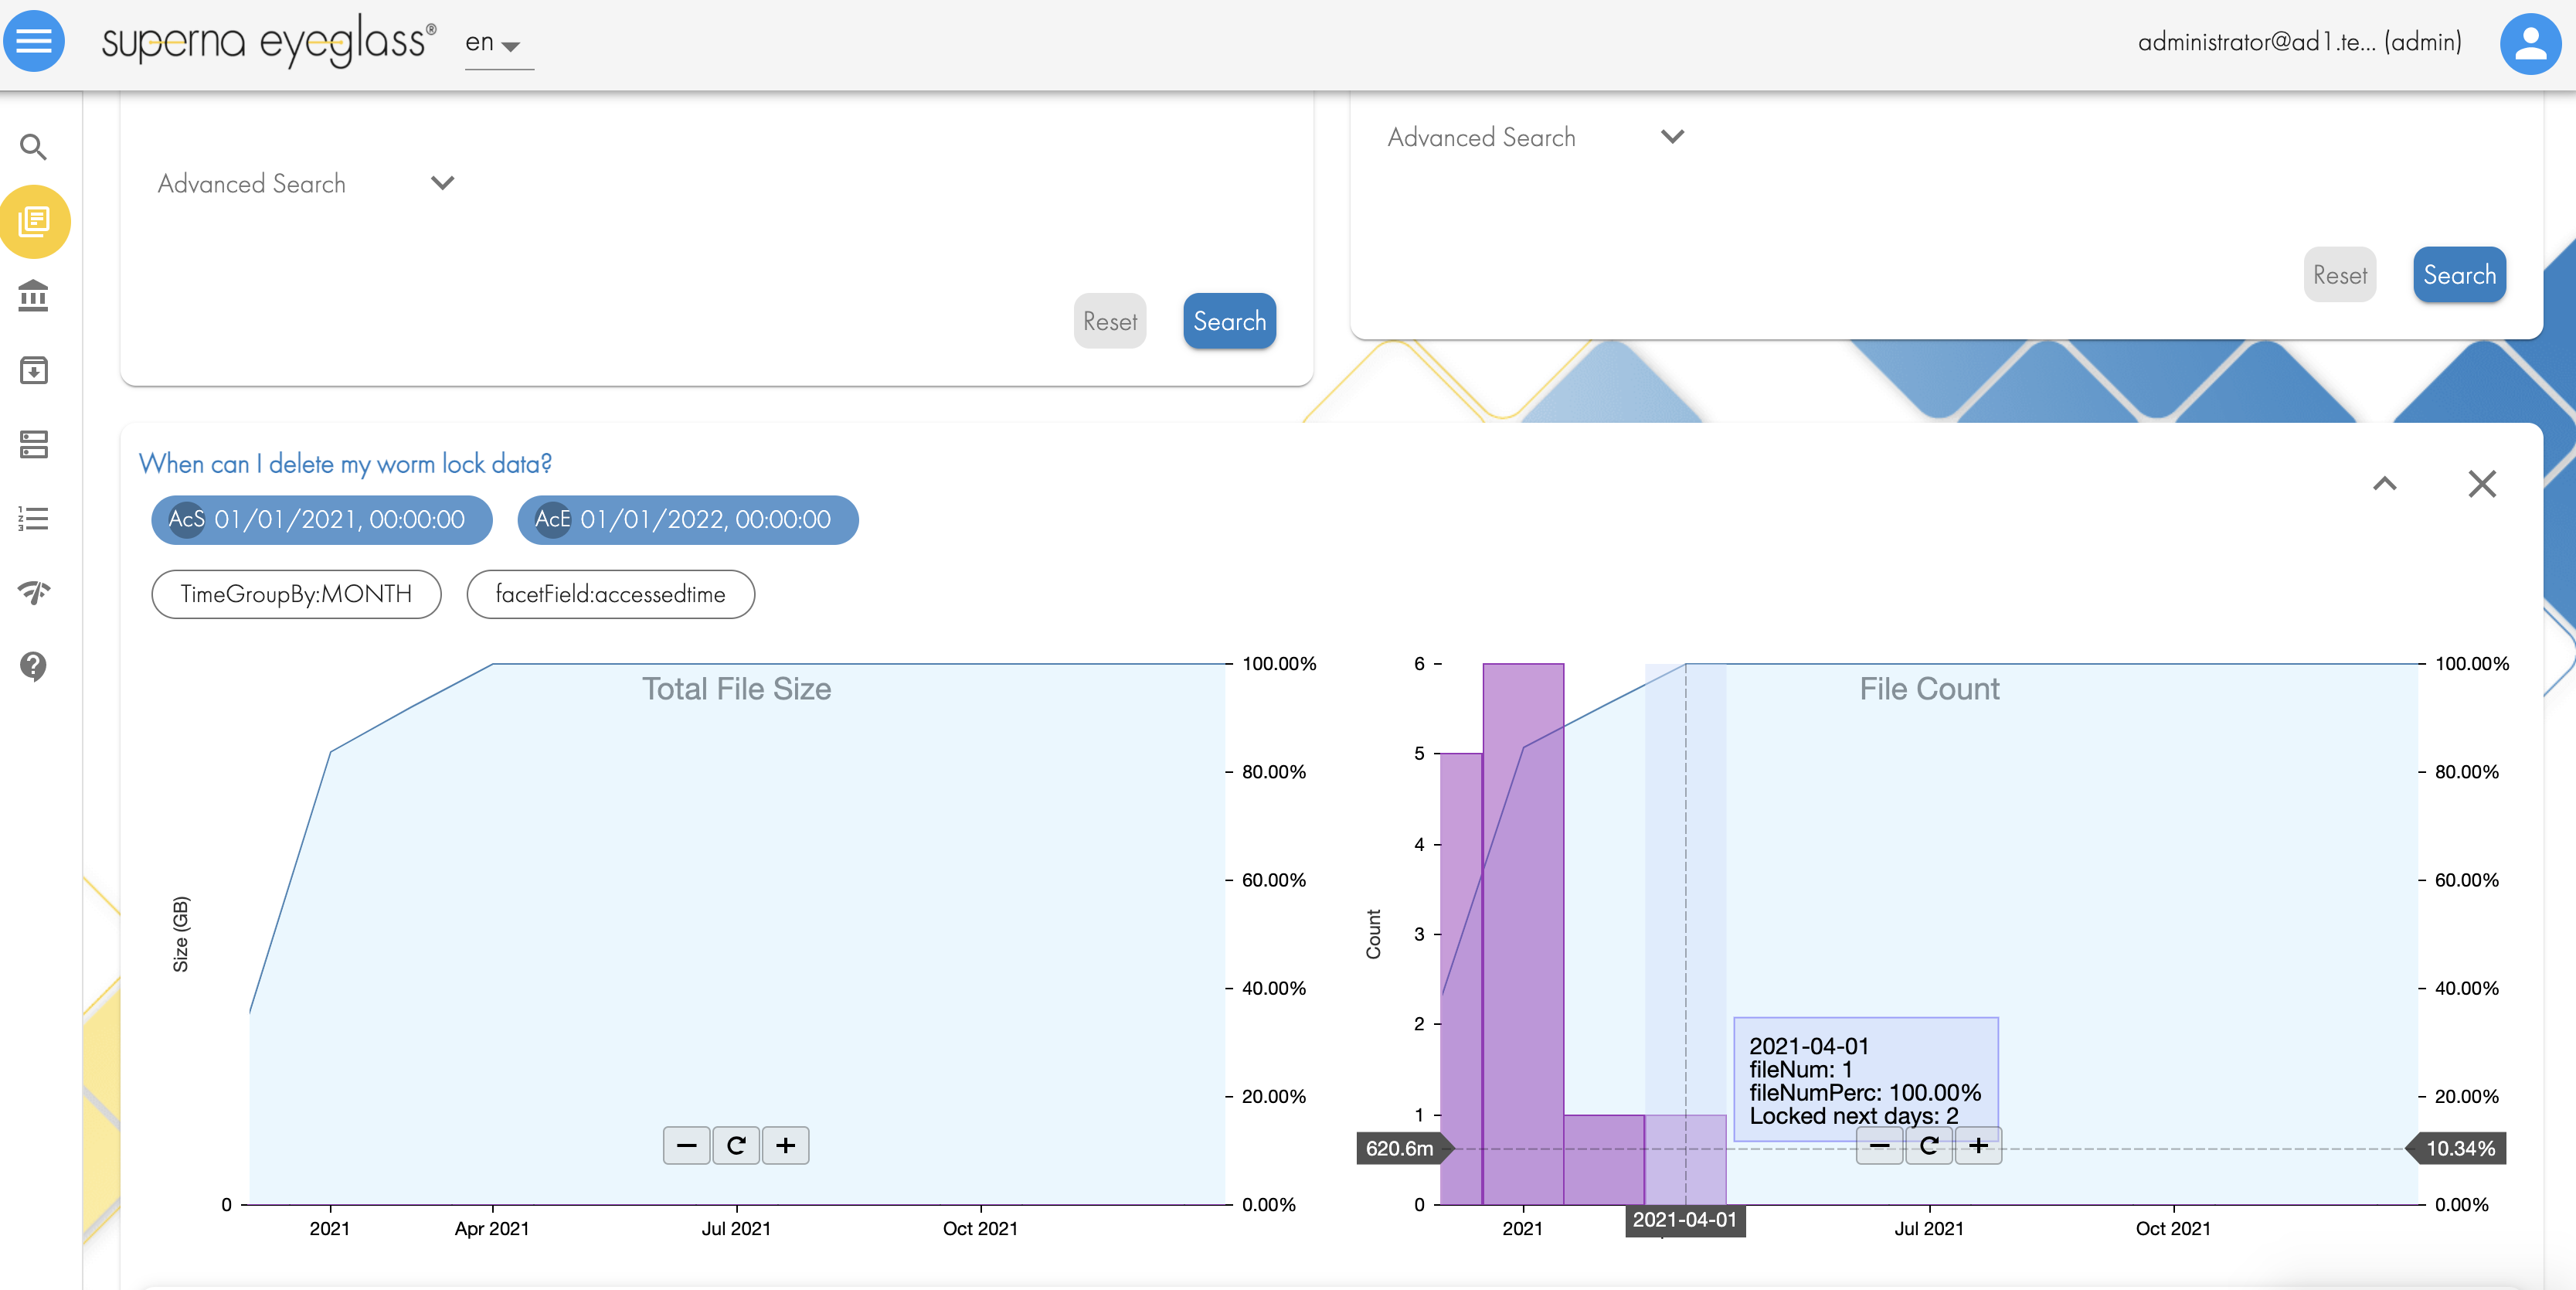
When can I delete my worm lock data?
- This report will assist administrators to locate and see the quantity of data into the future that will expiry lock status. This is data that can now be deleted since it has expired its retention period. This will assist administrators with reclaiming disk space and predict disk usage more accurately.
- This report will also allow drill in to locate data in a given month or week that has expired and can be deleted with the script command builder feature to assist with deleting expired data regardless of its location within the Worm folder structure. This is done using the last accessed date stamp.
- Requirements: Releasee 1.1.5 or later
- Example Report
How Fast is My Data Growing?
- This quick report helps forecast future data growth per month by sampling the previous x months of data. This report will show month by month future data growth using an extrapolation that uses the files created date stamps.
- Forecasts data created and files created
- Requirements: Release 1.1.5 or later
- The default will forecast data usage 1 year into the feature. The advanced options allow this to be changed to additional future years. It will sample the previous 12 months of created data to complete the forecast. The table view can be downloaded as CSV or Excel report with a break down per month showing data created and files created.
- Options:
- Group by month or year
- Forecast period 1 year or multiple years
- Limit analysis to a path
- Additional search controls to bound your search are available in the advanced configuration.
How to drill into Quick Reports to identify the files behind the results
After completing a quick report, a table of the results is shown directly below the graphs. This table allows selecting a day, or row of the results depending on the type of quick report desired. Then selecting the action menu:
- Select data in the table by selecting check boxes next to the data you want to analyze further. You can select all or several different date ranges. NOTE: The data in the table depends on the report setting and can be grouped by day, month or year.
- Then click the action menu icon.
- Select show me the files to get a list of files that match the row selection of the quick report.
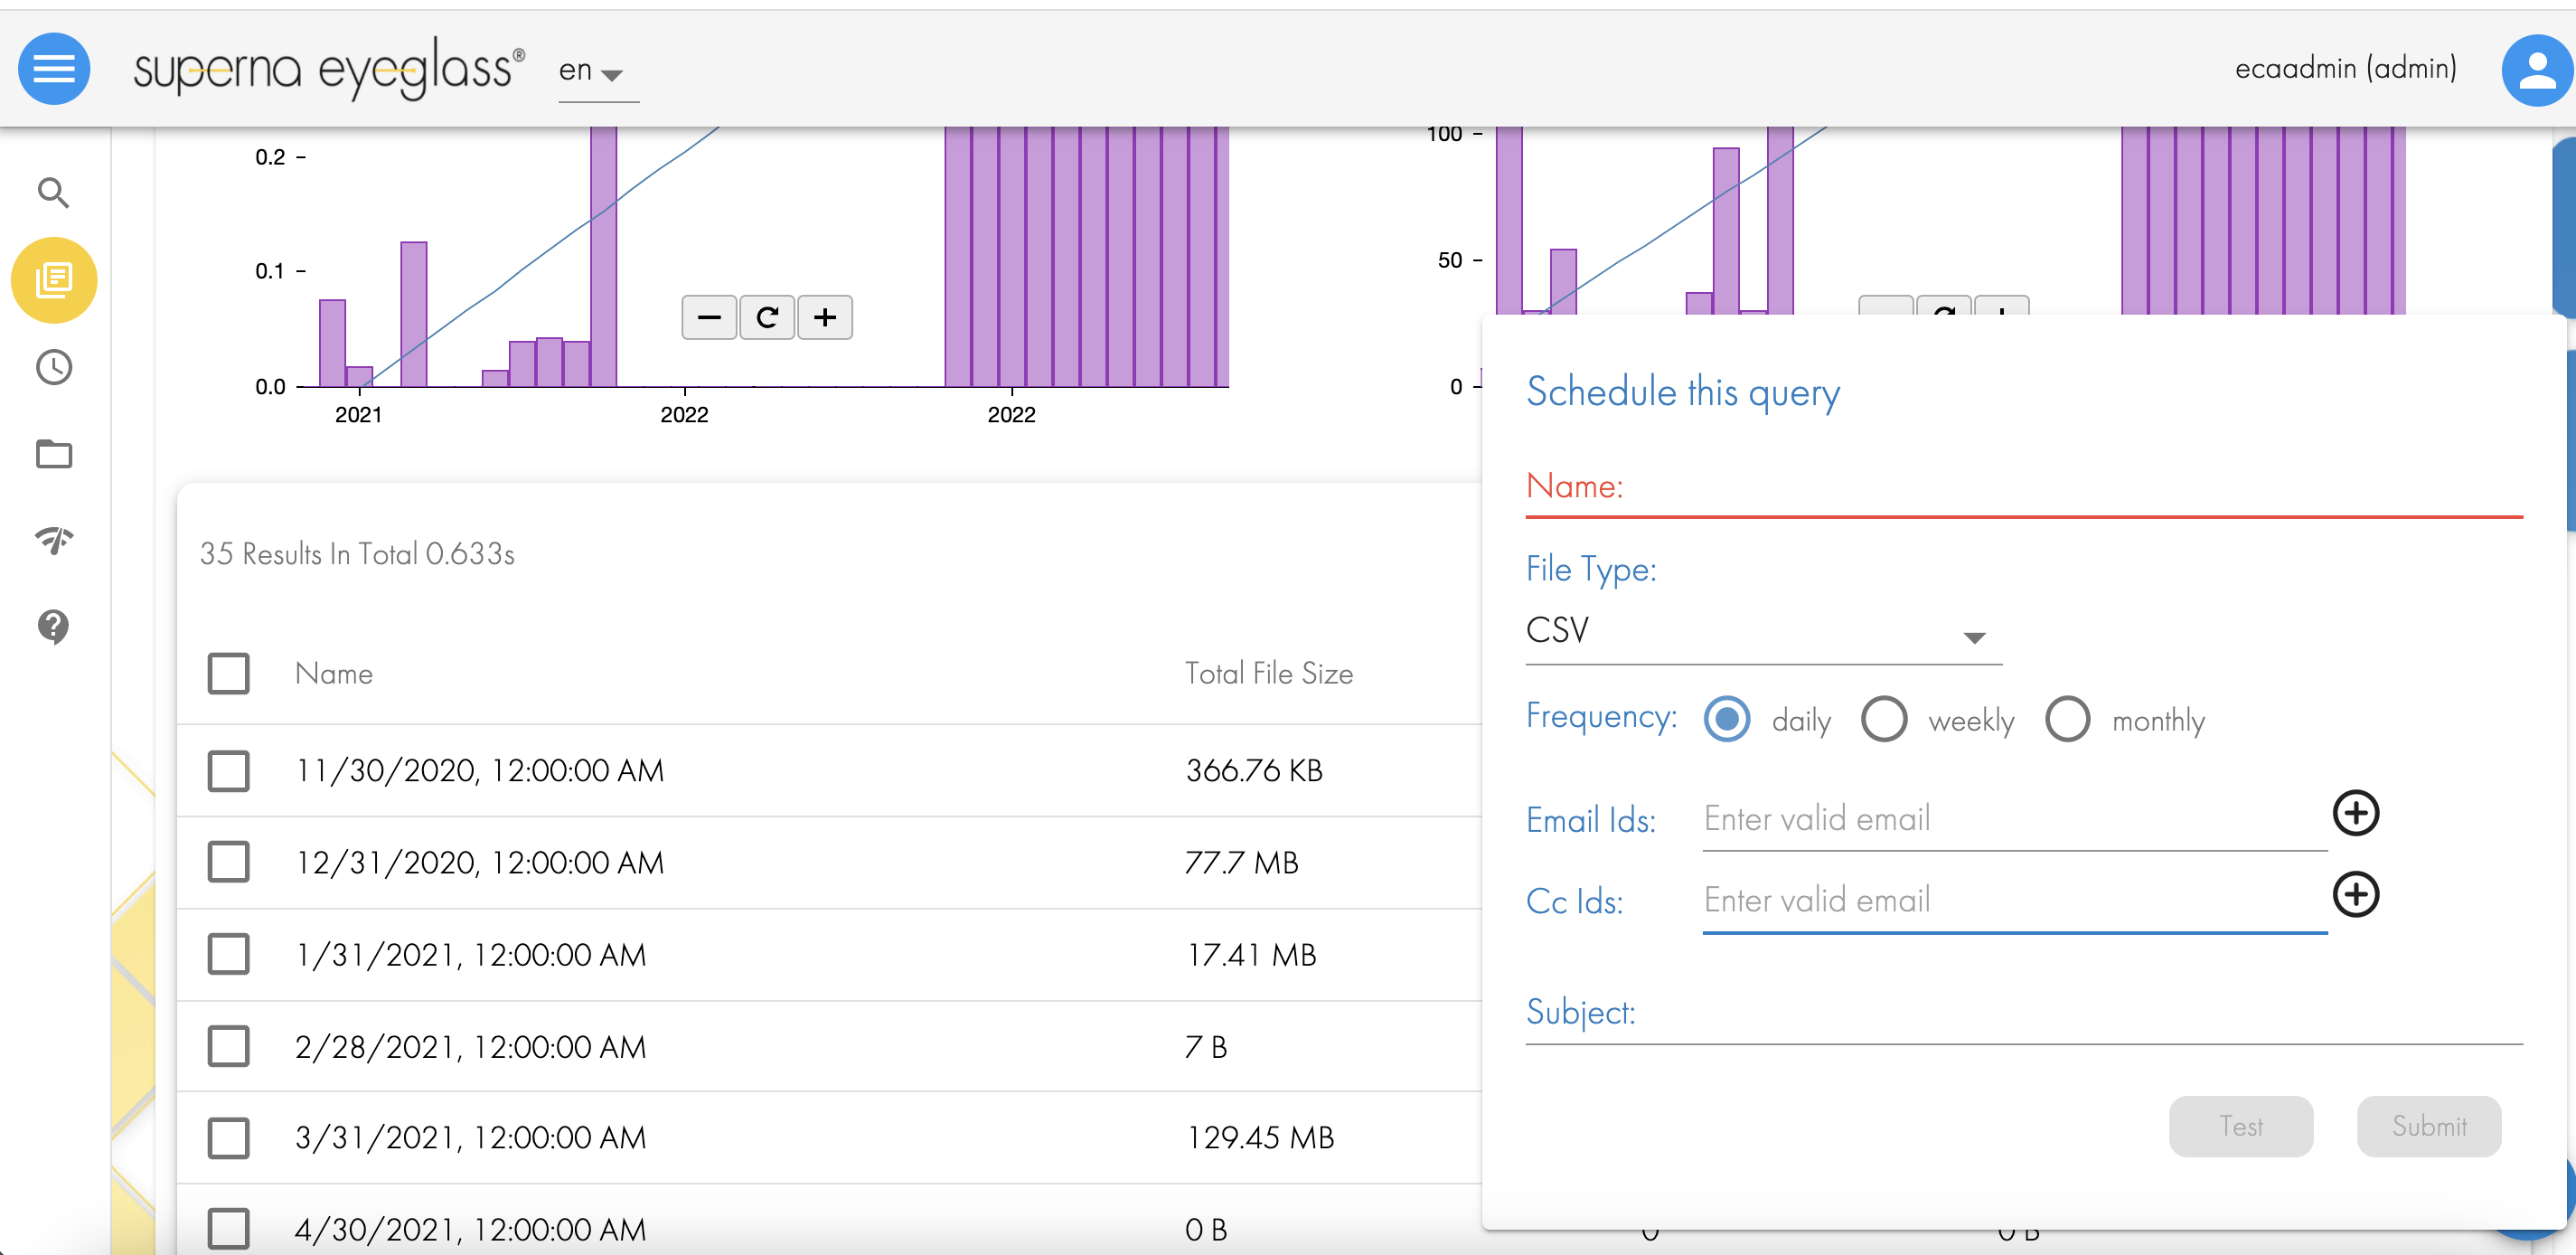
How to Schedule Quick Reports and email results
Requirements
- Configure email channel - see guide.
- Release 1.1.5 or later
- NOTE: Quick reports or file searches can be scheduled
Configuration
- Click the clock icon above the quick report results

- Fill in:
- name of the scheduled report
- format csv or excel
- interval to run the report
- email addresses for To and CC
- Subject of the email
- Click test button to verify the email is received
- Click submit to save
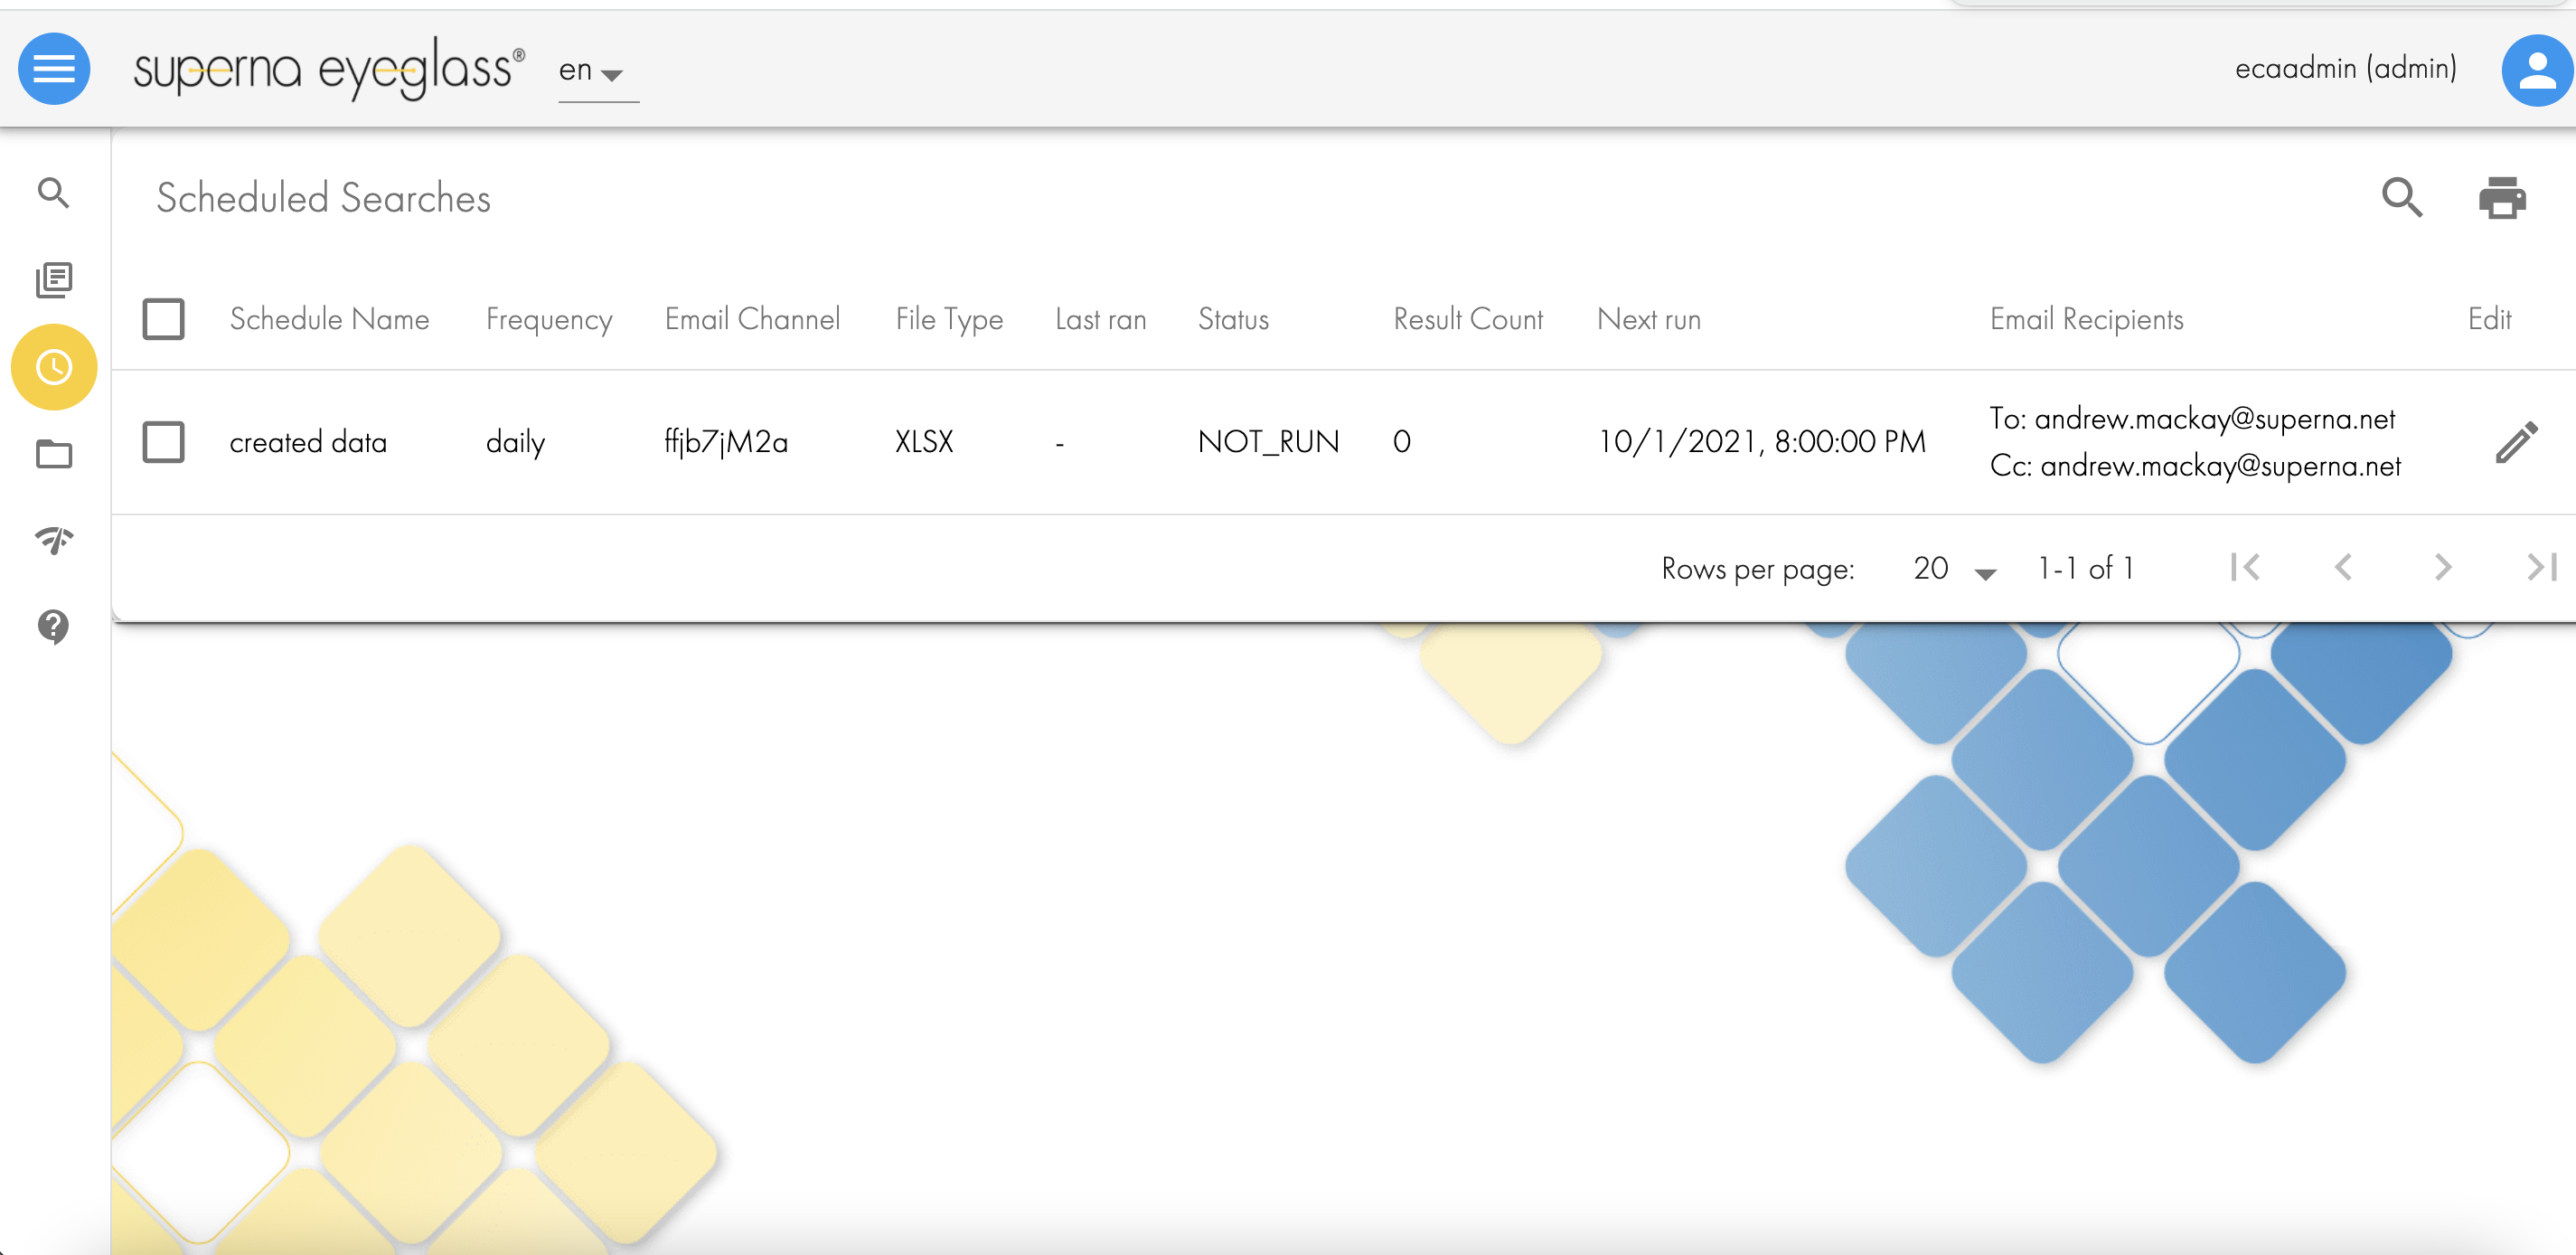
How to edit or delete Scheduled Reports
Requirements
- Release 1.1.5 update 1
Configuration
- Login as an admin user
- click side bar clock icon
- click pencil icon to edit and make changes
- Selection check box to select and the trash icon will appear to delete