- What's new
- Script Engine Overview
- Typical Script Use Cases
- Script Engine Admin Procedures
- Config variables
- Script Engine CURL Tips
- Script Engine Understanding Remote Execution to Hosts
- Video: How to Remount Exports Automation
- ssh Passwordless Login to Remote Linux Hosts
- How to Install Windows SSH Server for remote Powershell execution from Eyeglass with SSH
- Enable SSH on Windows Server
- Test the SSH Server with Powershell:
- How to setup keyless ssh login for Eyeglass Script engine with Windows SSH and Powershell
- Access Zone Example Bash Script using ssh Keys to Remotely Execute a Command
- Remote Host Script Example:
- Eyeglass Access Zone Failover and Failback Script Example
- Adding Additional Script Language Support to the Appliance
- Script Run Time Variables
- Sample Execution Rules & Overall Failover Job Status Impact
- Sample Scripts in the Library
- NodeJS - Example Script
- NodeJS - Example Output
- Python - Example Script
- Python - Example Output
- Bash - Example Script
- Bash - Example Output
- Consolidated Post Failover & Failback Script (Node.JS)
- Consolidated Post Failover & Failback Script (Node.JS) I.E Multiple Zone Access
What's new
- New script variables in 2.5.6 update 2 for handling failovver conditions in pre, post or unified scripts that need to know the status of the failover or errors to handle applicastion specific logic better. See the variable definition section for details.
Script Engine Overview
The new script engine feature provides an icon on the desktop that provides the following functions:
- Save scripts.
- Create new scripts.
- Activate and deactivate scripts for failover.
- Test scripts in simulated failover scenario.
- Debug and edit scripts.
- Scripts support in Bash, Nodejs, and Python languages.
- Run time variables provide access to failover meta data, to complete simplified scripts that leverage variable replacement to handle many different failover scenarios.
- Pre-failover - shutdown applications, unmount.
- Unified scripts - handles either failover or failback with a single script, that can handle logic for either operation.
- Post-failover scripts - runs when target cluster is writeable unmount, remount or mount only logic and application start up.
Typical Script Use Cases
Many failover scenarios depend on extra steps performed on devices, software, and infrastructure external to the NAS cluster. This tasks can now be automated with output captured and appended to Eyeglass failover logic logs.
- NFS host mount and remount automation.
- Application bring up and down logic to start applications post failover.
- Send alerts or emails.
- Run API commands on 3rd party equipment. (i.e. load balancer, switch, router or firewall).
- Shutdown an application.
- IP Load balancing solution and storage layer failover for web tier and storage tier dependencies.
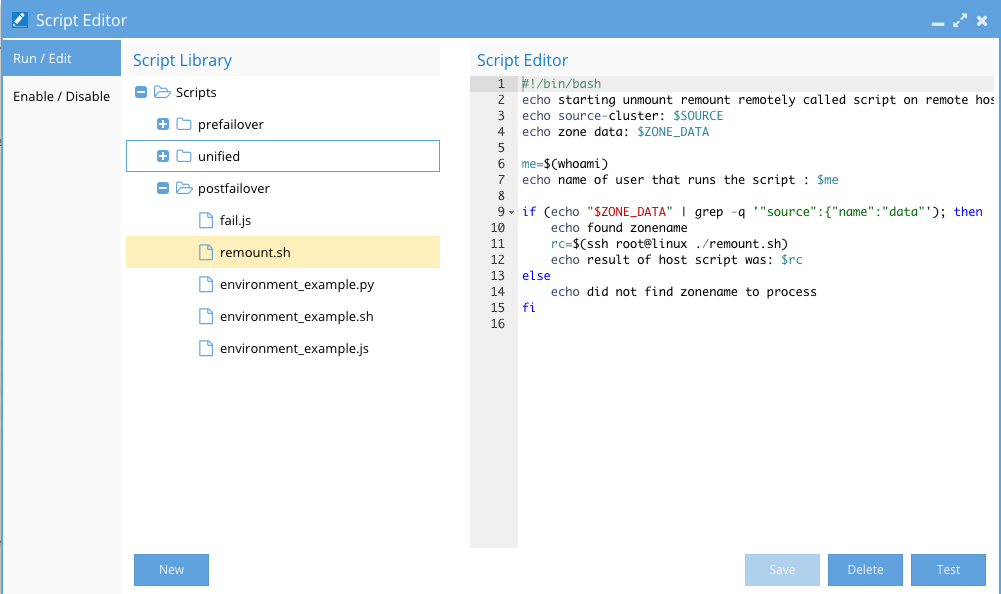
The screenshot below shows the editor, admin console for script editing activation and testing:
Script Engine Admin Procedures
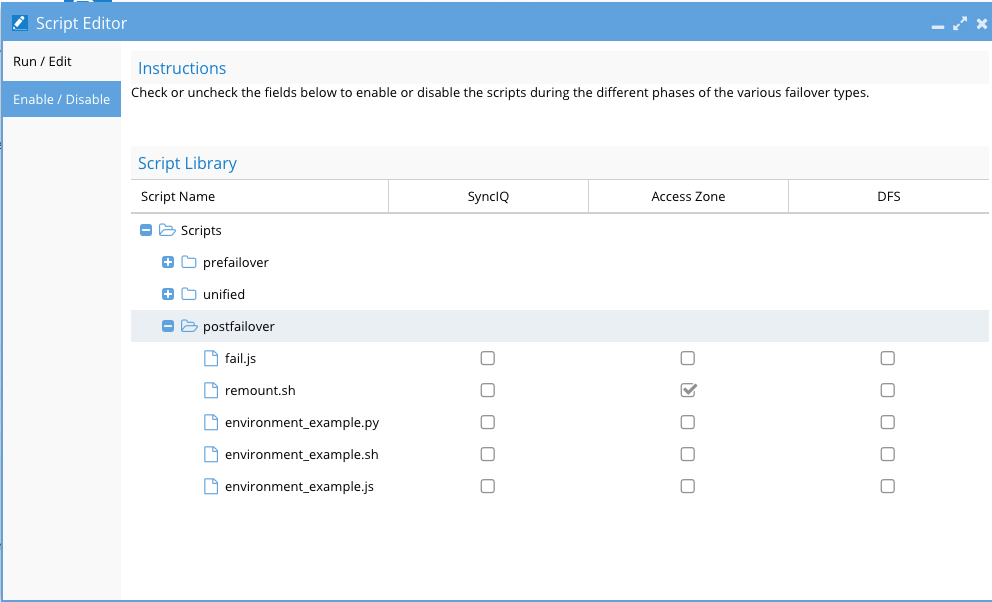
Script Library - store many scripts in the library, but only activate some using the enable/disable menu, to enable or disable a script for one or more failover mode:
- Add new scripts or delete existing scripts from the library.
- Select a script to edit.
- Numbered lines are for easier script editing and debugging.
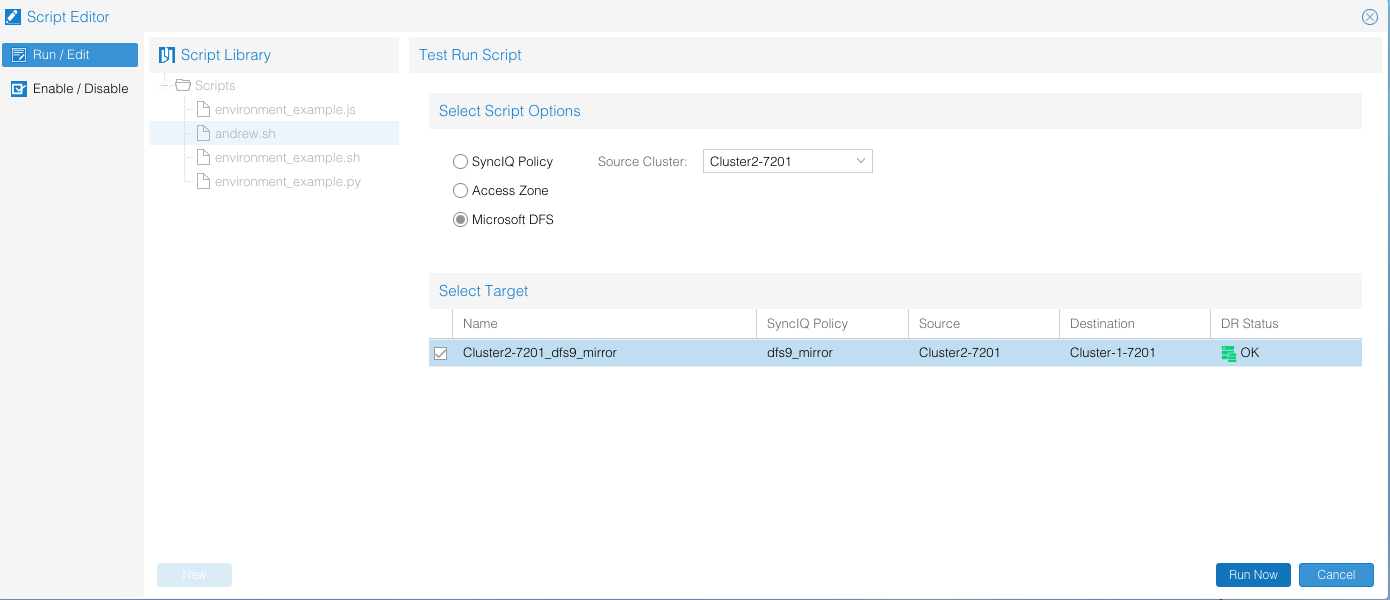
- Select a script click Test to see how it performs.
- You must select a failover mode and a SyncIQ policy (it won’t be failed over). This is done to pass variables that might be used for this failover into the script test to allow easier script that can handle multiple policies.
- Decide if the script should be prefailover, unified or post failover script mode, and place it in the correct folder, to ensure it executes at the right location in the failover logic.
- Enable or disable scripts for each failover mode as required.
- NOTE: All scripts that are enabled, run for all failovers using the selected mode, so logic needs to handle each policy, Access Zone option or ensure logic does not run when not required.
Config variables
Failover scripts timeout: maximum allowed time for script execution before termination. By default, it is 300 sec.
It is configurable using CLI
Script Engine CURL Tips
If you are using CURL as the method to automate with the API, be aware of the following:
- Curl -k will be required since the API is using a self signed certificate. This is not added to the CURL command with the CURL builder interface, and should be added to your CURL command.
- To avoid 411 response for content length, or body error from API server, add -d "" to the CURL command generated by the CURL builder interface of the API explorer.

Script Engine Understanding Remote Execution to Hosts
Video: How to Remount Exports Automation
ssh Passwordless Login to Remote Linux Hosts
A common use case is running a script locally on Eyeglass to take an action on a remote Linux host, or running a command on a remote host to complete failover. When using ssh from a supported language, you can use Bash and .ssh keys to avoid passwords with follow these steps.
Note: Bash scripts run as the sca user, when they execute, this user also owns Eyeglass files and processes.
- Ssh to Eyeglass appliance.
- Sudo -s (to switch to root).
- Enter admin password.
- Cd /opt/superna (this is the home directory for the sca user used by Eyeglass processes).
- Create directory /opt/superna/.ssh/id_rsa.
- Type ‘ssh-keygen -t rsa’ do not set a password and accept all default prompts but enter a path of /opt/superna/.ssh/id_rsa.
- Now set ownership on files for remote execution all scripts run as the sca user:
- Su sca.
- Ssh user@remotehost (creates known_hosts file for target host, answer yes to accept ssh ID).
- Exit (you are now root again).
- Cd /opt/superna/.ssh.
- Chown sca *.
- Chgrp users *.
- ssh User@remotehost mkdir -p .ssh (User is the user that has access to the script that must execute, remotehost is dns or host name of remote linuxhost ) - this will create .ssh if it does not already exist.
- cat /opt/superna/.ssh/id_rsa.pub | ssh User@remotehost 'cat >> .ssh/authorized_keys' (this places pub ssh keys into the remote users .ssh authorized keys file to allow passwordless login from a script).
- Enter password for User on remotehost.
- Test SCA remote ssh:
- Su sca .
- Ssh user@remotehost (if no pwd requested the setup is complete) .
- Done.
How to Install Windows SSH Server for remote Powershell execution from Eyeglass with SSH
Enable SSH on Windows Server
Tested on:
Windows server 2012 r2
Procedure:
Open Windows PowerShell
Change directory to the folder that we want to put the downloaded OpenSSH file
Example: PS C:\Users\Administrator> cd C:\myfolder
We need to download the .zip file from the Github repository using the Invoke-WebRequest command. Change security protocol to TLS1.2 or TLS1.3 using the following command:
PS C:\myfolder> [Net.ServicePointManager]::SecurityProtocol = [Net.SecurityProtocolType]::Tls12
Then download the binary using the Invoke-WebRequest:
PS C:\myfolder> Invoke-WebRequest -Uri "https://github.com/PowerShell/Win32-OpenSSH/releases/download/v7.7.2.0p1-Beta/OpenSSH-Win64.zip" -OutFile "powershell.zip"
On a fresh installation, Windows 2012 R2 does not have the Expand-Archive command, so we will use .NET directly. Add-Type loads a .dll with the necessary .net functions in our current session. then [io.compression.zipfile] is a reference to that loaded .dll and ::ExtractToDirectory is the way to call a function from that dll :
PS C:\myfolder> Add-Type -assembly "system.io.compression.filesystem"
Unzip the file
PS C:\myfolder> [io.compression.zipfile]::ExtractToDirectory( 'C:\myfolder\powershell.zip','C:\myfolder' )
Change into the directory that has been unzipped and launch the installation:
PS C:\myfolder> cd .\OpenSSH-Win64
PS C:\myfolder\OpenSSH-Win64> .\install-sshd.ps1
[SC] SetServiceObjectSecurity SUCCESS
[SC] ChangeServiceConfig2 SUCCESS
[SC] ChangeServiceConfig2 SUCCESS
sshd and ssh-agent services successfully installed
The following command will show the status of the SSHD service:
PS C:\myfolder\OpenSSH-Win64> get-service | findstr ssh
Stopped ssh-agent OpenSSH Authentication Agent
Stopped sshd OpenSSH SSH Server
Start the service:
PS C:\myfolder\OpenSSH-Win64> Start-Service sshd
PS C:\myfolder\OpenSSH-Win64> Start-Service ssh-agent
If need to set the service to start automatically:
PS C:\myfolder\OpenSSH-Win64> Set-Service -Name sshd -StartupType "Automatic"
PS C:\myfolder\OpenSSH-Win64> Set-Service -Name ssh-agent -StartupType "Automatic"
If need to open firewall port for SSH:
PS C:\myfolder\OpenSSH-Win64> netsh advfirewall firewall add rule name=SSHPort dir=in action=allow protocol=TCP localport=22
Test the SSH Server with Powershell:
SSH to Eyeglass as admin user
Run command: ssh <user>@<windows-server-ip>
Confirm the session establishment and provide the user password
Once logged in to the windows server via SSH, then run powershell command
Example:powershell.exe get-content env:computername
How to setup keyless ssh login for Eyeglass Script engine with Windows SSH and Powershell
ssh to Eyeglass as admin user
sudo su - (enter the password)
cd /opt/superna
mkdir .ssh
Run command : ssh-keygen -t rsa (enter the path of /opt/superna/.ssh/id_rsa and do not set a passphrase, accept all default prompts)
Change ownership of this .ssh directory: chown -R sca:users .ssh
su sca
ssh <user>@<windows-server-ip> (creates known_hosts file for target host, answer yes to accept ssh ID)
Exit ssh
Back to root: exit
ssh <user>@<windows-server-ip> mkdir -p .ssh (this will create .ssh if it does not already exist on windows server).
Exit ssh from windows server
cat /opt/superna/.ssh/id_rsa.pub (to get the content of the id_rsa.pub file)
Copy the content of id_rsa.pub file to .ssh/authorized_keys file on windows server (this places pub ssh keys into the remote users .ssh authorized keys file to allow passwordless login from a script). We can use text editor to copy the content of id_rsa.pub file to the authorized_keys file.
Test the SSH: su sca
ssh <user>@<windows-server-ip> (if no password requested the setup is complete)
Done
Access Zone Example Bash Script using ssh Keys to Remotely Execute a Command
The Access Zone Based failover preserves SmartConnect Zone names across failovers, which only requires an unmount and remount of the same FQDN SmartConnect Zone name. This means the failover logic can be used for failover or failback since it's’ the same operation.
This sample solution uses a script that is unique on each host with the same name. Example; remount.sh placed in the user home directory used with the ssh remote execution rsa pub key. (See steps above to set up Eyeglass for ssh passwordless login to remote hosts).
Remote Host Script Example:
Script name remount.sh, placed in the home directory of the user account setup, for ssh login automation from the Eyeglass appliance:
#remount script
echo "remounting filesystem post failover"
umount -fl /mnt/data
mount -a
mount | grep "/mnt/data"
Eyeglass Access Zone Failover and Failback Script Example
#!/bin/bash
#
# Script: remount.sh
# Purpose: unmount and remount from /etc/fstab persistent mounts post failover script, depends on remote script on remote host to execute
# Location: Eyeglass post failover scripting paste into script engine and enable for Access zone based failovers
#
echo starting unmount remount remotely called script on remote hosts
echo source-cluster: $SOURCE
echo zone data: $ZONE_DATA
me=$(whoami)
echo name of user that runs the script : $me
# The variables set during failover include many variables and attributes of the Access Zone selected for failover that can be used to grep and select when # to apply failover logic. This can be used to group which hosts to automate failover based on the Access Zone selected for failover. The example below:
# can be expanded to be used with per SyncIQ policy names using the same grep solution and variables shown in the Eyeglass echo example scripts.
# This string "source":{"name":"xxxx" replace the xxxx with the name of the zone you want to failover, hint you can use test feature in script engine to
# run the sample scripts with your clusters and access zones to see which string to grep for test see bolded section used below to select and access zone
# zone data: #{"source":{"name":"data","subnets":[{"name":"subnet0","smartConnectServiceIp":"172.31.1.201","pools":[{"name":"subnet0:dfsdata","ranges":"172.31#.1.113-172.31.1.113","smartConnectZoneName":"dfsdata-dr.ad1.test","smartConnectAliases":["igls-ignore"]},{"name":"subnet0:userdata","ranges":"17#2.31.1.111-172.31.1.111","smartConnectZoneName":"userdata.ad1.test","smartConnectAliases":["igls-user-prod"]}]}]},"target":{"name":"data","subnet#s":[{"name":"subnet0","smartConnectServiceIp":"172.31.1.200","pools":[{"name":"subnet0:dfsdata","ranges":"172.31.1.112-172.31.1.112","smartConn#ectZoneName":"dfsdata.ad1.test","smartConnectAliases":["igls-ignore"]},{"name":"subnet0:userdata","ranges":"172.31.1.110-172.31.1.110","smartCon#nectZoneName":"igls-original-userdata.ad1.test","smartConnectAliases":["igls-user-prod"]}]}]},"poolMap":[{"sourcePool":{"name":"subnet0:userdata","#ranges":"172.31.1.111-172.31.1.111","smartConnectZoneName":"userdata.ad1.test","smartConnectAliases":["igls-user-prod"]},"targetPool":{"name":"s#ubnet0:userdata","ranges":"172.31.1.110-172.31.1.110","smartConnectZoneName":"igls-original-userdata.ad1.test","smartConnectAliases":["igls-user-#prod"]}}]}
if (echo "$ZONE_DATA" | grep -q '"source":{"name":"data"'); then
echo found zonename
# remotely execute the remount.sh script on the remote host (NOTE: requires ssh pub keys from eyeglass on the remote host)
rc=$(ssh root@linux ./remount.sh)
# remote script runs and returns output, can be output below to be captured in the failover log
echo result of host script was: $rc
else
echo did not find zonename to process
Adding Additional Script Language Support to the Appliance
- Nodejs can be added by: (https://nodejs.org/en/docs/)
- ssh as root to the appliance .
- then run zypper install npm.
- answer yes (requires internet access).
- bash - pre-installed in the OS (2.7.8).
- Python - pre-installed in the OS (2.7.8).
Script Run Time Variables
The following variables can be used to pass in values to a script, to handle various policies or scenario’s, using substitution of the values:
- FAILOVER_RAN is true or false failover steps completed intended for single script that handles pre or post failover with a single script and needs to know if failover has happened or not.
- example pre script would stop application, unmount file system, post script logic would wait until failover has exercuted before mounting and start up the application.
- Only valid in a post failover script
- New in 2.5.6 update 2
- FAILOVER_STATUS is "OK" "WARNING" or "ERROR" if your script logic needs to handle scenario's where the failover was not error free then use this variable.
- Only valid in a post failover script
- New in 2.5.6 update 2
- FAILOVER_SUCCESS is true or false - this is a simple true or false without providing the specific error code the previous variable offers. This can be used to trigger logic after failover is successful versus a failure. This could be used to skip application steps on a failure to avoid mount issues or application startup problems.
- Only valid in a post failover script
- New in 2.5.6 update 2
- source - Represents the name of the source cluster of the SyncIQ policy.
- target - Represents the name of the target cluster of the SyncIQ policy.
- policy - Used to return metadata about the policy itself see example output below (NodeJS - Example Output).
- failover_type - SyncIQ, DFS or Access Zone.
- zone_data - zone data about the Access Zone that can be used example SmartConnect Zone list and zone alias for DNS updates
Sample Execution Rules & Overall Failover Job Status Impact
- They run after all Eyeglass automation.
- One or more scripts can be enabled per failover type and both will execute in series during failover.
- Return code provided by the script should return 0 to indicate the script had no errors and completed successfully.
- Return code > 0 indicates an error.
- Return codes can be set to any value and number and meaning in the script, Eyeglass takes no actions based on specific return codes.
- Return codes are logged in the failover log for post failover review and debugging.
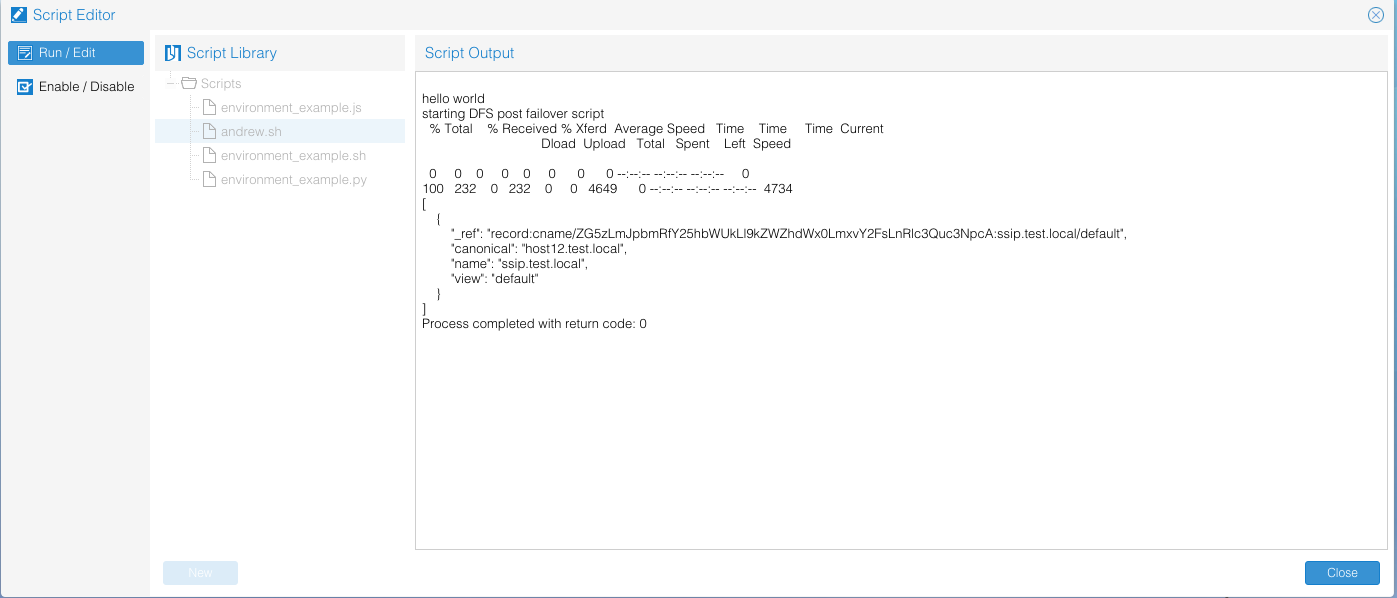
- Script output is captured in the failover log. It is best practice to use the echo command to output script execution so that it's included in the Failover log.
- If running two or more scripts each script should have discrete function to complete, AND should not have any dependency on other scripts. No ability to have IF script return code of X then 2nd script do Y exists.
- Put host side script automation into its own script.
- Put DNS automation logic into it’s own script.
- Put application specific logic into it’s own script.
- If any scripting logic needs dependant logic then a single script should be used for all functions.
- Return code > 0 will failover the overall job status.
Sample Scripts in the Library
NodeJS - Example Script
#!/usr/bin/env node
console.log("these are the environment variables");
console.log("source", process.env.SOURCE);
console.log("target", process.env.TARGET);
console.log("type", process.env.FAILOVER_TYPE);
console.log("zone data", process.env.ZONE_DATA);
console.log("policy data", process.env.POLICY_DATA);
NodeJS - Example Output
These are the environment variables:
source {"pass":"password!","port":8080,"ip":"172.31.1.105","name":"Cluster2-7201","guid":"005056ba72edf6450c552312a728d3a22a23","user":"admin"}
target {"pass":"password!","port":8080,"ip":"172.31.1.104","name":"Cluster-1-7201","guid":"005056ba34580f410c55fd077989478a3821","user":"admin"}
type SYNCIQ
zone data
policy data [{"name":"dfs9_mirror","targetIp":"172.31.1.104","targetHostname":"172.31.1.104","sourcePath":"/ifs/data/policy1","targetPath":"/ifs/data/policy1","enabled":true,"shares":[],"exports":[],"zones":[],"lastJobStatus":"running","lastSuccess":"null","lastStarted":"1446812101","schedule":"every 1 days every 5 minutes between 12:00 AM and 11:59 PM","sourceExludePaths":[],"sourceIncludePaths":[]}]
Process completed with return code: 0
Python - Example Script
#!/usr/bin/env python
import os
print "these are the environment variables"
print os.environ['SOURCE']
print os.environ['TARGET']
print os.environ['FAILOVER_TYPE']
print os.environ['ZONE_DATA']
print os.environ['POLICY_DATA']
Python - Example Output
these are the environment variables
{"pass":"password!","port":8080,"ip":"172.31.1.105","name":"Cluster2-7201","guid":"005056ba72edf6450c552312a728d3a22a23","user":"admin"}
{"pass":"password!","port":8080,"ip":"172.31.1.104","name":"Cluster-1-7201","guid":"005056ba34580f410c55fd077989478a3821","user":"admin"}
SYNCIQ
[{"name":"dfs9_mirror","targetIp":"172.31.1.104","targetHostname":"172.31.1.104","sourcePath":"/ifs/data/policy1","targetPath":"/ifs/data/policy1","enabled":true,"shares":[],"exports":[],"zones":[],"lastJobStatus":"finished","lastSuccess":"1446812701","lastStarted":"1446812701","schedule":"every 1 days every 5 minutes between 12:00 AM and 11:59 PM","sourceExludePaths":[],"sourceIncludePaths":[]}]
Process completed with return code: 0
Bash - Example Script
#!/bin/bash
echo these are the environment variables
echo source: $SOURCE
echo target: $TARGET
echo failover type: $FAILOVER_TYPE
echo zone data: $ZONE_DATA
echo policy data: $POLICY_DATA
Bash - Example Output
these are the environment variables
source: {"pass":"password!","port":8080,"ip":"172.31.1.105","name":"Cluster2-7201","guid":"005056ba72edf6450c552312a728d3a22a23","user":"admin"}
target: {"pass":"password!","port":8080,"ip":"172.31.1.104","name":"Cluster-1-7201","guid":"005056ba34580f410c55fd077989478a3821","user":"admin"}
failover type: SYNCIQ
zone data:
policy data: [{"name":"dfs9_mirror","targetIp":"172.31.1.104","targetHostname":"172.31.1.104","sourcePath":"/ifs/data/policy1","targetPath":"/ifs/data/policy1","enabled":true,"shares":[],"exports":[],"zones":[],"lastJobStatus":"running","lastSuccess":"null","lastStarted":"1446812701","schedule":"every 1 days every 5 minutes between 12:00 AM and 11:59 PM","sourceExludePaths":[],"sourceIncludePaths":[]}]
Process completed with return code: 0
Consolidated Post Failover & Failback Script (Node.JS)
#!/usr/bin/env node
var exec = require('child_process').exec;
var child;
var mycmd = 'echo 41d7297b7c79651bb94dcf676538f9b3b5ed6e8ed25e04c6ee38d14269e022cc | sudo -S su root -c "sh /opt/superna/sca/failover.sh"';
var mycmd2 = 'echo 41d7297b7c79651bb94dcf676538f9b3b5ed6e8ed25e04c6ee38d14269e022cc | sudo -S su root -c "sh /opt/superna/sca/failback.sh"';
// refresh name resolution
if (process.env.SOURCE.indexOf('cluster20') !== -1)
{
console.log("Failover");
child = exec(mycmd, function (error, stdout, stderr)
{
console.log('result output: ' + stdout);
console.log('result errors: ' + stderr);
}
);
}
else
{
console.log("Failback");
child = exec(mycmd2, function (error, stdout, stderr)
{
console.log('result output: ' + stdout);
console.log('result errors: ' + stderr);
}
);
}
var node_ssh = require('node-ssh');
var ssh = new node_ssh();
var cmd1 = "ls -l /proc/*/cwd | grep /mnt/z01-nfs01 | awk '{print $9}' | grep -o '[0-9]*' | xargs kill -s 9",
cmd2 = 'umount -fl /mnt/z01-nfs01',
cmd3 = 'mount -t nfs -o vers=3 cluster20-z01.ad1.test:/ifs/data/zone01/z01-nfs01 /mnt/z01-nfs01',
host = '172.16.81.161',
user = 'root',
pass = 'GoSuperna!';
console.log('Executing command: ' + cmd1);
console.log('Executing command: ' + cmd2);
console.log('Executing command: ' + cmd3);
console.log(' On host: ' + host);
ssh.connect({
host: host,
username: user,
password: pass
}).then(function() {
ssh.execCommand( cmd1, {
stream: 'both'
}).then(function(result) {
console.log('result output: ' + result.stdout);
console.log('result errors: ' + result.stderr);
}).then(function() {
ssh.execCommand( cmd2, {
stream: 'both'
}).then(function(result) {
console.log('result output: ' + result.stdout);
console.log('result errors: ' + result.stderr);
}).then(function() {
ssh.execCommand( cmd3, {
stream: 'both'
}).then(function(result) {
console.log('result output: ' + result.stdout);
console.log('result errors: ' + result.stderr);
console.log('ssh operation complete');
ssh.end();
});
});
});
});
Consolidated Post Failover & Failback Script (Node.JS) I.E Multiple Zone Access
The following node.js script is the example for handling multiple zone access:
// 1st Part refresh name resolution
var exec = require('child_process').exec;
var child;
var mycmd1 = 'echo 41d7297b7c79651bb94dcf676538f9b3b5ed6e8ed25e04c6ee38d14269e022cc | sudo -S su root -c "sh /opt/superna/sca/failover-z01.sh"';
var mycmd2 = 'echo 41d7297b7c79651bb94dcf676538f9b3b5ed6e8ed25e04c6ee38d14269e022cc | sudo -S su root -c "sh /opt/superna/sca/failover-z03.sh"';
var mycmd3 = 'echo 41d7297b7c79651bb94dcf676538f9b3b5ed6e8ed25e04c6ee38d14269e022cc | sudo -S su root -c "sh /opt/superna/sca/failback-z01.sh"';
var mycmd4 = 'echo 41d7297b7c79651bb94dcf676538f9b3b5ed6e8ed25e04c6ee38d14269e022cc | sudo -S su root -c "sh /opt/superna/sca/failback-z03.sh"';
if (process.env.SOURCE.indexOf('cluster20') !== -1)
{
console.log("Failover");
if (process.env.ZONE_DATA.indexOf('zone01') !== -1)
{
child = exec(mycmd1, function (error, stdout, stderr)
{
console.log('result output: ' + stdout);
console.log('result errors: ' + stderr);
}
);
}
if (process.env.ZONE_DATA.indexOf('zone03') !== -1)
{
child = exec(mycmd2, function (error, stdout, stderr)
{
console.log('result output: ' + stdout);
console.log('result errors: ' + stderr);
}
);
}
}
if (process.env.SOURCE.indexOf('cluster21') !== -1)
{
console.log("Failback");
if (process.env.ZONE_DATA.indexOf('zone01') !== -1)
{
child = exec(mycmd3, function (error, stdout, stderr)
{
console.log('result output: ' + stdout);
console.log('result errors: ' + stderr);
}
);
}
if (process.env.ZONE_DATA.indexOf('zone03') !== -1)
{
child = exec(mycmd4, function (error, stdout, stderr)
{
console.log('result output: ' + stdout);
console.log('result errors: ' + stderr);
}
);
}
}
// 2nd Part refresh mount
var node_ssh = require('node-ssh');
var ssh = new node_ssh();
var cmd1 = "ls -l /proc/*/cwd | grep /mnt/z01-nfs01 | awk '{print $9}' | grep -o '[0-9]*' | xargs kill -s 9",
cmd2 = 'umount -fl /mnt/z01-nfs01',
cmd3 = 'mount -t nfs -o vers=3 cluster20-z01.ad1.test:/ifs/data/zone01/z01-nfs01 /mnt/z01-nfs01',
cmd4 = "ls -l /proc/*/cwd | grep /mnt/z03-nfs01 | awk '{print $9}' | grep -o '[0-9]*' | xargs kill -s 9",
cmd5 = 'umount -fl /mnt/z03-nfs01',
cmd6 = 'mount -t nfs -o vers=4 cluster20-z03.ad1.test:/ifs/data/zone03/z03-nfs01 /mnt/z03-nfs01',
host = '172.16.81.161',
user = 'root',
pass = 'GoSuperna!';
console.log(' On host: ' + host);
if (process.env.ZONE_DATA.indexOf('zone01') !== -1)
{
console.log('Executing command: ' + cmd1);
console.log('Executing command: ' + cmd2);
console.log('Executing command: ' + cmd3);
ssh.connect({
host: host,
username: user,
password: pass
}).then(function() {
ssh.execCommand( cmd1, {
stream: 'both'
}).then(function(result) {
console.log('result output: ' + result.stdout);
console.log('result errors: ' + result.stderr);
}).then(function() {
ssh.execCommand( cmd2, {
stream: 'both'
}).then(function(result) {
console.log('result output: ' + result.stdout);
console.log('result errors: ' + result.stderr);
}).then(function() {
ssh.execCommand( cmd3, {
stream: 'both'
}).then(function(result) {
console.log('result output: ' + result.stdout);
console.log('result errors: ' + result.stderr);
console.log('ssh operation complete');
ssh.end();
});
});
});
});
}
if (process.env.ZONE_DATA.indexOf('zone03') !== -1)
{
console.log('Executing command: ' + cmd4);
console.log('Executing command: ' + cmd5);
console.log('Executing command: ' + cmd6);
ssh.connect({
host: host,
username: user,
password: pass
}).then(function() {
ssh.execCommand( cmd4, {
stream: 'both'
}).then(function(result) {
console.log('result output: ' + result.stdout);
console.log('result errors: ' + result.stderr);
}).then(function() {
ssh.execCommand( cmd5, {
stream: 'both'
}).then(function(result) {
console.log('result output: ' + result.stdout);
console.log('result errors: ' + result.stderr);
}).then(function() {
ssh.execCommand( cmd6, {
stream: 'both'
}).then(function(result) {
console.log('result output: ' + result.stdout);
console.log('result errors: ' + result.stderr);
console.log('ssh operation complete');
ssh.end();
});
});
});
});
}
Superna Eyeglass API Guide
It is now possible to failover using external applications such as VMware SRM or a script called from an application, web page or CURL command. The API Guide covers API Explorer to automatically build CURL commands that allows a single command failover over a policy or entire Access Zone. This also allows script engine logic to run if enabled at the end of failover.
The API and example VMware integration for failover is explained in the Superna Eyeglass API guide.
© Superna Inc