AirGap 2.0 Guide For ECS
- Overview
- Architecture Overview
- Key Features
- Deployment and Configuration
- Hardware Requirements
- Vault ECS Sizing
- Potential Additional Equipment
- Installation Services Required
- Scalability
- Superna Software
- Performance Considerations
- Service Account Permissions for Vault Agent Data Movers
- ECS Bucket Policy for Vault User Access
- Scope
- Policy Template
- Permission Required
- Applying a Bucket Policy in ECS (via GUI 3.8.x)
- Configuration
- How to Create ECSSync Jobs
- How to Clone ECSSync jobs
- Airgap Operations
- Monitoring Vault ECS cluster alarms and free space
- Monitoring ECSsync job success and failures and policy sync job reports
- Monitoring Job History
- Vault Agent CLI Commands for ECS Sync
- Add ECS production & vault cluster to the vault agent
- Manage ECSSync jobs, schedules, run jobs, push support logs, update eyeglass
Overview
The AirGap 2.0 configuration for ECS ensures a highly secure, one-directional data transfer mechanism, designed to protect the Vault ECS from external threats. The architecture is purposefully unidirectional, ensuring that data flows only outbound from the Vault ECS environment to the production ECS, never the reverse.
Architecture Overview
The system is architected as follows (note quantities of VM's not shown in this diagram)
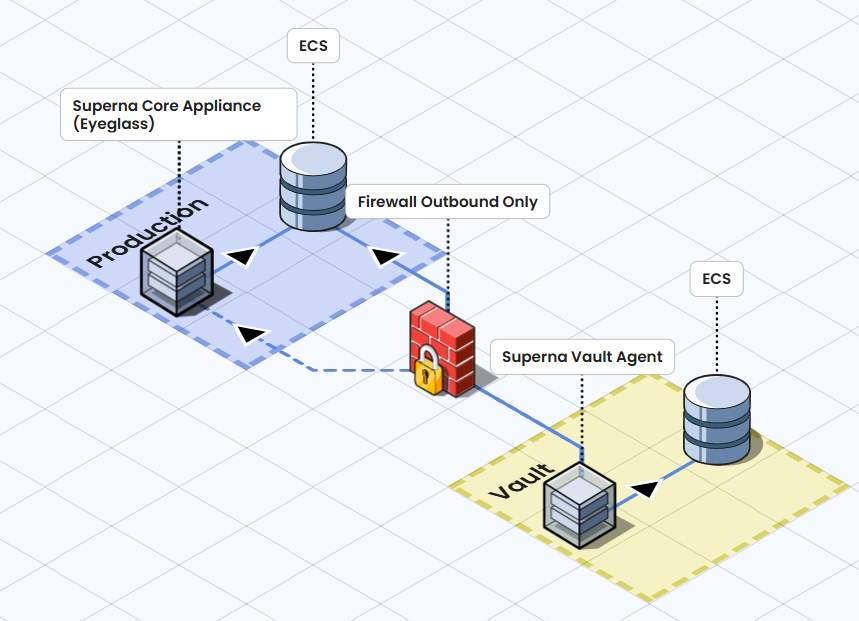
Superna Vault Agent checks for any active ransomware events from the Superna Core Appliance (Eyeglass) on a preconfigured schedule before initiating data sync.
Superna Vault Agent uses ECS Sync to pull data from the production ECS which is then proxied to the Vault ECS.
Firewall should enforce strict outbound-only rules, preventing any inbound connections into Vault ECS.
Vault ECS serves as the immutable backup (if object-lock is enabled), only receiving data and never responding to external requests.
The fundamental security principle here is that the Vault ECS never initiates inbound connections. The firewall rules are explicitly designed to allow outbound connections only, ensuring that no data or access can be exploited from the Vault ECS.
Key Features
S3 to S3 Airgap Support – Ensures secure, asynchronous replication between S3-compatible ECS environments.
Inside-the-Vault Automation – Automates replication management within the vault for enhanced security.
Object Recovery - object level recovery with cyber recovery manager from production ECS. Recovery from attacks on objects with bucket versioning enabled on production buckets.
Smart Airgap Technology – Only syncs data when conditions are safe, minimizing risk exposure.
Per-Bucket Level Replication – Enables granular control over data synchronization at the bucket level.
Immutability Support – Leverages ECS Object Lock and bucket versioning to ensure data integrity and protection.
Rapid Recovery – Vault ECS can quickly present an immutable copy of data at petabyte scale. Object Lock safeguards data from modifications during recovery.
Many-to-One Support – Allows multiple production ECS clusters to securely replicate to a single ECS Vault cluster.
Data Security Edition for ECS – Includes IAM user lockout capabilities for enhanced access control.
Deployment and Configuration
Hardware Requirements
Dell PowerEdge R650 Server (see Superna for quantity required)
4 x RAID 1, 800GB SSD
40 core dual CPU
256GB RAM (Dual Socket, 48 Threads)
Dual 10G NIC
Support Options:
3-Year Next Business Day (NBD) Support OR
ProDeploy Plus Service
Vault ECS Sizing
Intended Use case:
Highly critical business data to vault, on a limited number of S3 buckets with low change rate applications are the best fit.
For all other scenarios protecting the production ECS or Object scale is the recommend solution, and provides advanced monitoring and real time protection including data recovery automation from S3 versions with Cyber Recovery Manager feature built into Security Edition.
Capacity must be sized based on the required data protection volume.
Supported Airgap must contact sales before quoting.
Potential Additional Equipment
Production Network Requirements
Ethernet Switch or Firewall to connect the Vault Agent Host
Vault Network Requirements
Ethernet Switch for private network connectivity between Vault Agent Host and Vault ECS Cluster
Load Balancer Support
Progress Kemp LoadMaster (if applicable)
If using a load balancer in front of ECS, configure its IP address during the Add Managed Device step.
This ensures Vault Agent-managed airgap jobs are correctly associated with the ECS cluster.
Installation Services Required
Dell Services:
Physical Installation of Dell Server
Configuration and Hardening of ECS Vault Cluster
Superna Services:
Airgap Design & Implementation
Ransomware Defender for ECS – Installation, Configuration, and Knowledge Transfer
Scalability
Vault Agent Cluster Options:
3, or 6 Vault Agent VMs for high availability and high throughput asynchronous object-to-object copying
Enterprise Airgap Scaling:
Supports 10 ECSSync instances
Superna Software
Ransomware Defender for ECS
Enterprise Airgap
Performance Considerations
For the latest ECSSync performance estimates, refer to: ECSSync Performance Metrics
Contact support for sizing of VM count based on object count, average object size, total TB's, number of buckets. This information is required in order to provid maxium supported configuration.
| Firewall Requirements |
| Port | Direction | Description | Comment |
| 443 TCP | Network → Airgap ECA Cluster (all node IPs) | Web Access to ECSSync UI | Required for setup only, remove after setup |
| SSH TCP | Network → Airgap ECA Cluster (all node IPs) | Management SSH Access | Required for setup only, remove after setup |
| 9021 TCP HTTPS | Airgap ECA cluster (all node ip addresses) --> Production ECS Load Balancer IP address | Sync Data Replication ( data node network in production). Gets, list objects API required | during sync window |
| 9021 TCP HTTPS | Airgap ECA cluster Data movers --> Load balancer in vault --> Vault ECS | Sync Data replication (vault ecs data node in vault) Get, put, list API required | during sync window |
| 443 TCP API | Airgap ECA Cluster (all node IPs) → Superna Core Appliance (Eyeglass) IP | API Access from Vault to Eyeglass | Secure API communication |
Service Account Permissions for Vault Agent Data Movers
ECS Bucket Policy for Vault User Access
This policy ensures the Vault Access object user can reliably access all objects in a bucket, regardless of how they were uploaded or what ACLs they carry. It prevents sync failures due to 403 Forbidden errors caused by restrictive object-level permissions.
Scope
Applies at the bucket level (ECS does not support namespace-wide policies)
Consider scripting this via the ECS Management API if you manage many buckets
Must be applied to each bucket ECS-Sync will read from
Policy Template
{ "Version": "2012-10-17", "Statement": [ { "Sid": "AllowSupernaVaultAgentReadAccess", "Effect": "Allow", "Principal": { "AWS": "vault-agent-user-access-key" }, "Action": [ "s3:GetObject", "s3:GetObjectAcl", "s3:ListBucket", "s3:GetBucketLocation" ], "Resource": [ "arn:aws:s3:::bucket-name", "arn:aws:s3:::bucket-name/*" ] } ] } |
Replace bucket-name and vault-agent-user-access-key with actual values:
Permission Required
Action | Purpose |
s3:GetObject | Read object contents |
s3:GetObjectAcl | Read object-level ACLs (used by ECS-Sync) |
s3:ListBucket | List objects in the bucket |
s3:GetBucketLocation | Determine bucket region (required by SDKs) |
Notes |
|
Applying a Bucket Policy in ECS (via GUI 3.8.x)
Log into the ECS management URL (e.g., https://ecs.example.com)
Sign in with an account that has admin or bucket management privileges
Go to Manage → Buckets
Find the bucket you want to modify
Click Edit Policy

Paste Your Policy
Save/Apply changes
TIP: For environments with many buckets - Refer to ECS API Reference Documentation to apply ECS bucket policies via CLI/Automation.
Configuration
- Follow the Ransomware Defender for ECS installation guide.
- Deploy the Dell Vault hardware with vmware pre-installed
- Deploy Enterprise Vault Agent ECA cluster to the vault hardware. See guide.
- Configure firewall as per port table above.
- Install Enterprise Airgap license key in Eyeglass using the License Manager Icon
- Enter eyeglass IP address and API token on the vault agent
- Login to Eyeglass
- click main menu and select Eyeglass REST API
- create new token and name it vault
- copy the new token by clicking it to use with yyyyy value below
- Login to the vault agent as ecaadmin
- nano /opt/superna/eca/eca-env-common.conf
- export EYEGLASS_LOCATION=x.x.x.x
- export EYEGLASS_API_TOKEN=yyyyyy
- Add the Object Services for Enterprise Airgap
- export ECS_SYNC_CFG=true
- control + x (save and exit)
- ecactl cluster down
- ecactl cluster up
- Login to Eyeglass
- Follow these steps to configure the Vault Agent
- Add ecs clusters to the vault agent
- ecactl ecs add --host x.x.x.x --user <user>
- ip of management interface and service account user (see the guide)
- repeat for each managed production and vault ECS cluster
- verify
- ecactl ecs list
- ecactl ecs add --host x.x.x.x --user <user>
- OneTime ECS Sync instance configuration
- https://x.x.x.x/ecssyncui
- login with ecaadmin and default password 3y3gl4ss
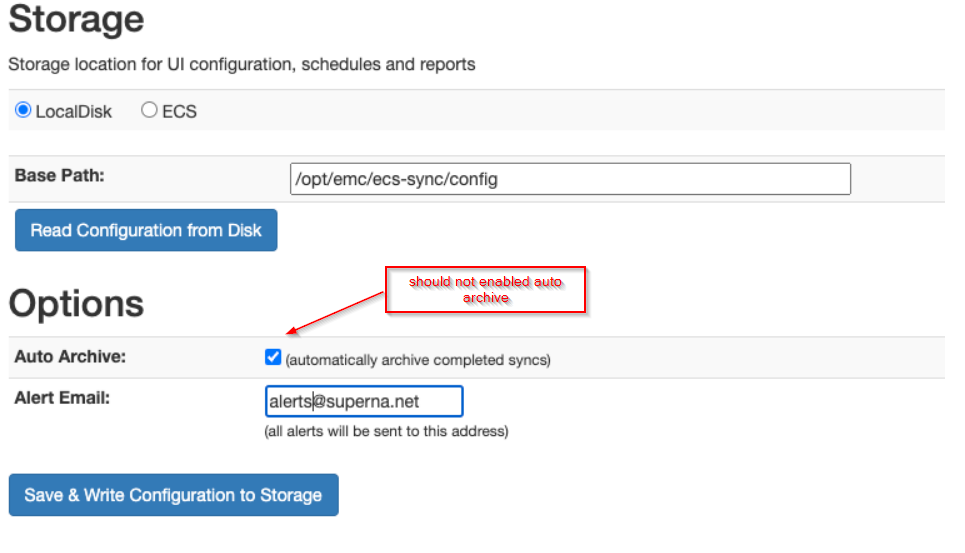
- Click Config tab and enter the config path /opt/emc/ecs-sync/config and an email address (this email will not be used for any alerting but is a required input)
- Uncheck (automatically archive completed syncs)
- https://x.x.x.x/ecssyncui
- Configure ECS Sync Jobs
- https://x.x.x.x/ecssyncui (each vault agent has an ecssync container, enter the ip address of each instance to add jobs to the copy engine)
- login with ecaadmin and default password 3y3gl4ss
- NOTE: Always change the default password following steps here.
- See detailed steps below for adding jobs
- Save the jobs
- Add ECSSync Jobs to the vault agent to control them and push to Eyeglass
- ecactl ecssync listjobs (to get list of configured jobs)
- ecactl ecssync addjob --job xxxx (enter the job name from the list command, this will add the job to the managed job list)
- Push ECS job definitions to Eyeglass to register them
- This command will push all the jobs defined and added to the vault agent to be managed, monitored and scheduled.
- ecactl ecssync updatejobs
- Login to Eyeglass
- Open Airgap Icon
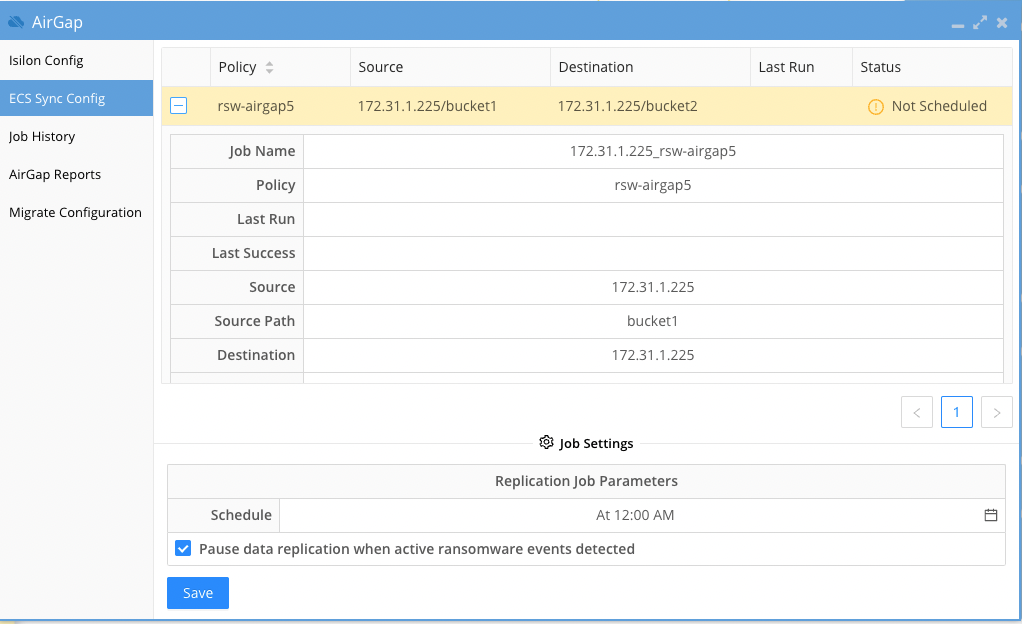
- Click ECS Sync Config Tab
- The new jobs should appear automatically and show status of Not Scheduled.
- Click the checkbox to enable Ransomware Defender smart airgap control and set the schedule for each ECS Sync job listed and click save after making changes to any policy.
- Set the schedule and save
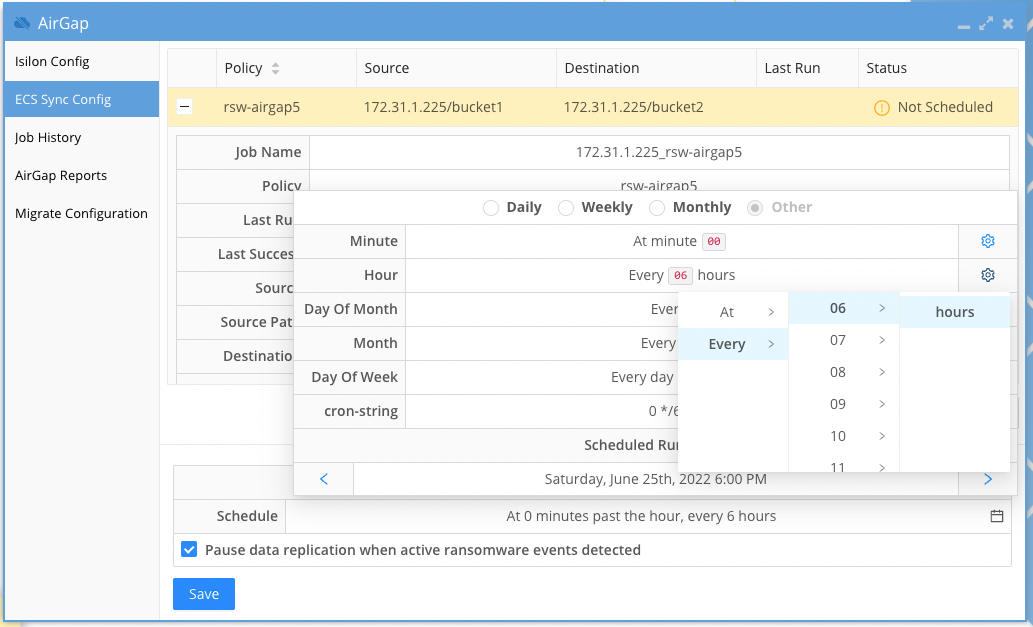
- Repeat for each policy that displays not scheduled.
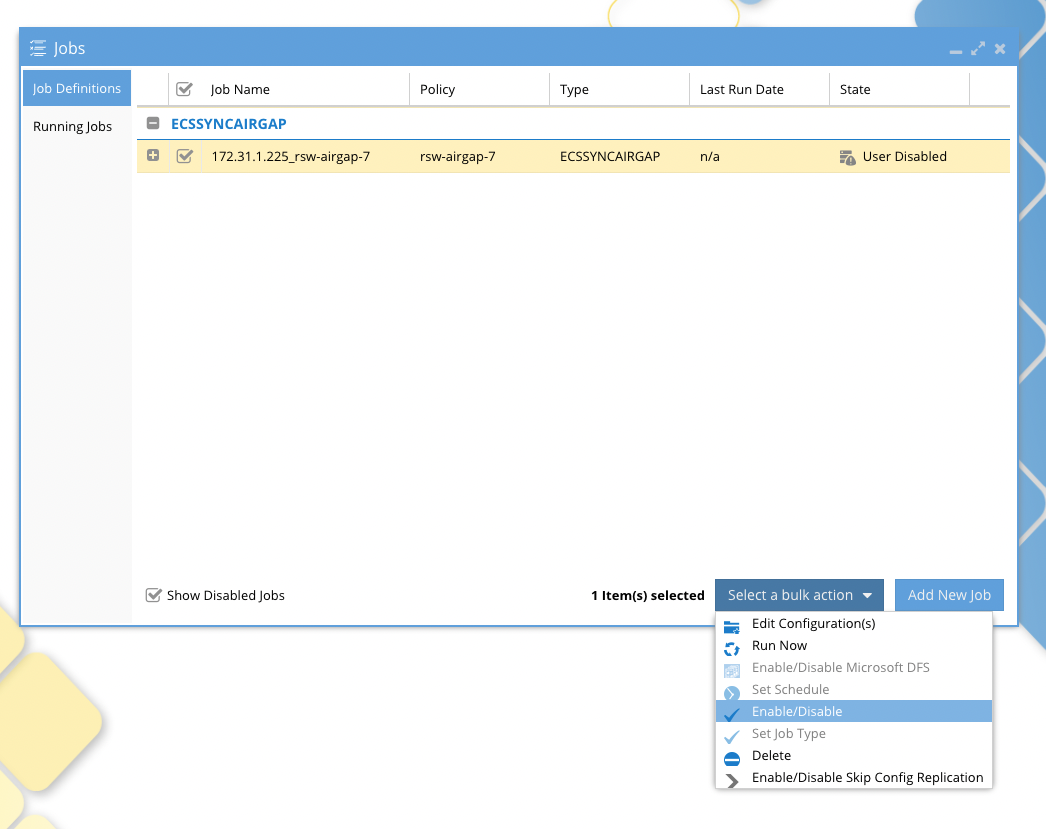
- Open the jobs icon to enable the job. The default state is disabled and no sync jobs will run until enabled.
- Verify Vault agent has detected the schedule change
- login to the vault agent
- ecactl ecssync schedules
- The schedule should be displayed for each policy configuration.
- Done
- Test a job sync - this will force run a job from the vault agent cli
- ecactl ecssync startjob --job xxxx (where xxxx is the name of the policy configured in ecactl ecssync checkjobs command
- The job should indicate it was started, You can verify from the ECSSync GUI
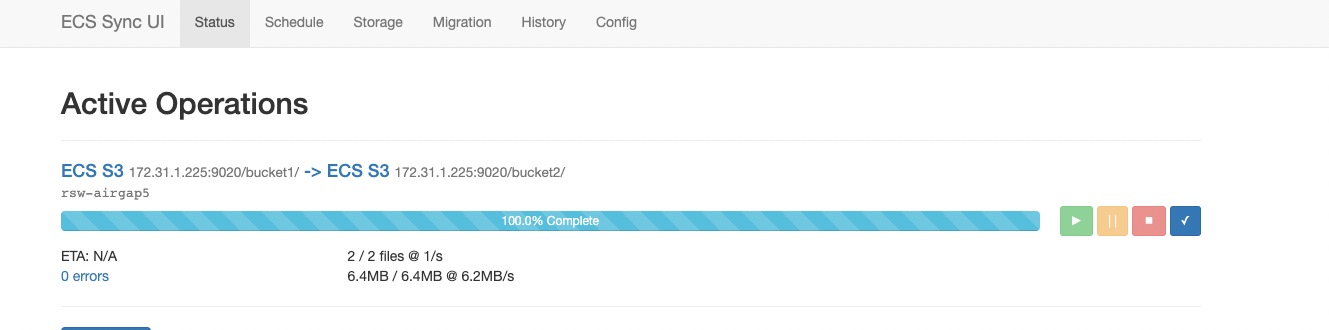
- NOTE: Do not archive jobs, they are managed by Vault agent.
- List all jobs
- Add ecs clusters to the vault agent
How to Create ECSSync Jobs
- Login to each instance of ecssync on each Vault Agent vm
- https://x.x.x.x/ecssyncui/ (each ECA vault vm hosts an instance of ecssync to load balance the workloads)
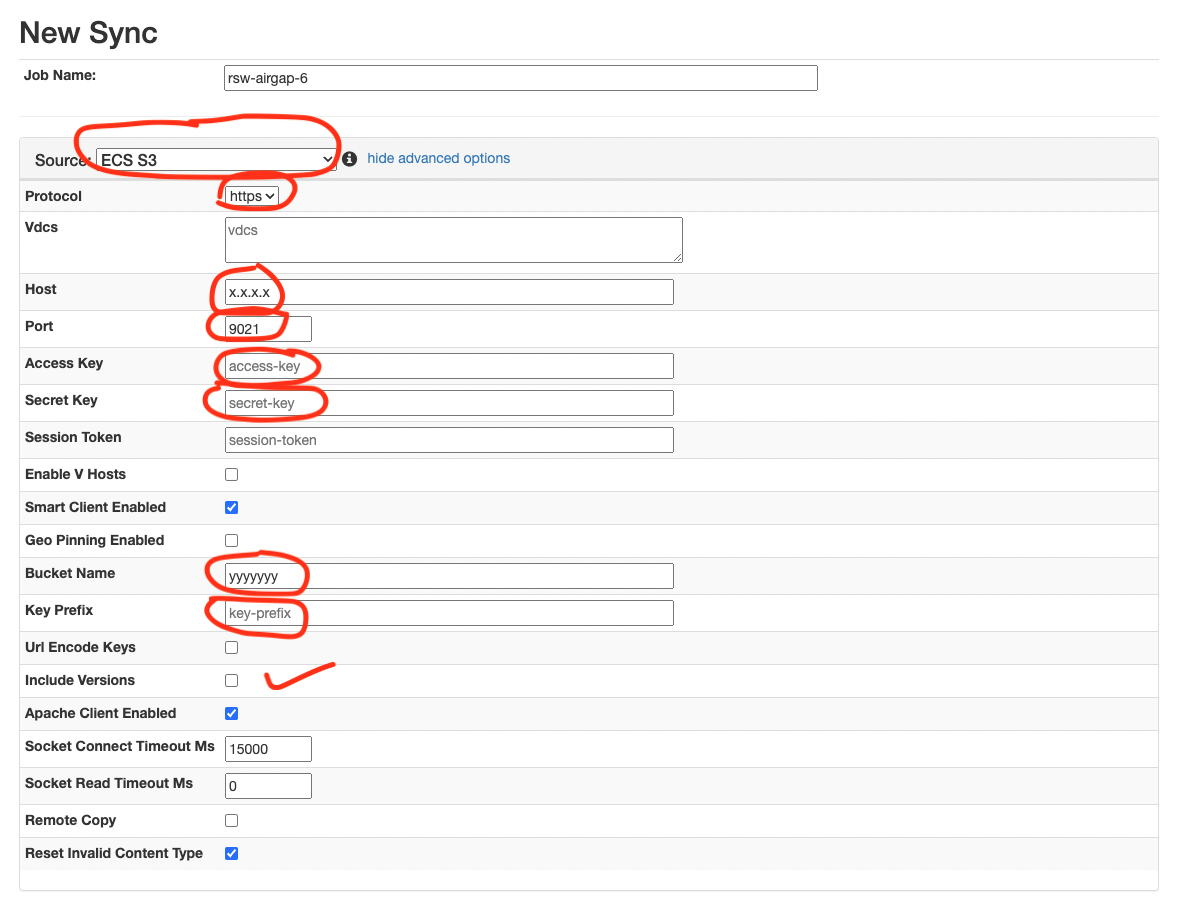
- Select the Status Tab and click the New Sync Button
- NOTE: the job name is mandatory and MUST be unique across all instances of ecssync
- NOTE: Select ECS S3 for source and destination. See suggested parameter highlighted below.
- NOTE: selecting the version check box will increase copy time significantly
- NOTE: Key prefix allows selecting a location within a bucket
- NOTE: The source and target host ip address should specify the load balancer DNS name or ip address for the source production cluster and the load balancer in the secure network for the Vault ECS.
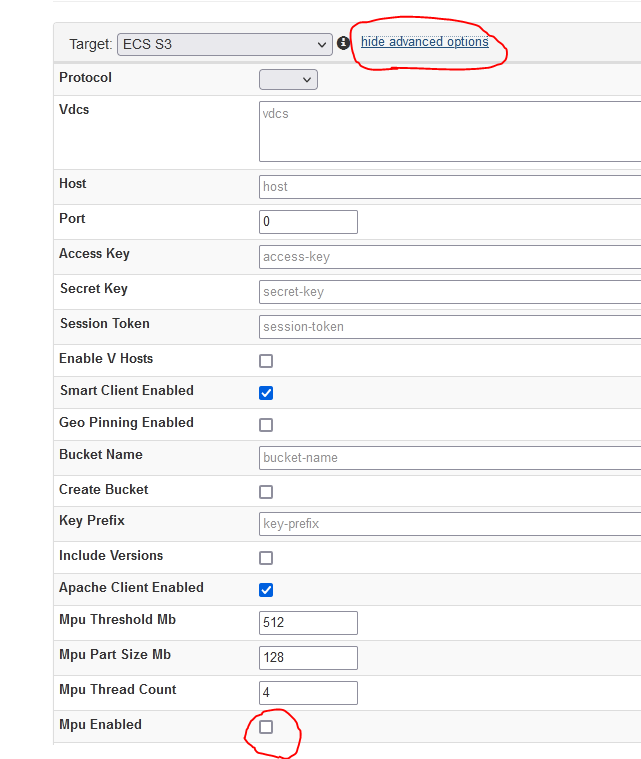
- To enable high performance multipart copies for large objects click the Hide Advanced button. This will accelerate the copy with multiple threads per object. Always recommended for larger objects.
- Click the start button to save the configuration and start the copy process.
- If the Vault is open the job will succeed and start the copy.
- If the Vault is closed the job will fail and can be scheduled by Eyeglass for running at a later time.
How to Clone ECSSync jobs
Use these steps to clone a job and change the source or destination bucket
- Run from Vault agent on the airgap VM
- ecactl ecssync clonejob --job jobname --newname jobname1
- ecaadmin@cpvault01-1:~> ecactl ecssync clonejob --helpusage: ecactl ecssync clonejob [-h] --job JOB --newname NEWNAME [--sourcebucket SOURCEBUCKET] [--destbucket DESTBUCKET] [--sourceusername SOURCEUSERNAME] [--destusername DESTUSERNAME][--sourceuserkey SOURCEUSERKEY] [--destuserkey DESTUSERKEY] [--sourceconnstr SOURCECONNSTR] [--destconnstr DESTCONNSTR]optional arguments:-h, --help show this help message and exit--job JOB Name of the ecs-sync job we want to clone in vault agent--newname NEWNAME The name of the new job--sourcebucket SOURCEBUCKETThe source bucket of the new job--destbucket DESTBUCKETThe dest bucket of the new job--sourceusername SOURCEUSERNAMEThe user name on source for the new job--destusername DESTUSERNAMEThe user name on destination ECS for the new job--sourceuserkey SOURCEUSERKEYThe user secret key on source for the new job--destuserkey DESTUSERKEYThe user secret key on destination ECS for the new job--sourceconnstr SOURCECONNSTR--destconnstr DESTCONNSTR
- To set the schedules of the jobs, this can be done from the eyeglass CLI
- igls airgap schedule set --job 10.152.0.73_rw-airgap-20-clona5_cpvault01 --cronstr '28 * * * *'
- The cron string sets the schedule
- NOTE: For a job called jobname in VA (Vault Agent), in eyeglass those jobs have format: source_jobname_vaultagentid
Airgap Operations
Monitoring Vault ECS cluster alarms and free space
- Login into the eyeglass vm to review Alarms retrieved from the vault cluster
Monitoring ECSsync job success and failures and policy sync job reports
- Login to eyeglass and open the airgap icon and click the Airgap Reports
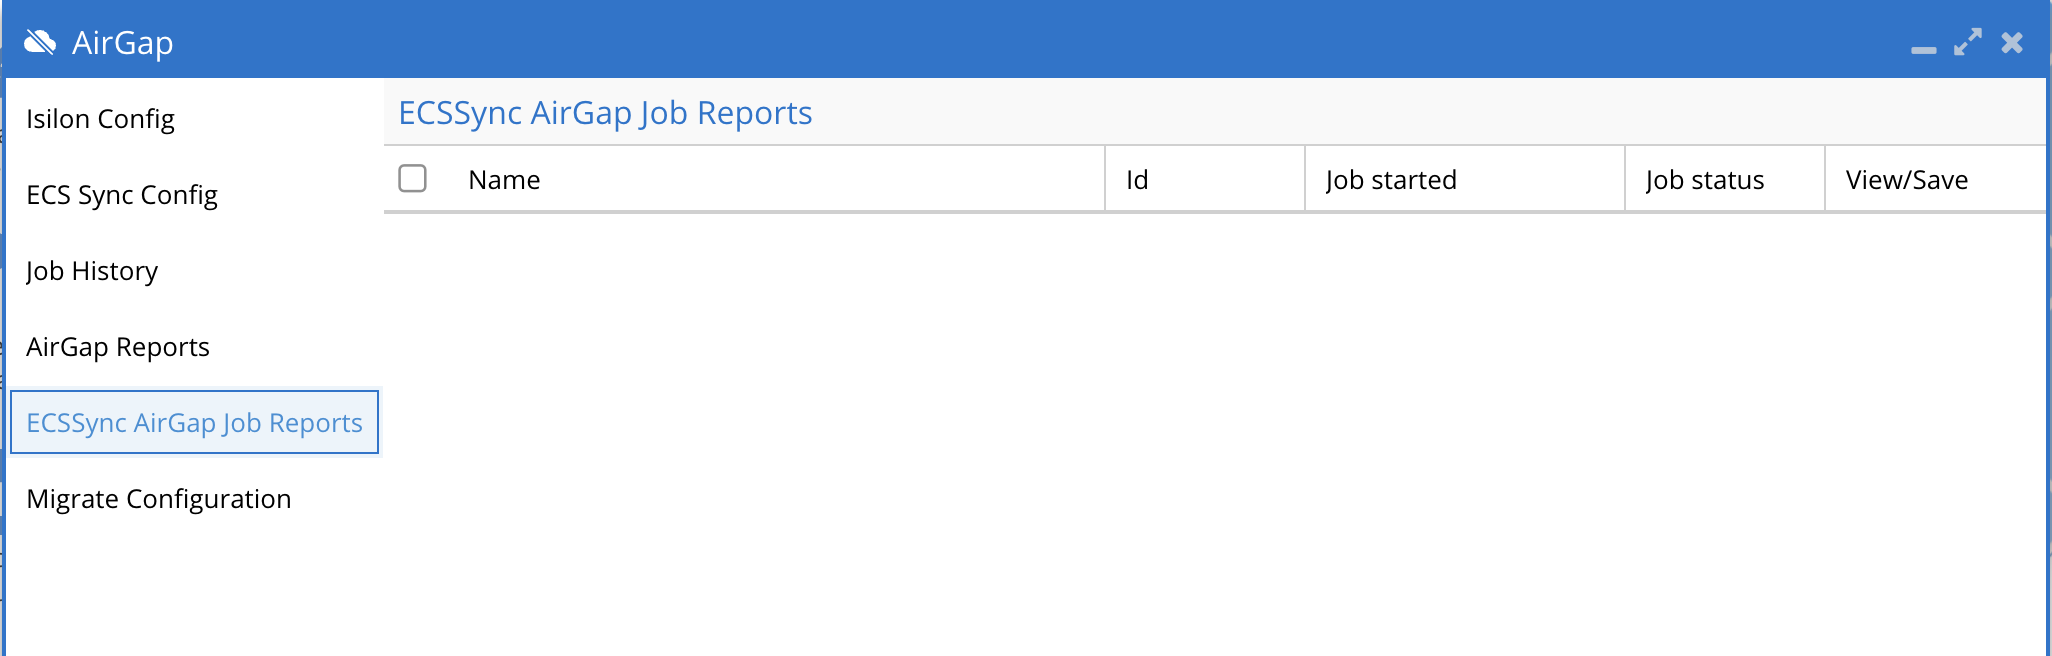
- Click the open button to view the reports. The reports are also emailed.
Monitoring Job History
- Login to eyeglass and open the airgap icon and click the Job History
- Click on each job to view details
Vault Agent CLI Commands for ECS Sync
Add ECS production & vault cluster to the vault agent
- ecactl ECS add –host <host> –user <user>
- --host management ip address of the ecs
- --user service account created on the ecs
- ecactl ecs list
- ecactl ecs delete
- ecsctl ecs pushalerts
- Retrieves the alerts from all ecs registered and forwards it to eyeglass.
- ecactl ecssync clonejob where we provide the original job, New job name, and what we want to change:source /dest bucket.
Manage ECSSync jobs, schedules, run jobs, push support logs, update eyeglass
- ecactl ecssync {startjob, checkjobs, pushvaultagentlogs, schedules, updatejobs)
- ecactl ecssync starjob --job xxx (xxx is the the name of the ecssync job) This will start the copy job immediately on the ecssync that owns the job
- ecactl ecssync checkjobs - Retrieves the jobs from all ecssync instances and displays summary and status of the job
- ecactl ecssync schedules - Retrieves the schedules set in Eyeglass
- ecactl ecssync pushvaultagentlogs - push vault agent logs to eyeglass
- ecactl ecssync updatejobs - push jobs created in ecssync GUI to eyeglass to be managed and scheduled.
- ecactl ecssync {startjob, checkjobs, pushvaultagentlogs, schedules, updatejobs)