- How to know when Uncontrolled failover should be used?
- Eyeglass Pre-Failover Check Important - Read me
- How to failover Data With DR Assistant
How to Execute A Failover with DR Assistant
Follow these steps to execute a failover.
Note: The planning guide is expected to be the referenced document for all planned failovers. Support expects this document has been used for planning.
How to know when Uncontrolled failover should be used?
This option in Eyeglass DR assistant should be used while understanding the data protection implications.
READ THIS FIRST: Using this option means you are failing away from the data and losing ALL changes at the moment the failover is started in Eyeglass.
NOTE: Uncontrolled failover should only be used when the Eyeglass VM DOES NOT have reachability to both Clusters that replicate. Even if data access is an issue to PowerScale BUT Eyeglass reachability is green on the liveops icon. DO NOT USE UNCONTROLLED FAILOVER, USE CONTROLLED FAILOVER.
NOTE: All steps to recover from this failover mode, WILL require manual steps to recover DR sync status and failback from the DR cluster back to the Production cluster.
- Recovery from uncontrolled failover is customer responsibility and is NOT covered by Superna support contract.
- This will require involvement with all vendors related to the equipment in customer data center and receiving the green light from all vendors that the data center is ready to resume operations. This will include PowerScale and all dependent components such as AD, DNS, other application using PowerScale services, physical infrastructure (power, networking WAN links).
DO NOT BRING THE CLUSTER ONLINE WITHOUT PLANNING. RESYNC PREP DOES NOT RUN, WHICH MEANS BOTH CLUSTERS WILL BE WRITEABLE. YOU SHOULD DISCONNECT THE SOURCE CLUSTER AND PLAN A CONTROLLED RECOVERY FROM AN UNCONTROLLED FAILOVER.
Reasons you may choose to execute an uncontrolled failover include the following:
- WAN link is cut to the data center with a very long repair time to restore service.
- Loss of power for extended periods of time to the production data center.
- Damaged cluster or serious cluster issue (upgrade).
- Equipment failover blocking access to the cluster, or application server failures with long recovery times.
- Networking failure that prevents users from accessing storage and PowerScale management network has ALSO Failed.
Eyeglass Pre-Failover Check Important - Read me
IMPORTANT:
Making any changes to the SyncIQ Policies or related Eyeglass Configuration Replication Jobs during failover may result in unexpected results.
IMPORTANT:
Eyeglass Assisted Failover has a 45 minute timeout on each failover step. Any step which is not completed within this timeout period will cause the failover to fail. This can occur if SyncIQ policies are already running when failover job is started or SyncIQ steps take longer than expected to complete. This timeout can be changed but does not accelerate failover if lowered.
IMPORTANT:
Deleting configuration data (shares, exports, quotas) or modifying Share name or NFS Alias name or NFS Export path on the target cluster before failing over without running Eyeglass Configuration Replication will incorrectly result in the object being deleted on the source cluster after failover. You must run Eyeglass configuration replication before the failover OR select the Config Sync checkbox on failover to prevent this from happening.
How to failover Data With DR Assistant
This covers Access Zone/ IP Pool mode, DFS policy mode or SyncIQ mode.
To failover Data with DR Assistant:
- Consult the Failover Design Guide for monitoring failover progress.
- There should be no client access to the Failover Source cluster during failover as this data will not be replicated. Use SMB Data Integrity option to disconnect user sessions on shares that will failover (NFS clients should unmount).
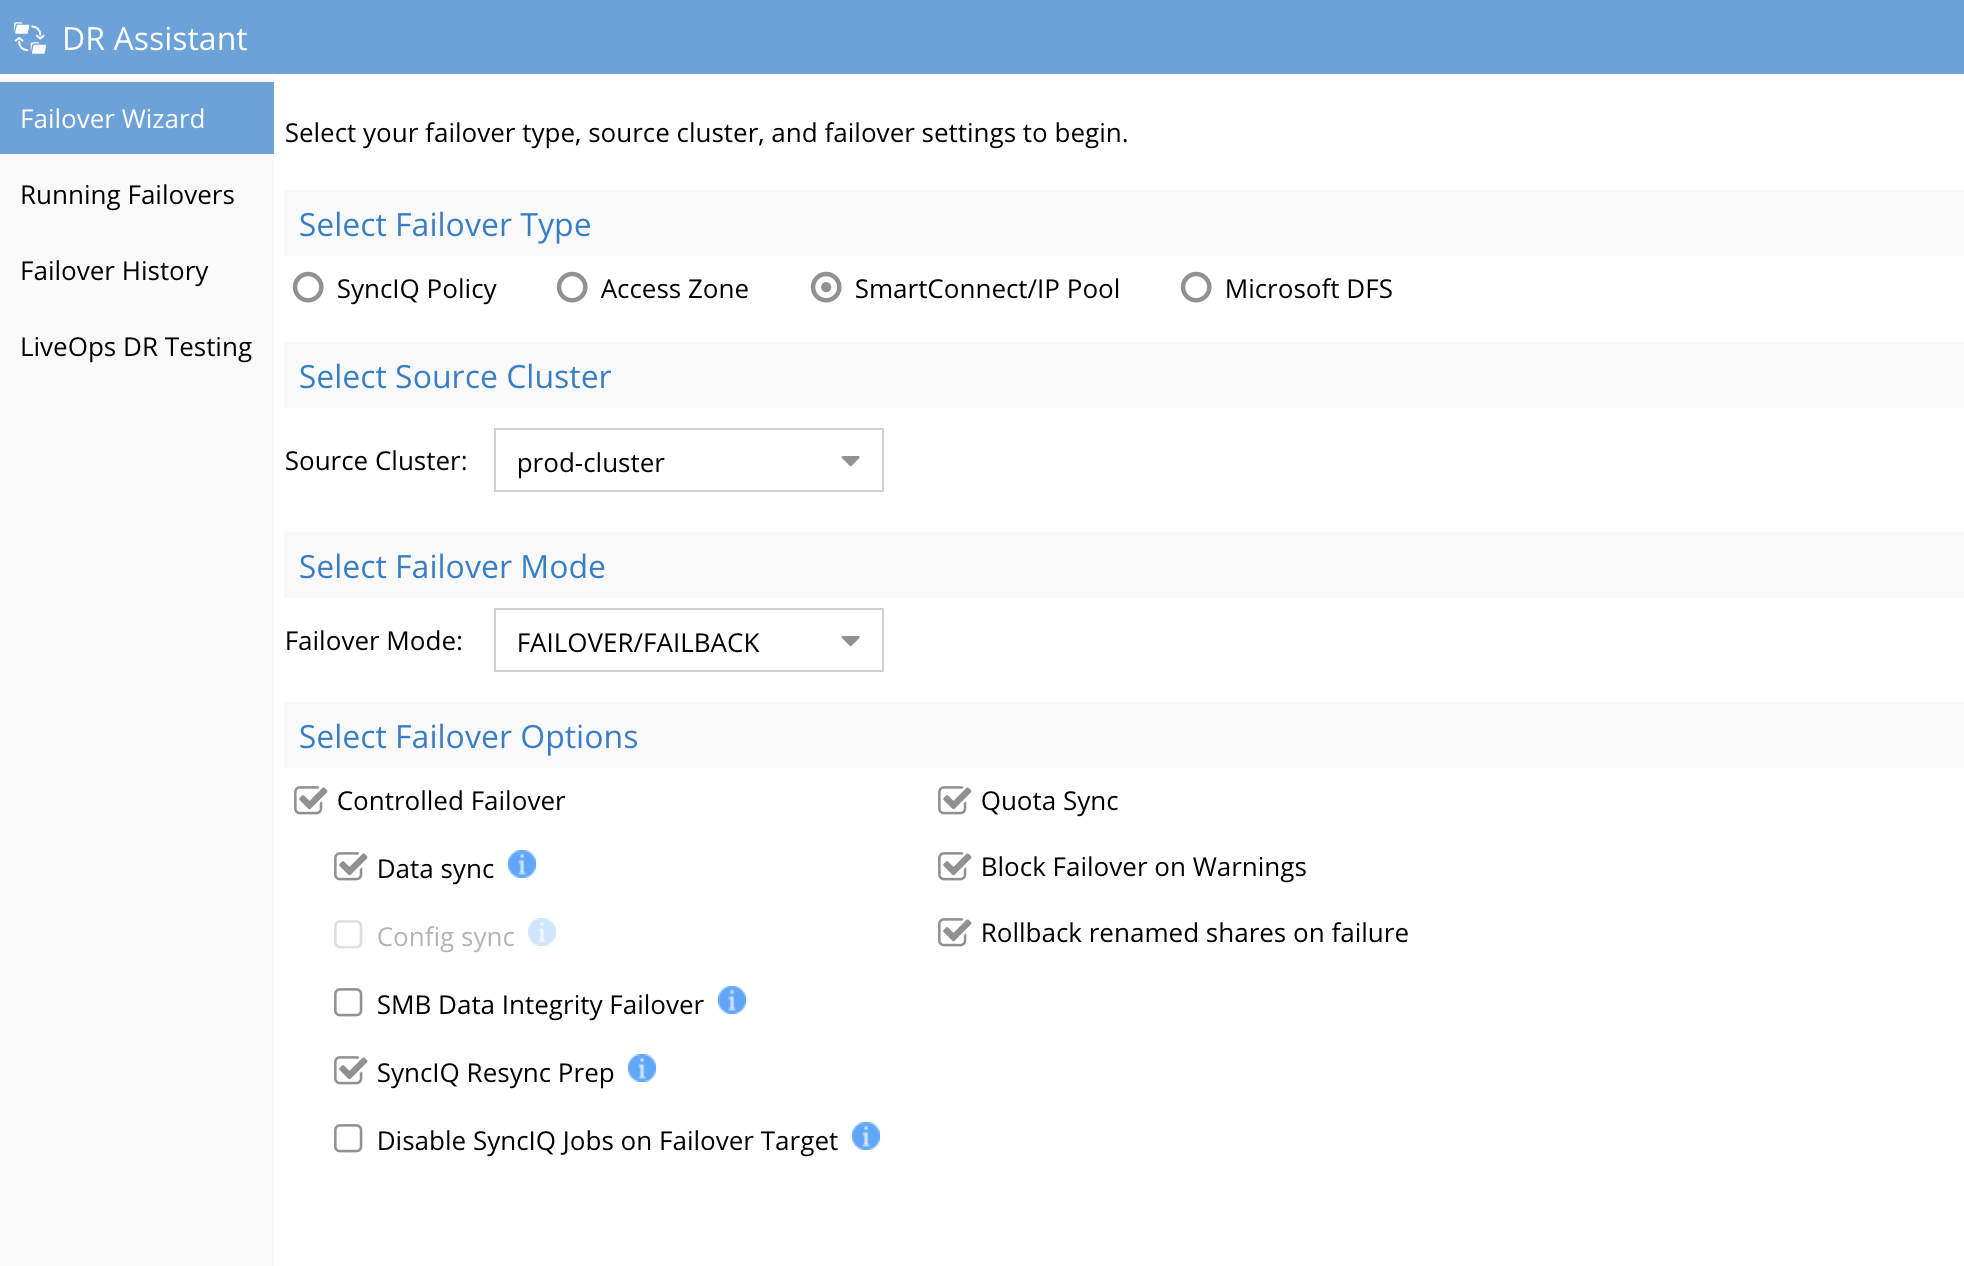
- Open DR Assistant Icon

- Select Failover Type that is configured in your environment.
- Select Source Cluster that has the writable data to failover.
- Leave the Failover Mode set to "Failover / Failback".
- Leave all default check boxes for a planned controlled failover (or read the options below to make changes) .
- FAILOVER OPTIONS ARE DEFINED BELOW:
- Controlled failover
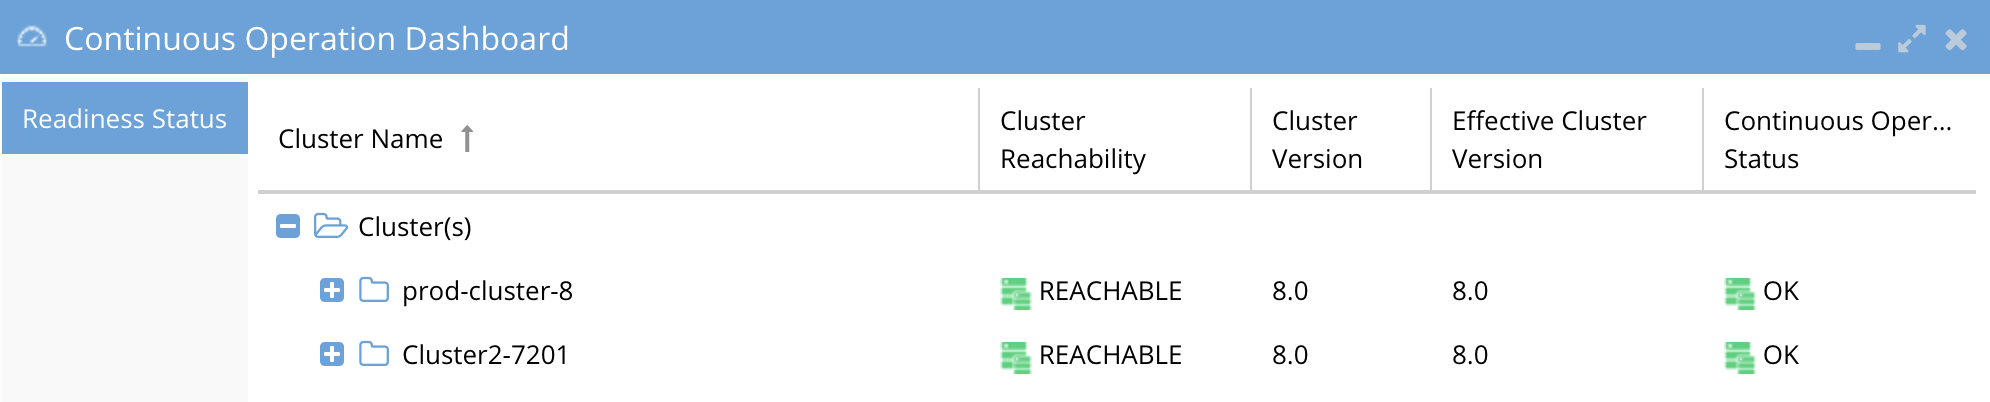
- Check if the source cluster is healthy and reachable. Review the LiveOPS Dashboard Icon and verify the clusters show reachable true.
- Uncheck this option ONLY IF THIS IS A REAL DR EVENT. This option is a REAL DR event. NOTE: Do not use this option unless lab testing OR you are prepared for manual steps to recover from the resulting end state. In this case, source cluster API calls are skipped and cached knowledge of shares, quotas are used to failover (Real DR Event).
- MUST READ: Uncheck Controlled Failover ONLY if this is a REAL DR event (NOTE: If this is unchecked Eyeglass assumes the source cluster is destroyed, NO steps that provide failback are executed. Customer is responsible for recovery from uncontrolled failover - it is not covered by Superna support. NO automated recovery is possible from using this option. It is expected customers make decisions to protect data at all times and only use this option if data is deemed not usable for business reasons.
- Recovery from uncontrolled failover is customer responsibility and is NOT covered by Superna support contract.
- This will require involvement with all vendors related to the equipment in customer data center and receiving the green light from all vendors that the data center is ready to resume operations. This will include PowerScale and all dependent components such as AD, DNS, other application using PowerScale services, physical infrastructure (power, networking WAN links).
- All recovery is manual if this option is used. Ensure the cluster you fail away from is no longer accessible to users and take steps to ensure it cannot be accessed.
- IMPORTANT:
- Eyeglass Configuration Replication Jobs will be in USERDISABLED state on source and target cluster after an uncontrolled failover.
- Data Sync
- Check to run a final SyncIQ data sync Job as part of the failover (RECOMMENDED)
- Uncheck to skip the SyncIQ data sync step
- Config Sync (DISABLED > 2.5.6)
- Check to run a final Eyeglass Configuration Replication Job as part of the failover to sync shares, exports, nfs aliases.
- Uncheck to skip the Eyeglass Configuration Replication step (RECOMMENDED)
- SMB Data Integrity Failover (Optional)
- Check to enable SMB Data Integrity Failover . This mode disconnects any active SMB sessions prior to failover and ensures that no new sessions can be established on the failover source. It applies a deny read permission to the Everyone user to each share.
- NOTE: if shares use root with full control, you are no longer using Active Directory user, this is a Linux user on PowerScale only and not an Active Directory user. Any share with run as root by passes all security and cannot be locked out from a share. Any shares with this permission will not be locked out.
- Uncheck to skip SMB Data Integrity Failover step. (Default)
- Quota Sync (Default enabled)
- This option allows skipping of quota failover and will leave the quotas on the source cluster. This would be selected if 1000’s of quotas exist which affects failover performance of SyncIQ operations. It will also remove the risk of a quota scan job impacting SyncIQ operations on quotas that are flagged with needs a scan on the destination cluster.
- Checked means quotas will failover will create quotas on the target cluster and then delete them on the source cluster.
- Unchecked means quotas will not be failed over but will remain on the source cluster.
- Best Practice: If you plan to failover and failback in the same day, uncheck this option to ensure quota scan job does not impact failover operations.
- Block Failover on Warning (Default Enabled)
- This option will block failover from starting if a validation shows warning in DR Dashboard. All Warnings in DR Dashboard will block a failover and must be reviewed before unchecking this option to continue.
- Preceding with a failover with warnings, proceed at your own risk to data.
- Best Practice: Open a case and get input from support.
- Quota Domain conflict with SyncIQ Validation
- Allows override of default validation that will detect target cluster quotas with a quota scan pending flag set. This flag blocks running policies, resync prep and make writable steps from completing on policies that have newly created quotas and no quota domain created.
- See image below on policy quota domain validation check.
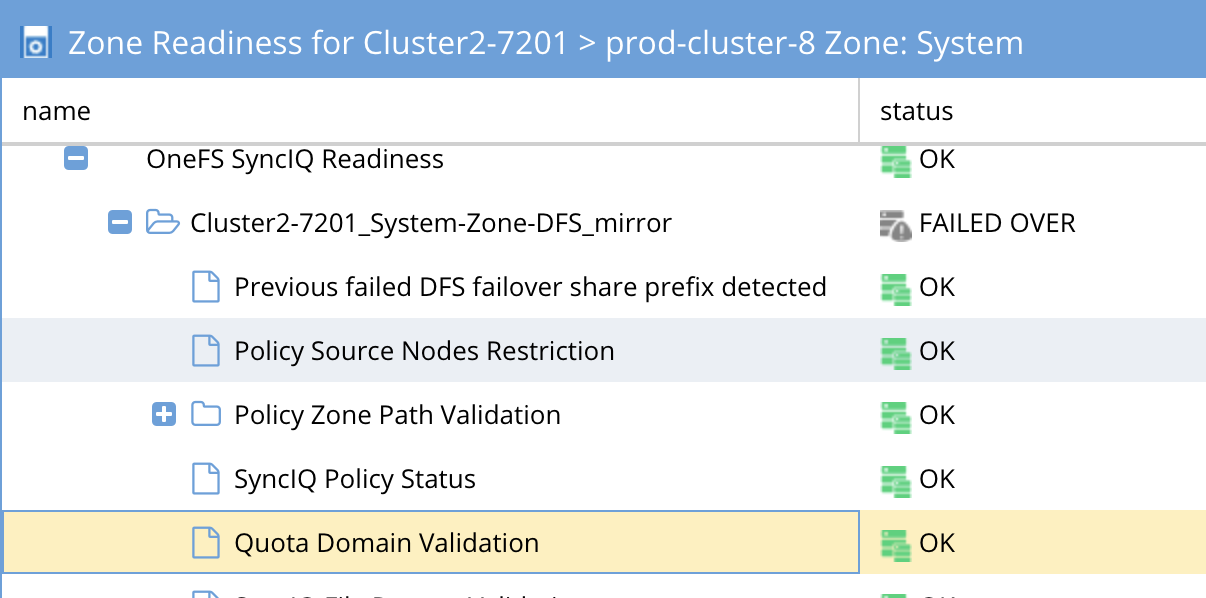
- This validation will block a failover attempt when checked and a warning validation is detected on the Access zone, SyncIQ policy or ip pool mode.
- To continue uncheck this option and restart the failover, If unchecked you are taking the risk of SyncIQ policies failing either Make Writable step or Re-sync prep.
- Solution: Run quota scan job from cluster jobs menu and allow quota scan to complete the quota domain creation on all quotas with the flag set. Then start the failover again once the validation shows Green OK.
- NOTE: If multiple policies are defined some policies may fail make writable step OR resync prep step. In this release Eyeglass will continue to the next policy if a step fails.
- SyncIQ Resync Prep (Default Enabled)
- Check to execute the SyncIQ Resync Prep failover step (leave this default advanced setting) (Recommended)
- Uncheck to skip SyncIQ Resync Prep failover step. This is not recommended as it will leave the system in state where you will not be able to use Eyeglass to failback. This is used ONLY when customers want to failover in one direction and then recreate a new policy or they know how to manually recover and create mirror policy.
- Disable SyncIQ Jobs on Failover Target (Default Enabled, advanced setting leave at default)
- Recommendation to leave enabled
- Disable on failover is optional if you don’t want to configure failback and execute sync job in the return direction. This is used when you want to verify systems before replicating data back to the source. Warning: Using this option WILL require manual steps to failback to enable the policy and set the schedule on the policy.
- Rollback SMB Shares on Failure (default enabled)
- This only applies to DFS mode failover and should be left enabled to automatically rollback SMB share rename step if a share rename step fails the the failover needs to rollback.
- Recommendation: Enabled.
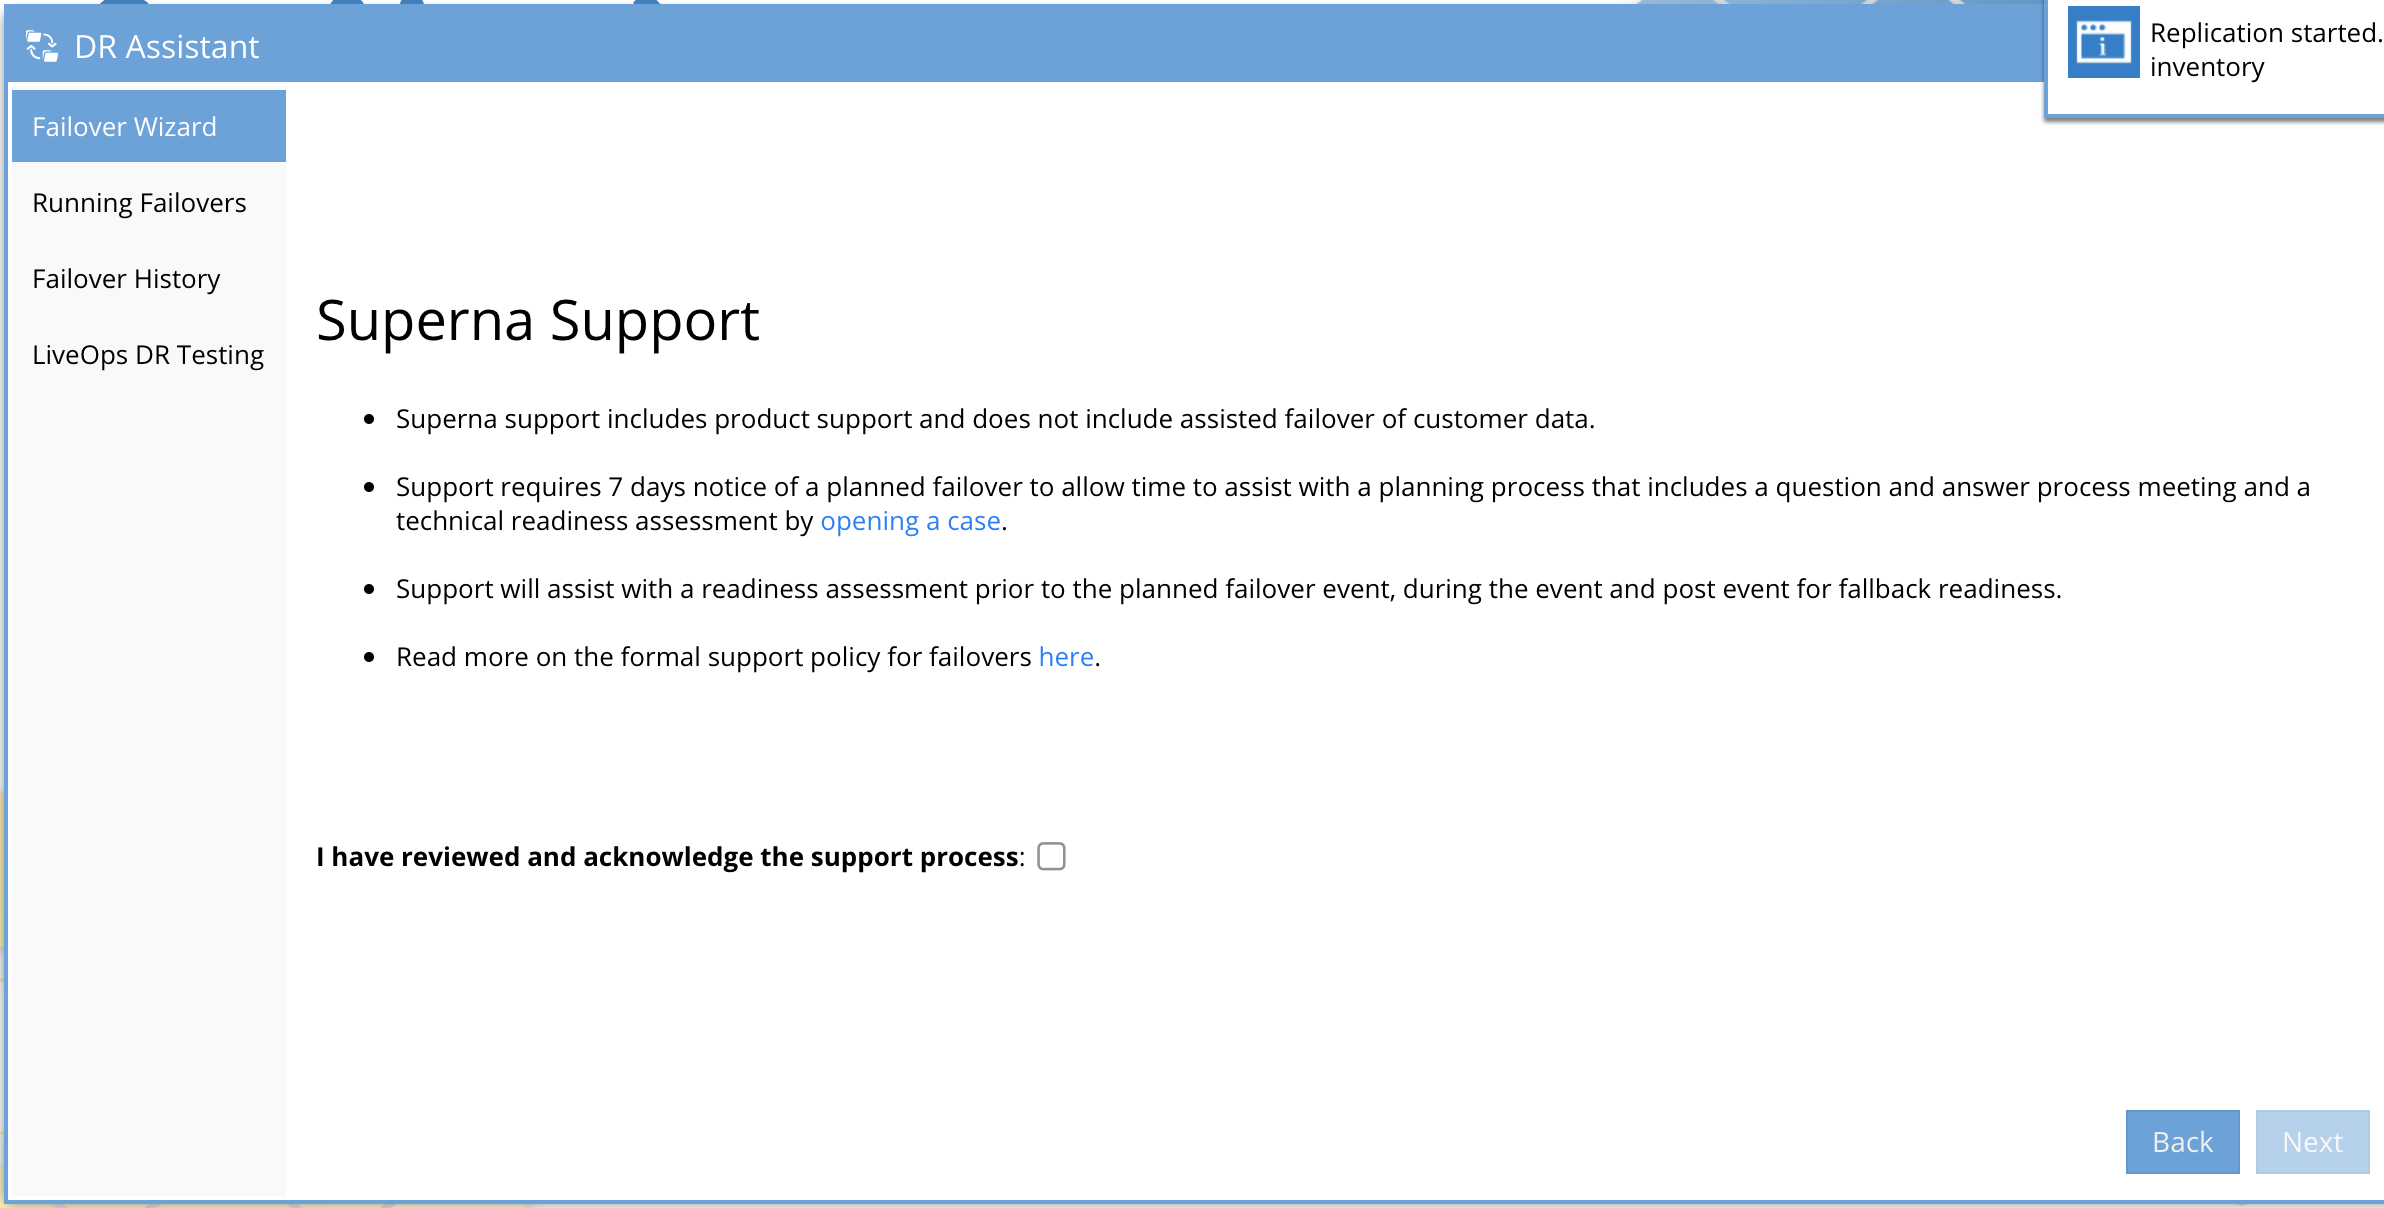
- Click Next after making selecting all DR Assistant Failover Options
- Review and accept that you have read all preparation material regarding support process and customer responsibilities.
- Verify domain mark steps have been completed (> 2.5.6 has new validation warning if Domain mark has not be completed)
- Select the policy or policies (multi select) or Access Zone (no multi select) or IP pool (multi select) for the failover type selected.
- Check readiness again before continuing to ensure you understand the warnings and if they will affect your failover. In general warnings do not block failover. Errors block failover. Consult with support to get clarification.
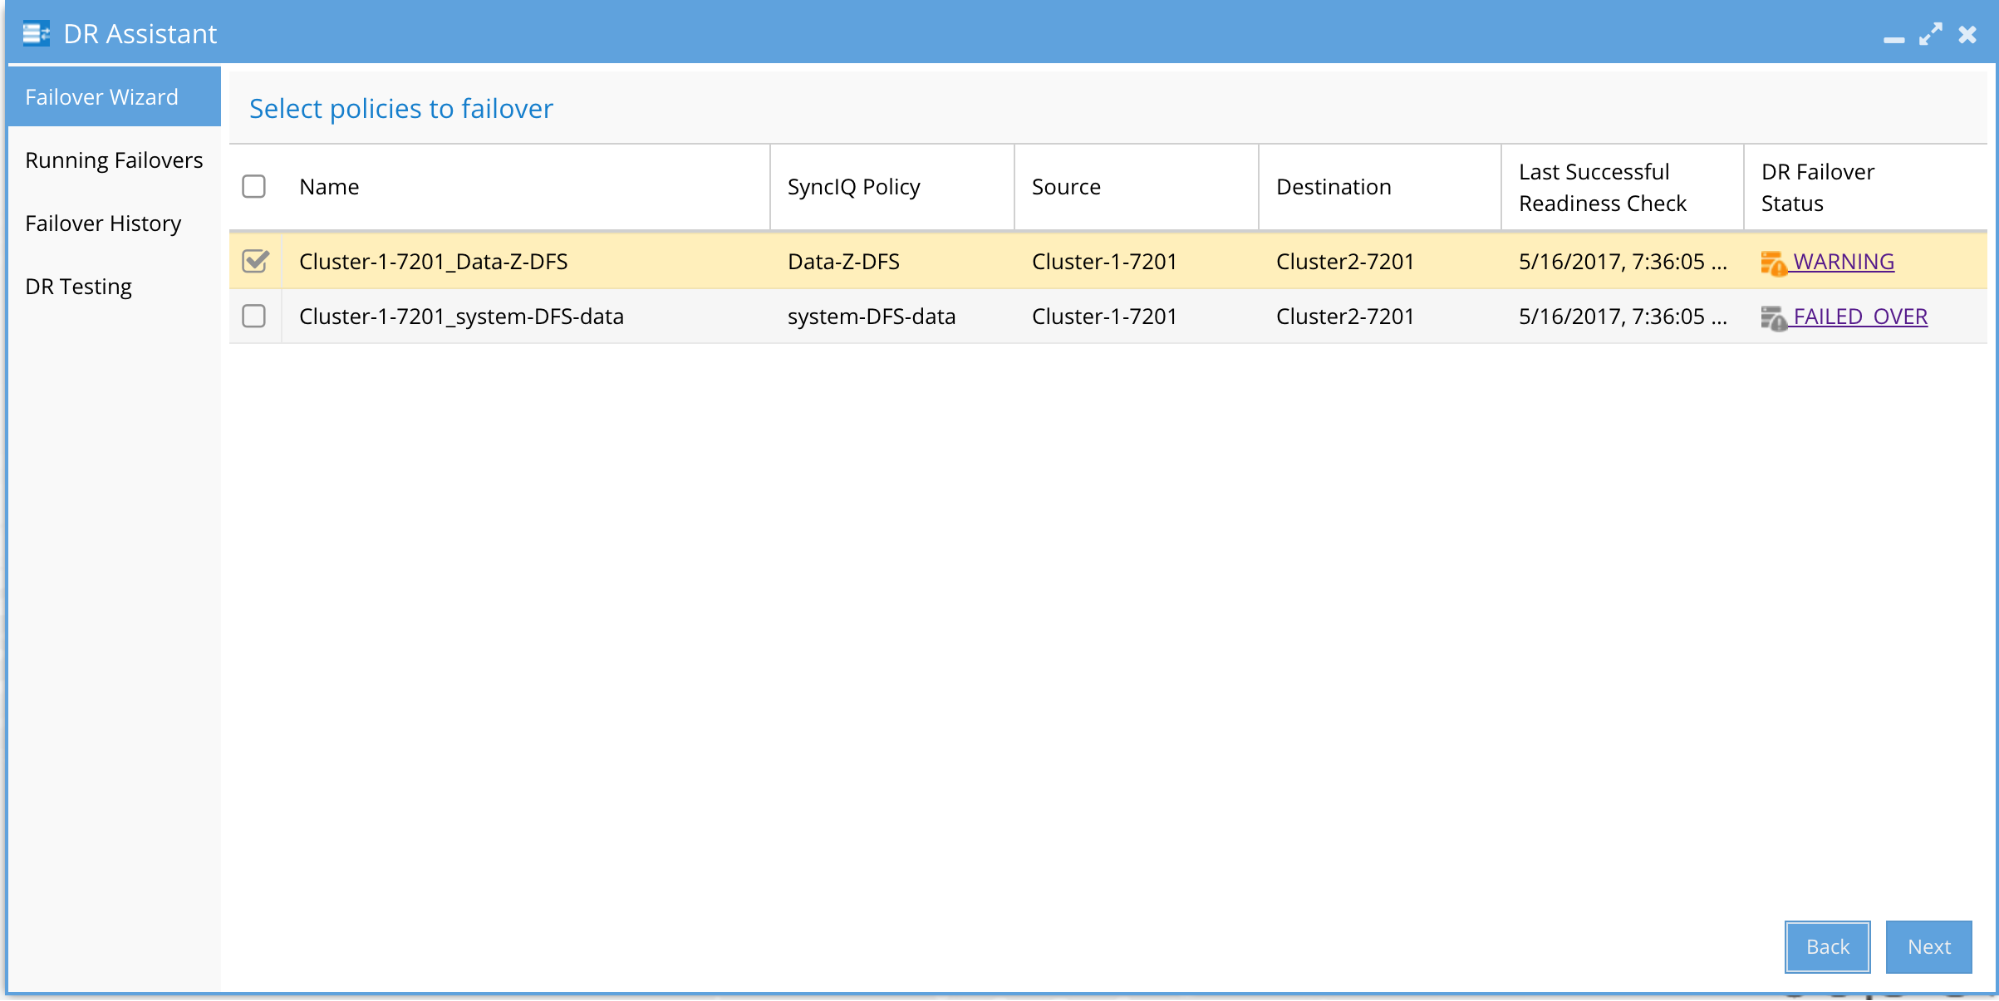
- Click Next for Failover Configuration Validation
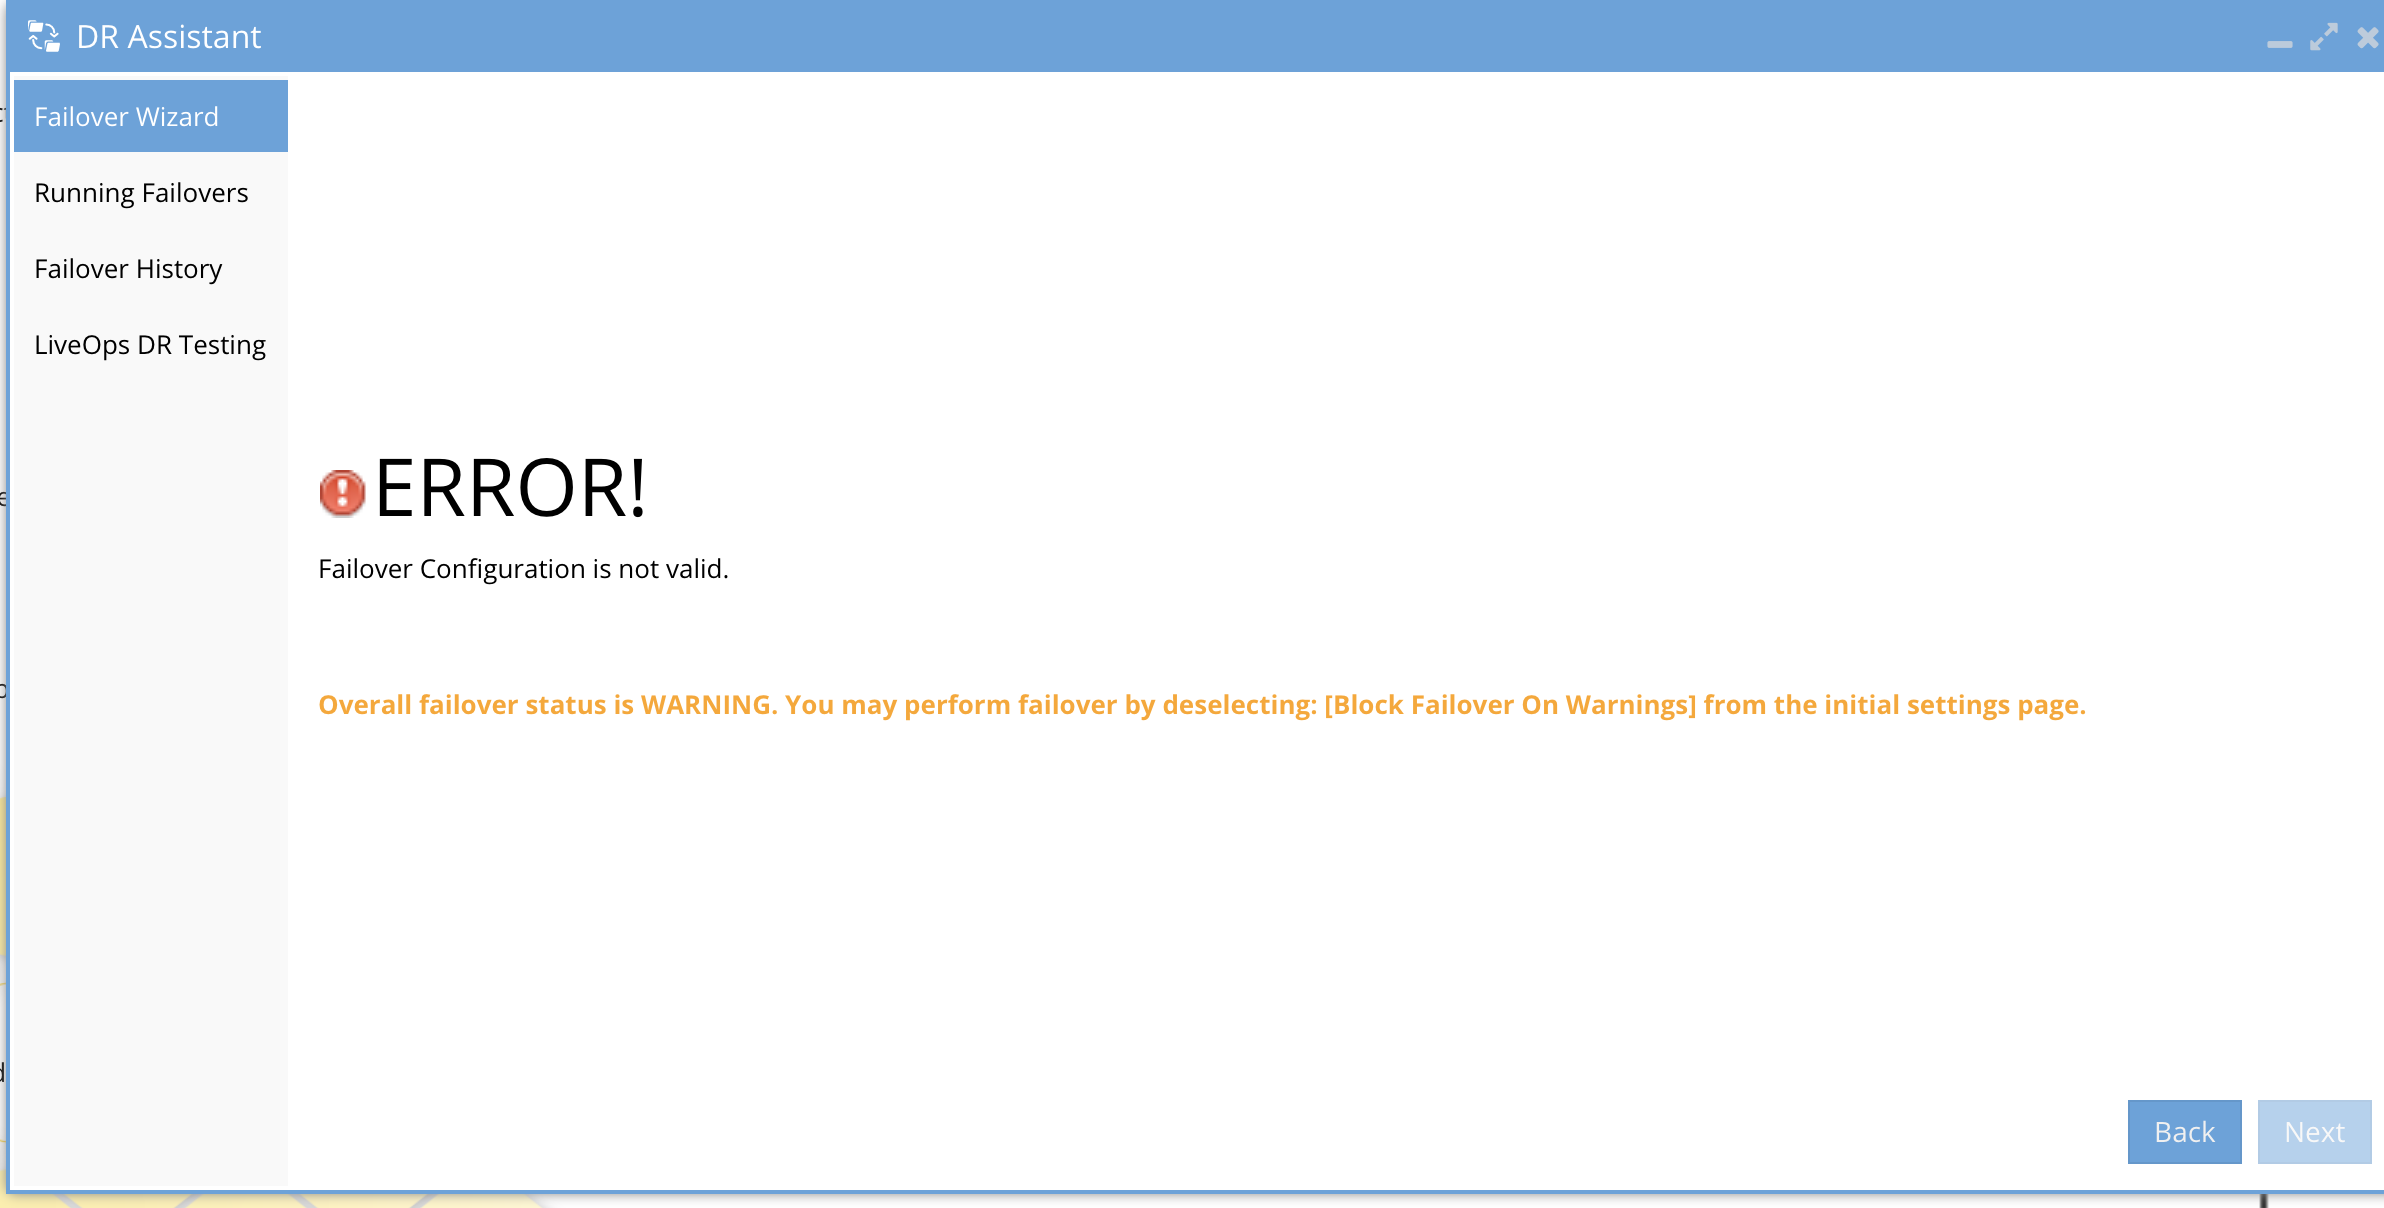
- If you see a failover validation error (example below), review the error and determine if you need to uncheck block failover with warnings on the first DR assistant options screen. You will need to click back to the start to make this change. See image below. If unsure consult with support on the warning to understand the impact.
- If you do not receive a validation you will see the next screen to review.
- Each Failover mode has a validation screen.
- SyncIQ or DFS mode failover Validation example
- Access Zone or IP pool Failover Validation Example
- Access Zone and IP Pool Failover Mode validation Screen (below). NOTE: This screen will show all policies within the Access Zone that are eligible for failover. If any policy is USER DISABLED or policy disabled it will be shown as “will NOT be failed over”. NOTE: Do not failover with a disabled policy unless you know the data protected by this policy does not need to be failed over.
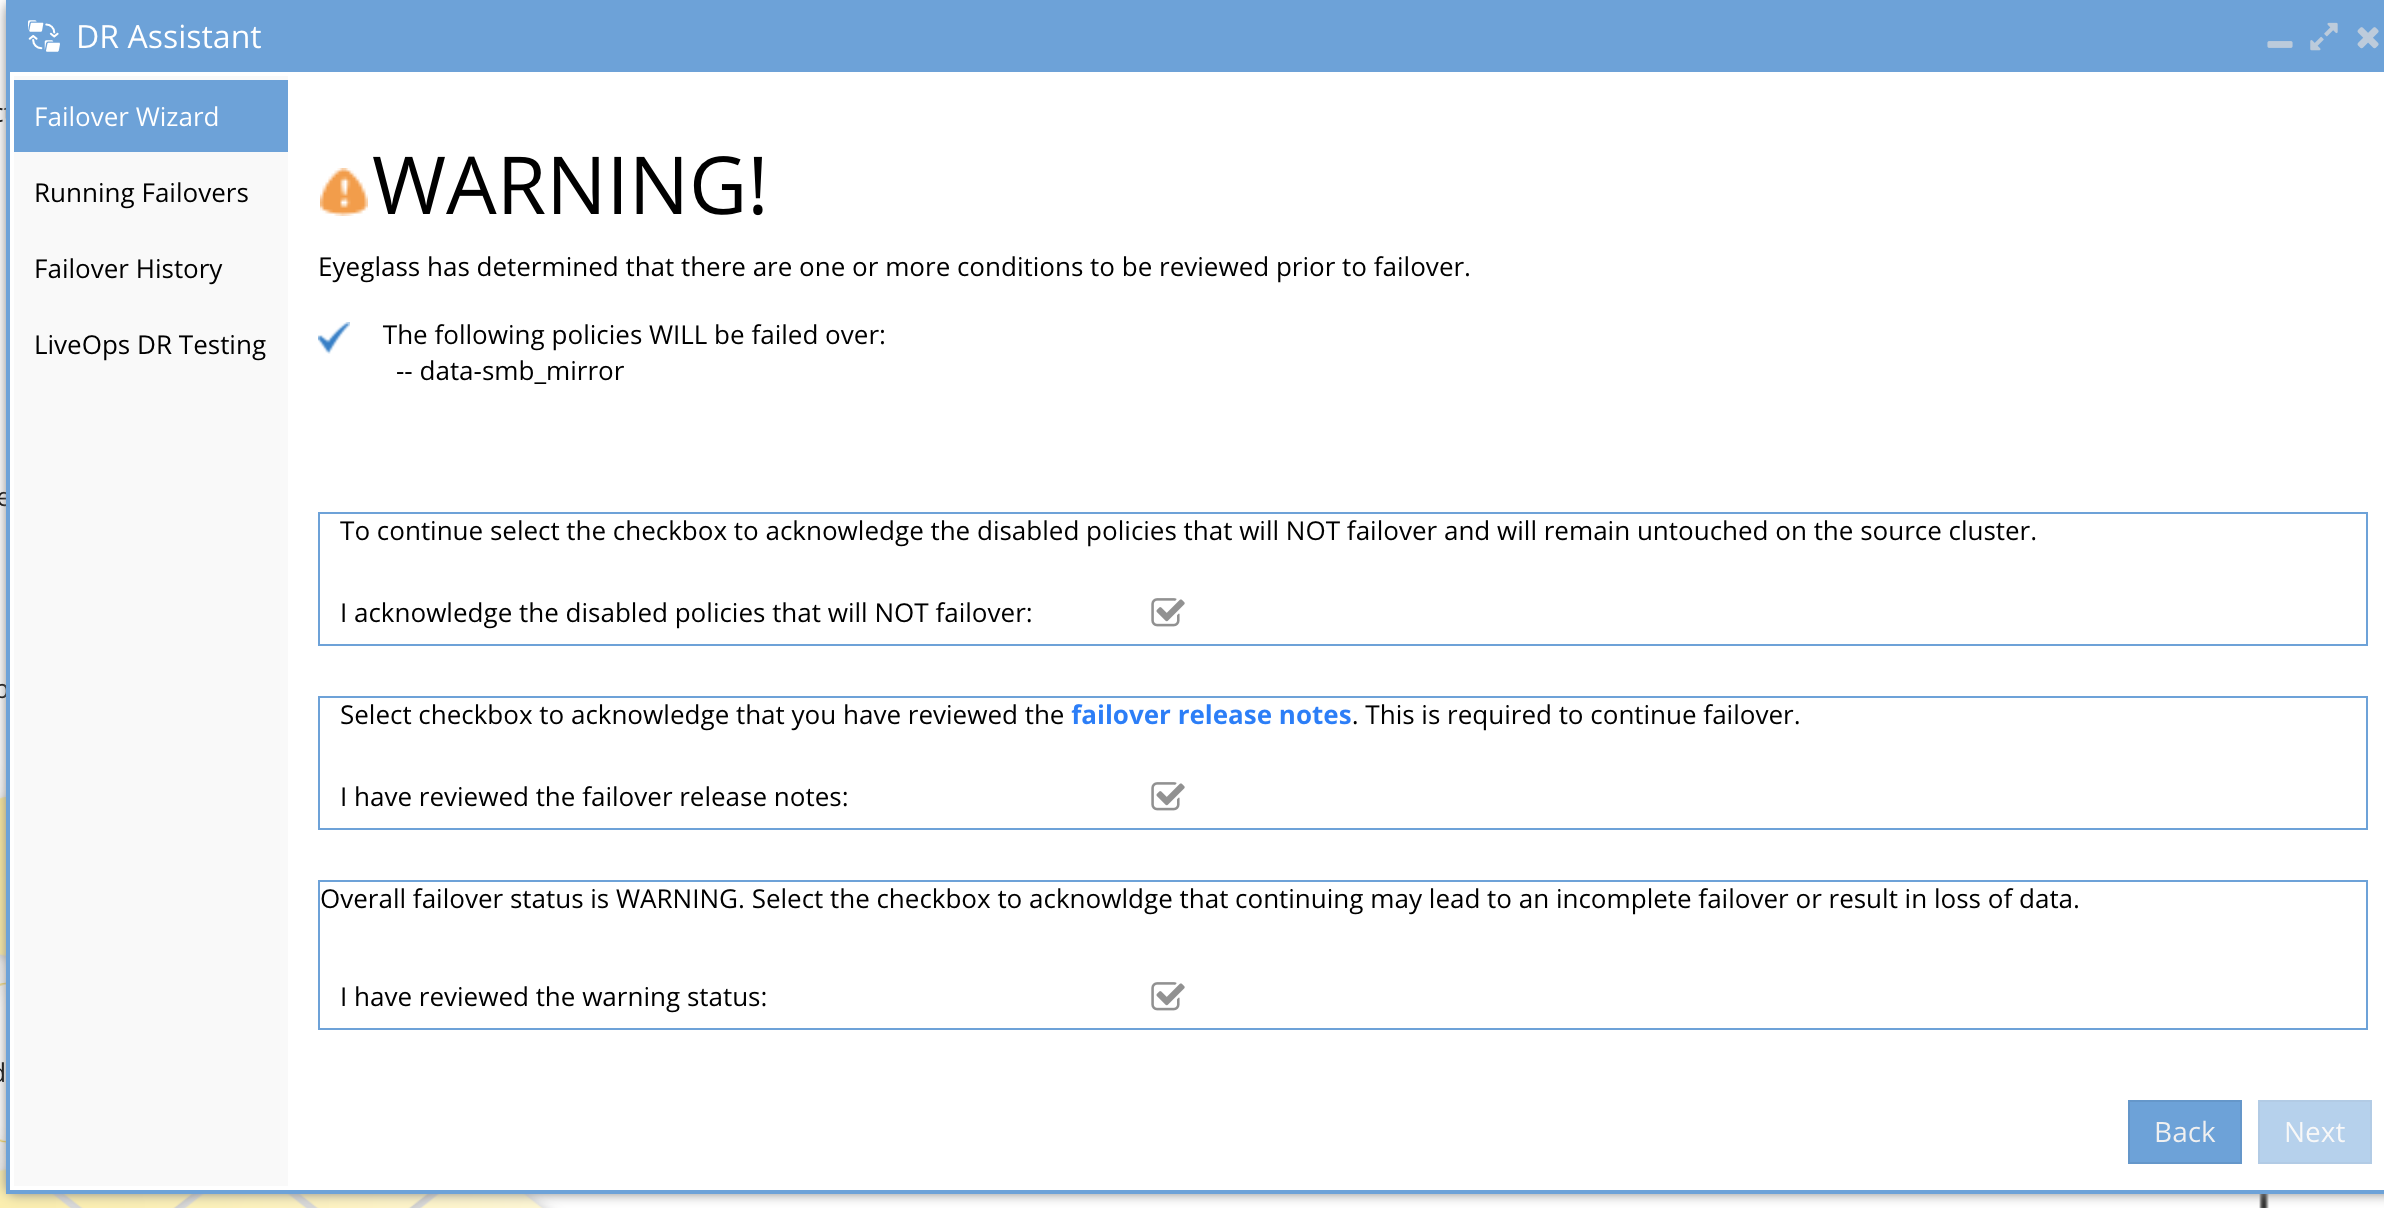
- Review each validation
- This screen requires acknowledgment before continuing.
- Failing to read this document can result in data loss.
- Customer's are expected to read all supporting documents prior to planning a failover event.
- Final acceptance and point of no return.
- NOTE: The failover job can be canceled once started but recovery steps will be manual.
- Final summary page before starting the failover. New in 2.5.7 or later is a summary of all options selected.
- Release < 2.5.6 Summary page
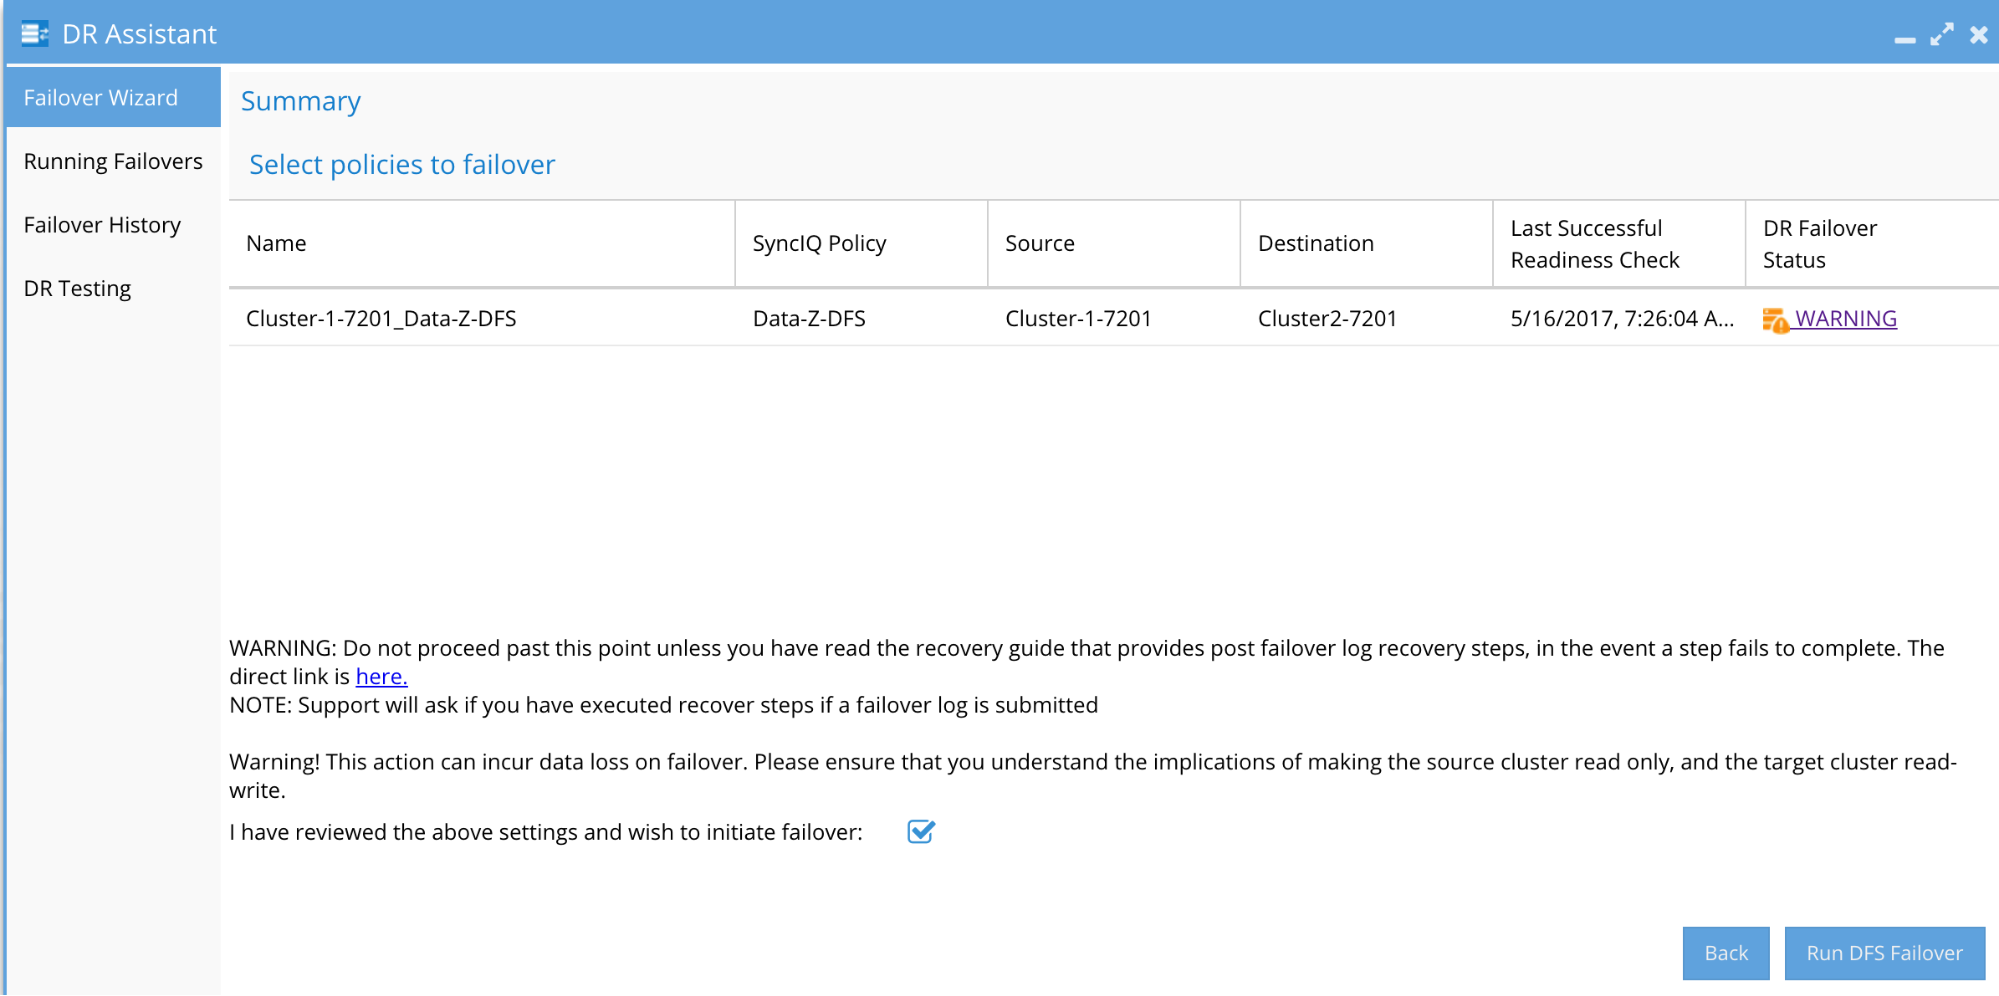
- Release > 2.5.7 Summary Page allows a review of all options selected for the failover before starting the failover.
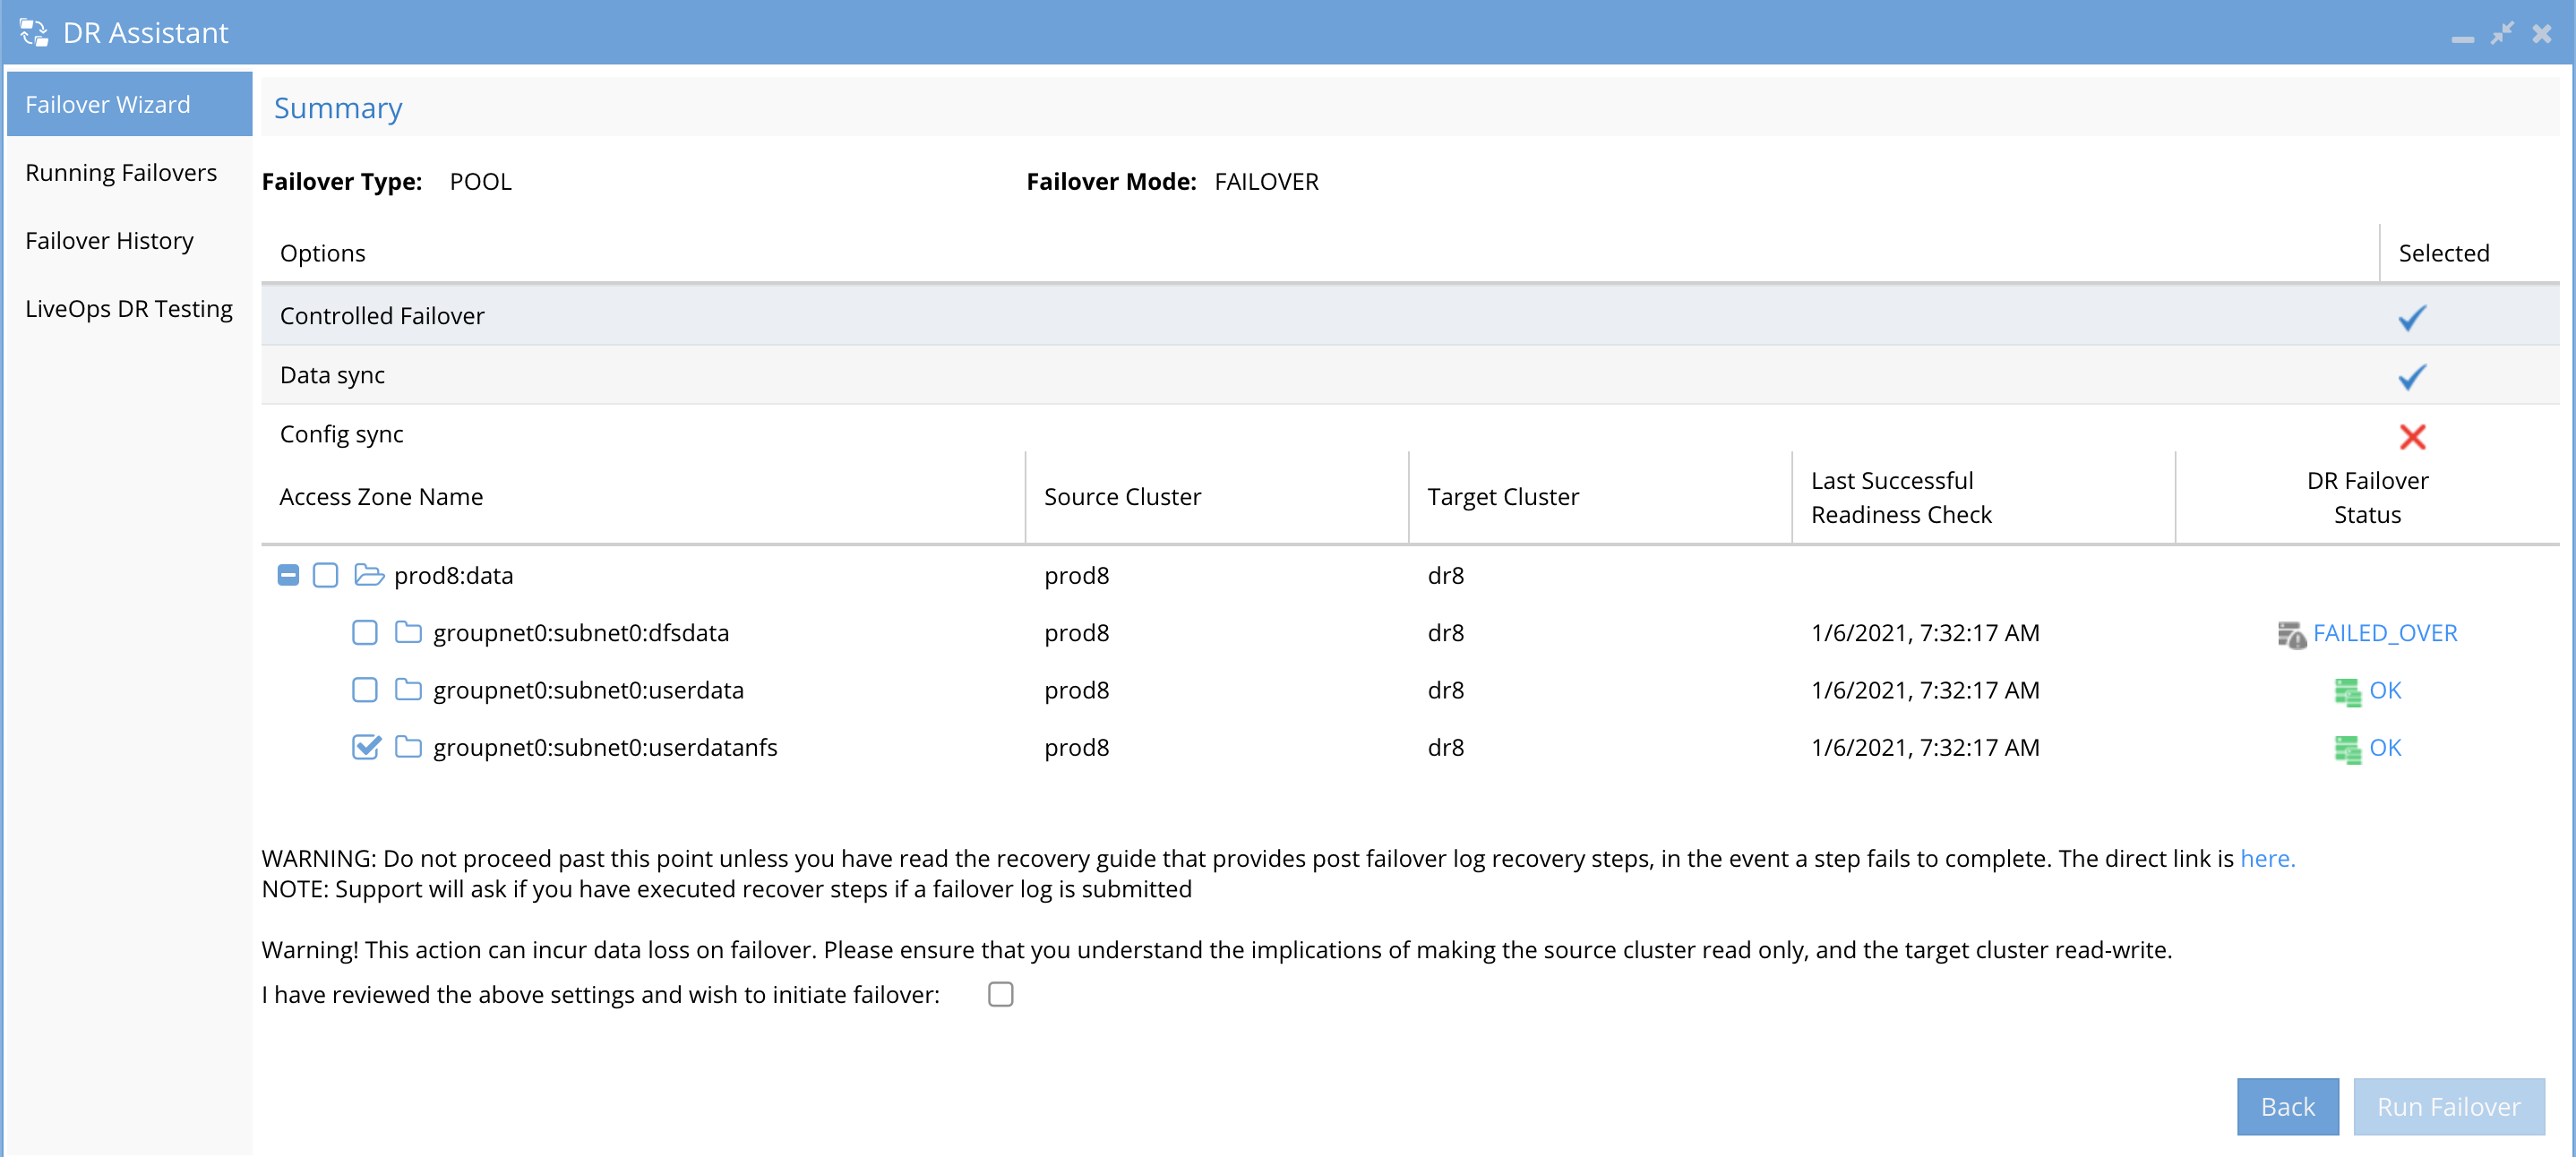
- Start the failover with Run button.
- Click Watch to follow the failover real-time or click fetch to update log window with current progress.
- Click Watch to follow the failover real-time or click fetch to update log window with current progress.
- NOTE: Failover jobs can be canceled cancel job link.
- ONLY USE IF DIRECTED BY SUPPORT
- WARNING: IF YOU CANCEL A FAILOVER, MANUAL RECOVERY OF NETWORKING POLICY STATE, SHARES, SPN, SMARTCONNECT IS REQUIRED. SUPPORT IS UNABLE TO ASSIST WITH RECOVERY FROM INTENTIONALLY CANCELING A FAILOVER.
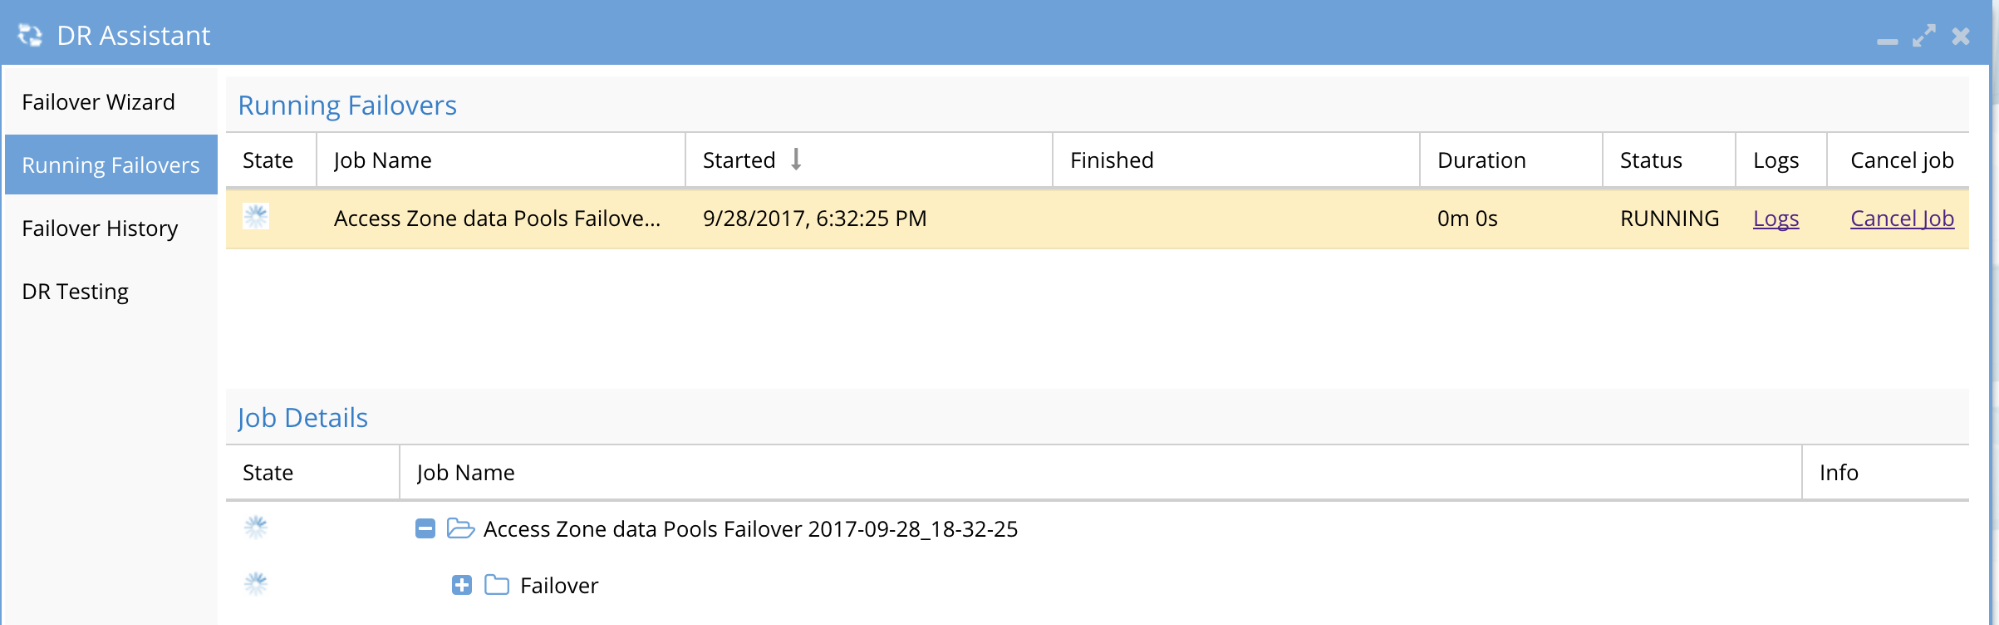
- Monitor the Failover job Progress
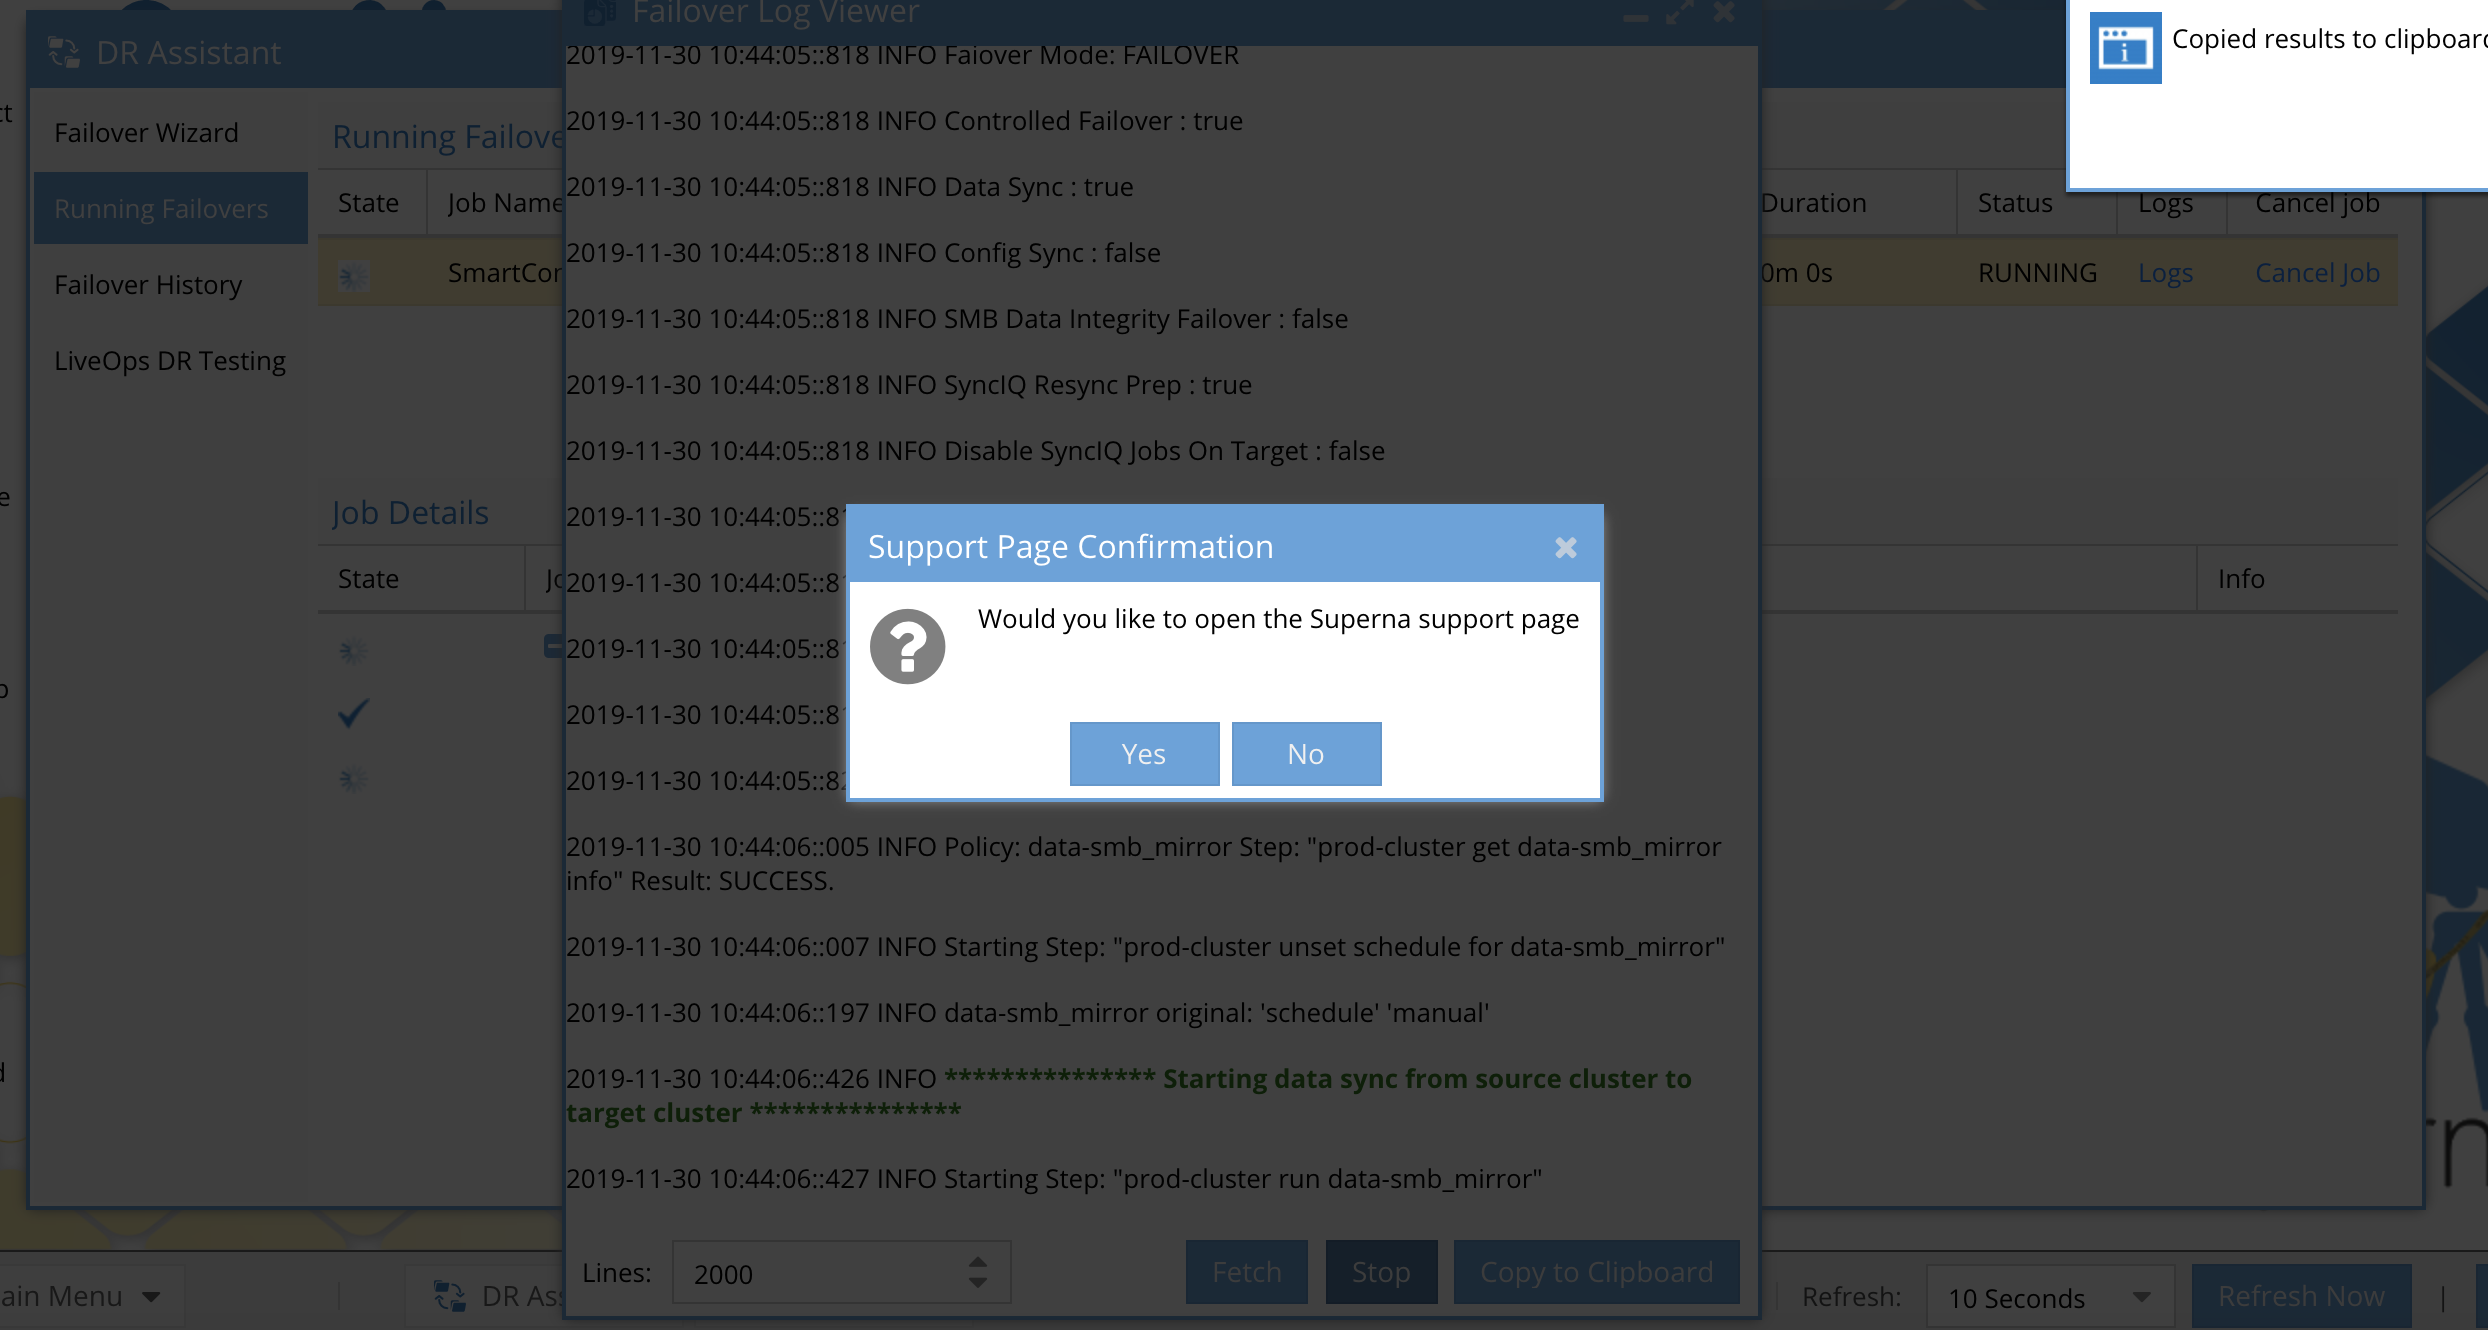
- (2.5.6 or later Release) Use the Copy to Clipboard button to update support case for partial Failover Review.
- Clicking the button will prompt to open a browser tab to the support web site to paste the support log. Answer no to skip opening the support site.
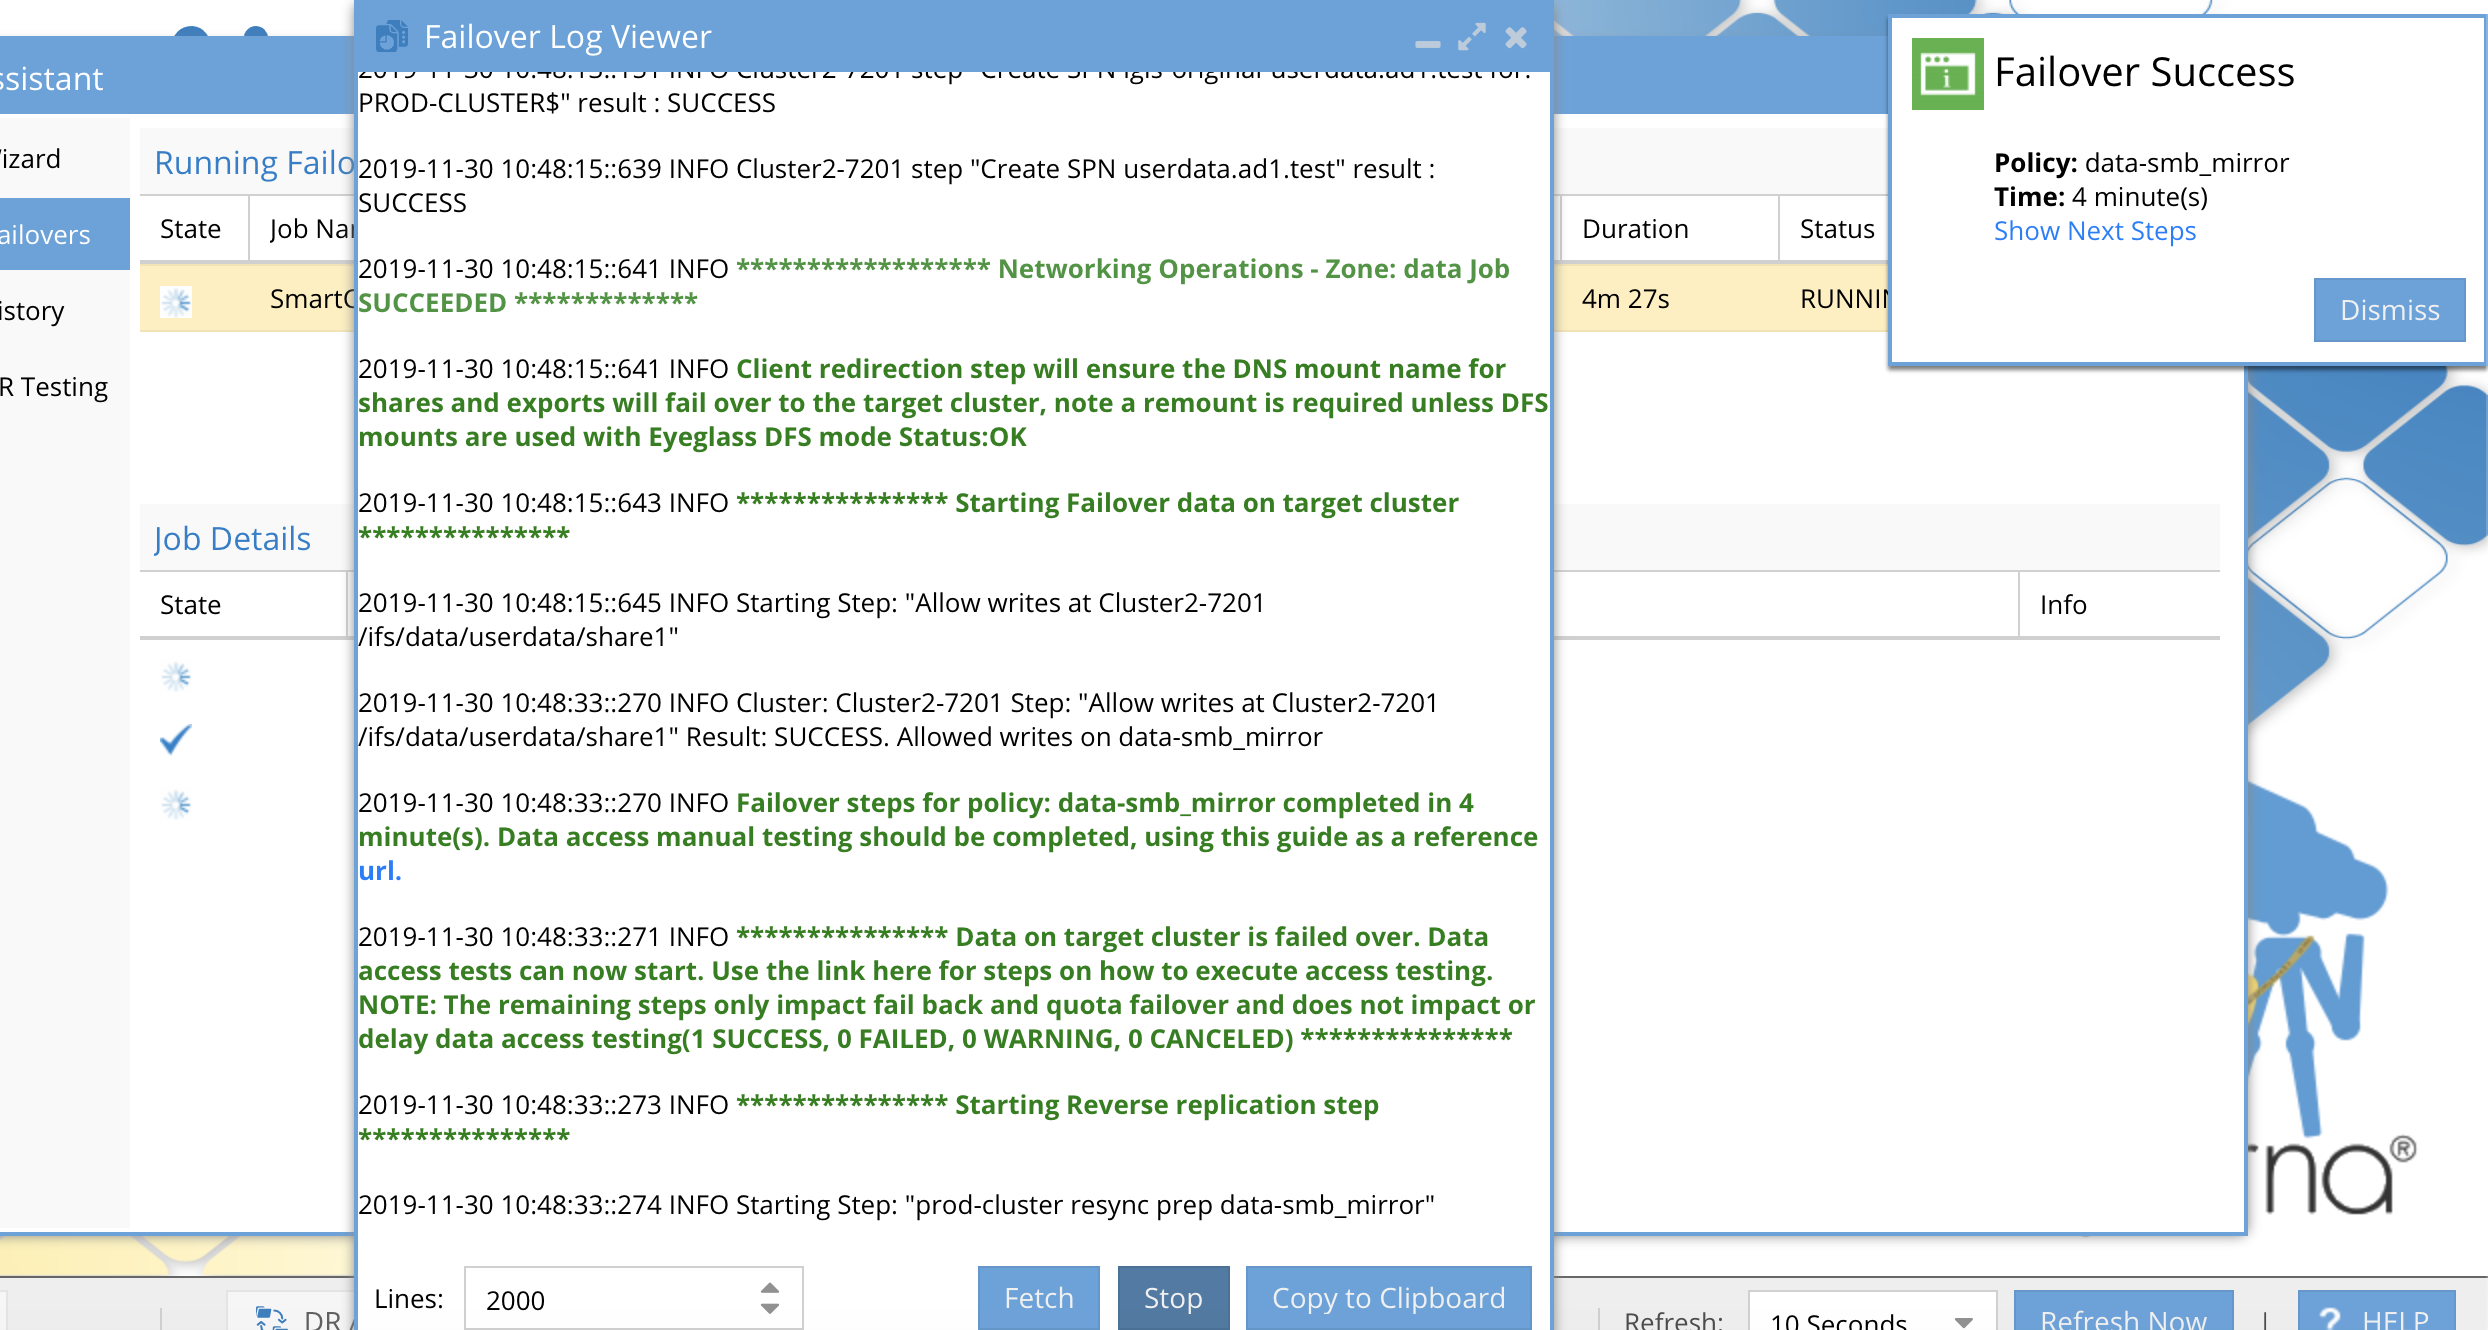
- (2.5.6 or later release) Notification Popup Indicates each Policy that Completes Steps to Allow Data Access Testing
- Click to open instructions or Dismiss button to close the Window.
- (2.5.6 or later Release) Use the Copy to Clipboard button to update support case for partial Failover Review.
- All other Releases Follow Data Access Testing Documentation once the failover log indicates the Allow writes step has completed.
- IMPORTANT: Always test data access for any failover success or failure. Detailed steps are posted How to Validate and troubleshoot A Successful Failover WHEN Data is NOT Accessible on the Target Cluster
- The failover will continue to complete Resync Prep, Run mirror and quota failover steps
- Auto enabling of Eyeglass jobs to prepare for failback (Requires 2.5.6 or later)
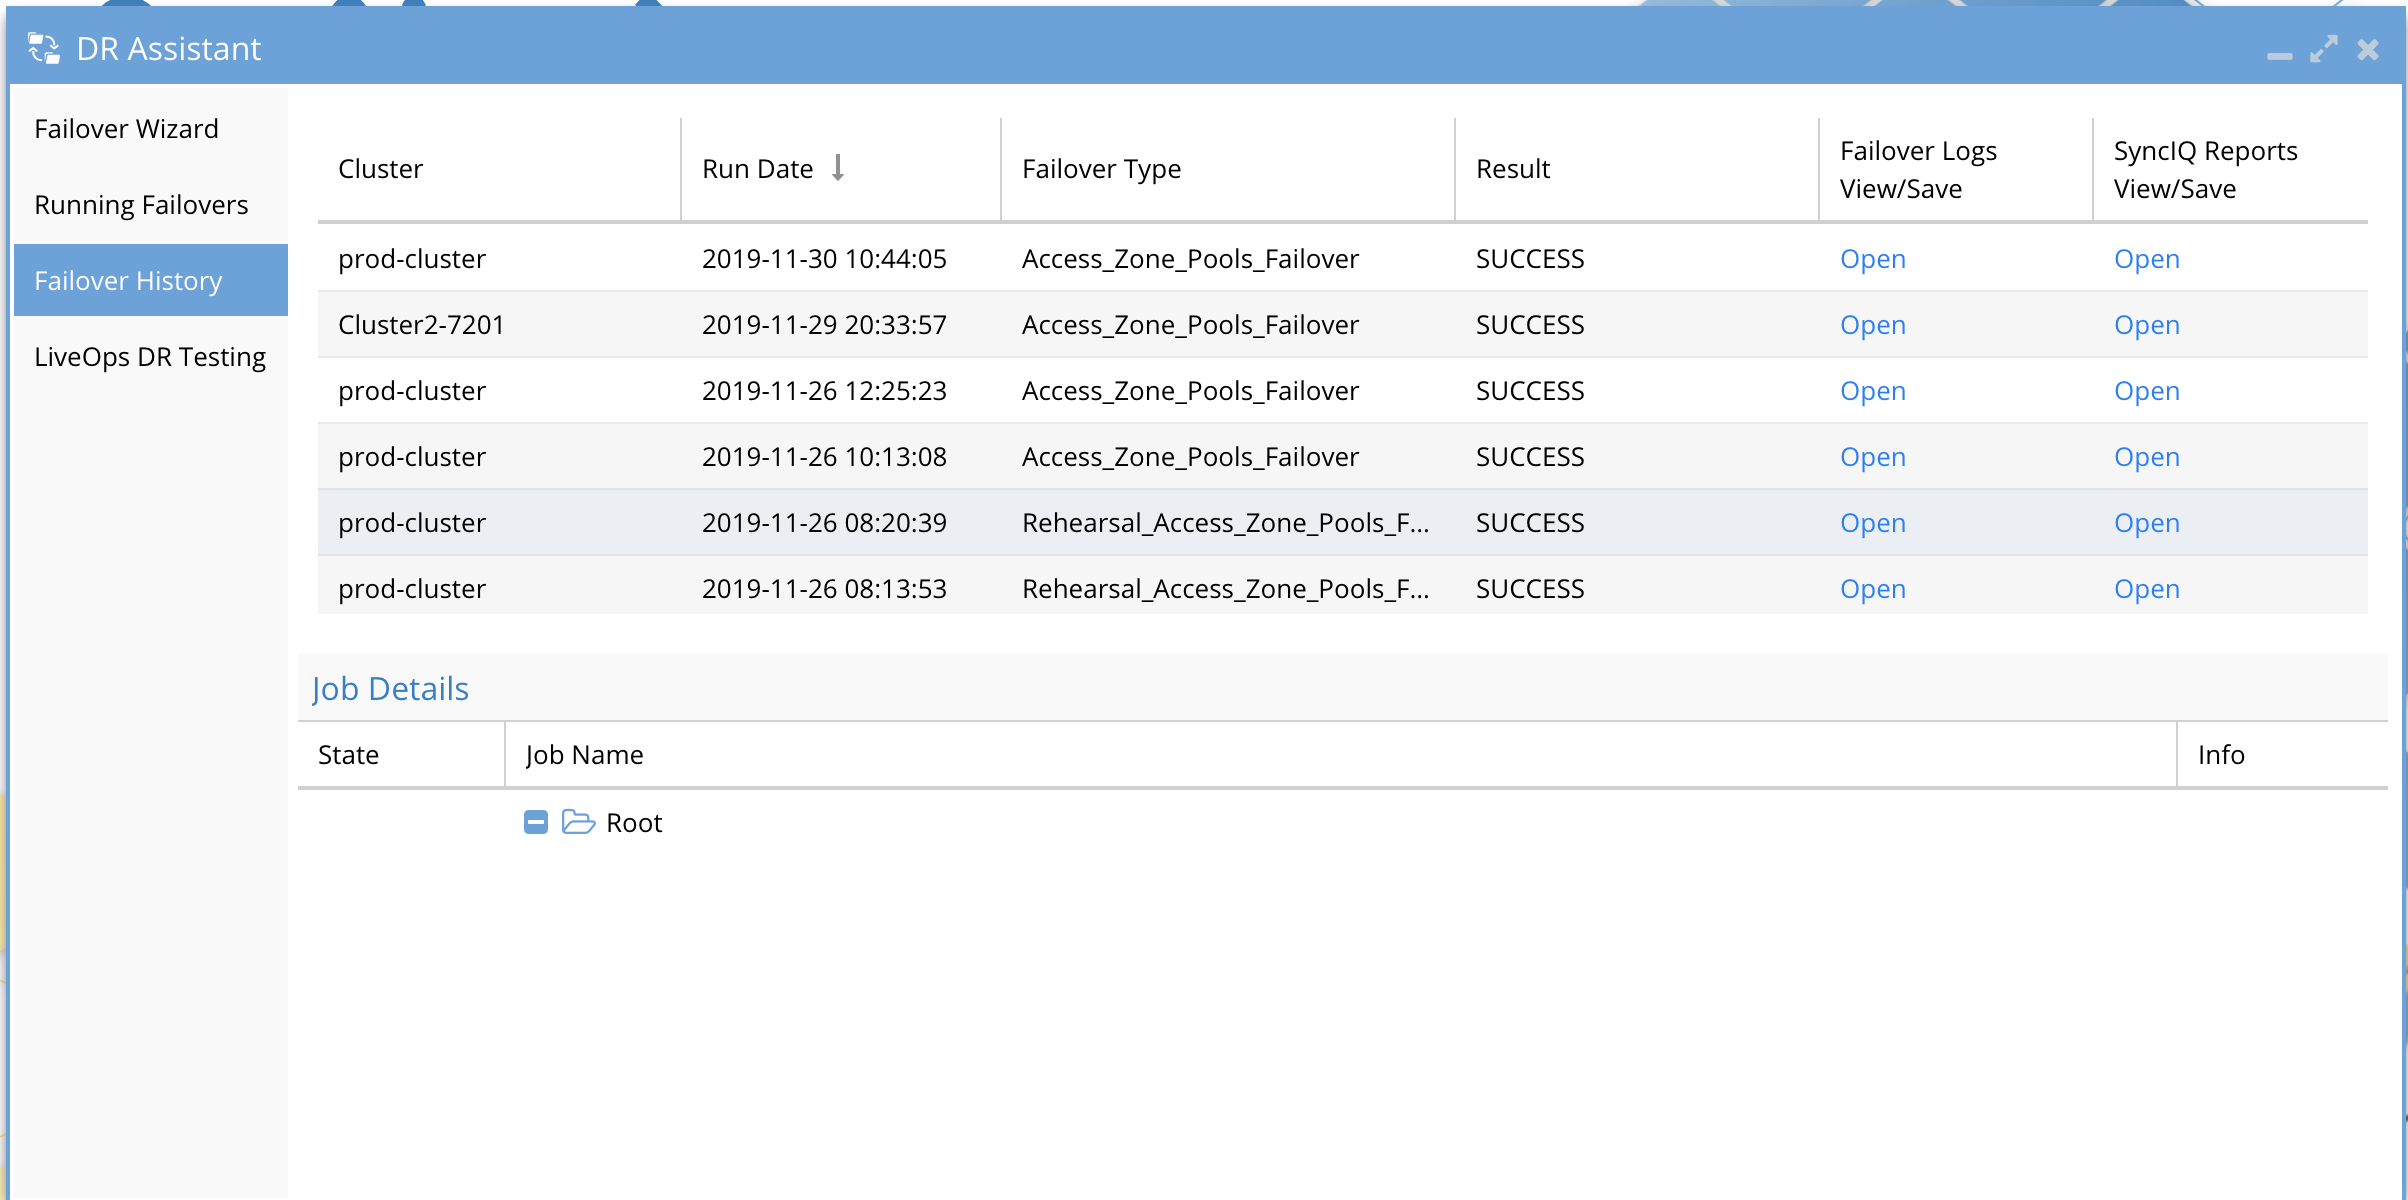
- Download Completed Failover logs or review failover log history by Clicking on the Failover History Tab.
- NOTE: SyncIQ steps are logged to a separate log that can be downloaded and provided to support to provide details on why a syncIQ step failed and can be used when opening a Dell SR with PowerScale support.
- Example below
- Failover Complete
© Superna Inc