- Abstract:
- What's New
- Deprecation Notice
- Definitions
- Deployment and Topology Overview
- Deployment Diagram (Ransomware Defender, Easy Auditor, Performance Auditor)
- ECA Cluster Sizing and Performance Considerations
- ECA Cluster Size by Application (Ransomware Defender, Easy Auditor, Performance Auditor)
- IP Connection and Pool Requirements for Analytics database Requires HDFS on the Cluster (Easy Auditor)
- ECA Cluster Network Bandwidth Requirements to PowerScale (Ransomware Defender, Easy Auditor, Performance Auditor)
- VMware ESX Host Compute Sizing for ECA nodes (Ransomware Defender, Easy Auditor, Performance Auditor)
- VMware or Hyper-V Host Requirements
- ECA Cluster Deployment Topologies with PowerScale Clusters
- Considerations & Requirements to Select a Deployment Option for the ECA Cluster:
- Security - Firewall Port Requirements Ransomware Defender , Easy Auditor and Performance Auditor
- Firewall Rules and Direction Table
- Eyeglass VM Prerequisites - Mandatory Step
- Eyeglass License Requirements
- Deployment Overview
- Summary Overview of steps to install and configure Easy Auditor or Unified Ransomware Defender ,Easy Auditor and Performance Auditor
- Isilon/PowerScale Protocol Audit Configuration (Required Step) (Ransomware Defender , Easy Auditor, Performance Auditor)
- Overview
- Enable Protocol Access Auditing OneFS GUI
- Disable High Rate Audit Events Onefs 8.2 and later (Mandatory Step)
- Procedure to Disable High Rate Events
- Preparation of Analytics Database or Index (Easy Auditor) (Required Step)
- OVA Install Prerequisites
- Installation Procedure of the ECA Vmware OVA
- Time Configuration PowerScale, Eyeglass, ECA cluster (Required Step) (Ransomware Defender , Easy Auditor, Performance Auditor)
- How to disable VMware vSphere ESXi host time sync (Mandatory Step)
- How to Configure Audit Data Ingestion on the Isilon/Powerscale (Ransomware Defender, Easy Auditor, Performance Auditor) (Required Step)
- Prerequisites for Isilon/Powerscale Audit Data NFS Export
- Create a read-only NFS Export on the Isilon/PowerScale cluster(s) that will be managed
- REST API Audit Ingestion - Mandatory for All deployments
- Configure an NFS mount point on each ECA node to Read Audit data from Isilon/PowerScale (Required)
- Start up the ECA Cluster (Required)
- Verify ECA Remote Monitoring Connection from the Eyeglass Appliance (Required Step) (Ransomware Defender , Easy Auditor, Performance Auditor)
- How to Backup and Protect the Audit Database with SnapshotIQ (Easy Auditor) (Required Step)
- Installation Complete
- Ransomware and Easy Auditor IGLS CLI command Reference
- How to Upgrade the ECA cluster Software For Easy Auditor , Ransomware Defender and Performance Auditor
- Steps to Carrier Grade Upgrade - No downtime
- Steps to upgrade:
- How to Migrate ECA cluster settings to a new ECA cluster deployment - To upgrade Open Suse OS.
- Prerequisites
- Monitor Health and Performance of an ECA Cluster (Optional)
- How to Verifying ECA Cluster Status
- How to Verify ECA containers are running
- Check cluster status and that all analytics tables exist (Ransomware Defender, Easy Auditor, Performance Auditor) (Optional Step)
- How to Check ECA node Container CPU and Memory Usage (Optional)
- How to Enable Real-time Monitor ECA cluster performance (If directed by support)
- ECA Cluster Modification Procedures (optional)
- How to expand Easy Auditor cluster size
- Advanced Configurations (Optional)
- How to Configure a Ransomware Defender Only Configuration (Skip if running multiple products)
- How to Configure NFS audit data ingestion with non system access zone
Abstract:
This Guide provides a step by step procedure for installing the Superna Eyeglass clustered agent vAPP used by Ransomware Defender, Easy Auditor and Performance Auditor. NOTE: Only follow steps in each section that names the product in the section
What's New
- Syslog forwarding of ECA logs to eyeglass
- Uses FluentD container for local logging and forwarding
- Cluster Startup now checks HDFS configuration before starting and provides user feedback on validations
- 3, 6 or 9 or upto 99 ECA node control and upgrade
- Delayed startup option for containers
- Statistics per container cli command
- Kafka manager UI
- New 2.5.5 Ransomware Defender does not require HDFS or a smartconnect name pool for HDFS but if Easy Auditor is also installed than HDFS pool is still required.
Deprecation Notice
- Audit data ingestion without using REST API is deprecated as of release 2.5.8.x. All installations should migrate to REST API ingestion for more efficient lower bandwidth ingestion that allows archive GZ files to accumulate on the cluster. REST API is the only supported method of ingestion to handle all ingestion requirements with support for NFS v3 or v4
Definitions
- ECA - Eyeglass Clustered Agent - the entire stack that runs in a separate VM outside of Eyeglass that processes audit data
Deployment and Topology Overview
Deployment Diagram (Ransomware Defender, Easy Auditor, Performance Auditor)
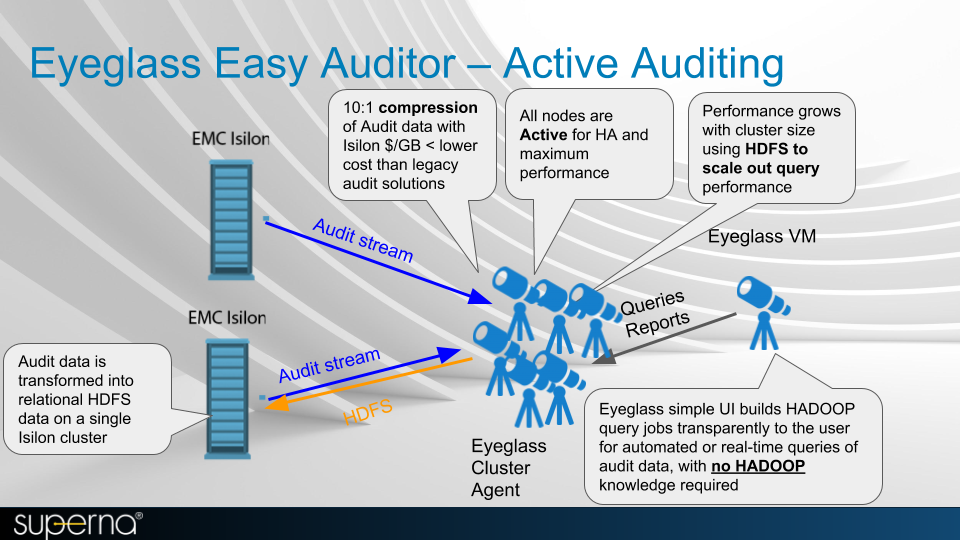
This diagram shows a three node ECA cluster
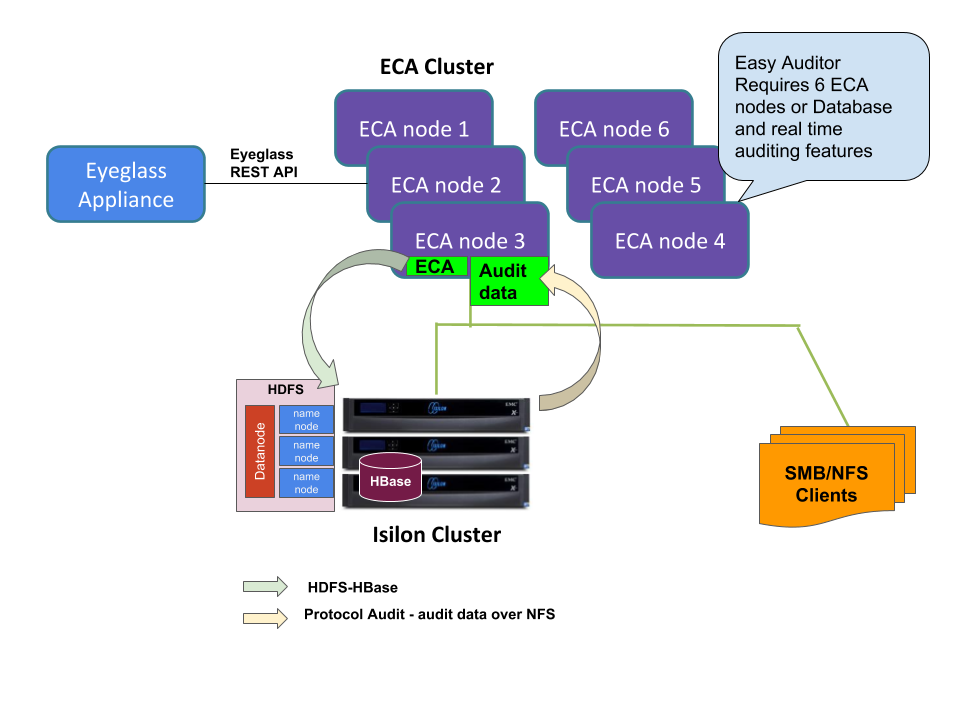
ECA Cluster Sizing and Performance Considerations
ECA Cluster Size by Application (Ransomware Defender, Easy Auditor, Performance Auditor)
ECA clusters are 3-12 nodes or greater depending the applications running on the cluster and the number of events per second or by the number of cluster nodes that generate audit events. The minimum ECA node configurations that are supported for all deployments are documented below. NOTE: New applications or releases with features that require more resources will require ECA cluster to expand to handle multiple clusters or new application services.
Application Configuration | Number of ECA VM nodes Required | ESX hosts to split VM Workload and Ensure High Availablity | ECA Node VM Size | Network Latency NFS mount For Ransomware Defender & Easy Auditor | Easy Auditor Database Network Latency between ECA and PowerScale storing the DB | Host Hardware Configuration Requirements |
Ransomware Defender only 3,6,8, 9 | 3 ECA node cluster (1 to 2 managed clusters OR < 6000 audit events per second) 6 ECA node cluster (> 2 managed clusters OR > 6000 EVTS) | 26 | 4 x vCPU, 16G Ram, 30G OS partition + 80G disk | < 10 ms RTT | NA | 2 socket CPU 2000 GHZ or greater, Disk IO latency average read and write < 20 ms |
Easy Auditor Only 2, 3, 5,7,8, 9 | 6 ECA node cluster | 2 6 | 4 x vCPU, 16G Ram, 30G OS partition + 80G disk | < 10 ms RTT | < 5 ms RTT | 2 socket CPU 2000 GHZ or greater, Disk IO latency average read and write < 20 ms |
Ransomware Defender And Easy Auditor Unified deployment (< 18K events per second) 3,5,7,8,9 | 6 ECA node cluster | 2 6 | 4 x vCPU, 16G Ram, 30G OS partition + 80G disk | < 10 ms RTT | < 5 ms RTT | 2 socket CPU 2000 GHZ or greater, Disk IO latency average read and write < 20 ms |
| Very High IO rate clusters ( > 18 K events per second) Ransomware Defender And Easy Auditor Unified deployment 3,5,7,8,9,10 | 9 ECA node cluster | 36 | 4 x vCPU, 16G Ram, 30G OS partition + 80G disk | < 10 ms RTT | < 5 ms RTT | 2 socket CPU 2000 GHZ or greater, Disk IO latency average read and write < 10 ms |
| Large node count clusters > 20 nodes. The more nodes to monitor audit data in real-time requires more VM's to maintain throughput for a supported configuration. 3,5,7,8,9 | 20 -30 nodes = 9 VM's > 30 nodes = 12 VM's | 3 6 | 4 x vCPU, 16G Ram, 30G OS partition + 80G disk | < 10 ms RTT | < 5 ms RTT | 2 socket CPU 2000 GHZ or greater, Disk IO latency average read and write < 10 ms |
| Unified Ransomware Defender, Easy Auditor and Performance Auditor Deployments 3,4,5,7,8,9 | 6-9 ECA VM's depending on event rates | 3 6 | 6 x vCPU, 20G Ram, 30G OS partition + 80G disk | < 10 ms RTT | < 5 ms RTT | 2 socket CPU 2000 GHZ or greater, Disk IO latency average read and write < 10 ms |
1 VMware OVA, Microsoft Hyper-v VHDX are available appliance platforms
2 Contact support for reduced footprint configuration with 3 VM's only for low event rate environments.
NOTE: OVA default sets resource limit of 18000 MHZ for the OVA shared by all ECA VM nodes in the cluster. This limit can be increased if audit event load requires more CPU processing. Consult support before making any changes in vmware.
3 NOTE: The ECA cluster is a real-time distributed processing and analysis platform which requires the ECA VM's to be on the same layer 2 subnet and low latency between the VM's. The VM's communicate between each other for many functions that requires low latency VM to VM communications. It is not supported to split the VM's in a single ECA cluster between data centers. The only supported distributed mode requires the Mini-ECA deployment architecture covered in this guide.
4 NOTE: Unified Ransomware Defender, Easy Auditor and Performance Auditor requires additional resources in addition to the event rate sizing requirements. Each new application requires resources to maintain real time performance. Additional RAM is required on ECA nodes 2-N. The additional resources are 4 G RAM per ECA node and 2 additional vCPU per ECA node. If the event rate is very high resources may need to be increased beyond these initial settings. The Eyeglass VM also has increased RAM requirements for Performance Auditor. Consult the EyeGlass Scalability table for RAM upgrade requirements.
5 NOTE: Audit Data retention > 1 year will increase the database size. As the database grows the number of VM's required to maintain the larger database will also need to increase. Any data retention > 1 year will require additional 3 ECA VM's added to maintain support for larger databases. Data retention set to greater than 365 days will require additional resources and a minimum of 3 additional ECA VM's to expand the cluster size.
6 NOTE: Supported HA requires multiple physical Hosts to split VM's across hosts based on the size of the ECA cluster. ECA clusters with 3 VM's can tolerate N-1 VM failures, ECA clusters with 6 VM's can tolerate N-2 failures and ECA clusters > than 6 can tolerate N-3 VM failures.
7 NOTE: All customers running Onefs 8.2 or later must disable directory open and directory close to reduce audit rate and reduce VM footprint for a supported configuration. See instructions here to maintain support for your deployment.
8 NOTE: Storage vmotion or SDRS and DRS should be disabled since the ECA vm's are a real-time processing system.
9 NOTE: Archiving old gz files that collect on Onefs nodes is required to maintain performance of audit data ingestion. The cluster maintains old audit data in gz files once the active audit log reaches 1 GB. These files will collect for ever and NFS ingestion performance is impacted once the total GZ file count exceeds 5000 and will continue to degrade above this level. It is recommended to follow the procedures here or with Onefs 9.x use the auto archive of audit data feature.
10 Database save rate > 1000 events per second bursts per ECA node, requires more database VM's to manage save operations.
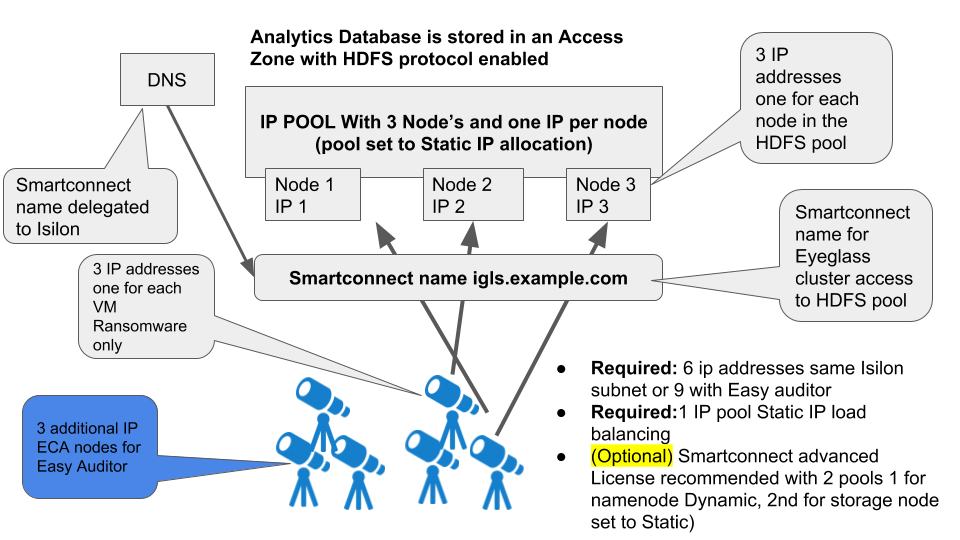
IP Connection and Pool Requirements for Analytics database Requires HDFS on the Cluster (Easy Auditor)
ECA Cluster Network Bandwidth Requirements to PowerScale (Ransomware Defender, Easy Auditor, Performance Auditor)
Each ECA node process audit events and writes data to the analytics database using HDFS on the same network interface. Therefore the combined TX and RX constitutes the peak bandwidth requirement per node. The table below is is a minimum bandwidth requirements per ECA VM example calculation.
HDFS Bandwidth estimates and guidelines for Analytics database network bandwidth access to PowerScale.
Product Configuration | Audit Event rate Per Second | Peak Bandwidth requirement | |
Events per second per ECA cluster (input NFS Reading events from PowerScale to ECA cluster) | Audit data Writes Mbps per ECA cluster (output HDFS writing events) | ||
Ransomware Defender only | 2000 evts | Input to ECA → 50 Mbps | Out of ECA <-- < 150 Mbps |
Unified Ransomware and Easy Auditor - Steady state storing events | > 4000 evts | Input to ECA → 125 Mbps | Out of ECA ← 500 Mbps - 1.2 Gbps |
Easy Auditor Analysis Reports (long running reports) | NA | Input to ECA (HDFS from PowerScale) ← 800 Mbps - 1.5 Gbps while report runs | |
VMware ESX Host Compute Sizing for ECA nodes (Ransomware Defender, Easy Auditor, Performance Auditor)
Audit data is a real-time intensive processing task. Auditing workload increases with file IO, and the number of users is a good metric to estimate file IO workload per user. The table below is based on an assumption of 1.25 events per second per user with a peak of 1.5 events per second and can be used as a guideline to help determine how many events per second your environment will produce. This will help you to determine the sizing of the VM and placement on ESX hardware.
VMware or Hyper-V Host Requirements
- NOTE: Vmware environments with DRS and SDRS should excempt the ECA and vApp from dynamic relocation as a best practise. As a real-time application with time skew requirements between VM's for processing and database operations, DRS movement of running VM's . For maintenance purposes it is ok migrate vm's as needed.
Number of active concurrent Users per cluster 1 | ECA VM per Physical Host Recommendation | Estimated Events Guideline |
1 to 1000 | 1 Host | =5000 * 1.25 = 6,250 events per second |
5000 - 10000 | 2 Host | =10,000 * 1.25 = 12,500 events per second |
> 10000 | 3 Host | = Number of users * 1.25 events/second |
1 Active tcp connection with file IO to the cluster
ECA Cluster Deployment Topologies with PowerScale Clusters
Considerations & Requirements to Select a Deployment Option for the ECA Cluster:
- When to use Mini ECA solution: latency between the site where the ECA database for Easy Auditor will reside or the site where Ransomware Defender Analytics cluster will reside and the site with a cluster that will be managed by Easy Auditor or Ransomware Defender is > 8 ms ping time should use Mini ECA with the install guide here.
- if latency is < 10 ms ping times then use NFS mount to the remote cluster for Easy Auditor/Ransomware Defender monitoring
Security - Firewall Port Requirements Ransomware Defender , Easy Auditor and Performance Auditor
Firewall Rules and Direction Table
NOTE: These rules apply to traffic into the VM and out of the VM. All ports must be open between VM's, private VLAN's and firewall between VM's is not supported.
To harden the ECA we recommend firewalling the ports between Eyeglass VM and the ECA vm. No external access to ECA is required other than SSH access for management access. This is the #1 method to secure the ECA. We also recommend securing the trouble shooting GUI's (HBASE, Spark and Kafka) to a management subnet.
| Eyeglass GUI VM (Applies to Ransomware Defender & Easy Auditor) | ||
| Consult the EyeGlass firewall ports Required ports that must be in place for Addon products Ransomware and Easy Auditor are listed in the table for specific features. | ||
| Ransomware Defender Only | ||
Port | Direction | Function |
| Operating System Open Suse 15.x | It is customer responsibility to patch the operating system and allow Internet repository access for automatic patching. The OS is not covered by the support agreement. | |
| TCP 9090 | Eyeglass → ECA | Prometheus database for event stats |
2181 (TCP) | Eyeglass → ECA | zookeeper |
9092 (TCP) | Eyeglass → ECA | Kafka |
5514 (TCP) as of 2.5.6 build 84 | ECA → Eyeglass | syslog |
443 (TCP) | ECA → Eyeglass | TLS messaging |
NFS v3 UDP/TCP port 111, TCP and UDP port 2049 and TCP/ UDP 300 | ECA → PowerScale | NFS export mounting audit data folder on managed clusters (NOTE: Kerberized NFS is not supported) |
| NFS 4.x TCP port 2049 | ECA → PowerScale | NFS export mounting audit data folder on managed clusters |
REST API 8080 TCP | ECA --> Powerscale (New mandatory) | needed for REST API audit log monitoring |
| NTP (UDP) 123 | ECA → NTP server | time sync |
ICMP | vault cluster -> prod cluster(s) | AirGap Solution: Enterprise Edition Description of port: Ping from prod cluster to vault cluster Comments: Used to assess network reachability and vault isolation |
| ICMP | ECA VM's using REST API mode --> Powerscale nodes in system zone used for audit data ingestion | Used to provide reachablity check and filter out nodes in the smarconnect pool that are not reachable via ping ICMP |
Additional Ports for Easy Auditor | ||
8020 AND 585 (TCP) | ECA → PowerScale | HDFS (NOTE: Encrypted HDFS is not supported) |
| 18080 | Eyeglass --> ECA node 1 only | hbase history required for Easy Auditor |
| 16000, 16020 | Eyeglass → ECA | hbase |
6066 (TCP) | Eyeglass → ECA | Spark job engine |
| 9092 (TCP) | Eyeglass --> ECA | Kafka broker |
443 (TCP) | Admin browser → ECA | Secure access to management tools with authentication required. |
Eyeglass VM Prerequisites - Mandatory Step
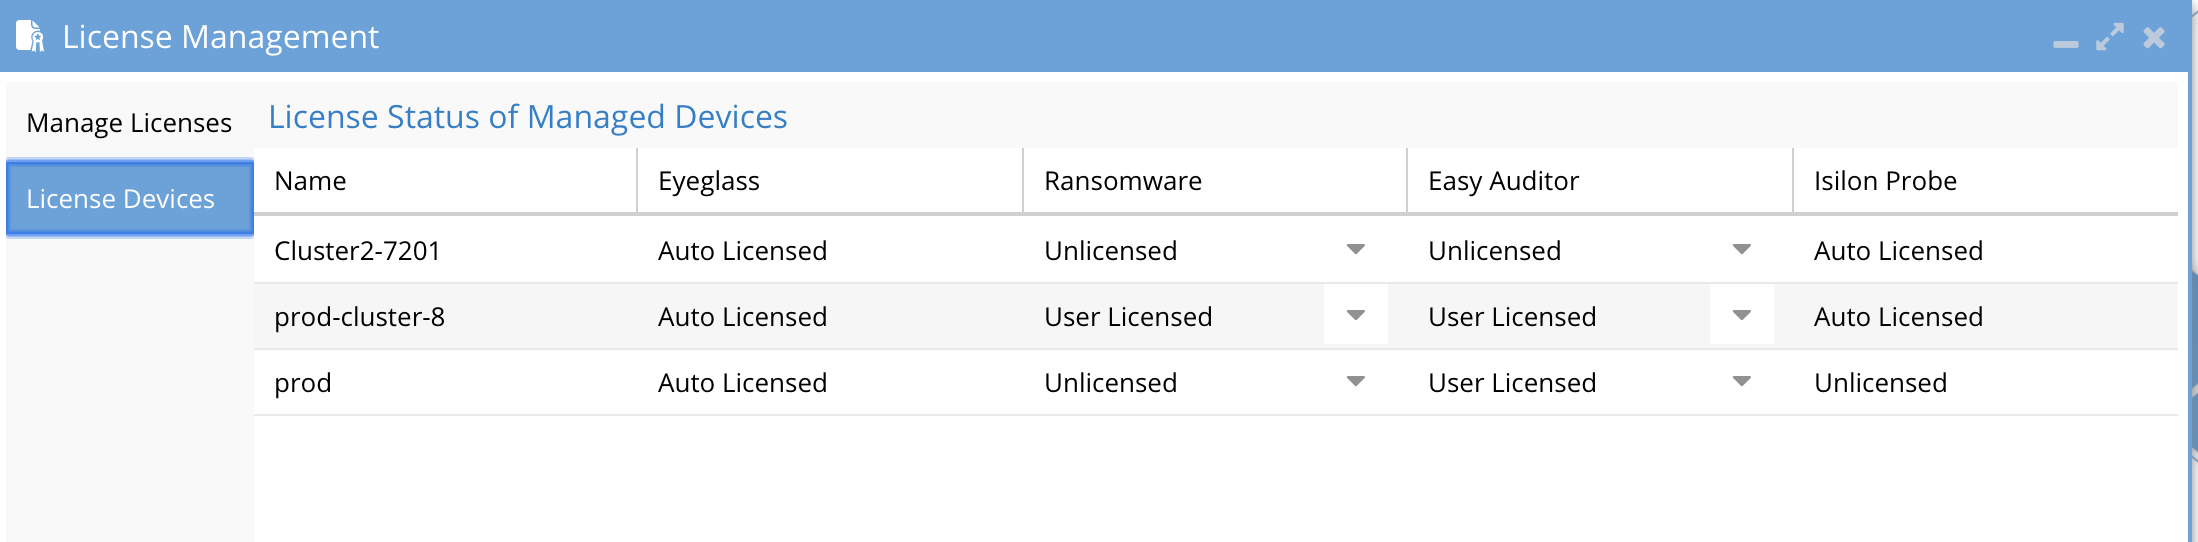
Eyeglass License Requirements
- Eyeglass must be deployed with or upgraded to the correct compatible release for the ECA release that is being installed.
- Eyeglass Licenses for Easy Auditor or Ransomware Defender must be added to Eyeglass VM.
- Login to Eyeglass
- Open Licence manager Icon
- Follow how to download license key instructions using the email license token provided with your purchase.
- Upload the license key zip file from Step #3
- Web page will refresh
- Open License manager
- Select Licensed devices tab
- Set the license status for each product to user licensed for clusters that should be monitored by Ransomware Defender or Easy Auditor (depending on what license keys you purchased).
- Set the license status for each product for each cluster that should not be licensed to Unlicensed. This is required to ensure licences are applied to the correct cluster and blocked from being applied to the incorrect cluster.
Deployment Overview
The Eyeglass appliance is required to be installed and configured. The ECA Cluster runs in a separate group of VM’s from Eyeglass.
Eyeglass will be responsible for taking action against the cluster and notifying administrators.
- PowerScale cluster stores analytics database (this can be the same cluster that is monitored for audit events)
- Eyeglass appliance with Ransomware Defender agent licenses or Easy Auditor Agent Licenses Or Performance Auditor Licenses
- PowerScale cluster with HDFS license to store the Analytics database for Easy Auditor only (Ransomware Defender only deployments no longer need HDFS pool as of release 2.5.5 or later)
Summary Overview of steps to install and configure Easy Auditor or Unified Ransomware Defender ,Easy Auditor and Performance Auditor
- Configure Access Zone for Analytics database using an Access Zone with HDFS enabled
- Configure SmartConnect on the Access Zone for the HDFS Database
- Configure Smartconnect name for NFS mount access to each managed cluster
- Create Eyeglass api token for ECA to authenticate to Eyeglass
- Install ECA cluster
- Configure ECA cluster master config
- Push config to all nodes from master with ECA CLI
- Start up the cluster software
- Verify cluster is up and database is created
- Verify Eyeglass Service heartbeat and ECA cluster nodes have registered with Eyeglass in the Managed Services Icon
- Test Features
Isilon/PowerScale Protocol Audit Configuration (Required Step) (Ransomware Defender , Easy Auditor, Performance Auditor)
Overview
This section configures PowerScale file auditing required to monitor user behaviors. The Audit protocol can be enabled on each Access Zone independently that requires monitoring.
Enable Protocol Access Auditing OneFS GUI
- Click Cluster Management > Auditing
- In the Settings area, select Enable Configuration Change Auditing and Enable Protocol Access Auditing checkbox.
- In the Audited Zones area, click Add Zones.
- In the Select Access Zones dialog box, select one or more access zones, and click Add Zones (do not add Eyeglass access zone). NOTE: Any zone that does not have auditing enabled is unprotected.
Disable High Rate Audit Events Onefs 8.2 and later (Mandatory Step)
Directory Open and Directory close events generate unnecessary load on the cluster to log these event types, these event types are not used by Ransomware Defender or Easy Auditor (Default settings do not store these events in the Database). These events also cause performance issues on the cluster and high cluster overhead for these 2 events. It is required to disable these events.
Procedure to Disable High Rate Events
- Login to the Onefs cluster over ssh as the root user.
- Replace yellow highlight with access zone names that are enabled for auditing. This change takes effect immediately and will reduce audit overhead and increase auditing performance.
- isi audit settings modify --zone=<zone_name> --remove-audit-success=open_directory,close_directory
Preparation of Analytics Database or Index (Easy Auditor) (Required Step)
Prepare the PowerScale Cluster for HDFS
Prerequisites
- Easy Auditor only
- Must add minimum 3 PowerScale nodes added to new IP pool and assign the pool to the access zone created created for the audit database
- Must configure smartconnect zone name with FQDN
- Must complete DNS delegation to the FQDN assigned to the new pool for HDFS access
- Must Enable HDFS protocol on the new access zone (protocols tab in OneFS gui) Easy Auditor only
- Must have HDFS license applied to the cluster
- Must configure Snapshot schedule on the access zone path below every day at midnight with 30 day retention
- Optional - Create SyncIQ policy to replicate the db to a DR site.
- Activate a license for HDFS. When a license is activated, the HDFS service is enabled by default.
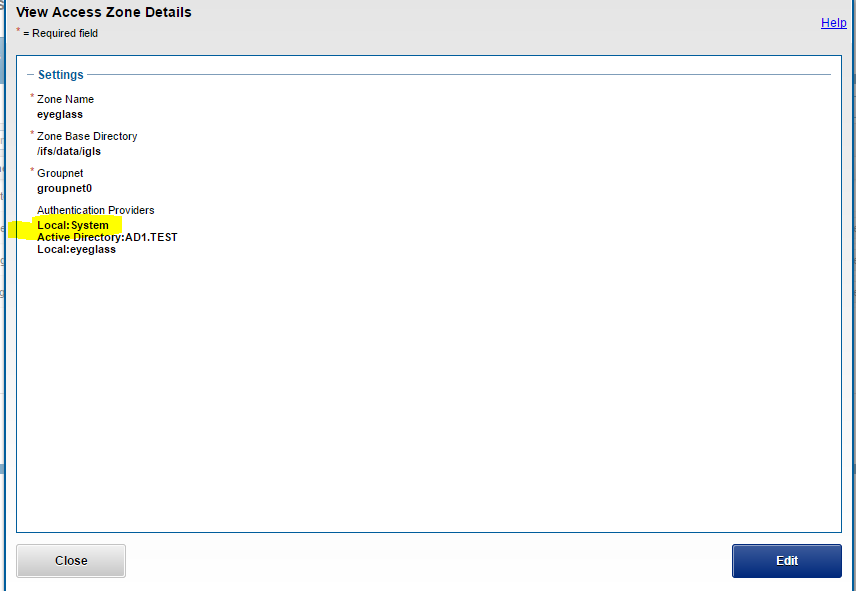
- Create “eyeglass” Access Zone with path “/ifs/data/igls/analyticsdb” for the HDFS connections from hadoop eyeglass compute clients (ECA) and under Available Authentication Providers, select only the Local System authentication provider.
- Select create create zone base directory
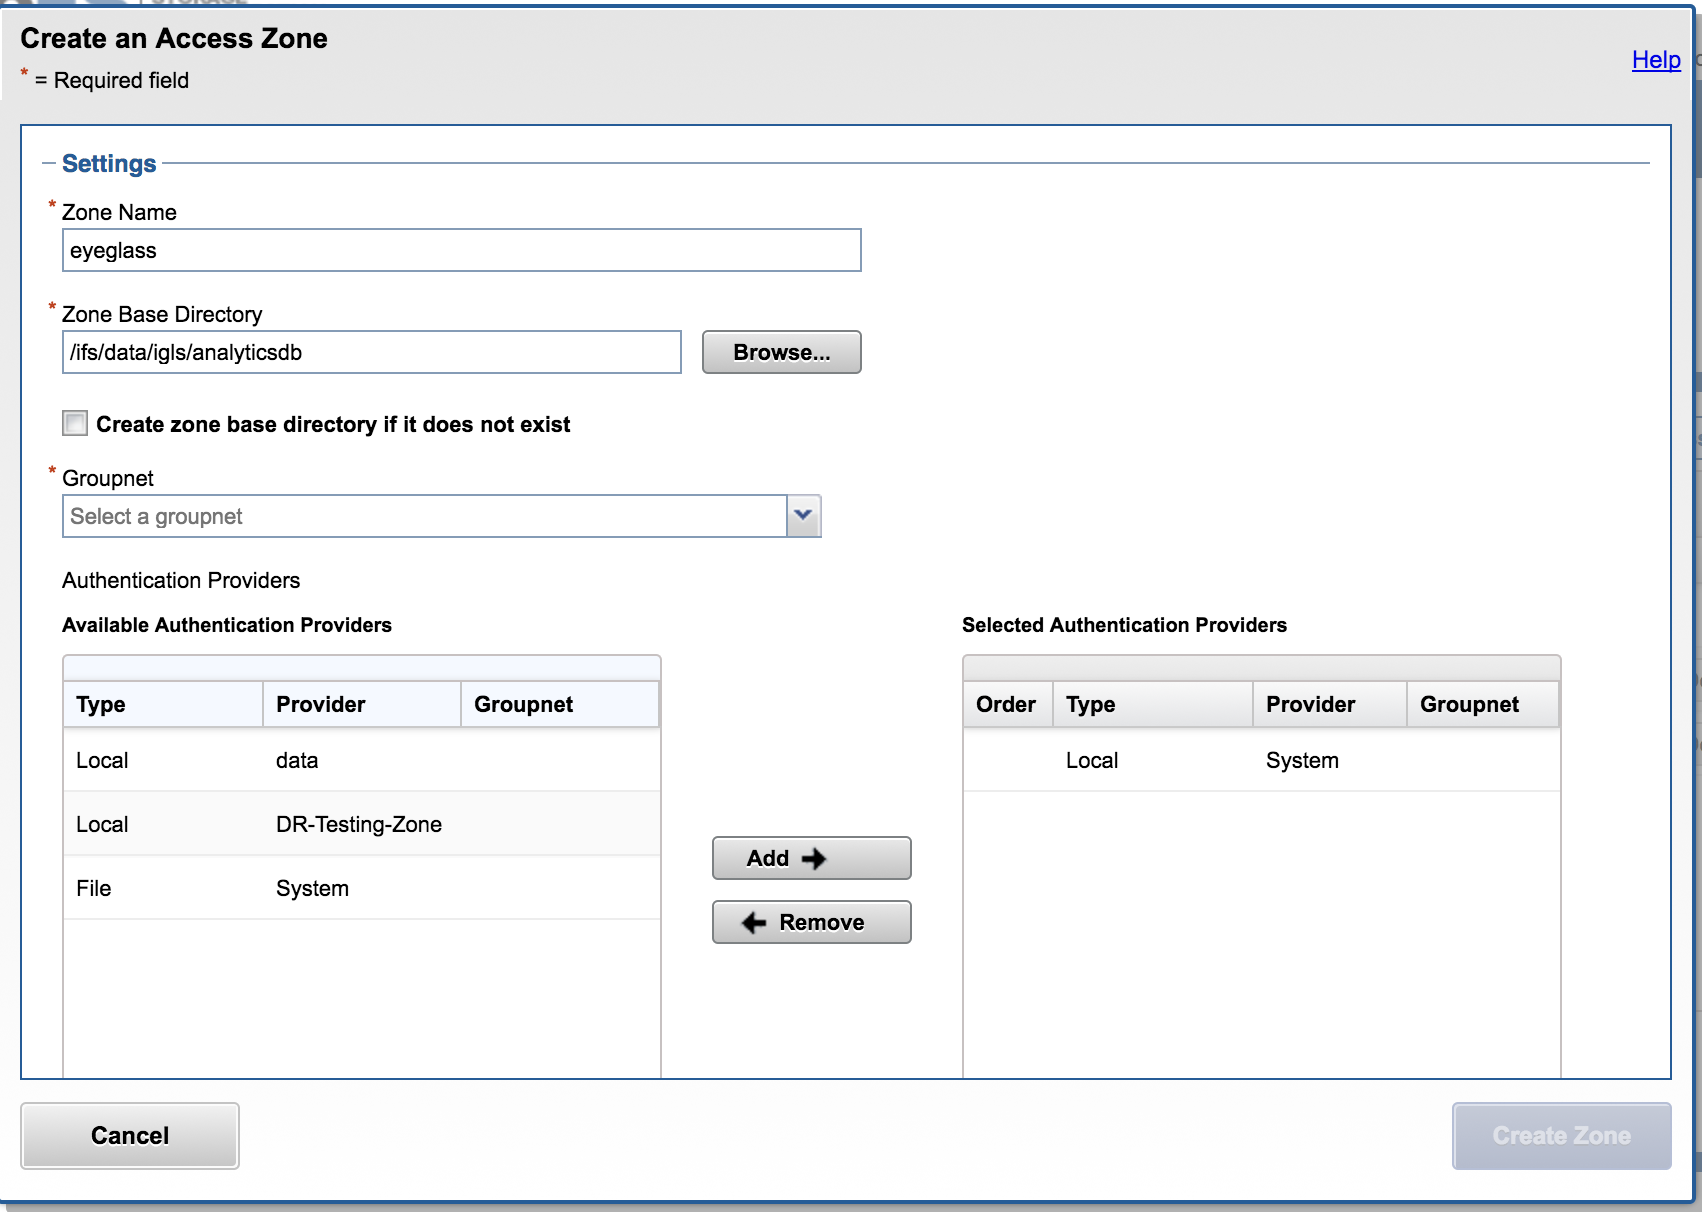
NOTE: Ensure that Local System provider is at the top of the list. Additional AD providers are optional and not required.
NOTE: In OneFS 8.0.1 the Local System provider must be added using the command line. After adding, the GUI can be used to move the Local System provider to the top of the list.
isi zone zones modify eyeglass --add-auth-providers=local:system
- Set the HDFS root directory in eyeglass access zone that supports HDFS connections.
(Onefs 8.x) isi hdfs settings modify --root-directory=path_to_hdfs_root_dir --zone=access_zone_name_for_hdfs Example: isi hdfs settings modify --root-directory=/ifs/data/igls/analyticsdb/ --zone=eyeglass |
- Create One IP pool for HDFS access with at least 3 nodes in the pool to ensure high availability access to each ECA node, the Pool will be configured with round robin load balancing. This will be used for datanode and storage node access by the ECA cluster for the Analytics database.
Command:
(Onefs 8.0) isi network pools create groupnet0.subnet0.hdfspool --ranges=172.22.1.22-172.22.1.22 --ifaces 1-4:10gige-1 --access-zone eyeglass --sc-dns-zone hdfs-mycluster.ad1.test --alloc-method static |
A virtual HDFS rack is a pool of nodes on the PowerScale cluster associated with a pool of Hadoop compute clients. To configure virtual HDFS racks on the PowerScale Cluster:
NOTE: The ip_address_range_for_client = the ip range used the by the ECA cluster VM’s.
Command:
(Onefs 8.0) isi hdfs racks create /hdfs_rack_name --zone=access_zone_name_for_hdfs --client-ip-ranges=ip_address_range_for_client --ip-pools=subnet:pool Example: isi hdfs racks create /hdfs-iglsrack0 --client-ip-ranges=172.22.1.18-172.22.1.20 --ip-pools=subnet0:hdfspool --zone=eyeglass isi hdfs racks list --zone=eyeglass Name Client IP Ranges IP Pools ------------------------------------------------------------- /hdfs-rack0 172.22.1.18-172.22.1.20 subnet0:hdfspool ------------------------------------------------------------- Total: 1 |
- Create local Hadoop user in the System access zone.
NOTE: User ID must be eyeglasshdfs.
Command:
(Onefs 8.0) isi auth users create --name=eyeglasshdfs --provider=local --enabled=yes --zone=system Example: isi auth users create --name=eyeglasshdfs --provider=local --enabled=yes --password-expires=no --zone=system |
- Login via SSH to the PowerScale cluster as the root user to change the ownership, permissions and block inherited permissions from parent folders on the HDFS path that will be used by Eyeglass ECA clusters.
- chown -R eyeglasshdfs:'Isilon Users' /ifs/data/igls/analyticsdb/
- chmod -R 755 /ifs/data/igls/analyticsdb/
- chmod -c +dacl_protected /ifs/data/igls/analyticsdb
- NOTE: if using a cluster in compliance mode do not run the commands above and run the command below.
- chmod 777 /ifs/data/igls/analyticsdb/
- Analytics Cluster setup Complete.
Deployment, Installation and Configuration ECA Cluster (Required Step)
OVA Install Prerequisites
| Configuration Item | Notes |
| see scaling section | The OVA file will deploy 3 vm's. to build a 6 node cluster, deploy the OVA twice and move the VM's into the first Cluster object in vcenter. See instructions below to correctly move VM's into a single vapp in vcenter. |
| vSphere 6.x or higher | |
| 1x ip address on the same subnet for each node | |
| Gateway | |
| Network Mask | |
| DNS IP | |
| NTP server IP | |
| IP Address of Eyeglass | |
| API token from Eyeglass | |
| Unique cluster name (lower case no special characters) |
Installation Procedure of the ECA Vmware OVA
- The deployment is based on three node ECA appliances.
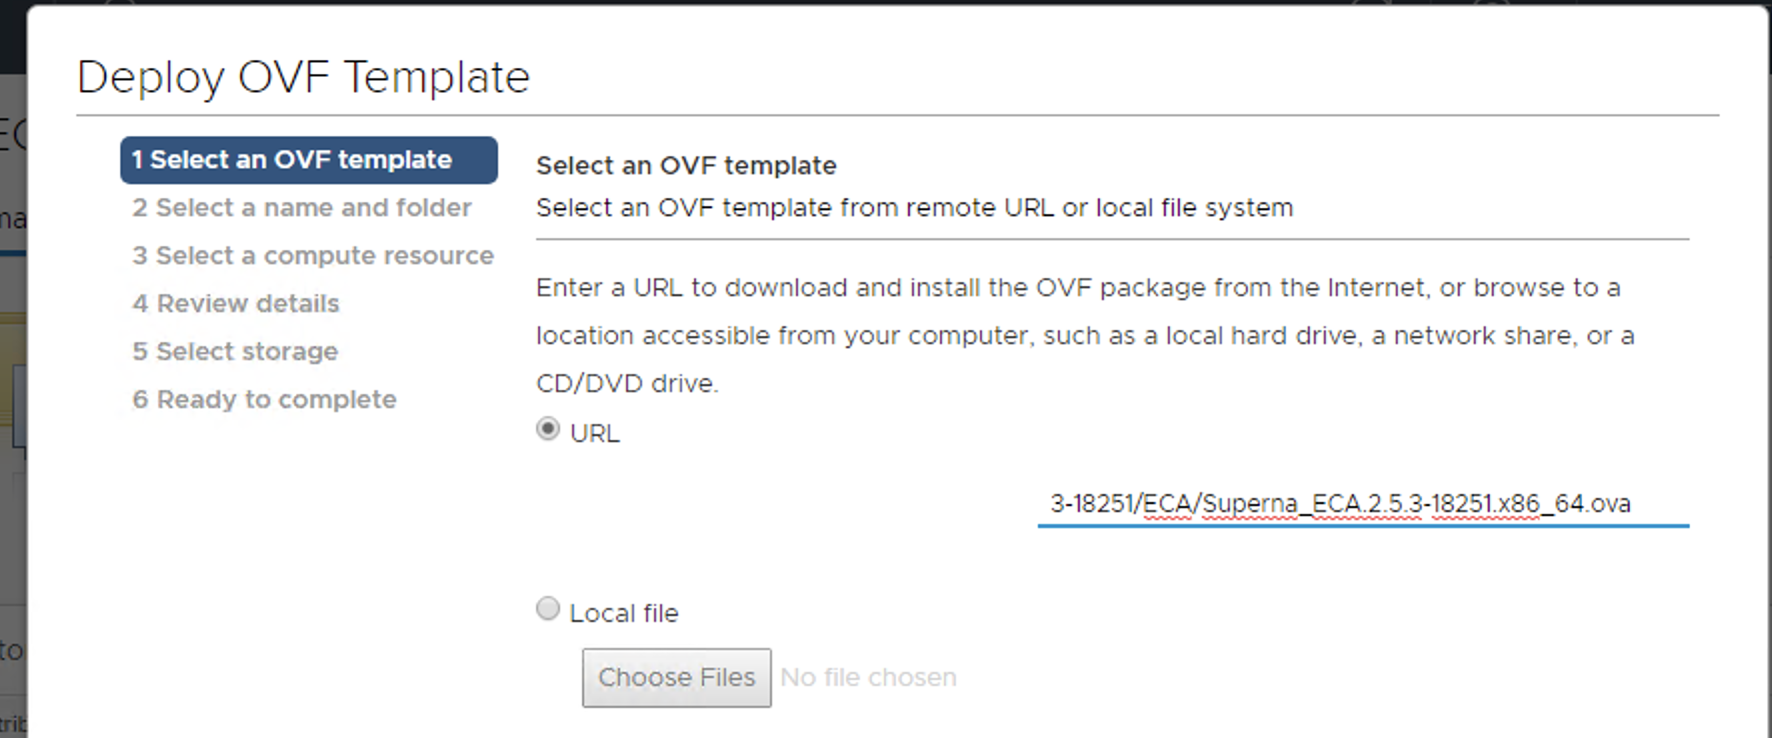
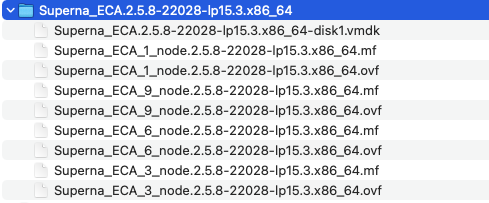
- Download the Superna Eyeglass™ OVF from https://www.supernaeyeglass.com/downloads
- Unzip into a directory on a machine with vSphere client installed
- NOTE: the unzipped download contains 1, 3, 6, and 9 VM OVF files
- Use the 1 VM OVF if you do not have vmware license for vAppliance objects and deploy N x VM based on scaling table in this guide
- Select 3, 6, 9 OVF + vmdk file to deploy an ECA cluster matching the VM count from the scaling table in this guide.
- Install the OVF using steps below with HTML vCenter web interface.
- WARNING: Access vCenter with an FQDN DNS name NOT an IP address, a bug in vCenter will generate an error during OVA validation.
- MANDATORY STEP: POWER ON THE VAPP AFTER DEPLOYMENT SO THAT IP ADDRESSES GET ASSIGNED. DO NOT REMOVE VM'S FROM VAPP BEFORE POWER ON.
- Make sure the first boot steps completes by reviewing running this command and repeat on each ECA vm to ensure it has completed all first boot steps.
- sudo systemctl status superna-on-boot (enter admin password and verify the first boot process completes)
- Verify the process has completed and exited the processing.
- cat /var/log/superna-on-boot.log, it must show done before the boot process is completed. Do not proceed until this steps finishes.
- Procedures
- Once the VM's ping you can move the VM's from the vApp object if you need to rename each VM for VM naming convention.
- NOTE: Make sure the first boot script has completed using procedure above on each VM, this can take 10 minutes per vm on first boot sets up docker containers and this must complete successfully along with ssh key creation.
- Make sure the first boot steps completes by reviewing running this command and repeat on each ECA vm to ensure it has completed all first boot steps.
- vCenter HTML Example
- Deploy from a file or URL where the OVA was saved
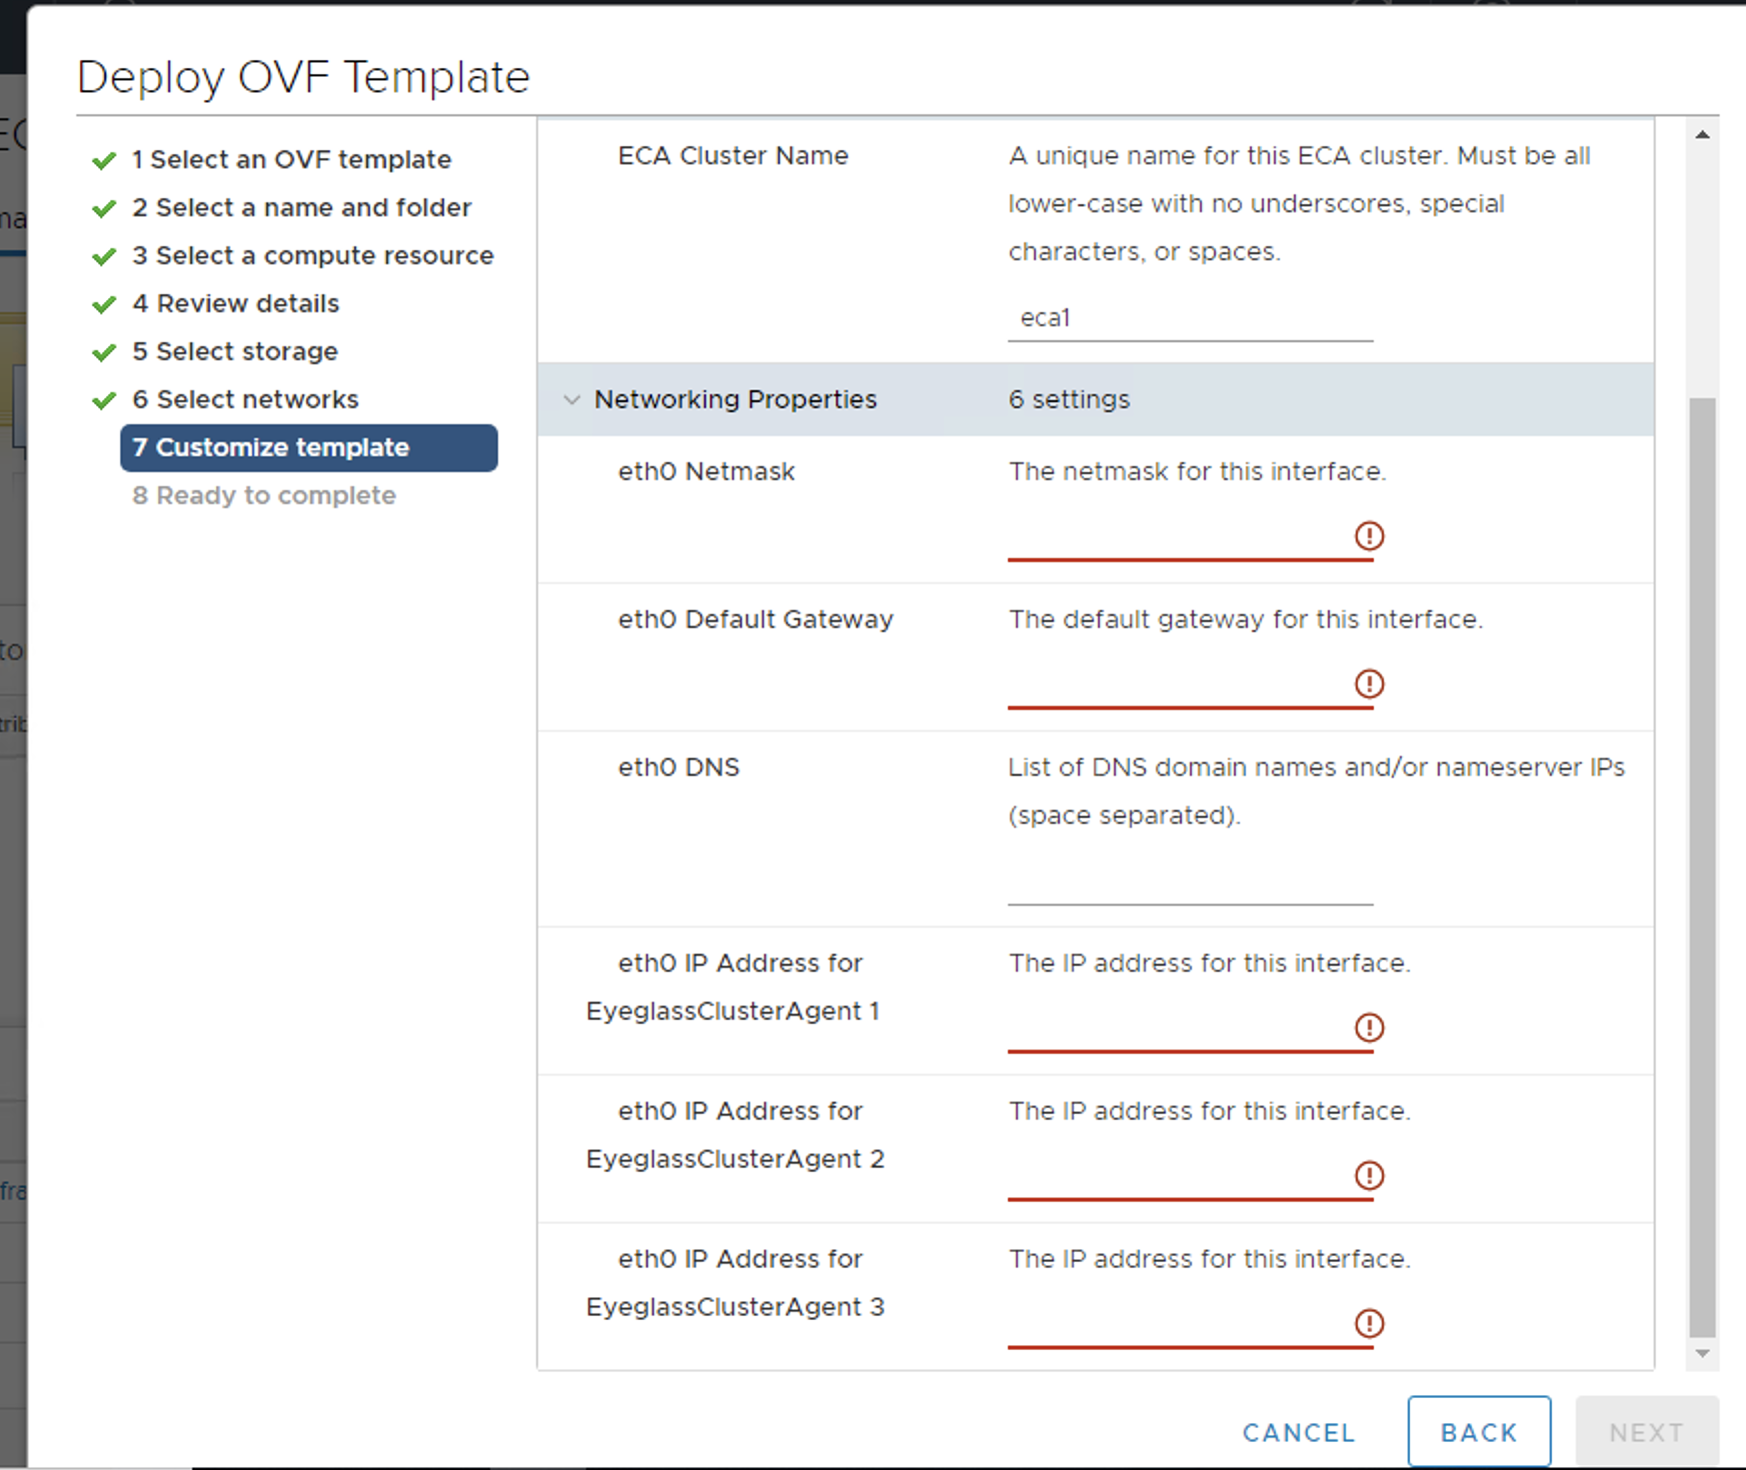
- Using vCenter client set required VM settings, for datastore, networking. NOTE: Leave setting as Fixed IP address
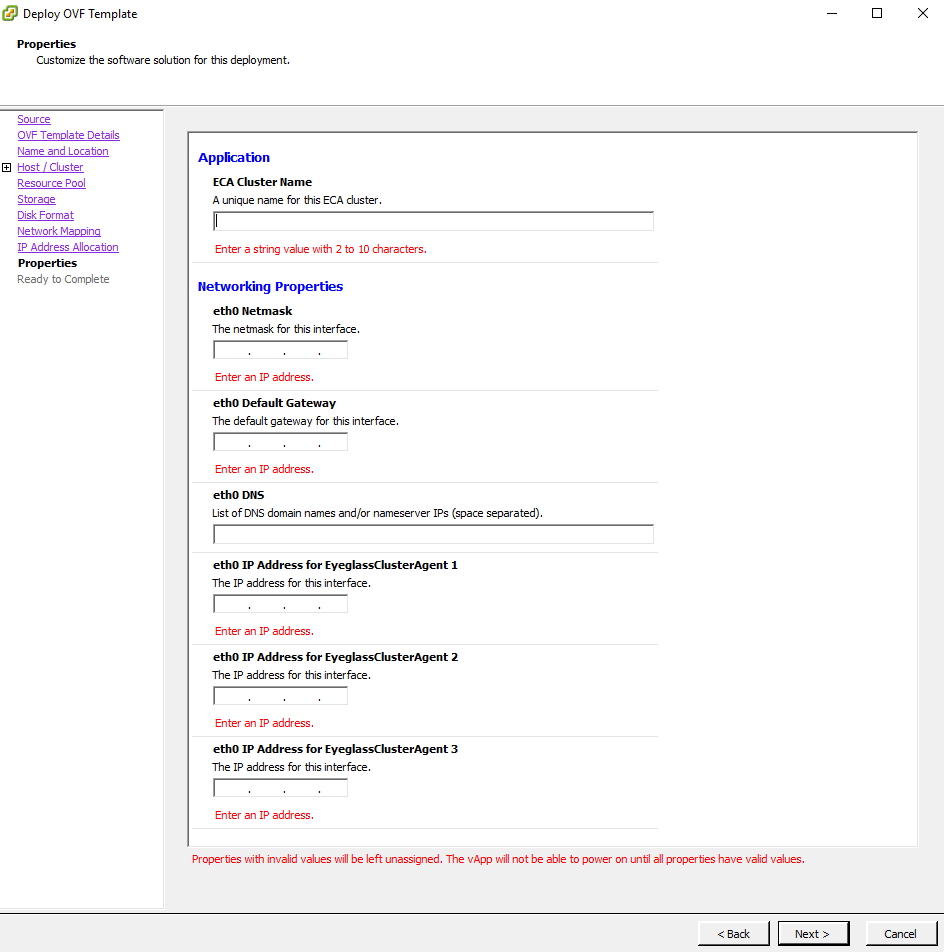
- Complete the networking sections as follows:
- ECA Cluster name (NOTE: must be lowercase < 8 characters and no special characters, with only letters)
- IMPORTANT: ECA Cluster name cannot include _ as this will cause some services to fail
- All VM are on the same subnet
- Enter network mask (will be applied to all VM’s)
- Gateway IP
- DNS server (must be able to resolve the igls.<your domain name here>) (Use nameserver IP address)
- NOTE: Agent node 1 is the master node where all ECA CLI commands are executed for cluster management
- vCenter Windows client example
- vCenter HTML Client Example
- Example OVA vAPP after deployment
- Enter all IP information for each ECA VM in the vcenter UI.
- After Deployment is complete Power on the vAPP (Recommended to stop here and wait for services to complete the remaining steps)
- Ping each ip address to make sure each node has finished booting
- Login via SSH to the Master Node (Node 1) using the “ecaadmin” account default password 3y3gl4ss and run the following command:
- ecactl components configure-nodes (this command sets up keyless ssh for the ecaadmin user to manage the cluster)
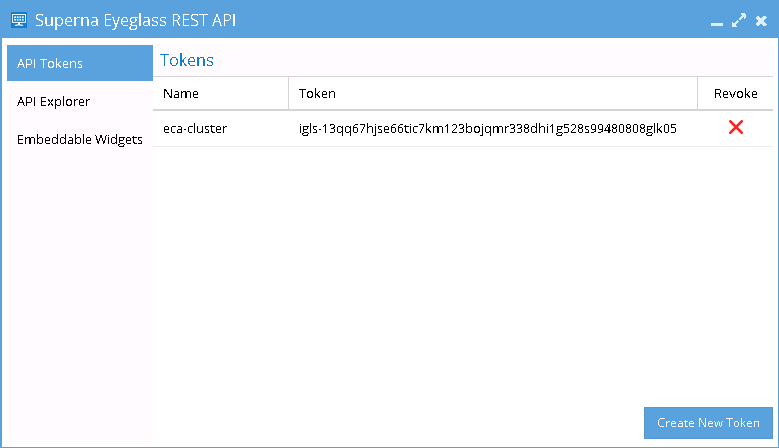
- On Eyeglass Appliance: generate a unique API Token from Superna Eyeglass REST API Window. Once a token has been generated for the ECA Cluster, it can be used in that ECA’s startup command for authentication.
- Login to Eyeglass goto main menu Eyeglass REST API menu item. Create a new API token. This will be used in the startup file for the ECA cluster to authenticate to the Eyeglass VM and register ECA services.
- On ECA Cluster Master node ip 1
- Login to that VM using assh as the ecaadmin user default password 3y3gl4ss. From this point on, commands will only be executed on the master node.
- On the master node, edit the file nano /opt/superna/eca/eca-env-common.conf , and change these five settings to reflect your environment. Replace the variables accordingly.
- Set the IP address or FQDN of the Eyeglass appliance and the API Token (created above), uncomment the parameter lines before save file. I.e:
- export EYEGLASS_LOCATION=ip_addr_of_eyeglass_appliance
- export EYEGLASS_API_TOKEN=Eyeglass_API_token
- Verify the IP addresses for the nodes in your cluster. It is important that NODE_1 be the master, (i.e. the IP address of the node you’re currently logged into.)
- NOTE: add additional ECA_LOCATION_NODE_X=x.x.x.x for additional node in the ECA cluster depending on ECA cluster size. All nodes in the cluster must be listed in the file. Copy a line and paste to add additional ECA nodes and make sure to change the node number example to add the 4th ECA VM it would like like this export ECA_LOCATION_NODE_4=
- export ECA_LOCATION_NODE_1=ip_addr_of_node_1 (set by first boot from the OVF)
- export ECA_LOCATION_NODE_2=ip_addr_of_node_2 (set by first boot from the OVF)
- export ECA_LOCATION_NODE_3=ip_addr_of_node_3 (set by first boot from the OVF)
- Set the HDFS path to the SmartConnect name setup in the Analytics database configuration steps. Replace the FQDN hdfs_sc_zone_name with <your smartconnect FQDN >.
- NOTE: Do not change any other value. Whatever is entered here is created as a subdirectory of the HDFS root directory that was set earlier.
- export ISILON_HDFS_ROOT='hdfs://hdfs_sc_zone_name:8020/eca1'
- Login to that VM using assh as the ecaadmin user default password 3y3gl4ss. From this point on, commands will only be executed on the master node.
- Done: Continue on to the Cluster Auditing Configuration Section
Time Configuration PowerScale, Eyeglass, ECA cluster (Required Step) (Ransomware Defender , Easy Auditor, Performance Auditor)
Overview: To get accurate auditing features for Ransomware or Easy Auditor time sync between all components is critical step. NTP should be used on all VM’s and use the same NTP source.
- Verify PowerScale clusters being monitored are using an NTP server. Many Internet time sources exist or internal Enterprise server IP address
- Enable NTP on all PowerScale clusters
- Eyeglass VM configure the same NTP servers used by PowerScale by following.
- On each ECA VM repeat the YAST steps above to configure NTP on each VM.
If NTP and ESX host time sync conflict it may be necessary to disable ESX host time sync to the ECA nodes to allow ECA nodes to get NTP time versus esx host. This ensure that DB queries and each node has consistent time in sync across Eyeglass VM’s and ECA nodes.
How to disable VMware vSphere ESXi host time sync (Mandatory Step)
For ECA:
- Initiate ecactl cluster down
- Power down ECA vApp
- Change VMware time sync configuration as below:
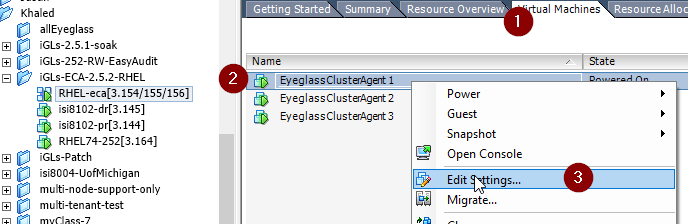
- Click on Virtual Machine
- Right click on ECA node1
- Click Edit Settings..
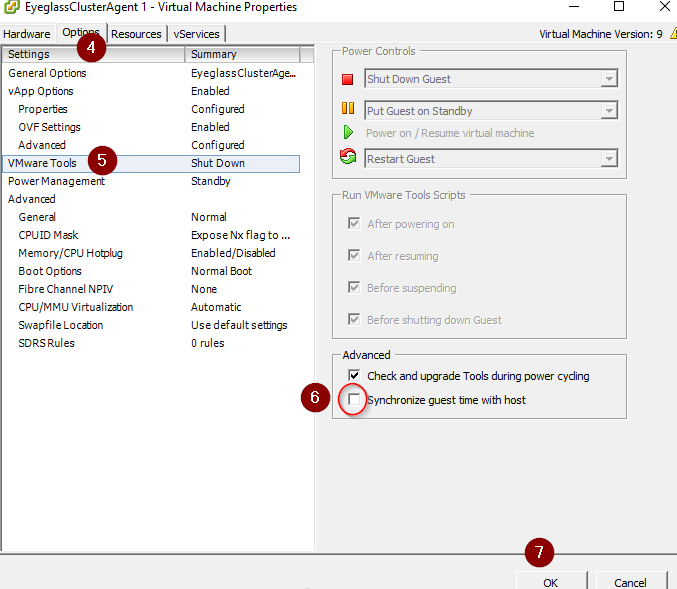
- Click on Option
- Click VMware Tools
- Uncheck ‘Synchronize guest time with host’
- Click OK
- Power up vApp
- Initiate ecactl cluster up
NOTE: Apply this change on ALL ECA nodes. Perform same steps for Eyeglass Appliance if needed
New changes may take up to 15 mins in some cases, you may need to restart ntpd after cluster up
How to Configure Audit Data Ingestion on the Isilon/Powerscale (Ransomware Defender, Easy Auditor, Performance Auditor) (Required Step)
Prerequisites for Isilon/Powerscale Audit Data NFS Export
- A Smartconnect name configured in the system zone for the NFS export created on /ifs/.ifsvar/audit/logs (steps below)
- Isilon/Powerscale IP pool set to dynamic mode for NFS mount used by the ECA cluster nodes for a highly available NFS mount.
- Firewall
- Port TCP 8080 from each ECA node --> all PowerScale nodes in the management pool within system zone for Audit data ingestion
- NFS ports --> ECA (all nodes) --> all PowerScale nodes in the management pool within system zone for Audit data ingestion
- Note: NFS v4.x is now supported with Appliance OS version 15.3 and above. Kerberized NFS is not supported.
Create a read-only NFS Export on the Isilon/PowerScale cluster(s) that will be managed
NFS v4.x (Recommended all Deployments) - NFSv3 is also supported
- Create NFSv4 or NFSv3 export from the CLI as per belowisi nfs exports create /ifs/.ifsvar --root-clients="<ECA_IP_1>,<ECA_IP_2>,<ECA_IP_3>" --clients="<ECA_IP_1>,<ECA_IP_2>,<ECA_IP_3>" --read-only=true -f --description "Easy Auditor Audit Log Export" --all-dirs true
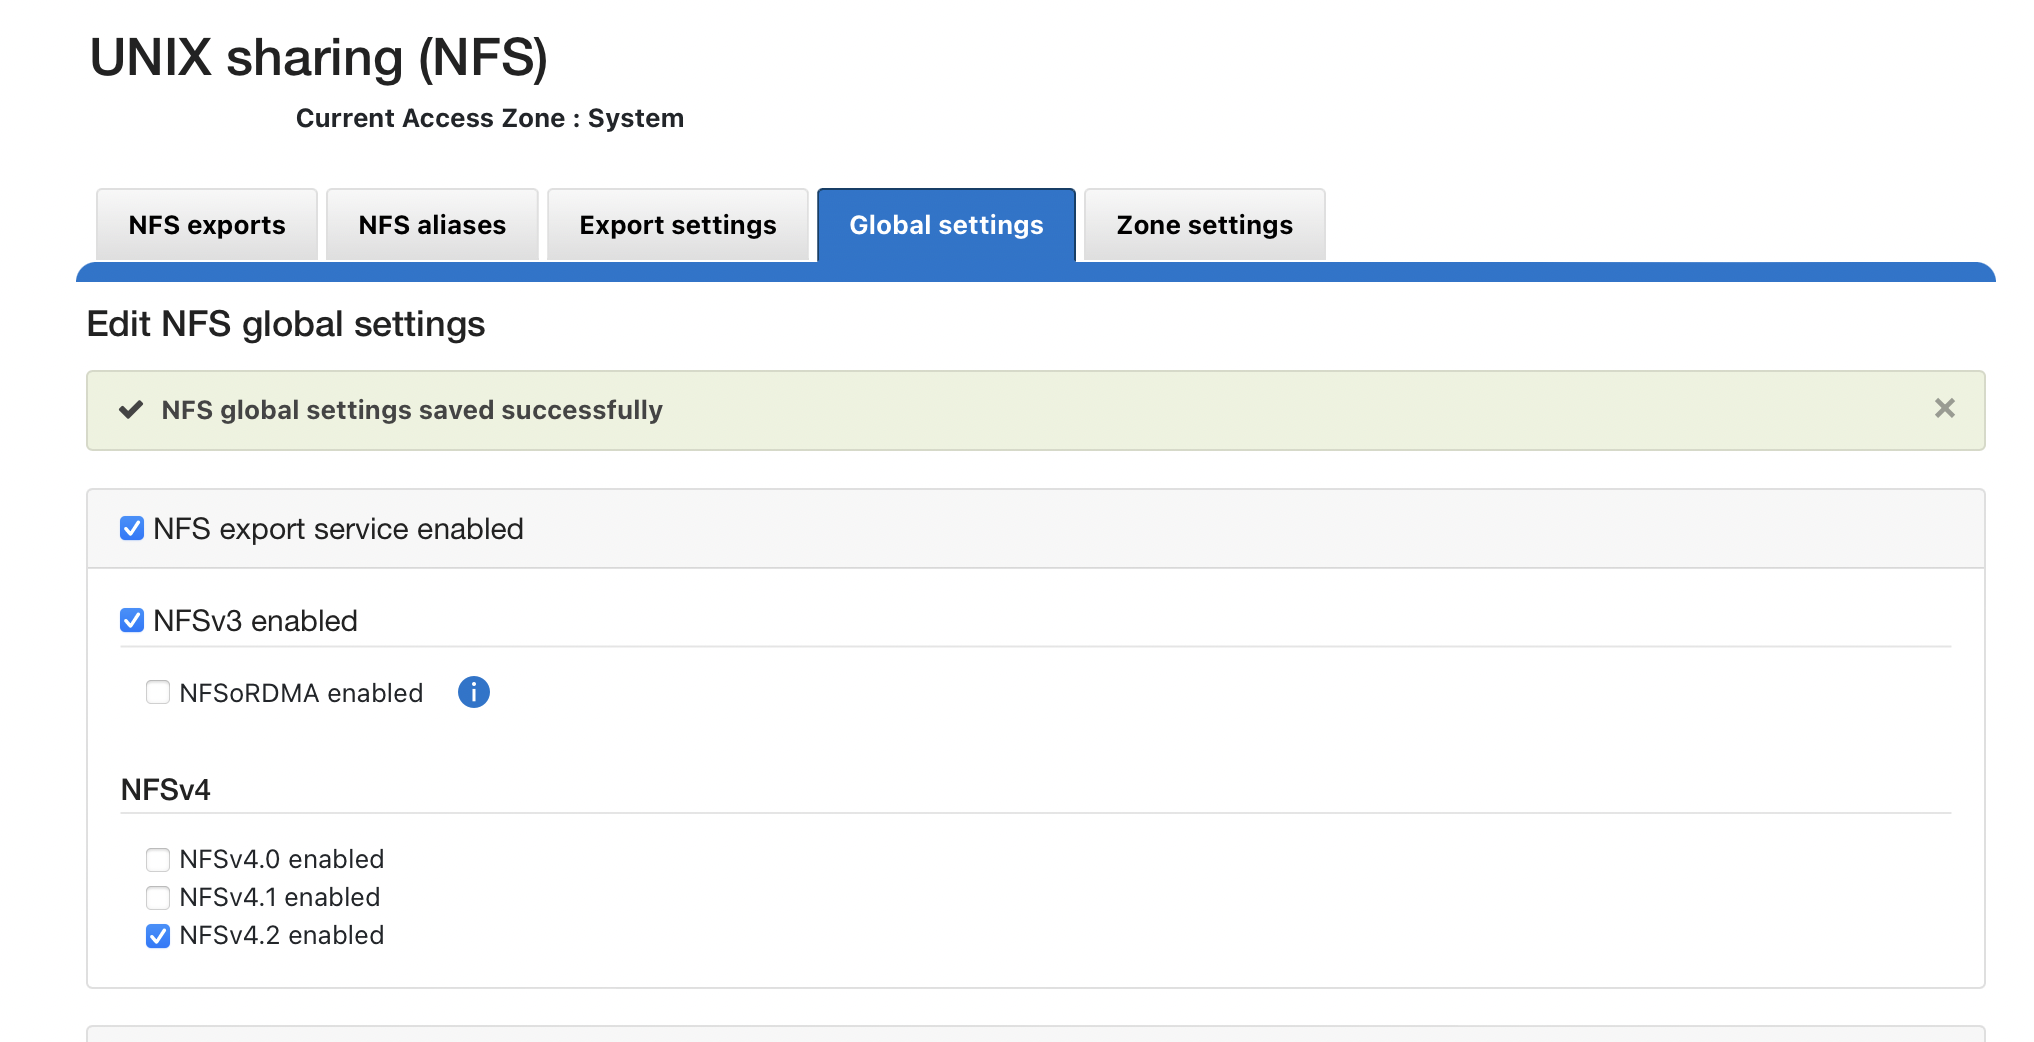
Prerequisite: Enable NFS 4.2
- NOTE: you should not enable nfsv4 if your hosts do not specify the mount protocol in fstab or auto-mount. Before enabling nfsv4 consult with Dell technical team on considerations and enabling checklist.
REST API Audit Ingestion - Mandatory for All deployments
- NOTE: you should not enable nfsv4 if your hosts do not specify the mount protocol in fstab or auto-mount. Before enabling nfsv4 consult with Dell technical team on considerations and enabling checklist.
- Requirements: 2.5.8.1 > and NFS v4 OR NFSv3
- Prerequisites: Update the eyeglass service account role and add the backup read permissions to the Eyeglass admin role. Add the 9.x permission or the 8.2 permission below.
Eyeglass Update
- Login to eyeglass vm
- sudo -s (enter admin password)
- nano /opt/superna/sca/data/system.xml
- Location the <process> tag
- insert this tag
- <syncIsilonsToZK>true</syncIsilonsToZK>
- control +x (save and exit)
- systemctl restart sca
- done
- for 9.x clusters add Backup Files From /Ifs
- isi auth roles modify EyeglassAdmin --add-priv-ro ISI_PRIV_IFS_BACKUP
- For 8.2 or later add these permissions to the role
- isi auth roles modify EyeglassAdmin --add-priv-ro ISI_PRIV_IFS_BACKUPisi auth roles modify EyeglassAdmin --add-priv-ro ISI_PRIV_IFS_RESTORE
- On each source cluster to be protected follow these steps to enable REST API audit folder monitoring.
- Login as root user and create this symlink
- ln -s /ifs/.ifsvar/audit/logs /ifs/auditlogs
- Login to ECA node 1
- nano /opt/superna/eca/eca-env-common.conf
- add this variable
- export TURBOAUDIT_AUDITLOG_PATH=/ifs/auditlogs
- control+x to save the file
- You will need restart the cluster for the change to take effect. (ecactl cluster down, ecactl cluster up)
- NOTE: ECA VM's require port https TCP 8080 from ECA to the protected cluster
Configure an NFS mount point on each ECA node to Read Audit data from Isilon/PowerScale (Required)
- Audit events are ingested over NFS mounts on ECA nodes 1 - X (where X is the size of your ECA cluster). Follow the steps below to add the export to each of the VM's.
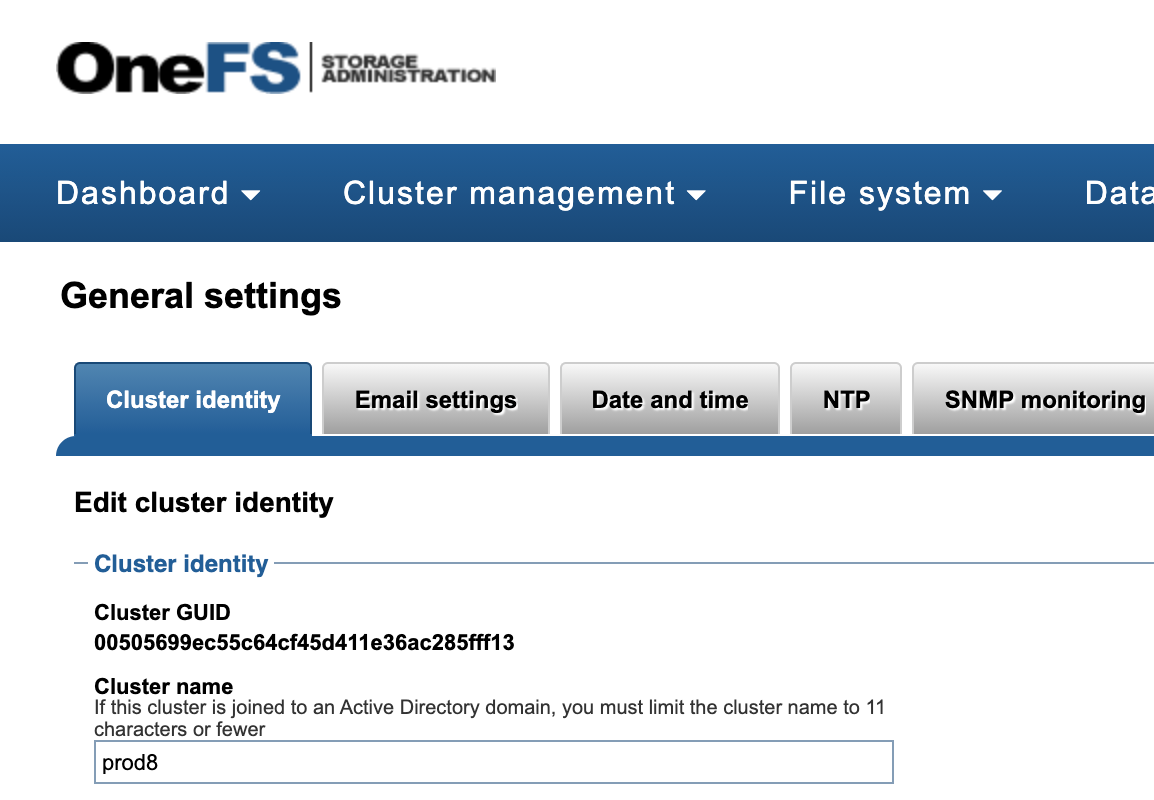
- What you will need to complete this step on nodes 2 - x (where x is the last node IP in the cluster):
- Cluster GUID and cluster name for each cluster to be indexed
- Cluster name as shown on top right corner after login to OneFS GUI NOTE: this name is case sensitive and the mount MUST match the case of the cluster name.
- See example of where to get this information.
- Login to ECA node 1
- ssh ecaadmin@x.x.x.x (where x.x.x.x is node 1 IP of the ECA cluster)
- Create local mount directory and sync to all nodes
- ecactl cluster exec "sudo mkdir -p /opt/superna/mnt/audit/GUID/clusternamehere/"
- replace GUID and clusternamehere with correct values from above (note cluster name is case sensitive and must match the cluster name case as shown in Onefs)
- enter the admin password when prompted on each ECA node
- Verify the folder exists on all ECA nodes
- ecactl cluster exec "ls -l /opt/superna/mnt/audit/"
- ecactl cluster exec "ls -l /opt/superna/mnt/audit/"
- ecactl cluster exec "sudo mkdir -p /opt/superna/mnt/audit/GUID/clusternamehere/"
- NFS Mount Setup with Centralized Mount file for all Nodes with Auto-Mount
- NOTE: This option will mount on cluster up using a centralized file to control the mount. This simplifies changing mounts on nodes and provides cluster up mount diagnostics.
- Configuration Steps for Auto mount
- nano /opt/superna/eca/eca-env-common.conf
- add a variable to ensure the cluster up stops if the NFS mount fails copy this line and paste into the file export STOP_ON_AUTOMOUNT_FAIL=true
- ssh to ECA node 1 as ecaadmin user to enable auto mount and make sure it starts on OS reboot. NOTE: for each node you will be prompted for the ecaadmin password.
- ecactl cluster exec "sudo systemctl unmask autofs"
- ecactl cluster exec "sudo systemctl start autofs"
- Check and ensure the service is running
- ecactl cluster exec "sudo systemctl status autofs"
- Add new entry to auto.nfs file on ECA node 1
- NOTE: the FQDN should be a smartconnect name for a pool in the System Access Zone IP Pool. <NAME> is the cluster name collected from the section above. GUID is the cluster GUID from the General settings screen of Onefs
- NOTE: Add 1 line for each Isilon/Powerscale cluster that will be monitored from this ECA cluster.
- Fix the command below with correct values highlighted in yellow and paste into the SSH session. Repeat for each Isilon/Powerscale cluster mount
- NFS v3
- echo -e "\n/opt/superna/mnt/audit/<GUID>/<NAME> --fstype=nfs,nfsvers=3,ro,soft <FQDN>:/ifs/.ifsvar/audit/logs" >> /opt/superna/eca/data/audit-nfs/auto.nfs
- NFS v4.x
- echo -e "\n/opt/superna/mnt/audit/<GUID>/<NAME> --fstype=nfs,nfsvers=4,ro,soft <FQDN>:/ifs/.ifsvar/audit/logs" >> /opt/superna/eca/data/audit-nfs/auto.nfs
- Verify the auto.nfs file contents
- cat /opt/superna/eca/data/audit-nfs/auto.nfs
- Push the configuration to all ECA nodes
- ecactl cluster push-config
- Start Auto mount and verify the mount
- ecactl cluster exec "sudo systemctl restart autofs" (note you will be asked to enter the ecaadmin password for each ECA node)
- Check the mount by typing command below
- mount
- The cluster up command will read the mount file and mount on each ECA node during cluster up.
Start up the ECA Cluster (Required)
- At this point you can start up the cluster
- SSH to ECA node 1 as ecaadmin and run the command below.
- ecactl cluster up (Note can take 5-8 minutes to complete)
- See trouble shooting section below for commands to verify startup and post startup status.
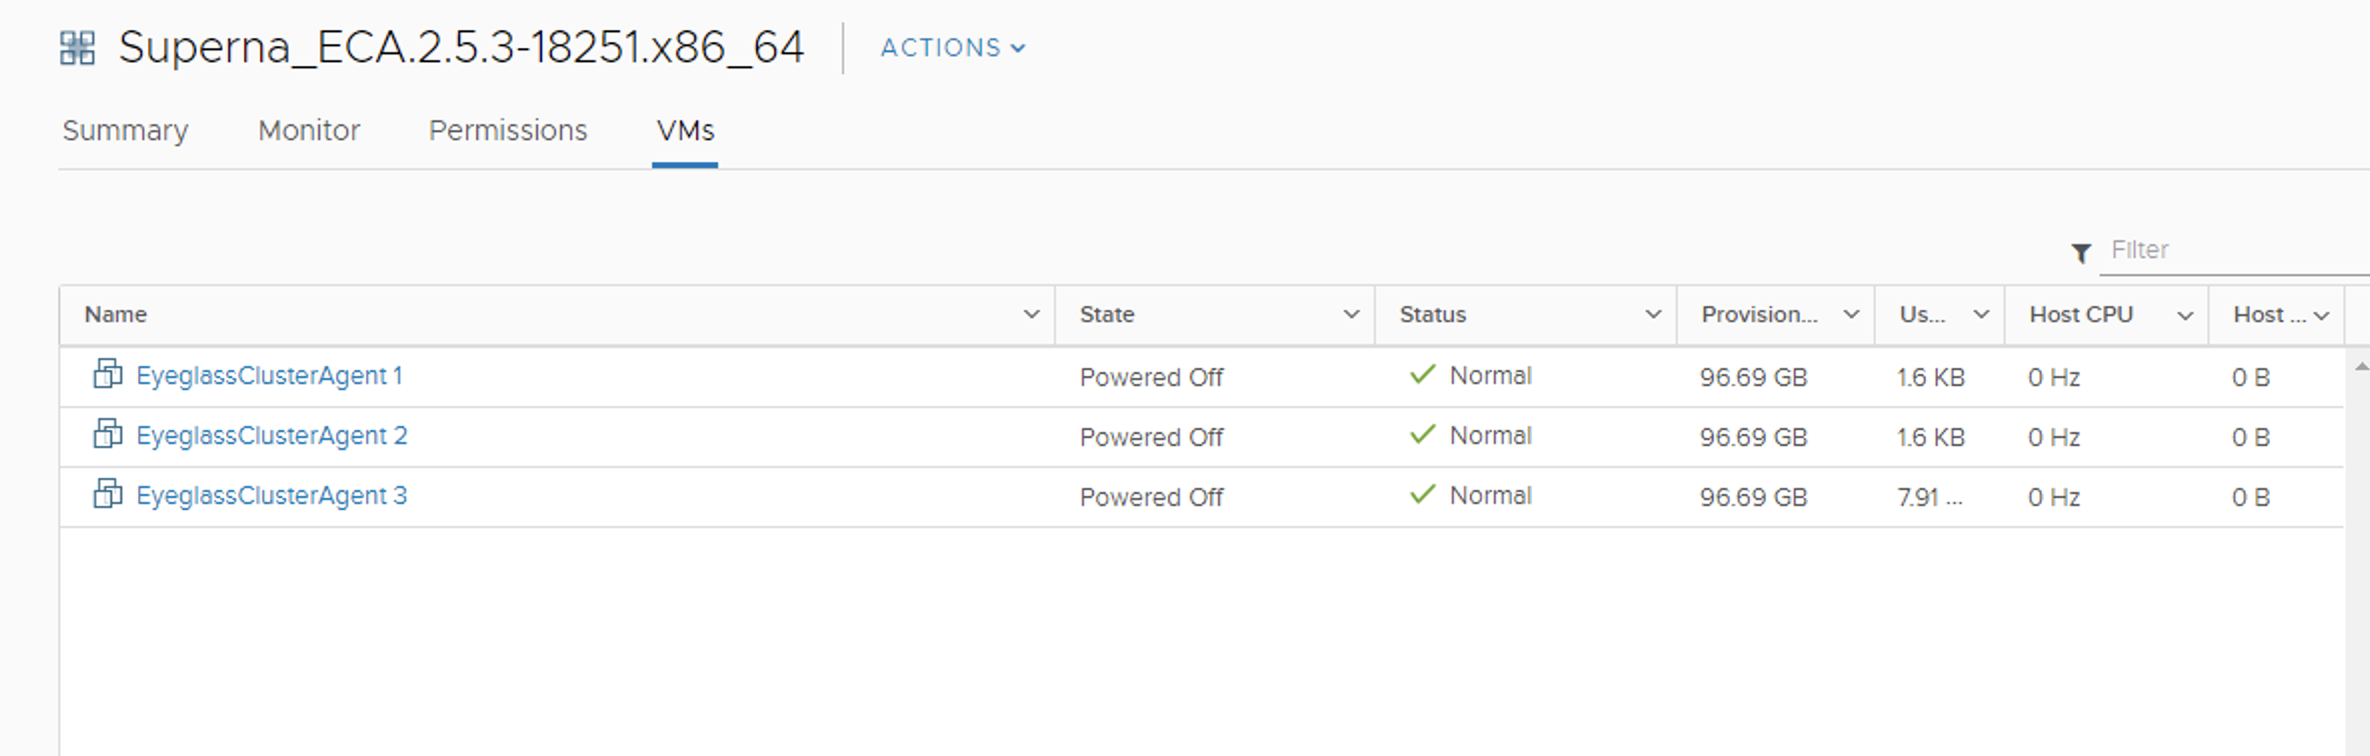
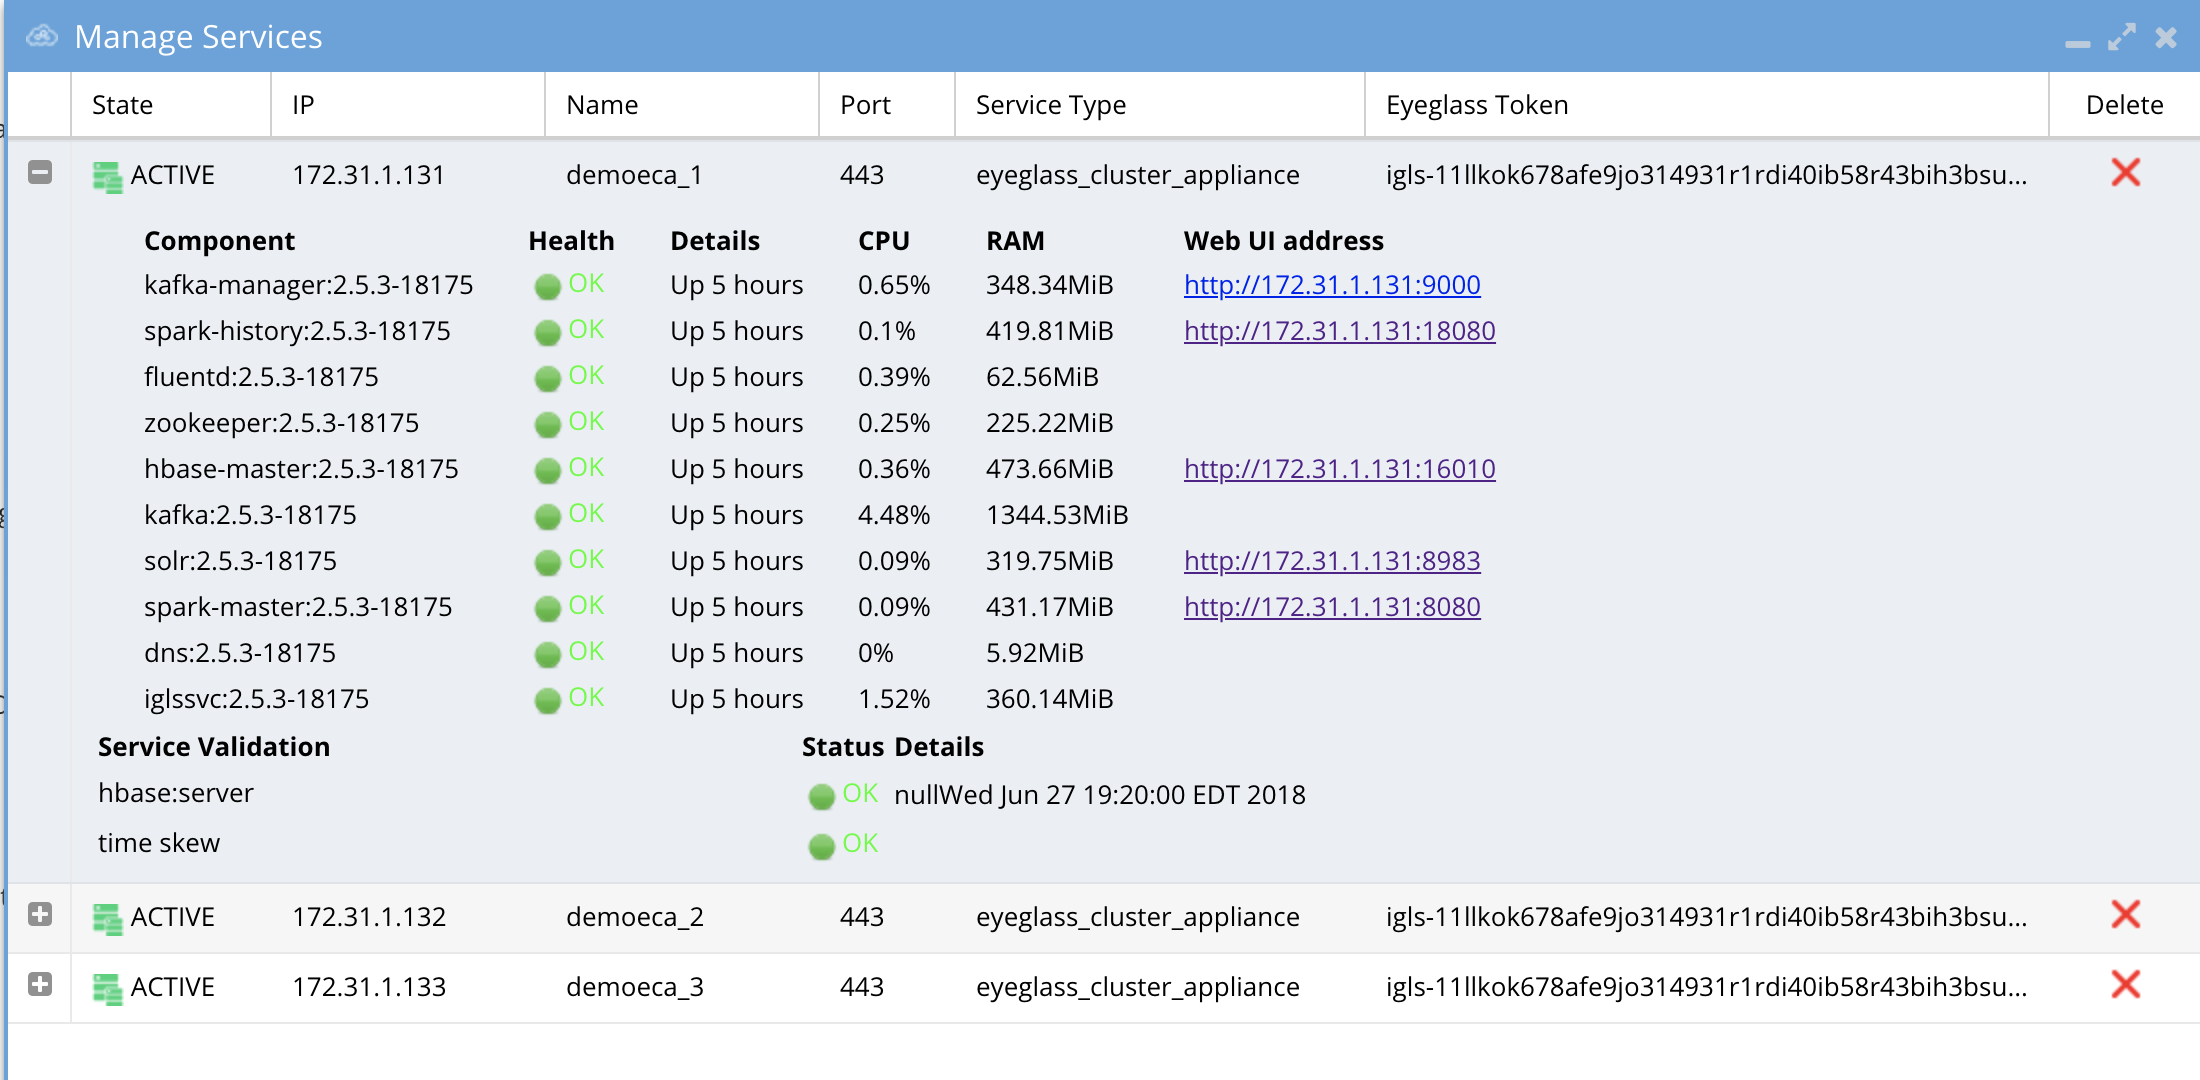
Verify ECA Remote Monitoring Connection from the Eyeglass Appliance (Required Step) (Ransomware Defender , Easy Auditor, Performance Auditor)
- Login to Eyeglass as admin user
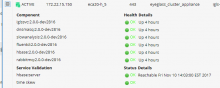
- Check the status of the ECA Cluster, click ‘Manage Service’ Icon and click on + to expand the container or services for each eca node review image below.
- Verify the ip addresses of the ECA nodes are listed.
- Verify all cluster nodes show and all docker containers show green health.
- NOTE: Hbase status can take 5 minutes to transition from warning to Green.
How to Backup and Protect the Audit Database with SnapshotIQ (Easy Auditor) (Required Step)
Use the PowerScale native SnapshotIQ feature to backup the audit data. Procedure documented here.
Installation Complete
At this point in the document, installation should be complete. Review the CLI guides for customizing different products.
Ransomware and Easy Auditor IGLS CLI command Reference
Additional configuration can be completed from the CLI to customize the default behavior.
How to Upgrade the ECA cluster Software For Easy Auditor , Ransomware Defender and Performance Auditor
NOTE: Contact support first before upgrading the cluster for compatibility with the Eyeglass version. Both Eyeglass and ECA MUST be running the same version.
NOTE: Upgrade assistance is scheduled and is a service not covered under 7/24 support. Please review the EULA terms and conditions.
NOTE: Always take a VM level snapshot before any upgrade steps to provide a roll back to the previous release
Steps to Carrier Grade Upgrade - No downtime
- Requirements:
- 2.5.8.2 or later release
- Login to node 1 as ecaadmin and copy the run file to node 1
- chmod 777 xxxx (name of run file)
- ./eca-xxxxx.run -- --rolling-upgrade
- Provide password for ecaadmin when prompted.
- Nodes will be upgraded in manner that allows audit data and all ECA products to continue to operate fully.
- Upgrade will manage all the node upgrades and will exit when done. The final state leave all containers running the new code.
- That's it, Cool eh!!!
Steps to upgrade:
- Hypervisor level VM snapshot to enable a roll back if needed. Mandatory step.
- Disable Ransomware Defender, Easy Auditor, Performance Auditor functionality before beginning upgrade - required first step
- Log in to ECA Node 1 using "ecaadmin" credentials.
- Issue the following command: ecactl cluster down
- Please wait for the procedure to complete on all involved ECA nodes.
- Done!
- Upgrade Eyeglass VM first and download the latest release from here https://www.supernaeyeglass.com/downloads
- NOTE: Eyeglass and ECA cluster software must be upgraded to the same version.
- Follow the guide here
- Double check licenses are assigned to the correct clusters based on information here.
- Double check Ransomware Defender, Easy Auditor and Performance Auditor settings are correct and match the settings you had before the upgrade.
- Then Download latest GA Release for the ECA upgrade following instructions here https://www.supernaeyeglass.com/downloads
- Log in to ECA Node 1 using "ecaadmin" credentials.
- Note: ECA is in down state - ecactl cluster down already done in step 1
- Verify by executing command: ecactl cluster status
- No containers should be running
- If containers running stop by executing the command and waiting for it to complete on all nodes: ecactl cluster down
- Once the above steps are complete
- Use WinSCP to transfer run file on node 1 (Master Node) in /home/ecaadmin directory
- ssh to ECA node 1 as ecaadmin user example ssh ecaadmin@x.x.x.x
- cd /home/ecaadmin
- chmod +x ecaxxxxxxx.run file (xxxx is name of file)
- ./ecaxxxxxx.run file (xxxx is name of file)
- Enter password for ecaadmin when prompted
- wait for installation to complete
- Capture the upgrade text to provide to support if needed
- Software upgrade is completed
- Now bring up the ECA cluster
- ecactl cluster exec "sudo systemctl enable --now zkcleanup.timer" (enter ecaadmin password will be required for each node)
- ecactl cluster up
- wait until all services are started on all nodes. If there are any errors copy the upgrade log referenced when the upgrade starts and use Winscp to copy the log file to your pc or copy and paste to a support case.
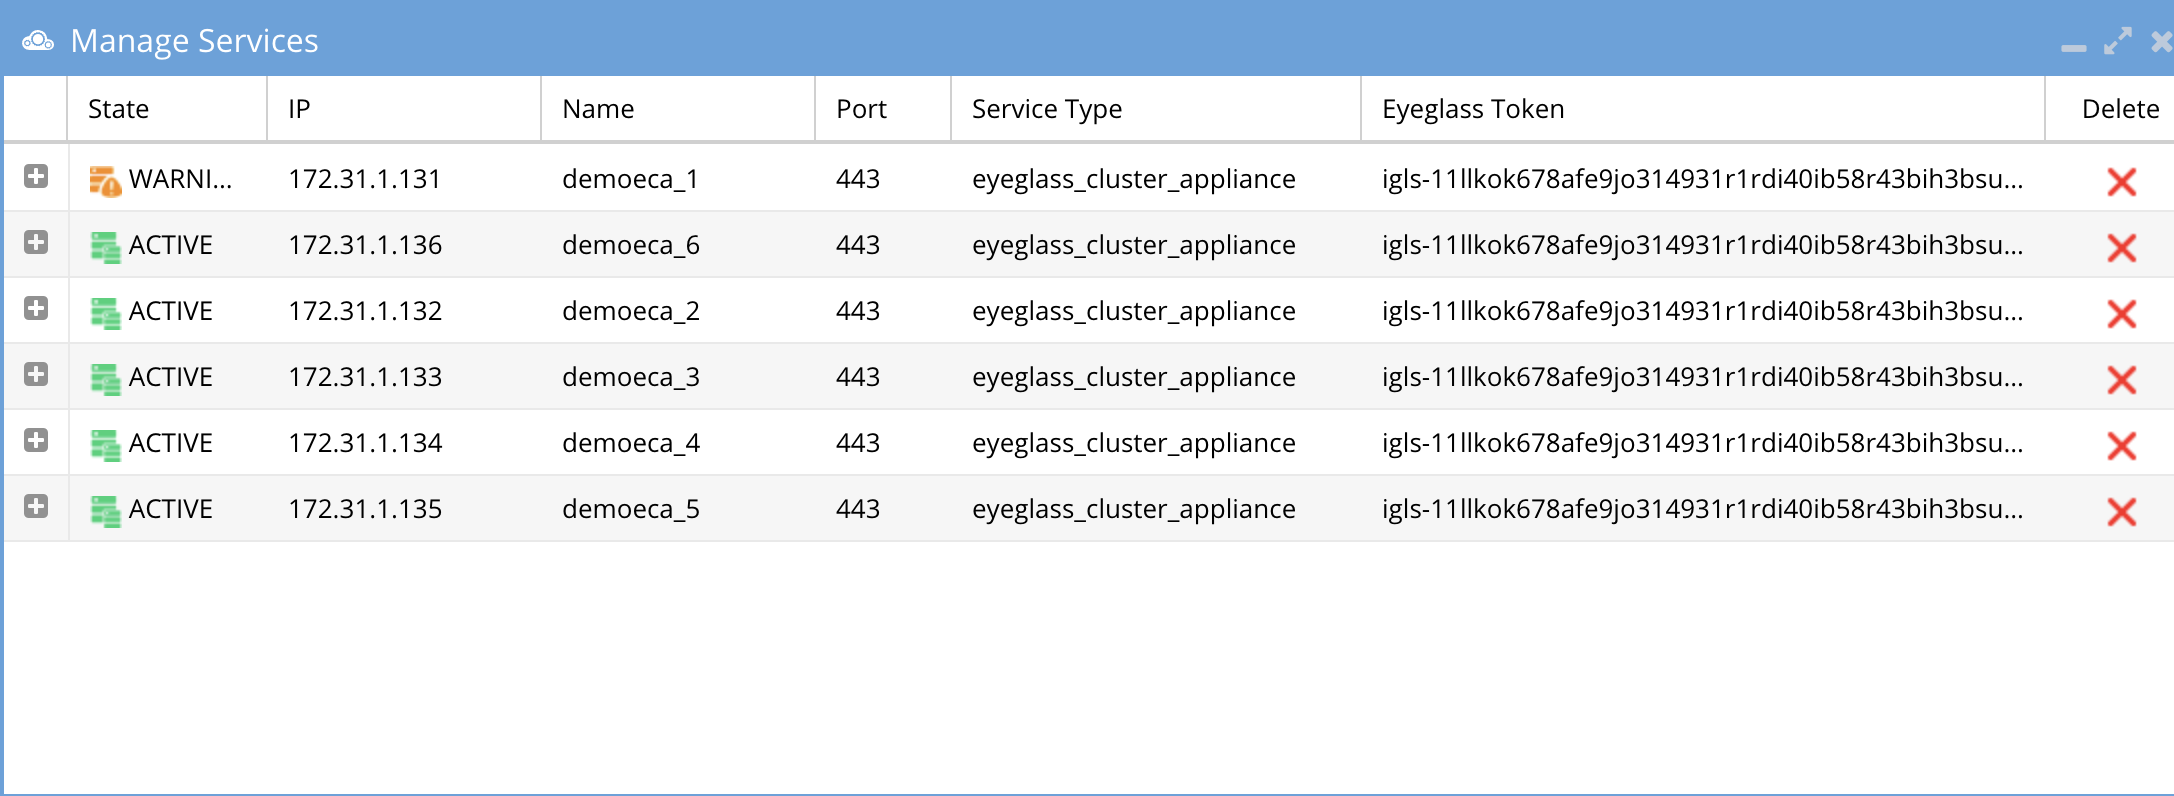
- Once completed, login to Eyeglass open the managed services icon, verify all ECA nodes show green and online. If any services show warning or inactive wait at least 5 minutes, if the condition persists, open a support case.
- If the above steps pass and all ECA nodes show green online
- Then use the Security guard test in Ransomware Defender or run the RoboAudit feature run in Easy auditor, to validate audit data ingestion is functioning.
- Consult the admin guide of each product to start a manual test of these features.
How to Migrate ECA cluster settings to a new ECA cluster deployment - To upgrade Open Suse OS.
To upgrade an ECA cluster OS, it is easier to migrate the settings to a new ECA cluster deployed with the new OS. Follow these steps to deploy a new ECA cluster and migrate configuration to the new ECA cluster.
Prerequisites
- The ECA cluster has a logical name between the nodes, when deploying the new OVA the deployment promtps for the ECA cluster name and this should use the same name as the previous ECA cluster.
- How to get the ECA cluster name
- Login to eca node 1 via ssh ecaadmin@x.x.x.x and then run the command below:
- cat /opt/superna/eca/eca-env-common.conf | grep ECA_CLUSTER_ID
- Use the value returned after the = sign when deploying the new ECA cluster.
- Using winscp utility copy the following files from ECA node 1 of the existing ECA cluster, login using ecaadmin user
- /opt/superna/eca/eca-env-common.conf
- /opt/superna/eca/docker-compose.overrides.yml
- /opt/superna/eca/conf/common/overrides/ThreatLevels.json
- /opt/superna/eca/data/audit-nfs/auto.nfs
- /opt/superna/eca/eca-env-common.conf
- NOTE: This procedure assumes the IP addresses will stay the same so that the cluster NFS export does nont need to be changed and no impact to any firewall rules.
- Deploy a new OVA ECA cluster using the latest OS OVA by downloading from instructions here.
- Follow deployment instructions in the install guide to deploy the new OVA and use the ECA cluster name captured from the prerequisites when prompted during the installation process of the OVA. The install guide for deploying the OVA is here.
- NOTE: Use the same ip addresses as the current ECA cluster
- Shutdown the old ECA cluster
- Login to node 1 as ecaadmin
- ecactl cluster down
- wait for the shutdown to finish
- Using vcenter UI power off the vapp
- Startup new ECA cluster
- Using vcenter UI power on the vapp
- ping each ip address in the cluster until each VM responds. NOTE: Do not continue if you cannot ping each VM in the cluster.
- Using winscp and login ecaadmin copy the files from the steps above into the new ECA OVA cluster
- On node 1 replace these files with the backup copies
- /opt/superna/eca/eca-env-common.conf
- /opt/superna/eca/docker-compose.overrides.yml
- /opt/superna/eca/conf/common/overrides/ThreatLevels.json
- /opt/superna/eca/data/audit-nfs/auto.nfs
- /opt/superna/eca/eca-env-common.conf
- On Nodes 1 to node X (where x is the last node in the cluster)
- On each node complete these steps
- ssh ecaadmin@x.x.x.x (ip of each eca node)
- sudo -s (enter ecaadmin password when prompted)
- mkdir -p /opt/superna/mnt/audit/cluster GUID/cluster name/
- example only /opt/superna/mnt/audit/0050569960fcd70161594d21dd22a3c10cbe/prod-cluster-8
- Repeat for each cluster managed by this ECA cluster. View the contents of this file to get the cluster GUID and name /opt/superna/eca/data/audit-nfs/auto.nfs
- Restart the Autofs process to read the auto.nfs file and mount all the clusters
- ecactl cluster exec "sudo systemctl restart autofs"
- Test the mount worked on each node
- ecactl cluster exec "mount"
- Verify the mount is present on all nodes in the output from the mount command.
- Startup the new ECA cluster
- login to eca node 1 as ecaadmin
- ecactl cluster up
- review statup messages for errors.
- Done.
Monitor Health and Performance of an ECA Cluster (Optional)
The sections below cover how to check the vitals of an ECA cluster. Always check with support before taking any actions. ECA clusters are designed to consume CPU for most operations and is expected to see high CPU on all nodes most of the time.
How to Verifying ECA Cluster Status
- On the master node run these commands:
- run the following command: ecactl db shell
- Once in the shell execute command: status
- Output should show 1 active master , 2 backup master server

How to Verify ECA containers are running
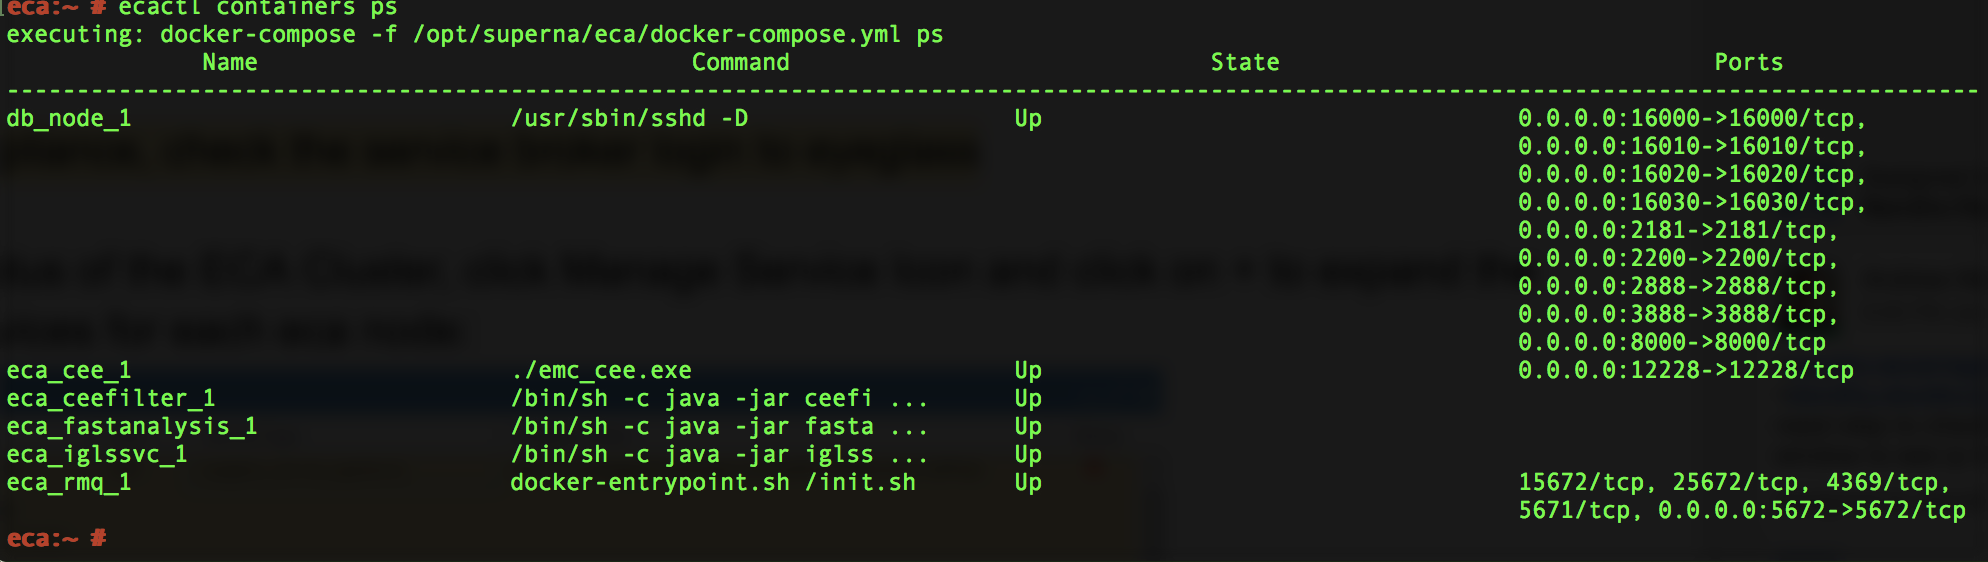
- Command: “ecactl containers ps”
Check cluster status and that all analytics tables exist (Ransomware Defender, Easy Auditor, Performance Auditor) (Optional Step)
- Command: ‘ecactl cluster status’
- This command verifies all containers are running on all nodes and verifies each node can mount the tables in the Analytics database.
- If any error conditions open a support case to resolve or retry with steps below:
- ecactl cluster down
- ecactl cluster up
- Send ECA cluster startup text to support
How to Check ECA node Container CPU and Memory Usage (Optional)
- Login to the eca node as ecaadmin
- Type cli command to see real time view of container resources utilization
- ecactl stats
How to Enable Real-time Monitor ECA cluster performance (If directed by support)
Use this procedure to enable container monitor to determine if cpu GHZ are set correctly for query and writing to PowerScale performance.
- To enable cadvisor, add the following line to eca-env-common.conf:
- export LAUNCH_MONITORING=true
- This will launch cadvisor on all cluster nodes.
- If you want to launch it on a single node, login to that node and execute:
- ecactl containers up -d cadvisor
- Once the cadvisor service is running, login to http://<IP OF ECA NODE>:9080 to see the web UI.
- Done.
ECA Cluster Modification Procedures (optional)
How to expand Easy Auditor cluster size
NOTE: Support will determine if your installation requires expansion. Always contact support.
Follow this steps to add 3 or 6 more VM’s for analytics performance increase for higher event rate or long running queries on a large database. Deploy the ECA OVA again, copy the new VM's into the vAPP, remove the vAPP created during the deployment. NOTE: The ECA name will not matter during the new OVA deployment since it will be synced from the existing ECA cluster during cluster up procedures.
- Login to the master ECA node
- ecactl cluster down
- deploy one or two more eca clusters. No special config needs to be added on the newly deployed ECA OVA.
- nano /opt/superna/eca/eca-env-common.conf to add more nodes:
- ECA_LOCATION_NODE_4: <IP>
- ECA_LOCATION_NODE_5: >IP>
- add anywhere from nodes 4 to 9 depending on the number of VM's added to the cluster.
- ecactl components configure-nodes
- ecactl cluster up
- This will expand HBASE and Spark containers for faster read and analytics performance
- Login to eyeglass and open managed services
- Now HBASE needs to balance the load across the cluster for improved read performance.
- Now login to the Region Master vm typically node 1
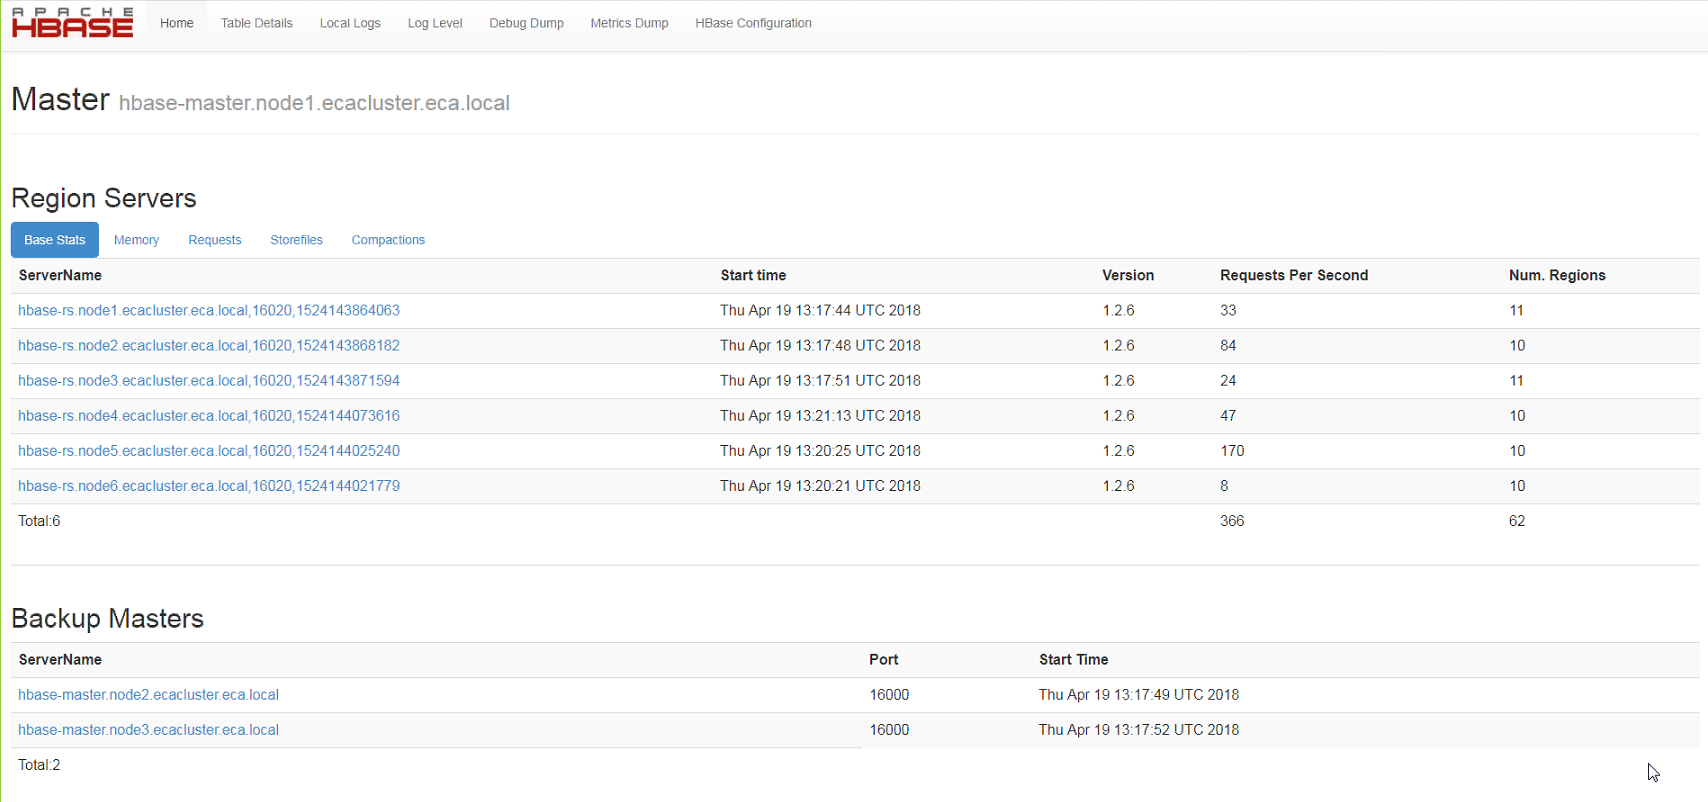
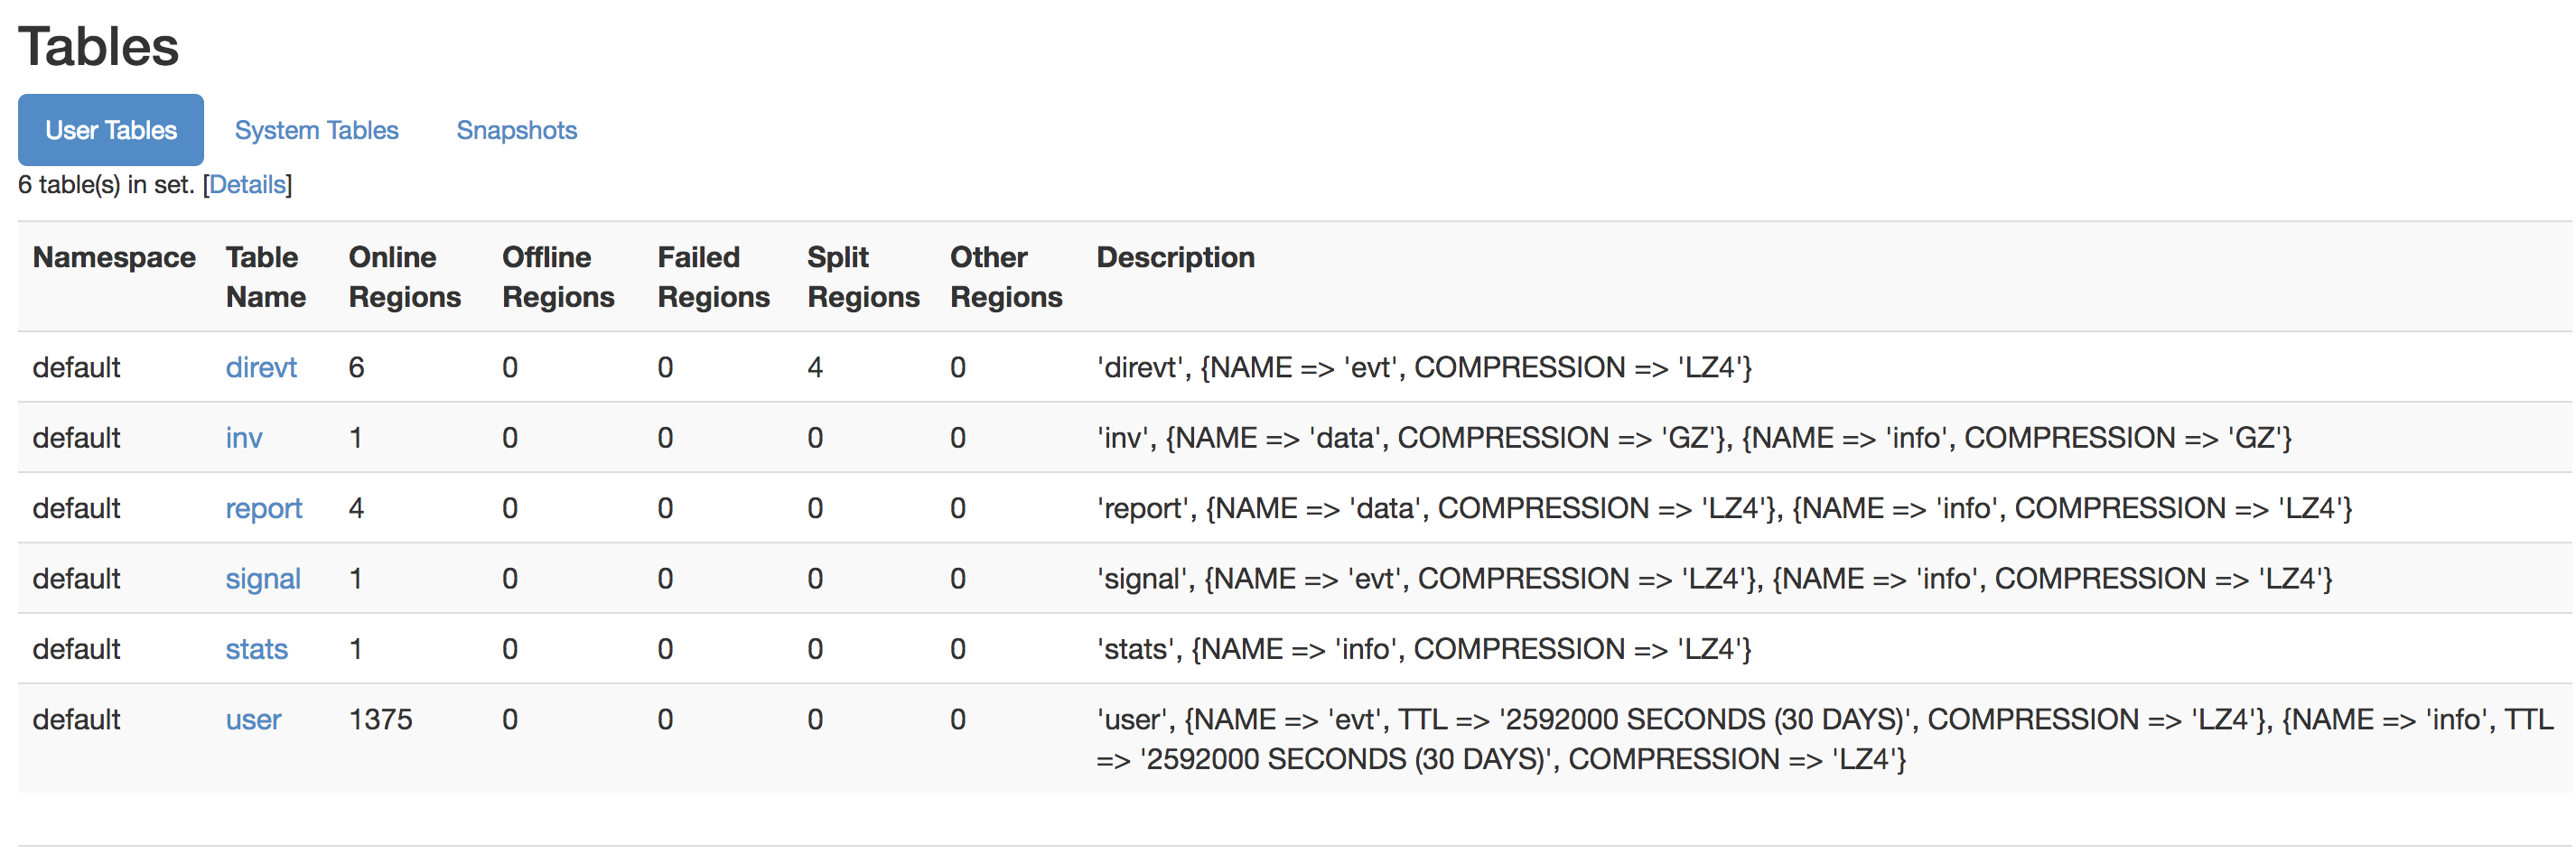
- http://x.x.x.x:16010/ verify that each region server (6 total) are visible in the UI
- Verify each has assigned regions
- Verify requests are visible to each region server
- Verify tables section shows no regions offline, no regions in other column,
- Example screenshots of 6 region servers with regions and normal looking table view
- Now login to the Region Master vm typically node 1
- done.
Advanced Configurations (Optional)
How to Configure a Ransomware Defender Only Configuration (Skip if running multiple products)
Make this change before starting up the cluster to ensure docker containers that are not required are auto disabled on startup.
- Login to node 1 over ssh as ecaadmin
- nano /opt/superna/eca/eca-env-common.conf
- add a variable
- export RSW_ONLY_CFG=true
- :wq (to save the file)
- Continue with startup steps below
How to Configure NFS audit data ingestion with non system access zone
- Create an access zone in /ifs/ called "auditing"
- Create an IP pool in the new access zone with 3 nodes and 3 ip's in the pool.
- Create a smartconnect name and delegate this name to DNS.
- Auditing will be disabled on this zone by default.
- Use this smart connect name in the auto.nfs file
- Login to node 1 of the eca as ecaadmin
- nano /opt/superna/eca/data/audit-nfs/auto.nfs
- See syntax in this guide to enter the mount of the cluster audit folder.
- save with control+x
- Login to the cluster to move the NFS export used for auditing to the new access zone.
- isi nfs exports modify --id=1 --zone=system --new-zone=auditing --force
- isi nfs exports list --zone=auditing
- isi nfs exports modify --id=1 --zone=system --new-zone=auditing --force
- Restart autofs service to remount the NFS export in the new zone
- ecaclt cluster push-config
- ecactl cluster exec sudo systemctl restart autofs
- enter the ecaadmin password on each node
- Done.