Initial Environment Setup
If you have already configured the Eyeglass RunbookRobot feature in your environment for Access Zone or DFS Continuous DR Testing, you may skip this initial environment setup section and proceed to Verify Environment Setup section.
NOTE: ONLY 1 RUNBOOK ROBOT SUPPORTED PER EYEGLASS
- Both (DFS, Access Zone): On both Cluster1 and Cluster2, create an Access Zone with name format "EyeglassRunbookRobot-XXXX", where XXXX is a string or number of your choice.
- Both (DFS, Access Zone): On both Cluster1 and Cluster2, as best practice, create an IP pool dedicated for SyncIQ data replication.
- Note that the Replication IP pool should be in the System Access Zone. While configuring your production or test SyncIQ policies, for the “Restrict Source Nodes” option, make sure to select the second option that says “Run the policy only on nodes in specified subnet and pool”, then select the IP pool that you have dedicated to SyncIQ data replication.
- For the Replication IP pool, make sure to configure a SmartConnect Zone Alias with syntax igls-ignore-xxxx, where xxxx is a string that makes the alias (as a whole string) unique across your infrastructure.
- Both (DFS, Access Zone): On both Cluster1 and Cluster2, create an IP pool for clients to access data in the EyeglassRunbookRobot-XXXX Access Zone.
- The IP pool for DFS client access will be configured with SmartConnect zone alias of the format igls-ignore-xxxx
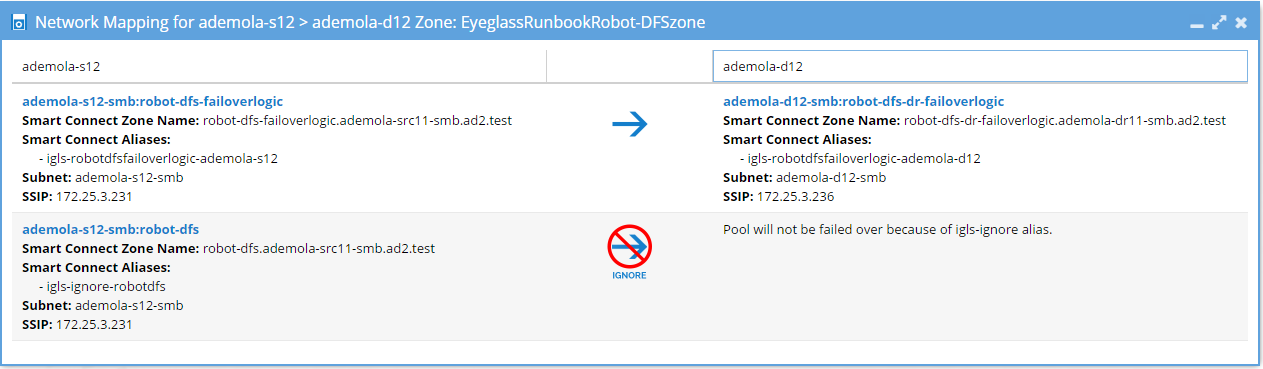
- The Access Zone failover logic pool will be configured with SmartConnect zone alias of the format igls-aaaa-bbbb, where aaaa is the same string on Cluster1 and Cluster2, and bbbb make the alias (as a whole string) unique across your infrastructure. Eyeglass uses the first two sections (igls-aaaa) to map the pool from Cluster1 to Cluster2.
See below a sample pool mapping for the DFS and Access Zone as seen from Eyeglass Zone Readiness:
- Both (DFS, Access Zone) Create Test SyncIQ policy on Cluster1 with name format "EyeglassRunbookRobot-yyyy", where yyyy is a number or string of your choice.
Note that you can only have one SyncIQ policy within each EyeglassRunbookRobot-XXXX Access Zone.
- Make the test SyncIQ policy target host the SmartConnect zone FQDN of the dedicated SyncIQ replication IP Pool on Cluster2.
- Restrict Source Nodes option should be selected when configuring the test SyncIQ policy.
- The test SyncIQ policy source directory path should be below the EyeglassRunbookRobot access zone base directory.
- Run the policy on OneFS UI once it has been created.
- Both (DFS, Access Zone) On Cluster1 EyeglassRunbookRobot Access Zone, create test SMB shares (and quotas if required) at folder paths below the Test SyncIQ policy source folder.
- DFS Mode: In DFS snapin for AD configure the DFS folder targets using FQDN(s) for Cluster1 and Cluster2 IP pool for client access.
Example format for DFS folder targets are:
<\\fqdn-of-DFS-testdata-IPpool-on-cluster1\SMBsharename>, and <\\fqdn-of-DFS-testdata-IPpool-on-cluster2\SMBsharename>. Windows client will mount this DFS share using the path <\\AD domain name\dfsrootname\dfsfoldername>.
- DFS Mode: On Eyeglass, change the configuration replication job associated with Test DFS policy to DFS mode. (See product documentation for details)
- Both (DFS, Access Zone) In order to have a Test SyncIQ mirror-policy in place (and also as best-practices), using Eyeglass, perform an initial controlled failover (Cluster1 to Cluster2) of the EyeglassRunbookRobot Access Zone or Test DFS SyncIQ policy, followed by a controlled failback (Cluster2 to Cluster1) of the EyeglassRunbookRobot Access Zone or Test DFS SyncIQ policy.
See sample screenshot below showing that mirror policies are in place for all the Jobs.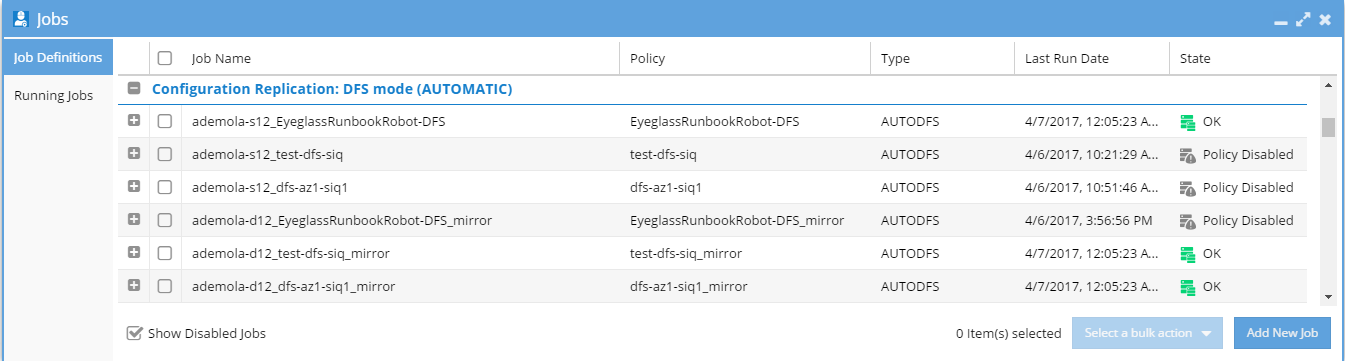
- Access Zone Mode: Must have DNS Dual Delegation in place and AD permissions for cluster to read and write SPNs.