Access Zone Failover - SyncIQ Configuration for 3 site
- SyncIQ Policy multi Site support Matrix
- Multi Site Failover and Failback Behaviours
- Zone Readiness
- Zone Readiness - Initial Configuration / before Failover / after Failback
- Before Failback B ⇒ A
- Before Failback C ⇒ A
- Summary of Network Mappings
- Access Zone Failover and Failback Procedures
- Failover from A to B Procedure:
- Failback from B to A Procedure:
- Failover from A to C Procedure:
- Failback from C to A Procedure
The source cluster SyncIQ policy path must fall inside the Access Zone for Target cluster 1, a Second SyncIQ policy can use the same source path (recommended). See the configuration guide below.
Not Recommended
Examples where failover leaves some data behind after failover and moves networking (SmartConnect Zones) to Target cluster. After Failover both SmartConnect zones would failover together leaving the namespace and data stranded since the SyncIQ policies only failed over a portion of the data.
SyncIQ Policy multi Site support Matrix
Access Zone Path for these examples is /ifs/data/AZ1
Unsupported configuration
A supported configuration requires that all data and all DNS name space fails over together to achieve fully automated Access Zone failover.
Recommended Policy Configuration
Multi Site Failover and Failback Behaviours
| Operation | Direction | Supported | Require Manual Step Prior to Initiate Eyeglass Access Zone Failover |
| Failover | A ⇒ B | Yes | Yes - refer to this diagram and Access Zone Failover - SyncIQ Configuration for 3 site |
| Failback | B ⇒ A | Yes | No - refer to this diagram and Access Zone Failover - SyncIQ Configuration for 3 site |
| Failover | A ⇒ C | Yes | Yes - refer to this diagram and Access Zone Failover - SyncIQ Configuration for 3 site |
| Failback | C ⇒ A | Yes | No - refer to this diagram and Access Zone Failover - SyncIQ Configuration for 3 site |
Zone Readiness
This section gives example of the Zone Readiness status and Network Mapping between Source-Target#1 and Source-Target#2 pairs.
For the purpose of this example we use the following names:
| Site | Cluster Name |
| A (Source) | cluster20 |
| B (Target#1) | cluster21 |
| C (Target#2) | cluster31 |
There are two Access Zones on all those three clusters: zone01 and zone03
Zone Readiness - Initial Configuration / before Failover / after Failback
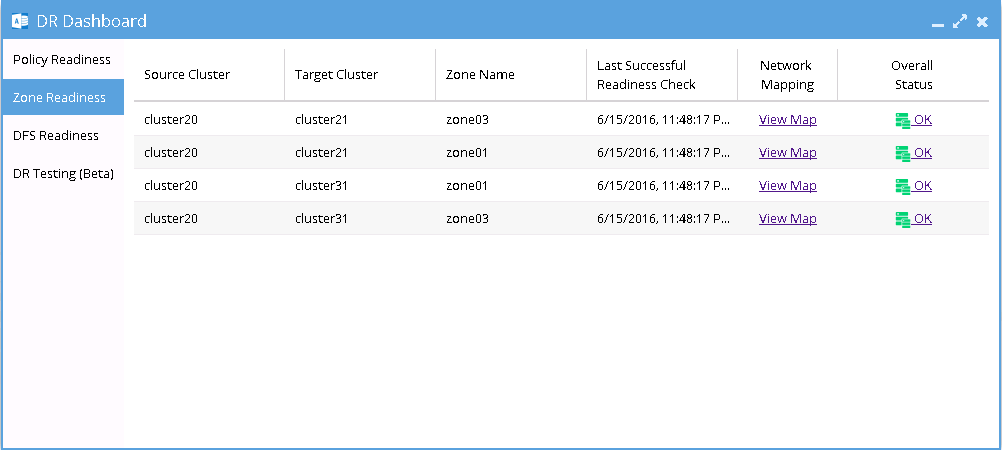
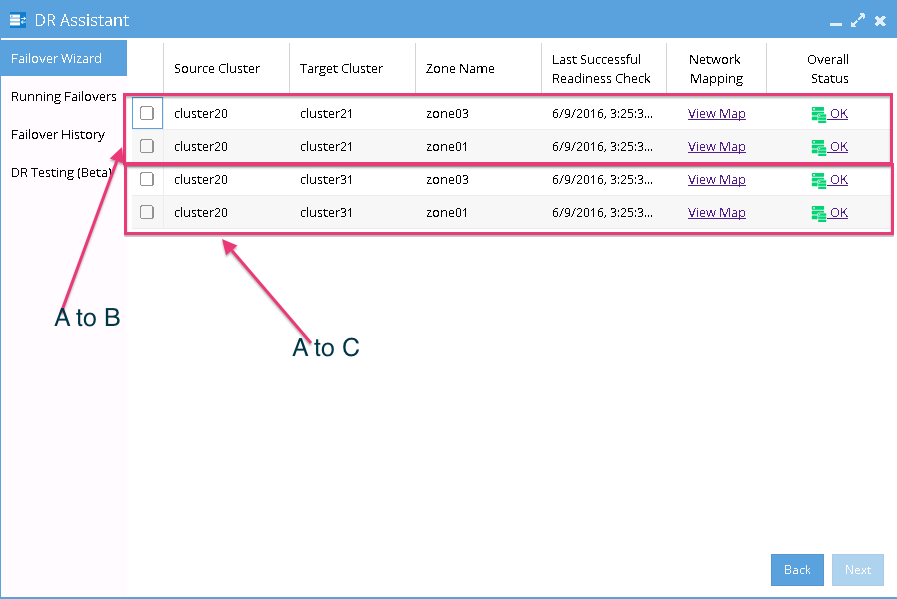
This is the Zone Readiness for Initial Configuration / before Failover / after failback state. As we can see from this figure, that both Source-Target Pairs (A - B and A - C) are listed in this DR Dashboard’ zone readiness window.
This shows that a failover choice can be made to any target cluster in Green OK state (Warning status also allowed).
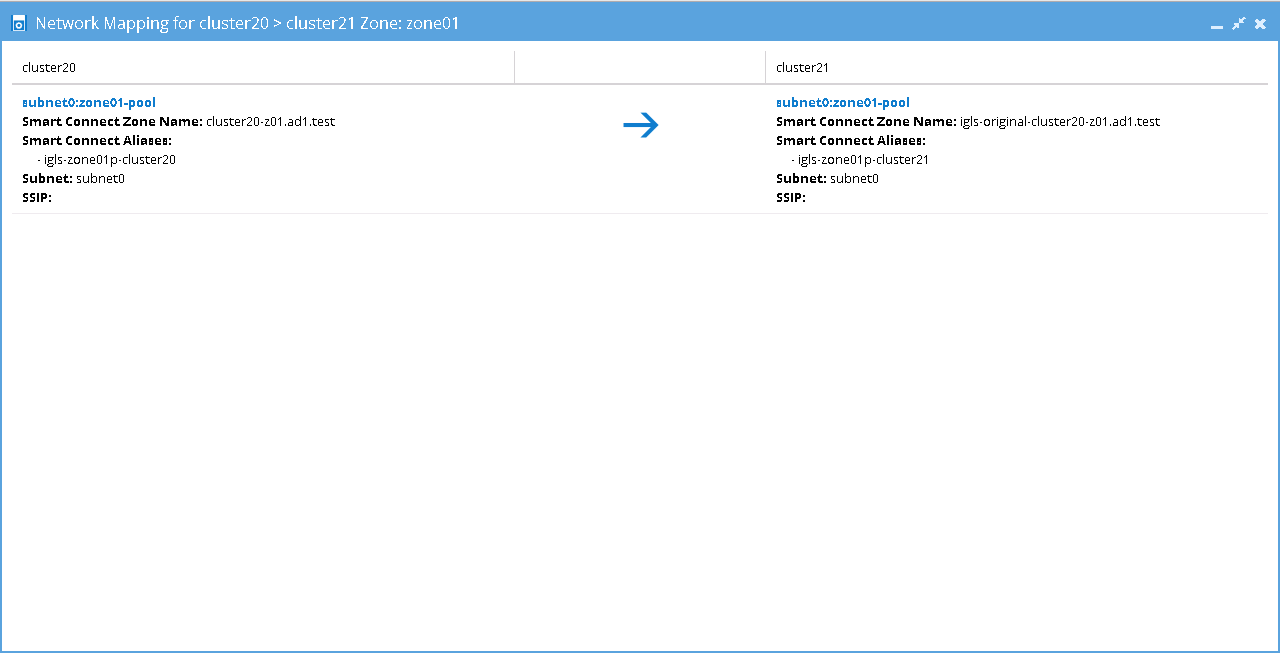
Network Mapping - Initial Configuration: A ⇒ B Zone01
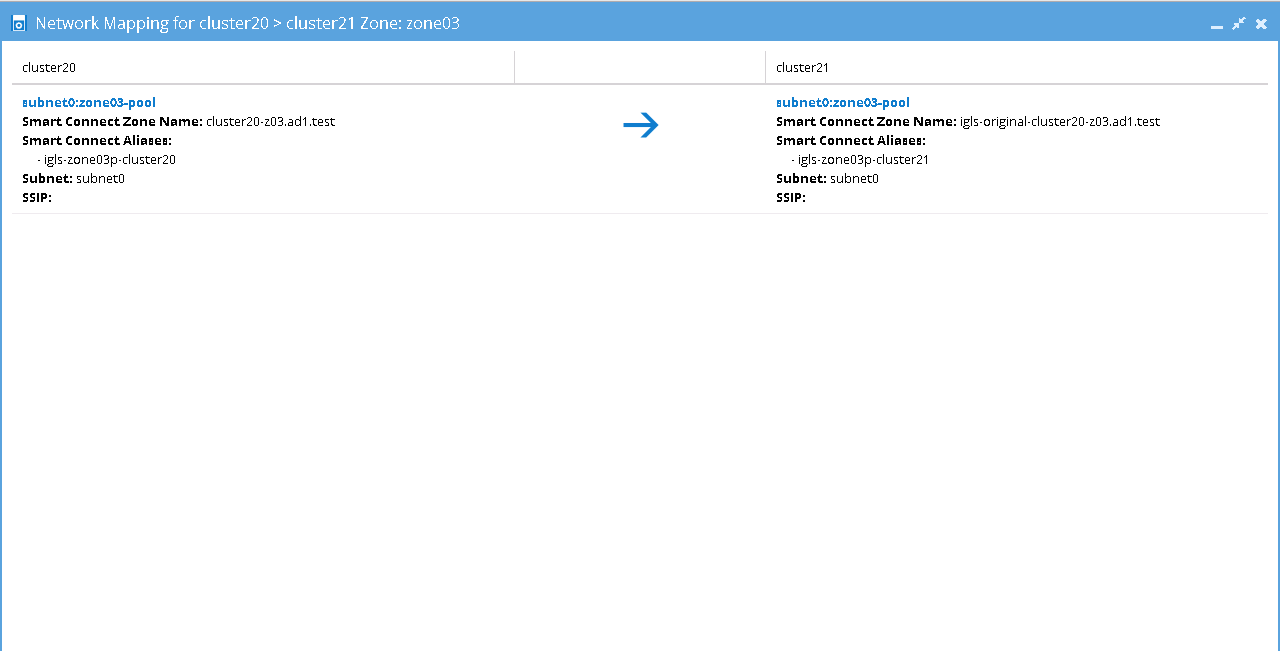
Network Mapping - Initial Configuration: A ⇒ B Zone03
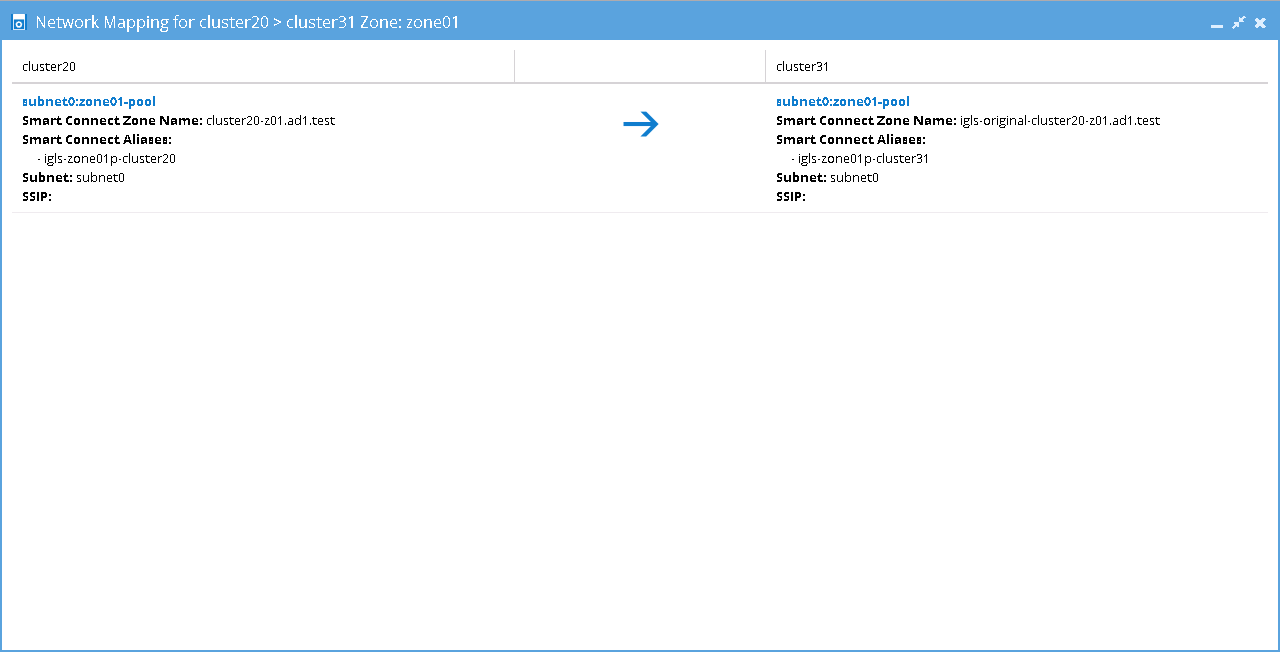
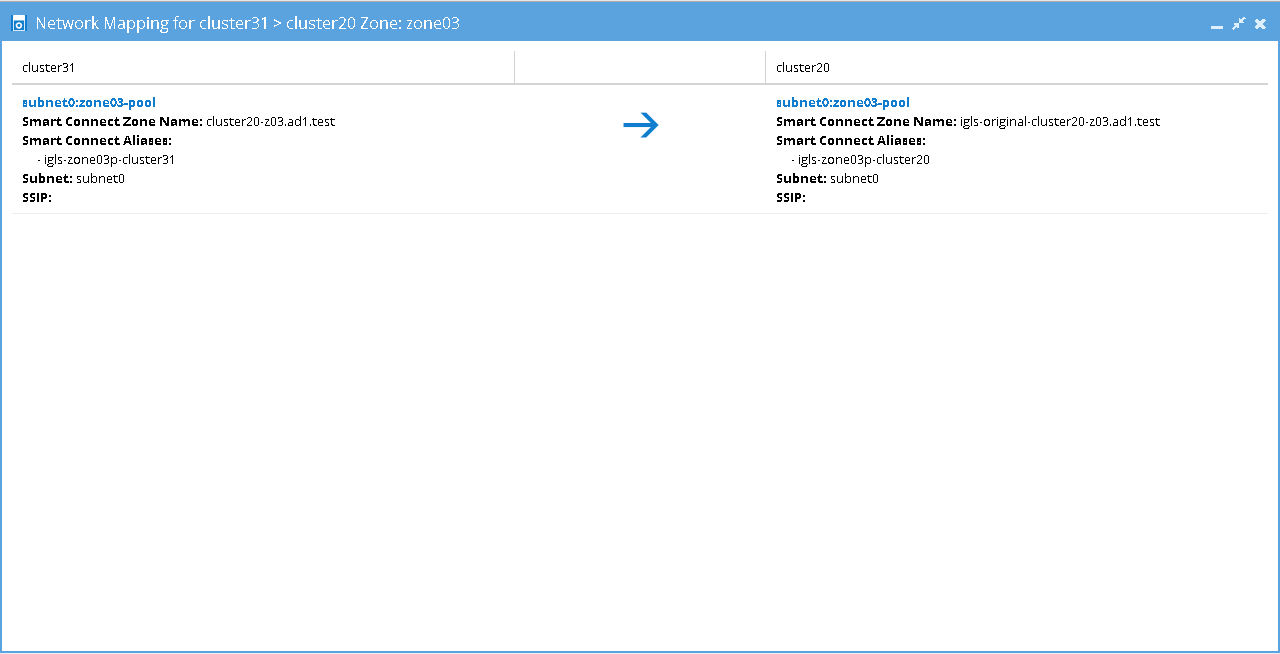
Network Mapping - Initial Configuration: A ⇒ C Zone01
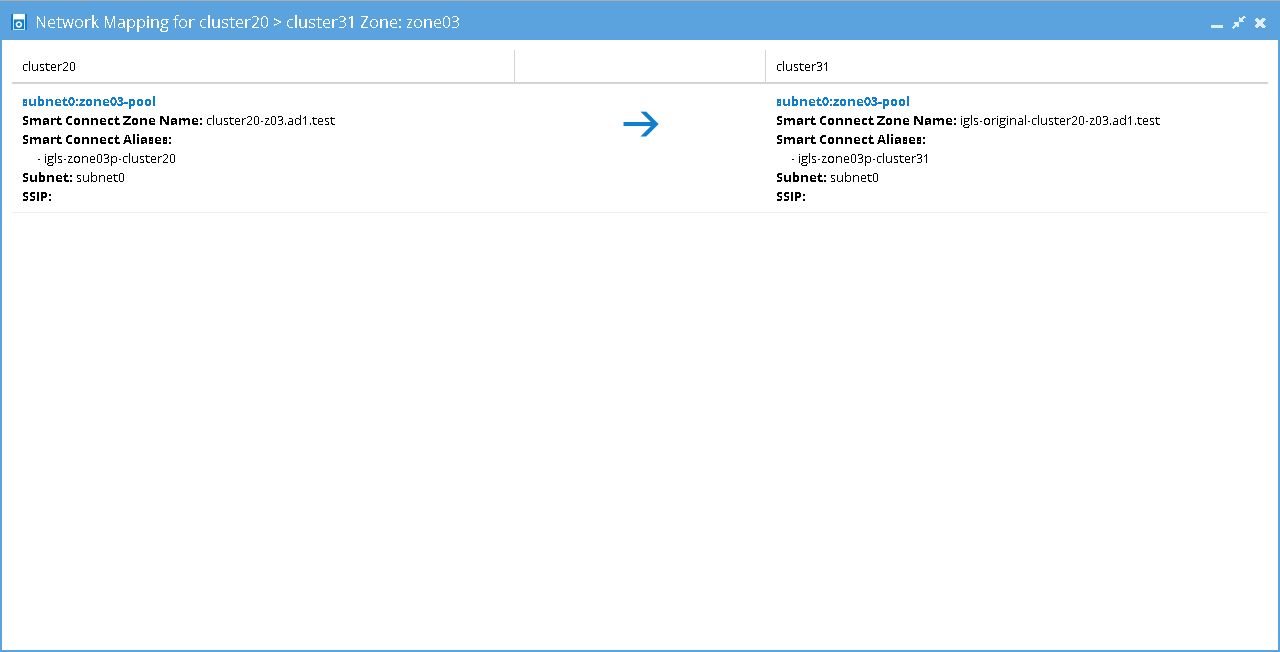
Network Mapping - Initial Configuration: A ⇒ C Zone03
This table shows the SmartConnect Zone Name and SmartConnect Alias Name mappings for this Initial Configuration / before failover / after failback states:
Before Failback B ⇒ A
Zone Readiness
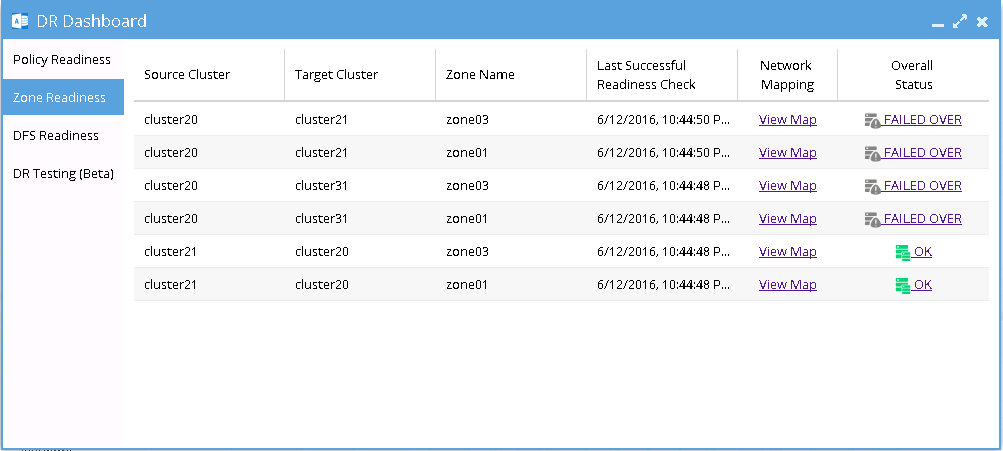
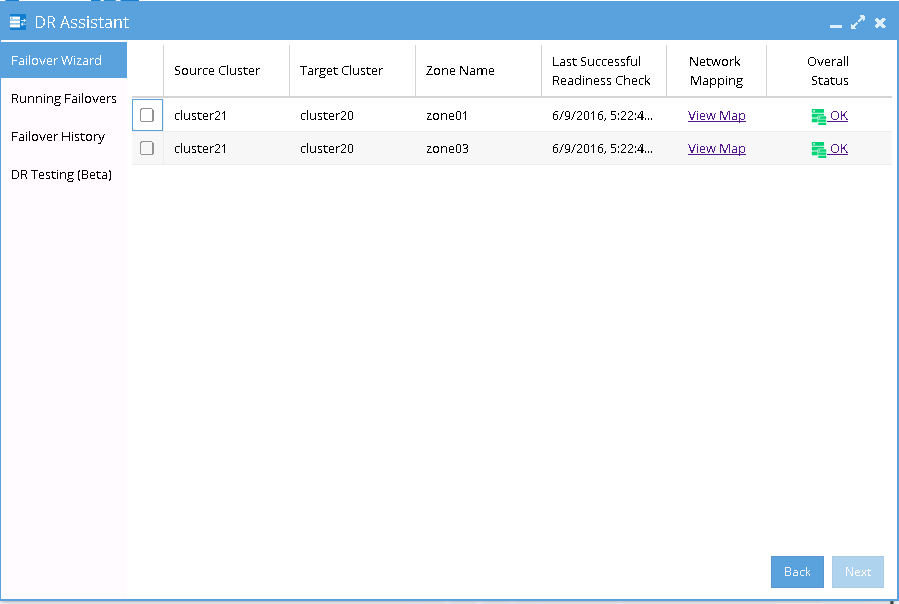
This Zone Readiness is for the state before Failback from B to A. As we can see from this figure, that only TargetB(cluster21))-SourceA(cluster20) pairs are listed as available in this DR Dashboard’s zone readiness window. The other pairs (SourceA(cluster20)-TargetB(cluster21) and SourceA(cluster20)-TargetC(cluster31)) are stated as FAILED-OVER.
[Network Mapping - Before Failback B ⇒ A] B ⇒ A Zone01

[Network Mapping - Before Failback B ⇒ A] B ⇒ A Zone03

This table shows the SmartConnect Zone Name and SmartConnect Alias Name mappings for this Before Failback B ⇒ A state:
Before Failback C ⇒ A
Zone Readiness
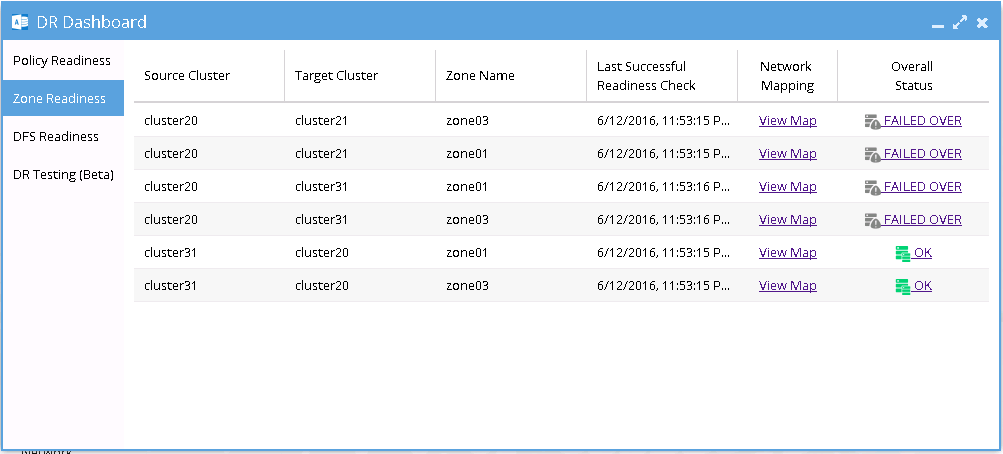
This Zone Readiness is for the state before Failback from C to A. As we can see from this figure, that only TargetC(cluster31))-SourceA(cluster20) pairs are listed as available in this DR Dashboard’s zone readiness window. The other pairs (SourceA(cluster20)-TargetB(cluster21) and SourceA(cluster20)-TargetC(cluster31)) are stated as FAILED-OVER.
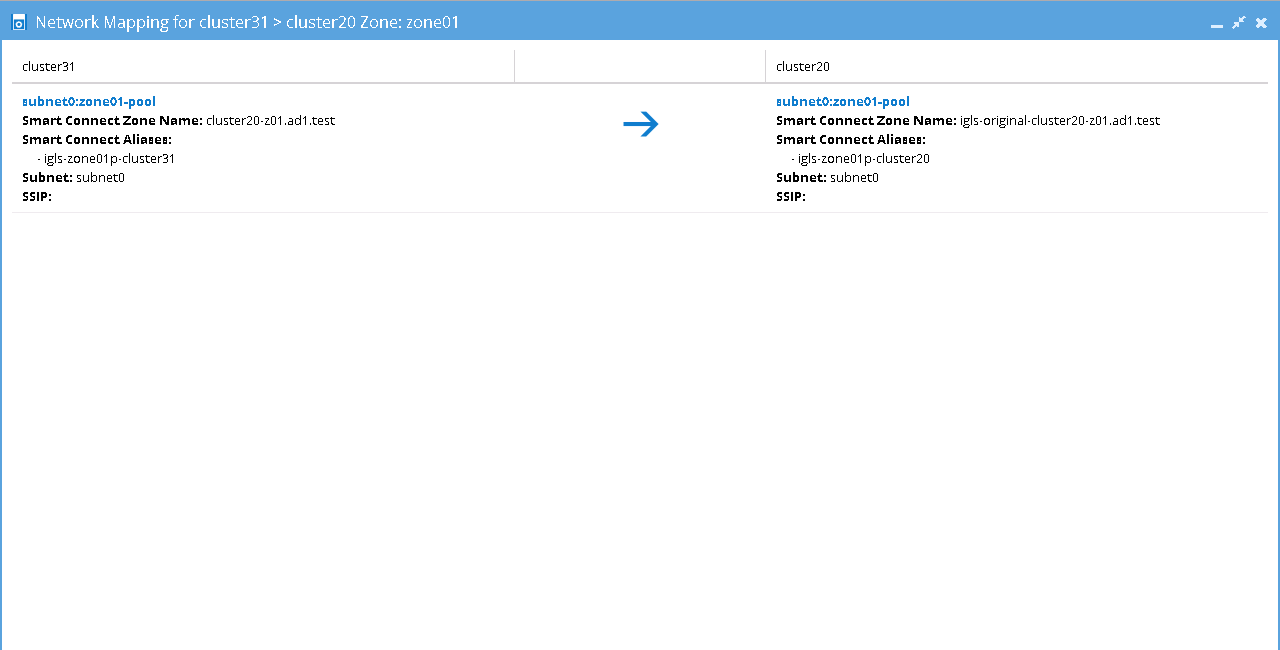
[Network Mapping - Before Failback C ⇒ A] C ⇒ A Zone01
[Network Mapping - Before Failback C ⇒ A] C ⇒ A Zone03
This table shows the SmartConnect Zone Name and SmartConnect Zone Alias Name mappings for Before Failback C ⇒ A state:
Summary of Network Mappings
Based on the above example, the following table summarizes the network mappings with zone names and zone alias names:
Initial Configuration / Before Failover / After Failback:
After Failover
This table shows the zone names and zone alias names after failover A ⇒ B / after failover A ⇒ C:
Access Zone Failover and Failback Procedures
It is recommended to create SyncIQ Policies that will be used for multi site replications (e.g. to replicate from Site A to Site B and also from Site A to Site C) with names that reflect the Source-Target pairs.
The following table is an example for 2 SyncIQ Policies per Source-Target pairs:
| SyncIQ Policy Name | SyncIQ Pairs |
AB-synciq-01 AB-synciq-02 | A and B |
AC-synciq-01 AC-synciq-02 | A and C |
This name format will help us to identify which Access Zones that we want to failover.
Failover from A to B Procedure:
- Prior to initiating Eyeglass Access Zone Failover from A to B, we need to ensure that there is no existing SyncIQ Mirror Policies from C to A. The recovery resync prep step of this Failover A to B will create Mirror Policies from B to A with same Mirror Target Paths as the C to A (Mirror Target Paths are overlaps). This will make the Mirror Policies from B to A unrunnable and the Eyeglass Failover Job will fail. If there are existing ones, we need to delete them first. Refer to step P1 in the Failover workflow diagrams.
- NOTE: The above step MUST be completed before A to C failover, the order matters since the domain mark will be deleted on cluster A once the step above is completed.
- Now run a domain mark job on each SyncIQ policy on cluster A. This is a required step since no domain mark exists and will be created during failover process from A to B. The best practise is to run domain mark before failover to ensure the resync prep step does not take a long time to complete. Domain mark can run longer if a the path has a large number of files. NOTE: During the time while domain mark job is running no failover from A to C should be executed until the domain mark job completes on ALL sync polices involved in the failover. Monitor progress from the PowerScale Cluster jobs UI.
- Then we can perform Eyeglass Access Zone Failover as per normal. In DR Assistant Wizard, after we selected the source cluster (Cluster A (for this example: name cluster20)) the next wizard screen display the list of available Failover options based on Source-Target-Zone pairs.
- We need to be careful to select the correct Target Cluster that we want to Failover (A to B or A to C). For this case we want to failover from A to B. Select a zone that we want to Failover from cluster20 (source) - cluster21 (target) pairs.
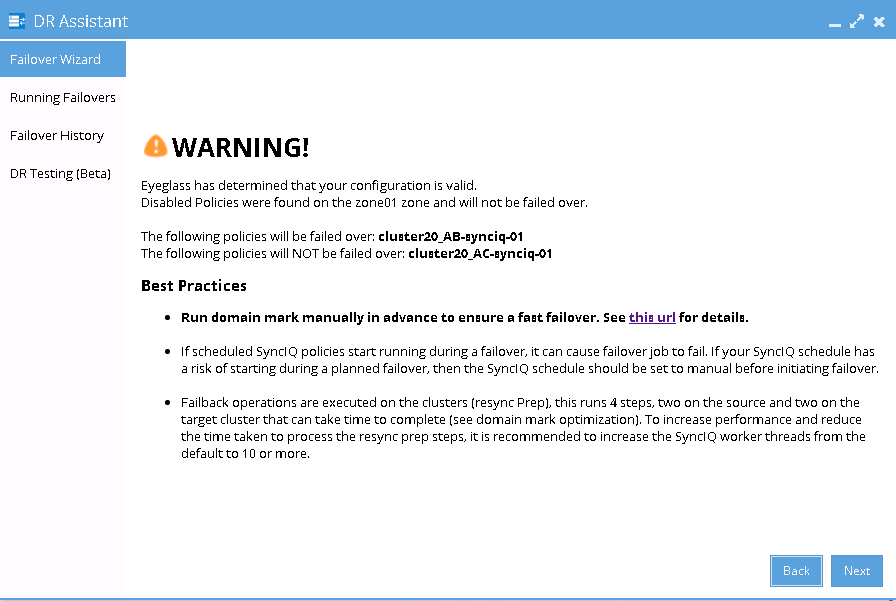
- The next screen will gives warning to highlight that this wizard will only perform Access Zone failover from A to B. The other policy on the same Access Zone (A to C) will not be failed over.
- Proceed this Access Zone Failover as per normal. Refer to Eyeglass Access Zone Failover Guide for details.
- Repeat the same procedure for failover other Access Zones from A to B.
Failback from B to A Procedure:
- We can perform Eyeglass Access Zone Failback as per normal.
- In DR Assistant Wizard, after we selected the source cluster (Cluster B (for this example: name cluster21)) the next wizard screen will only display the Failover options From Cluster B (cluster21) to Cluster A (cluster20).
- Select the Access Zone to be failed back and the next screen will not highlight any warning about other SyncIQ policies that will not failed back.
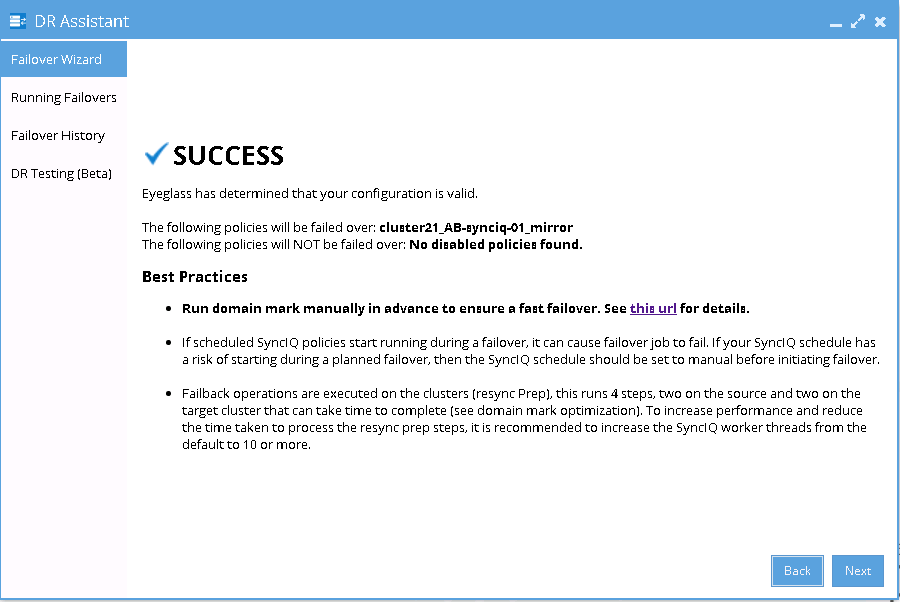
- Proceed this Access Zone Failback as per normal. Refer to Eyeglass Access Zone Failover Guide for details.
- Repeat the same procedure for failback other Access Zones from B to A.
Failover from A to C Procedure:
- Prior to initiate Eyeglass Access Zone Failover from A to C, we need to ensure that there is no existing SyncIQ Mirror Policies from B to A. The recovery resync prep step of this Failover A to C will create Mirror Policies from C to A with same Mirror Target Paths as the B to A (Mirror Target Paths are overlaps). This will make the Mirror Policies from C to A unrunnable and the Eyeglass Failover Job will fail. If there are existing ones, we need to delete them first. Refer to step P1 in the Failover workflow diagrams.
- NOTE: The above step MUST be completed before A to C failover, the order matters since the domain mark will be deleted on cluster A once the step above is completed.
- Now run a domain mark job on each SyncIQ policy on cluster A. This is a required step since no domain mark exists and will be created during failover process from A to B. The best practise is to run domain mark before failover to ensure the resync prep step does not take a long time to complete. Domain mark can run longer if a the path has a large number of files. NOTE: During the time while domain mark job is running no failover from A to C should be executed until the domain mark job completes on ALL sync polices involved in the failover. Monitor progress from the PowerScale Cluster jobs UI.
- Then we can perform Eyeglass Access Zone Failover as per normal. In DR Assistant Wizard, after we selected the source cluster (Cluster A (for this example: name cluster20)) the next wizard screen display the list of available Failover options based on Source-Target-Zone pairs.
- We need to be careful to select the correct Target Cluster that we want to Failover (A to B or A to C). For this case we want to failover from A to C. Select a zone that we want to Failover from cluster20 (source) - cluster31 (target) pairs.
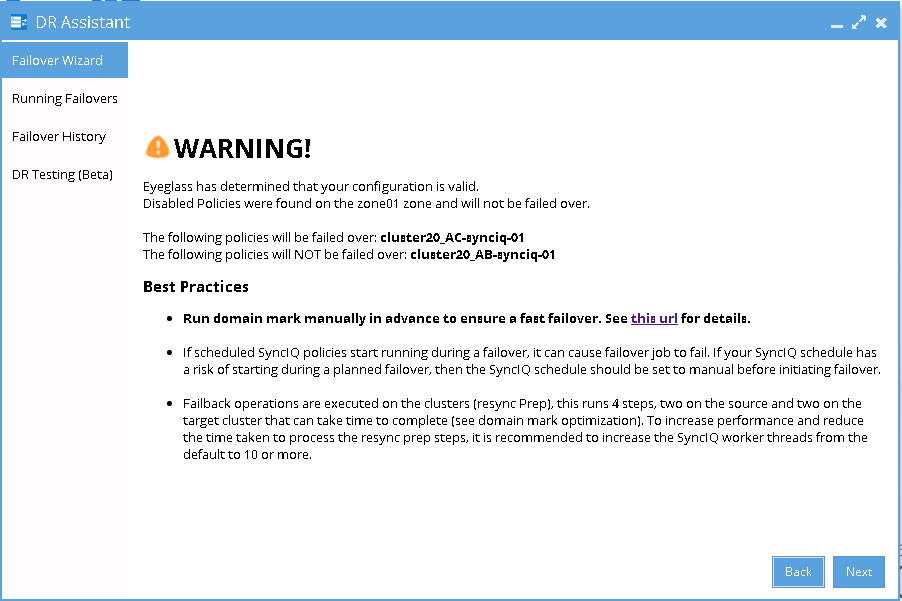
- The next screen will gives warning to highlight that this wizard will only perform Access Zone failover from A to C. The other policy on the same Access Zone (A to B) will not be failed over.
- Proceed this Access Zone Failover as per normal. Refer to Eyeglass Access Zone Failover Guide for details.
- Repeat the same procedure for failover other Access Zones from A to C.
Failback from C to A Procedure
- We can perform Eyeglass Access Zone Failback as per normal.
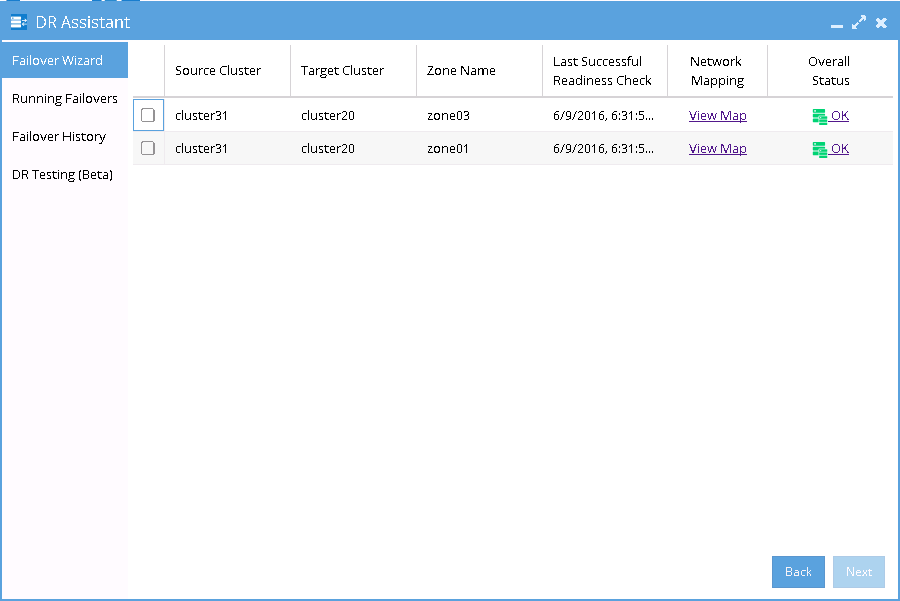
- In DR Assistant Wizard, after we selected the source cluster (Cluster C (for this example: name cluster31)) the next wizard screen will only display the Failover options From Cluster C (cluster31) to Cluster A (cluster20).
- Select the Access Zone to be failed back and the next screen will not highlight any warning about other SyncIQ policies that will not failed back.
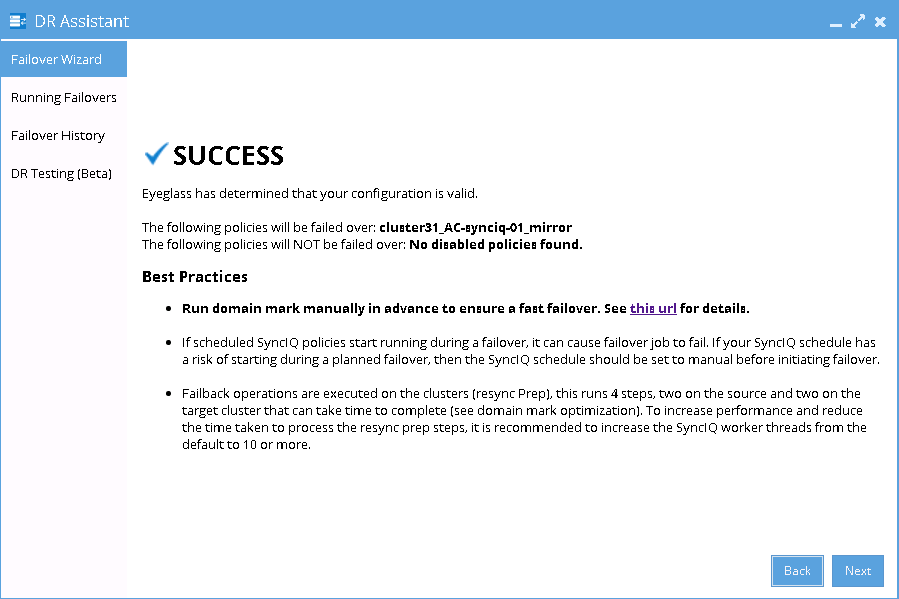
- Proceed this Access Zone Failback as per normal. Refer to Eyeglass Access Zone Failover Guide for details.
- Repeat the same procedure for failback other Access Zones from C to A.