LiveOps Writable Snapshot with Isolated Network - High Level Configuration Guide
- Overview
- Prerequisites
- Get Help?
- LiveOps Writable Snapshot with Isolated Network Configuration
- Configuration for Isolated Network
Overview
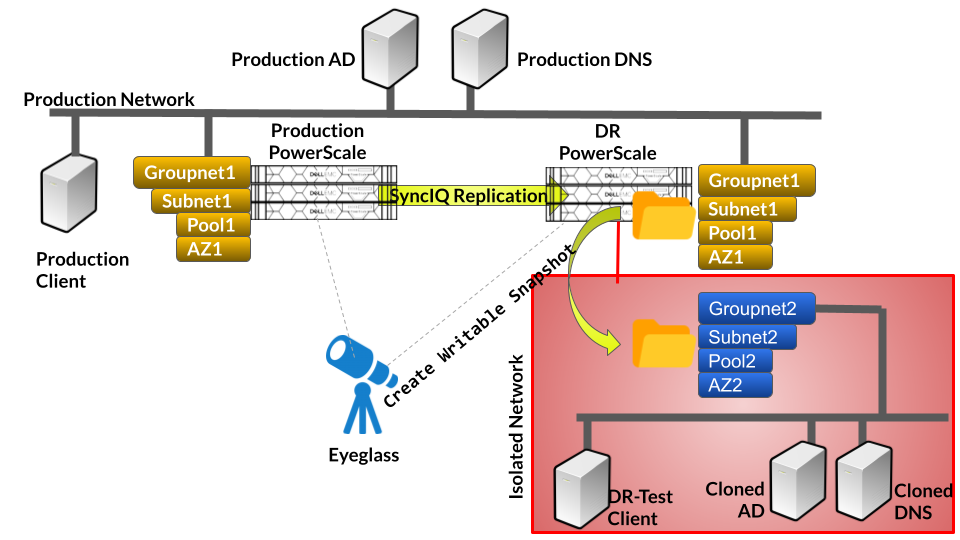
This guide is not intended to be a step by step guide on PowerScale configuration. Experience on PowerScale networking is required to fully configure an isolated network bubble with firewalls, VMware hosts, AD and DNS. This guide provides specific steps on how to use PowerScale Onefs 9.3 or later feature for 2nd connection to the same AD domain to create an isolated test environment that can be used together with the Eyeglass LiveOps Writable Snapshot feature to recreate a production clone of data, shares, exports, AD, hosts for DR or file systems testing scenarios with no impact to production.
This guide only covers the AD provider and groupnet steps and high level steps needed in VMware for AD and DNS only. Consult with subject matter experts within your organization for assistance. NOTE: Support is not able to assist with external device configuration within your infrastructure.
Prerequisites
- Eyeglass 2.5.9 or later
- OneFS 9.3 or later
- SnapshotIQ license
Get Help?
- Contact Sales@superna.net for assistance with DR services for assistance with this solution guide.
LiveOps Writable Snapshot with Isolated Network Configuration
LiveOps Writable Snapshot can be configured on an isolated network with a non-production AD and DNS (Cloned from production AD and DNS).
As the cloned AD will have the same domain as the production AD, we need to add this cloned AD to DR PowerScale Cluster on an isolated Groupnet with parameters for multi-instance Active Directory (available in OneFS 8.2 or newer):
- New instance provider name
- New machine account
Configuration for Isolated Network
The following procedure is for configuring Writable Snapshot within DR PowerScale to be mounted on the Isolated Network.
- Ensure that DR PowerScale cluster has network interface that connect to the isolated network subnet
- Create VM Clone of Production AD and DNS VMs (use vSphere - Clone to Virtual Machine)
- Update cloned AD and DNS:
- Before power on VM:
- Edit VM setting and change Network Adapter from Production VM Network to Isolated VM network
- After power on VM:
- Modify IP Address according the the IP range of the isolated network subnet
- Remove DR PowerScale Cluster machine account from this cloned AD (example: isidr)
- Before power on VM:
- Update cloned AD and DNS:
- On the DR PowerScale Cluster:
- Create a new Groupnet (Example: groupnet02) and configure the DNS server to point to the cloned DNS IP address
- Create a new Subnet for this new Groupnet (Example: subnet2) and configure the netmask, SSIP and other network settings (VLAN) according to the isolated network subnet
- Create a new Access Zone in this new Groupnet (Example: AZ2) and set the groupnet to groupnet2.
- Create a new IP Pool in the new Subnet (Example: pool2) with the required interface and IP range in the isolated network and specify the access zone as AZ2 and configure the smartconnect zone name for this pool (Example: dr-test.domain.com)
- On the Cloned DNS server:
- Create a Reverse Lookup Zone for the Isolated subnet
- Create a new A record for the new isolated subnet DR PowerScale SSIP IP address
- Create a new DNS delegation in Cloned DNS server for this new smartconnect zone name (Example: dr-test.domain.com) that point to that isolated SSIP IP address
- On the DR PowerScale Cluster:
- Add a new AD Authentication Provider by joining the cloned AD. This requires Multi-Instance Active Directory feature that is available in OneFS 8.2.0 or newer
- Same domain name as the production domain name (Example: domain.com)
- Specify new provider instance name (Example: isolated-domain.com)
- Specify new machine account (Example: isidr-c)
- Specify the groupnet as groupnet02
- User and password are same as the production user and password to join AD
Example:
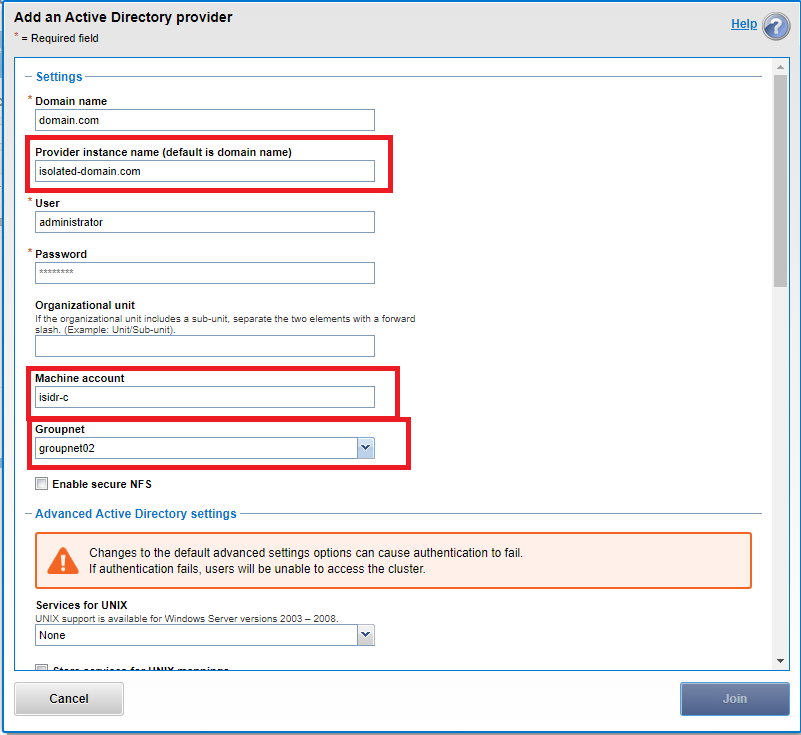
- Verify that both production AD and cloned AD (with new provider instance name) are shown with status online.
- Add this new AD provider (ISOLATED-DOMAIN.COM) to the isolated access zone (AZ2) as the AD provider
© Superna Inc