Archive Engine - Configuration
- How to Configure Archive Engine
- Summary
- Steps to Prepare the VM and S3 Buckets
- Steps to Configure a File System Path for User Self Service Archiving
- How to Archive data as an end user
- How to Recall Archived Data back to the File System
- How to Track Data Lifecycle Movement
- How to Configure AWS Deep Archive Tier Transparency Archive Solution
- Overview
- Prerequisites
- Temporary Archive Retention from AWS Deep Archive
- How it Works
- What data looks like when stored in Deep Archive Tier
- What Data looks like when a recall request has been issued to Deep Archive Tier
- Policy Based Data Archive Feature Overview
- Overview
- Prerequisites
- Workflow
- How to Configure Policy based Archive
- How to test an Archive Job (pre-production)
- How to switch to Production Archiving
- Error handling
- Policy-based Dry Run
- Dry Run Behaviour
- Easy start Dry Run job
- Dry Run on existing archivedfolder
- Export option for dry run archive job
How to Configure Archive Engine
Summary
- Add a folder definition to archive data to a target S3 bucket with all required parameters, including storage tier for cloud providers.
- Create 2 buckets:
- One for holding archived data example gcae-archive;
- One for temporarily recalled data staging example gcae-staging;
- trashcan bucket for deleted recalled data in the cloud example gcae-trashcan.
optional: optional trashcan bucket and all bucket names need to be changed
- Create 2 buckets:
- Specify the authorized user paths that will be enabled for end-user archive capabilities.
- Add a pipeline configuration to present Archived data to end users for recall.
Steps to Prepare the VM and S3 Buckets
- S3 buckets needed:
- Two buckets are needed
- Archive target bucket recommended name: gcae-archive;
- Recall Staging bucket recommended name: gcae-staging;
Trashcan bucket recommended name: gcae-trashcan (optional).
- Two buckets are needed
- Add the Archive Engine license key
a. searchctl license add --path /home/ecaadmin/<zip file name>
3. Pipeline NFS mount configured for data recall on Golden Copy

|
a. NOTE: covered in this guide is creating the NFS mount on all Golden Copy nodes in fstab to setup the recall NFS mount and use the /ifs/fromcloud/ path on the target cluster. b. NOTE: The NFS mount path AND the --recall-sourcepath flag on the searchctl isilons modify command MUST match the NFS mount path above |
c. See the Guide here.
4. Set the recall data location for cloud data on the cluster
a. searchctl isilons modify --name xxxx --recall-sourcepath /ifs/fromcloud/ (where xxxx is the cluster name added to Golden Copy)
b. This path will uniquely store all data arriving from the cloud for all pipeline based product workflows within Golden copy.
Steps to Configure a File System Path for User Self Service Archiving
- Overview
- An archive definition is built using 2 folder definitions:
- On premise to the cloud
- Cloud to on premise
- The folder definitions use specific types and features to enable archive and recall workflows. Security of what data is presented to users for archive and recall is also defined within the folder definitions
- The security model allows archive and recall security to be defined separately which means you can allow users to archive data but recall data or allow archive and recall.
- An archive definition is built using 2 folder definitions:
- Add the folder definition:
NOTE: The user adds the recall staging bucket first. After that, the user can add a second folder with --archive-engine-recall-folder
- --folder - The location where archive data will be staged before it's moved to the cloud. We recommend using /ifs/tocloud
- --accesskey and --secretkey
- --endpoint URL - See the configuration guide on how to specify different target endpoint URLs
- --region - the region parameter based on the s3 target used
- --cloudtype - set the cloud type to match your s3 target
- --archive-engine-sourcepaths - This parameter is used to authorize any path in the file system to appear as an eligible path to end users to select folders to archive to S3, enter a comma separated list of paths example below
- --archive-engine-sourcepaths /ifs/projects, /ifs/home
- --full-archive-schedule - Set a schedule that will be used to archive data selected for archive. Recommended daily archive at midnight to move the data copy to off peak hours
- example --full-archive-schedule "0 0 * * *"
- --delete-from-source - this will ensure data is deleted after it's copied; this is required for move operations versus end-user backup to S3 use case
- --archive-engine-type upload - This flag indicates the configuration definition is on premise to the cloud direction and data is moved here before it's archived to the cloud
- --archive-engine-type recall - This flag indicates the configuration definition is from the cloud to on premise when users recall data
- --storeFileHistory - This flags the lifecycle of file data with each archive or recall the history of what happened to the file is encoded into a custom s3 property to allow admins to see what has happened to the data.
- --type AE
- optional
- --tier xxxx {specify AWS tier using (STANDARD (default), STANDARD_IA, GLACIER, DEEP_ARCHIVE, INTELLIGENT_TIERING, ONEZONE_IA, OUTPOSTS, GLACIER_IR (Glacier instant access tier). Use upper case tier name.
- --tier DEEP_ARCHIVE - only use this if you plan on long RTO restores but the lowest price point storage in AWS. This uses the new "archive transparency" mode with AWS Deep Archive tier
- Cloud to on-premise - Add Pipeline from Object to File configuration for user recall jobs
- Create the staging area where recalled data will be copied during the recall process. This is a location on the cluster.
- Login to the cluster with data that will be archived as the root user
mkdir -p /ifs/fromcloud/gcae-staging
- Add the Pipeline configuration for Archive Engine
- searchctl archivedfolders add --isilon gcsource --folder /ifs/fromcloud/gcae-staging --accesskey xxxx --secretkey yyyy --endpoint s3.ca-central-1.amazonaws.com --region ca-central-1 --bucket gcae-staging --cloudtype aws --source-path gcsource/ifs/projects --recall-schedule "*/5 * * * *" --recall-from-sourcepath --archive-engine-type recall --trash-after-recall --recyclebucket gcae-trash --storeFileHistory --type AE
--source-path This parameter authorizes the data path in the archive bucket that will be presented to the user as recall eligible data the syntax is <clustername>/<pathtoarchivedata> all data under this path will be visible to end users for recall.
a. In the example above gcsource is the cluster name, and /ifs/projects is authorised for the end user to see data in the archive and recall it.
- Create the staging area where recalled data will be copied during the recall process. This is a location on the cluster.
iii. --bucket <bucket name> This must be the same bucket used in the folder definition above where the data is archived. This ties the two folder definitions together.
v. --recyclebucket smartarchiver-trash - moves recalled data to a trash bucket with a life cycle policy to delete the data after x days.
vii. --recall-schedule this sets the schedule for how often data will be scanned in the staging bucket before it will be copied back to the on premise file system.
4. On premise to Cloud - example Archive Engine command
a. The two folder definitions make up a complete Archive configuration. Data to cloud and data from cloud. The commands must be done in the correct order since the folder ID from the command above is used to connect the 2 folder definitions together into an archive engine configuration.
b. searchctl archivedfolders add --isilon gcsource --folder /ifs/tocloud --accesskey xxxxx --secretkey yyyyy --endpoint s3.ca-central-1.amazonaws.com --region ca-central-1 --bucket gcae-archive --cloudtype aws --archive-engine-sourcepaths /ifs/projects --full-archive-schedule "*/15 * * * *" --delete-from-source --archive-engine-type upload --storeFileHistory --tier deep_archive --archive-engine-recall-folder "zzzzzz" --type AE
i. --archive-engine-recall-folder "zzzzzz". - The folder ID needed is the folder ID from the folder definition in the previous step.
5. Done
How to Archive data as an end user
Staged For Archive
- Login to the Archive Engine GUI as an Active Directory User
- Select the Archive Engine icon
- Browse to the path entered above that was authorized for end users to archive. Folders that are eligible will show Up Cloud icon.
.png)
- Click the button to archive the data
.png)
- After the job is launched, the folders will show as staged until the archive job completes
.png)
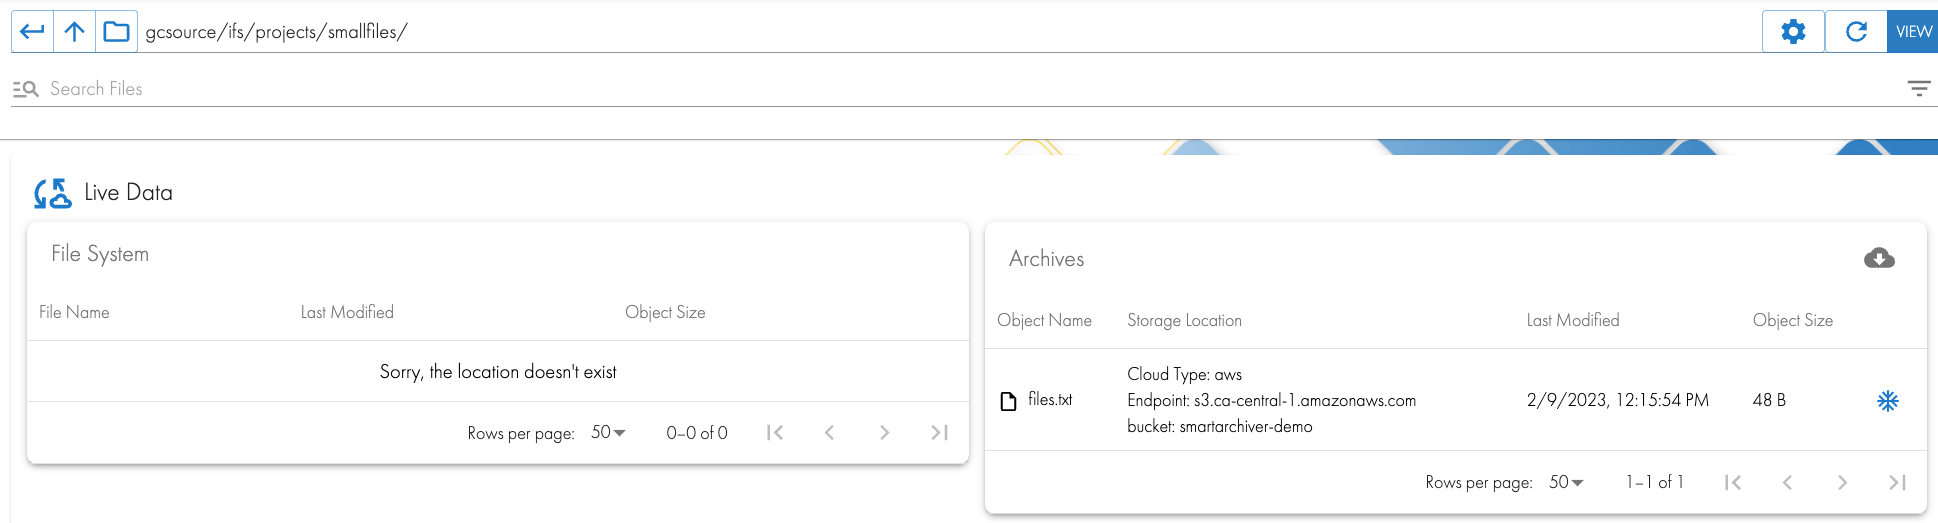
- After the job completes and the user browses to the folder, they will now see the archived data on the right-hand screen.
How to Recall Archived Data back to the File System
Staged For Recall
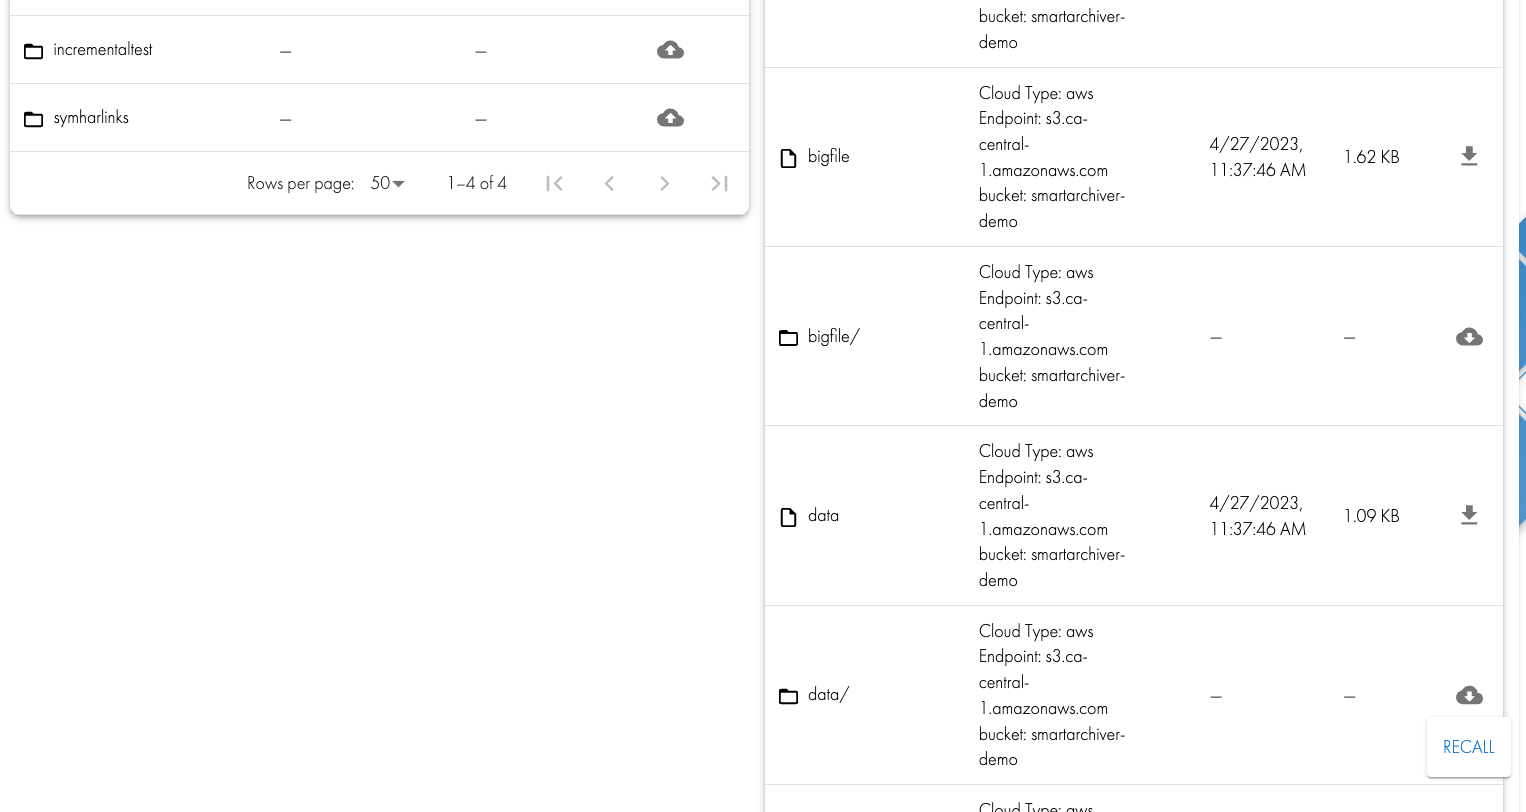
- User action "RECALL". A user can log in to the Archive Engine portal and view the file system on the left-hand pane, and on the right, they will see data archived from the currently selected folder on the right side. In the screenshot below, the child1 folder is visible on the left pane but also visible on the right side. This is because the data was recalled back to the file system. The cloud down arrow button on the right is used to recall data with a single click.
.png)
- Data are copied to the recall staging bucket
.png)
- Scheduled recall job ran, and data are restored to the original path
.png)
7.
|
|
NOTE: If the file name already exists in the file system, a collision will occur. This is handled by renaming the file before it's restored. The file will be renamed <original file name>-smart-archiver-recall-collision-<year>-<month>-<day>-<time> |
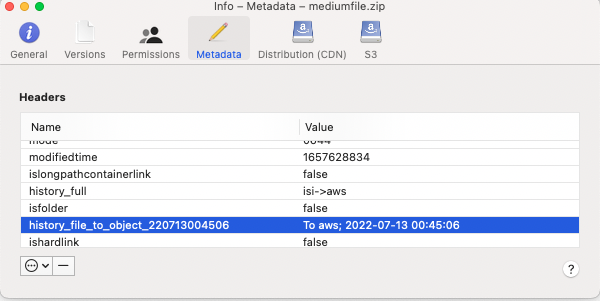
How to Track Data Lifecycle Movement
- The --storeFileHistory flag adds tracking data to each file's movement from file to object and object back to file. This provides full traceability of all data movement within the Archive Engine system. This is encoded directly in the objects making inspection easy and simple to see what happened to data. Future releases will use this metadata to report data movement across the file and object systems.
- In this example, the data is moved from PowerScale (isi) to the AWS storage target. The tag shows the date and time the object was moved from file to object.
How to Configure AWS Deep Archive Tier Transparency Archive Solution
Overview
The ideal archive solution is where data is stored in the lowest possible cost storage medium but also allows end users to self service recall data without IT involvement. That is what the new feature in Archive Engine allows. This solution is built around AWS S3 Deep Archive tier which is the lowest archive storage available from Amazon AWS. The storage tier recall normally requires specialized API's to recall data from this tier into a state that it can be accessed for download. This can take hours using this service.
This new "Archive Transparency" feature hides the complexity of managing object level recall within the S3 Deep Archive storage tier and allows users to request their data back and have Golden Copy Archive Engine manage the entire process end to end.
Prerequisites
- Golden Copy release 1.13 or later
- Licensing: Golden Copy Archive Engine Archived TB subscription license
Temporary Archive Retention from AWS Deep Archive
- AWS S3 Deep Archive recalls allow data to be temporarily accessible after recall between 4 to 14 days after recall.
- If not specified data will stay in the bucket for 7 days. This can be controlled with a variable.
- On golden copy node 1
nano /opt/superna/eca/docker.compose.overrides.yml
Add this text below and save the file with control+x
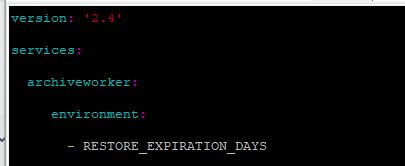
- nano /opt/superna/eca/eca-env-common.conf
- export RESTORE_EXPIRATION_DAYS=<number of days>
- The default number of days that a restored object will remain in the restored state will be changed to the value provided (to a minimum of 4 days and a maximum of 14 days)
How it Works
- The folder definition that sends to data to the bucket when users request data to be archived is configured with --tier DEEP_ARCHIVE. That's it. It is no different than standard Archive Engine configuration with one requirement. The end point must be AWS based S3 buckets.
- Archive Engine knows automatically how to use Deep Archive API's to request user data back and runs a background job to monitor the recall status from AWS services. The job runs until all data requested is available to be recalled to on premise storage.
- Deep Archive has several recall options that specify how long the data should remain available in the S3 bucket. This time period is problematic if you need more time than AWS provides. Golden Copy works around this by doing a server side call to copy the data to a recall bucket and this data can stay in this bucket indefinitely or use a life cycle policy to delete it in a number of days.
- This provides the cost advantage of low cost storage with easy of use recall and transparency for your end users.
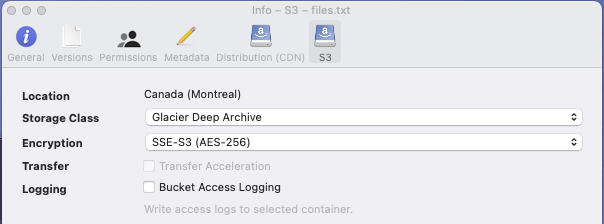
What data looks like when stored in Deep Archive Tier
- Using Cyber duck or AWS console to show the tier the data is currently stored.
- Data stored in Deep archive when viewed through cyberduck information.
-
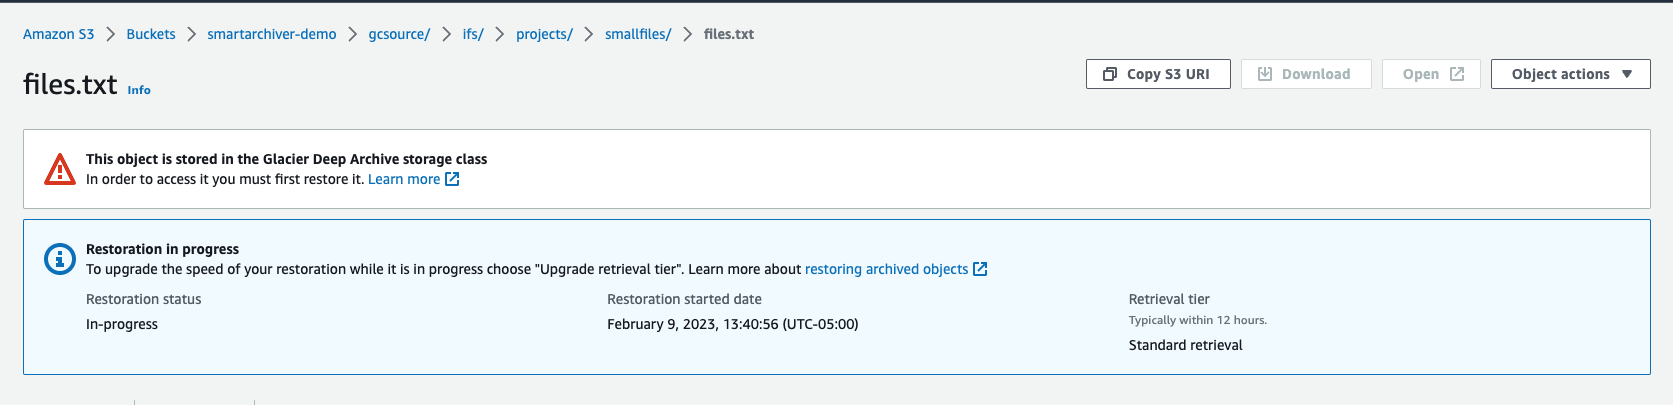
What Data looks like when a recall request has been issued to Deep Archive Tier
- Data that has been recalled and is still inflight before it can be recalled to on premise storage
- The AWS console shows data that is in progress of being recalled from glacier
- The AWS console shows data that is in progress of being recalled from glacier
- End users can also visually see the data that has been requested for recall from Deep Archive. The Archives panel on the right shows the Star icon indicating this file and folder are "inflight".
Policy Based Data Archive Feature Overview
Overview
Policy archive allows administrators to target path(s) in the file system with scanning criteria that can identify data using the last modified date stamp on files older than X months or years and move the data to target S3 storage. The solution allows older than months or years to target stale data to be moved, 2 options allow empty folders to be left behind or cleanup empty folders after the archive job completes. The job definitions allow the tree scan to put set on a schedule.
Prerequisites
- Golden Copy with Advanced license key
- License Key for Archive Engine addon product
- S3 target administrative access
Workflow
- Create an Archive Engine upload and recall folder definition to allow data to be archived or recalled
- (Upload) A folder definition to for the target S3 storage the archive staging folder location on the PowerScale typically /ifs/tocloud.
- (recall) A folder definition to recall data is required for users or administrators to login and recall data.
- A bucket in a cloud provider or local s3 storage
- For maximum cost savings AWS deep archive can be used with recall transparency
- Create Archive policies
- This step creates one or more policies that target data using last modified date stamp during the file system treewalk to select data for archive
- Policies are applied to upload folder definitions and more than one policy and path can be applied to a folder definition to allow targeting paths with different date matching criteria.
How to Configure Policy based Archive
- NOTE: These steps are specific to AWS S3 Deep Archive Tier archiving. Non Deep archive or alternate S3 storage target configuration differences will be highlighted below.
- S3 bucket configuration does not require versioning or life cycle policies
- Create S3 buckets
- Create an AWS S3 bucket to hold archived data example GCARCHIVEDATA
- Create an AWS s3 bucket for staging data for recall from the cloud, this bucket hold temporary data during a recall to on premise. GCARCHIVESTAGING
- Create an AWS S3 bucket to hold deleted staging data example GCARCHIVETRASH. Data is staged in the GCARCHIVESTAGING bucket and then deleted once it has been recalled. Holding the data in a trash bucket allows holding on to this data and applying a lifecycle policy on this bucket to delete objects older than 7 days or a value. Consult AWS documentation on how to configure a delete objects older than policy.
- Recall Folder Definition
- On the managed powerscale create this folder path /ifs/fromcloud
- Scheduled recall interval is set to daily, which means data is staged and then recalled on premise no more than once per day.
- CLI command to create the Recall folder definition, update the yellow highlighted fields to match your installation names.
- searchctl archivedfolders add --isilon <cluster name> --folder /ifs/fromcloud --accesskey xxxx --secretkey yyyy --endpoint s3.<region name>.amazonaws.com --region <region name> --bucket GCARCHIVESTAGING --cloudtype aws --source-path <cluster name>/ifs/ --recall-schedule "0 0 * * *" --recall-from-sourcepath --smart-archiver-type recall --trash-after-recall --recyclebucket GCARCHIVETRASH --storeFileHistory --type SA
- searchctl archivedfolders list (Get the folder ID for the folder definition , it will be required in the steps below)
- Upload Folder Definition
- On the managed powerscale create this folder path /ifs/tocloud
- End user or administrator recall using the recall portal requires specific paths to be "enabled" for recall. This is done through the paramter --smart-archiver-sourcepaths.
- In the example CLI command below the following paths were enabled for portal recall /ifs/projects,/ifs/olddata a comma separated list allows different paths to support portal recall. Change these paths to match your installation.
- --full-archive-schedule This schedule determines how often the archive policy paths are scanned for files that match the criteria for archiving. In this example it is scheduled to run daily at midnight to ensure data is archived during non business hours.
- --smart-archiver-recall-folder this value is the folder ID of the recall folder definition created above. This binds the 2 folder definitions together to create an upload and recall configuration. Use searchctl archivedfolders list to get the folder ID.
- --tier this flag is used for AWS or Azure.
- For maximum archive storage cost saving AWS deep archive is recommended. --tier DEEP_ARCHIVE
- specify AWS tier using (STANDARD (default), STANDARD_IA, GLACIER, DEEP_ARCHIVE, INTELLIGENT_TIERING, ONEZONE_IA, OUTPOSTS, REDUCED_REDUNDANCY, GlACIER_IR (Glacier instant access tier). Use upper case tier name.
- CLI command to create the upload folder definition, update the yellow highlighted fields to match your installation names.
- searchctl archivedfolders add --isilon <cluster name> --folder /ifs/tocloud --accesskey xxxx --secretkey yyyy --endpoint s3.<region name>.amazonaws.com --region <region name> --bucket GCARCHIVEDATA --cloudtype aws --smart-archiver-sourcepaths /ifs/projects,/ifs/olddata --delete-from-source --smart-archiver-type staging --storeFileHistory --smart-archiver-recall-folder "xxxxx" --type sa --full-archive-schedule "0 0 * * *" --tier <AWS or Azure tier>
- Archive Policy Definition
- A policy defines a path to scan, a folder ID to attach the policy to and last modified data older than parameter
- Definition of how to use the --older-than parameter
- --older-than <number of months[-number of years]> - The older than date will be created by subtracting the number of months and years from the date when the job started. For example, setting "--older-than 3-1" would be 3 months and 1 year before the date at the start of the archive job. Setting "--older-than 5" would mean 5 months before the date at the start of the job. If 12 or more is given for the months count, the value will carry over into years (eg. 13-1 being 13 months and 1 year would automatically be converted to 1-2, 1 month and 2 years).
- Optional parameters for how to handle empty folders that are left behind when all files in the folder are archived and pausing archiving.
- --remove-empty-folders true. - This enables a task that will rescan the policy folders and delete the empty folders. Recommended to contact support before enabling, default is false.
- Users like to see the folder tree to recall what folder structure existed before the archive job ran.
- --pause true/false - An archive path policy can be updated to pause archiving during job runs without needing to delete the policy. Use this parameter to pause any archiving. Default is false
- Example policy to archive data older than 18 months, the folder ID parameter is the upload or /ifs/tocloud folder ID
- searchctl archivedfolders policies add --folder xxxxx --path /ifs/olddata --older-than 6-1
- Create one or more policies with a single path listed and attach them to the same folder ID in order to target different paths with different criteria
- Configuration complete
How to test an Archive Job (pre-production)
- NOTE: Never run an archive job without testing it first.
- Create a policy to test your archive see example below using an older than 1 month flag
- searchctl archivedfolders policies add --folder xxxxx --path /ifs/testdata --older-than 1
- Copy a tree of test data into /ifs/testdata
- SSH to the powerscale cluster as root user to set the last modified dates to a date that is in the past.
- cd /ifs/testdata
- find /ifs/testdata -exec touch -m -d "2023-01-01 00:00:00" {} \;
- Verify the data was updated correctly
- cd /ifs/testdata
- find . -mtime +30 -exec ls -l {} \;
- Verify the last modified shows the date you set
- Test an archive using only this test policy (NOTE: do NOT apply production path policies to the upload folder ID)
- searchctl archivedfolders archive --id xxx --follow
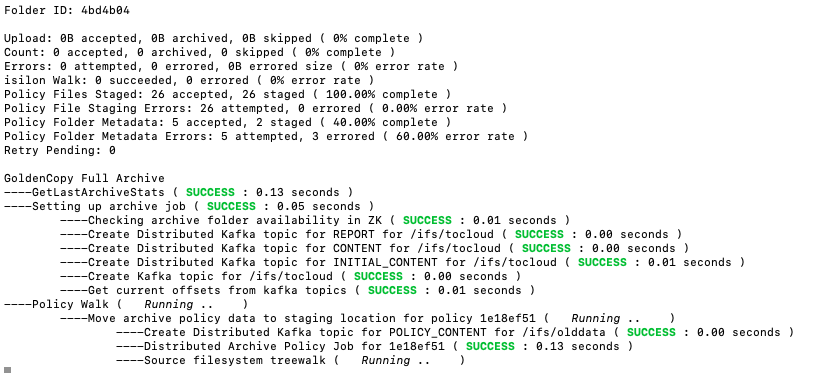
- Sample job view will show the policy path being processed and the number of files that match the criteria. In the example below 26 files matched the criteria
- Policy Files Staged: The number of files that matched the date comparison during the treewalk
- Policy File Staging Errors: each file that is stage will succeed or fail , this tracks the completion of staging data in the /ifs/tocloud
- Policy Folder Metadata: This counts the folders that matched the criteria and had the ACL information backed up
- Policy Folder Metadata: This shows the attempted archive of folders and the error rate detected when staging data in the /ifs/tocloud path.
- Policy Walk Section
- This shows the policy ID that is being processed and show the path that is scanned for matching files and folders
- A screenshot using cyberduck shows the data has been archived

- Wait until the job status shows completed.
- Then login as an AD user with at least SMB read permissions to an SMB Share that is at or below the path that was listed in the archive policy. If these conditions are not met the user will not see the option to recall data from the archive path.
- Submit a recall job on the test data that was archived. Monitor the recall job from the CLI searchctl jobs view --id xxxxxx. Once the job completes verify the files are recalled back in the original location in the file system.
- Verify the recalled data is back in the file system path.
- Done testing.
How to switch to Production Archiving
- After testing on test data and performing an archive and recall test. The steps to switch to production arching are outlined below.
- Remove the test policy
- searchctl archivedfolders policies list (get policy id)
- searchctl archivedfolders policies remove --id ID
- Add production policy paths to /ifs/tocloud folder definition, update the yellow with parameters that match your environment.
- searchctl archivedfolders policies add --folder xxxxx --path <production path> --older-than y
- Run an archive job
searchctl archivedfolders archive --id xxxx (xxx is the folder ID of the /ifs/tocloud folder definition)
Error handling
When the user tries to archive 1M of files, it is possible, for example, to lose the connection and not delete some files (there is always a percentage of error).
But if the user has some recurrent archive process, this information will finally be deleted because there’s less information to archive.
Sometimes the Isilon receive too many requests that cannot be managed, or the token session has expired. However, new INFO-level error messages have been added to describe this a little bit more:
Timeout error: Too many requests sent to Isilon
- Connection error: Isilon token session has expired
Policy-based Dry Run
Before you proceed with the job, use the 'dry run' command to determine the amount of data that will be archived.
Dry Run Behaviour
When running a dry run, the application will walk through all the standard steps for an archive job with policies and collect all the stats that a normal archive job would without performing any copy or move actions on the data. The dry run will only collect stats within the policies configured on the archivedfolder and will ignore files and folders already under the archivedfolder’s actual path.
While all the expected stats will be collected, the job output will only show the stats relevant to the user in a way that shows what the policy would copy if it were run. These stats include the total bytes walked on the policy path, the number of files and bytes that matched the policy being walked, the number of files and bytes that didn’t match the policy being walked, and the percentage of bytes matched and not matched.
Like other stats, dry stat totals can be seen by running the command searchctl stats view. The stats collected are under the job type DRY, allowing the stats to be distinguished from non-dry jobs.
Easy start Dry Run job
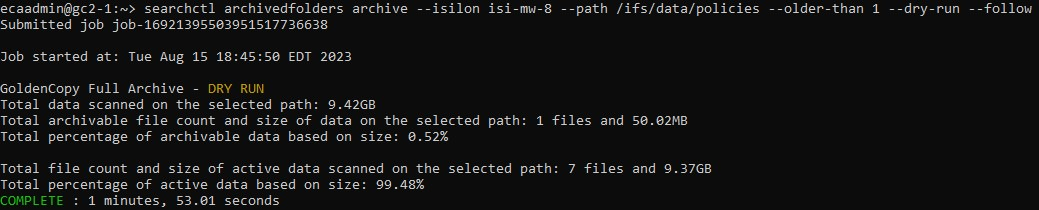
While dry run jobs can be run on existing archivedfolders with policies, it is also possible to run a dry run job without setting up all components for an easier test. This can be done by running the command searchctl archivedfolders archive --path <absolute policy path> --isilon <isilon name> --older-than <policy older than last modified rule> --dry-run.
By doing this, a temporary archivedfolder will be created for the purposes of this job, and after the job, it will be removed. The temporary folder will use blackhole cloud type and only run the policy walk steps to gather the required stats.
This temporary folder is also created to allow configuration that would normally conflict with other existing archivedfolders since these dry archivedfolders never enact any real change on the system.
Running a dry run using these options is available without the licenses normally required to run jobs for Archive Engine (GCP, GCA, GCAE). This allows users to run tests on their paths to see how Archive Engine would benefit them before acquiring the licenses.
Dry Run on existing archivedfolder
For a dry archive job to be run on an existing archivedfolder, the archivedfolder will need to have dry policies configured for it to have any results. This can be done by setting up normal archive policies but with the --dry-run flag set to true. Non-dry archive jobs will ignore an archive policy set to be a dry run.
Running a dry run job on an existing archivedfolder can be done with the normal searchctl archivedfolders archive command but with the --dry-run option provided. When this is done, the job will walk through all policies configured to be dry run as a normal archive job with policies would do and give the same results as an Easy start dry run job. Beyond the configuration, everything about this job is the same, but the archivedfolder will not be removed after the job has been completed.
Export option for dry run archive job
Dry run jobs are just like any other job and, as such, are compatible with the option to export the job using the command searchctl jobs export. The details of the jobs, including stats and events, will be exported as usual. The exported events are fabricated for the dry run, as the dry run job does not send or resolve any events to archiveworker.
© Superna Inc