Golden Copy Backup Bundle & Adv License and Pipeline Configuration Steps
- Overview
- Golden Copy Advanced License And Backup Bundle Feature Configuration
- Overview
- Powerscale Cluster Configuration Backup
- Requirements
- Cluster Configuration Backed Up
- Procedures To Configure Cluster Backup
- How to enable a folder to store a cluster backup
- How to set up a backup schedule for the cluster Configuration Backup on the cluster.
- How to Restore Configuration Backup from the S3 bucket back to the source cluster
- Cloud Storage Tier Aware Copy and Sync (AWS, Azure)
- Version Aware Recall/Restore
- Non-Version Aware Recall / Restore
- Power User Restore Portal
- Overview
- Requirements
- User Login and Data Recall Experience
- How to redirect recall data to a different target cluster
- Overview
- With Metadata
- Without Metadata
- Target Object Store Stats Job to Monitor the backup object store
- Overview
- How to Report on the object count and quantity of data protected on a folder Definition
- How to Run a Data Integrity Job
- How to Enable Ransomware Defender Smart Airgap
- Media Mode
- Overview
- Requirements
- Important Use Case Information
- Configuration Hardlink and Symlinks Aware Mode
- Symlink and Hardlink Stats and Job View
- Media Workflows Dropbox Folder or S3 Bucket Feature
- Support Limitations
- Feature Behaviours to be aware of
- Requirements
- Use Cases
- Topology Diagram
- Configuration On Premise Drop box
- Configuration Cloud Bucket Drop Box
- Long Filesystem Path Support
- Overview
- Requirements
- Feature
- How to Enable:
- Golden Copy Pipeline Workflow License Overview
- Overview
- Typical Use Case
- Fan-In Topology
- Requirements
- Fan-In Configuration Requirements
- Prerequisite Configuration Steps
- Configuration Examples for Creating Pipelines
- Advanced Job Transaction Log Backup
- Cloud Browser for Data Mobility
- Overview
- Adding Users to Golden Copy and Configure access credentials per s3 target
- Metadata Content Aware Backup and Search
- Overview
- Requirements
- Configuration
- Limitations
- Example Use Case
- Data Life Cycle Traceability with Embedded Metadata to Enable Software Defined Workflows
- Automation with Golden Copy Rest API
- Overview
- How to use the Golden Copy API
- How to Configure Unified Workflows (Pipelines, Data Mover, Archive Engine)
- Prerequisites
Overview
This topic covers installations licensed with the backup bundle or advanced license key features. These features require the license key installed.
Golden Copy Advanced License And Backup Bundle Feature Configuration
Overview
These features require the Advanced license addon for Golden Copy to use the Backup use case features. The backup features make managing backup workflows easier to monitor and automate reporting. New features to protect data allow several new workflows. Data integrity features, API access for automation with external tools and new reporting options.
Requirements
- Advanced Golden Copy license applied
- Golden Copy Backup Bundle license
How to Assign an Advanced License to a Cluster
- A Golden Copy Advanced license enables the features in this guide for a cluster managed by Golden Copy. Use the steps below.
- searchctl isilons license --name <clusterName> --applications GCA

|
NOTE: An available advanced license must exist for this command to succeed, and the cluster also requires a base Golden Copy license before an Advanced license key can be applied. |
Powerscale Cluster Configuration Backup
- Backing up data does not fully protect your cluster's configuration needed to recover your cluster. This feature collects a backup of the shares, exports and quotas using the onefs 9.2 export feature and stores a copy of this configuration in an S3 bucket configured to store a backup.
- Supports Scheduling configuration backup jobs to be generated on the cluster, and incremental changelist aware backup will pick up the new backup job files and copy them to the bucket.
Requirements
- Onefs 9.2 or later
Cluster Configuration Backed Up
- Quotas
- SMB shares
- NFS exports
- S3 Configuration
- Snapshot settings
- NDMP configuration settings
- http settings
Procedures To Configure Cluster Backup
How to run an immediate cluster backup
- searchctl isilon config (show help)
- searchctl isilon config --name <isilon-name> --backup itbackups the configurations immediately and return the task id of the backup job. The task ID will be referenced in the folder name copied to the S3 bucket.
EyeglassAdminSR account for Goldencopy must also include import/export privileges to run the command above.
isi auth roles modify EyeglassAdminSR --add-priv ISI_PRIV_CONFIGURATION
|
|
NOTE: This only generates a backup on the cluster. It does not copy the backup to S3 until a folder configuration is added and run. Follow the steps below. |
How to enable a folder to store a cluster backup
- New flag for searchctl archivedfolders add command to specify the S3 bucket to store the cluster backup. This is a required step to protect the cluster configuration. This flag is used instead of the --folder path. This will auto-populate the correct path to backup the cluster configuration data and copy it to the S3 bucket configured.
- searchctl archivedfolders add --backup-isilon using this flag will set the folder path to ISILON_BACKUP_CONFIGURATIONS_PATH automatically. It cannot be set with the --folder at the same time. Complete the other mandatory flags needed to copy data to the S3 bucket.
- Example for AWS with a daily backup.
|
|
NOTE: This will back up the cluster configuration 5 minutes after midnight. This provides 5 minutes for the cluster backup to be created. The incremental flag uses 5 0 * * *, and the first number means 5 minutes after the hour. This value can be changed if needed. |
a. searchctl archivedfolders add --isilon <cluster name>--backup-isilon --accesskey xxxxxxx --secretkey yyyyyy --endpoint <region endpoint> --region <region> --bucket <backup bucket> --cloudtype aws --incremental-schedule "5 0 * * *"
b. The job definition will fill in the correct path to pick up the cluster backup. See the example below.
c. 
d. 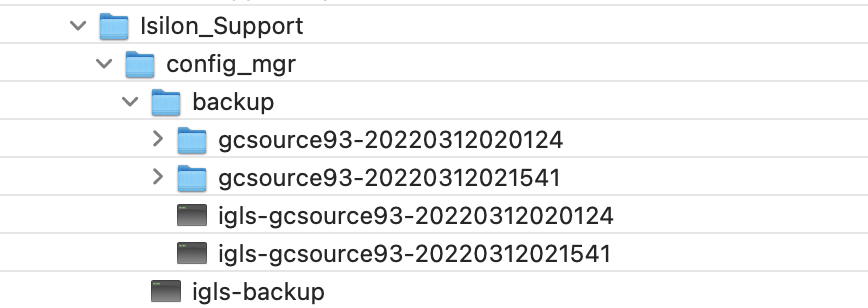
How to set up a backup schedule for the cluster Configuration Backup on the cluster.
- This step is needed to create a new backup of the cluster configuration and should be set to once per day as a best practice.
- searchctl isilon config --name <isilon-name> --set-backup-cron set up the cron for backing up the configurations, "NEVER" or "DISABLED" could inactive the schedule
- Done
- searchctl isilon config --name <isilon-name> --set-backup-cron "0 0 * * *"
How to Restore Configuration Backup from the S3 bucket back to the source cluster
|
|
NOTE: Never use this command unless you need to restore the configuration; this command will overwrite all shares, exports and quotas on the named cluster. |
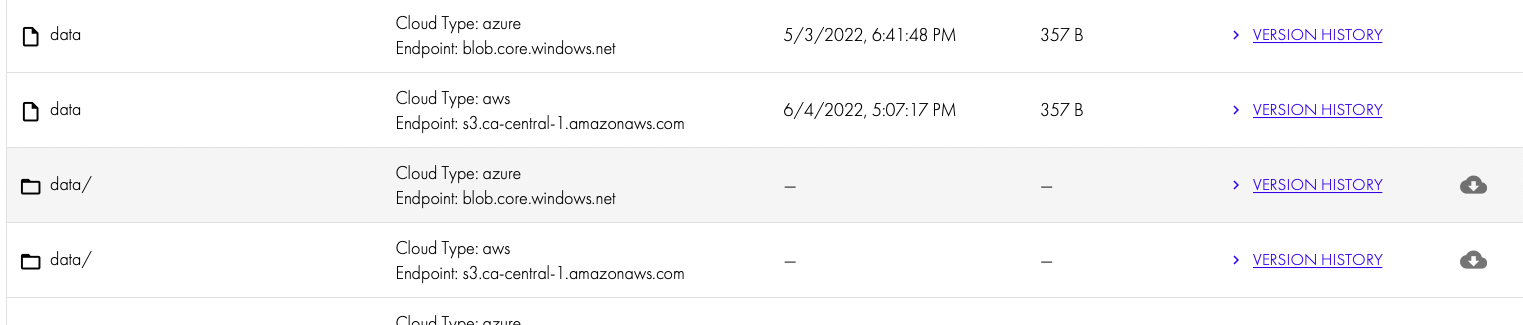
- Browse the S3 bucket with cloud browser GUI and locate the bucket/clustername/ifs/data/Isilon_Support/config_mgr/backup path and locate the subfolder name that contains the backup you want to use for the restore. For example, in this screenshot 2 backups exist to choose from.
- searchctl isilon config --name <isilon-name> --restore <id> restore the configuration file named by id and return the task id of the restore job.
- example
- searchctl isilons config --name gcsource93 --restore gcsource93-20220312020124
- The job will read the backup data from the bucket and restore it to the source cluster.
- Done.
- example
- (optional advanced) new environment variable to set the path to store the backup in the S3 bucket
- Edit /opt/superna/eca/eca-env-common.conf and add this variable to change the default
- export ISILON_BACKUP_CONFIGURATIONS_PATH=xxxx is the path of the folder that the backup job will create the new folder in. The path is fixed by Isilon but add this environment variable for the future in case this path changes.
- Default path /ifs/data/Isilon_Support/config_mgr/backup
Cloud Storage Tier Aware Copy and Sync (AWS, Azure)
-
This feature allows copying or syncing data directly into an archive tier for AWS S3 and Azure targets. Google Cloud storage requires creating the bucket with a storage class and does not support setting the tier of individual objects.
- This feature avoids life cycle policies to move objects to different tiers.
-
The add folder and modify folder CLI command allows specifying the tier that objects should be copied into.
-
[--tier] default is standard (AWS), Cool (Azure)
- Requires Golden Copy Advanced license or Backup Bundle license
- Requires 1.1.6
-
Azure
- flag to specify the tier the API calls are sent to; this should match the container tier configuration options are Access tier for Azure, e.g. hot, cool, archive) Without this flag, the default is cold.
-
NOTE: The archive tier does not support versioning and only allows one version of an object to exist. This also means incremental mode should be disabled on this tier. This tier is intended for cold data without any modifications to the source.
- AWS
- specify AWS tier using (STANDARD (default), STANDARD_IA, GLACIER, DEEP_ARCHIVE, INTELLIGENT_TIERING, ONEZONE_IA, OUTPOSTS, REDUCED_REDUNDANCY, GlACIER_IR (Glacier instant access tier). Use upper case tier name.
-
NOTE: Not all tier options are valid for all use cases. Consult AWS documentation.
-
[--tier] default is standard (AWS), Cool (Azure)
-
Example command
- searchctl archivedfolders add --isilon gcsource --folder /ifs/archive --secretkey xxx --endpoint blob.core.windows.net --container gc1 --accesskey yyyy --cloudtype azure --tier STANDARD_IA
Version Aware Recall/Restore
Overview
- Requires
- Release 1.1.6
- Overview
- A path based recall solution for bulk data recall.
- NOTE: It is not a file based recall solution.
- Limitations
- On a folder with an active archive job, recall jobs will be blocked until the archive job completes. This prevents trying to recall data that is not yet copied.
- Full and incremental with S3 bucket versioning allows multiple versions of files to be protected using S3 policies configured on the target storage. The Storage bucket must have versioning enabled and the folder should be configured in sync mode, or have run a copy job multiple times to detect file changes and update objects with a new version. NOTE: Storage bucket version configuration is external to Golden Copy consult your S3 storage device documentation.
- This allows recalling jobs to select files based on a date range using older than x date or newer than Y date. This allows selecting files based object creation date (the date the backup ran) using the older newer than flags on the recall job.
- NOTE: The date range is evaluated against the object creation date of the object in the version history of an object. This date is when the object was backed up.
- NOTE: If you run multiple recall jobs with the same path the files in the recall staging area under /ifs/goldencopy/recall will be overwritten if they already exist.
Use Case #1: Recall "hot data" first
- This solution is when a large recall of data is needed to be recalled/restored but you want the most recent data recalled first. This would use the newer than a flag to select a date example 2 weeks in the past.
-
Example
- searchctl archivedfolders recall --id 3fd5f459aab4f84e --subdir /ifs/xxx --newer--than "2020-09-14 14:01:00" --apply-metadata
Use Case #2: Recall "cold data" last
- This solution would be used to recall data after "hot data" is recalled since it has not been recently updated. This would use a recall job, and the older than flag, using the example above using the same date 2 weeks in the past with the older than flag, would start a recall job to locate and recall data unmodified that is at least 2 weeks or older.
-
Example
- searchctl archivedfolders recall --id 3fd5f459aab4f84e --subdir /ifs/xxx --older--than "2020-09-14 14:01:00" --apply-metadata
Non-Version Aware Recall / Restore
- Overview:
- This feature also adds the ability to scan the metadata in the object's properties to recall files based on created or modified data stamps of the files that existed on the file system at the time they were backed up.
- Limitations
- On a folder with an active archive job, recall jobs will be blocked until the archive job completes. This prevents trying to recall data that is not yet copied.
- The recall command adds to new options with the following date syntax. Use double quotes.
- NOTE: The times enter Must be in UTC time zone.
- --start-time "<date and time>" (yyyy-mm-dd HH:MM:SS e.g 2020-09-14 14:01:00)
- --end-time "<date and time>" (yyyy-mm-dd HH:MM:SS e.g 2020-09-14 14:01:00)
Use Case #3: Recall files with a specific created or modified time stamp
- This use case allows scanning the metadata that Golden Copy encodes into the properties of the objects as criteria to select data to recall the data based on the created date stamp of the files or modified time stamp.
- [--start-time STARTTIME] (yyyy-mm-dd HH:MM:SS e.g 2020-09-14 14:01:00)
- [--end-time ENDTIME] (yyyy-mm-dd HH:MM:SS e.g 2020-09-14 14:01:00)
- [--timestamps-type {modified, created}] The default is modified date stamp. The files are backed up with created and modified time stamps; this flag allows selecting which time stamp to use when evaluating the older than or newer than dates.
- Example to scan for files with a last modified date stamp between Sept 14, 2020 and Sept 30 2020 under the /ifs/xxx folder.
- searchctl archivedfolders recall --id 3fd5f459aab4f84e --subdir /ifs/xxx --start-time "2020-09-14 14:01:00" --end-time "2020-09-30 14:01:00" --apply-metadata
- Example of scanning for files with a created date stamp between Sept 14, 2020 and Sept 30 2020 under the /ifs/xxx folder.
- searchctl archivedfolders recall --id 3fd5f459aab4f84e --subdir /ifs/xxx --start-time "2020-09-14 14:01:00" --end-time "2020-09-30 14:01:00"--timestamps-type created --apply-metadata
Power User Restore Portal
Overview
- This feature targets power users that have a need to log in and recall data, but they should not be an administrator within the Golden Copy appliance. This solution is SMB share security overlay awareness. This means after AD login to the Golden Copy appliance the users SMB share paths are compared to the backed-up data and restricts visibility of the data in the Cloud Browser interface. The user is also limited to only seeing icons related to Cloud Browser.
Requirements
- Golden Copy VM node 1 must have SMB TCP port 445 access to the Clusters added to the appliance
- SMB shares on a path at or below the folder definitions configured in Golden Copy
- Disable Admin only mode on the Golden Copy Appliance
User Login and Data Recall Experience
- The user must log in with user@domain and password
- The options in the UI are limited to Cloud Browser and stats.
- Select the Cloud Type and bucket name
- The displayed data is based on the SMB share permissions of the user.
- Clicking the icon will launch a recall job.

|
|
NOTE: The recall data path is not the original data location and the Power user would need access via NFS or SMB to the /ifs/goldencopy/recall/ifs/xxxxx path to retrieve the data. Designing a user restore solution requires some planning with SMB shares to grant access to data that has been recalled. |
How to redirect recall data to a different target cluster
Overview
- 2 use cases
- recall to a target cluster without metadata - no license needed
- recall to a target cluster with metadata - requires license
With Metadata
- Use this option to redirect a recall to a different cluster and restore metadata.
- NOTE: This requires a full license for the target cluster that is added to Golden Copy
- The target cluster should be added to Golden Copy, and all NFS mounts should be in place following the documentation in the installation guide.
- A valid license needs to be applied to the cluster
- To recall data from Cluster A to Cluster B
- Add the folder definition specifying Cluster B and the same S3 bucket used to backup Cluster A
- example recall command
- searchctl archivedfolders recall --id xxxx --source-path clusterA/ifs/data/yyyy
- xxxx is the folder id added above
- yyyy is full path to the data you want to recall to clusterB but was backed up from ClusterA
Without Metadata
- Use this option to redirect a recall to another cluster without restoring metadata.
- NOTE: This option does NOT require a license on the target cluster of the recall
- WARNING: no metadata means (owner, group, mode bits, folder ACL's)
- Login to each node and follow these steps
- Create an NFS export with root client mount permissions in a location on any device with ip addresses of each Golden Copy VM. NOTE: The only supported method to recall data plus file metadata (owner, group, mode bits, folder ACL's) requires PowerScale as the target. Other storage devices require metadata recall disabled.
- On Golden Copy nodes
- sudo -s
- nano /etc/fstab
- edit the mount text to change the device IP address and path used in the step above to create the NFS export
- control + x to save and exit
- repeat on each Golden Copy node
- (PowerScale) Start the recall job and specify the source path where the data is stored in the S3 bucket.
- searchctl archivedfolders recall --id YY --apply-metadata
- Replace xxxx with the new cluster name
- YY replace with the New folder ID created when adding the folder in the steps above.
- NOTE: The recall NFS mount must be created on the new target cluster on the /ifs/goldencopy/recall path before a recall can be started.
- This will start a recall job and data will be recalled to the new cluster added to the folder definition.
- searchctl archivedfolders recall --id YY --apply-metadata
- (other NFS Storage)
- searchctl archivedfolders recall --id YY
Target Object Store Stats Job to Monitor the backup object store
Overview
This job type will scan all the objects protected by a folder definition and will provide a count of objects, the sum total of data along with the the age of the objects.
In addition it will summarize:
- File count
- Total data stored
- oldest file found
- newest file found
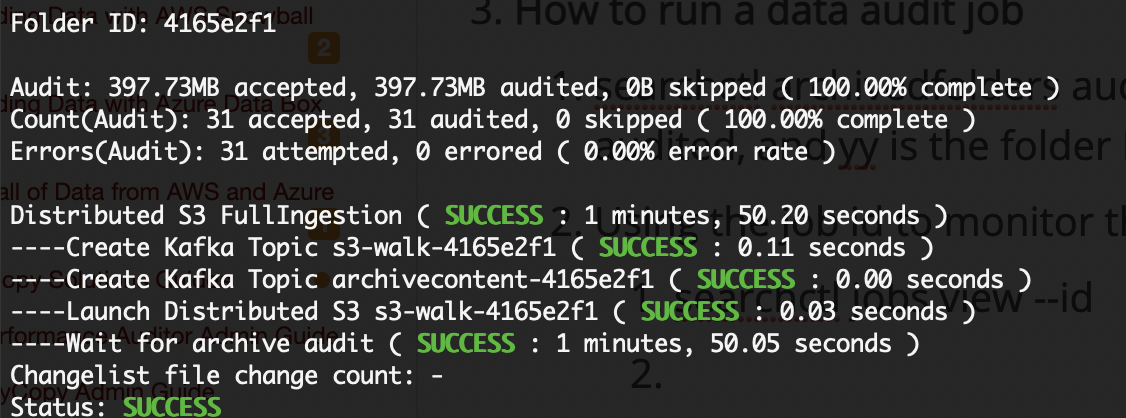
How to Report on the object count and quantity of data protected on a folder Definition
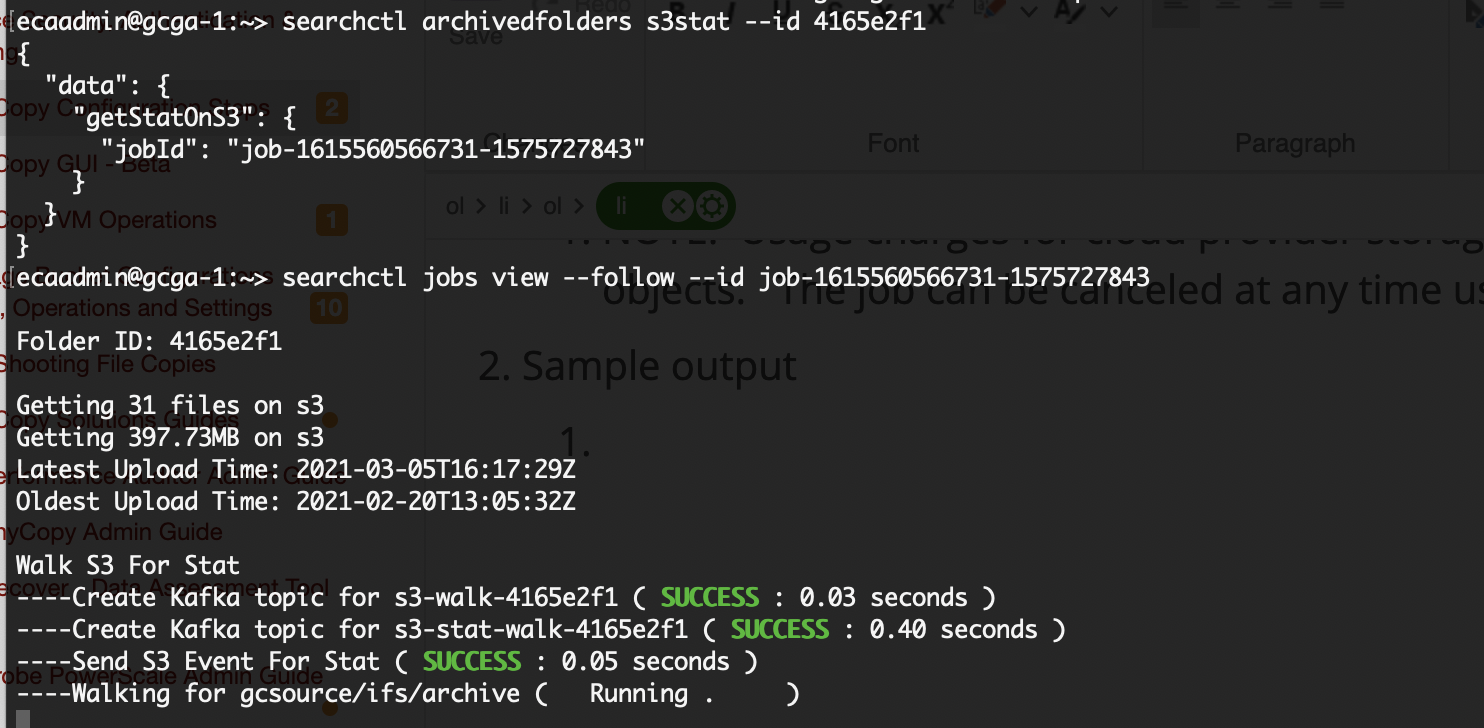
- searchctl archivedfolders s3stat --id <folderID>
- NOTE: Usage charges for cloud provider storage will be assessed based on API list and get requests to objects. The job can be canceled at any time using searchctl jobs cancel command.
- Use the searchctl jobs view --follow --id xxxxx (job ID) to view the results
- Sample output
-
How to Run a Data Integrity Job
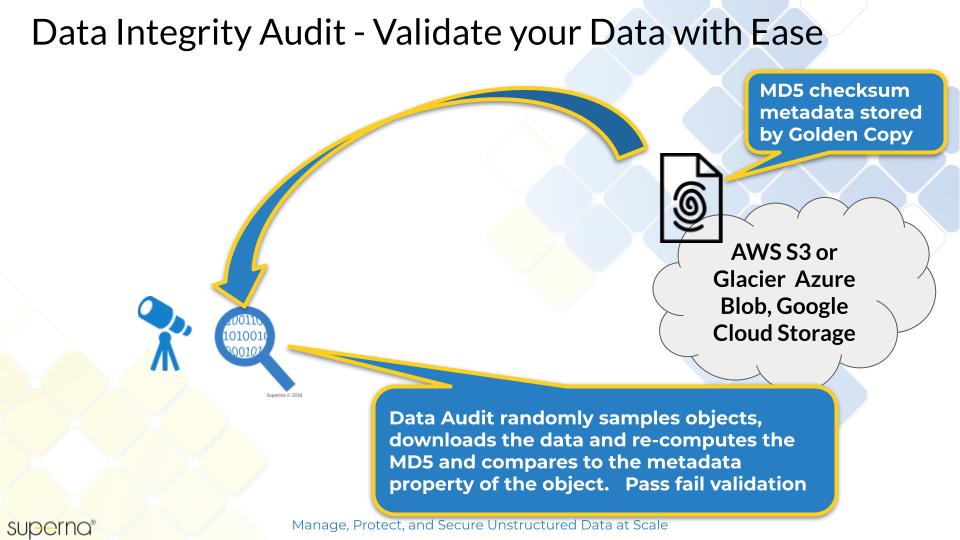
- Overview
- This feature provides a data integrity audit of folders by leveraging the metadata checksum custom property. Random files are selected for audit on the target device, downloaded the file computes the checksum and compares to the checksum stored in the metadata. If any files fail the audit, the job report will summarize failures and successful audit passing. This verifies your target device stored the data correctly.
-
- Requirements
- Release 1.1.6 update 2 or later
- NOTE: If data did not have a checksum applied during a copy the job will return 100% error rate.
- This feature will require data is copied with the --checksum ON global flag enabled. See the Global configuration settings.
- searchctl archivedfolders getConfig
- searchctl archivedfolders configure -h
- How to run a data integrity job
- searchctl archivedfolders audit --folderid yy --size x (note x is GB total of data that will be randomly audited, and yy is the folder ID that will be audited)
- Using the job id to monitor the success of the job
- searchctl jobs view --id xxxxx
-
How to Enable Ransomware Defender Smart Airgap
- This feature integrates with Ransomware Defender to enable Smart Airgap. This blocks full or incremental jobs if an active alarm is raised in Ransomware Defender or Easy Auditor Active Auditor triggers.
- login to node 1 of Golden Copy as ecaadmin
- nano /opt/superna/eca/eca-env-common.conf
- Add these variables and generate a new API token in eyeglass to authenticate Golden Copy API calls. This can be completed from Eyeglass GUI, main action menu, Eyeglass Rest API, API tokens and create a new token named for Golden Copy.
- Add these variables and enter the eyeglass ip address and api token.
- export EYEGLASS_LOCATION=x.x.x.x
- export EYEGLASS_API_TOKEN=yyyy
- copy api token created in eyeglass api menu to replace yyyy
- export ARCHIVE_RSW_CHECK_THRESHOLD=WARNING
- Options are WARNING, MAJOR, CRITICAL to determine the severity of the alarm that will block the backup process. If set to the warning, then all severities will block; if set to Major, then Warnings will be ignored; if set to critical, then warning and major will be ignored
- export ARCHIVE_RSW_CHECK_INTERVAL_MINS=1
- How often to poll eyeglass for ransomware events, recommended to use 1 minute
- export ARCHIVE_RSW_CHECK_ENABLED=TRUE
- True / False to enable the functionality. True required to activate the feature.
- control + x to save the file
- ecactl cluster down
- ecactl cluster up
Media Mode
Overview
Media workflows and applications generate symlinks and hardlink files in the file system to optimize disk space. These file system structures allow efficient re-use of common files in a media project space. The challenge with this data structure is backup of these files from file to objects and each symlink or hardlink being treated as a full sized unique file. This issue will cause an explosion of the data set in the object store and objects recalled back to a file system will lose the sym and hard link references.
Media mode in Golden copy is designed to automatically detect symlinks and hardlinks and only backup the real file once and maintain the references to this file to a) optimize backup performance and b) preserve the links in the object store. This feature will allow recalling the data back to the file system and will recreate the symlinks and hardlinks in the file system to maintain the optimized data structure.
This mode can be enabled or disable and support full backup and incremental detection of new symlink or hardlinks that are created in between incremental sync jobs.
Requirements
- License key required - Pipeline subscription
Important Use Case Information
- The source and target of a hard link or symlink must be under the archive folder definition.
Configuration Hardlink and Symlinks Aware Mode
- Follow these steps to enable media mode
- login to the Golden Copy node 1
- nano /opt/superna/eca/eca-env-common.conf
- add the following variables
- export IGNORE_SYMLINK=false
- export IGNORE_HARDLINK=false
- export ARCHIVE_LINK_SUFFIX=.link.json
- export INDEX_WORKER_RECALL_SKIP_EXISTENT_FILES=true #(skips files in the S3 bucket if they already exist in the recall path)
- export ARCHIVE_WORKER_RECALL_SKIP_EXISTENT_FILES=true #(note requires release 1.1.20 or later, skips files that already exist on disk, this allows archiveworker restarts during jobs to skip over data that is already downloaded)
- Requires 1.1.19 or later
- export IGNORE_ADS_FILES=true
- control+x (to save and exit)
- ecactl cluster down
- ecactl cluster up
- done.
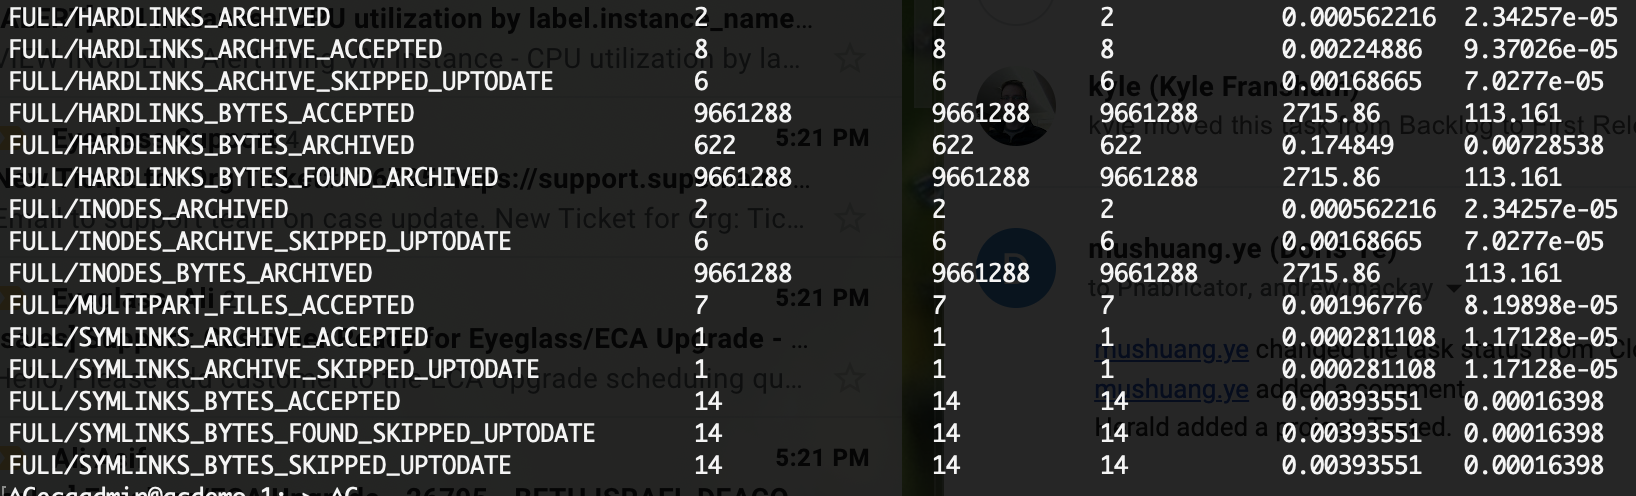
Symlink and Hardlink Stats and Job View
- When media mode is enabled the following stats are available along with job view details.
- Job View summary provides symlink and hardlink count and MB copied along with skipped files that did not need to be copied as redundant copies. A calculation on data copied saving when duplicate data is not copied is also provided.
- Stats view summary now has detailed stats on inodes, symlinks, hardlinks and skipped copies when data reduction has occured due to duplicate data removed from the copy job.

4. If ARCHIVE_ENABLE_INODE_SKIP_EXISTS is set to true, the GoldenCopy will not check for the presence of duplicate inodes during the processing of hardlinked data. This will result in higher bandwidth from the GoldenCopy to cloud targets and should only be set to false if directly instructed by customer support. (Default false)
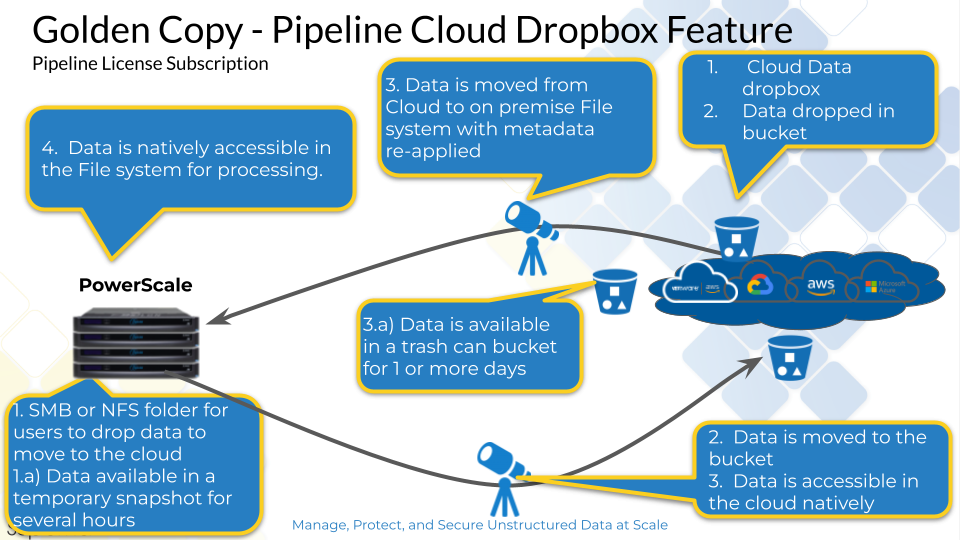
Media Workflows Dropbox Folder or S3 Bucket Feature
- This allows a folder on the cluster to be monitored for new files and synced to an S3 bucket and the source files are deleted after the copy of the files completes. This enables a workflow that allows completed work to be dropped into a folder to be moved to the production finished work storage bucket. This feature manages the on premise to cloud direction. It is also possible with the Pipeline license to offer an S3 bucket drop box bucket where new data copied into the bucket is copied to on premise storage and then deleted from the bucket.
Support Limitations
- The drop box delete at source feature is a file by file delete designed for media workflows. It is not a high speed delete for TB's or millions of files.
Feature Behaviours to be aware of
- Data copied into a dropbox folder path may have many levels of folder structure. The delete process is 1 thread per copied file and this thread only deletes files if the target storage returns http 200 return code. This code means it is ok to delete the file. The delete occurs by the same thread that copied the file.
- At the end of the job, many empty folders will remain. Golden Copy has a cleanup task to delete these folders. Each folder detected during the job will have at least one delete api request executed. Two possible outcomes:
- The folder is empty and will be deleted successfully. Stats view also shows successful deletes of dropbox folders.
- The folder is not empty
- A) because a file in the folder failed to copy OR
- B) New data was copied into this folder After the job started
- What happens?
- The folder delete request will fail since the folder is not empty and the folder will be left alone since B) this could be new data Or A) a file filed to be copied and can be retried on the next Dropbox Job.
Requirements
- Pipeline license subscription
Use Cases
- On premise to Cloud drop box - Pipeline license required
- Cloud to on premise drop box - Pipeline license required
Topology Diagram
Configuration On Premise Drop box
- searchctl archivedfolders add <add folder parameters> --delete-from-source
- This flag will apply delete from source rule to every full archive of this folder.
- searchctl archivedfolders archive --id <folderid> --delete-from-source
- This flag will apply delete from source rule to this full archive only.
Configuration Cloud Bucket Drop Box
- This feature allows a bucket in the cloud to receive data from various sources and have it automatically synced to the on premise cluster on a schedule and once the sync is completed the source files in the bucket are moved to the trash bucket. Two solution to control how data is moved from Cloud to on premise storage. One will delete data after copy is completed and the 2nd will move data to a trashcan bucket with TTL lifecycle policy applied.
- Move to trashcan
- searchctl archivedfolders add --folder /bucket1 --isilon <name of cluster> --source-path '/bucket path' [--pipeline-data-label xxxxx] --recall-schedule "*/30 * * *" --cloudtype {aws, azure, ecs, other} --bucket <bucket name> --secretkey <> --accesskey xxxxx --trash-after-recall True --recyclebucket <trashbucket>
- The flag with a bucket name is used to store deleted data from the main bucket. This allows a bucket policy to specify how long the deleted data should remain before it is purged from the trash bucket that is defined. This provides a time period to recover data from the trash bucket if needed.
- searchctl archivedfolders add --folder /bucket1 --isilon <name of cluster> --source-path '/bucket path' [--pipeline-data-label xxxxx] --recall-schedule "*/30 * * *" --cloudtype {aws, azure, ecs, other} --bucket <bucket name> --secretkey <> --accesskey xxxxx --trash-after-recall True --recyclebucket <trashbucket>
Long Filesystem Path Support
Overview
- Many media workflows create long path names which is supported in NFS, posix file systems. These path lengths can exceed the supported S3 limit of object keys of 1024 bytes. This blocks copying folder data at deep depth's in the file system.
Requirements
- Onefs 9.3 or later supports REST API calls for a path that is 4K bytes long
- Golden Copy 1.1.7 build 22067 or later
Feature
- This feature supports long path names that exist in the file system that need to be copied to S3. S3 has a limitation of 1024 byte object key length which limits the filesystem path that can be directly copied into the s3 bucket. This feature will create object symlinks for all data that would fail to copy to the S3 bucket.
How to Enable:
- nano /opt/superna/eca/eca-env-common.conf
- add this variable
- export ENABLE_LONGPATH_LINKING=true
- control+x (to save and exit)
- ecactl cluster down
- ecactl cluster up
- Done.
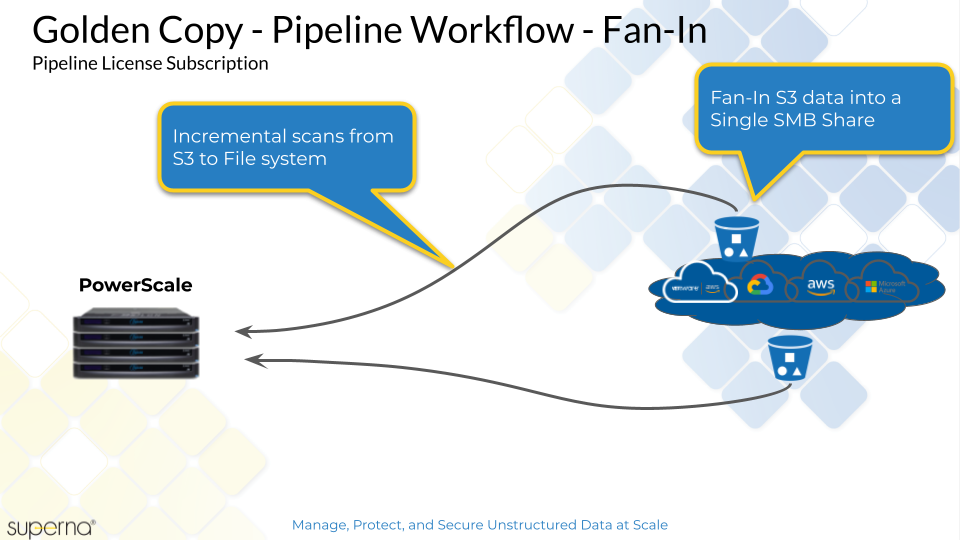
Golden Copy Pipeline Workflow License Overview
Overview
This feature license allows S3 to file workflows and File to Object. The S3 to File direction requires incremental detection feature that will leverage the date stamps on the file system to match the object time stamp. This will allow incremental sync from S3 to file. This unique feature can track differences between S3 and the file system and only sync new or modified objects from the cloud down to the file system.
Use Cases
- Media workflows to pickup media contribution from a 3rd party from an Cloud S3 bucket and transfer the data to an on premise Powerscale for editing workflows
- Media workflow to download S3 output from a rendering farm that produces output that is needed on premise for video editing workflows.
- HPC cloud analysis for AI/ML that requires on premise data to be copied to an S3 Cloud bucket for analysis input to AI/ML that produces an output in a different bucket that needs to be copied back on premise.
- Many to one - Many source buckets dropping data into a common project folder on Powerscale. Accept data from multiple locations and drop the data into a common project folder on the file system.
These workflows are file to object and object to file with different source and destinations along with scheduled copies or incremental sync in both directions. The solution is designed to allow scheduled incremental in both directions to pickup new or modified files only from the S3 bucket and copy to the cluster.
Typical Use Case
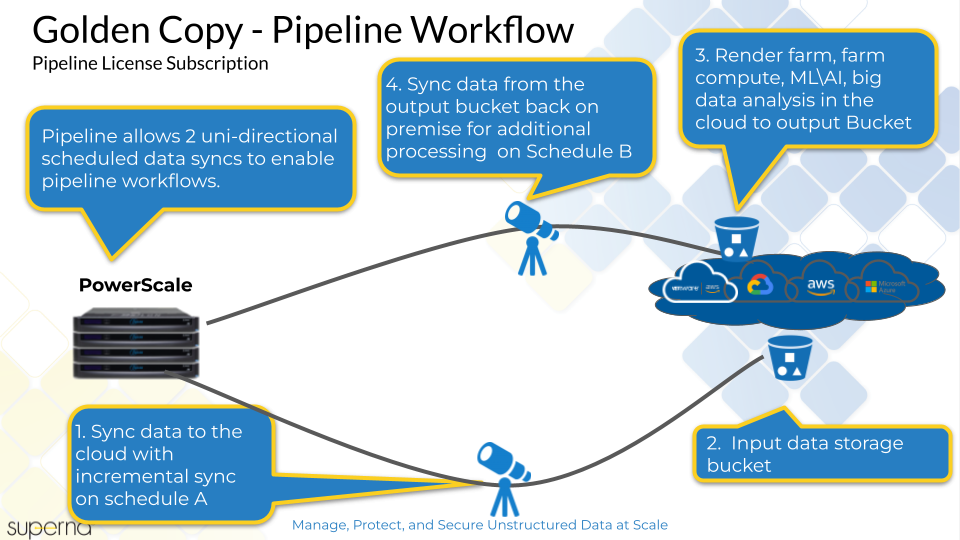
Fan-In Topology
Requirements
- Pipeline license key applied to Golden Copy and assigned to a cluster
- searchctl isilons license --name <clusterName> --applications GCP
Fan-In Configuration Requirements
- Fan-in allows multiple source s3 buckets to be synced to a single path on the on premise PowerScale.
- The prefix path must be unique to avoid file system collisions
- example
- bucket source1 - bucket1
- bucket source2 - bucket2
- searchctl archivedfolders add --folder /ifs/fromcloud/bucket1 --isilon <name of cluster> --source-path '/bucket path' --recall-schedule "*/30 * * *" [--pipeline-data-label xxxxx] --cloudtype {aws, azure, ecs, other} --bucket bucket1 --secretkey <yyyy> --accesskey <xxxx> --recall-from-sourcepath
- searchctl archivedfolders add --folder /ifs/fromcloud/bucket2 --isilon <name of cluster> --source-path '/bucket path' --recall-schedule "*/30 * * *" [--pipeline-data-label xxxxx] --cloudtype {aws, azure, ecs, other} --bucket bucket2 --secretkey <yyyy> --accesskey <xxxx> --recall-from-sourcepath
Prerequisite Configuration Steps
- The data that is pipelined from the cloud needs to land on the cluster in a path. An NFS mount is required to /opt/superna/mnt/recallsourcepath/GUID/clusternamehere/ mounted on Powerscale onto a path on the cluster example /ifs/fromcloud. This path on the cluster will store all data arriving from the cloud S3 buckets.
- NOTE: You can share out the data from S3 buckets using SMB or NFS protocols.
- Configuration Steps for NFS export for all data arriving from the cloud.
- Create an NFS export on the Golden Copy managed cluster(s) on path /ifs/fromcloud and set the client and root client lists to the IP addresses of all Golden Copy VM's
- Golden Copy uses PowerScale snapshots to copy content. Follow the steps below to add the NFS export to each of the VM's that was created in the steps above. 2 NFS mounts are required, 1 for copying data and one for recalling data.
- You will need to complete this steps on all nodes
- Cluster GUID and cluster name for each licensed cluster
- Cluster name as shown on top right corner after login to OneFS GUI
- Change to Root user
- ssh to each VM as ecaadmin over ssh
- sudo -s
- enter ecaadmin password 3y3gl4ss
- Create local mount directory (repeat for each Isilon cluster)
- mkdir -p /opt/superna/mnt/recallsourcepath/GUID/clusternamehere/ (replace GUID and clusternamehere with correct values)
- (Only if you have Virtual accelerator nodes, otherwise skip) Use this command to run against all Golden Copy nodes, you will be prompted for ecaadmin password on each node.
- NOTE: Must run from the Golden Copy VM and all VAN VM's must be added to the eca-env-common.conf file.
- NOTE: example only.
- ecactl cluster exec "sudo mkdir -p /opt/superna/mnt/recallsourcepath/00505699937a5e1f5b5d8b2342c2c3fe9fd7/clustername"
- Configure automatic NFS mount After reboot
- Prerequisites
- This will add a mount for content copying to FSTAB on all nodes
- Build the mount command using cluster guid and cluster name, replacing sections with correct values for your cluster. NOTE: This is only an example
- Replace smartconnect FQDN and <> with a DNS smartconnect name
- Replace <GUID> with cluster GUID
- Replace <name> with the cluster name
- On each VM in the Golden Copy cluster:
- ssh to the node as ecaadmin
- sudo -s
- enter ecaadmin password
- echo '<CLUSTER_NFS_FQDN>:/ifs/fromcloud /opt/superna/mnt/recallsourcepath/<GUID>/<NAME> nfs defaults,nfsvers=3 0 0'| sudo tee -a /etc/fstab
- mount -a
- mount to verify the mount
- Login to next node via ssh and ecaaadmin
- repeat steps above on each VM
- Prerequisites
Configuration Examples for Creating Pipelines
A pipeline is a Cloud to on premise storage configuration. Follow the steps below. NOTE: One to one or many to one definitions are supported to map multiple source S3 buckets to a single folder path target.
- Modify the PowerScale cluster that is the target of the cloud pipeline. Golden Copy needs to know where the pipeline data will be stored. This is attached to the cluster configuration globally for all pipelines that drop data on this cluster. Repeat for each cluster that will have Pipelines configured.
- searchctl isilons modify --name xxxx --recall-sourcepath AbsolutepathforFromcloudData < add folder parameters here for bucket, credentials etc >
- xxxx is the isilon cluster name
- AbsolutepathforFromcloudData is the path used for the fromCloud NFS mount. The default should be used /ifs/fromcloud.
- example
- searchctl isilons modify --name cluster1 --recall-sourcepath /ifs/fromcloud
- searchctl isilons modify --name xxxx --recall-sourcepath AbsolutepathforFromcloudData < add folder parameters here for bucket, credentials etc >
- Example to create a pipeline configuration from an S3 bucket and path to a file system path on the cluster, scan the bucket every 30 minutes for new data. Compare the files to the file system and only copy new files to the cluster.
- searchctl archivedfolders add --folder /ifs/fromcloud/bucket1 --isilon <name of cluster> --source-path '/bucket path' --recall-schedule "*/30 * * *" [--pipeline-data-label xxxxx] --cloudtype {aws, azure, ecs, other} --bucket <bucket name> --secretkey <yyyy> --accesskey <xxxx> --recall-from-sourcepath
- --folder /ifs/fromcloud/bucket1 Fully qualified path where the data will be copied to on the cluster. This should be a fully qualified path to the data. The path must exist already.
- --source-path '/bucket path' or 'bucket prefix' - The S3 path to read data from in the bucket. If the entire bucket will be copied then use "/" for the source path.
- --recall-from-sourcepath This flag enables Pipeline feature and is a mandatory flag.
- --recall-schedule "*/30 * * *" - The schedule to scan the S3 bucket to copy new data or modified data found in the bucket. This example is scanning the S3 bucket every 30 minutes
- --trash-after-recall <trashbucket name> - This enables the drop box feature to delete data after sync of new data is completed from cloud to on premise. This will move the S3 bucket deleted data to the trashcan bucket specified. This data should be in the same region as the source bucket.
- searchctl archivedfolders add --folder /ifs/fromcloud/bucket1 --isilon <name of cluster> --source-path '/bucket path' --recall-schedule "*/30 * * *" [--pipeline-data-label xxxxx] --cloudtype {aws, azure, ecs, other} --bucket <bucket name> --secretkey <yyyy> --accesskey <xxxx> --recall-from-sourcepath
- After adding the folder you can run the job to scan the bucket and copy data from the cloud to the cluster file system.
- searchctl archivedfolders recall --id <folderID>
Advanced Job Transaction Log Backup
- Overview: This feature stores success, skipped, and errored details for each job in an S3 bucket to provide an audit log of all actions taken during copy jobs. This log records each action to every file copied and is a large log. This feature stores the job transactions and stores in an S3 bucket by reading the reporting topic to an S3 bucket for offsite audit logs.
- Implementation:
- When enabled, Archivereporter container will be responsible for monitoring all the archivereport-<folder-id> topics, when jobs start, newly created messages in the topics will be written to temporary text files by time intervals using a timer.
- host path for temp logs is /opt/data/superna/var/transactions/
- Time interval is 10 mins by default, new messages with information of temporary text files will be published to topic transactionLog after every interval
- Archiveworker containers will spawn a consumer to monitor the transactionLog topic, messages will be picked up individually and get sent to the configured s3 logging bucket, once upload is successful, the temporary file will be deletedExported log files will be sent to the logging bucket under <folder-id>/<job-type>/<job-id>/<file-name>, with file name containing the timestamp,
- Meta data logs will be sent to the logging bucket under <folder-id>/METADATA/<job-id>/<file-name>
- Only the Archiveworker running on the same container as the Archivereporter should continue to consume the message.
- This feature uses the Cloud Credentials(AWS, Azure, etc.) of each added archivedfolders.
- Each of those Cloud Credentials will need a bucket with the name defined with
export LOGGING_BUCKET=<bucketName>.
- Configuration:
- nano /opt/superna/eca/eca-env-common.conf
- add this variable
- The logging of the transaction is disabled by default. Set by the environment variable BACKUP_TRANSACTIONS=false, can be turned on by setting it to true.
- export BACKUP_TRANSACTIONS=true
- Default interval to send temp files to the S3 bucket is every 10 minutes
- export TRANSACTION_WRITE_INTERVAL=10
- Set the S3 bucket to store the audit transaction logs; note this bucket must be defined in a folder configuration.
- export LOGGING_BUCKET='gcandylin-log'
- control + X to save and exit
- ecactl cluster services restart archivereporter
- done
- NOTE:
- This can be exported to json using the searchctl archivedfolders export command.
- The archiveworkers do the uploading by consuming events and uploading directly to the cloud.
- This will consume bandwidth and storage costs in the target bucket.
Cloud Browser for Data Mobility
Overview
When using a hybrid cloud architecture with content stored in the cloud as the single source of truth for distributed workflows, this feature empowers users to store cloud credentials in Golden Copy to leverage Cloud browser single sign on feature to browse any bucket including buckets that are not configured for Golden Copy to select content for download to on premise PowerScale storage for high speed access. This feature allows adding access credentials to one or more S3 supported targets in Golden Copy for seamless data browsing and copy, move selected content for bulk download.
Adding Users to Golden Copy and Configure access credentials per s3 target
- Users that login to Golden Copy with AD credentials will have the ability to add S3 credentials to their profile to browse content on buckets in the cloud to manage the data within a single pane of glass
- Login to Golden Copy UI with and AD user and password.
- Click the icon top left to access the user profile
- Click + to add credentials to the user profile
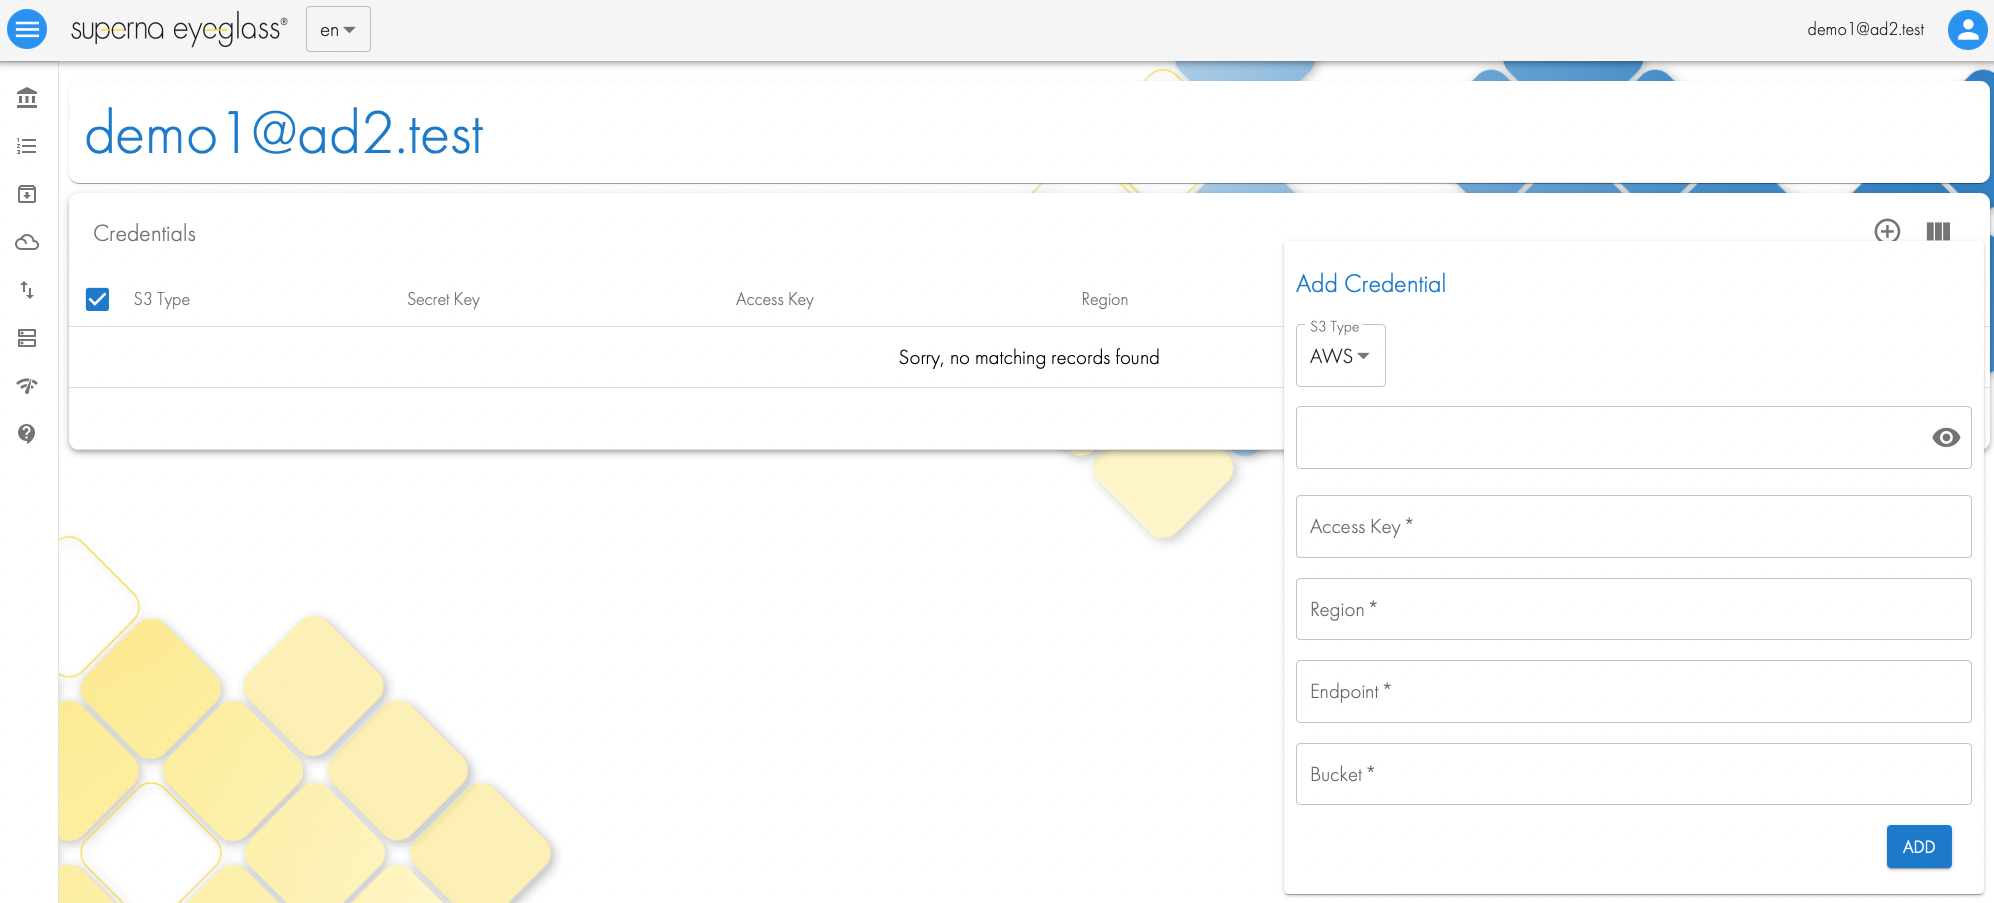
- Fill in the details for access, secret , region, endpoint and bucket name or leave blank.
- Logout an login again
- Click the Cloud Browser icon to view all count available through the profile access credentials
- Profile configuration done.
Metadata Content Aware Backup and Search
Overview
Metadata exists in almost all file types, media file types of a lot of valuable information stored in properties of the file. This feature is content aware with support for over 1500 file types. When enabled on a per folder basis the metadata is extracted from the file and added as custom tags to each object and added to a searchable full content index. This allows preservation of key metadata within the object store that is human readable with S3 browser tools and Cloud Browser built into Golden Copy. This also allows for admins or users to search for data to recall based on the metadata with them files themselves. This is a very unique solution the ties backup, content aware metadata and recall search into a single product. The additional overhead to extract metadata is minimal since it is all done in ram during the backup process.
Requirements
- Experimental feature: Use with caution
- Pipeline license subscription
- searchctl license list
- The pipeline license must be listed
- Release 1.1.11 or later
Configuration
- To enable the metadata content extraction and indexing feature
- Adding a folder
- use the --customMetaData flag
- Modifying a folder
- use the --customMetaData flag
- Adding a folder
- When data is archived metadata from the files will be extracted and copied into custom s3 properties and indexed to be searched in the Cloud browser
Limitations
- This flag option is only supported with Golden Copy or Data Orchestration edition, it is not supported with Archive Engine workflows.
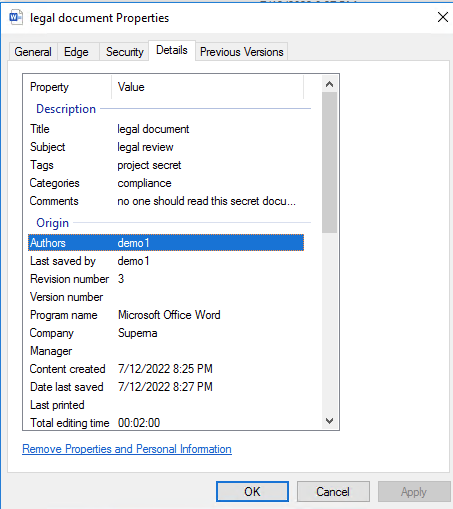
Example Use Case
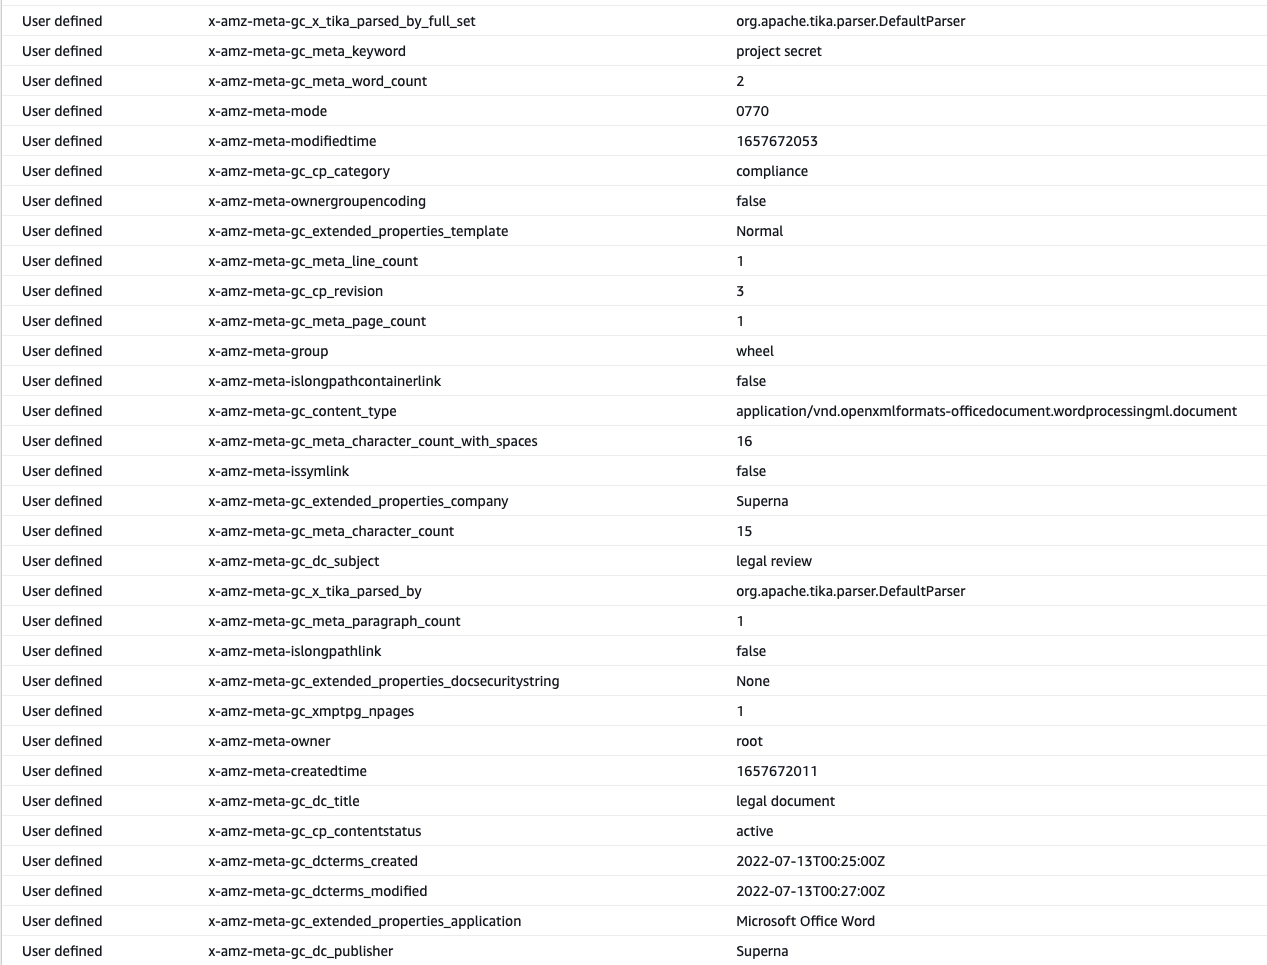
- Word document have rich metadata that can be populated. See the example of metadata on a word document, this exposes rich data that can be used for security , data life cycle, data protection or backup requirements. This allows metadata aware applications to gain access to rich metadata that can be used to apply policies to the data that arrives in the S3 bucket.
- The same Word Document has file attributes extracted with content aware backup mode that places the data into custom user defined fields on the object. This metadata is extracted and encoded into the object properties providing a view into the type of file. the GC_xxxx represents a dynamic tag extracted from each files that has metadata.
Data Life Cycle Traceability with Embedded Metadata to Enable Software Defined Workflows
- Overview
- Data tracking provides the ability to track data journey from file system to object store and back to file system. This traceablity is important when automation and software defined workflows become maintstream. Understanding where a data was created, moved, copied from object store to file system will give administrators and application developers access to data mobility history tracking.
- The key to this design principle is embedding the history of the data inside metadata that is visible in object or file systems.
- This feature is enabled with --storeFileHistory on a folder definition and will be auto enabled in release 1.12 and later.
- How does it work?
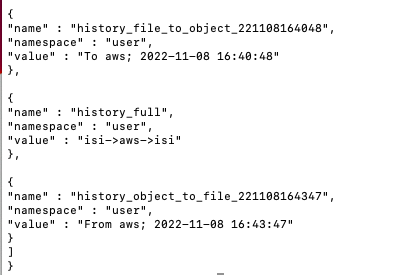
- When data is copied or moved to S3 from a file system the object in S3 will get a custom property that stores the history. See the example below that shows the origin was isi (file system) and was copied to AWS The property is called "history_full"
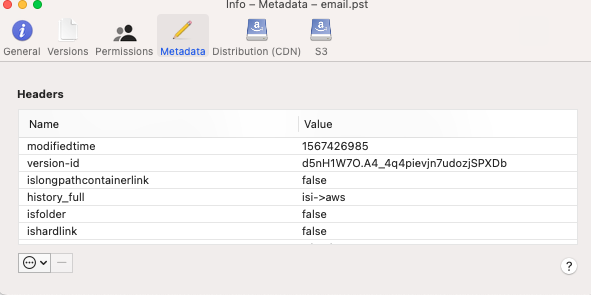
- The data was recalled back to the file system and Golden Copy uses the File api to embed custom properties into the file system itself. This provides a lot of detail on what happened to this file during it's life cycle from file to object and back to file again. See below using the curl command to display the embedded lifecycle metadata stored within OneFS.
- curl -k --user root:xxxx https://172.y.y.y:8080/namespace/ifs/goldencopy/recall/ifs/archive/incrementaltest/cow.txt?metadata
- You can see above the file was copied from file to object and specifically to AWS and the date this copied occurred is available
- The files life cycle is file --> AWS --> file
- And finally the object to file from AWS is visible with the date and time as well.
- Summary:
- Golden Copy is the market leading data orchestration content aware platform with file to object and object to file intelligence.
- When data is copied or moved to S3 from a file system the object in S3 will get a custom property that stores the history. See the example below that shows the origin was isi (file system) and was copied to AWS The property is called "history_full"
Automation with Golden Copy Rest API
Overview
The rest API can be used to automate copy jobs, monitoring of jobs to allow integration to application work flows that require data movement tasks from a file system to S3 or from S3 back to a file system. Examples include media work flows, machine learning and AI training where Cloud computing is used with data and the results are returned to on premise file systems.
How to use the Golden Copy API
How to Configure Unified Workflows (Pipelines, Data Mover, Archive Engine)
The configuration steps below outline how to use all 3 advanced workflows within Golden Copy.
Prerequisites
- This configuration assumes multiple access zones are used and that each zone will have various workflows in use.
- To use all 3 workflows Pipeline to sync data from the cloud to the file system, Data mover for end users and archive engine, a specific file system layout is required.
- File System Layout Example
- Access Zones - User Accesible
- /ifs/projectdata/marketing
- /ifs/projectdata/engineering
- Cloud Browser Data Mobility staging path - Not user accessible
- /ifs/projectdata/ This path should not have any SMB shares allowing user access at this level. Cloud mover jobs will stage data in /ifs/projectdata/CBDM before the data is moved to the user selected SMB share path.
- Archive Engine
- These paths need to be created as infrastructure locations for archive jobs to stage data to and from the cloud.
- /ifs/projectdata/AE/fromcloud/
- /ifs/projectdata/AE/tocloud/
- Pipeline Job definition example
- Data synced from the cloud to the marketing access zone would have it's destination created as follows
- /ifs/projectdata/marketing/pipeline - Data synced from the cloud will be located under this path and SMB shares can be created as needed to give access to marketing users.