AnyCopy Admin & User Guide
- NOTE: This product is deprecated starting with version 2.9.0
- Overview
- Prerequisites
- Limitations
- Creating a Copy Job
- How to monitor a running Copy Job
- How to View Copy Job Definitions, Job History, Job edit, Pre and Post script Assignment
- How to Copy to Multiple targets - Content Distribution One to Many
- How to Edit a Copy Job Definition
- How to Schedule a Copy Job
- How to Review a Copy Job Definition
- How to Delete a Job from the Finished Jobs Tab
- Advanced Administrator Pre and Post Script UI
- How to add a command to Pre or Post Operations with Path Variable Substitution
- Pre and Post Script Command Examples
- Solution Example post Script Remove Inheritance and file ACE's with Read only data
- How to Extend the Copy Log Changelist job timeout
- How to Test script logic
- POSIX Mode - How it Works
- Advanced POSIX Permissions Mode Configuration
NOTE: This product is deprecated starting with version 2.9.0
Overview
This guide covers how to use AnyCopy to create copy jobs and review settings for copy jobs, copy job history, monitoring copy job progress, copy job audit logs.
Prerequisites
- RBAC roles have been created for users and administrators of AnyCopy using an AD group and following the RBAC guide here.
- Clusters have syncIQ and SnapshotIQ licenses
- All Eyeglass DR & AnyCopy licenses have been assigned to the source and target clusters.
- The Eyeglass admin role has been assigned the backup and restore permission for all clusters to be managed by AnyCopy.
Limitations
- Pre script operations will fail the entire copy job if the pre script return code for the ssh command is > 0
- Post script operations will complete the copy job even if the script return codes is in error
- Copy Jobs require inventory to complete and will wait until cluster inventory is completed before starting steps.
- The copy job file list audit log has no paging to view, for large file lists download the CSV and view in a text editor
- The copy job file list is created using Isilon change list using snapshots before and after the copy job. If files are added to the target path before the change change list step runs, these files will appear in the the copy job report file listing even though they were not copied.
- SMB share level permissions are used to determine source and target SMB path selection. NTFS ACL's are not used to restrict access to select a folder.
- File Collision handling - If a copy job is run more than once, older files on the source path can overwrite a newer version of that file on the target. Deleted data on the source path, will not be deleted from the target, since SyncIQ is using copy mode. These limitations are SyncIQ with no work around.
- See a full list of release note items here.
Creating a Copy Job
- Login with your AD user name user@domain.com using the proxy login User interface. Refer to the RBAC guide link here.
- Open the AnyCopy Icon
- Mandatory Fields - Refer to the image below
- Job name (no special characters or spaces are allowed in the job name)
- Source:
- open this input and select a cluster
- Expand a smartconnect name (DNS name used to mount the cluster)
- Expand an SMB share
- Expand the file system to select the source path that you want to copy all the data at this folder and below to the target folder.
- NOTE: SMB shares listed are based on the logged in users AD group membership and it will include shares with the well known Everyone permission.
- Destination:
- Repeat the same steps as above to select the target cluster path. NOTE: You can select the same cluster as the source to copy data between 2 different SMB shares and offload the copy to the cluster.
- Target Host (Optional field)
i. Target host is the IP address or fqdn from target cluster
ii. If Target Host field is empty, copy job selects the IP address used to add the cluster to Eyeglass
iii. Finished copy panel has “Target Host” field for each job
e. Notifications:
i. For a long running copy you may enable email or slack channel updates by selecting the check box "Notify Progress", enter how often updates should be sent and enter email addresses using a comma separated list of emails that should be notified about this copy job.
ii. NOTE: This is useful to notify the end user who is waiting for this copy to be completed to start a new workflow with the data.
iii. (optional) Slack - enter the webhook url to publish updates on progress to a slack channel.
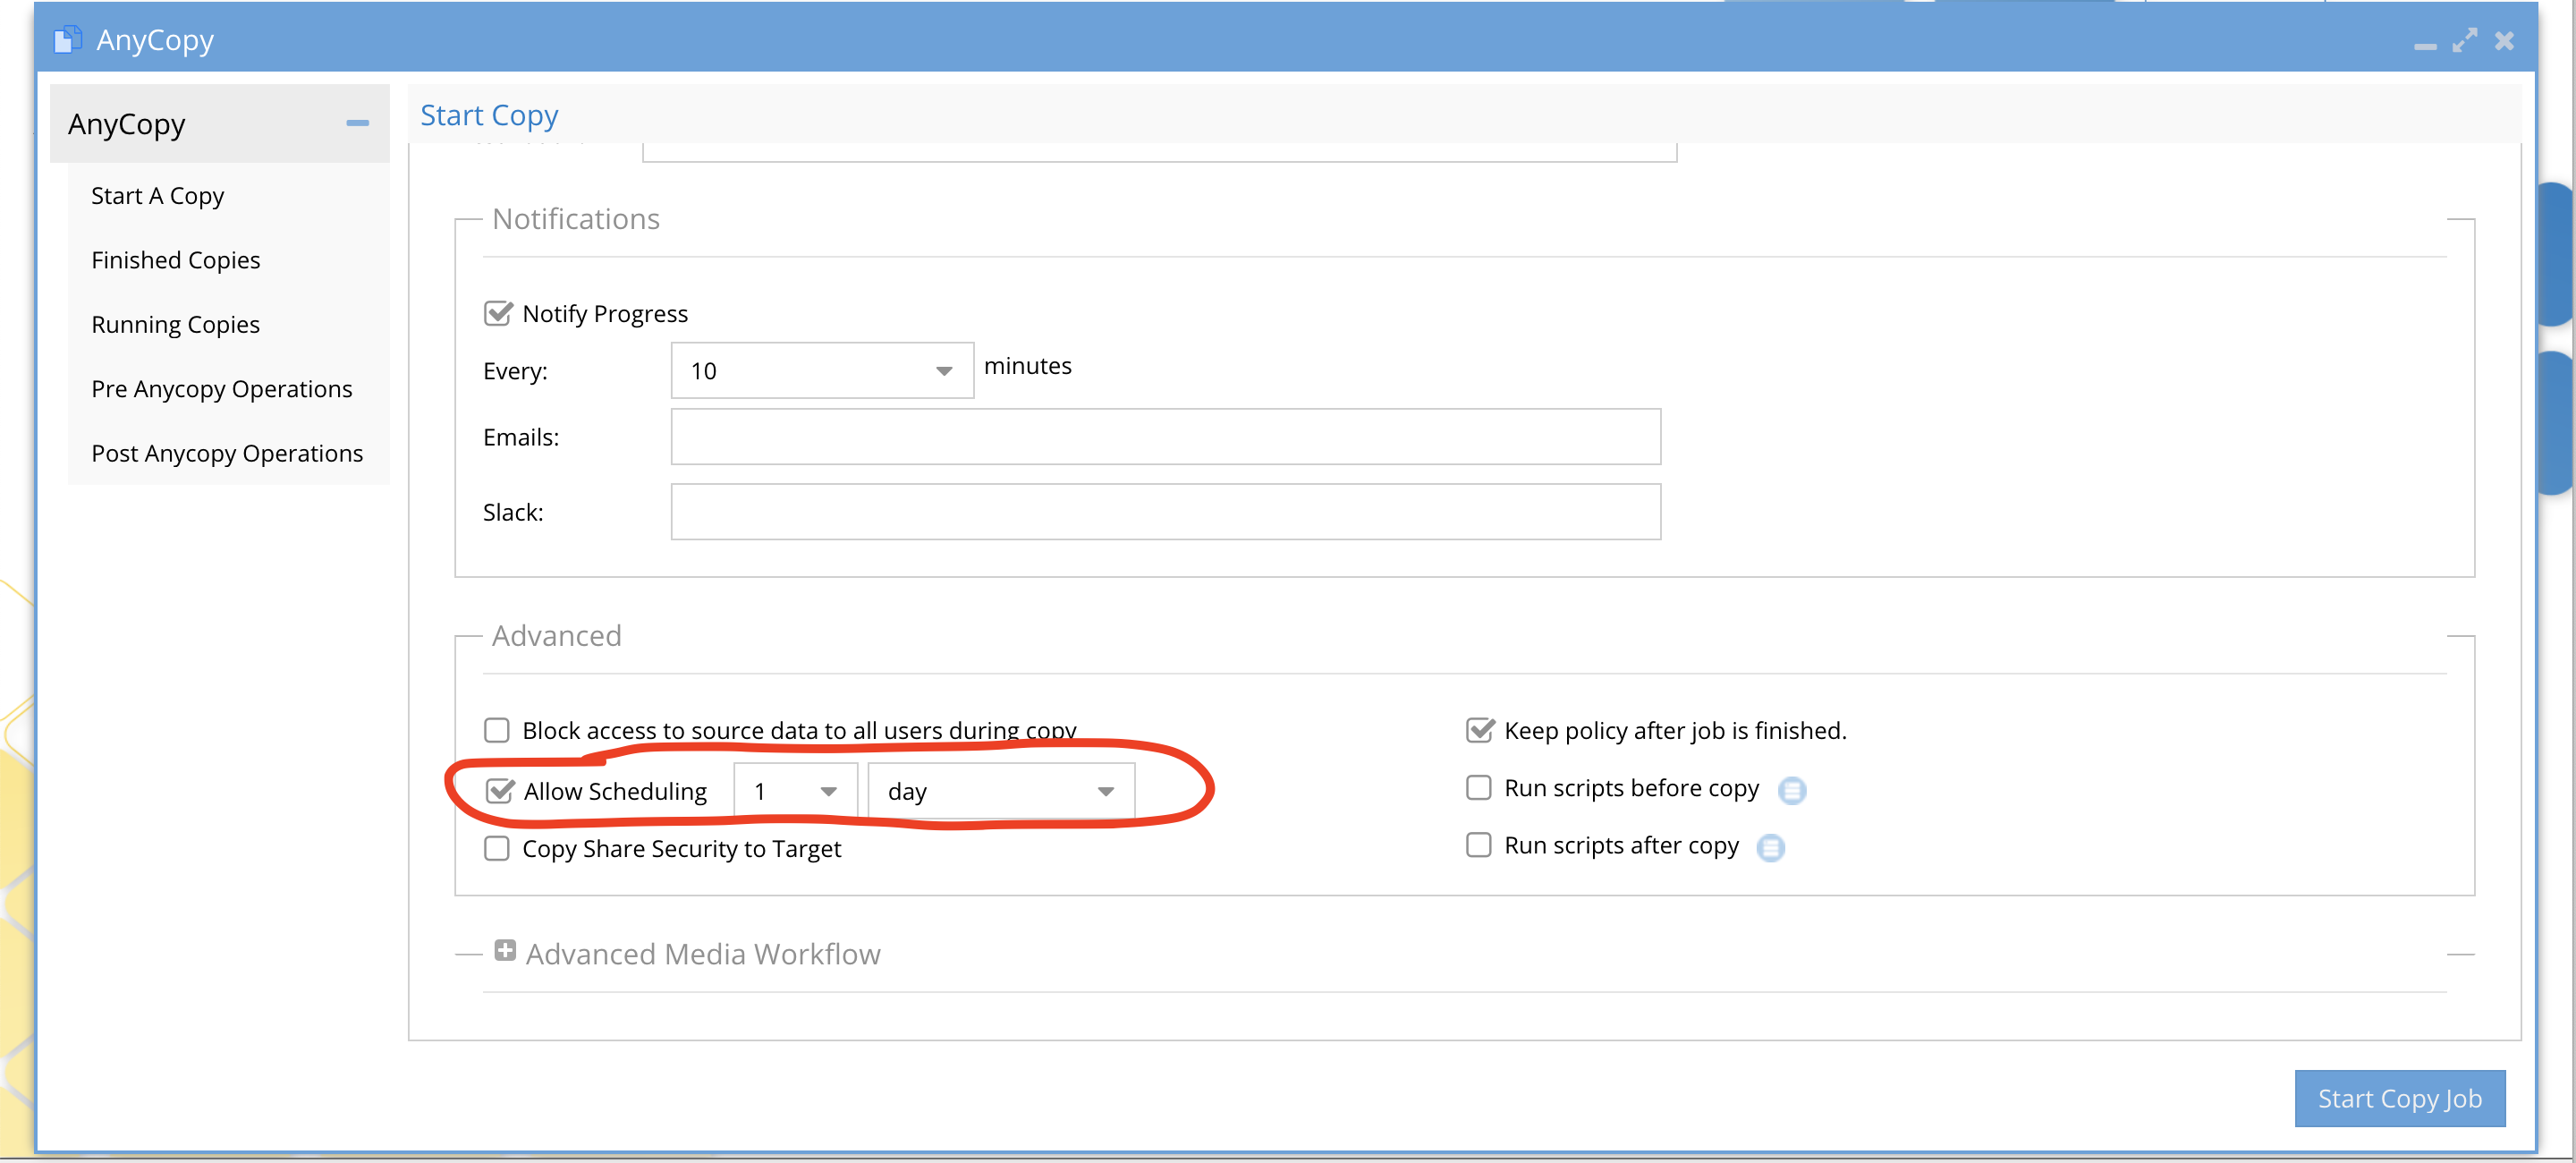
f. Advanced Section
i. Block Access to source data - This will lock the file system before the copy starts and no users will be able to save data on the source path if this is used. It will apply a deny read permission on the SMB shares detected on the source path and below. Once the copy completes the lockout is removed from the SMB shares.
ii. Allow Scheduling - this will leave the synciq policy after the copy job finishes and allow setting up a schedule within AnyCopy to run this copy on a regular basis.
1. It also enables the option to use the on demand run now option in the Jobs History tab.
iii. Copy Share Security to Target - This will read the SMB share definitions found under thee source path and will create the same SMB share(s) on the target cluster and path with the same security options and permissions configured.
iv. Run Scripts before and after allows a scripted action to be taken on the source path or target path or both. These scripts must be setup by an administrator and should not be used unless directed by the AnyCopy administrator.
g. Starting the copy jobs by finishing the settings configuration and click Start Copy Job. See next section on how to monitor the copy job.
h. 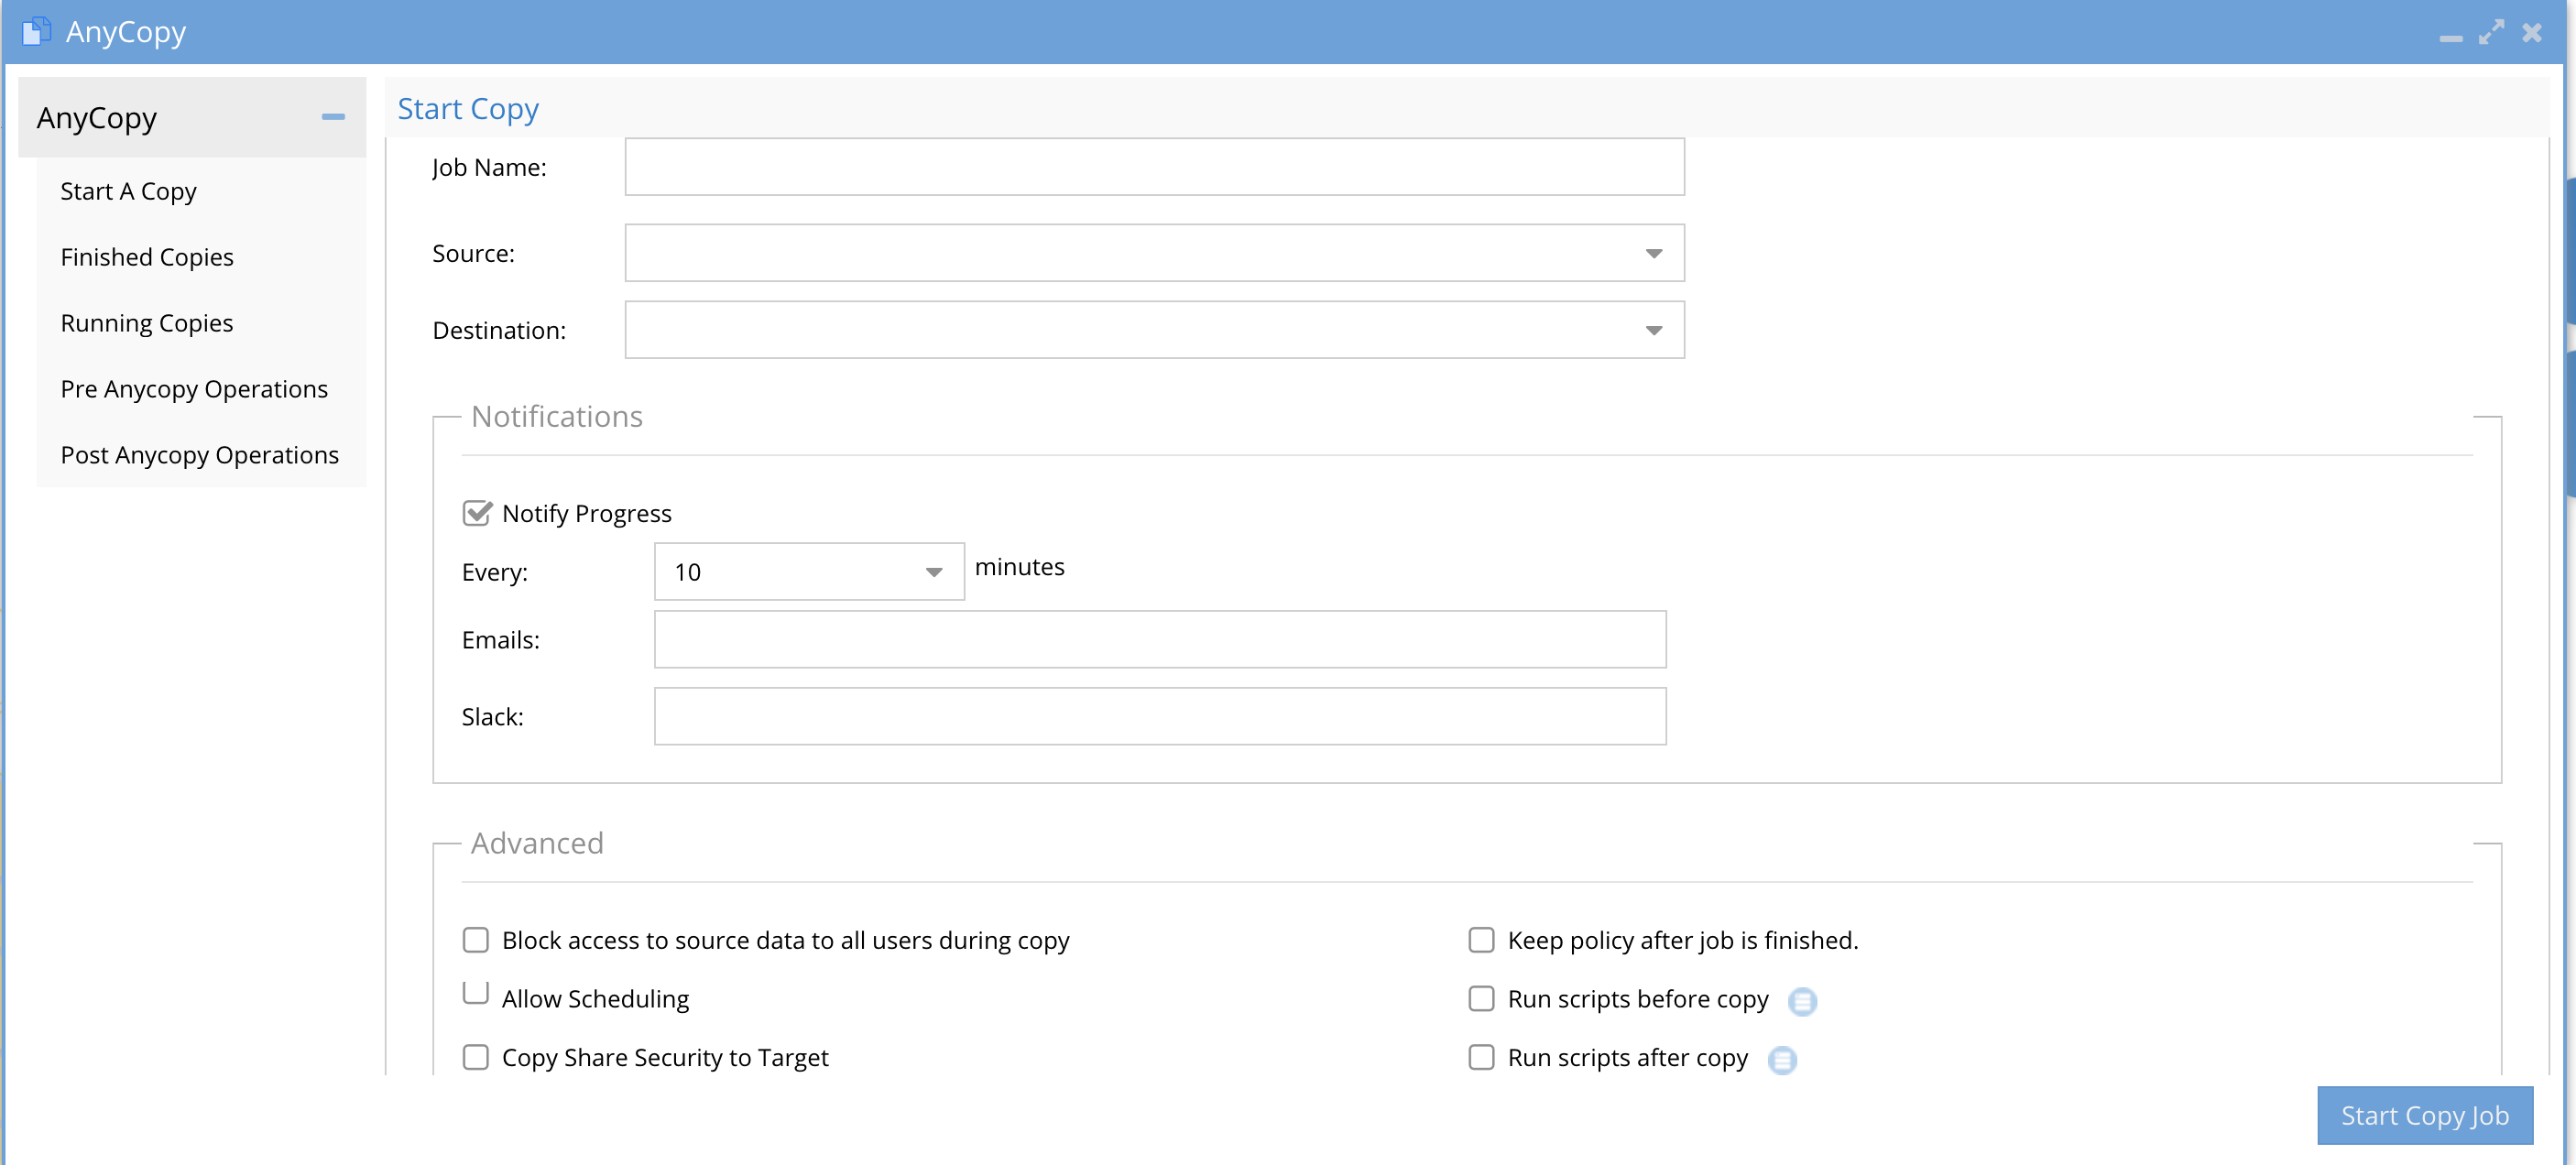
How to monitor a running Copy Job
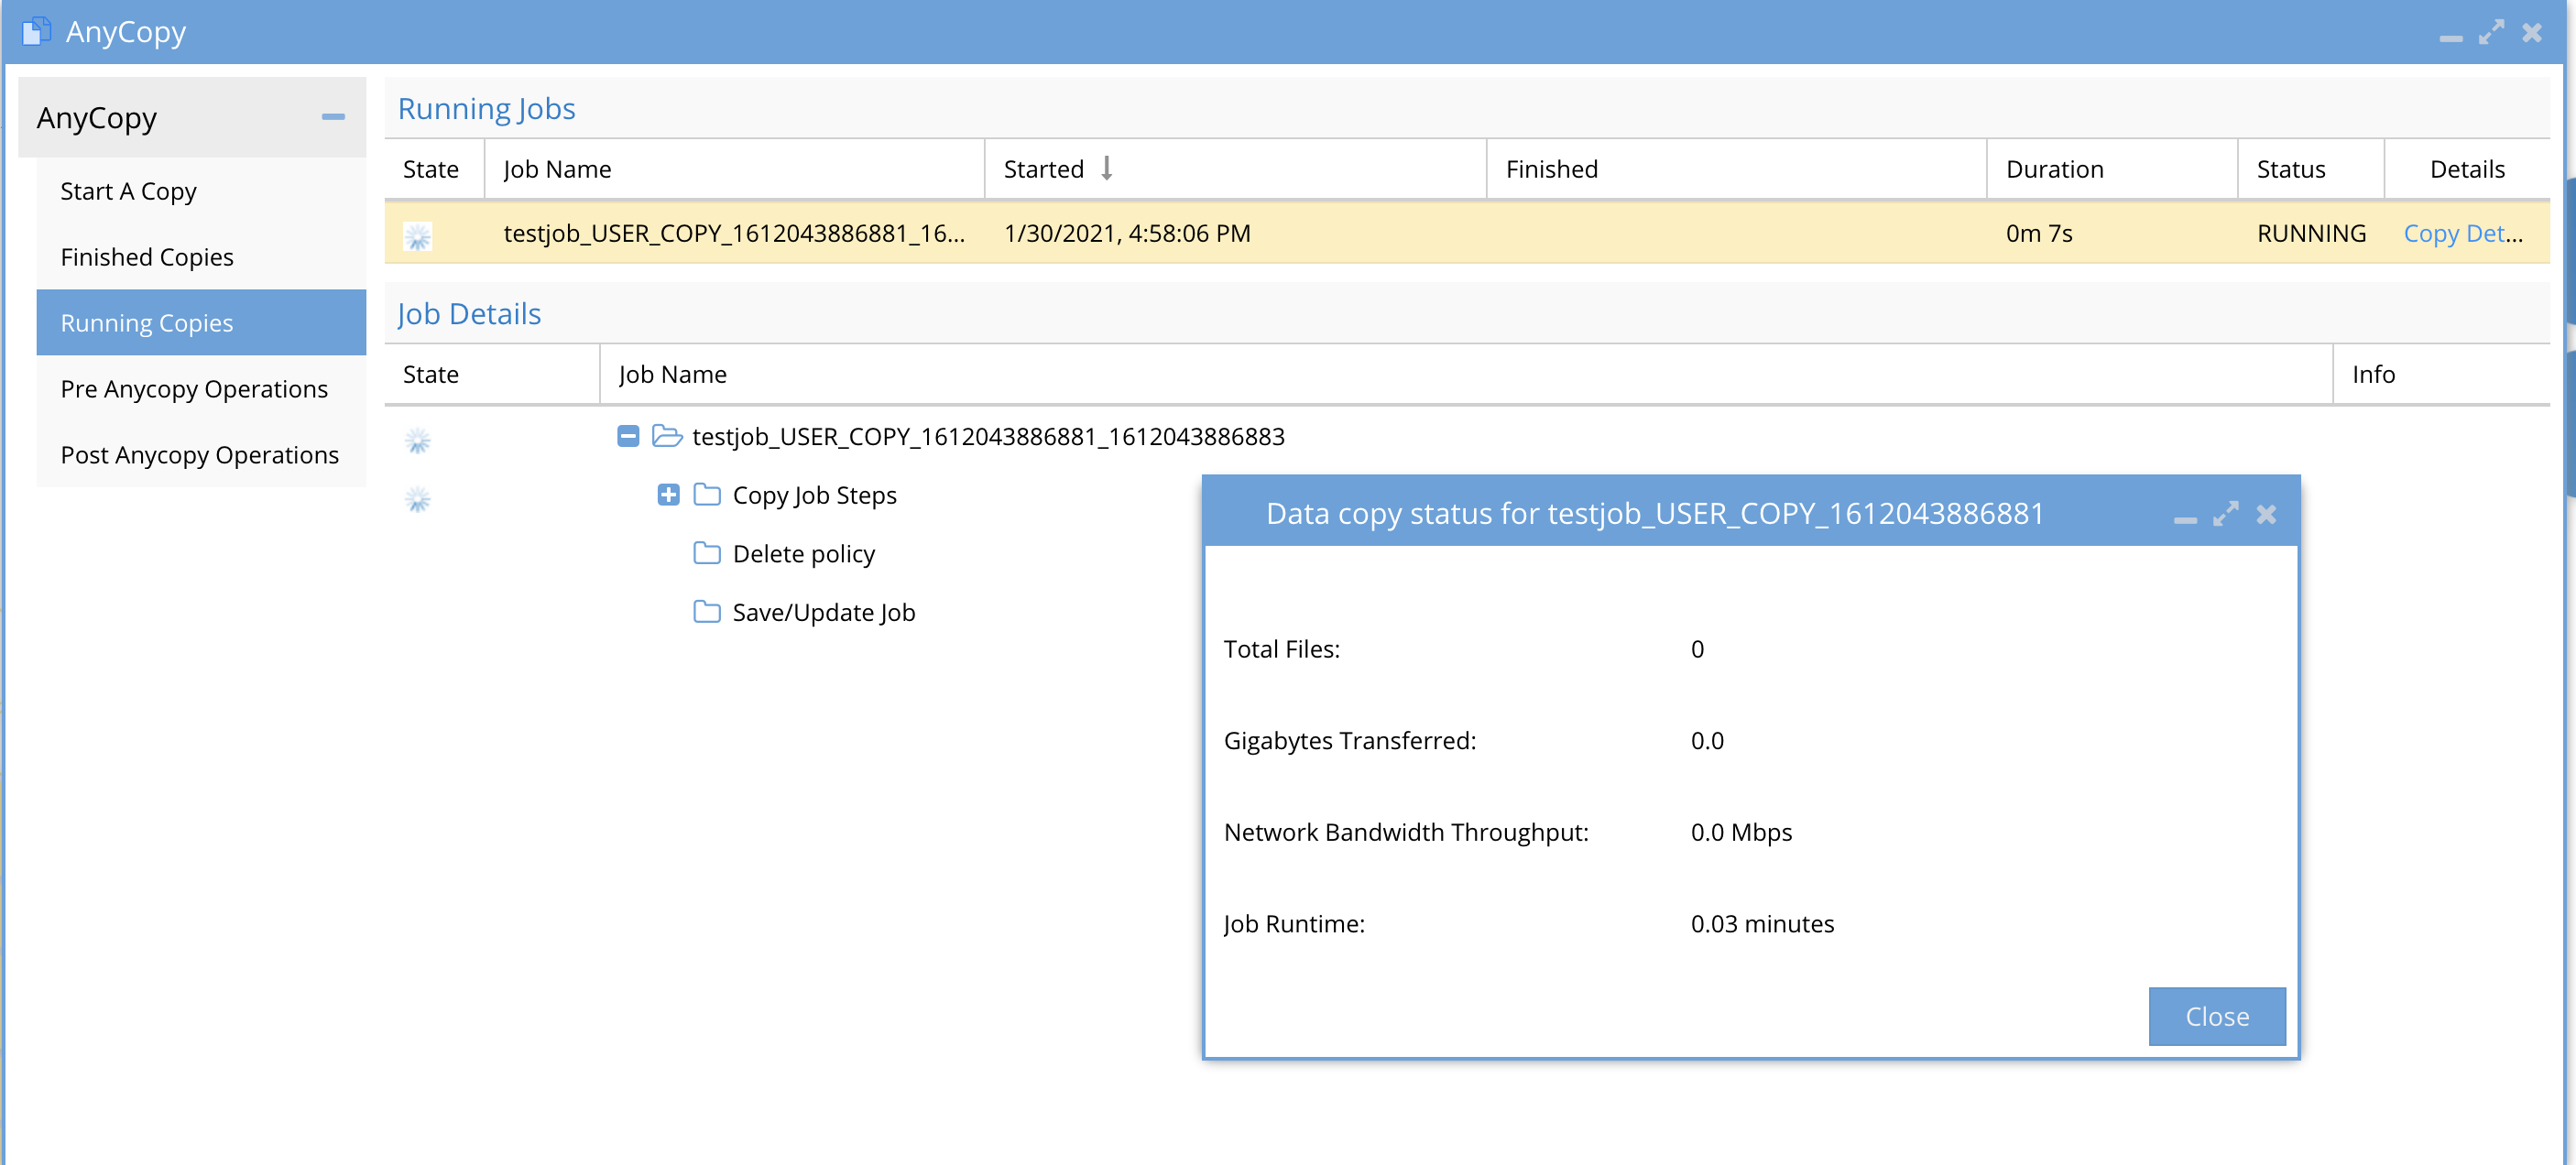
- Click no the running on the Running Copies tab to view running jobs.
- Details about the job are displayed, status and copy details.
- Clicking on Copy Details will allow monitoring real time progress, throughput and number of files copied and GB's transferred.
- The lower part of the screen shows each step the copy job is executing depending on the options that were selected.
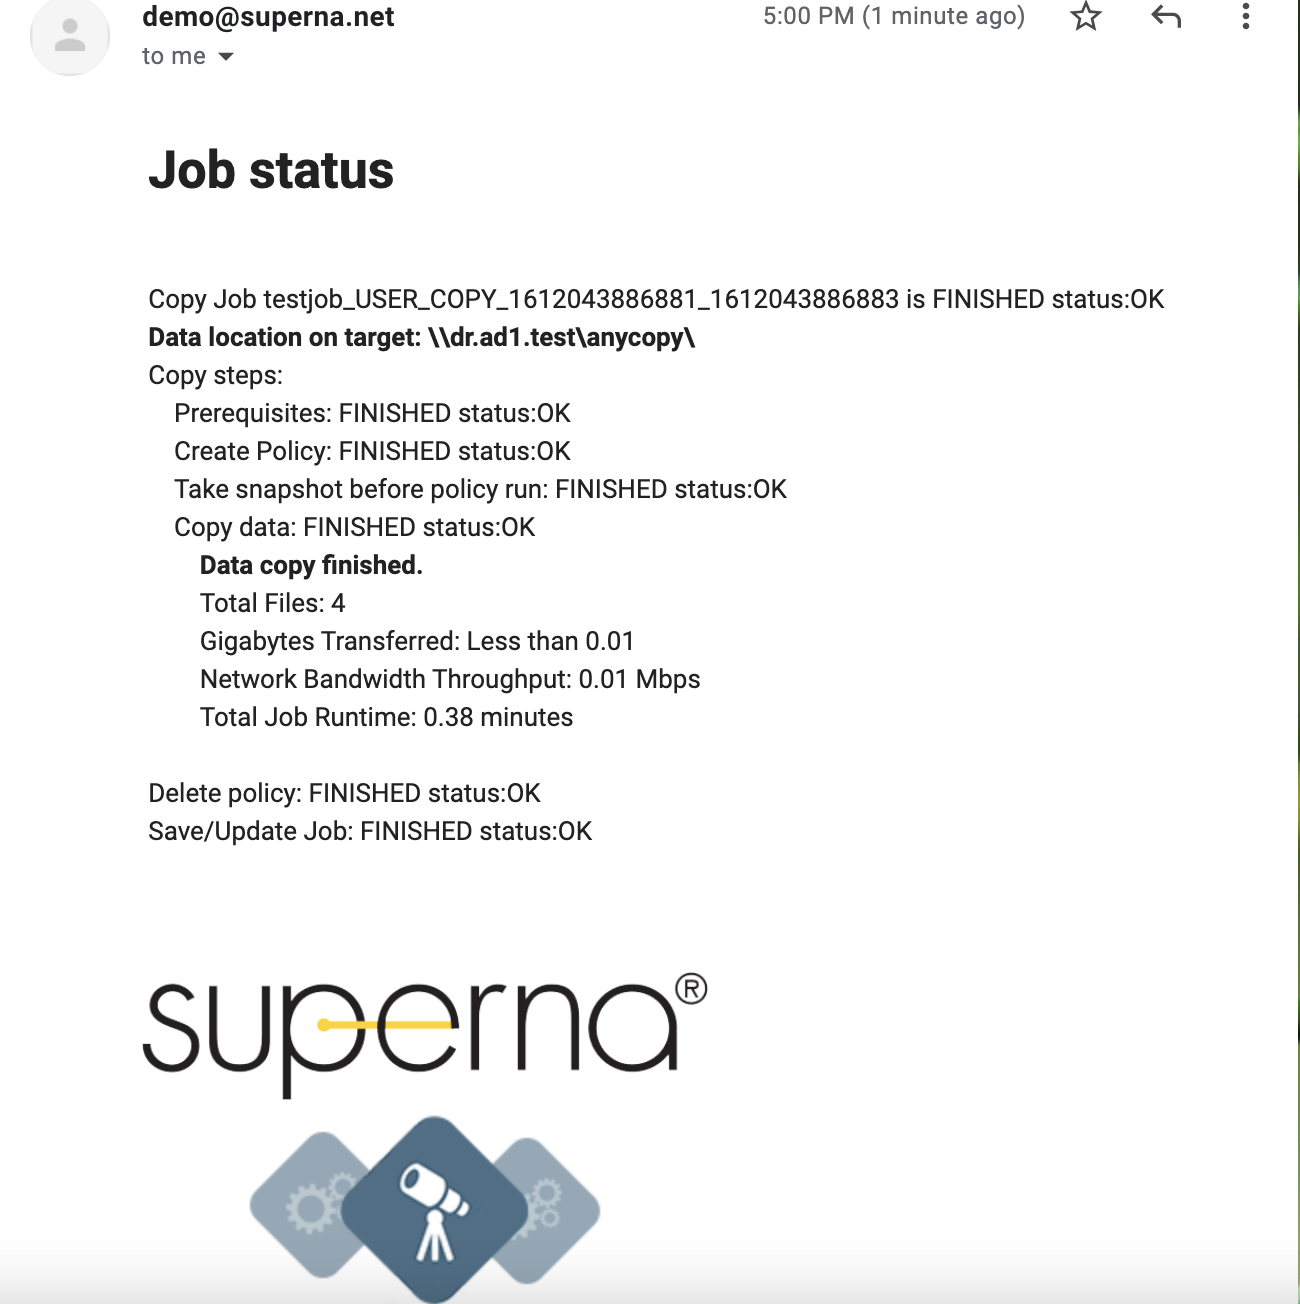
- If email notifications was enabled you will get emails showing progress of the copy jobs.
- Progress emails will be sent on the interval selected in the copy job. A final summary email that shows the total files, throughput, job duration, job details and UNC path to the target cluster SMB share is sent as per the example below.
How to View Copy Job Definitions, Job History, Job edit, Pre and Post script Assignment
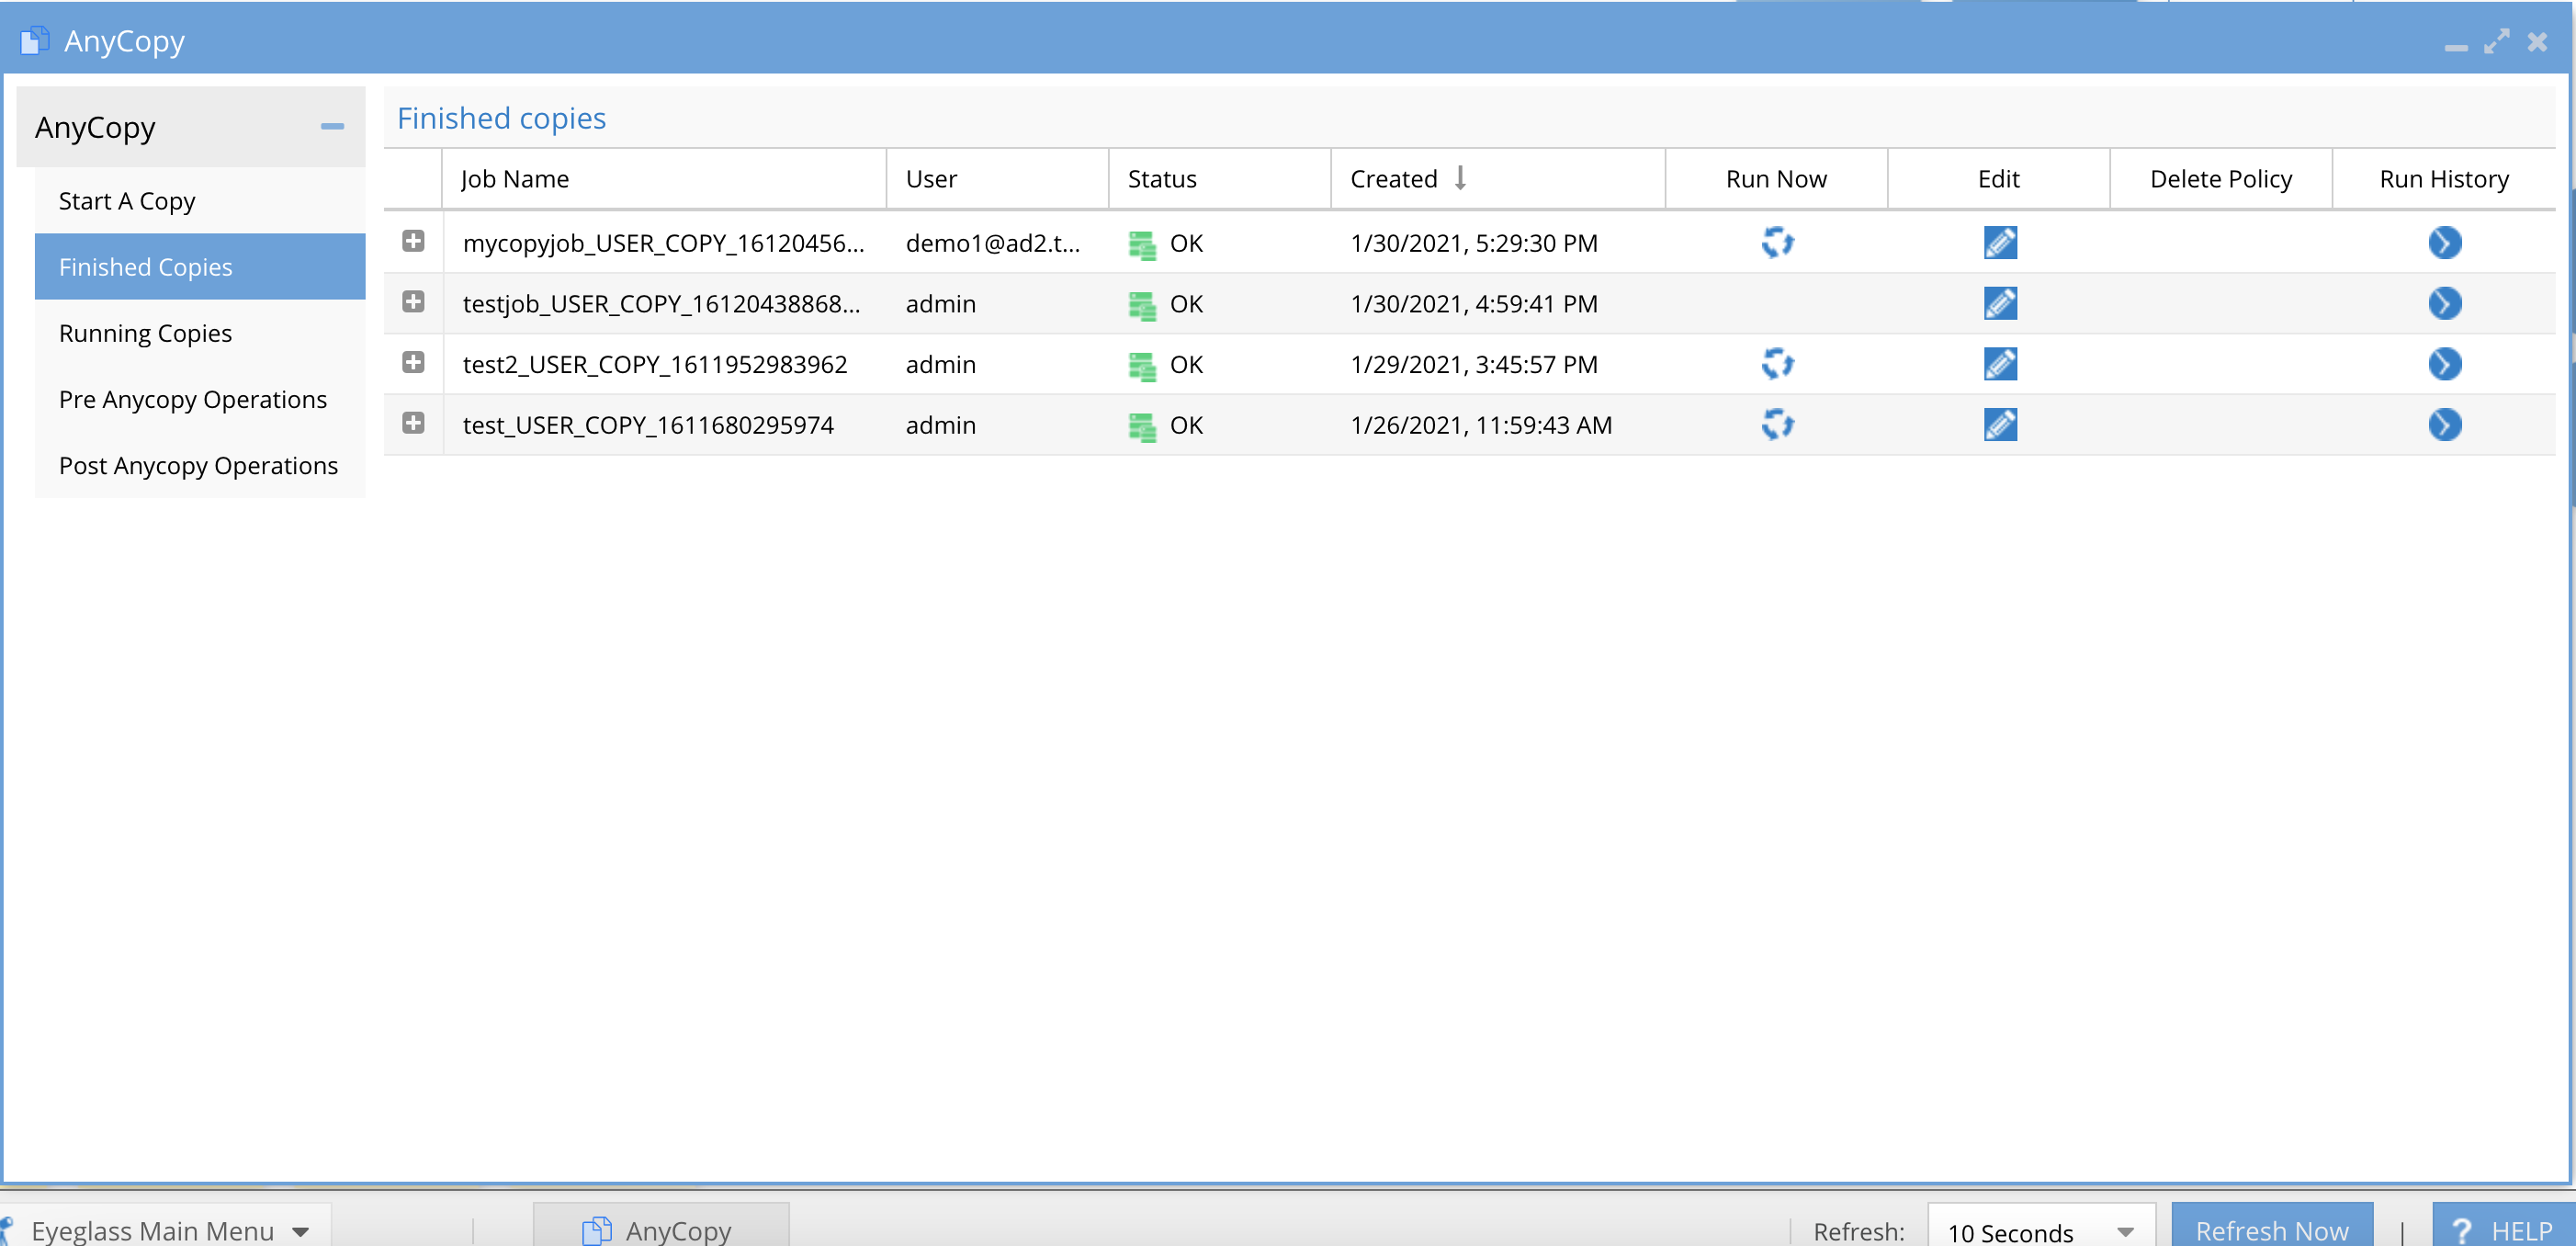
- Completed jobs and history of each job execution (scheduled or on demand run now) are accessible from the Finished Jobs tab. This page explains all the controls for jobs after they have run at least once.
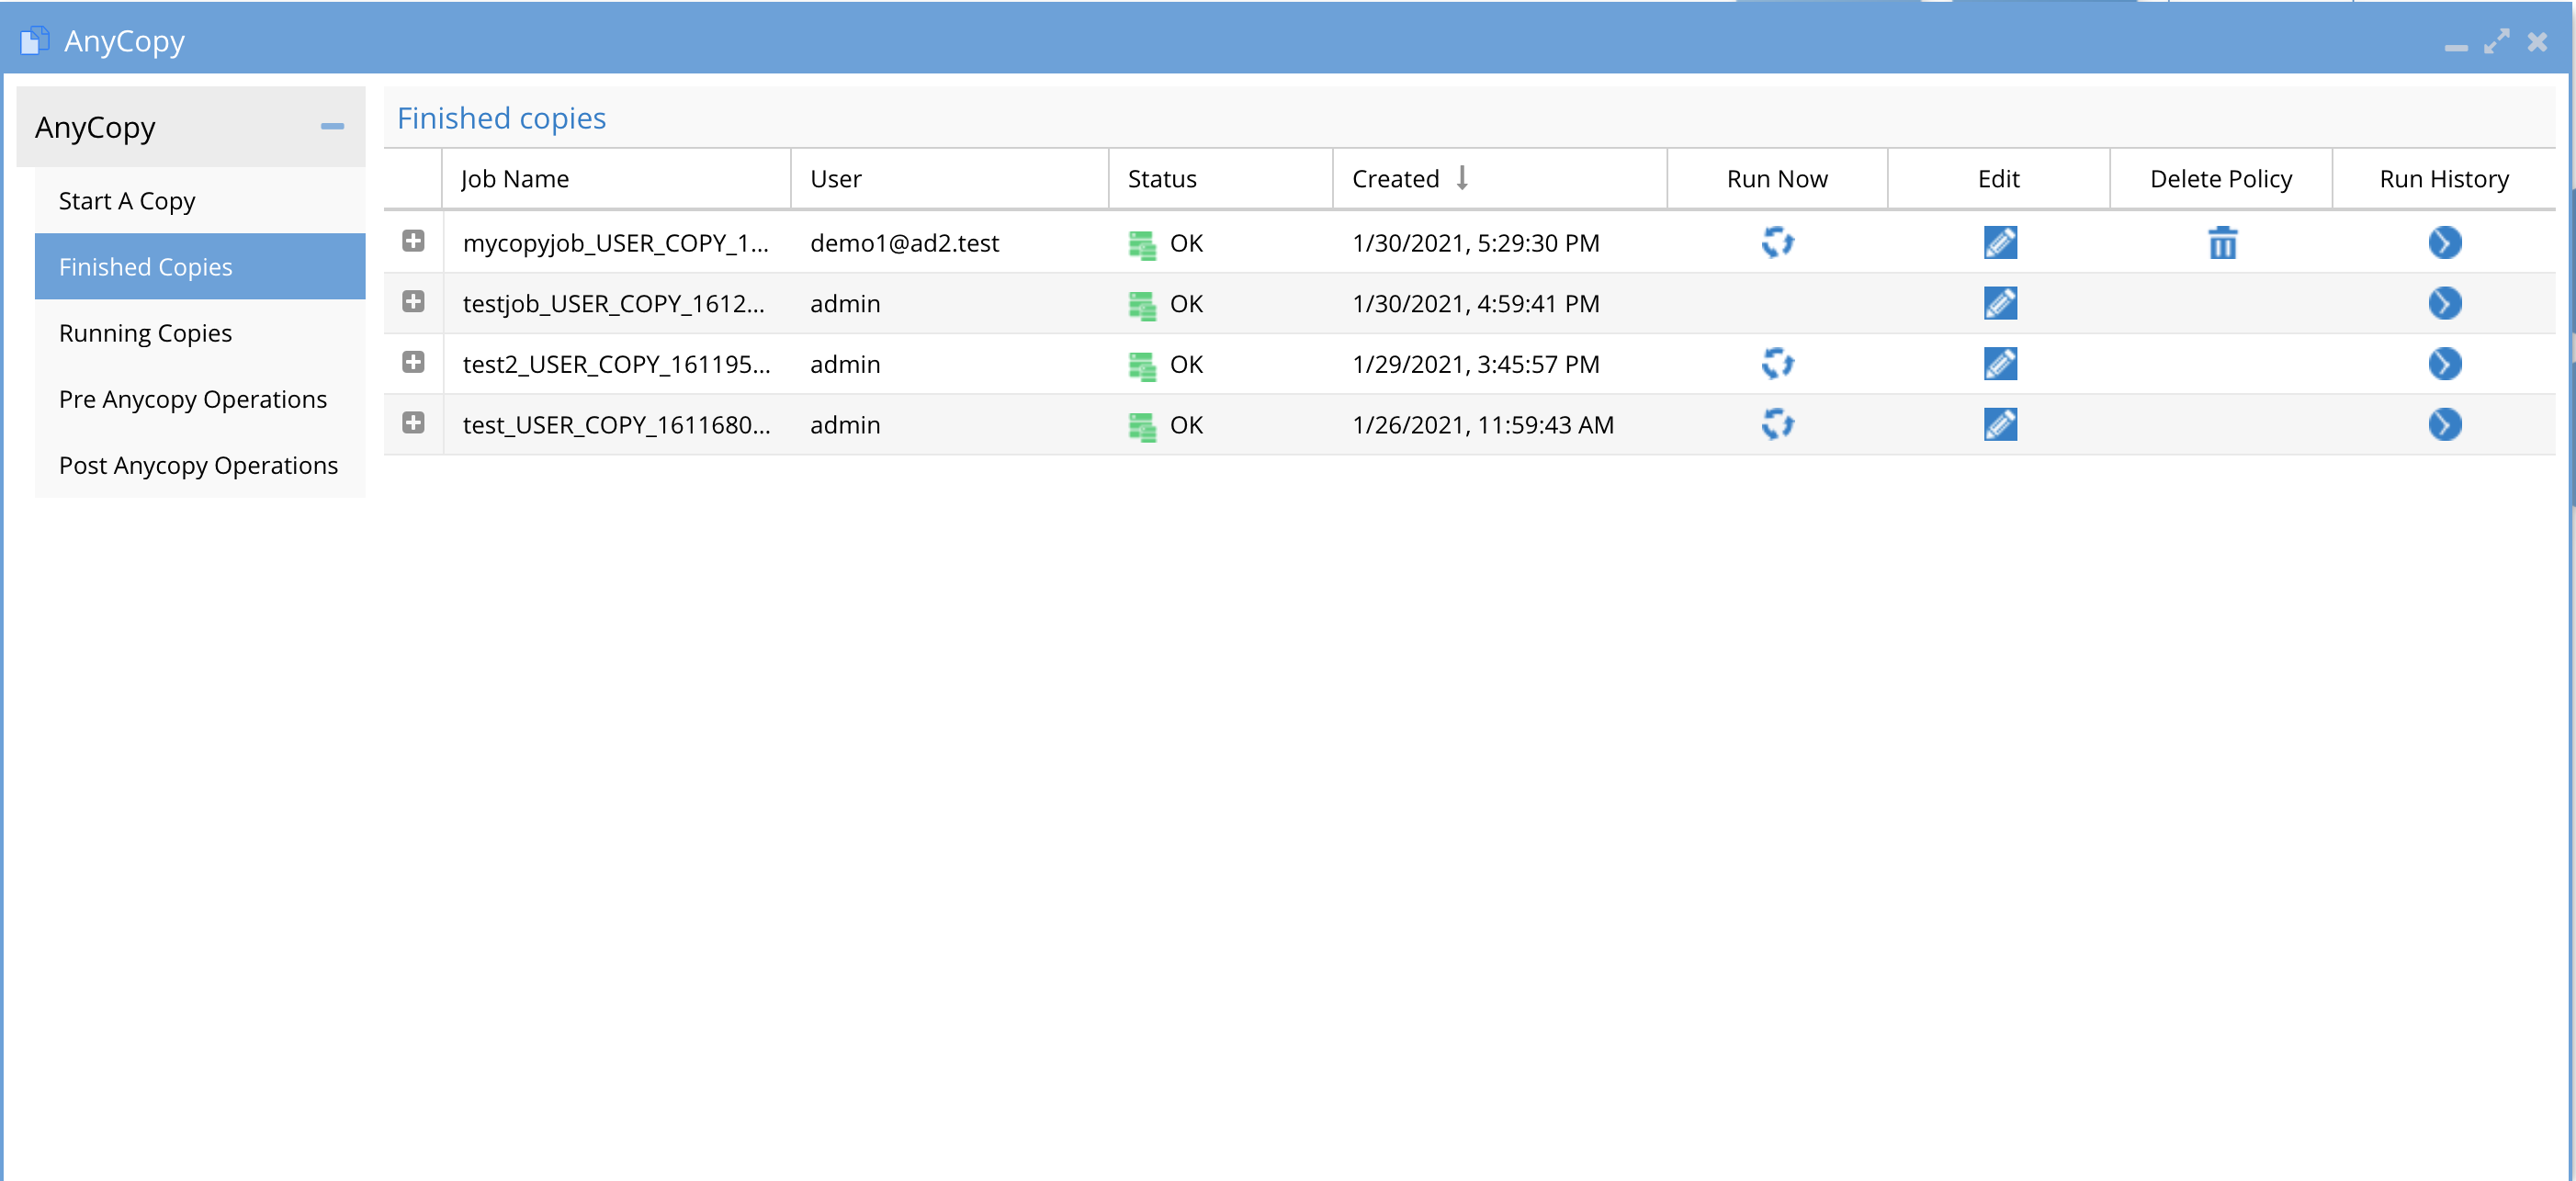
- Column Definitions
- Job name - this column is the name of the job entered by the user
- User - This column lists the user name of the logged in user that created the job.
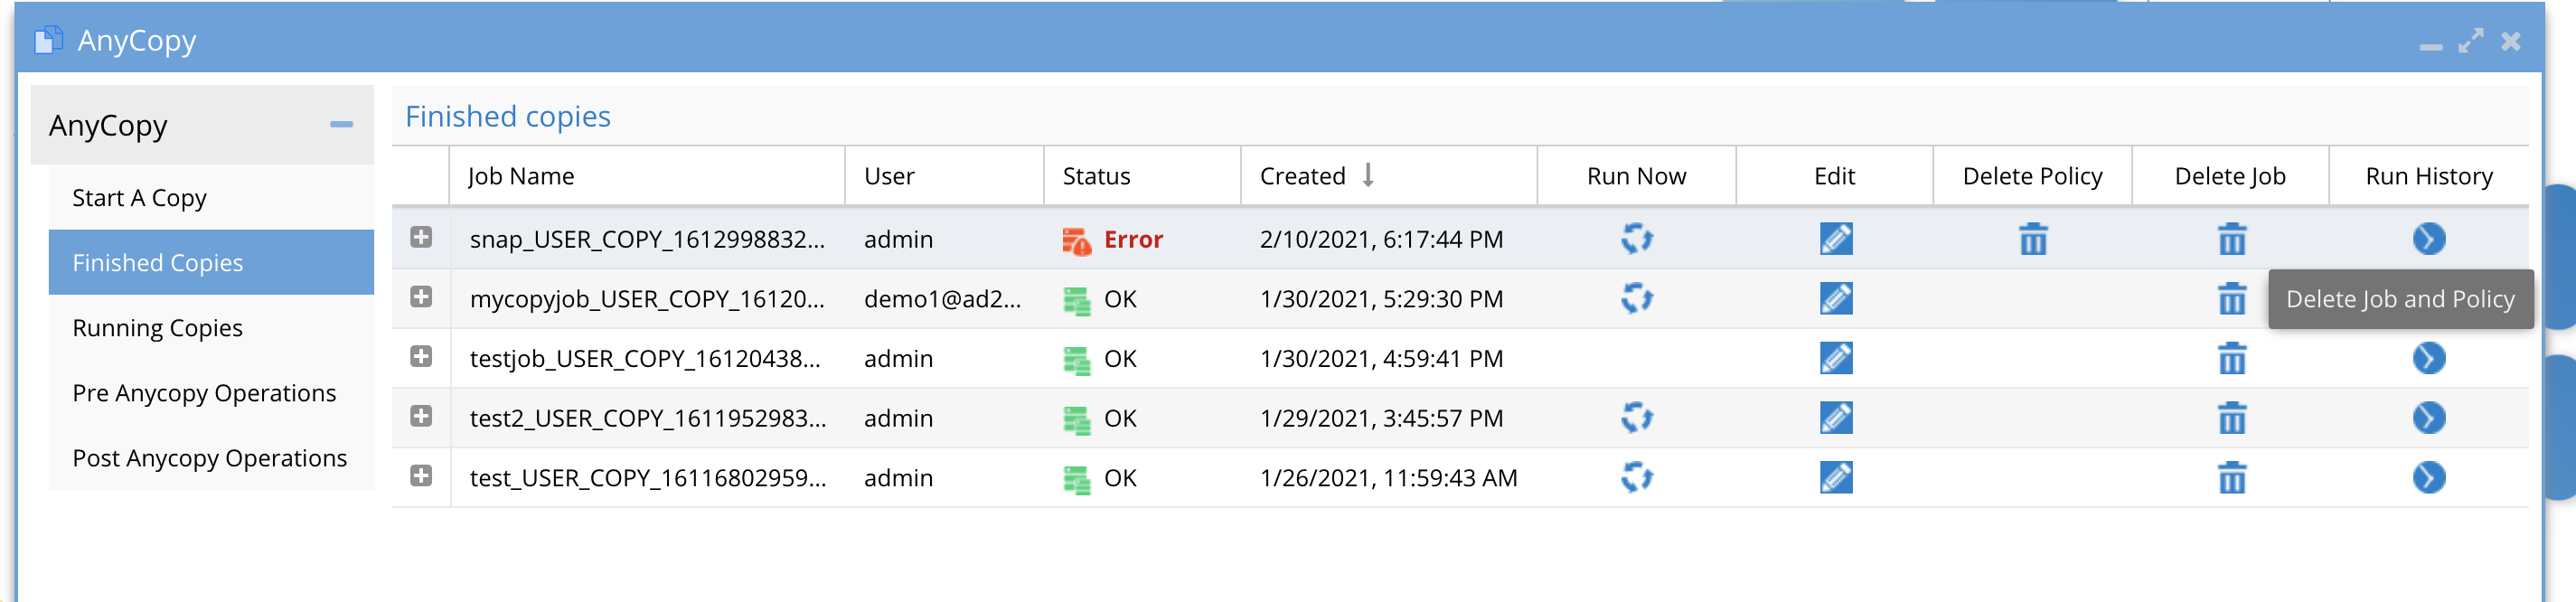
- NOTE: Users can only see jobs they created. Administrator role in AnyCopy can see all jobs created by all users as per the screenshot below.
- Status - This indicates if the copy job completed successfully without error and will show OK or a red error.
- Created - This is the date and time the copy job was created.
- Run Now - This column will show an icon only if the Schedule policy option was enabled, which will leave the policy on the source cluster after the copy finishes. Pressing the run now option will start the job again based on its defined settings.
- Any job without the icon, indicates the synciq policy was deleted and the job cannot be run on demand.
- NOTE: If the job definition is edited to allow scheduling, then the run now icon will still show the icon and running the job will automatically recreate a new SyncIQ policy if it was previously deleted based on the job definition settings.
- Edit - This opens a dialog box to allow editing the job definition and re-saving it, this is also where the job schedule is configured. The edit options are the same as the job create settings user interface. Make any needed changes and click Save job Configuration button.
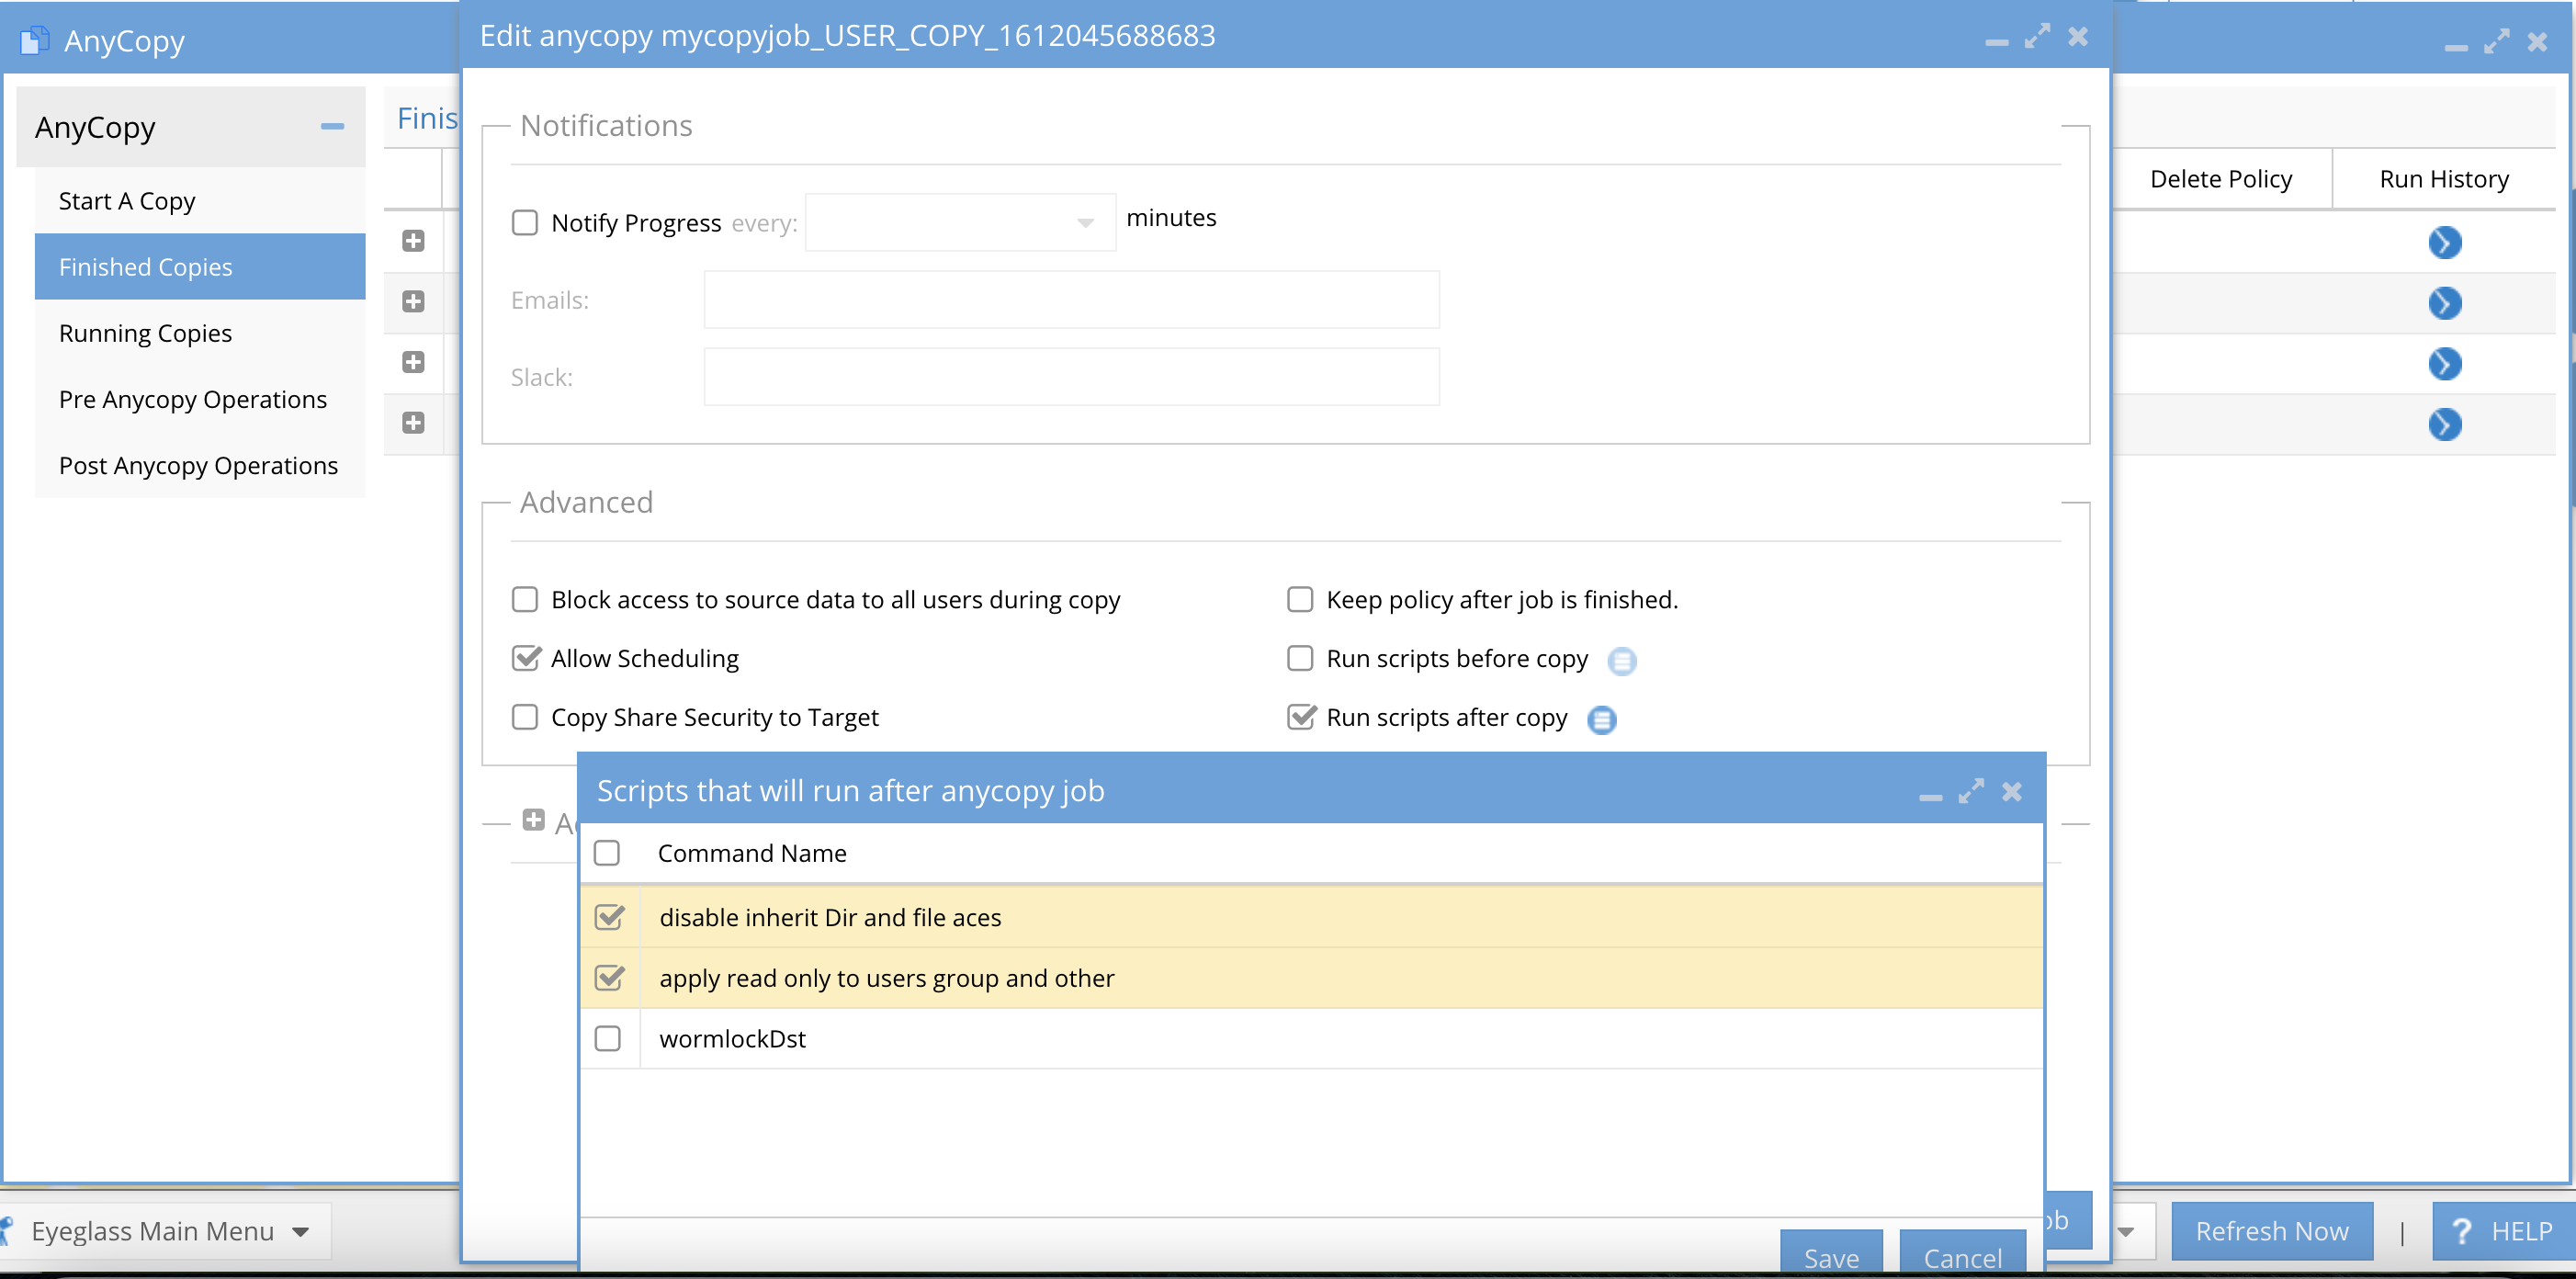
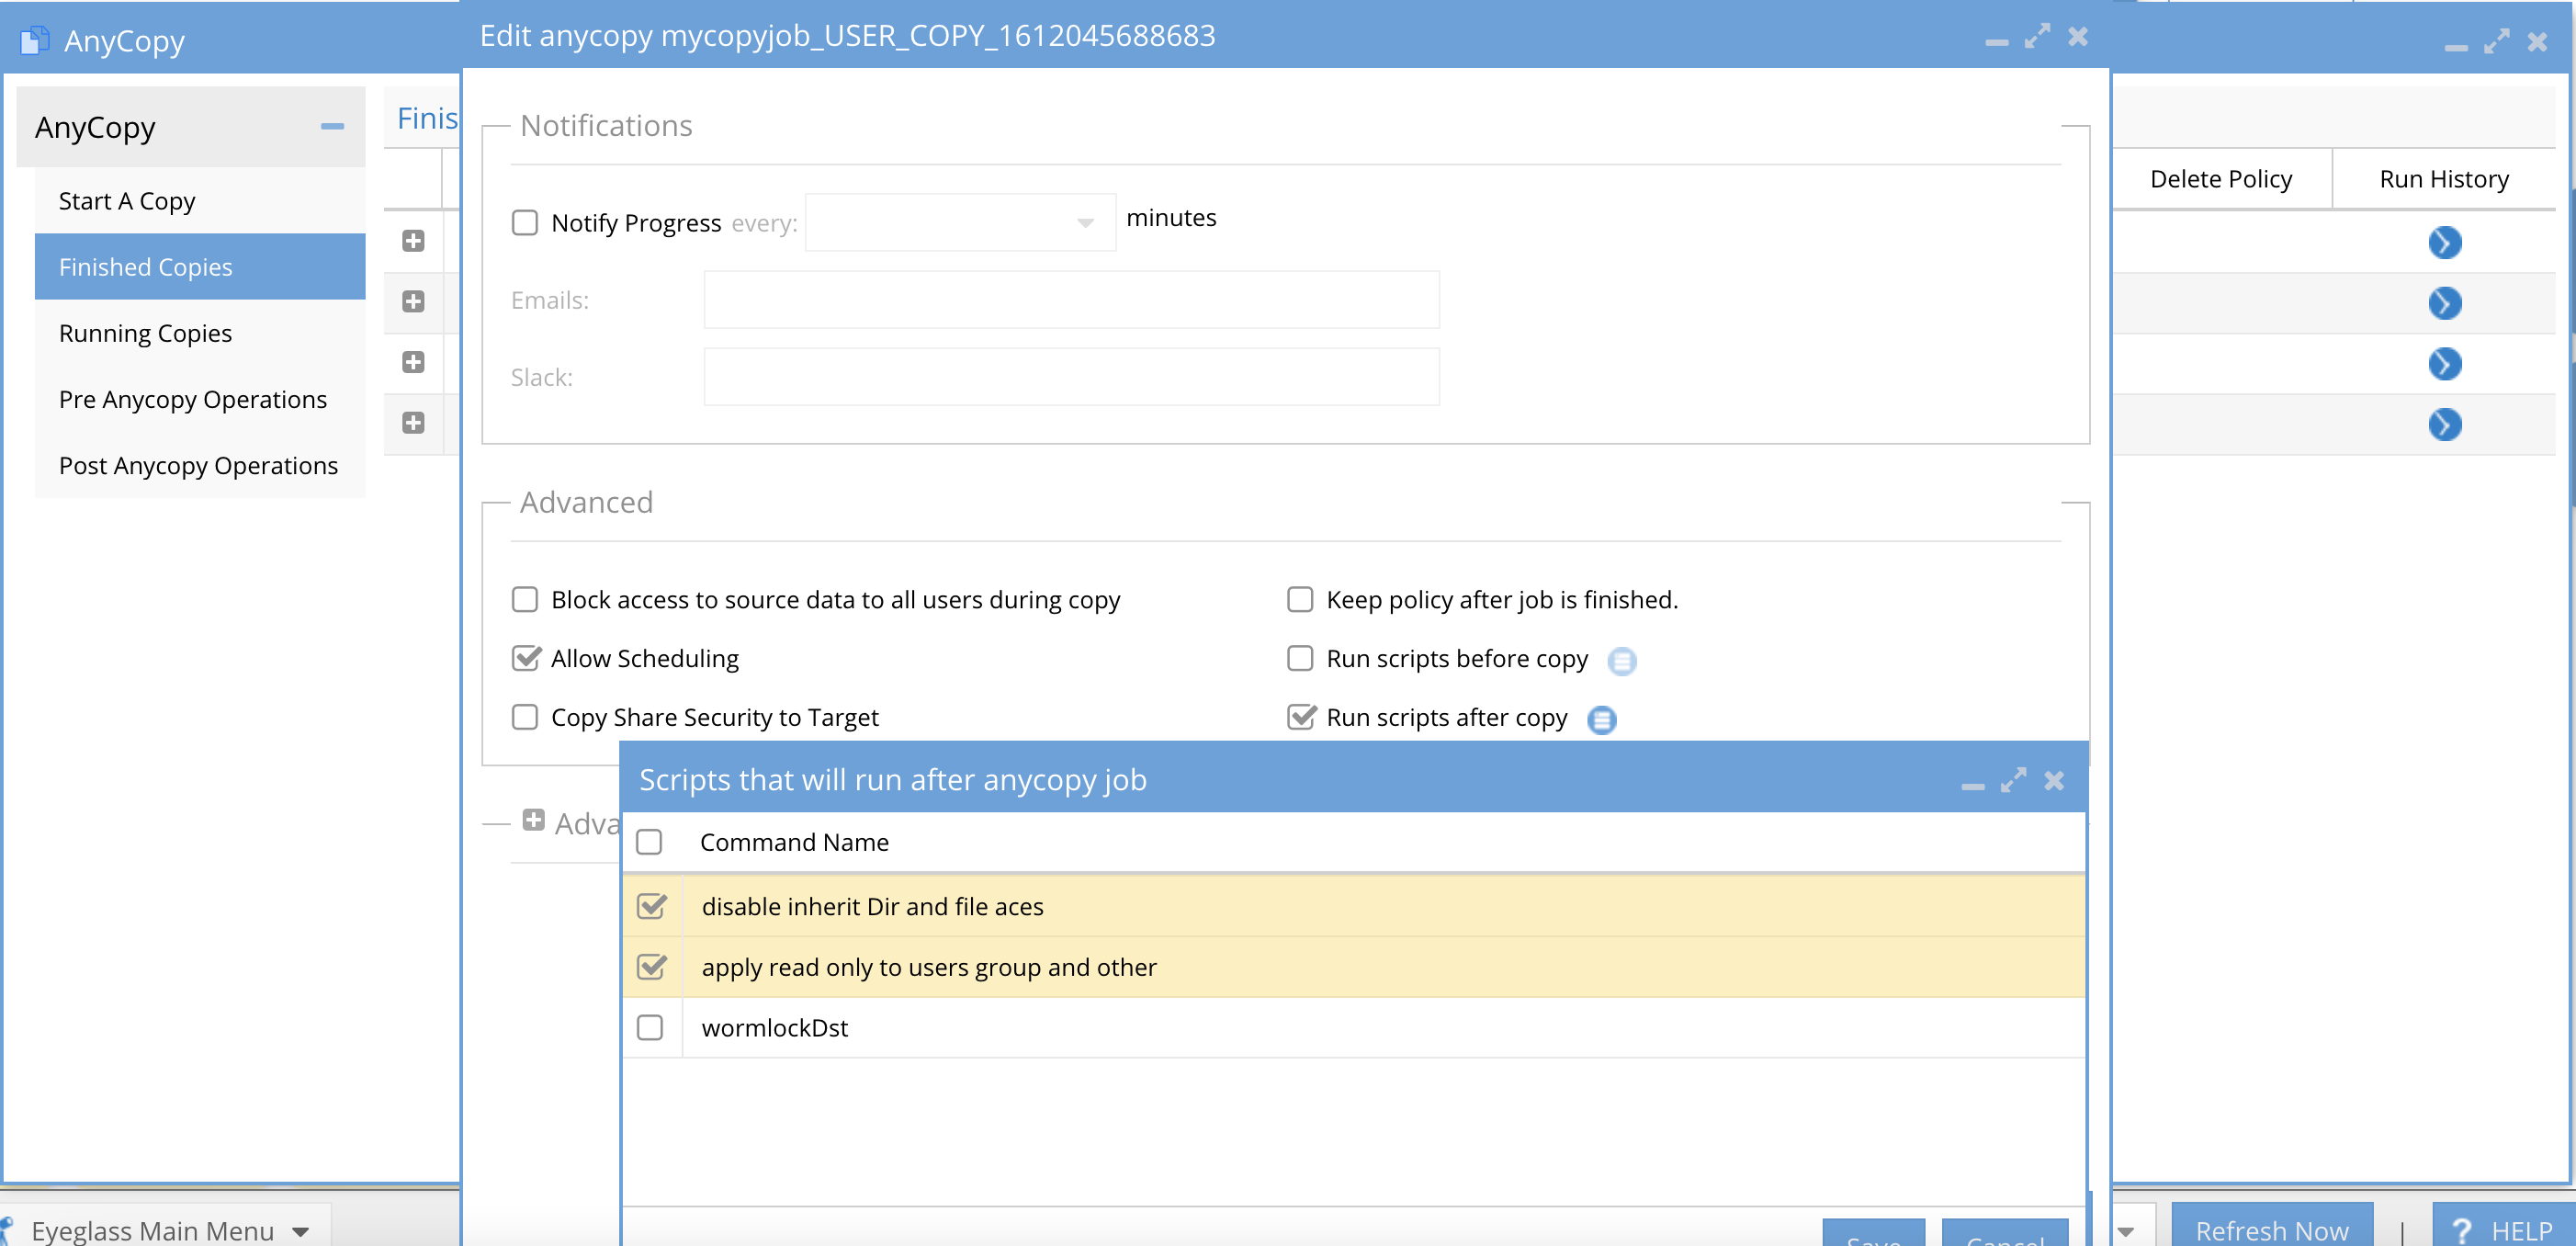
- On the edit page the option to select pre or post job operations check box(s) . Selecting either pre or post and the icon next to the option will provide selection of operation labels configured by your administrator.
- Delete Policy - This column will show a trash can icon only if the policy was left behind and still exists on the cluster.
- Pressing this icon will immediately delete the synciq policy from the cluster and will display a confirmation box that this will be updated in inventory after the next schedule inventory job completes.
- After the next scheduled configuration inventory job runs in Eyeglass the trash can icon will disappear.
- Running the on demand option will recreate the SyncIQ policy again.
- Run History - Each execution of a job via a schedule or on demand run now will create a run history with the date and time the job was run and 2 columns with each one providing access to logs.
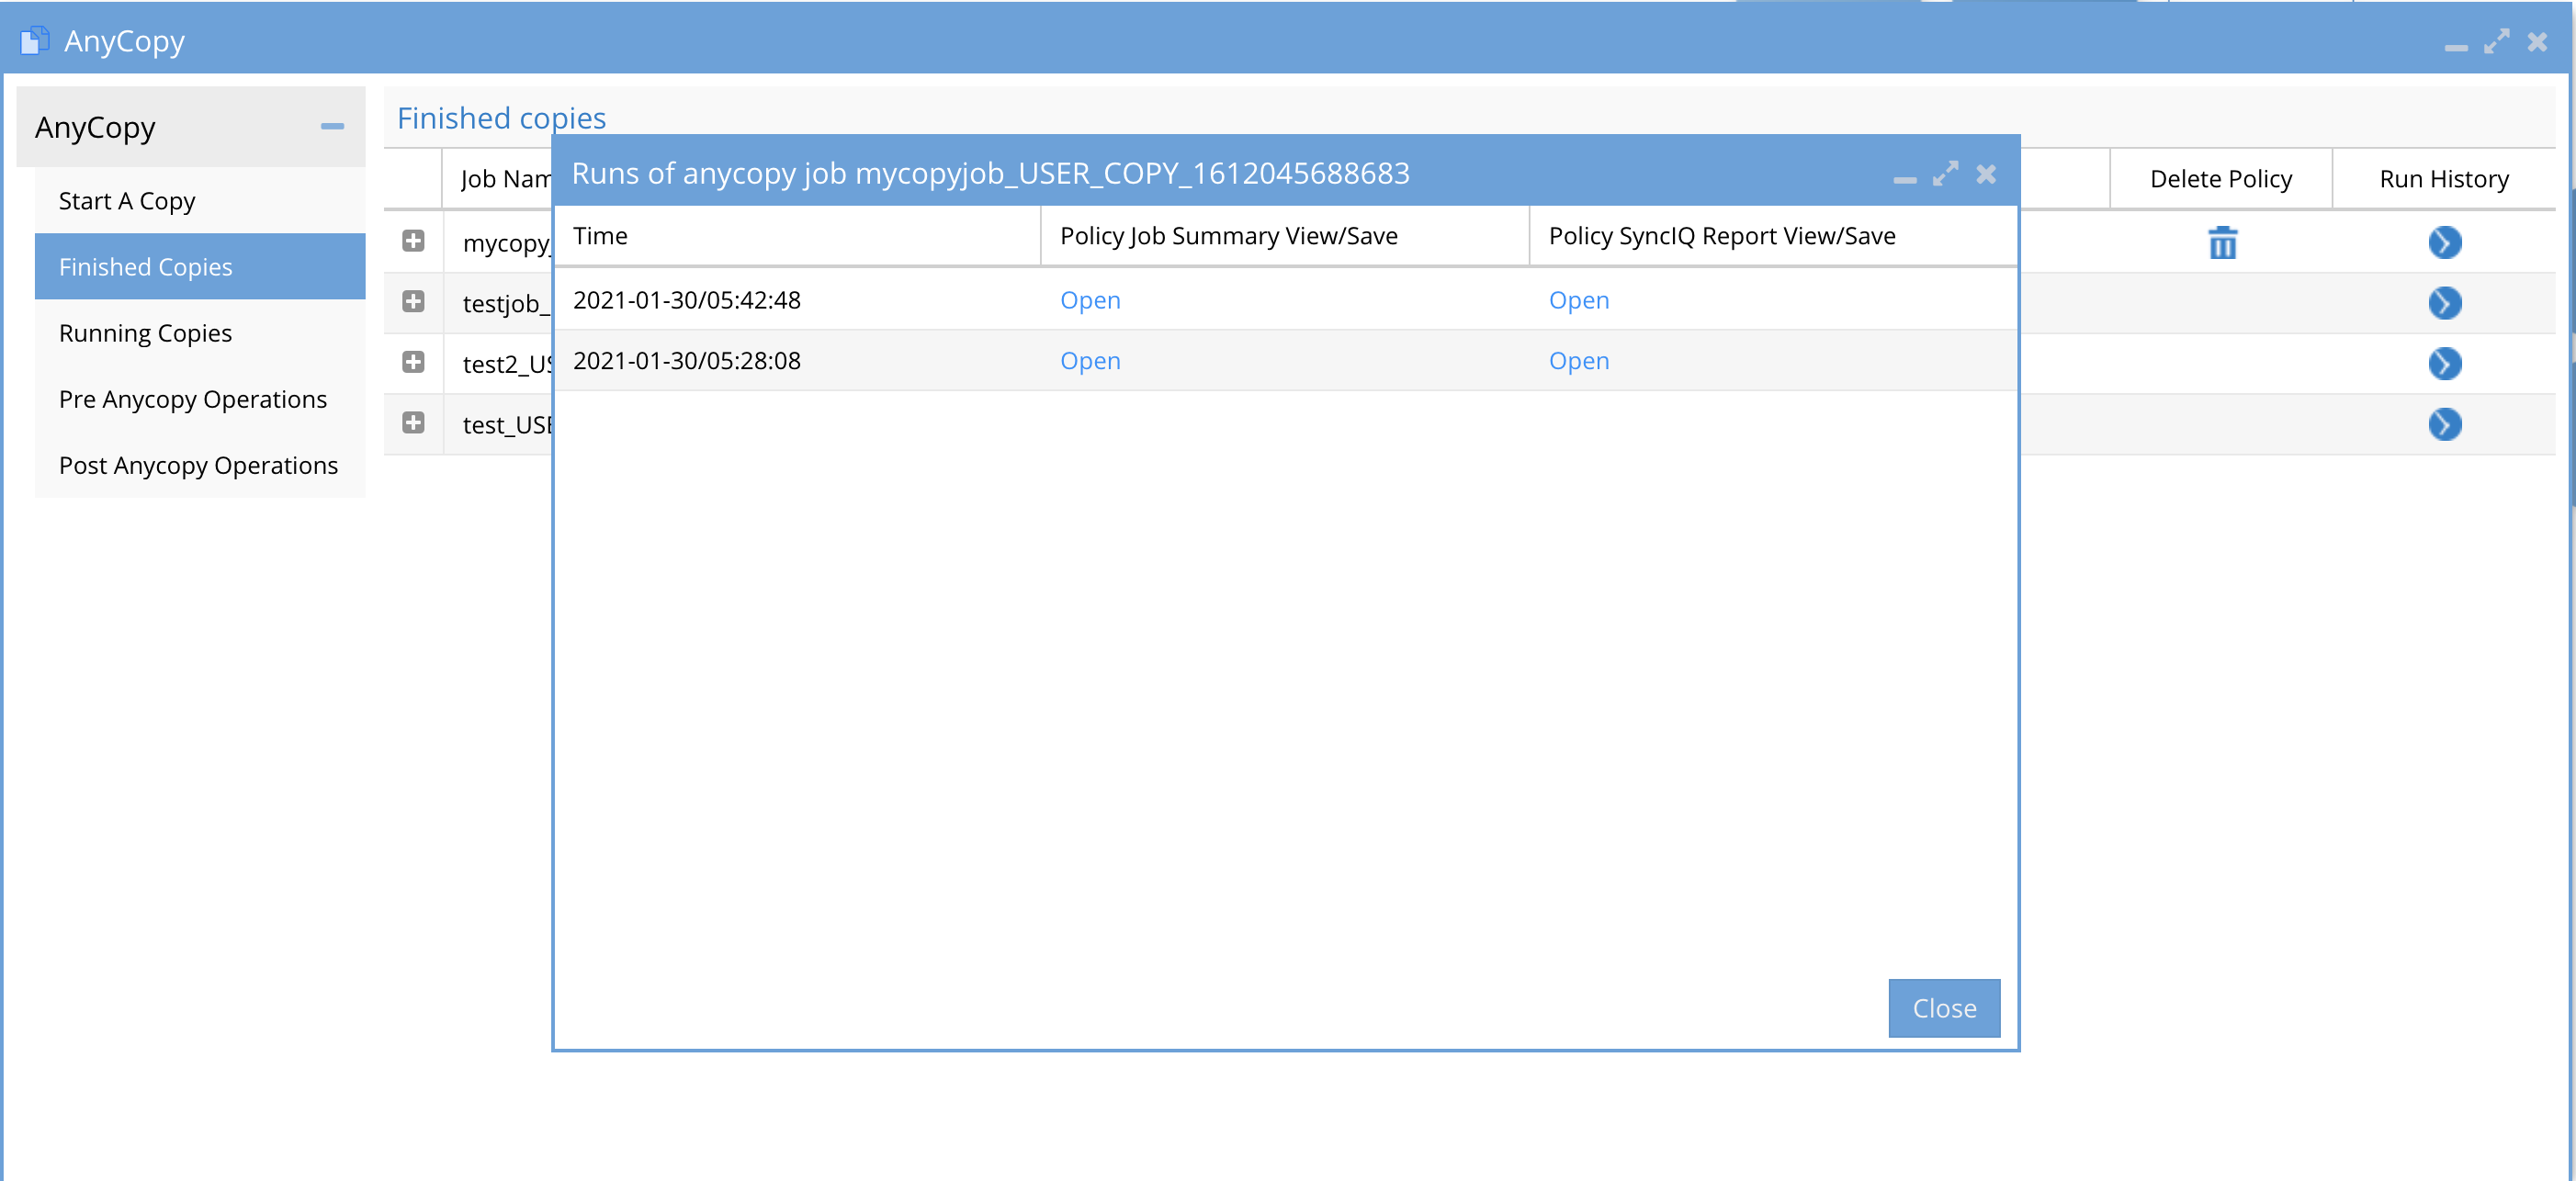
- Time - Shows the date and time of each job execution
- Policy Job Summary - will provide an audit log that lists all files copied to the target folder path.
- This file list is created using the Isilon changelist feature, where a snapshot is taken on the target path before the copy is started. After the copy is finished a 2nd snapshot is taken and the cluster API provides the differences which is the file list.
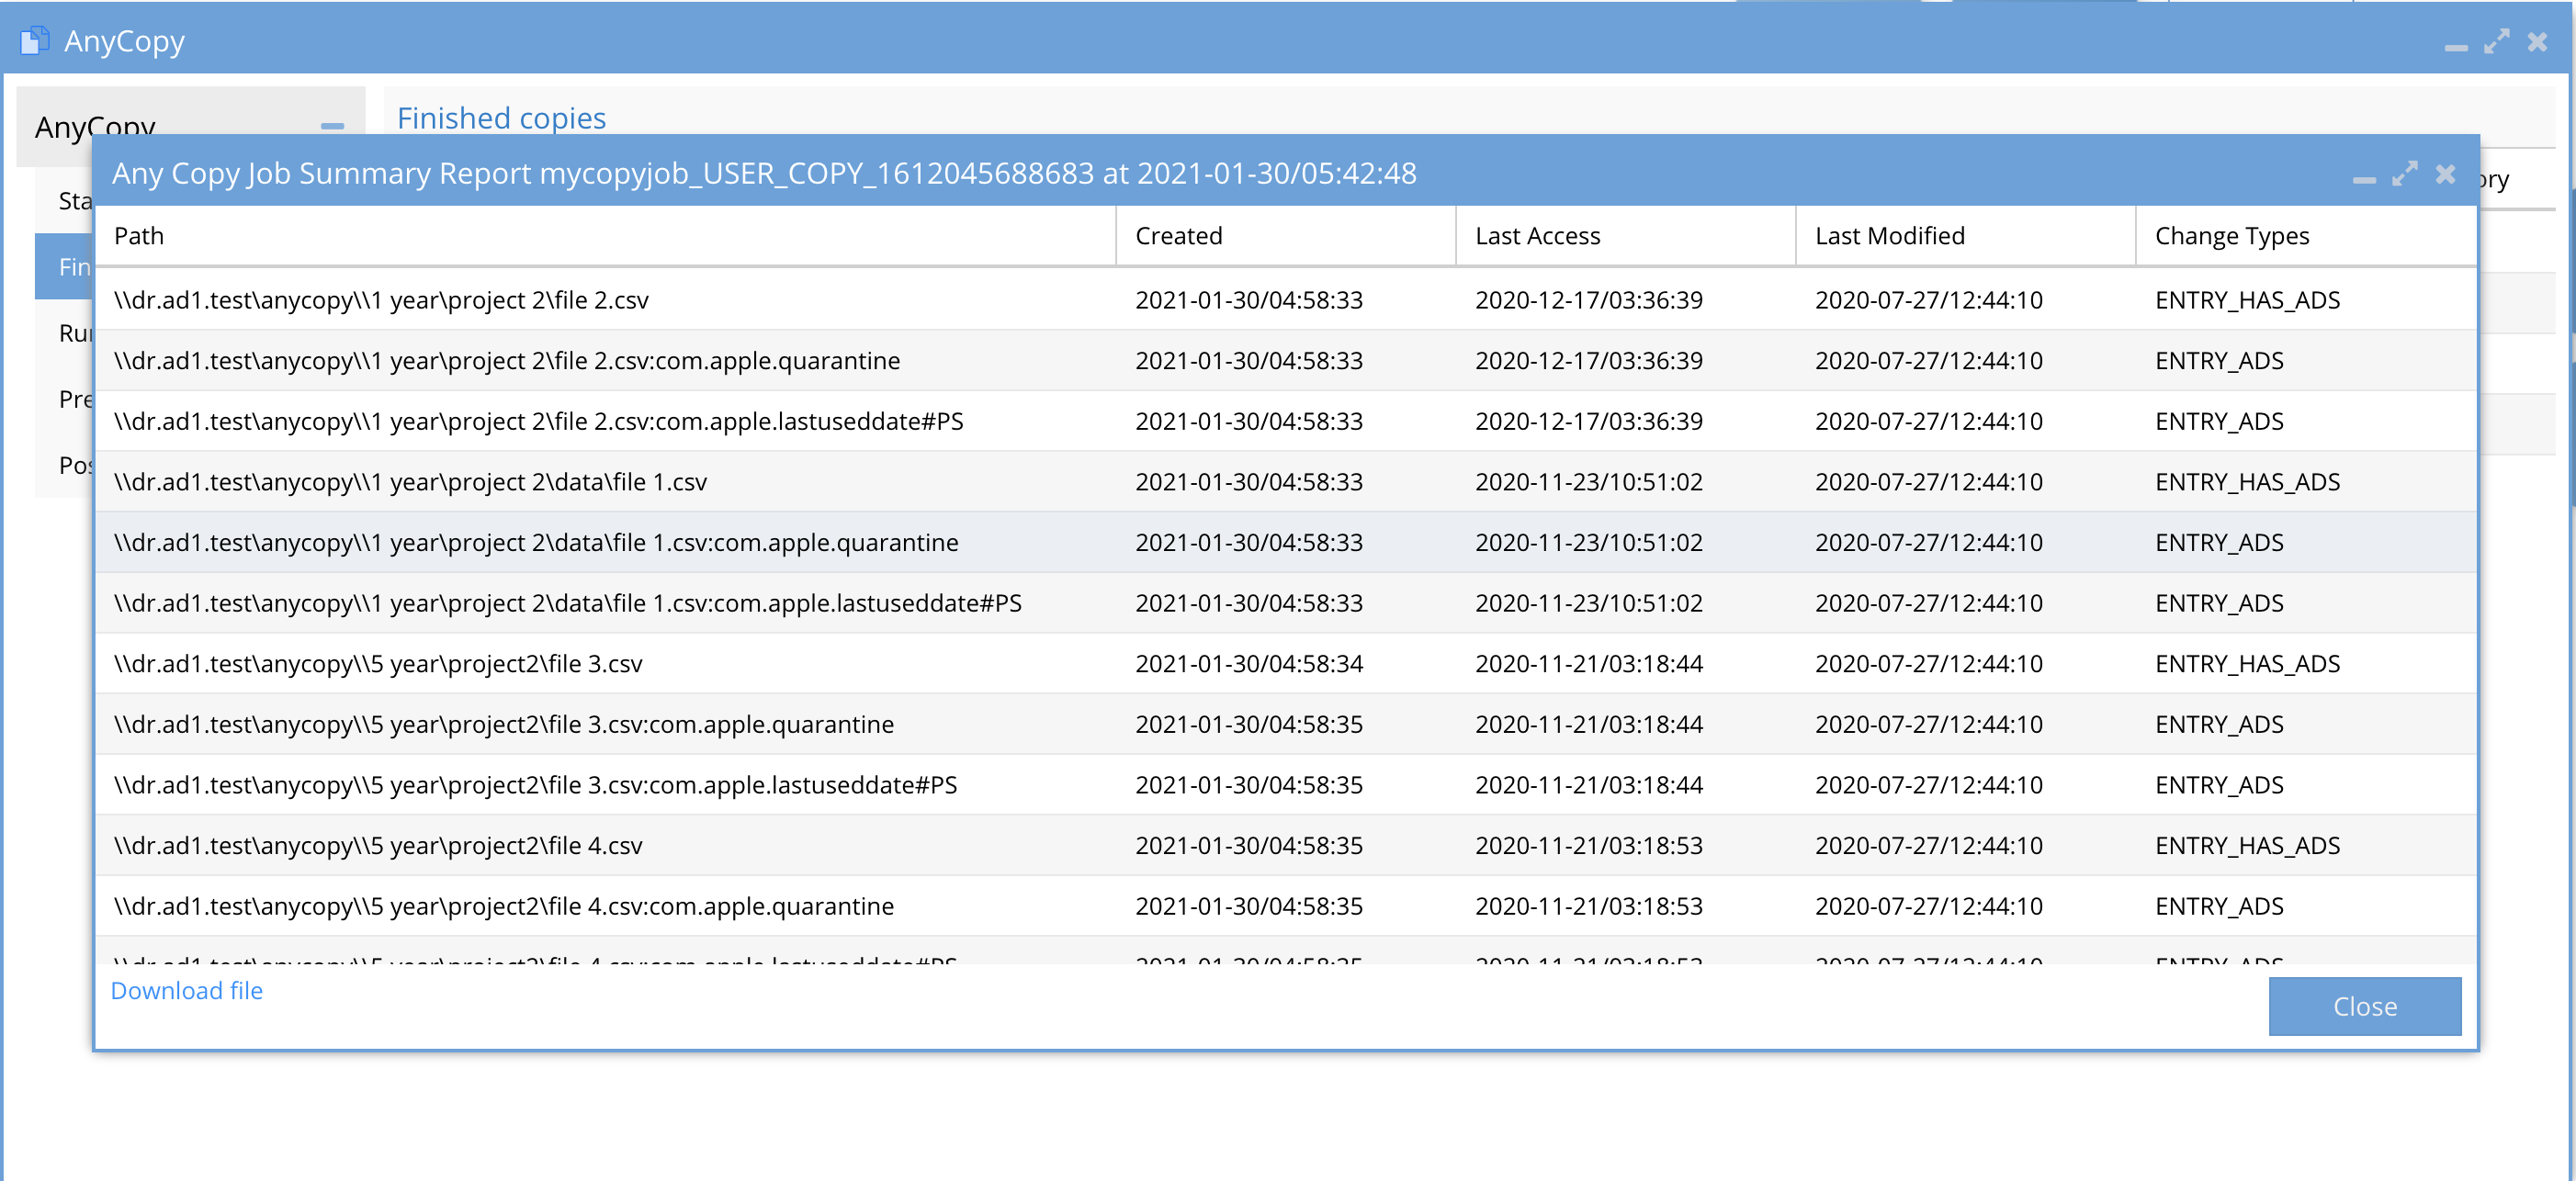
- The file list is provided as UNC path to the files using \\smartconnect name\SMB share name\path to file.
- Date Stamps of the files - created, modified, last accessed
- Action taken - Entry ADS means file was added to the target folder.
- Option to download this file to a CSV is available at the bottom of the window.
- Policy SyncIQ Report - This shows the diagnostic log captured from SyncIQ that is useful for support debugging or to align the SyncIQ job settings used on the SyncIQ policy. It can also be used with Dell support if errors occur.
- The file also has a download to txt file option in the UI.
How to Copy to Multiple targets - Content Distribution One to Many
- Requirements: 2.5.7 update 1
- When creating a new job definition simply click in the target drop down arrow to add additional targets. Each target can be the same as the source cluster or a different cluster or any combination of local and remote targets.
- This allows copying data to multiple shares on the same cluster or to remote clusters or both.

- Fill in the remaining job definitions as normal including the option to schedule this copy job on an interval.
How to Edit a Copy Job Definition
- NOTE: A copy job must run once before you can edit the configuration.
- NOTE: An administrator can edit other user jobs. Users can only edit job definitions they created themselves.
- Click the Finished Jobs tab
- Click the edit icon for the job you want to edit the configuration.
How to Schedule a Copy Job
- Requires 2.5.7 update 1
- NOTE: An administrator can edit other user jobs. Users can only edit job definitions they created themselves.
- When creating a new job definition Click the Allow Scheduling checkbox and set the interval. You can also uncheck keep policy after job is finished. This will delete and create the synciq policy each time the job is scheduled. This is useful if the target directory contains data that you want to write to in-between copy jobs.
- Complete the filling in the job details.
- To edit the schedule at a later time, follow the How to edit a job definition in this guide.
How to Review a Copy Job Definition
- From the Finished Jobs tab the list of jobs shows columns as described above. To review the configuration summary of a job definition. Click the + sign to expand the job details.
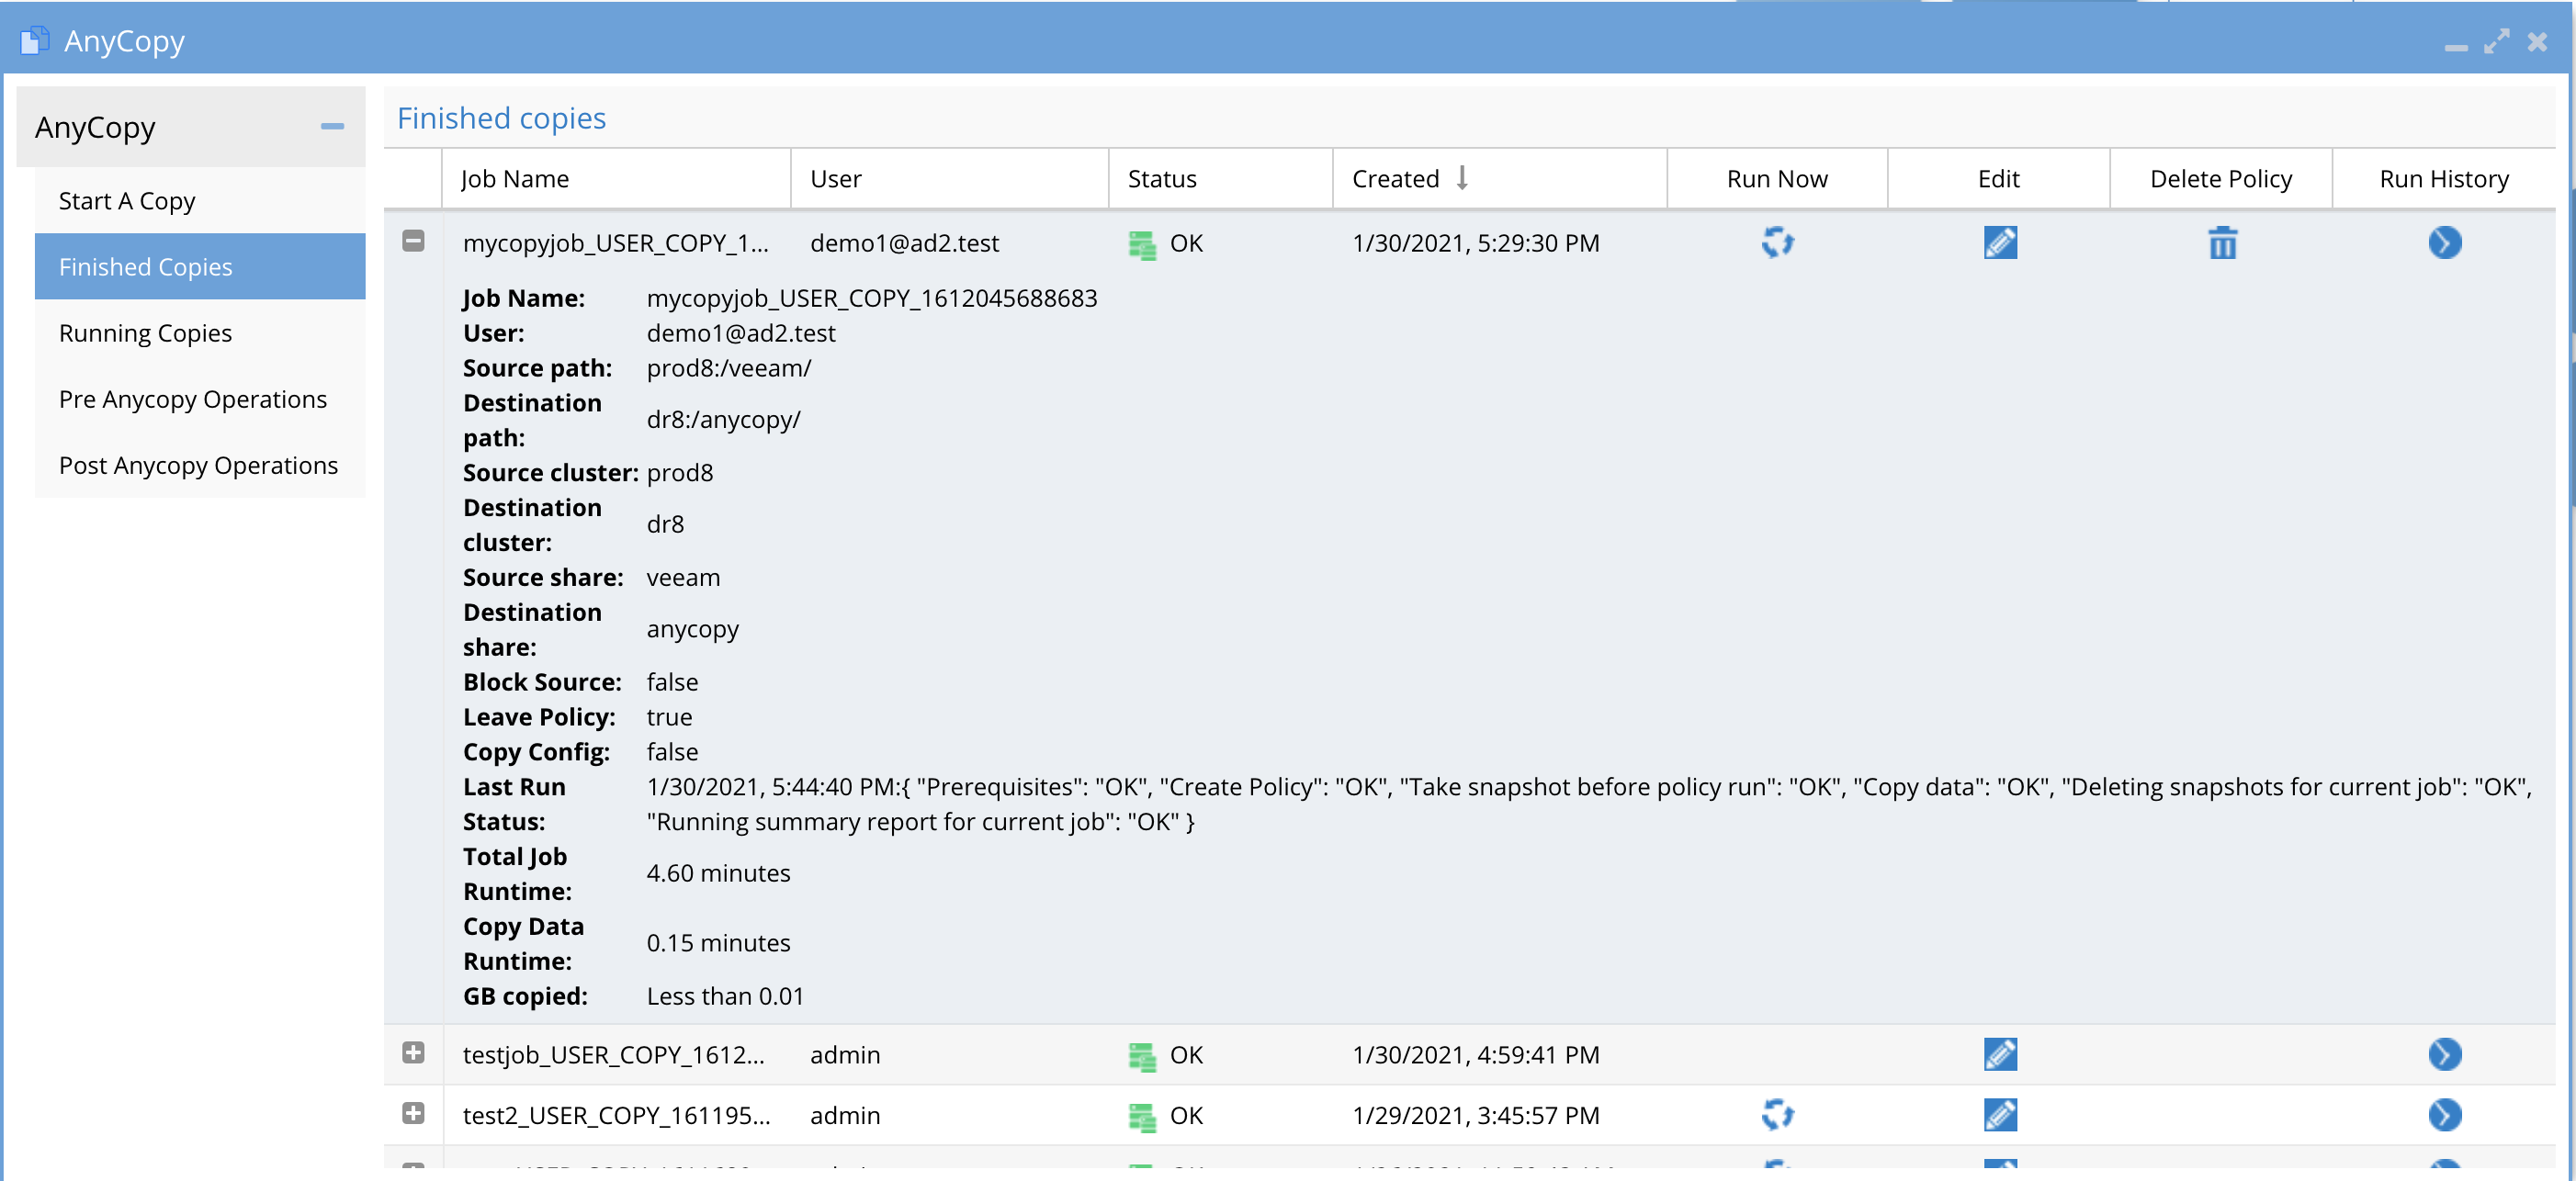
- The options will match the Job configuration or edit screen and are summarized on this screen.
- The screen also shows the "Last run" details and summarizes if the last run was successful, the job run time, and GB copied. This provides a quick way to see when the last job ran and the details without using the job history view.
How to Delete a Job from the Finished Jobs Tab
- Open the AnyCopy Icon
- Click the finished job tab
- Use the Delete job trashcan next to the job you want to delete. NOTE: This cannot be undone.
Advanced Administrator Pre and Post Script UI
- Overview:
- Pre and post script options allow create commands to run on the source or target path or both. The commands can be ordered and configured as pre or post.
- The pre and post commands are a library of functions that can be selected by users using a command label assigned to the commands.
- When users enable pre or post scripts they must also select the commands from the library to apply to their job. They will only see the command label and not the command itself in the UI.
- If the user is instructed to use more than on command the order of execution will be managed by the administrator who orders the commands in the pre and post administration UI.
- Only AnyCopy Administrators can create pre and post script operations for users to use
- The pre and post commands execute on the Isilon over ssh only Linux commands that run on Isilon can be used. You can use ISI commands. The command should be single line command to execute all logic or issue multiple commands.
- For more complex logic it is possible to create a scripts directory on the Isilon file system and reference a script name for more complex logic that requires a simpler way to maintain the logic within the bash script and simple reference this script name in AnyCopy UI.
- The pre AnyCopy Operations tab - This is where new commands can be added for pre copy steps to execute.
- The Post AnyCopy Operations tab - This is where new commands can be added for post copy steps to execute.
- Path substitution using variables
- The following variables can be used to insert an absolute path into your pre and post commands
- $DSTPATH - destination absolute path example /ifs/data/projectA is the destination copy target and this path will be replaced if this variable is used
- $SRCPATH - source absolute path example /ifs/data/projectA is the source path on the source cluster configured in AnyCopy.
How to add a command to Pre or Post Operations with Path Variable Substitution
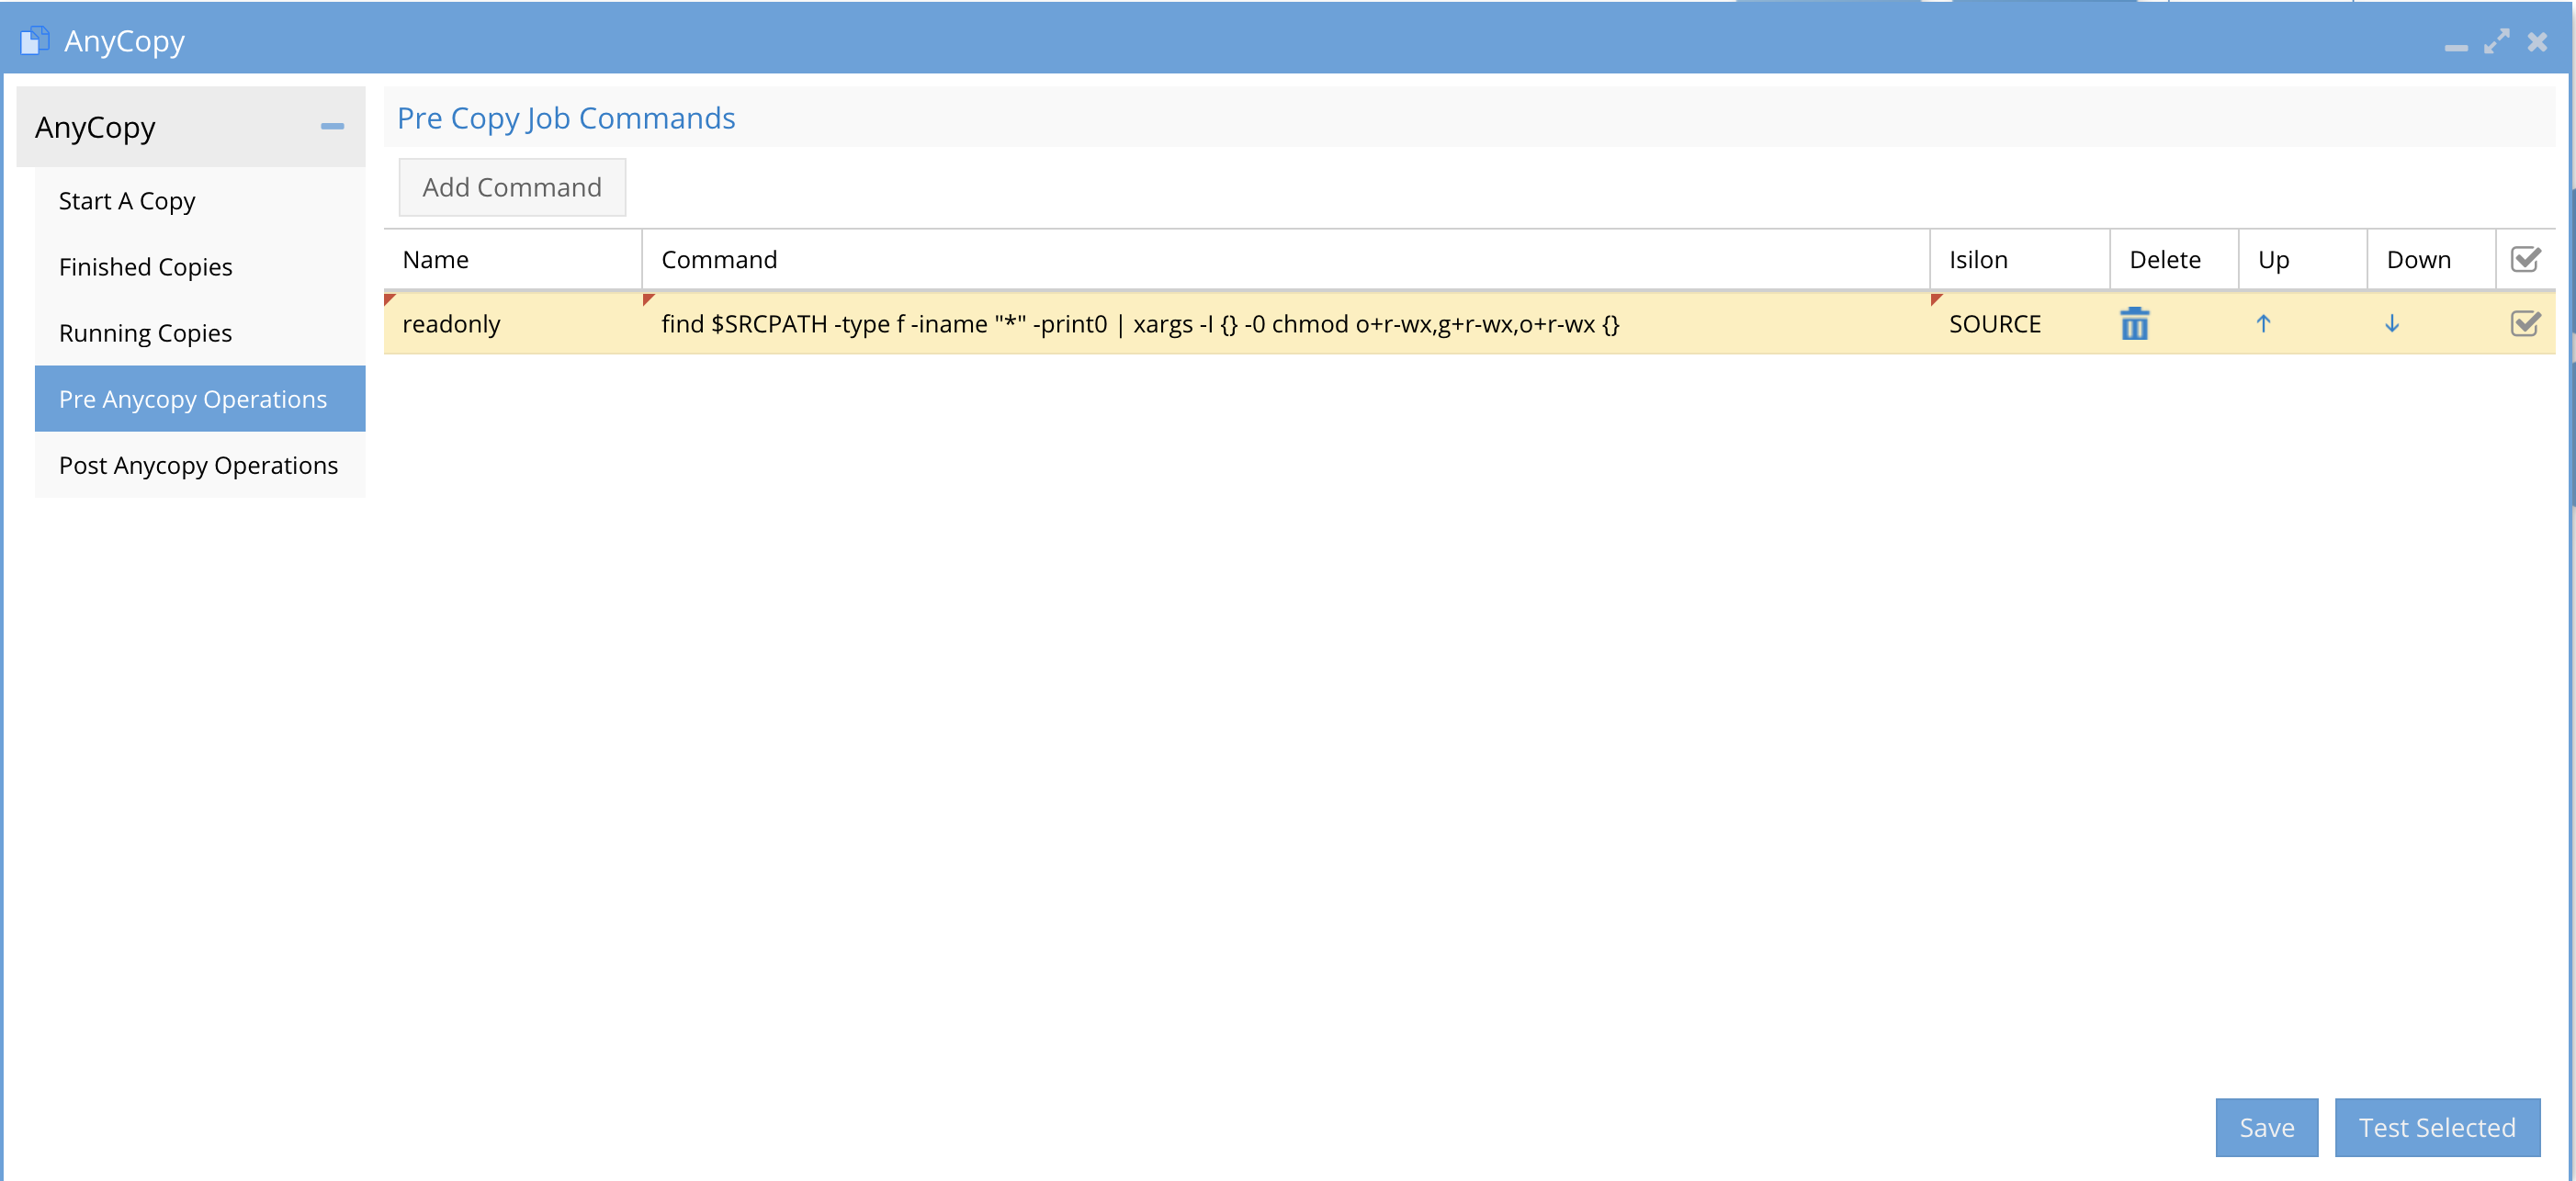
- Columns:
- Name - this is a name or label on the command to provide an idea of what it does. no special characters or spaced can be used.
- Command is a single line command that will be executed over ssh and should use recursive flags to process a change across all files and folders below the directory.
- Cluster - The command can be run on the source or target cluster regardless of the pre or post setting. Select source or target for this command.
- Delete - This option allows deleting a command from the pre or post list of commands
- Up/Down - If multiple commands are used the up and down arrow orders the commands with the command listed at the top of the UI being executed first. Re-order the commands based on the correct order of processing needed by your script logic.
- Selection Check Box - This check box allows testing your script logic by selecting the command and then clicking the Test Selected button.
Pre and Post Script Command Examples
These are examples to lock down data after a copy to remove all directory and file permissions and inheritance.
- Apply read only to users group and other
- This command example will set the permissions on the source files to read only for Other and will try to set Owner, Group to read only. NOTE: Directory inheritance may need to be disabled first. Using chmod u+r,g+r,o+r
- Uses $DSTPATH variable
- Recursive for files only
- sleep 2; find $DSTPATH -type f -iname "*" -print0 | xargs -I {} -0 chmod u+r,g+r,o+r {}
- Cluster target
- Used as post script
- Remove inheritance and remove file ACES
- This command disables directory permissions from flowing down the directory tree so that permissions can be customized after the copy is completed. This examples uses 3 commands on 1 line with a semi colon to allow each to run using a single line. This can be used to combine steps into a single command entry
- It applies a block of inheritance with +dacl_protected , removes directory ACL and synthetic auto inheritance
- It removes all ACE entries from all files using chmod -D
- Uses $DSTPATH variable
- Recursive for directories only and recursive for files to remove all ACE entries using chmod -c +dacl_protected and chmod -c -sacl_auto_inherited and chmod -c -dacl_auto_inherited
- Cluster is set to target
- Used as post script
- sleep 10; find $DSTPATH -type d -iname "*" -print0 | xargs -I {} -0 chmod -c +dacl_protected {};find $DSTPATH -type d -iname "*" -print0 | xargs -I {} -0 chmod -c -dacl_auto_inherited {};find $DSTPATH -type d -iname "*" -print0 | xargs -I {} -0 chmod -c -sacl_auto_inherited {} ; find $DSTPATH -iname "*" -print0 | xargs -I {} -0 chmod -D {}
Solution Example post Script Remove Inheritance and file ACE's with Read only data
- See how the above examples were used to create a solution to remove all permissions and inheritances of file and folder permissions.
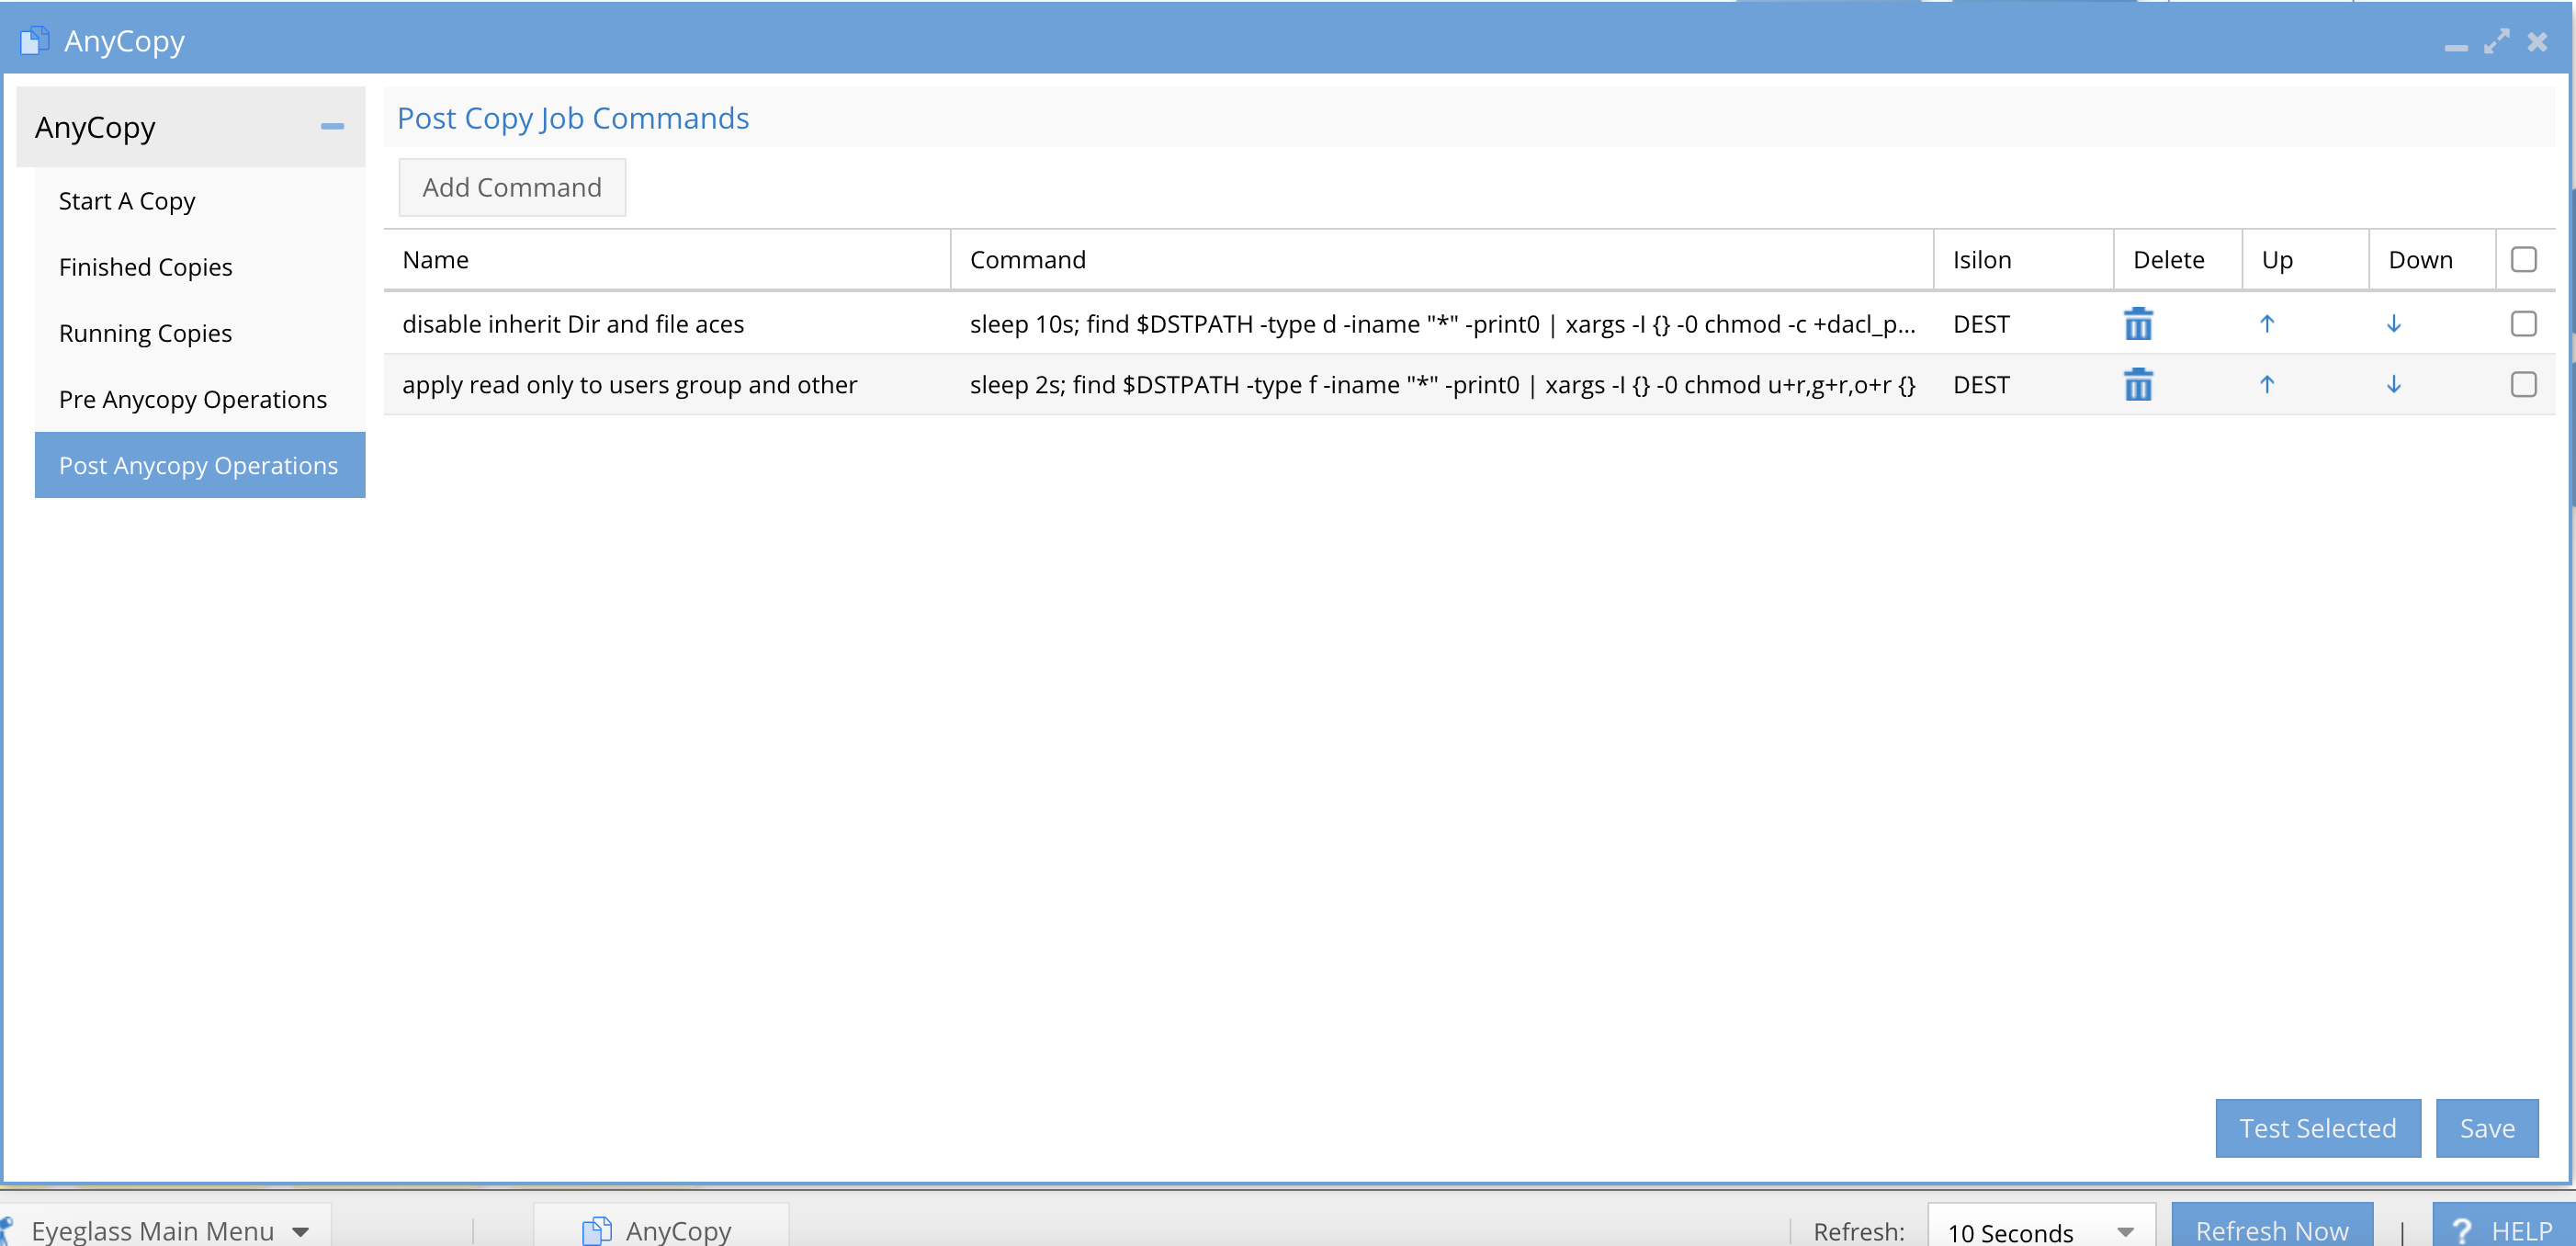
- Configure the Copy job to select the 2 labels configured in the post script operations tab and ordered as shown.
How to Extend the Copy Log Changelist job timeout
- Open an SSH session to Eyeglass
- Login as admin
- Elevate to root using : sudo su (enter admin password when prompted)
- Type the command below and press Enter
- sudo su
- Type the command below and press Enter
- sudo vi /opt/superna/sca/data/system.xml
- Once the file is opened, find/locate the tag below
- <changelistTimeout>300</changelistTimeout>
- Press i or "Insert" from your keyboard
- Replace 300 with new time out value - suggest 1800 the tag should look like <changelistTimeout>1800</changelistTimeout>
- If the file does not contain the tag add the following lines at the bottom of the file but before the </config> with new timeout value (example is 1800 s)
- <anycopy><changelistTimeout>1800</changelistTimeout></anycopy>
- Save the file:
- wq!
- Restart SCA service
- systemctl restart sca
How to Test script logic
- Not available in current release
POSIX Mode - How it Works
- Overview: If you are using NFS or AD authenticated users to access file systems with unified permissions using UID and GID locally generated by the cluster or stored in Active Directory RFC2703 UID and GID as properties of the user account can be used to present folders to the logged in user based on their UID/GID or the other permission on a folder. This allows posix permissions for owner, group or other to restrict what folders the user can see when selecting data to copy.
- How Owner, group, other permissions determine what is browsable in the GUI.
- The source input box enforces owner , group and other Only if the logged in user has Read permissions to the folder. If they do not, the folder will not display.
- The target input box enforces owner , group and other Only if the logged in user has Read & Write permissions to the folder. If they do not, the folder will not display.
- How Owner, group, other permissions determine what is browsable in the GUI.
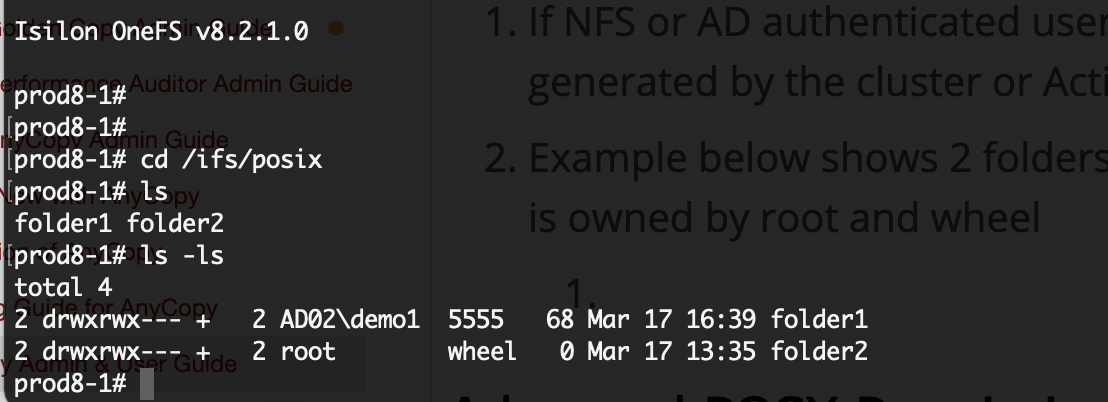
- Example below shows 2 folders with folder1 secured to an AD user using UID and GID stored in AD, and folder2 is owned by root and wheel.
- In this example the user demo1 logs into Eyeglass and has been assigned the AnyCopy user role to login. When the user tries to browser under an SMB share (NOTE: the user must have access to the SMB shares where posix data is stored. )
- After login Eyeglass will have the UID and GID assigned to the user in Active Directory.
- The user will expand folders under the share and a REST API is used to check the owner and group of the folders, the user must be either owner or member of the group granting access to the folder. See screenshot below that only lists folder1.

Advanced POSIX Permissions Mode Configuration
- To enable this mode
- ssh as admin
- sudo -s
- nano /opt/superna/sca/data/system.xml
- Inside the tags <anycopy> and </anycopy> add this value
- <usePosixPermissions>true</usePosixPermissions>
- control+x answer yes to save
- systemctl restart sca
- done