Eyeglass PowerScale Edition Quick Start Guide and Upgrade Guide for RHEL and Centos 8.x
- Read Me First
- Eyeglass Quick Start
- System Requirements
- Deprecation Notice
- Support limitations
- Supported OneFS releases
- Feature Release Compatibility
- Eyeglass Scalability Limits
- New Eyeglass Installation
- Download Eyeglass
- Deploy the virtual machine with Centos or RHEL
- Steps to Install
- Eyeglass Initial Configuration
- Login to the Eyeglass UI
- Install License
- Add PowerScale Clusters
- Before you add a cluster to Eyeglass verify SyncIQ FQDN Name resolution
- Enable Eyeglass Jobs
- Prerequisite for Enabling Configuration Replication
- Enable Jobs for Configuration Replication
- Initial state for Jobs
- Setup Eyeglass for Email Notification
- Configure SMTP
- Configure Email Recipients
- Appendix A
- List of files controlled by Eyeglass
- Eyeglass Upgrade Instructions for RHEL and Centos
- Pre-requisites:
- Upgrade Instructions
- Post Upgrade Instructions
- Installed Package List
Read Me First
This installer option requires a purchased RPM install license key; a trial key option is available. The OS key is required to use this installer option in production. This is not part of enterprise keys and is excluded from maintenance contracts.
This license key allows customers to build their own appliances. Contact the sales team via email sales@superna.net to request assistance with this order.
Eyeglass Quick Start
Use this document to get your new Eyeglass installation up and running fast with all the best options.
For planning DR and understanding design choices with Eyeglass use the Eyeglass Start Here First Guide
System Requirements
Operating System:
- CentOS Version 8.x (as of 2.5.8.1)
- Red Hat Enterprise Linux Version 8.x (as of 2.5.8.1)
 |
NOTE: The OS itself is not covered under the support contract |
Appliance requirements:
- 4 vCPU
- 16G RAM
- RAM please see the scalabilitytable
|
Note requires shutting down the VM, editing RAM, and restart |
- 130 GB disk
- Chrome Browser (preferred): The browser must support Web sockets; Internet Explorer is not supported
- Eyeglass Port Requirements: Eyeglass-Ports-Requirements
Deprecation Notice
- RHEL 7 upgrade and OS support is no longer supported as of June 30th 2022
Support limitations
- The Operating system maintenance of patches and updates is customer's responsibility
- Installation of the Linux Eyeglass installer combines application software and tested and supported dependencies, including the following:
- Sudoer configuration
- Lighttpd
- Support statement: This yum package manager will not be allowed to upgrade these components unless the forced overwrite option is used. The application version installed by the Eyeglass dependency rpm is version-controlled and is the supported version. Customers who want to update these packages own the risk of breaking application functionality. Support of versions other than those provided is excluded from support contract coverage. Customers will be asked to downgrade the version if application functionality is impacted by the customer-forced override of a supported package version.
- See Appendix A for a controlled list of files set as owned by Eyeglass RPM dependencies and how to force update the affected applications.
Supported OneFS releases
Please refer to the Release Notes for the Eyeglass PowerScale Edition version you install.
Feature Release Compatibility
Please refer to the Release Notes for the Eyeglass PowerScale Edition version you install.
Eyeglass Scalability Limits
Please refer to the Eyeglass Admin Guide Scalability limits.
New Eyeglass Installation
If you are doing a new Eyeglass installation, continue following the steps in this document.
Download Eyeglass
Request download Eyeglass RHEL/CENTOS from Superna website Latest Appliance Code Download
Deploy the virtual machine with Centos or RHEL
Eyeglass is delivered as RPM installer and has dependencies that must be installed
- Subnet and network required so that appliance will have IP connectivity to the PowerScale clusters that it is managing and the users that are using it
- IP address for the appliance
- Gateway
- DNS server
- RPM package dependencies required before installation:
- RHEL 8.x
- nodejs syslog-ng lighttpd python3-protobuf fontconfig net-tools nfs-utils python3-setuptools zip unzip python3-pip rsync sysstat fail2ban perl lighttpd
- The epel-release-latest-8.noarch.rpm repository will have to be enabled for Red Hat Enterprise Linux 8 installations. Additionally, the epel-release package will have to be manually added. Be sure to follow the detailed instructions below for the procedure.
- RHEL 8.x
| NOTE: If you are using a hostname or FQDN for the target cluster in your SyncIQ policies, the DNS information entered here must be able to resolve it back to a discovered cluster IP address (should resolve to a SyncIQ SmartConnect zone IP pool IP address) for Eyeglass to perform configuration replication. Eyeglass will not create the associated configuration replication job. If the hostname or FQDN cannot be resolved. |
Steps to Install
Appliance Deployment steps :
Step 1: Install Centos or RHEL VM as per the above requirements.
Step 2: Download RHEL/Centos RPM installer file: Download the correct run file to your VM using the 8.x install file. Follow the steps to download the installer https://www.supernaeyeglass.com/downloads.
| NOTE: You will need the password to download the RHEL-licensed installer |
Step 3: Login as root.
Step 4: SCP install file to the VM.
Step 5: chmod 755 install-file-name.
Step 6: Edit the file /etc/sysconfig/selinux and set up the SELINUX=permissive parameter after rebooting the VM.
Step 7: Install dependencies.
RHEL 8.x
| NOTE: The syslog-ng has a conflict with rsyslog, you need to remove the rsyslog package to be able install syslog-ng package by executing the following command: yum remove rsyslog |
Step 8: ./install-file-name (use the 8.x install file).
Step 9: verify output to verify installation completes without error; dependency checks will fail and indicate which packages are not installed.
Step 9a: Reboot the operating system and then proceed.
Step 10: Check services are running correctly.
- systemctl status sca
- systemctl status -l scadb
- systemctl status lighttpd
Step 11: Send the install log file in the same directory as the install file to http://support.superna.net if the installation fails by opening a support case and attaching the file to the case.
Step 12: Eyeglass appliance sudoers file needs to be updated with this information:
vi sudo configuration file add this line below
sca ALL=(ALL) NOPASSWD: /opt/bin/yum, /opt/superna/bin/kill_packagekit.sh, /opt/superna/sbin/*, /usr/bin/systemctl restart syslog
Eyeglass Initial Configuration
Your Eyeglass initial configuration steps are:
- Login to the Eyeglass UI
- Install License
- Create an Eyeglass service account first for each PowerScale cluster with minimum permissions (if not done, configure Clusters in Eyeglass using root user)
- Add Clusters ()
Login to the Eyeglass UI
To login to the Eyeglass web UI, enter the following URL into your browser (Chrome preferred), replacing <Eyeglass IP address> with the real IP address assigned to the appliance:
https://<Eyeglass IP address>
You have two options for login authentication:
Local - Select Auth Type “Local” and use the admin user and password configured on the appliance
Default user/password: admin/3y3gl4ss
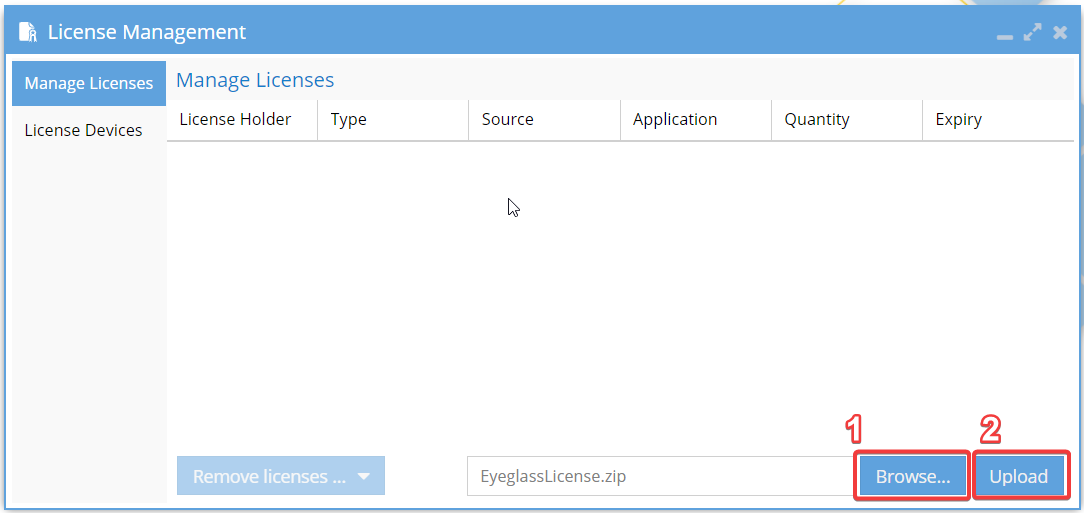
Install License
Retrieve your Eyeglass License keys (instructions provided here).
| NOTE: You will require a CENTOS or RHEL OS license key in addition to other Eyeglass product keys |
Upload the license zip file provided to you by Superna:
IMPORTANT: Do not unzip the license file. Upload the zip file.
IMPORTANT: After selecting the Upload button, you will be asked to accept the Eyeglass EULA and Phone Home. The license will not be loaded unless EULA is accepted.
Add PowerScale Clusters
| NOTE: No Auto Refresh Inventory View |
This window does not auto-refresh after adding a cluster. You must click the refresh button at the bottom right to verify when a cluster has finished discovery. This process can take 5-10 minutes typically.
| NOTE Cluster DNS Setup and Add Cluster to Inventory |
If discovery takes a very long time to complete (> 10 minutes), it's important to check whether the cluster configuration data can resolve the external URL. Cloud pools use a URL to a storage bucket, and if this URL can not complete DNS lookup to IP address API calls that discovery cloud pools will take too long to complete and will timeout the cluster discovery.
Important: After the Discovery of a Cluster’s SyncIQ policies, all eyeglass configuration jobs are disabled automatically.
Configuration Replication Jobs for zones, shares, exports and nfs alias protected by SyncIQ Policy automatically created and are in USERDISABLED state after successful provisioning in Eyeglass. Enabling these Jobs will be part of the installation steps.
Important: Clusters on the source target must be in the support feature matrix.
PowerScale cluster replication pairs must be running supported OneFS version as documented in the System Requirements/Feature Release Compatibility matrix.
Before you add a cluster to Eyeglass verify SyncIQ FQDN Name resolution
This step is important to allow the Eyeglass to automatically build configuration replication jobs correctly. Eyeglass will resolve the FQDN of the SyncIQ policy and then compare the returned IP address to all PowerScale clusters added to the Eyeglass appliance. If no match is found, Config Sync jobs will fail to be added to the jobs window until name resolution works correctly. A system alarm is also raised that indicates no matching clusters found for the SyncIQ policies on Cluster named X.
- Login to eyeglass
- Open the Eyeglass shell from the Eyeglass main menu (bottom left)
- Login as admin with default password 3y3gl4ss
- Get the list of SyncIQ policies from the source cluster you are adding and record the FQDN target host value used in the policy
- Validate the FQDN will resolve correctly on Eyeglass
- nslookup FQDN
- If an IP address does not get returned, you MUST fix this using the YAST utility to add DNS to the Eyeglass (see admin guide for instructions)
- OR you must sudo to root with sudo -s (enter admin password)
- vi /etc/hosts and add an entry for the FQDN value that does not resolve correctly
- NOTE: DNS is the preferred solution to resolve entries, the host file can be used as a workaround on the appliance for each SmartConnect zone that does not resolve to an IP address
7. Repeat nslookup step for each FQDN used on each cluster you want to add to the Eyeglass for DR management
From the Eyeglass UI add the PowerScale Clusters between which Eyeglass will be replicating the share and export configuration data.
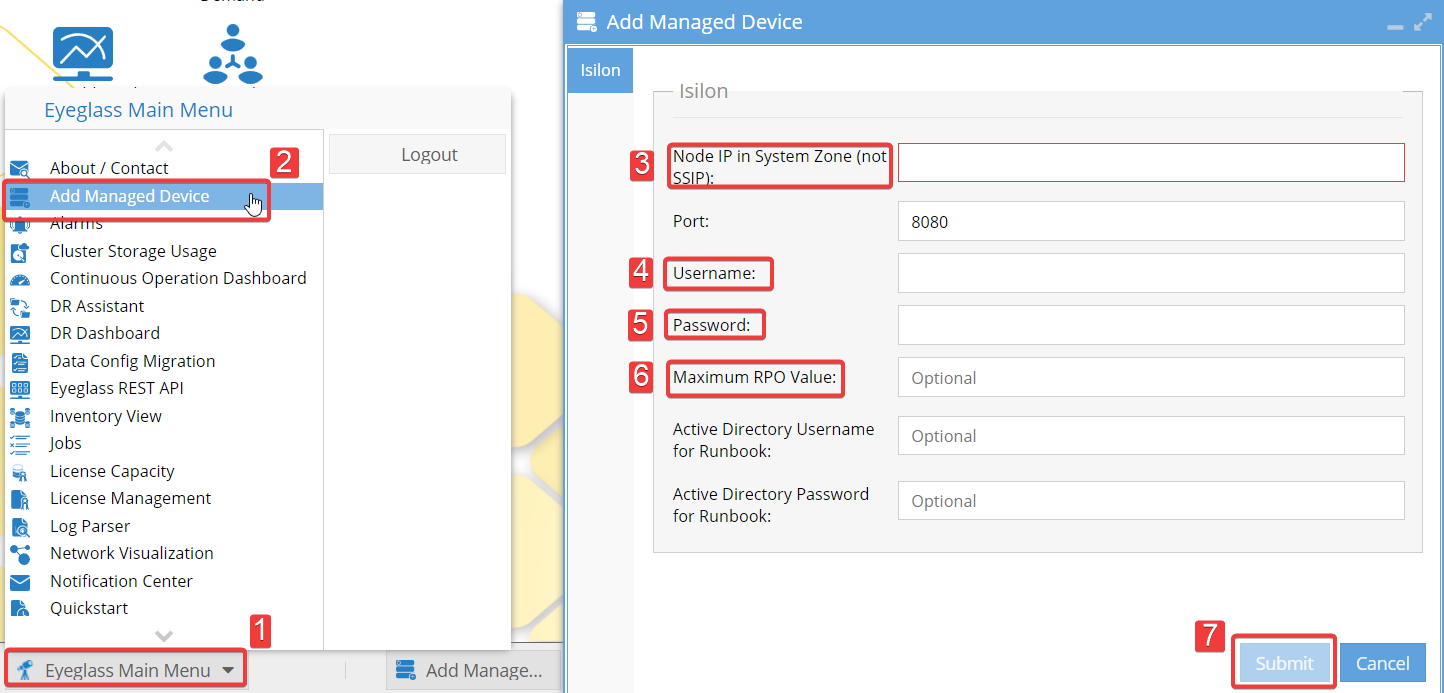
| Note:
|
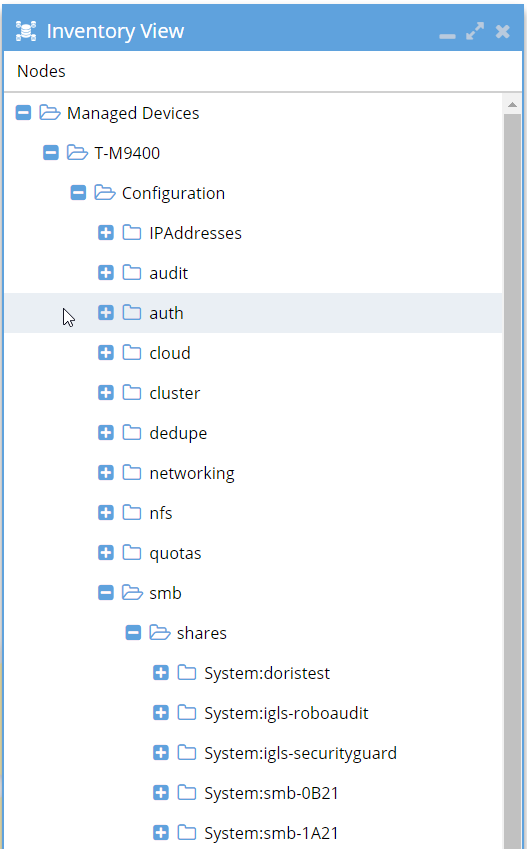
Once the PowerScale is added, Eyeglass will automatically run an inventory task to discover the PowerScale components. When completed, the discovered inventory can be seen in the Inventory View.
Enable Eyeglass Jobs
Once you have configured your PowerScale cluster pair and the Inventory task has been completed, The Eyeglass Jobs are automatically created per SyncIQ Policy to replicate between the SyncIQ Policy defined source and target.
In addition to the Configuration Replication Jobs, Failover Readiness Jobs are created between replicating clusters that monitor the configuration and readiness of Access Zones.
| Note: These jobs are disabled by default (see admin guide on how to change the default to enable via the CLI). Once enabled, they will raise alarms if all configuration for Access Zones is not created or prerequisites are completed |
Prerequisite for Enabling Configuration Replication
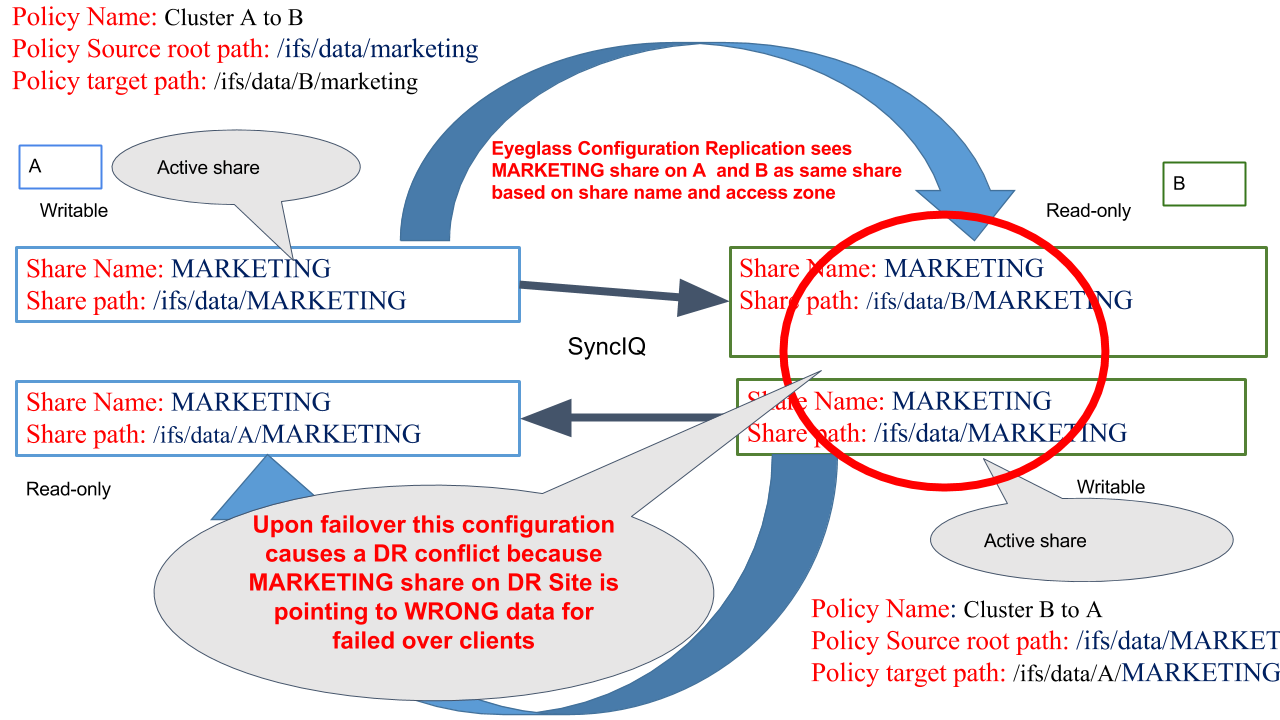
- If you have an Active - Active Replication Topology (for data), confirm that you do not have an unsupported share or NFS alias environment described in the diagram below:
- Review Eyeglass Admin Guide Jobs description to understand what the Configuration Replication Jobs will do.
- Review Eyeglass Admin Guide for Configuration Replication Pre-requisites
- Review how Eyeglass determines uniqueness for configuration items and what properties are replicated.
Enable Jobs for Configuration Replication
The next step is to enable your Share, Export, NFS Alias (AUTO) Jobs for Configuration Replication. This can be done on a Job by Job basis by following these steps:
Select the Configuration Replication Job to be enabled.
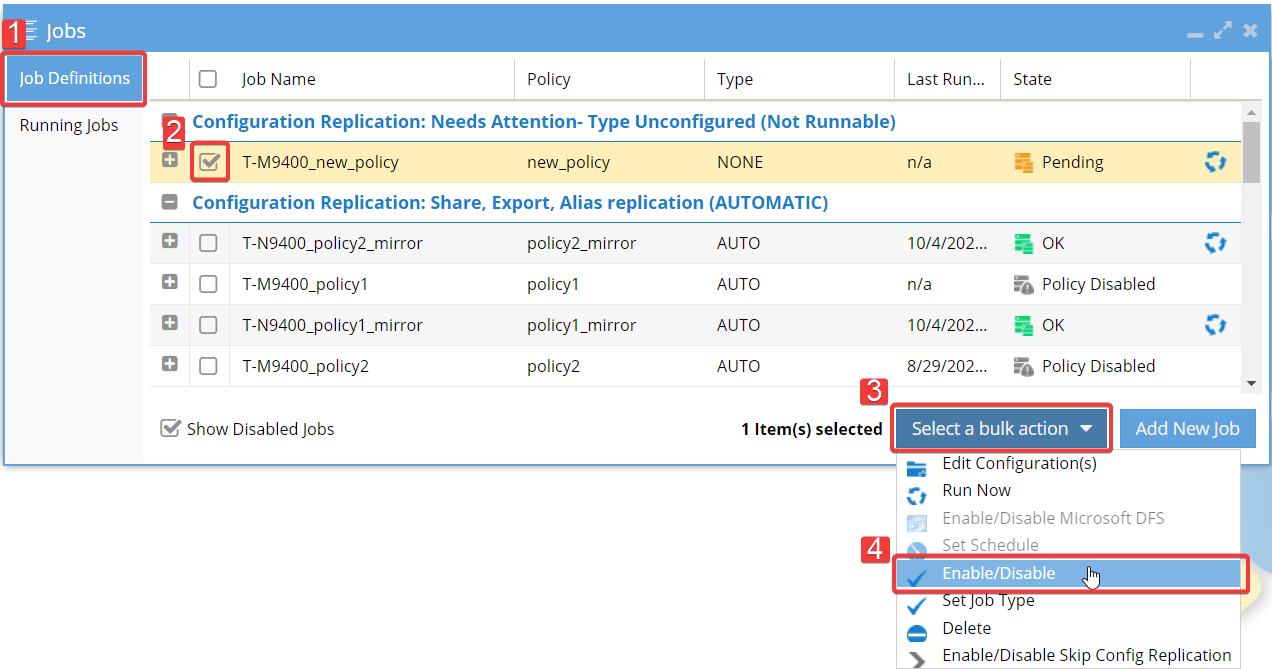
Select a bulk action and then select the Enable/Disable option.
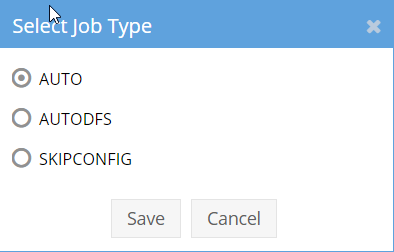
For the case when Enable Configuration Replication Jobs - Type Unconfigured, a message will pop up to Set JobType. The Job will be enabled after Selecting the Job type.
On the next Configuration Replication cycle, the enabled Job will be run.
Initial state for Jobs
You can change the default behavior so that these Jobs are enabled by default using the cli commands for here.
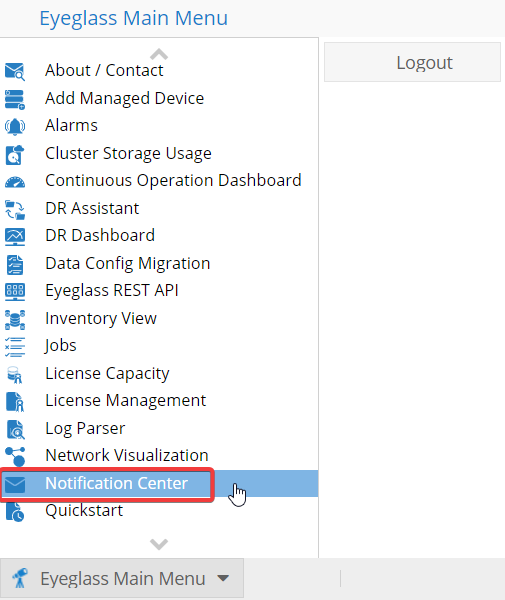
Setup Eyeglass for Email Notification
- Configure SMTP
- Configure Email Recipients
Configure SMTP
- Enter the information for your email server in the Notification Center/Configure SMTP tab.
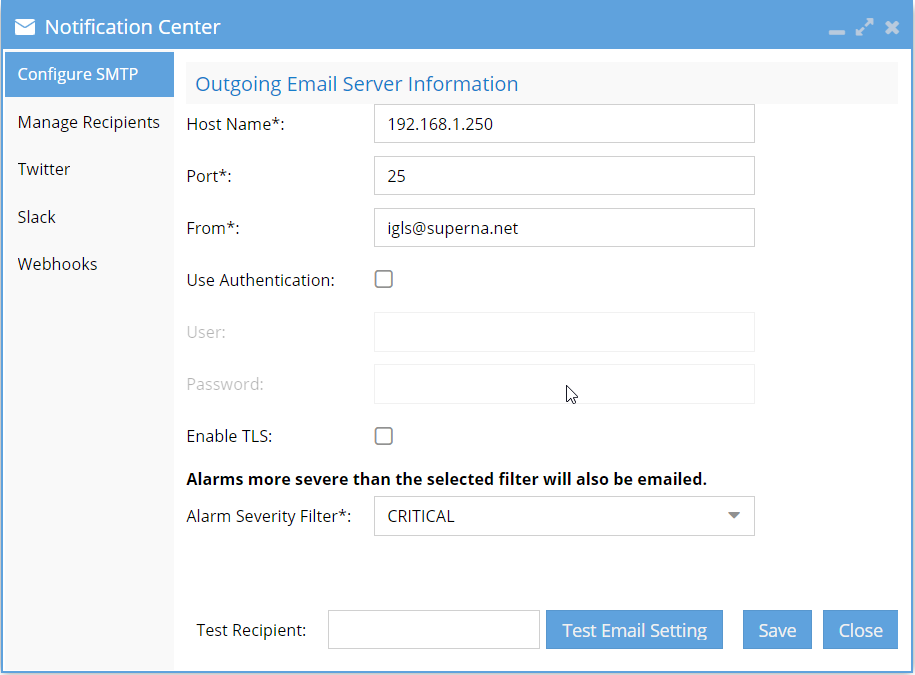
- Hostname: Enter the hostname for your email server
- Port: Enter the port which should be used for sending email
- From: Enter the email address of the sender of the email. Typically, this must be a valid email address recognized by the email server.
- Use Authentication: Select if the email server requires an authenticated login
User: User or email address for authentication
Password: Password for authentication
- Enable TLS: Select the Enable TLS check box if your email server expects TLS communication
- Alarm Severity Filter: Select the level of alarms you would like to receive email
2. Use the Test Email Setting button to check that the email server information added is correct. You will get error codes from the SMTP connection if an error occurs. The "no error" response indicates a successful connection. If an error is returned, the debug response should be sent to support.superna.net.
3. Save your changes.
Configure Email Recipients
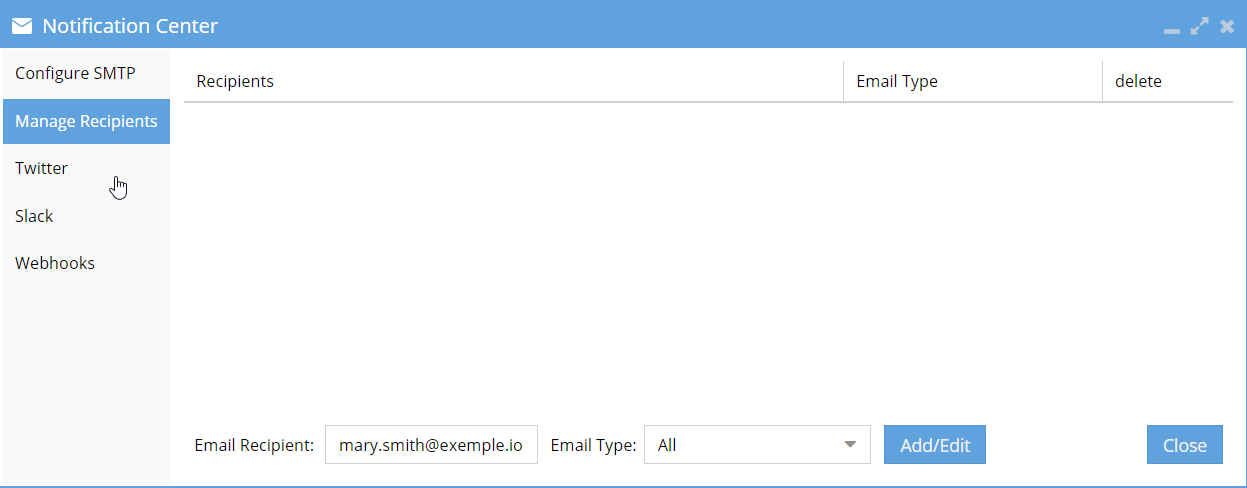
- Enter the information for your email server in the Notification Center/Manage Recipients tab.
Email Recipient: Enter the email address that emails will be sent to. - Select the Add button.
Appendix A
Use this procedure to force update Eyeglass controlled packages.
List of files controlled by Eyeglass
- /etc/lighttpd/conf.d/proxy.conf
- /etc/lighttpd/lighttpd.conf
- /etc/lighttpd/modules.conf
- /etc/motd
- /etc/sudoers.d/admin
These above-mentioned files need to be replaced after you upgrade your RHEL packages. We strongly recommend copying the above-mentioned files to a location prior to performing the RHEL package upgrade so that they can be copied back safe after the upgrade.
Eyeglass Upgrade Instructions for RHEL and Centos
Use these steps to upgrade an existing RHEL or Centos Eyeglass Appliance:
IMPORTANT: Before upgrading to the latest Eyeglass code, please take a VMware snapshot of the Eyeglass appliance. This is the only way to roll back if the upgrade fails.
Pre-requisites:
- To download the RHEL/Centos upgrade file, open a support ticket to request the download link and password.
- You may need internet connectivity for this upgrade. You need to download the extra packages if you do not have internet access from the Eyeglass appliance. You are responsible for installing the RHEL packages since RHEL is a licensed product. The installer will detect the missing packages and prompt you on how to install them.
|
|
NOTE: It is mandatory to have Internet access to the repositories listed above in the installation steps to install packages for upgrades. No other supported method exists for upgrades. No packages will be provided by the support available on RHEL repositories |
We recommend running the installer to find the missing packages and proceed accordingly.
Upgrade Instructions
- Download the file to your local machine.
- ssh to the Eyeglass appliance and assume root user with sudo -s
- Use the following command to install necessary xmlstarlet package before upgrade:
- sudo yum install xmlstarlet -y
- Then stop sca and remove all files under orientdb lib and plugins directories:
- systemctl stop sca
- sudo rm -rf /opt/superna/db/OrientDB/lib/*
/opt/superna/db/OrientDB/plugins/*
- Copy the file to the Eyeglass appliance (i.e. in the /tmp directory).
- Make the file executable (replacing name with specific run file name)
- chmod +x eyeglass_RHEL_file_name.run
- Run the file (replacing name with specific run file name)
- ./eyeglass_RHEL_file_name.run
- Reboot the OS
- reboot
- Upgrade completed.
Post Upgrade Instructions
1. After upgrade, using Eyeglass CLI run the following command
rpm -qa | grep -i 'eyeglass' | grep '<PRE_UPGRADE_MAJOR_EYEGLASS_VERSION>' | xargs rpm -e
example after upgrade from 2.5.4 to 2.5.5 the command would be:
rpm -qa | grep -i 'eyeglass' | grep '2.5.4' | xargs rpm -e
2. Login to the Eyeglass Web UI
3. Check the version number by going to About/Contact
Installed Package List
Top level OS Dependencies