Eyeglass Golden Copy Installation and Upgrade Guide
- Overview
- Requirements
- VM Specifications for 3 Scaling Configurations
- Cloud Storage Network Requirements
- Firewall Rules and Direction Table
- Firewall Diagram
- Isilon/Power Scale Cluster NFS Mount Preparation Steps (Mandatory)
- Eyeglass Golden Copy Service Account Preparation Steps (Mandatory)
- Golden Copy OVA Deployment and Cluster VM Configuration (Mandatory)
- How to Deploy Virtual Accelerator Nodes (VAN's) (Optional)
- Golden Copy and VAN VM node NFS Mount Configuration (Mandatory)
- How to Configure Multi Golden Copy VM Parallel Copy (Mandatory)
- How To Upgrade Golden Copy Cluster
- Offline Cluster No Internet Method
Overview
Golden Copy VM contains all management and GUI functions and can copy data directly from a single VM. Additional Virtual accelerator nodes (VAN's) can be deployed to scale out the performance of the copy jobs.
Requirements
- vCenter 6.x, 6.5 and 7.0.1 Build: 17491160
- Supported Browsers for GUI: Chrome Windows OS, Edge (chromium edition only)
VM Specifications for 3 Scaling Configurations
- Small Configuration Lab testing - 1 x VM with 4x vCPU , 16G of ram, 400G hard disk
- disk latency reads and writes < 20 ms (test with command iostat -xyz -d 3)
- Small Configuration Production Use with default VM resources 1 x VM with 4x vCPU , 16G of ram, 400G hard disk
- Limit of 4 folder definitions
- > 4 folder definitions requires additional disk space to store file copy history for each folder. Additional 110 GB for 10 folders added
- NOTE: Multi VM deployments provide additional disk space on the VM cluster for storing file copy history
- disk latency read and write latency < 20 ms (test with command iostat -xyz -d 3)
- Vertical Scaling high Performance Archiving - 1 x VM with 12x vCPU, 32 G of ram, 600 G hard disk
- Before power on, modify RAM and CPU to match above settings
- > 4 folder definitions requires additional disk space to store file copy history for each folder. Additional 110 GB for 10 folders added
- disk latency read and write latency < 20 ms (test with command iostat -xyz -d 3)
- modify the following file to expand the parallel file copies per VM
- nano /opt/superna/eca/eca-env-common.conf
- Add a line
- export ARCHIVE_PARALLEL_THREAD_COUNT=400
- control+x to save and exit
- Change memory configuration (note the the spacing must be Exactly as shown below)control+x to save and exit
- nano /opt/superna/eca/docker-compose.overrides
- version: '2.4'services:indexworker:mem_limit: 8GBmem_reservation: 8GBmemswap_limit: 8GBarchiveworker:mem_limit: 8GBmem_reservation: 8GBmemswap_limit: 8GBkafka:mem_limit: 4GBmem_reservation: 4GBmemswap_limit: 4GB
- Scale out Performance high performance and concurrent copy jobs - 6 x VM with 4x vCPU , 16G of ram, 400G hard disk
- > 4 folder definitions requires additional disk space to store file copy history for each folder. Additional 110 GB for 10 folders added
- disk latency read and write latency < 20 ms (test with command iotstat -xyz)
Cloud Storage Network Requirements
- Direct NAT (private ip to public IP) network
- Proxy configuration not currently supported
Firewall Rules and Direction Table
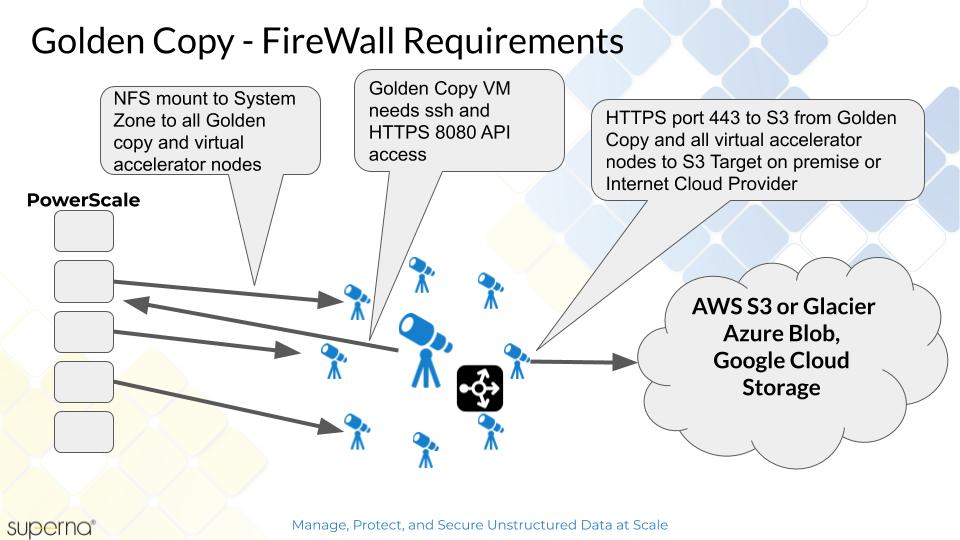
NOTE: These rules apply to traffic into the VM and out of the VM. All ports must be open between VM's, private VLAN's and firewall between VM's is not supported.
Port | Direction | Function |
| Operating System Open Suse 15.1 | It is customer responsibility to patch the operating system and allow Internet repository access for automatic patching. The OS is not covered by the support agreement. | |
ping | Golden Copy node 1 to PowerScale | Used to verify reachability before adding a cluster to Golden Copy |
22 | Admin PC → Golden Copy VM | Management access to the CLI |
| https 443 | Admin PC --> Golden Copy VM | Management GUIa |
8080 (HTTPS) and 22 SSH | Golden Copy VM → PowerScale | REST API Access and SSH |
NFS UDP/TCP port 111, TCP and UDP port 2049 UDP 300 | Golden Copy VM → PowerScale Virtual Accelerator nodes → PowerScale | NFS mount in System Zone |
| port 9020 9021 for Dell ECS | Golden Copy VM and VAN VM's -> S3 (https 9021) (http 9020) | S3 protocol (https 9021, http 9020) |
| AWS | Golden Copy VM and VAN VM's -> S3 (https 443) | S3 protocol (https 443) |
| Azure Blob | Golden Copy VM and VAN VM's -> Azure Blob rest api https 443 | Azure blob storage rest api |
Firewall Diagram
Isilon/Power Scale Cluster NFS Mount Preparation Steps (Mandatory)
- An IP pool created in the System access zone that with at least 3 Nodes as members. Must have DNS smartconnect name assigned to a management IP pool in the System zone for the NFS export used to read content from the snapshots folder and a 2nd NFS export for data recall.
- Get each Cluster GUID and name that will be indexed. Record these values for steps below.
- Login to the cluster OneFS GUI and open the Cluster Management --> General settings menu and record the cluster GUID and cluster name. Example below.
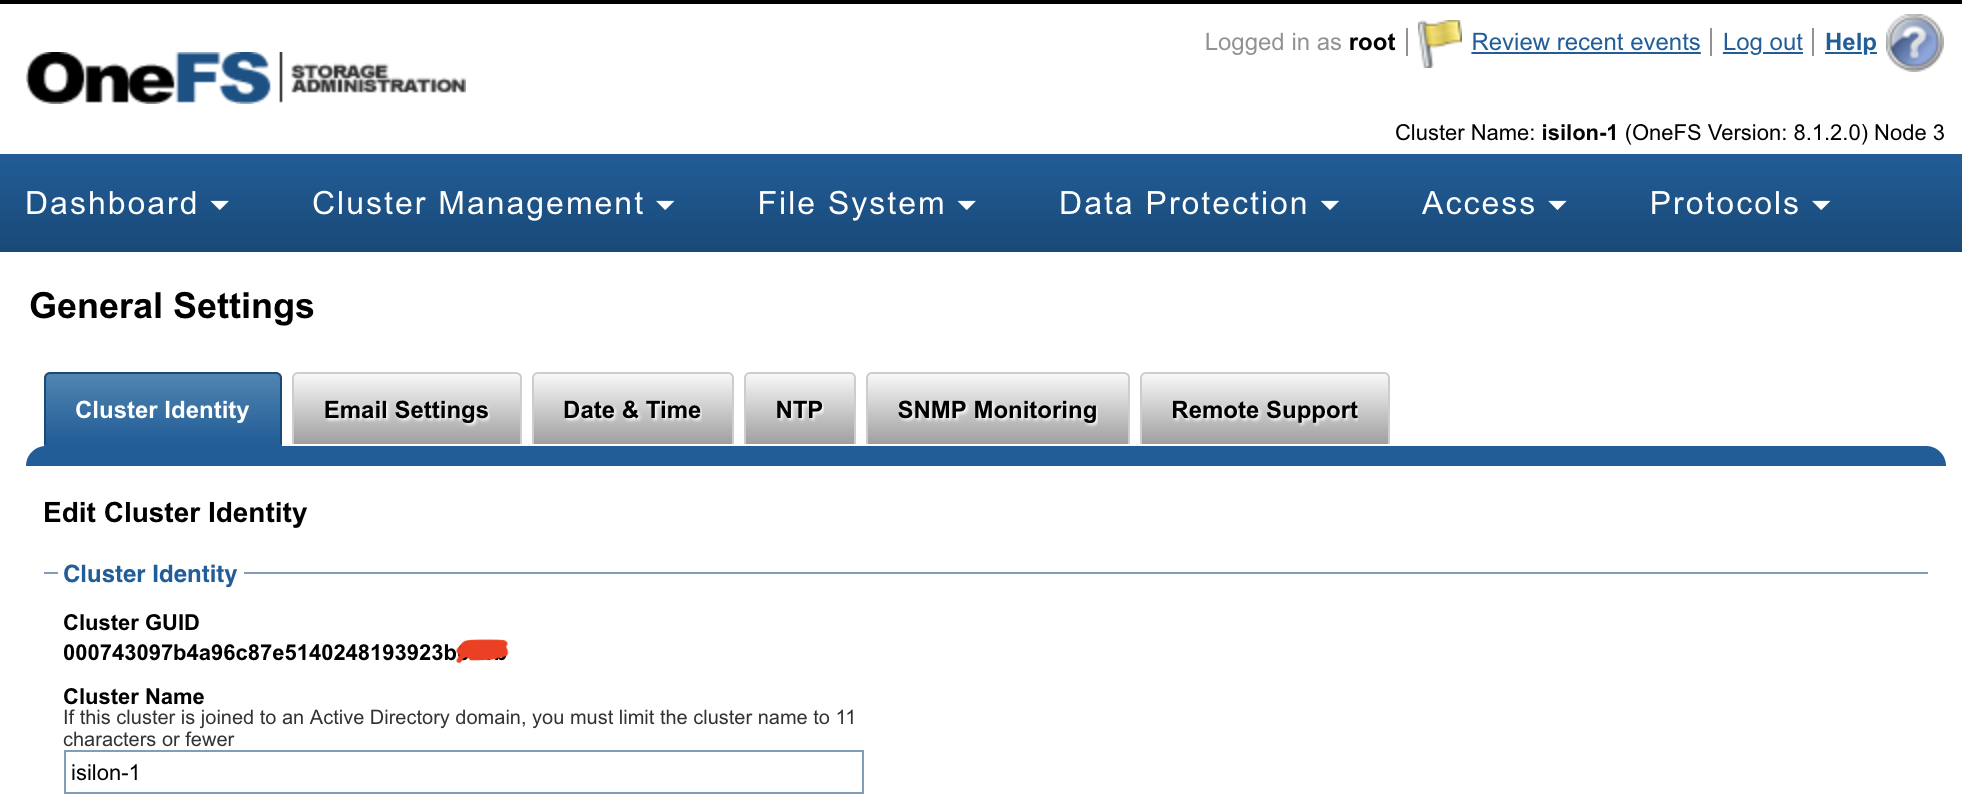
- Repeat for each cluster that will be licensed and used as a source cluster to copy data.
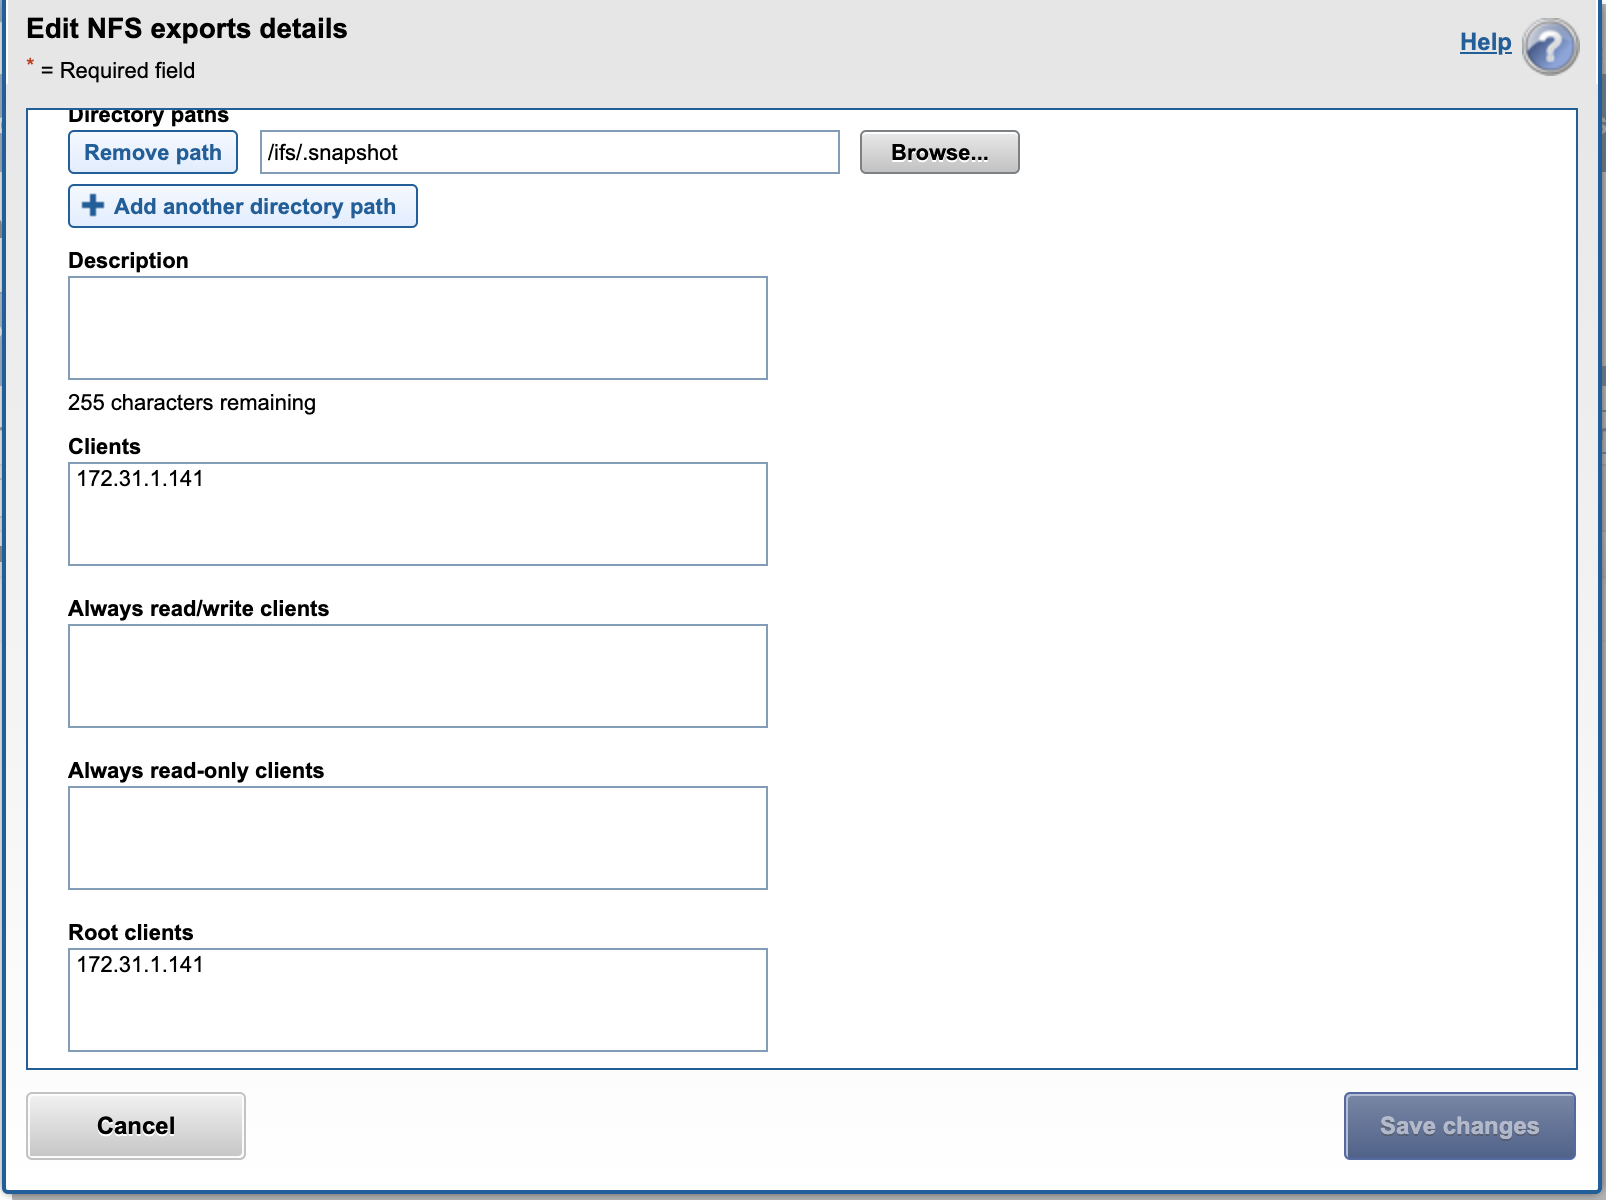
- Create an NFS export in the System Access Zone for full content on all clusters that will be used as a source for archiving data. See example below where the IP addresses entered are the Golden Copy VM's. The export is created on the /ifs/.snapshot directory with root client list and clients list. Add Golden Copy and all Virtual Accelerator Node IP addresses.
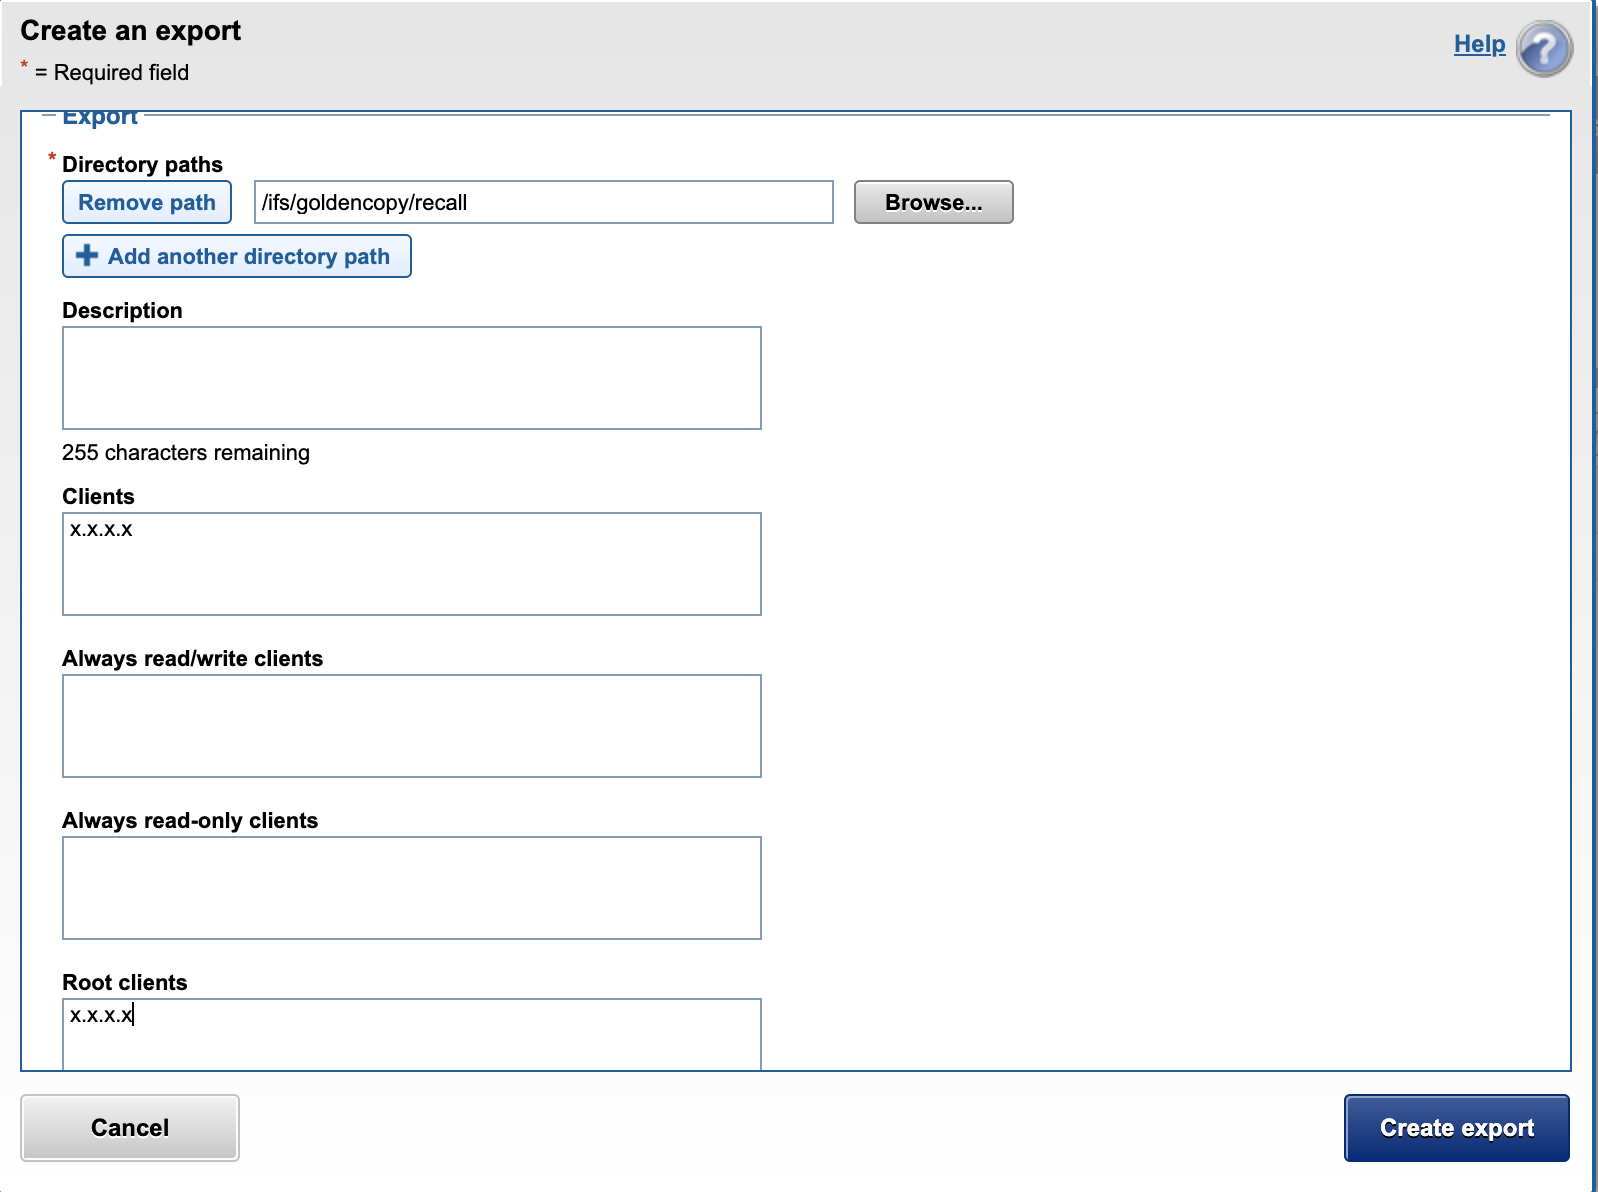
- Create the recall NFS folder /ifs/goldencopy/recall using the cluster root user over ssh. Then create the export.
- Done
Eyeglass Golden Copy Service Account Preparation Steps (Mandatory)
The Golden Copy appliance is based on the ECA cluster architecture and has similar steps to complete installation.
Before you begin, collect the information below and verify all prerequisites are completed:
- Permissions for Service Account: PowerScale REST API access with file traverse permissions to ingest files and directories by the Golden Copy VM. See the minimum permissions guide for a full list of permissions required for the eyeglassSR service account used by all ECA cluster products. Guide here.
Golden Copy OVA Deployment and Cluster VM Configuration (Mandatory)
- Download the OVA following instructions here
- Deploy with vCenter
NOTE: vCenter 6.5 and 6.7 use FLASH or FLEX interface. HTML5 interface is not supported.- Select the OVA file.
- Set the node ip addresses, gateway IP, DNS, NTP IP
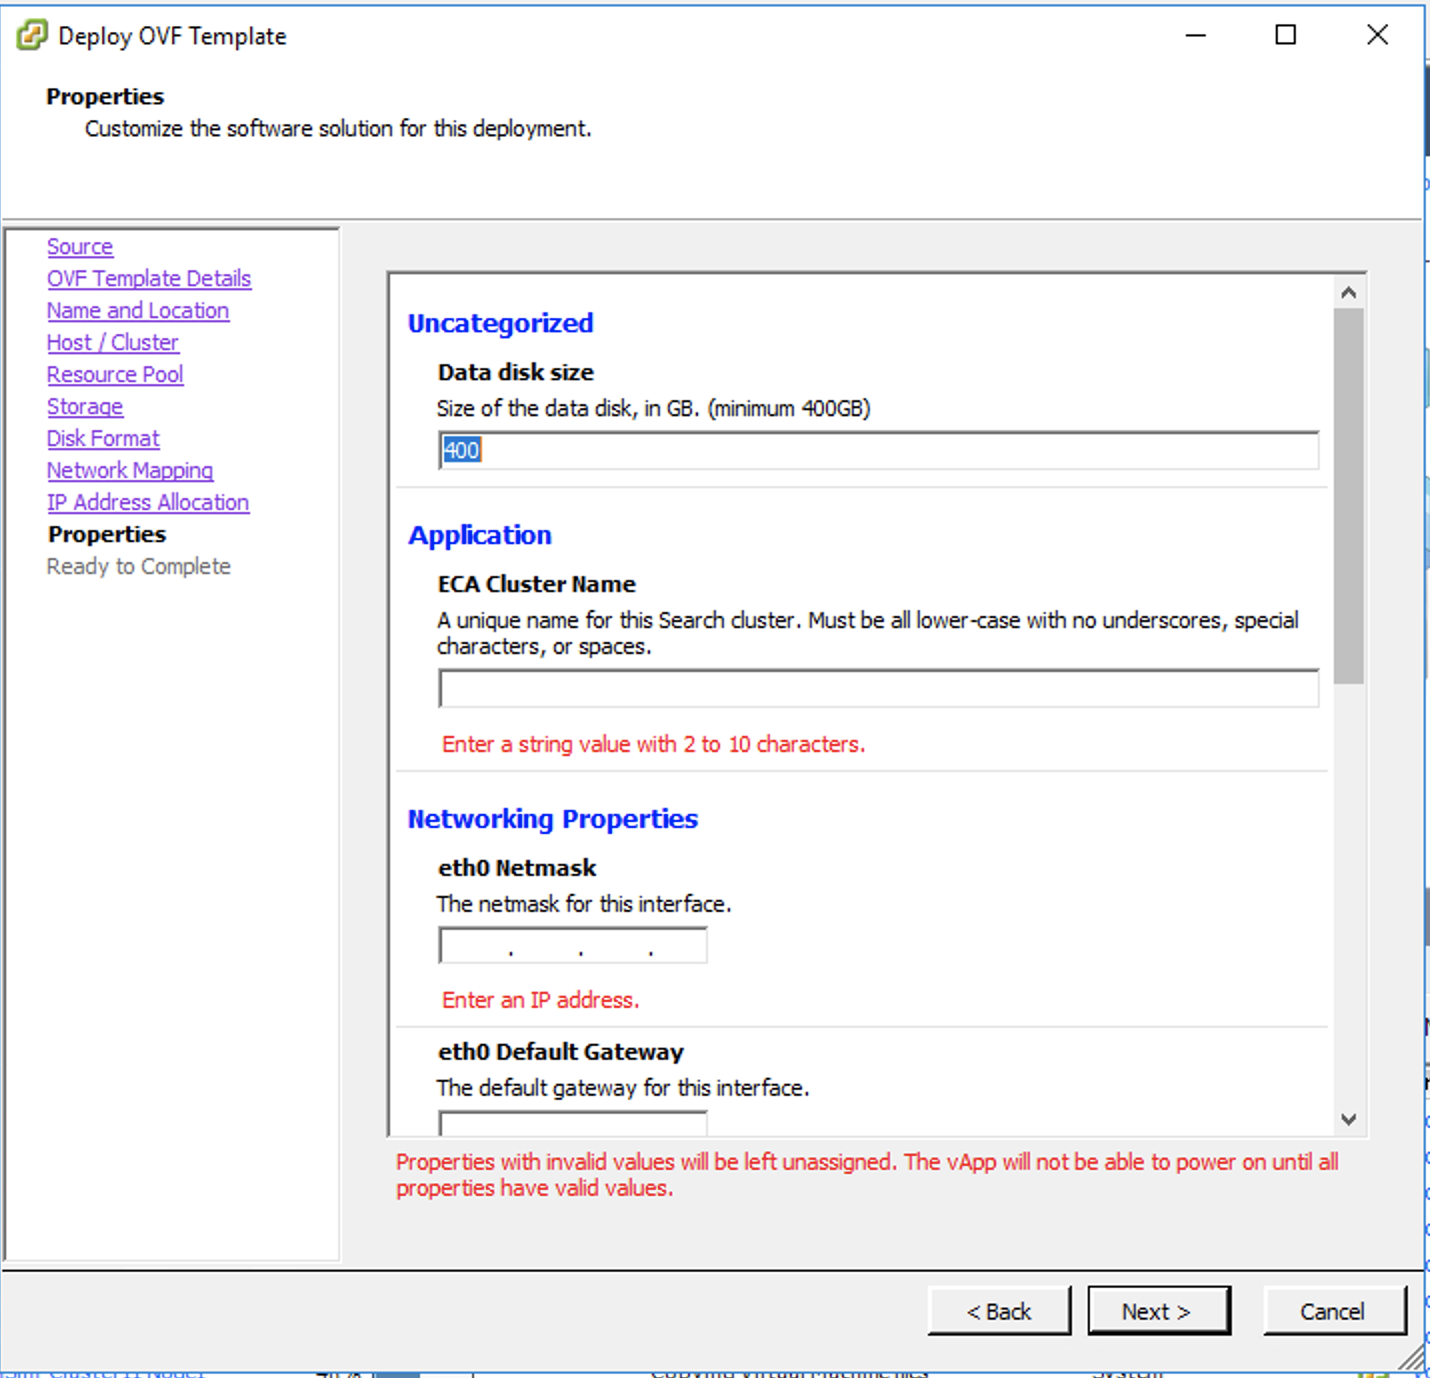
- Set the ECA cluster name (no special characters should be used, all lower case)
- NOTE: If using vertical scaling configuration edit the VM configuration with 12 vCPU and 32G of ram before power on.
- Power on the OVA
- SSH to the node 1 IP address
- Login with user ecaadmin and default password 3y3gl4ss
- Start up the cluster
- ecactl cluster up
- Get the appliance id and make a record of it - will be required to retrieve the license.
- ecactl version
- ecactl version
- Deployment done
- NEXT Steps Golden Copy Cluster Logical Configuration
- Configuration steps to add licenses, add clusters, add archive folders is covered in the Quick Start Steps of the Golden Copy Admin guide.
How to Deploy Virtual Accelerator Nodes (VAN's) (Optional)
This node type is optional and allows distributed scale out copy performance. The Golden Copy VM can copy files without VAN VM's deployed.
NOTE: VAN deployment requires 6 VM's
- Download the OVA following instructions here
- Deploy with vCenter
NOTE: vCenter 6.5 and 6.7 use FLASH or FLEX interface. HTML5 interface is not supported.- Select the OVA file.
- Set the node ip addresses, gateway IP, DNS, NTP IP
- Set the ECA cluster name (no special characters should be used, all lower case)
- Repeat 6 times to deploy all 6 VM's
- Power on the VM's
- SSH to the Golden Copy VM node 1 (first ip address VM deployed)
- Login with user ecaadmin and default password 3y3gl4ss
- Add each VM ip from node 1 using the command below:
- ecactl cluster add-node <ip_of_new_node> (note all 6 VM's must be booted and pingable)
- Upgrade each VM to the same release
- Download the upgrade file to each VAN vm and run the installer after making it executable with chmod 777 /home/ecaadmin/upgradefilename.run
- Run the upgrade
- ./home/ecaadmin/upgradefilename.run
- complete the upgrade on all VM's
- ecactl cluster up (from node 1)
- Verify boot process executes on all nodes in the cluster
- This will now allow copy jobs to use additional VAN's to copy files.
- Manage configuration from node 1 only.
Golden Copy and VAN VM node NFS Mount Configuration (Mandatory)
- Golden Copy uses PowerScale snapshots to copy content. Follow the steps below to add the NFS export to each of the VM's that was created in the steps above. 2 NFS mounts are required, 1 for copying data and one for recalling data.
- NOTE: An advanced configuration that enables SMB3 mount option with encryption is documented here. Consult with support before using this configuration.
- You will need to complete this steps on all nodes
- Cluster GUID and cluster name for each licensed cluster
- Cluster name as shown on top right corner after login to OneFS GUI
- Change to Root user
- ssh to each VM as ecaadmin over ssh
- sudo -s
- enter ecaadmin password 3y3gl4ss
- Create local mount directory (repeat for each Isilon cluster)
- mkdir -p /opt/superna/mnt/search/GUID/clusternamehere/ (replace GUID and clusternamehere with correct values)
- mkdir -p /opt/superna/mnt/recall/GUID/clusternamehere/
- (Only if you have Virtual accelerator nodes, otherwise skip) Use this command to run against all Golden Copy nodes, you will be prompted for ecaadmin password on each node.
- NOTE: Must run from the Golden Copy VM and all VAN VM's must be added to the eca-env-common.conf file.
- NOTE: example only.
- ecactl cluster exec "sudo mkdir -p /opt/superna/mnt/search/00505699937a5e1f5b5d8b2342c2c3fe9fd7/clustername"
- ecactl cluster exec "sudo mkdir -p /opt/superna/mnt/recall/00505699937a5e1f5b5d8b2342c2c3fe9fd7/clustername"
- Configure automatic NFS mount After reboot
- Prerequisites
- This will add a mount for content indexing to FSTAB on all nodes
- Build the mount command using cluster guid and cluster name replacing the yellow highlighted sections with correct values for your cluster. NOTE: This is only an example
- You will need a smartconnect name to mount the snapshot folder on the cluster. The Smartconnect name should be a system zone IP pool
- Replace smartconnect FQDN and <> with a DNS smartconnect name
- Replace <GUID> with cluster GUID
- Replace <name> with the cluster name
- On each VM in the Golden Copy cluster:
- ssh to the node as ecaadmin
- sudo -s
- enter ecaadmin password
- echo '<CLUSTER_NFS_FQDN>:/ifs/.snapshot /opt/superna/mnt/search/<GUID>/<NAME> nfs defaults,nfsvers=3 0 0'| sudo tee -a /etc/fstab
- echo '<CLUSTER_NFS_FQDN>:/ifs/goldencopy/recall /opt/superna/mnt/recall/<GUID>/<NAME> nfs defaults,nfsvers=3 0 0'| sudo tee -a /etc/fstab
- mount -a
- mount to verify the mount
- exit
- Login to next node via ssh
- repeat steps on each VM
- Prerequisites
- done
How to Configure Multi Golden Copy VM Parallel Copy (Mandatory)
- Vertically scaled VM or multi Golden Copy VM deployments
- The default deployment limits concurrent copies to 1 folder with a full or incremental job running. This must be changed for multi VM deployments to allow multiple folders to execute concurrent jobs (full or incremental).
- Single VM Limitations:
- Single VM deployment is only supported with single folder concurrent job execution.
- Steps to enable Job Concurrency
- Login to VM node 1 as eccadmin
- nano /opt/superna/eca/eca-env-common.conf
- Copy and paste the following settings shown below. This enables full or incremental on up to 30 folders defined within Golden Copy across all clusters added to Golden Copy.
- Consult product supported limits of jobs in the admin guide.
How To Upgrade Golden Copy Cluster
Offline Cluster No Internet Method
- Login to the support site https://support.superna.net and download the offline Golden Copy upgrade file
- Mandatory step:
- Take a vmware level snapshot of the appliance VM's before starting the upgrade for roll back.
- Read Me First
- 1.1.16 and later releases use the configuration backup command before upgrading to protect folder configurations and job history
- searchctl settings config export
- Shutdown the cluster
- Login to node 1 as ecaadmin over ssh
- run the command "ecactl cluster down"
- wait for the cluster to shutdown
- Modify the install file copied to the cluster node 1
- Assuming the file was copied to default location in /home/ecaadmin
- cd /home/ecaadmin
- chmod 777 <name of install file here>
- Run the installer
- ./name of install file here
- when prompted enter the ecaadmin password
- wait for all nodes to be upgraded to the new version
- NOTE: Restore custom memory configurations
- Delete any memory related lines from files below. Use control+x to save and exit after deleting the 3 lines highlighted below.
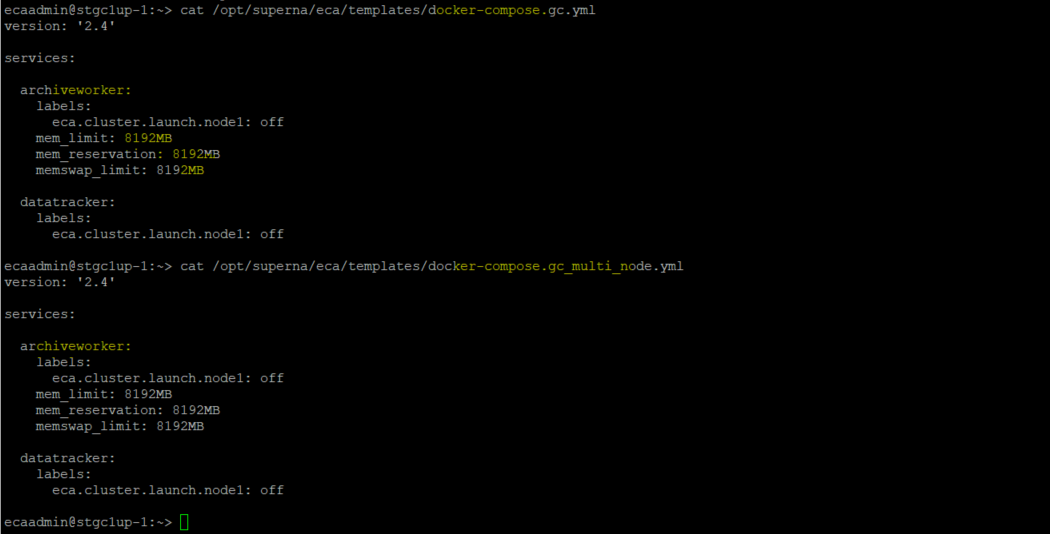
- nano /opt/superna/eca/templates/docker-compose.gc.yml
- nano /opt/superna/eca/templates/docker-compose.gc_multi_node.yml
- nano /opt/superna/eca/docker-compose.yml remove 3 lines for memory in archiveworker section.
- For changes to take effect
- echo y | ecactl cluster push-config
- Start the cluster
- ecactl cluster up
- wait until all nodes are started
- done.