- Technical Note
- Understanding how failover works
- Locate AD PowerScale machine Account Name
- Section 1 - All Steps performed on PRIMARY CLUSTER [For OneFS 8.x.x.x]
- 1A - SELF test
- 1B - CROSS test
- Section 2 - All Steps performed on DR CLUSTER [For OneFS 8.x.x.x]
- 1A - SELF test
- 1B - CROSS test
Technical Note
Abstract:
This technical note provides test methodologies to AD delegation is ready for failover under four scenarios:
- PRIMARY Cluster SELF SPN Delegation
- PRIMARY Cluster CROSS SPN Delegation
- DR Cluster SELF SPN Delegation
-
DR Cluster CROSS SPN Delegation
Use this procedure to validate AD delegation is done correctly. A common mistake is the computer account delegation.
Understanding how failover works
Failover process requires the target cluster to have AD permissions to manage SPN(s) on the source cluster AD machine account. The delegation guide sets this up for each cluster machine account to failover in either direction.
If not setup correctly the following issues are frequently seen:
- Ldap constraint violation
- Ldap permissions error
Locate AD PowerScale machine Account Name
Log into you cluster as ‘root’ and run the following CLI command to locate machine account name:
# isi auth ads list -v
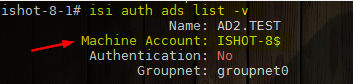
For OneFS 8.x
Section 1 - All Steps performed on PRIMARY CLUSTER [For OneFS 8.x.x.x]
1A - SELF test
-
CREATE SPN for PRIMARY Cluster [oneFS 8.x]
For this test, you will need 2 OneFS 8.x.x.x clusters connected to same AD.
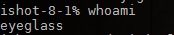
Step 1. Log in to your PRIMARY cluster using “eyeglass” user and issue the following command
“whoami”
Step 2. Add a SPN by using the following command
“sudo isi_classic auth ads spn add --machinecreds --spn=HOST/superna.test.spn --domain=xxx”

[--machinecred is needed to authenticate your cluster]
[--domain= Enter your Domain name]
Step 3. Check if SPN was created successfully.
“sudo isi_classic auth ads spn list --machinecreds --domain=xxx”

[--machinecred is needed to authenticate your cluster]
[--domain= Enter your Domain name]
-
DELETE SPN for PRIMARY Cluster [oneFS 8.x]
For this test, you will need OneFS 8.x.x.x clusters connected to same AD.
Step 1. Log in to your PRIMARY cluster using “eyeglass” user and issue the following command
“whoami”
Step 2. Delete the SPN from the same cluster by issuing the following command
“sudo isi_classic auth ads spn delete --machinecreds --spn=HOST/superna.test.spn --domain=xxx”

[--machinecred is needed to authenticate your cluster]
[--domain= Enter your Domain name]
Step 3. Check if SPN was deleted successfully.
“sudo isi_classic auth ads spn list --machinecreds --domain=xxx”

[--machinecred is needed to authenticate your cluster]
[--domain= Enter your Domain name]
1B - CROSS test
-
CREATE SPN for DR Cluster [oneFS 8.x]
For this test, you will need OneFS 8.x.x.x clusters connected to same AD.
Step 1. Log in to your PRIMARY cluster using “eyeglass” user and issue the following command
“whoami”
Step 2. Add SPN for DR cluster using PRIMARY cluster
“sudo isi_classic auth ads spn add --machinecreds --account=xxx$ --spn=HOST/superna.test.spn --domain=xxx”
[--account= is the AD computer machine name that we are deleting SPN from. “$” sign is needed after the AD computer name.]

[--machinecred is needed to authenticate your cluster]
[--domain= Enter your Domain name]
Step 3. Check if SPN was created successfully
“sudo isi_classic auth ads spn list --machinecreds --account=xxx$ --domain=xxx”
[--account= is the AD computer machine name that we are adding SPN to. “$” sign is needed after the AD computer name.]

[--machinecred is needed to authenticate your cluster]
[--domain= Enter your Domain name]
-
DELETE SPN for DR Cluster [oneFS 8.x]
For this test, you will need OneFS 8.x.x.x clusters connected to same AD.
Step 1. Log in to your PRIMARY cluster using “eyeglass” user and issue the following command
“whoami”
Step 2. Delete SPN for DR cluster using PRIMARY cluster
“sudo isi_classic auth ads spn delete --machinecreds --account=xxx$ --spn=HOST/superna.test.spn --domain=xxx”
[--account= is the AD computer machine name that we are deleting SPN from. “$” sign is needed after the AD computer name.]

[--machinecred is needed to authenticate your cluster]
[--domain= Enter your Domain name]
Step 3. Check if SPN was deleted successfully
“sudo isi_classic auth ads spn list --machinecreds --account=xxx$ --domain=xxx”

[--account= is the AD computer machine name that we are deleting SPN from. “$” sign is needed after the AD computer name.]
[--machinecred is needed to authenticate your cluster]
[--domain= Enter your Domain name]
Section 2 - All Steps performed on DR CLUSTER [For OneFS 8.x.x.x]
1A - SELF test
-
CREATE SPN for DR Cluster [oneFS 8.x]
For this test, you will need OneFS 8.x.x.x clusters connected to same AD.
Step 1. Log in to your DR cluster using “eyeglass” user and issue the following command
“whoami”
Step 2. Add a SPN by using the following command
“sudo isi_classic auth ads spn add --machinecreds --spn=HOST/superna.test.spn.domain.com --domain=xxx”

[--machinecred is needed to authenticate your cluster]
[--domain= Enter your Domain name]
Step 3. Check if SPN was created successfully.
“sudo isi_classic auth ads spn list --machinecreds --domain=xxx”

[--machinecred is needed to authenticate your cluster]
[--domain= Enter your Domain name]
-
DELETE SPN for DR Cluster [oneFS 8.x]
For this test, you will need OneFS 8.x.x.x clusters connected to same AD.
Step 1. Log in to your DR cluster using “eyeglass” user and issue the following command
“whoami”
Step 2. Delete the SPN from the same cluster by issuing the following command
“sudo isi_classic auth ads spn delete --machinecreds --spn=HOST/superna.test.spn --domain=xxx”

[--machinecred is needed to authenticate your cluster]
[--domain= Enter your Domain name]
Step 3. Check if SPN was deleted successfully.
“sudo isi_classic auth ads spn list --machinecreds --domain=xxx”
[--machinecred is needed to authenticate your cluster]
[--domain= Enter your Domain name]
1B - CROSS test
-
CREATE SPN for PRIMARY Cluster [oneFS 8.x]
For this test, you will need OneFS 8.x.x.x clusters connected to same AD.
Step 1. Log in to your DR cluster using “eyeglass” user and issue the following command
“whoami”
Step 2. Add SPN for PRIMARY cluster using DR cluster
“sudo isi_classic auth ads spn add --machinecreds --account=xxx$ --spn=HOST/superna.test.spn --domain=xxx”
[--account= is the AD computer machine name that we are deleting SPN from. “$” sign is needed after the AD computer name.]

[--machinecred is needed to authenticate your cluster]
[--domain= Enter your Domain name]
Step 3. Check if SPN was created successfully
“sudo isi_classic auth ads spn list --machinecreds --account=xxx$ --domain=xxx”
[--account= is the AD computer machine name that we are deleting SPN from. “$” sign is needed after the AD computer name.]

[--machinecred is needed to authenticate your cluster]
[--domain= Enter your Domain name]
-
DELETE SPN for PRIMARY Cluster [oneFS 8.x]
For this test, you will need OneFS 8.x.x.x clusters connected to same AD.
Step 1. Log in to your DR cluster using “eyeglass” user and issue the following command
“whoami”
Step 2. Delete SPN for PRIMARY cluster using DR cluster
“sudo isi_classic auth ads spn delete --machinecreds --account=xxx$ --spn=HOST/superna.test.spn.domain.com --domain=xxx”
[--account= is the AD computer machine name that we are deleting SPN from. “$” sign is needed after the AD computer name.]

[--machinecred is needed to authenticate your cluster]
[--domain= Enter your Domain name]
Step 3. Check if SPN was deleted successfully
“sudo isi_classic auth ads spn list --machinecreds --account=xxx$ --domain=xxx”
[--account= is the AD computer machine name that we are deleting SPN from. “$” sign is needed after the AD computer name.]
[--machinecred is needed to authenticate your cluster]
[--domain= Enter your Domain name]