Eyeglass Solutions Publication
Sentinel Incident integration and Log Analytics Logging with Zero Trust Alerts
Home
- Ransomware Defender & Easy Auditor Sentinel Webhook alarm to Incident Integration
- Support Statement
- Overview
- How to Configure Sentinel Logic App Webhook endpoint Workflow
- How to configure Zero Trust Webhooks using the Logic App endpoint URL
- How to Verify log alarm data has reached the Sentinel Log Service
- How to Create an Sentinel Analytics Rule to create Security Incidents
- A Sentinel Sample incident created by Superna Defender Zero trust webhook and Logic app in Azure
- How to Configure Data Security Essentials
- Overview
- Requirements
- Features
- Steps to Configure Event Forwarding Integration
- Data Security Essentials Events in Sentinel
Ransomware Defender & Easy Auditor Sentinel Webhook alarm to Incident Integration
Support Statement
- NOTE: This documentation is provided "as is" without support for 3rd party software. The level of support for this integration guide is best effort without any SLA on response time. No 3rd party product support can be provided by Superna directly. 3rd party components require support contracts
Overview
This integration enables customers to send Zero Trust alerts directly into Sentinel
How to Configure Sentinel Logic App Webhook endpoint Workflow
- This example uses Azure Sentinel Deployment option and record the workspace ID and primary key of the lag Analytics configured for use with your Sentinel Deployment.
- Create a Logic App with HTTP trigger to send log data to Sentinel
- The app name should be descriptive. Create the logic app with all the defaults.
- Once crated click go to resource
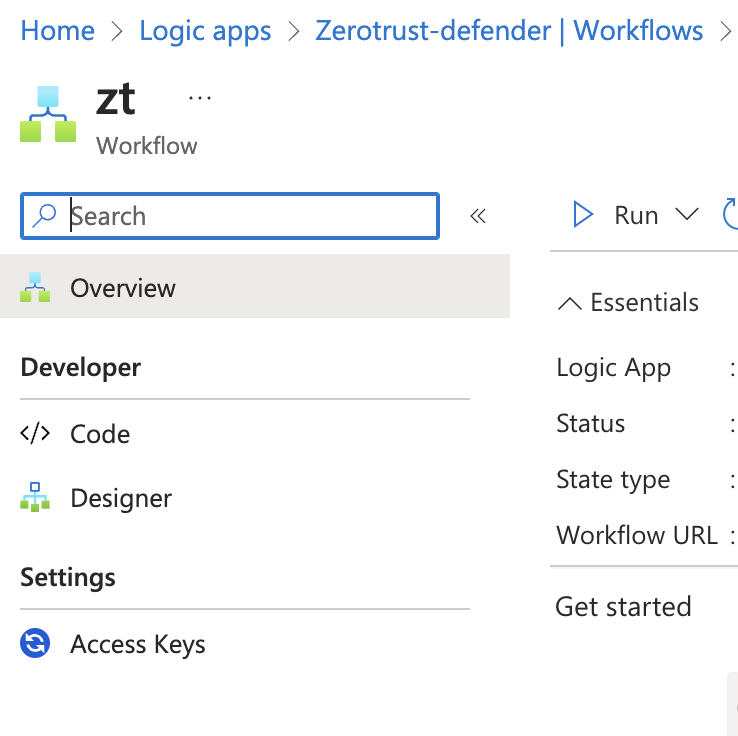
- Click the Workflows tab
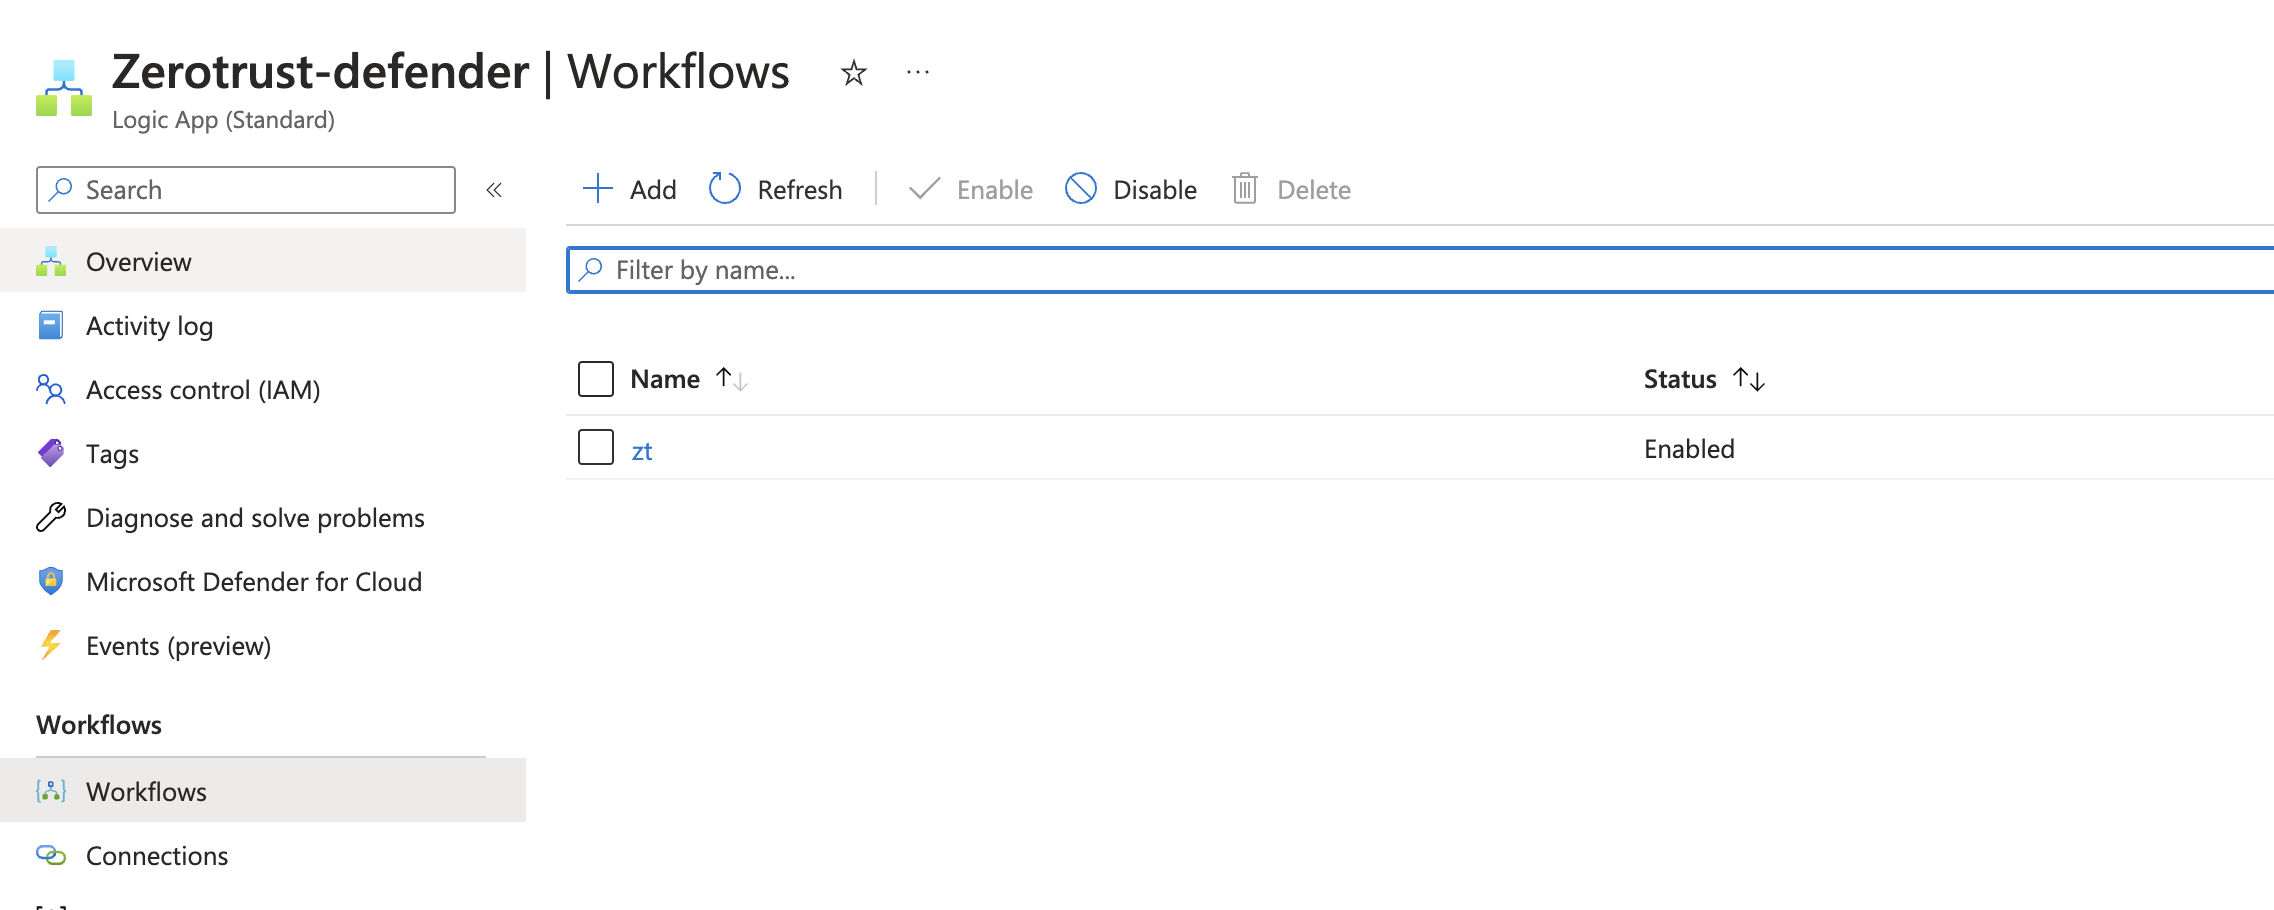
- Create a new workflow by clicking Add and then select the designer option
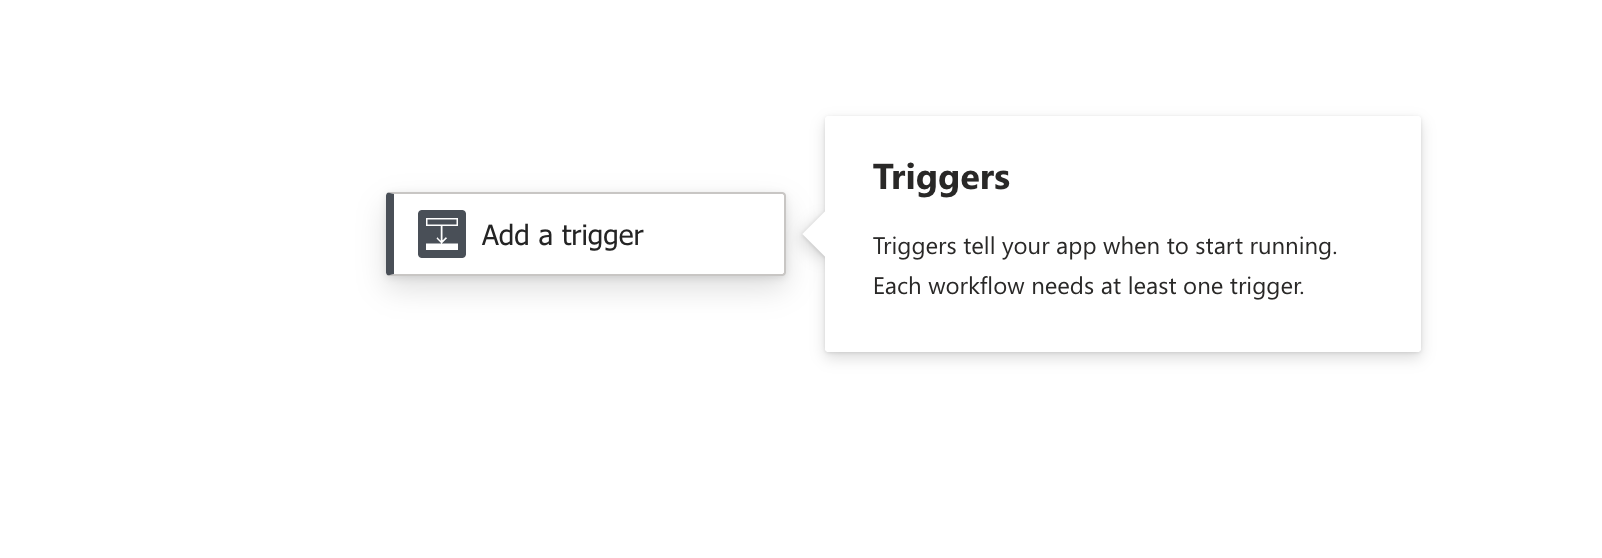
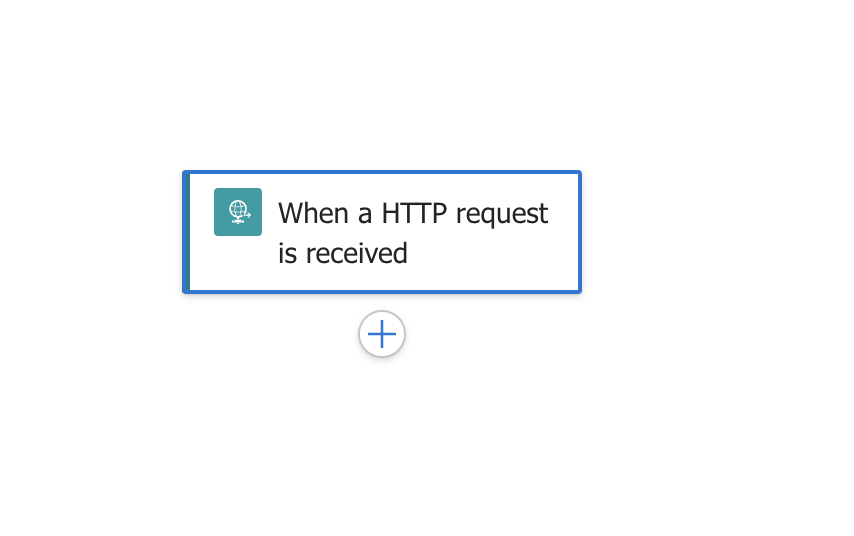
- Click add Trigger
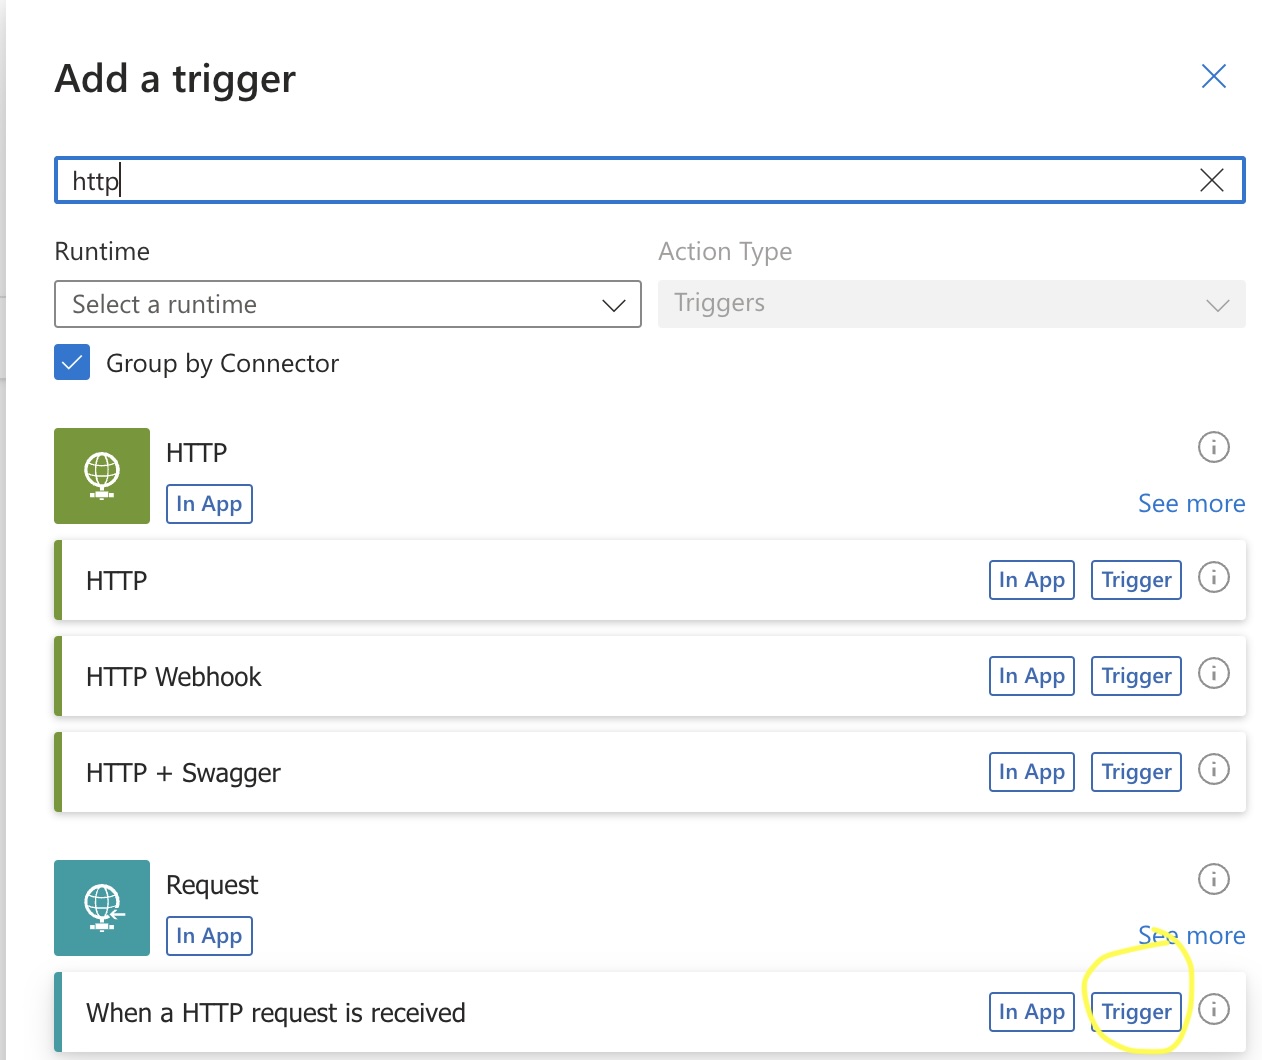
- Search for HTTP and select the http request option
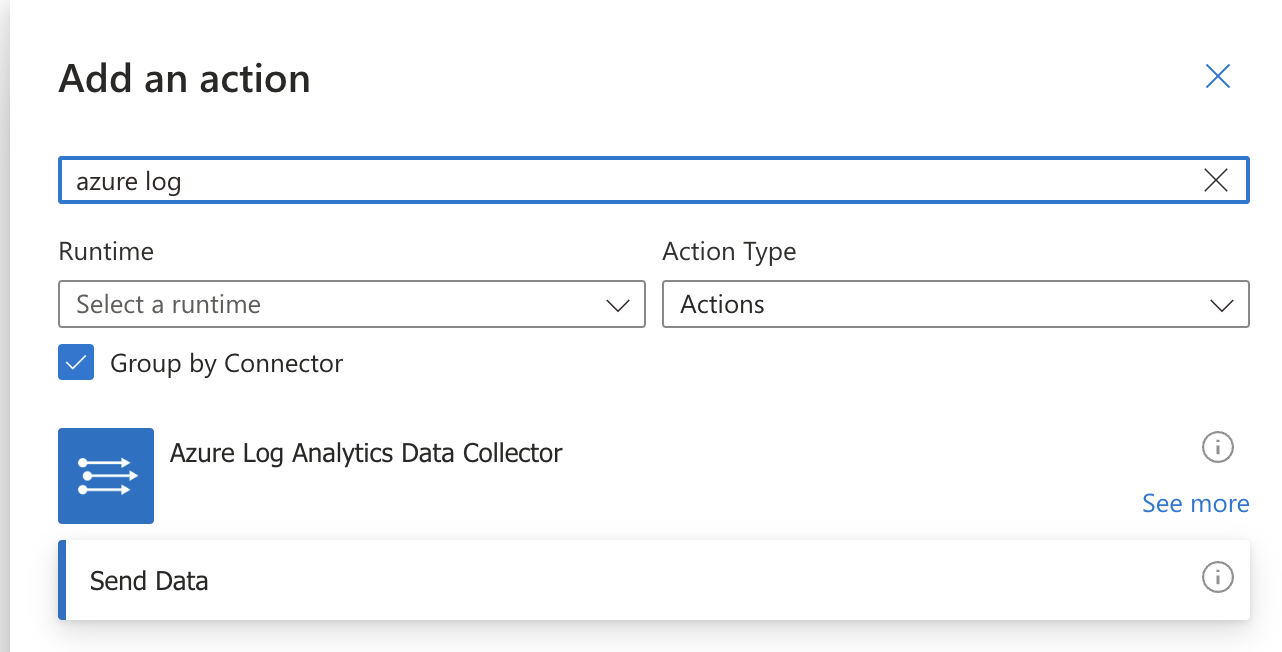
- Now add another step to the workflow to send incoming webhook data to Sentinel log analytics data collector. Click the + sign
- Search for "Azure Log" and select the Azure Log Analytics Data Collector "Send Data"
- Click in the json Request Body Field and click the lighting bolt that appears and select the Body option as shown below.
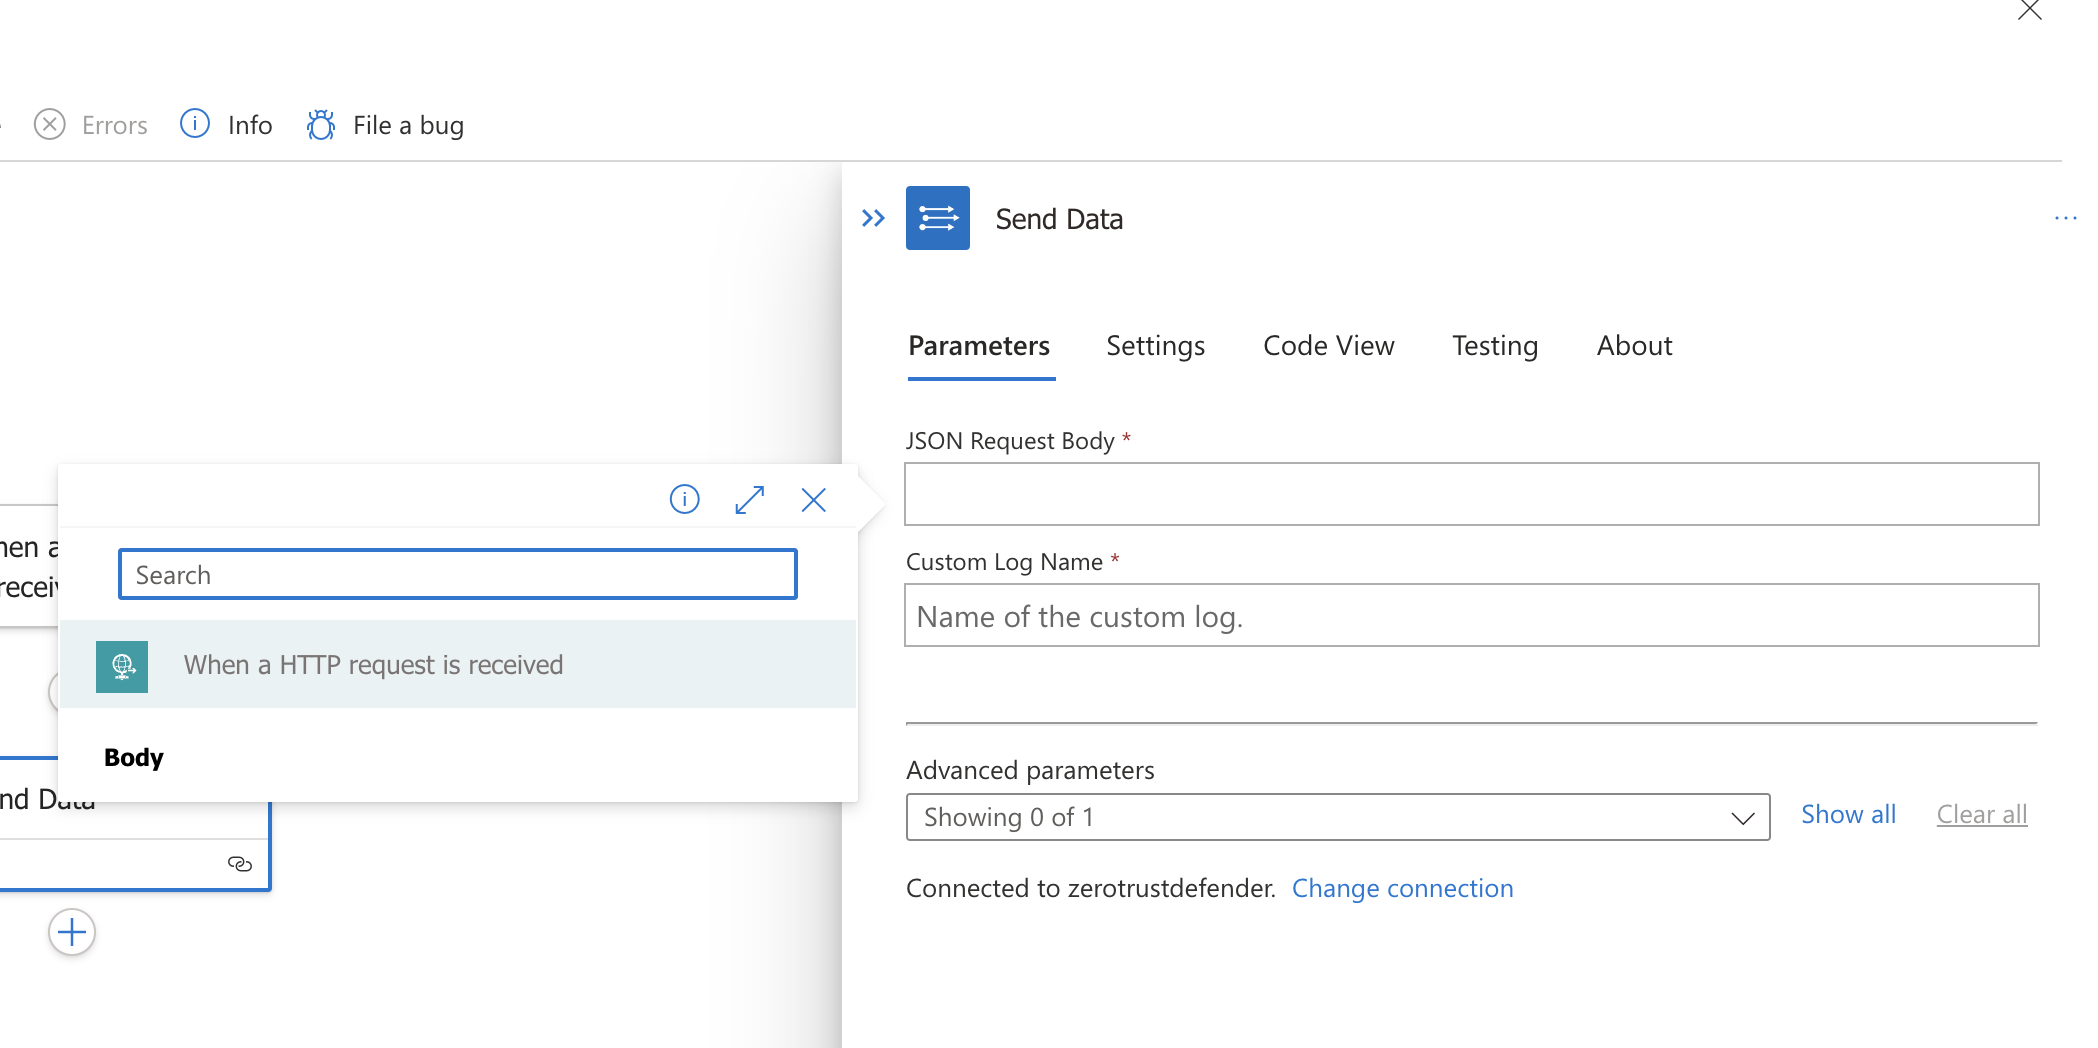
- Now enter a name for the collector. NOTE: This name will be the name of the log table created in Sentinel Custom logs section.

- Configuration is not completed.
- To generate the endpoint URL for your Logic app click the save button on the workflow.
- Now click on the workflow name to record the endpoint URL that will be used within Defender Zero Trust interface configuration.
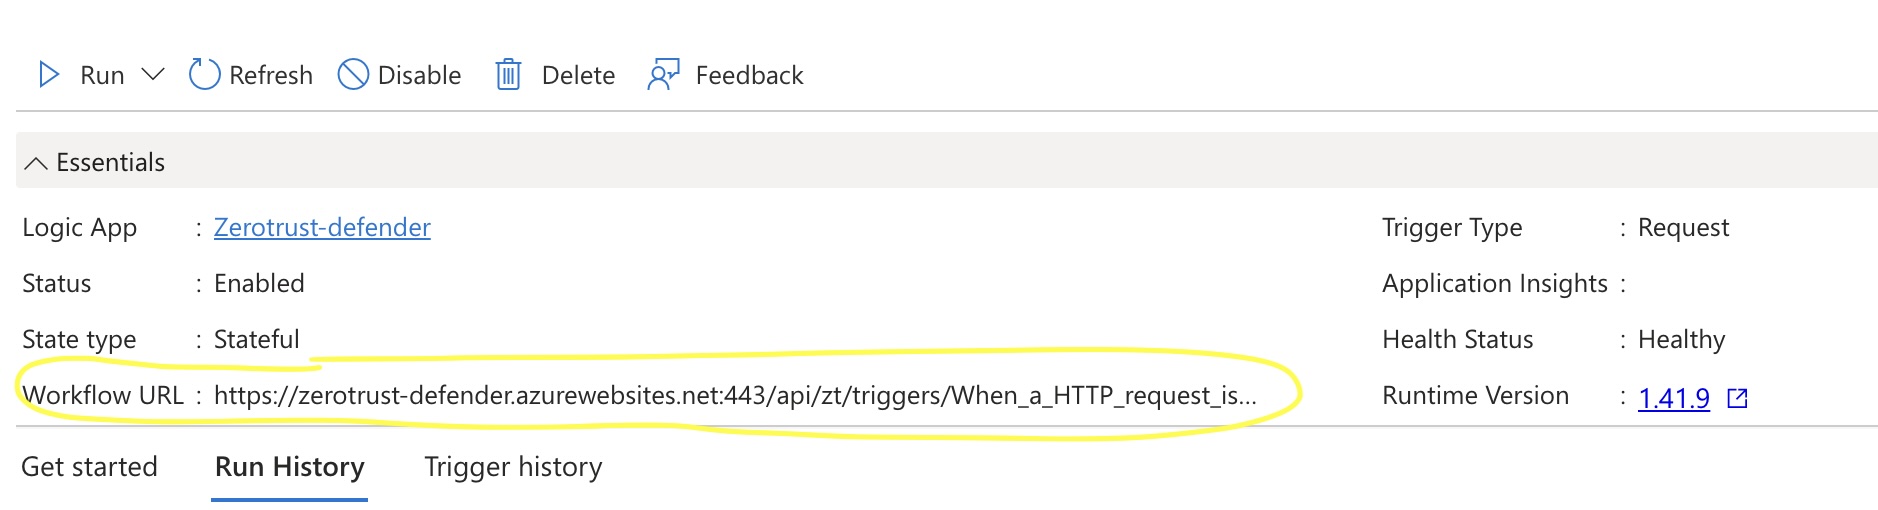
- Use the click to copy option and record this url for the steps below.
- done
How to configure Zero Trust Webhooks using the Logic App endpoint URL
- The next step creates an Zero Trust Webhook URL.
- Configure Zero Trust endpoint in Ransomware Defender Zero Trust tab.
- Recommended Configuration: Only Critical and Major events and only the webhooks that set lockout or delayed lockout. Customers can customize based on specific requirements. The goal is to send findings versus a list of alarms that do not pinpoint a security incident.
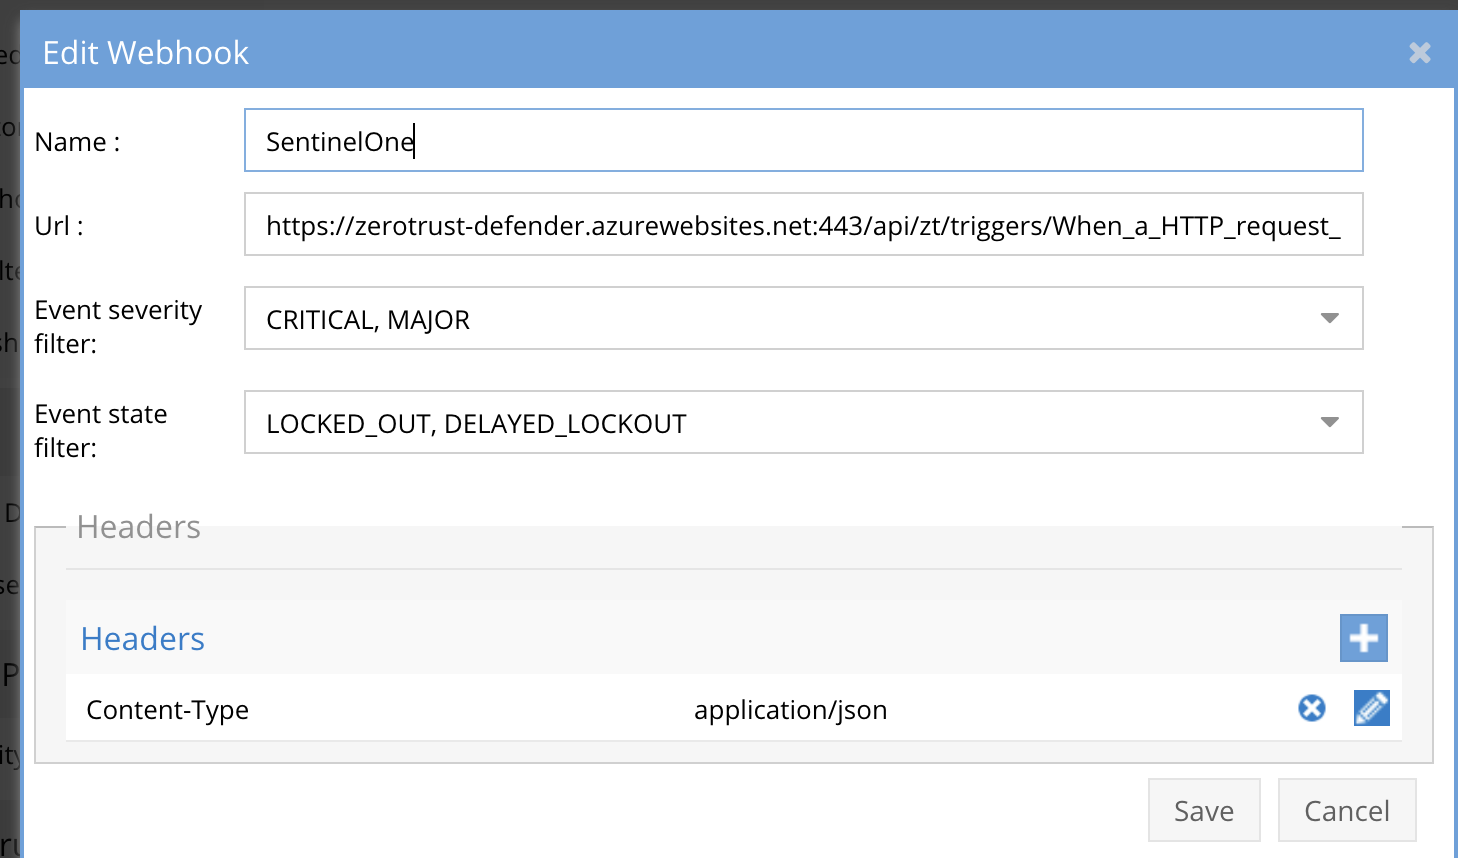
- The endpoint url above will the Logic App workflow URL from the steps above and will send Webhooks to the application service listening on port 443.
- Add the Content-Type header with value of application/json as shown above to complete the webhook configuration.
- Click save to commit the configuration.
- Click save on the main Webhook configuration page
- Configure Zero Trust endpoint in Ransomware Defender Zero Trust tab.
- Test the configuration by clicking the Test Webhooks button. Verify that no error message is returned.
How to Verify log alarm data has reached the Sentinel Log Service
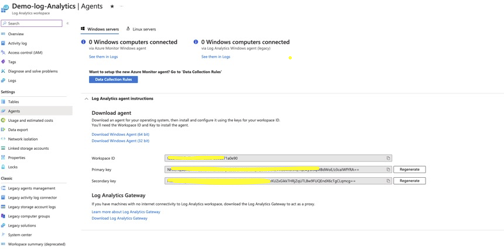
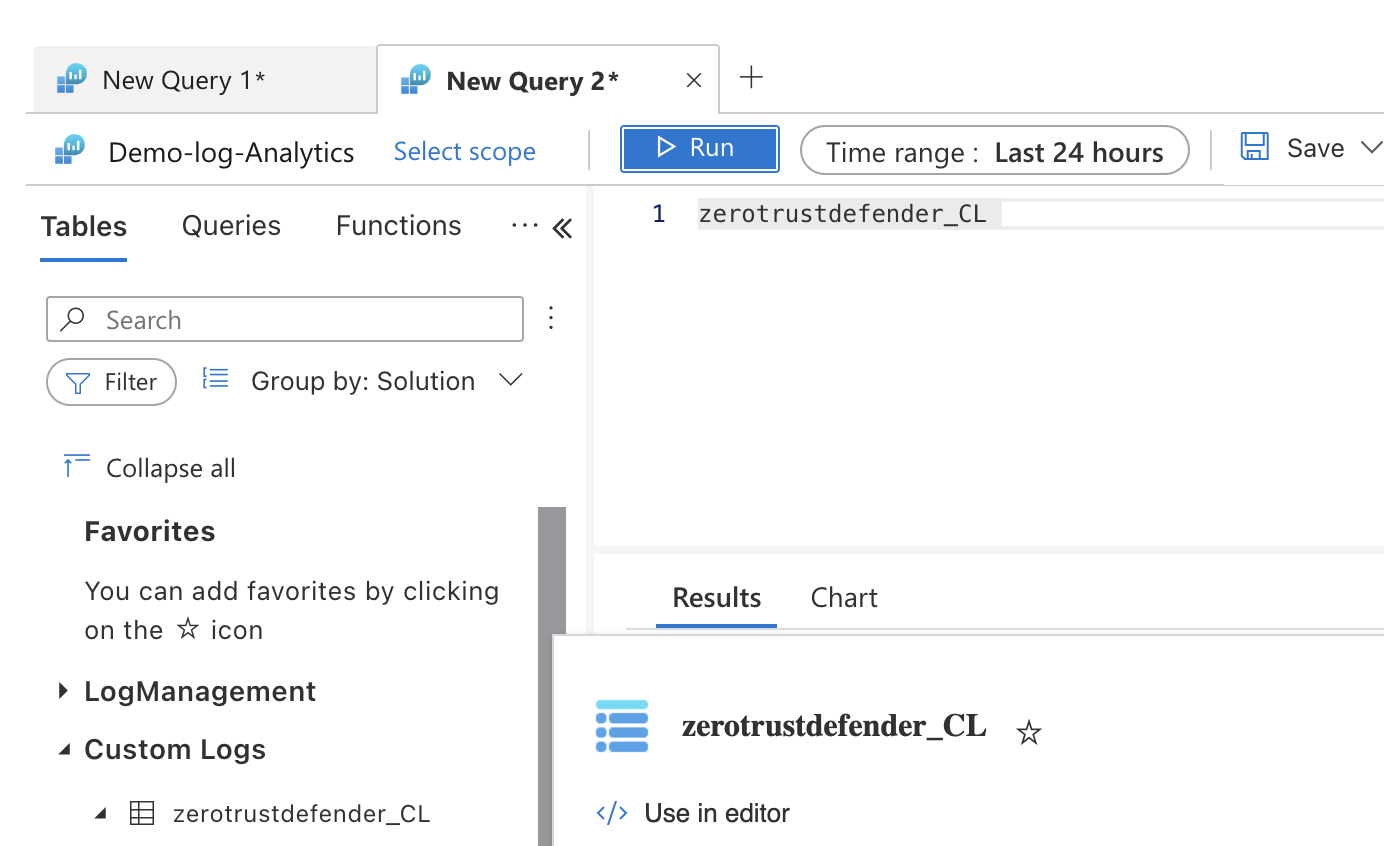
- Login to Azure and locate the Data log workspace attached to your Sentinel installation.

- Select the Logs menu
- Expand the Custom Logs menu

- If you successfully sent alarm data with the test function the Log table will be created automatically using the name configured in the Logic app.
- Double click the table name to add it to the query
- Click the run button to exeucte the query
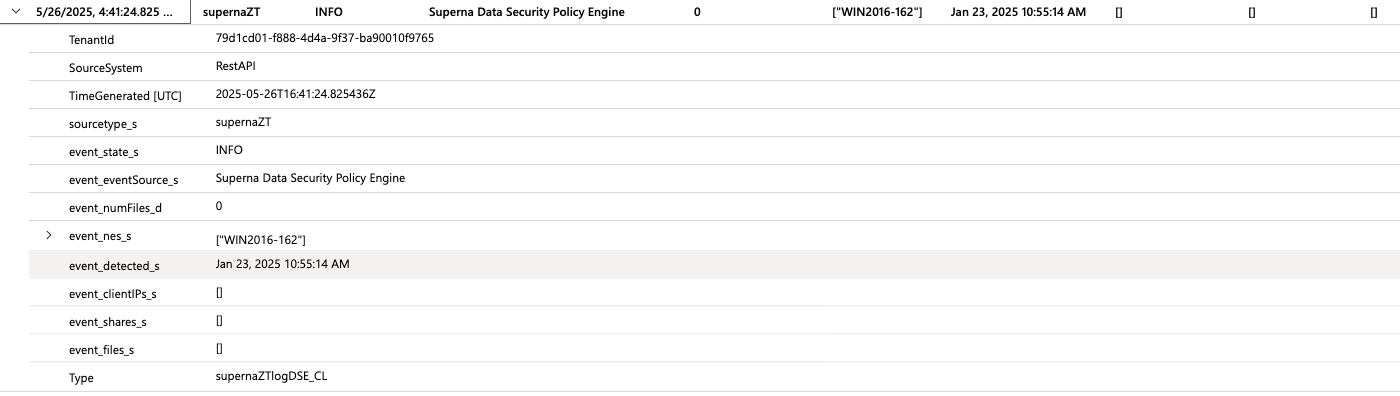
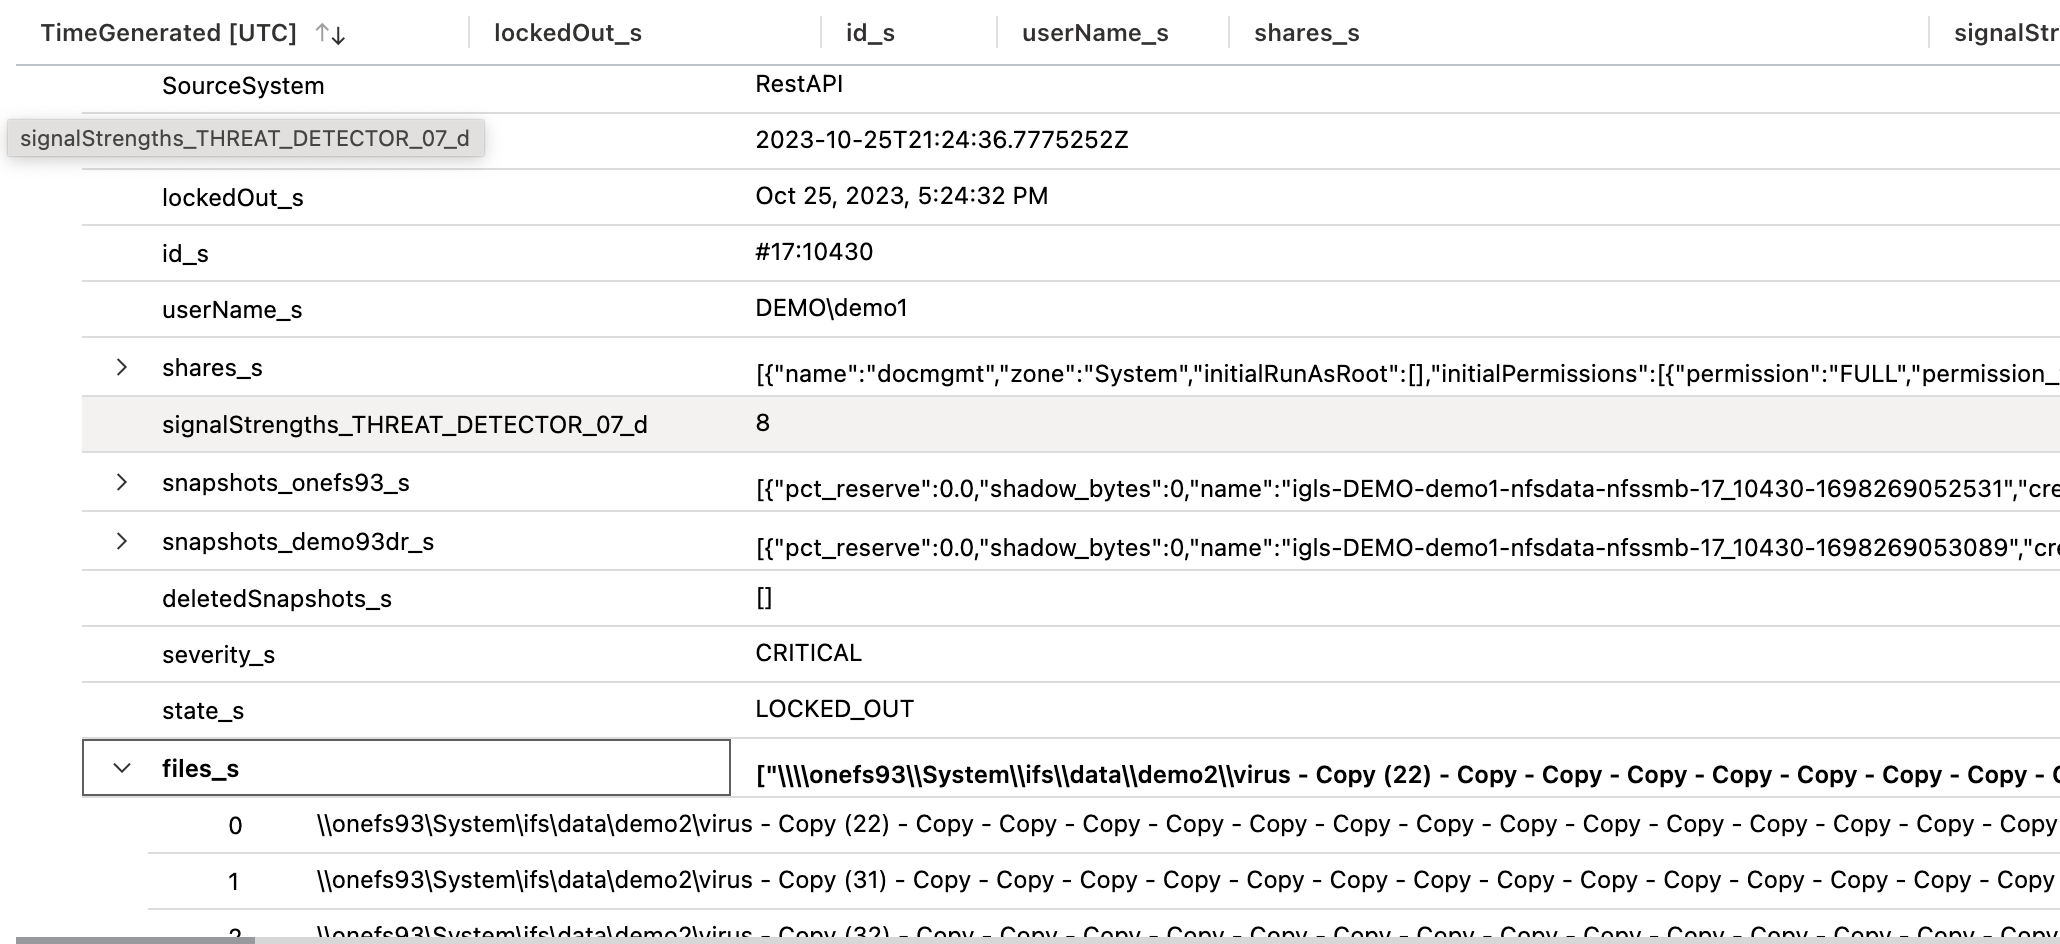
- The results will show each alarm sent from Defender Webhook including the test webhook.

- Expand an entry to see the payload of the alarm and all the Zero Trust fields included in the alarm data, example list of files, AD user name, smb share list etc..
- Done
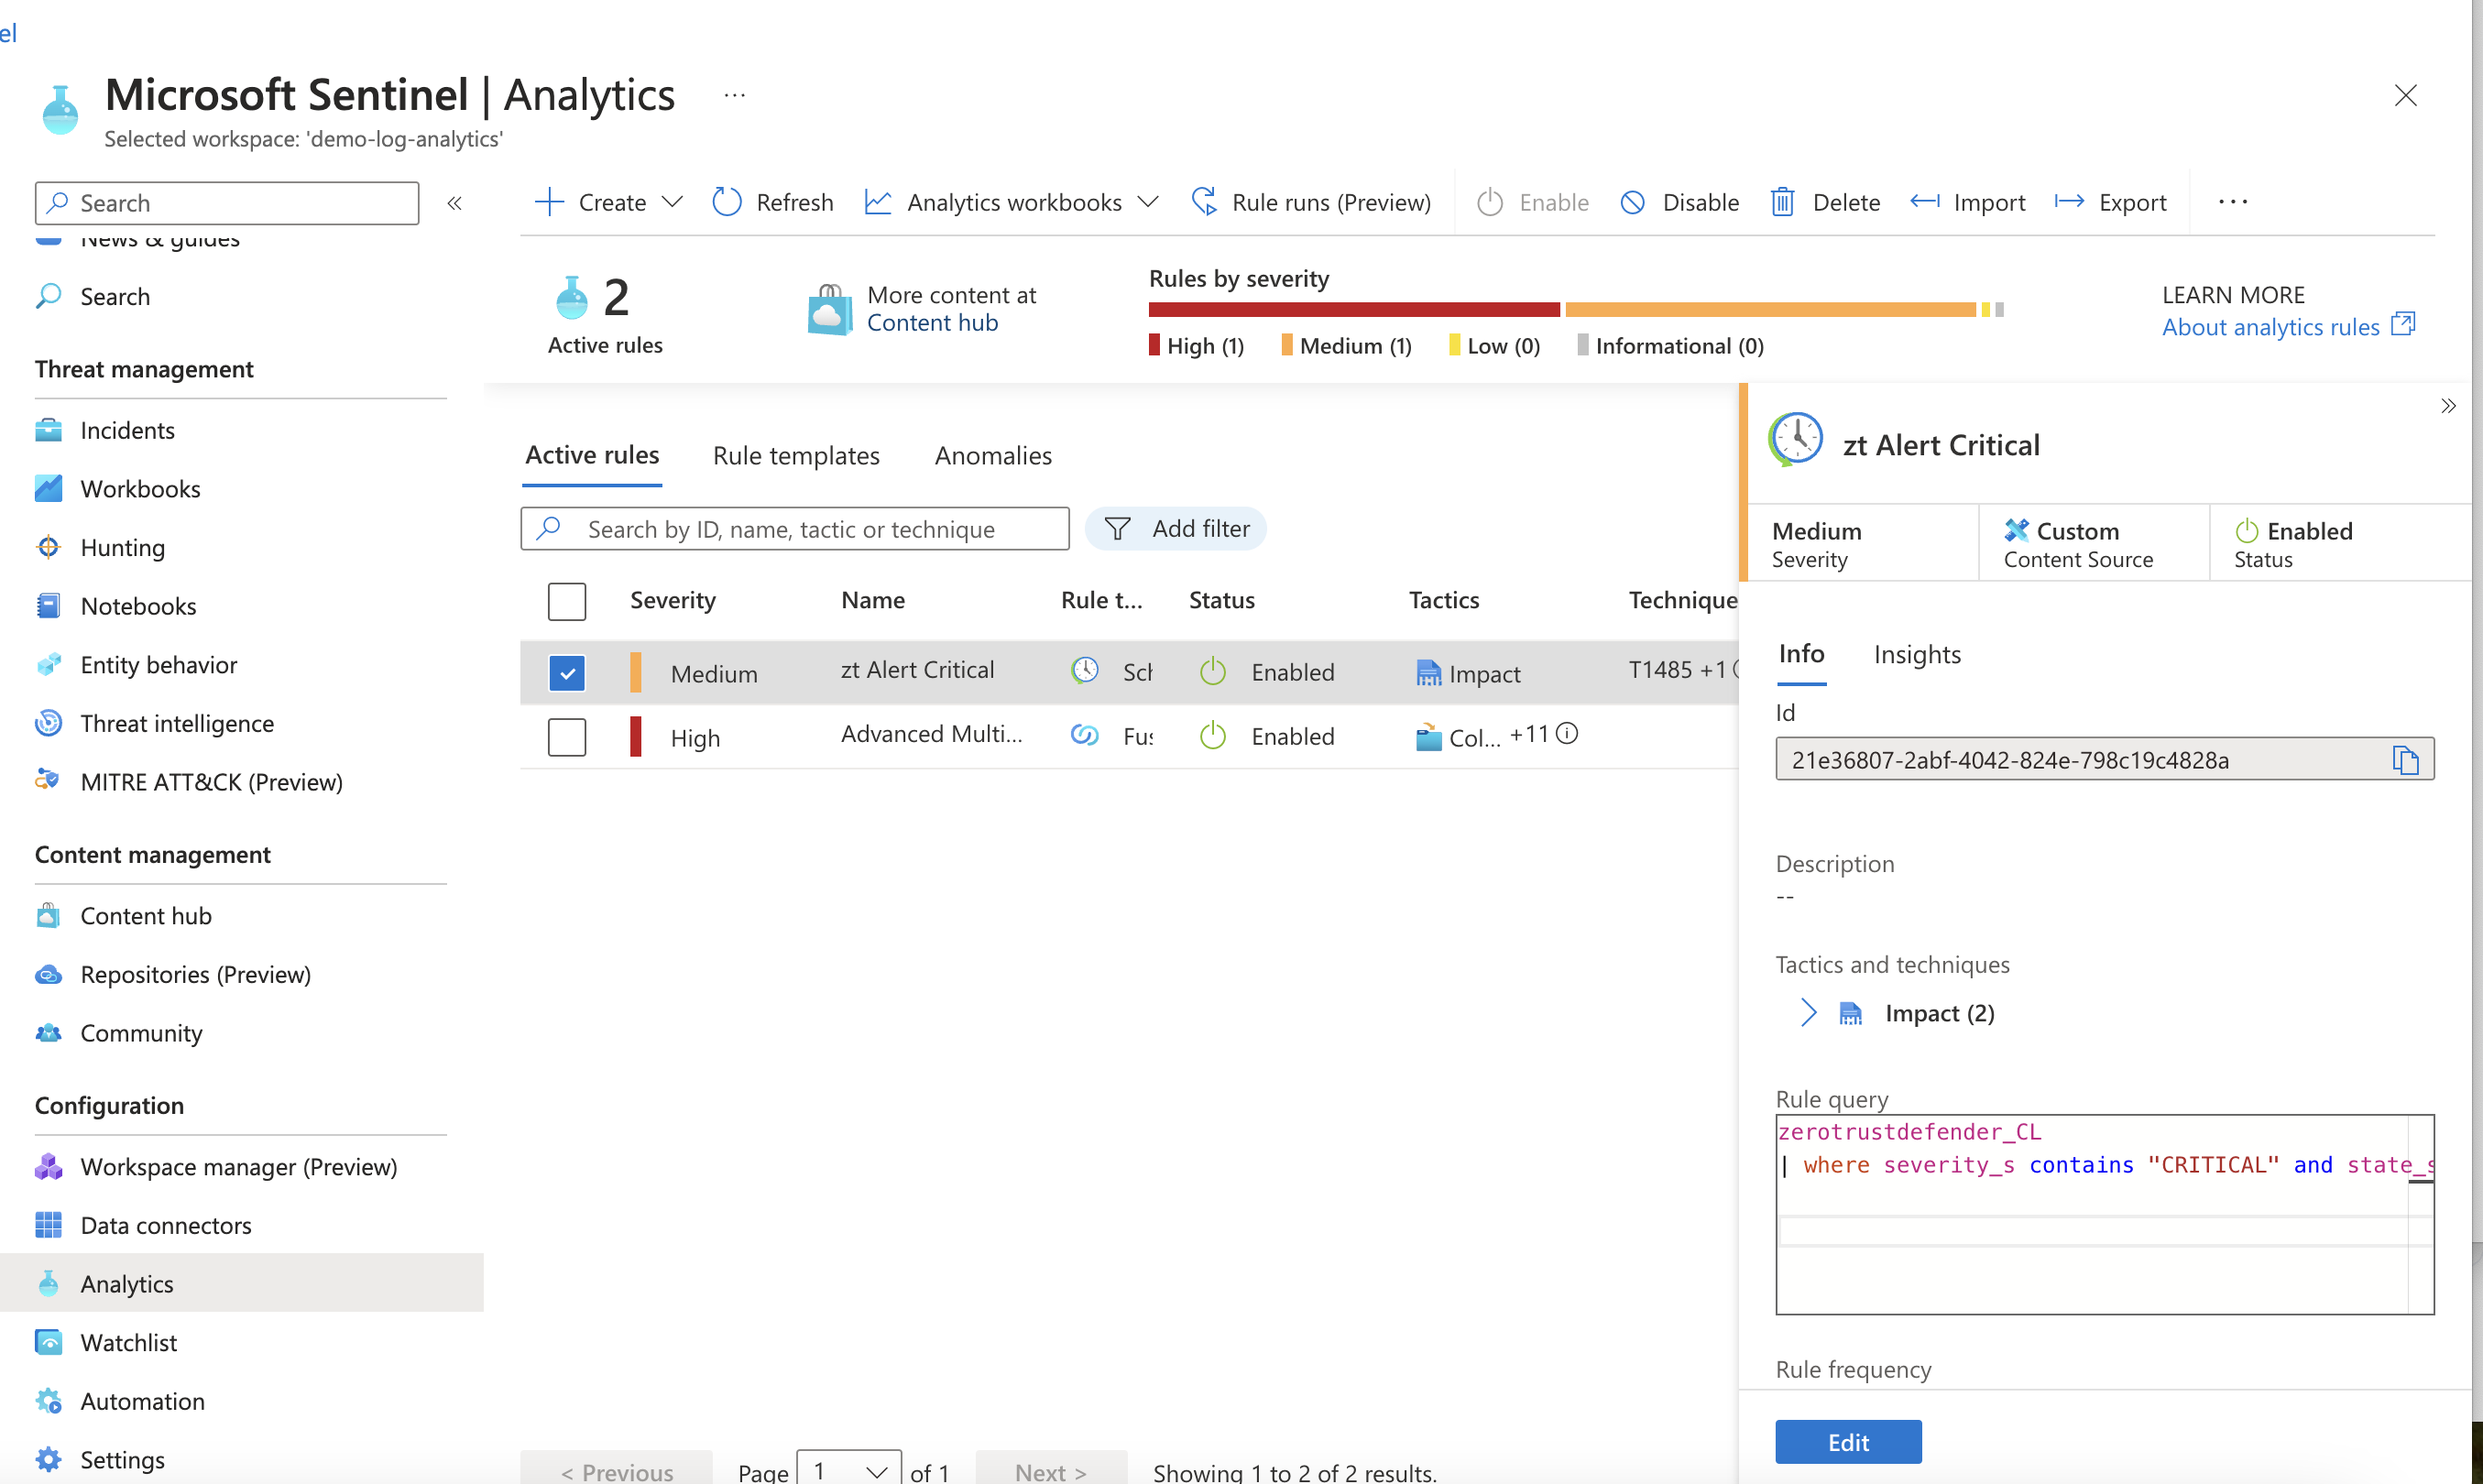
How to Create an Sentinel Analytics Rule to create Security Incidents
- Overview
- This procedure will create an analytics rule that uses the log data sent from Webhooks to create a security incident with customer data displayed from the log data sent by Defender. This is a single example on how to create an Incident trigger and can be duplicated for more advanced configurations.
- Using the same log query interface from the step above run.
- Build a query as follows:
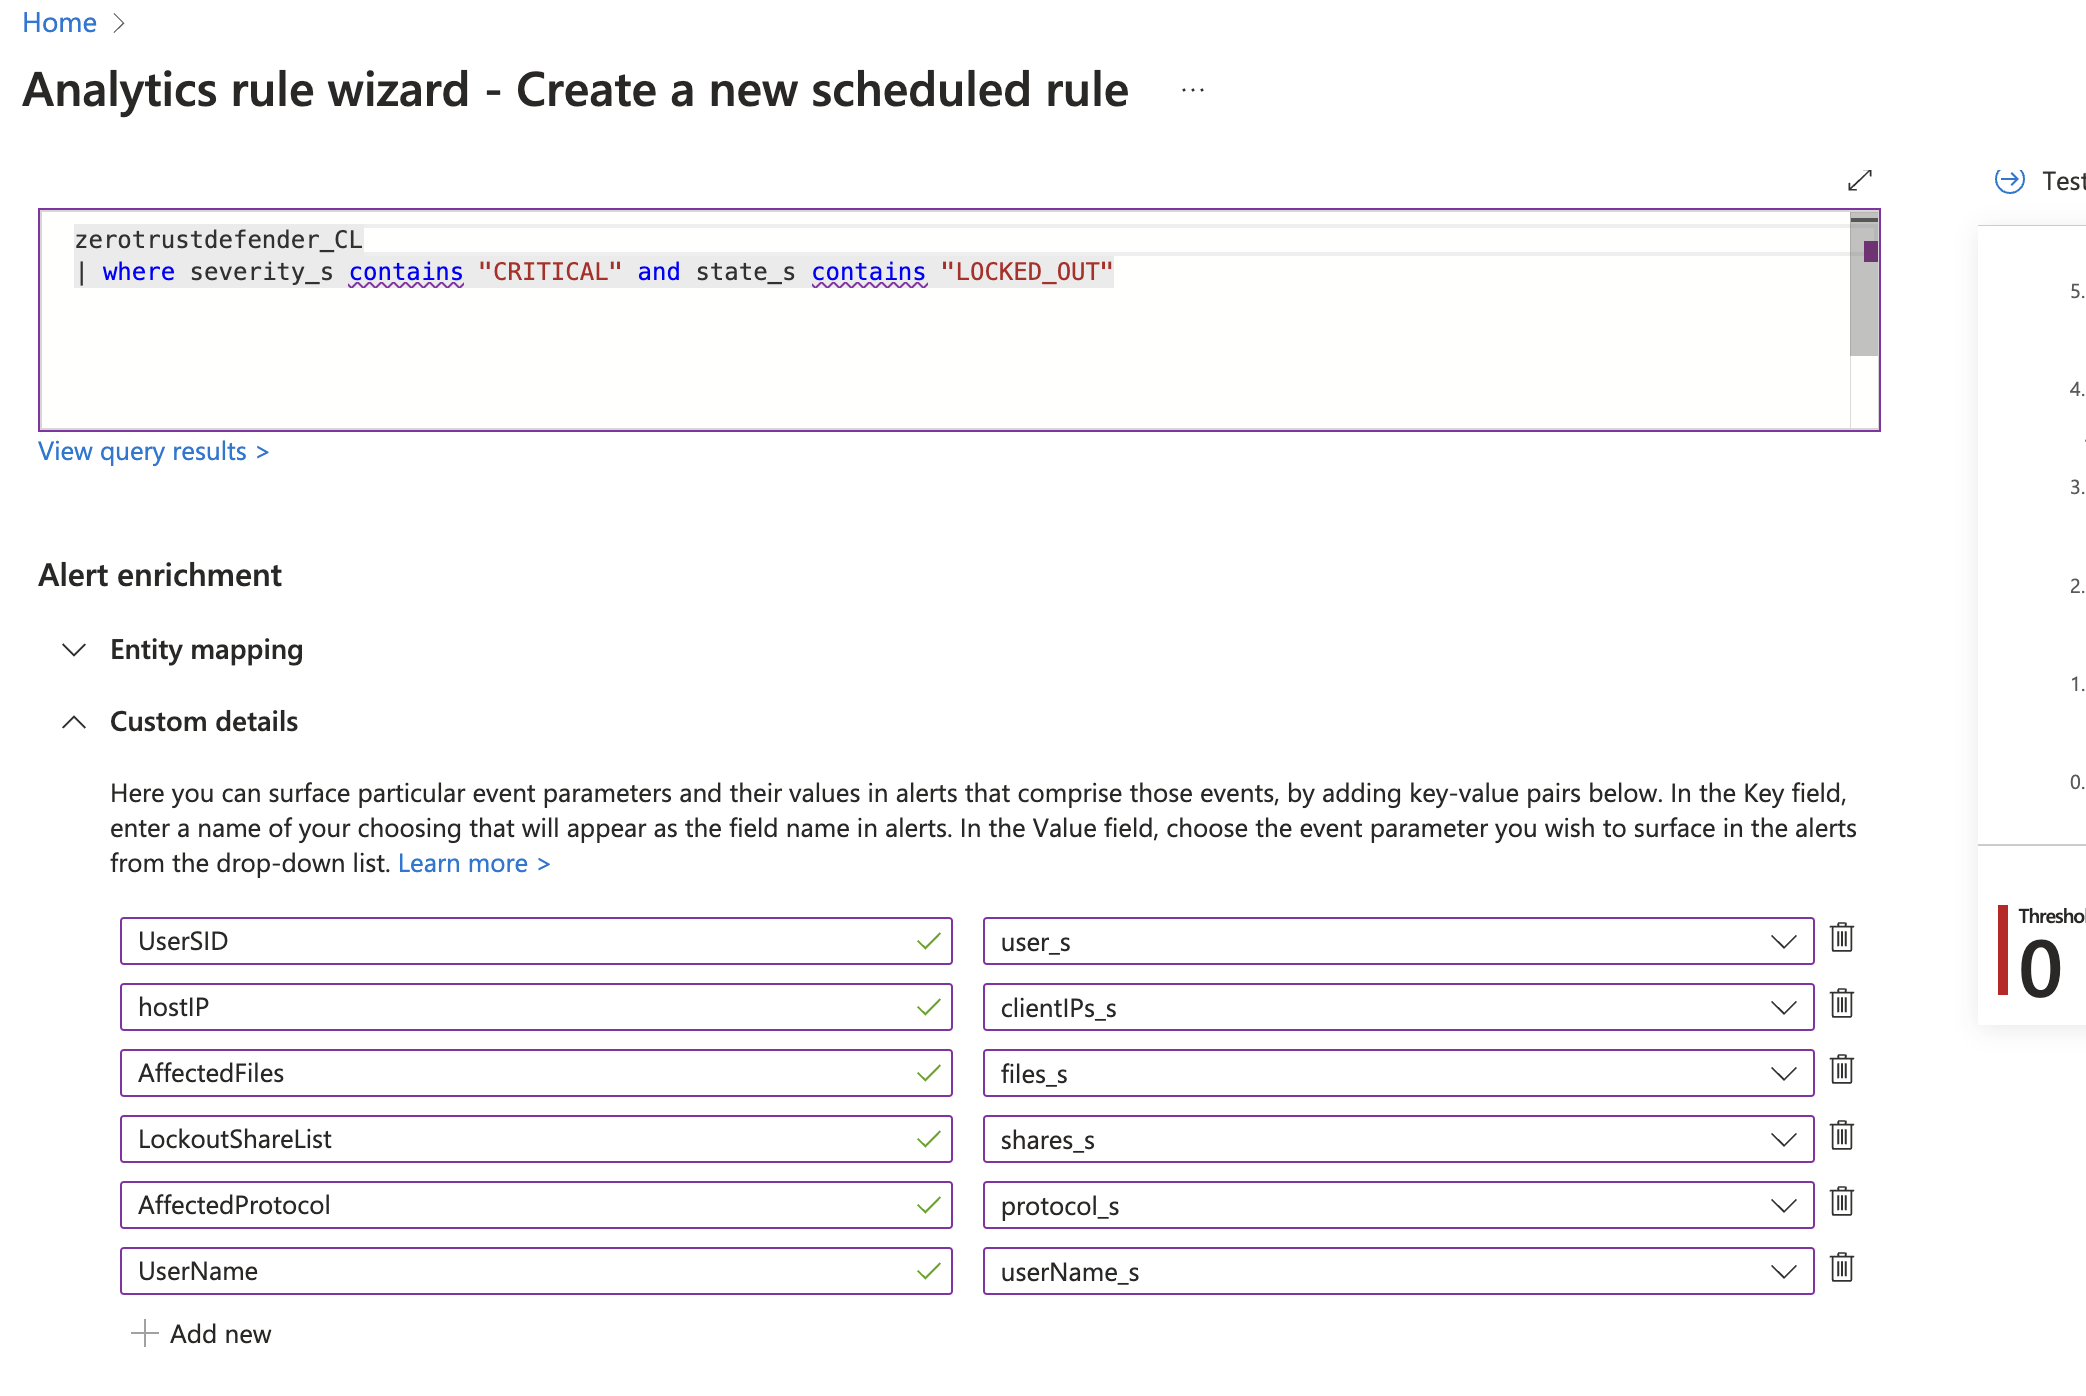
- The query string below assumes the log table name is zerotrustdefender_CL. This will search the log table for critical alerts with a status of lockout. This example shows how you can create triggers using any of the available fields in the Zero Trust alarm data. Query String example below.
- zerotrustdefender_CL | where severity_s contains "CRITICAL" and state_s contains "LOCKED_OUT"
- Run the query, You may not have any critical log entries in the table. Select the option to create a Sentinel

- Complete the fields to create the trigger
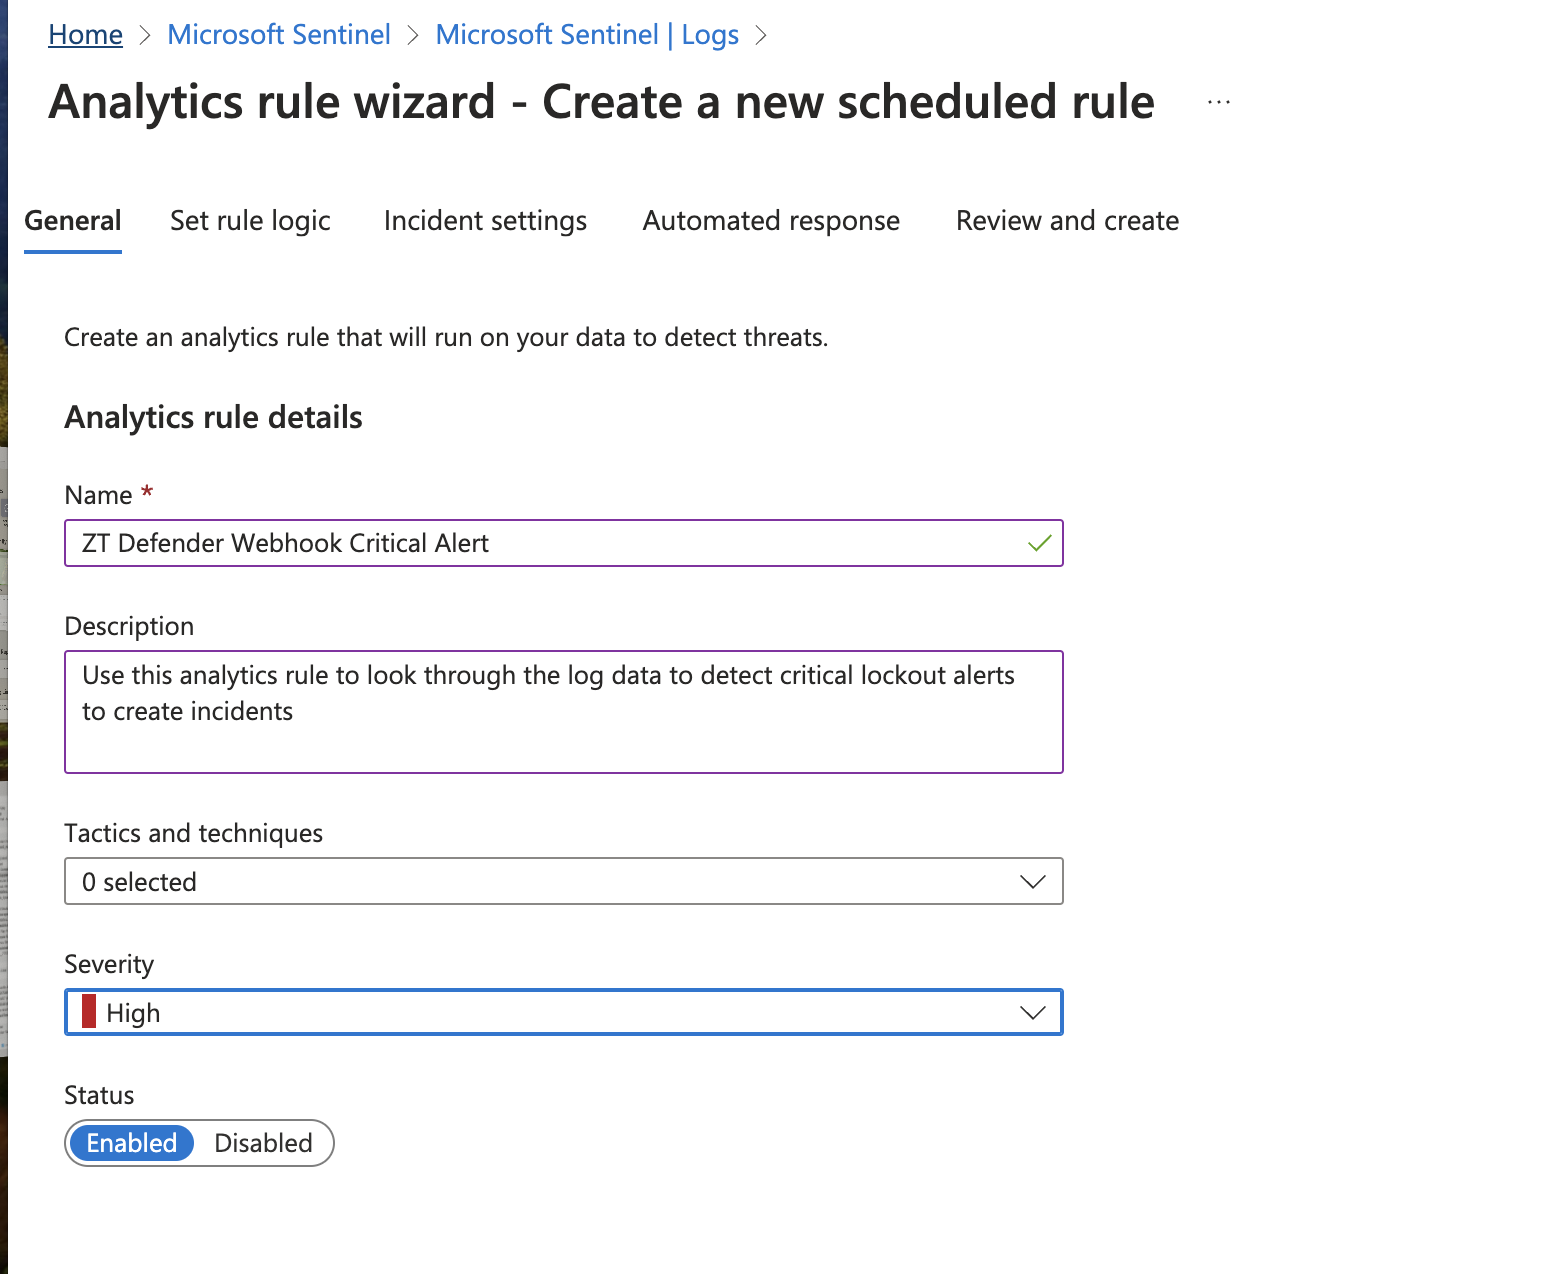
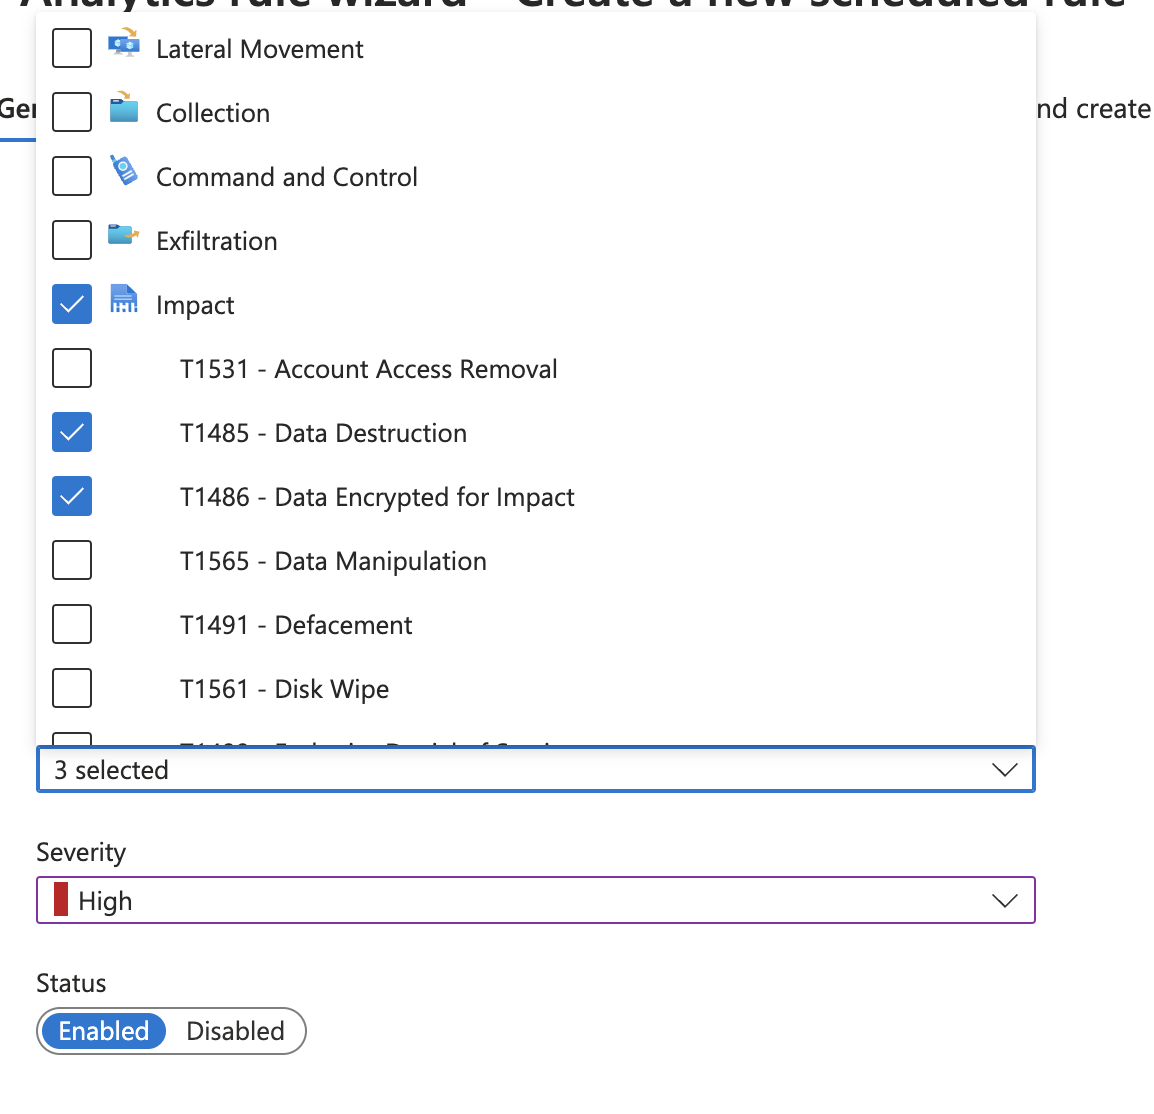
- Set the Tactics and Techniques as follows
- To Expose rich alarm data within the Sentinel Incident add custom key value pairs and map them to the field names in the log data. This example uses best practice fields to show in a security alert. NOTE: The key value names can be any label name you wish to display in the Incident.
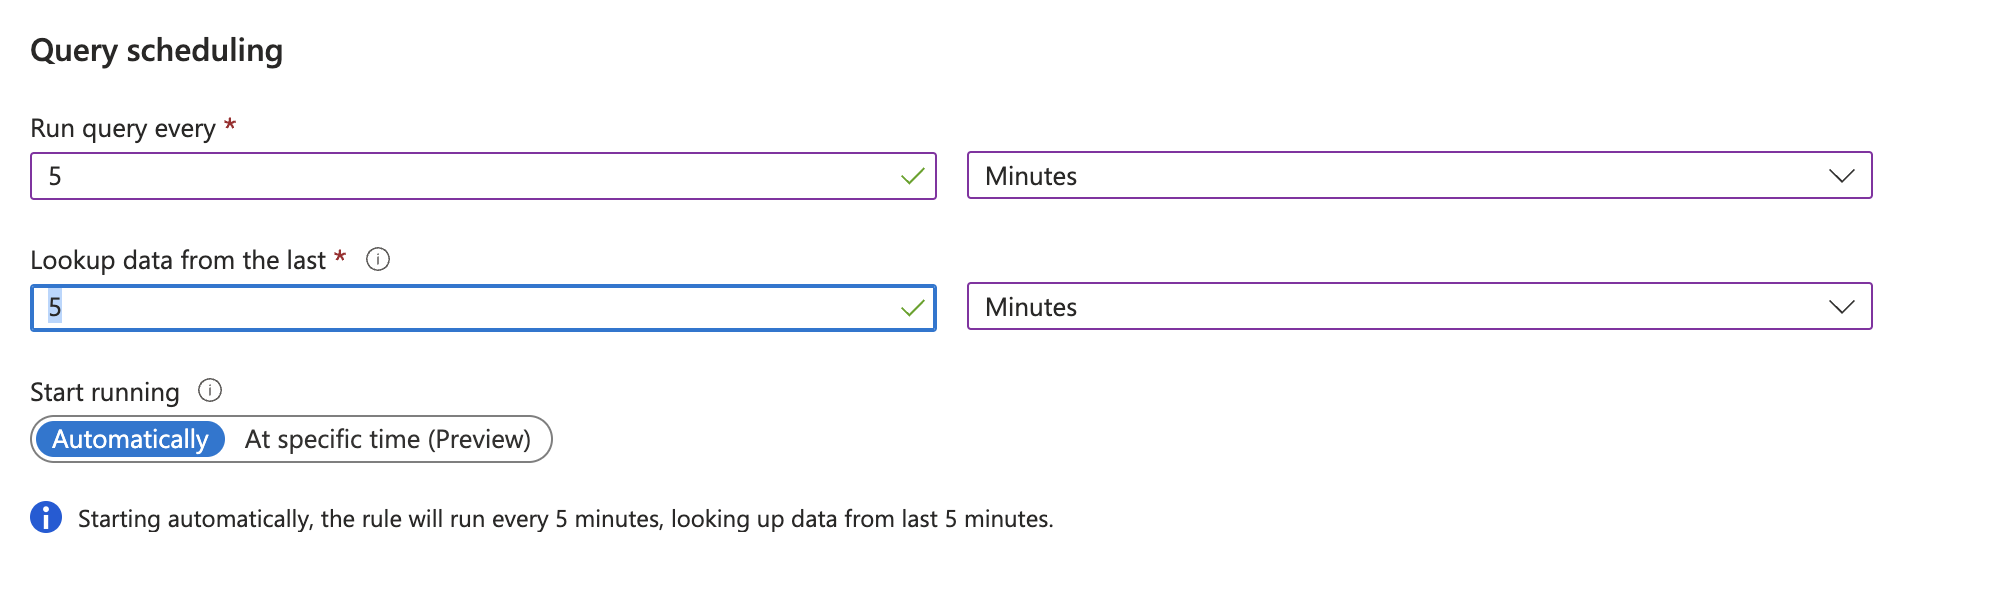
- To configure a response critical alert trigger, we suggest using the minimum values of 5 minute log scan and search for data within the last 5 minutes.
- We recommend setting the grouping alerts option

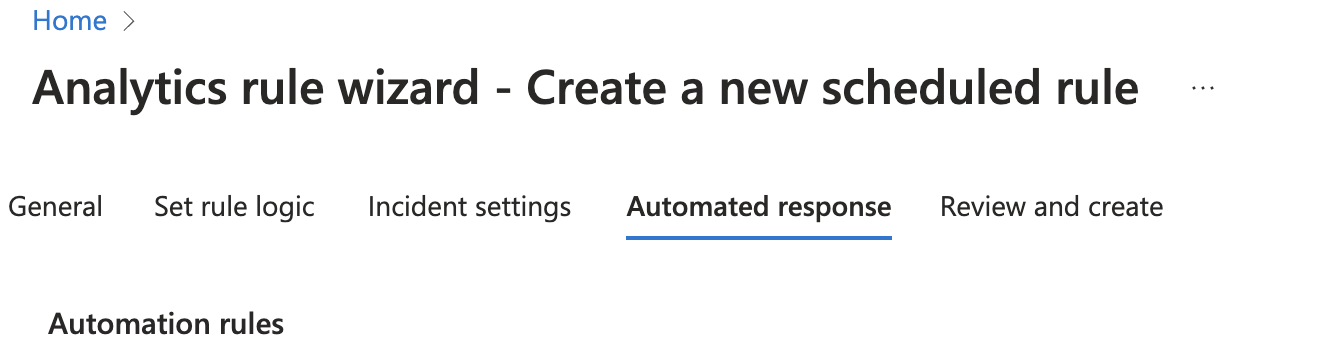
- Configure any playbooks or additional triggers that you want to run each time a Critical alert is recived.
- Click create on the final screen to create the analytics rule.
- To view or edit the analytics rule you can click Analytics under the Configuration section.
- Repeat the rule creation to create rules for additional scenario's
- To test this rule you will need to create a test Critical detection in defender. You can create a test detection using any mounted SMB share and creating banned files with notepad. Example .locky extension files will create a detection after you create more than the critical threshold in the settings tab in Defender. This is defaulted to 80 files. Create enough files to trigger a detection.
- After the files are created monitor the active events in Defender GUI, once the Critical lockout is completed. You can now use the steps above to verify the webhook data has reached the custom log managed by the Logic application.
- The analytics rule should trigger every 5 minutes and locate any events with severity set to Critical and state of locked out to create the incident.
- done.
A Sentinel Sample incident created by Superna Defender Zero trust webhook and Logic app in Azure
- You can see the example alert is craeted with custom data from the log displayed for Security Operations staff to investigate.
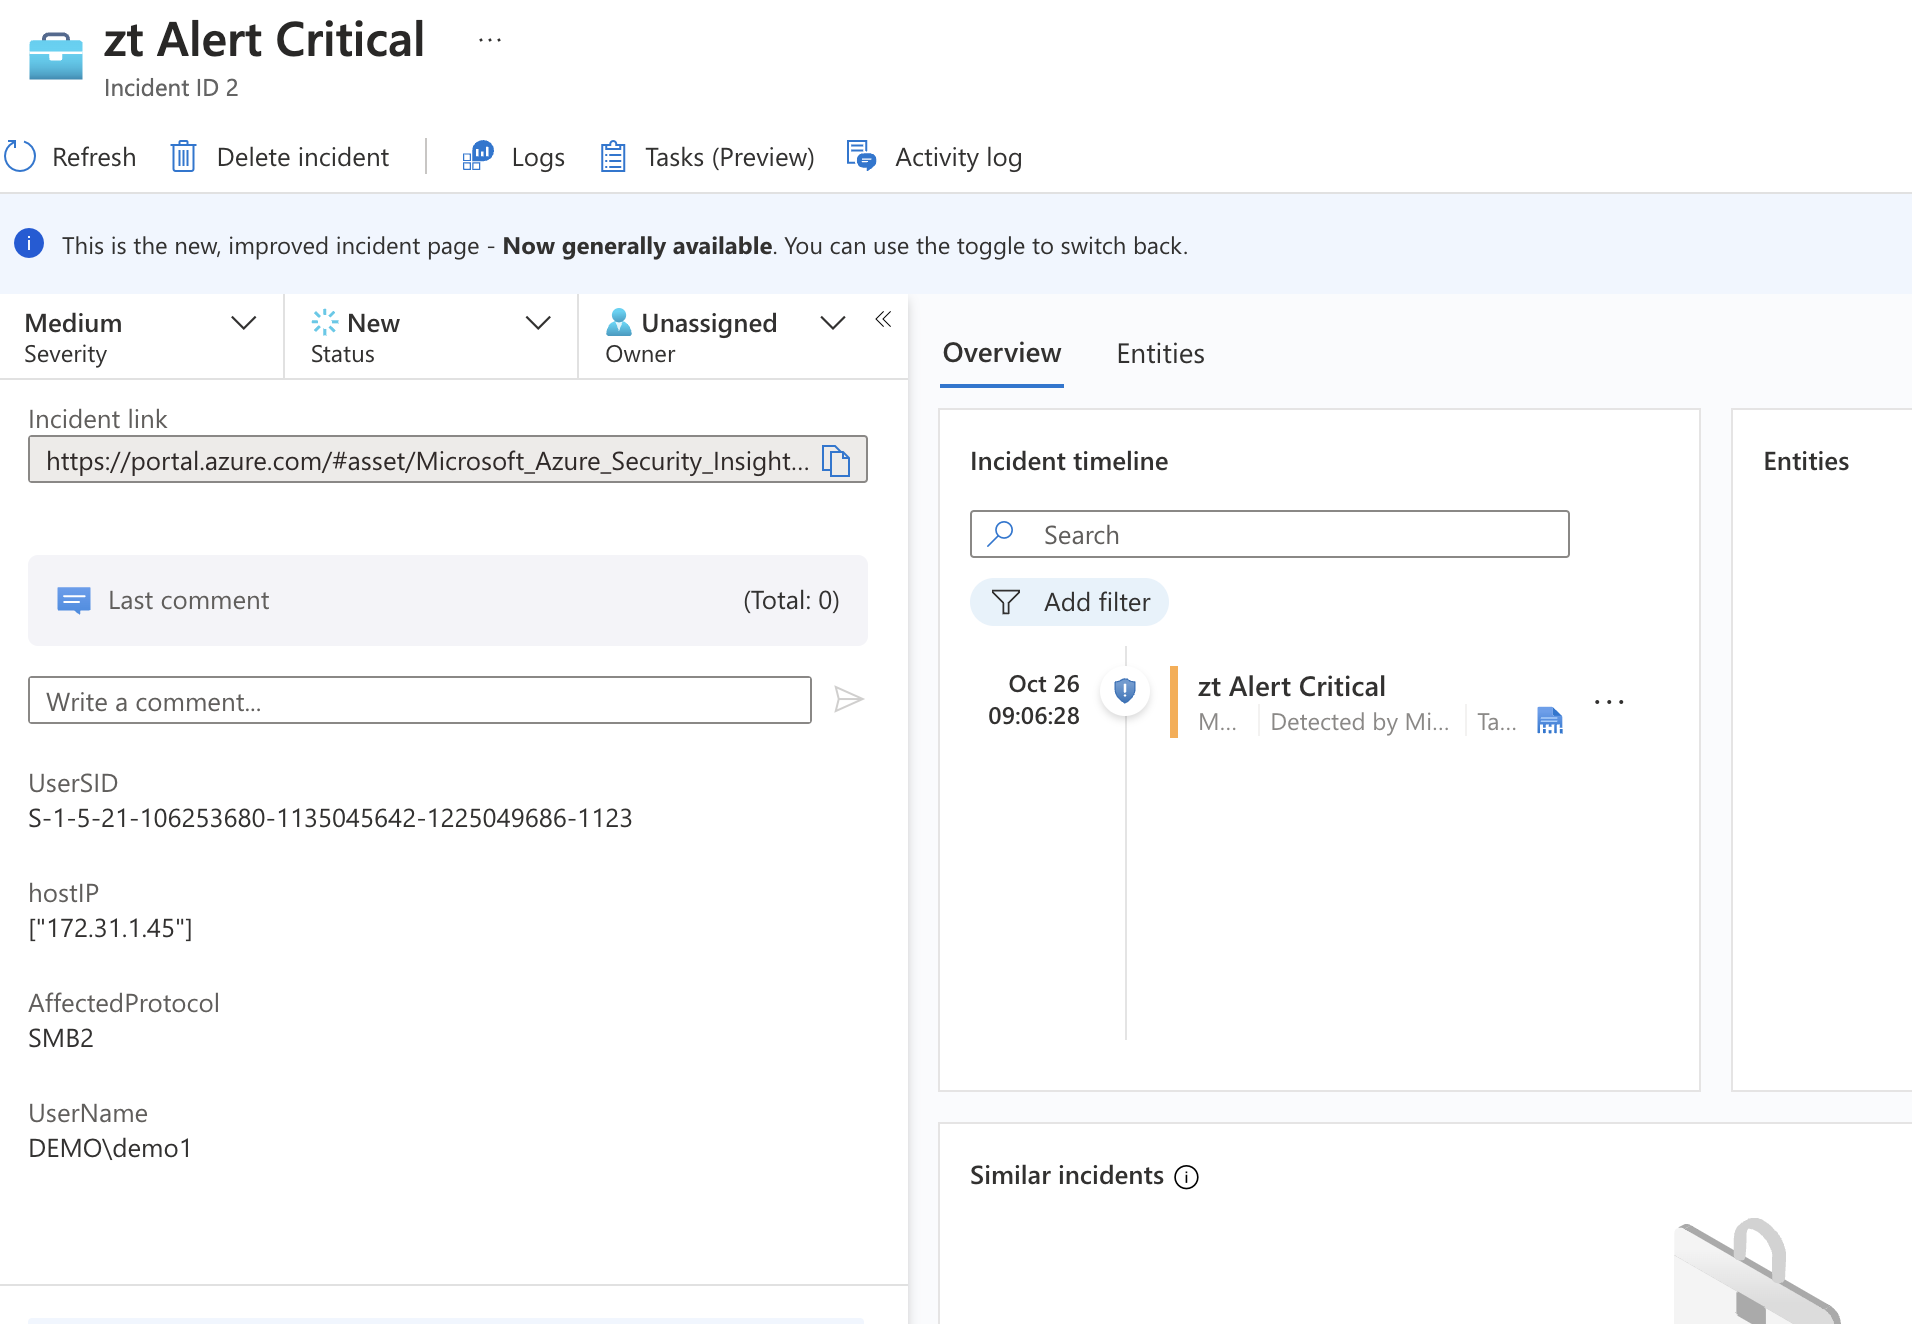
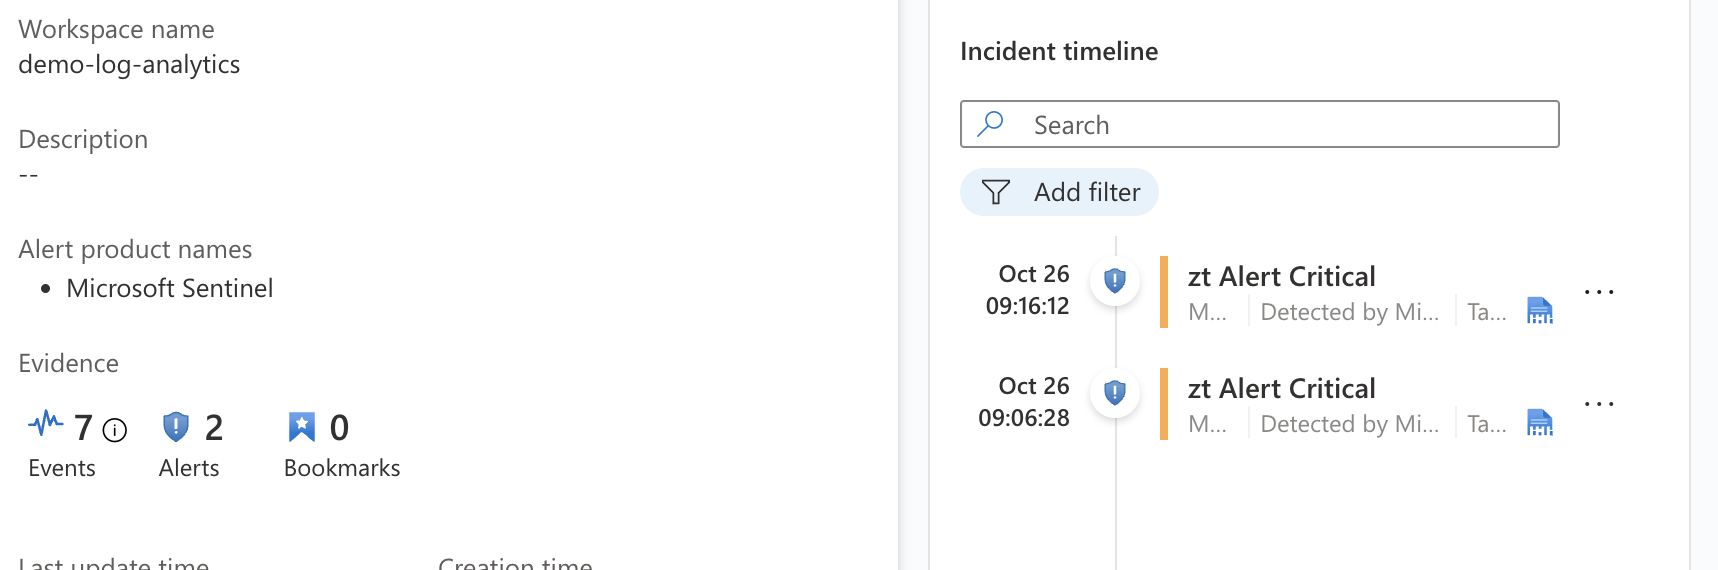
- The alert grouping will ensure that multiple alerts will be grouped, this can be seen below with 7 events (log entries) and 2 different incidents.
- done
How to Configure Data Security Essentials
Overview
Data Security Essentials saves alerts to the Windows Event log to a custom application log. This integration will extract the log entries and the json payload contained within them and format as webhook data to send to Sentinel logic app endpoint.
Requirements
- Follow the integration steps above to configure the logical app.
- Install python for Windows on the Data Security Essentials host and allow the installation to add python to the path variable. https://www.python.org/downloads/windows/
- NOTE: Ensure it's installed for all users so service accounts have access, by enabling for all users during installation.
- The integration code matches event log entries from Custom trigger BOT policies and File management policies
- The event log source names are below
- Superna Data Security Essentials BOT Service
- Superna Data Security Policy Engine
- The event log source names are below
Features
- Logs for each execution are stored in the path below along with the python code.
- Each execution will store the event log record ID and date time and event number of the last processed event in a file called last_processed_record.txt. This file is read on each execution to continue processing from last record. The record number is not visible in Event Viewer, the date time and event number can be used to understand where in the log the last processing occurred.
- The schedule sync runs every minute and only processes events since the last record and logs all processing as well as event matches in the log file for debugging.
- Only events that match the severity filter will be processed for client ip address. The sample code defaults to Major and Critical severity events all other severities will be ignored.
Steps to Configure Event Forwarding Integration
- NOTE: You will need the workflow endpoint url created in the steps above and complete all steps to create the logic app and connect it as a data collector for Sentinel
- Download the integration code from here. (Right click Download)
- Modify the python and update the Sentinel integration settings highlighted in yellow to match your environment.
- Edit the url in the template integration code downloaded above.SENTINEL_HEC_URL = 'xxxxxxx' # Replace with logic app workflow endpoint url# Configurationserver = 'localhost'log_name = 'Data Security Essentials'source_names = ['Superna Data Security Essentials BOT Service', 'Superna Data Security Policy Engine']trigger_severities = ['MAJOR', 'CRITICAL','WARNING'] # Configure severities that should trigger event forwarding
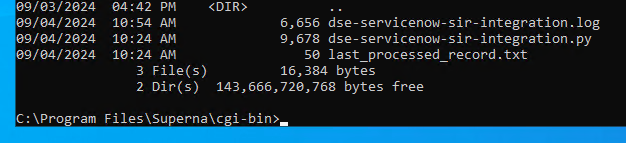
- Copy the Python code into C:\Program Files\Superna\cgi-bin on the Data Security Essentials host and name the file sentinel-dse.py
- Create the path from command prompt or GUI makedir 'C:\Program Files\Superna\cgi-bin'
- Install python dependencies
- MANDATORY Step: Open a command prompt as the service account (hold down shift and right click the command prompt icon) run as option to login as the service account dse-service. This is required to install the python packages under the correct user account.
- Install the dependencies with this command
- pip install pywin32 requests
- This command installs the windows API python libraries needed to read the event log.
- Test the script can correctly reach your Sentinel instance from a dos prompt
- cd 'C:\Program Files\Superna\cgi-bin'
- python sentinel-dse.py
- The output should display event log entries that match and will ignore severities that do not match script settings . It will display the event payload details in json format and will show the data that was sent to the Sentinel endpoint.
- NOTE: if no Critical or MAJOR detections occur you can edit the py file to add INFO for testing only.
- Example output
- You can also review this file last_processed_record.txt to see the last date and time within the event log and event id that was last processed. This file can be deleted to have the script start reading from the oldest windows event log entry. This can be done for testing puposes.
- The above examples shows the output when a client ip address is successfully located and the host containment api returns success.
- The example below is logged when event data is processed and inspected for severity and forwarded with key fields parsed and extracted.
- Steps to Schedule sync alerts into Sentinel Security Incidents
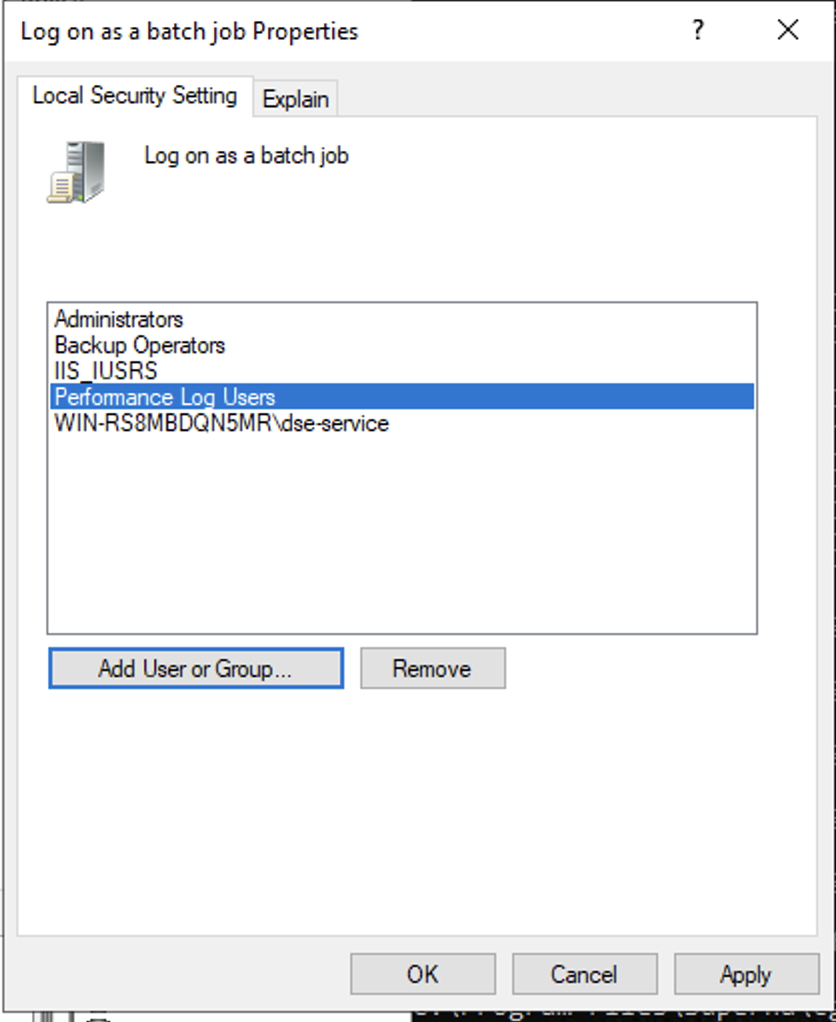
- Open secpol.msc, Local policies
- Give the Data security essentials AD service account the "Logon as a batch job" OS permission.
- Create a file
- Right click this link to save to a file. The task scheduler XML file to import into Task Scheduler
- You can rename the xml from Servicenow alert sync.xml to Sentinel integration.xml.
- Open Task Scheduler
- Run taskschd.msc, right click task schedule library

- Import the xml file
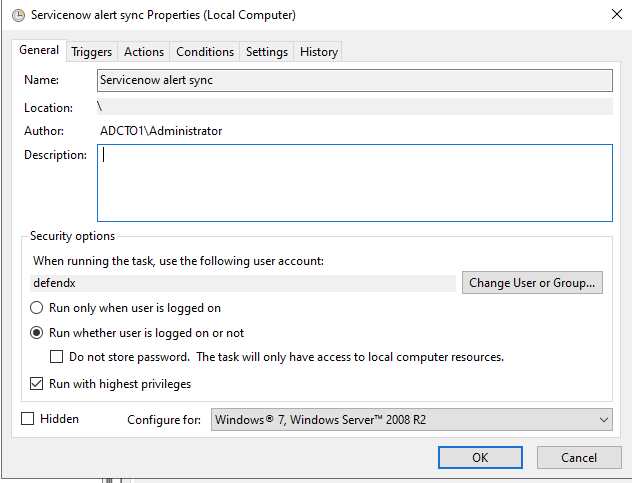
- You will be prompted with the task definition, you will need to change the service account to match your service account name and domain and re-enter the password to save the task scheduler. All other settings are configured and match the path and settings used above. Adjust any parameters that you changed if you did not use all the steps above.
- Edit the name "Sentinel Integration"
- Click the Actions tab and browse to select the file C:\Program Files\Superna\cgi-bin\sentinel-dse.py
- Click ok to save
- done.


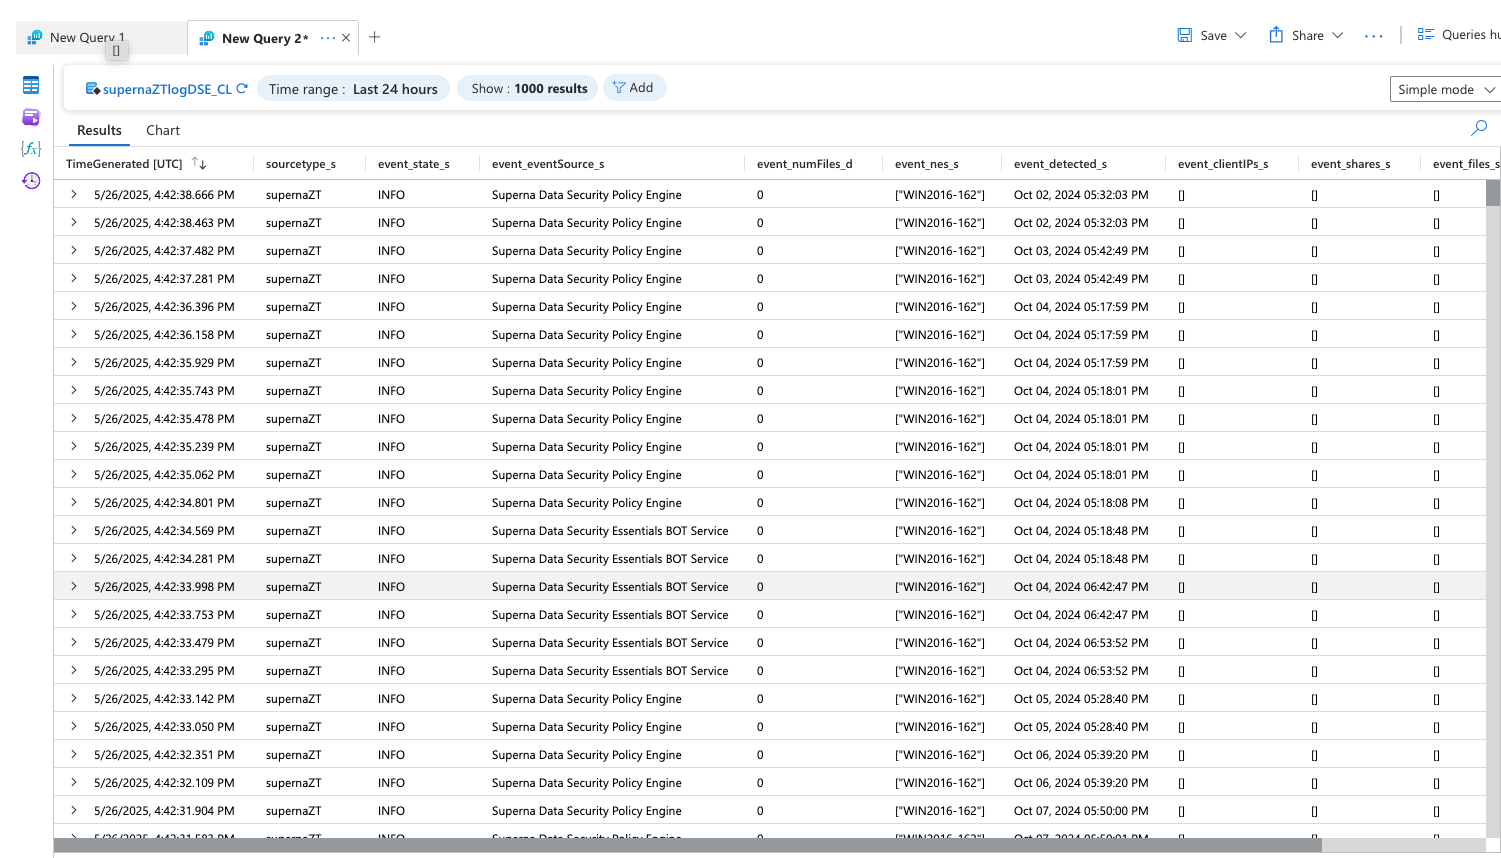
Data Security Essentials Events in Sentinel
- To run a report against the custom endpoint.
- Select logs in Azure console
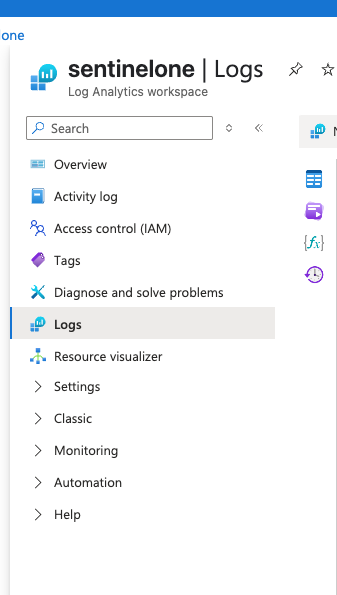
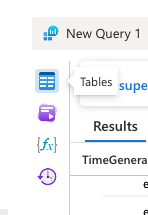
- Select the Tables icon
- Select the customer log name created during the logicapp endpoint configuration
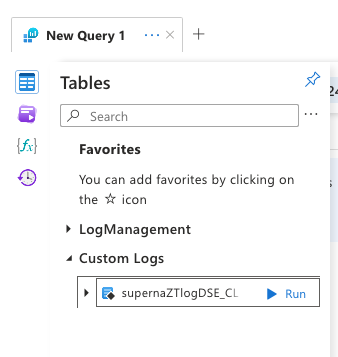
- Select run option