ManageEngine ServiceDesk Plus Zero Trust Alert to Problem Sync
Overview
Customers using ServiceDesk Plus offers a comprehensive service management solution, integrating ITSM, IT asset management, and a CMDB, alongside enterprise service management tools for departments like HR, facilities, and finance. It can be deployed on-premises or in the cloud. It can integrate incident response capabilities.
Support Statement
- NOTE: This documentation is provided "as is" without support for 3rd party software. The level of support for this integration guide is best effort without any SLA on response time. No 3rd party product support can be provided by Superna directly. 3rd party components require support contracts
Limitations
- None
Solution Overview
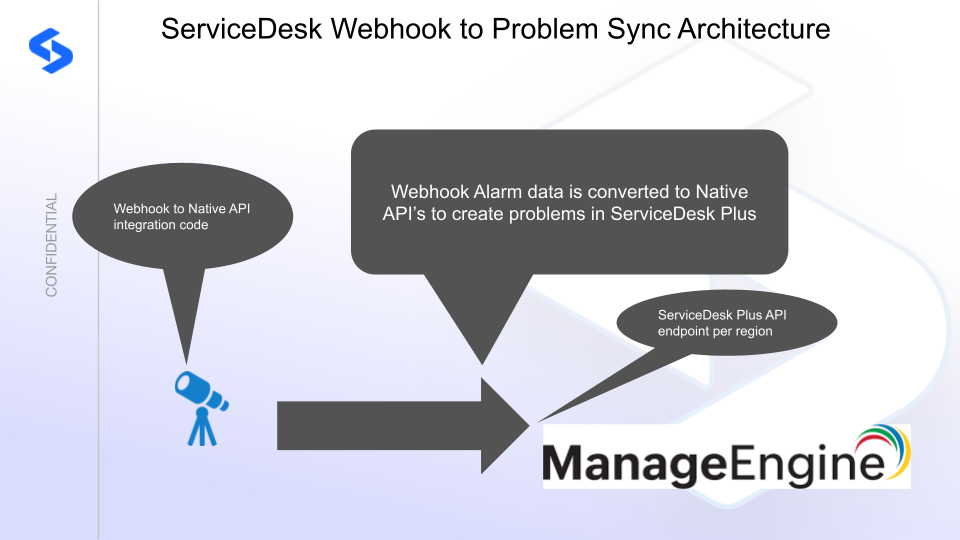
Superna Defender Zero Trust API receives webhook alerts and parses the key data into problems that are sent to ManageEngine ServiceDesk Plus. ManageEngine ServiceDesk Plus is a modular architecture that provides real-time visibility of your IT infrastructure, which you can use for threat detection and prioritization using problems created by this integration.
Advanced Zero Trust Capabilities
- Webhook to native syslog alarm integration
What is ManageEngine ServiceDesk Plus?
ManageEngine ServiceDesk Plus is a modular architecture that provides real-time visibility of your IT infrastructure, which you can use for threat detection and prioritization with problems created by Superna integration that maps CyberStorage threats to UDM formatted problems in ServiceDesk Plus.
Integration Architecture
Integration Features
- Creates problems from Zero trust alerts using oAuth authentication
- Stores access keys in encrypted file on disk
- Refreshes access token after expiry with rolling limited authentication tokens and stores in the encrypted cache
- Creates notes from the Zero trust event in the notes (Conversations of the problem).
- Encodes the event id into the title with use name listed in the title.
- New webhook alerts on state changes of the event in Superna Data Security Edition will update the notes of problems with matching unique event ID. Only problems of state closed will be ignored when updating notes.
Solution Configuration in ManageEngine ServiceDesk Plus and Defender Zero Trust
Prerequisites
- Installed Security Edition
- Eyeglass OS appliance version 15.5
- cat /etc/os-release
- License key for the Zero Trust API
- ManageEngine ServiceDesk Plus
Configuration in ManageEngine ServiceDesk Plus
The steps below create an oAuth configuration to authenticate api calls
- Login to the developer console for your region (use this URL to lookup your URL https://www.manageengine.com/products/service-desk/sdpod-v3-api/getting-started/data-centers.html)
- This URL is for the Canada region (NOTE you must create the oAuth config in the correct region) The developer console URL is listed under Developer Console
- https://api-console.zohocloud.ca/
- Create a self Client oauth access token with the Create button
- On the generate code tab use the following scope, description and change to 10 minutes.
- Use the following scope
- Minimal Required Scopes:
- If your script only deals with problems and related metadata like priorities and statuses, you need: SDPOnDemand.problems.ALL: Access and manage problems.
- SDPOnDemand.setup.ALL: Fetch metadata such as priorities and statuses.
- Copy the text below to paste into the scope field:
- SDPOnDemand.problems.ALL, SDPOnDemand.setup.ALL
- Minimal Required Scopes:
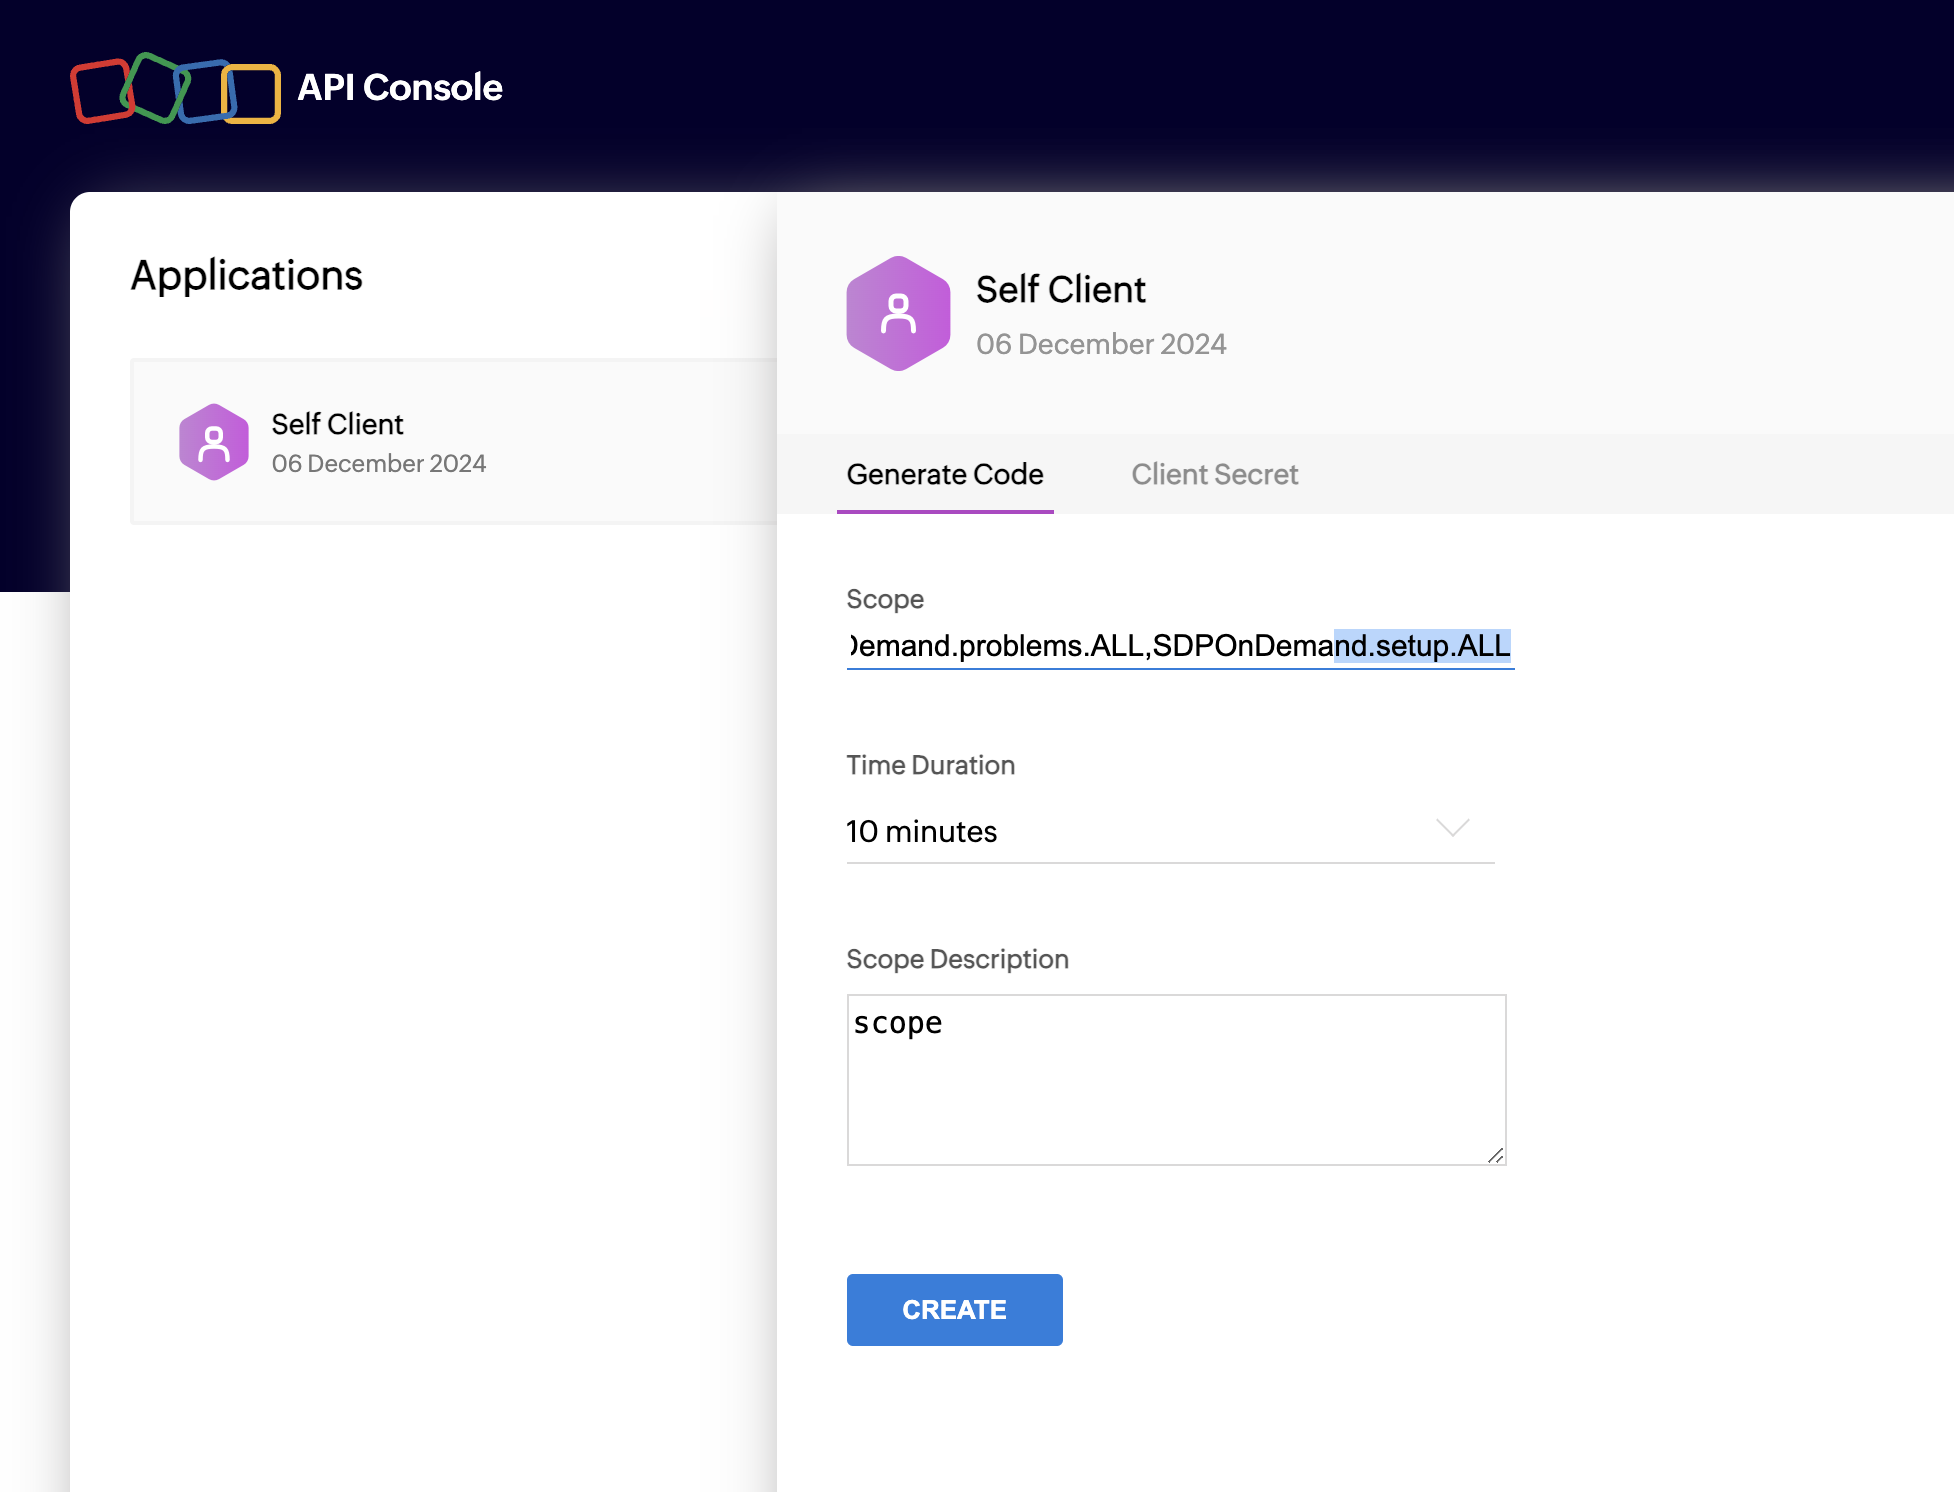
- Click Create
- Click Download, save the self_client.json for use later.
- NOTE: The create and download steps will need to be repeated once the python code is installed and configured in the steps below.
Configuration Steps on Eyeglass Virtual Machine
High Level steps
- Create python location to run the application on the Eyeglass vm
- Create python main application script
- Create linux systemd service and set to auto start
- Create Zero Trust configuration in Defender
- Update the main script to customize with ManageEngine ServiceDesk Plus python code
- Test the script is running as a service
- Create a test event in Defender to validate the alerts appear as indexed parsed events in ManageEngine ServiceDesk Plus
Configuration Step by Step
Configure the Service start and python integration files
Configure the python packages and customize the zt-servicedesk integration python code
- Customize the application code by downloading (right click download as) the python code from this link to download
- Open the python template file in a text editor. NOTE: make sure to only replace the values and do not delete any of the commas
- Locate this section in the file and replace the yellow sections to match your zt-servicedesk endpoints. Using this URL https://www.manageengine.com/products/service-desk/sdpod-v3-api/getting-started/data-centers.html and region for your instance, record the following URLs as follows from the webpage.
- Accounts Server URL = TOKEN_URL
- API Endpoint = API_URL
- Locate the url's at the top of the py file and replace the URL with the value that matches your region data center from the link above.
- TOKEN_URL = "https://accounts.zohocloud.ca/oauth/v2/token"
- API_URL = https://servicedeskplus.ca/api/v3/problems
- nano /opt/superna/cgi-bin/zt-servicedesk.py
- Open the file locally in Windows OS notepad and use control-A or select all the text in the python template
- Paste the clipboard into the ssh terminal session with the open nano editor file
- save the file
- press control+x
- Answer yes to save and exit the nano editor
- Copy the oAuth configuration file self_client.json to Eyeglass vm
- NOTE: Repeat the download load steps from above to generate the self_client.json file with 10 minute timer. Then start the steps below. The authorization does not return the token after the timer and a new json file needs to be generated. Once the token is cached locally the it can be refreshed against the oAuth endpoint as needed by the integration code.
- Open the self_client.json in a text editor copy all the text to clipboard
- On the eyeglass vm
- nano /opt/superna/cgi-bin/self_client.json
- paste the clipboard to the file in the nano editor.
- press control+x
- Answer Yes to save the file and exit.
- Download an access token using these steps. This will send the self_client.json file to the account api end point and returns an access token with the oAuth scope encoded into the token. This token is encrypted and stored in the tokens.enc file and a random decryption key is created called secret.key
- whoami (should be root user)
- cd /opt/superna/cgi-bin/python3 zt-servicedesk.py –get-token
- Verify no errors occur. Do not proceed passed this step unless you see a token returned and success from the command.

Configure Defender Zero Trust Webhooks
- The next step creates a Zero Trust Webhook URL.
- Configure Zero Trust endpoint in Ransomware Defender Zero Trust tab.
- Recommended Configuration: Only Critical and Major events and only the webhooks that set lockout or delayed lockout. Customers can customize based on specific requirements. The goal is to send findings versus a list of alarms that do not pinpoint a security incident.
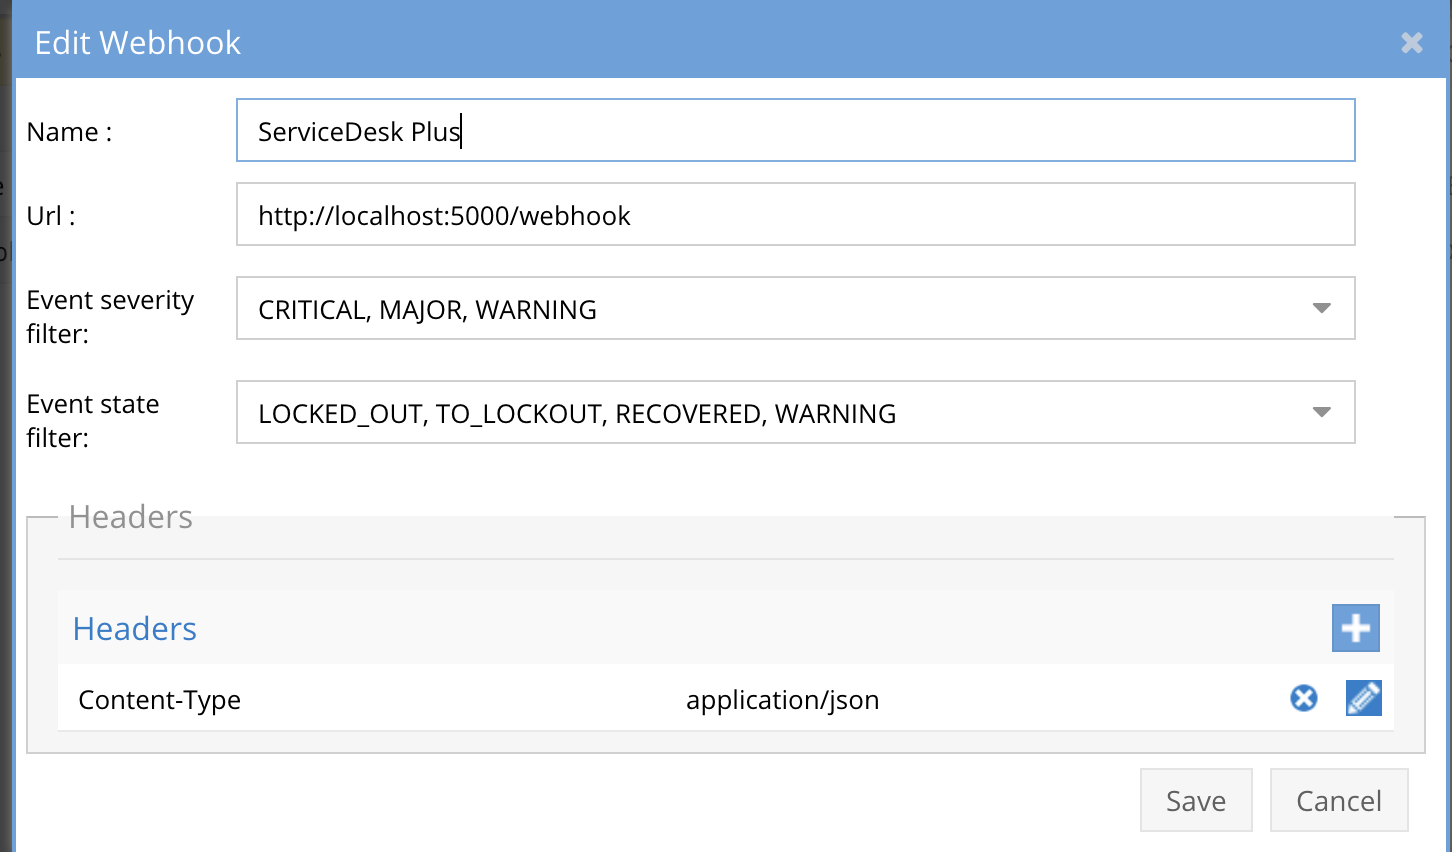
- The endpoint URL above will use localhost and will send Webhooks to the application service listening on port 5000. URL to use in the configuration
- http://localhost:5000/webhook
- Add the Content-Type header with value of application/json as shown above to complete the webhook configuration.
- Click save to commit the configuration.
- Click save on the main Webhook configuration page
- Configure Zero Trust endpoint in Ransomware Defender Zero Trust tab.
- Test the configuration is working following the next section
How to test the Integration with ManageEngine ServiceDesk Plus
- To test the integration, follow these steps
- download this curl command template and open with a text editor and locate the IP address of eyeglass at the very end of the text and replace the IP address with the IP address of your eyeglass vm.
- Copy all the text in the text editor
- ssh to the eyeglass vm as the admin user
- Paste the entire cli command text to the ssh prompt to send sample data to the running Zero Trust application. This will send test data directly to the application to be processed and sent to ManageEngine ServiceDesk Plus Integration service that is running on the Eyeglass VM.
- The output of a successfully processed webhook test will return this text in the ssh terminal
- done sending event to zt-servicedesk and check for http 200 and success count in response
- How to review the process logs from the web application
- sudo -s
- journalctl -f -u zt-servicedesk
- This allows you to view the logs generated by the application.
- To log to a file and review with nano showing only the most recent 250 lines.
- journalctl -f -n 250 -u zt-servicedesk > /tmp/zt-servicedesk.log
- nano /tmp/zt-servicedesk.log
- In the log below the response code from the ManageEngine ServiceDesk Plus api call should show http 200 status code.
- You can also view zt-servicedesk.log for specific error messages.
- Login to the ManageEngine ServiceDesk Plus and verify a new problem has been created.
- Done
Starting the Integration code for Production Use
- Start the service and verify it is running
- systemctl start zt-servicedesk
- systemctl status -l zt-servicedesk
- Verify the service is started successfully and returns "active and running".
- If the service does not start do not proceed and double check the steps above are completed.
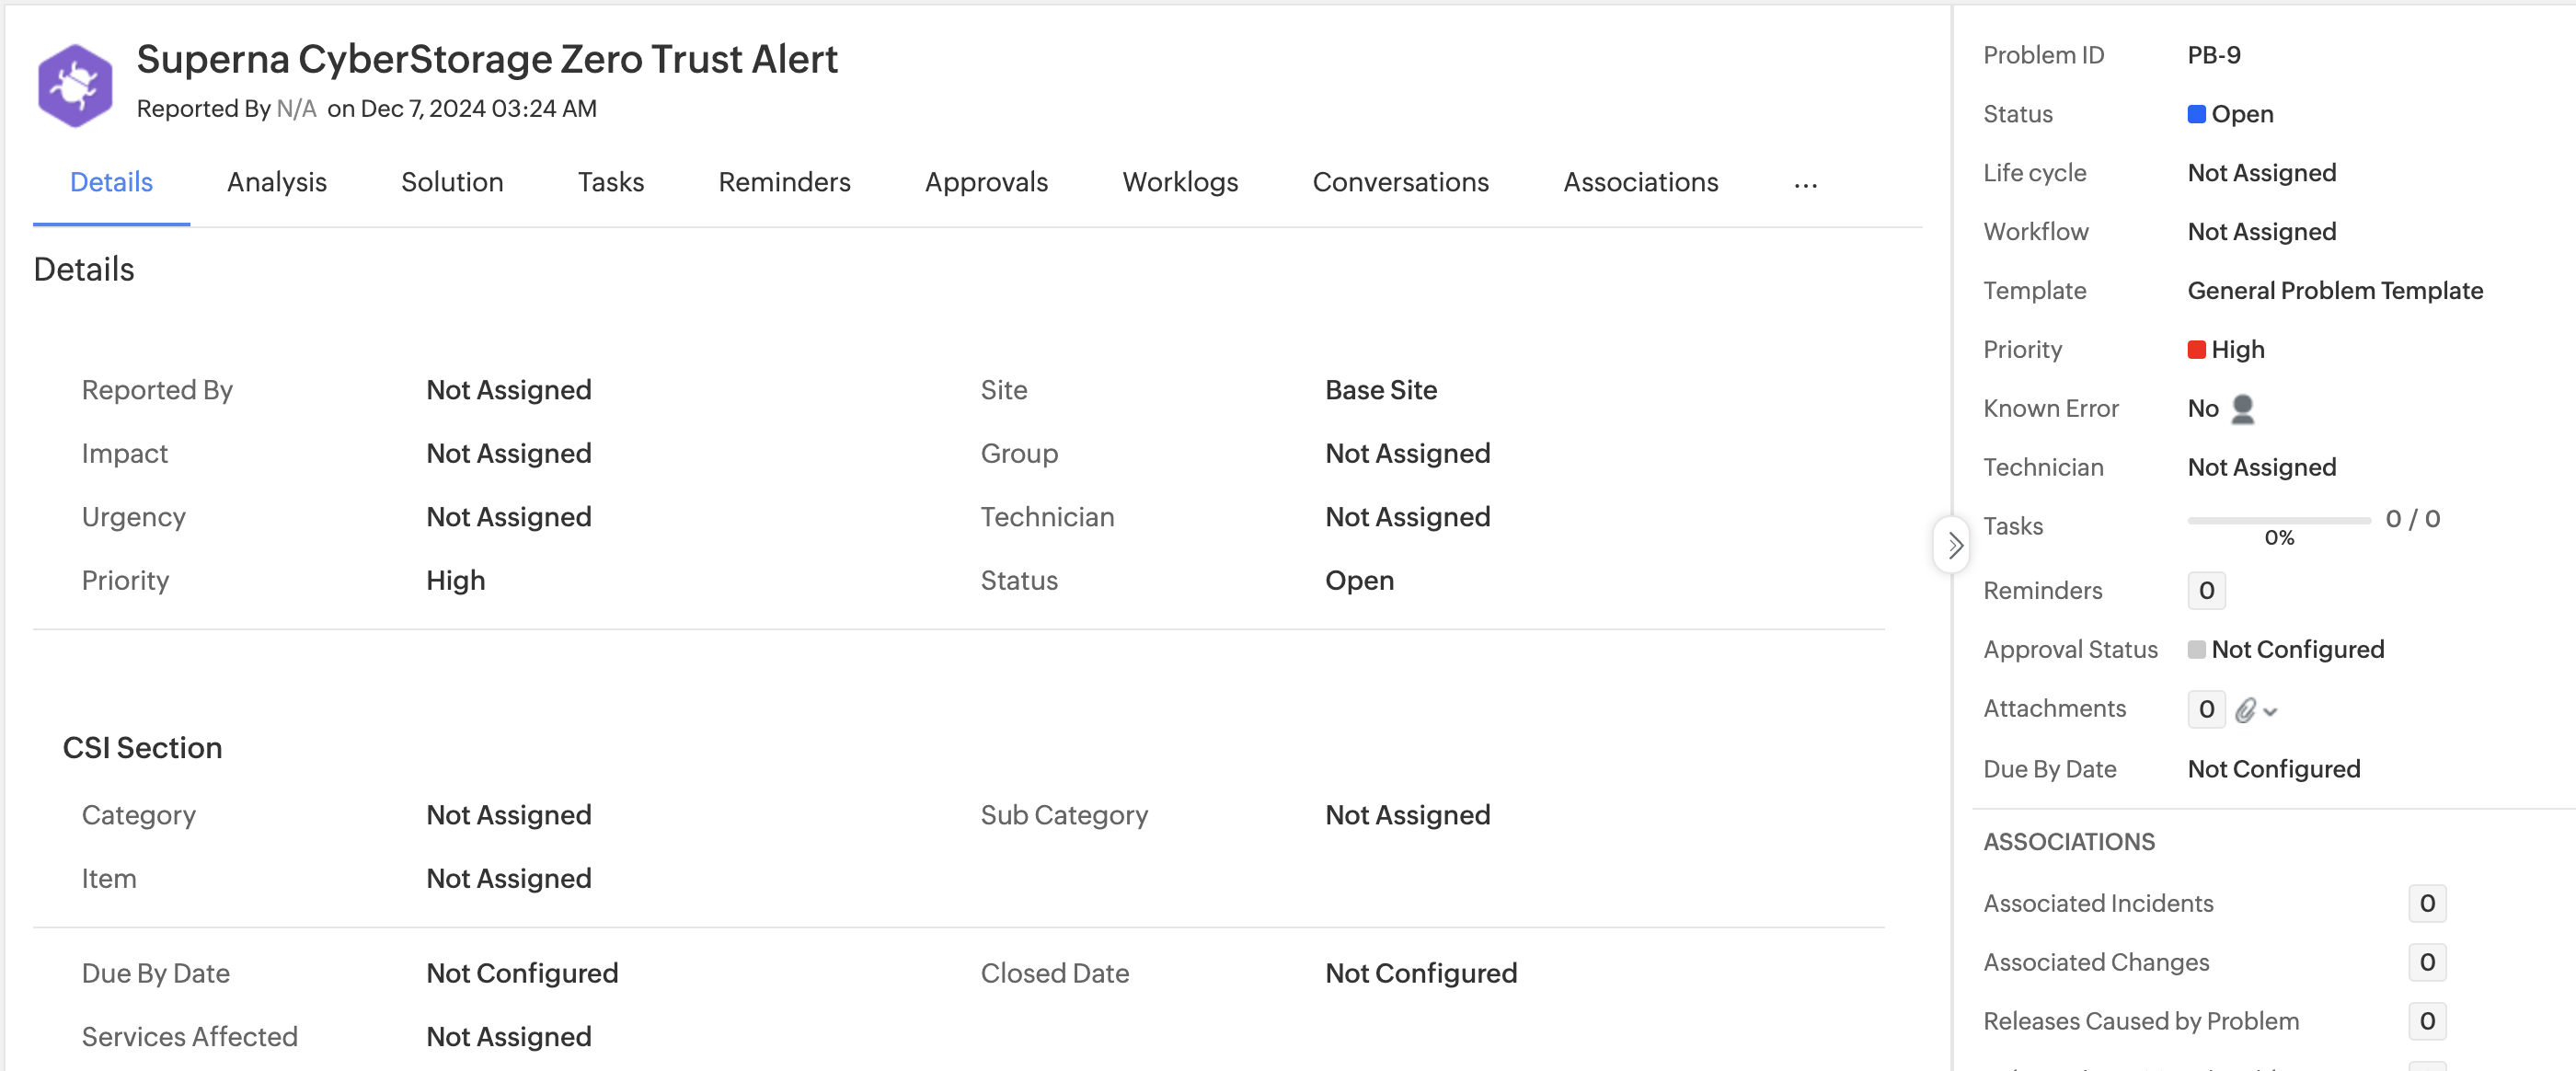
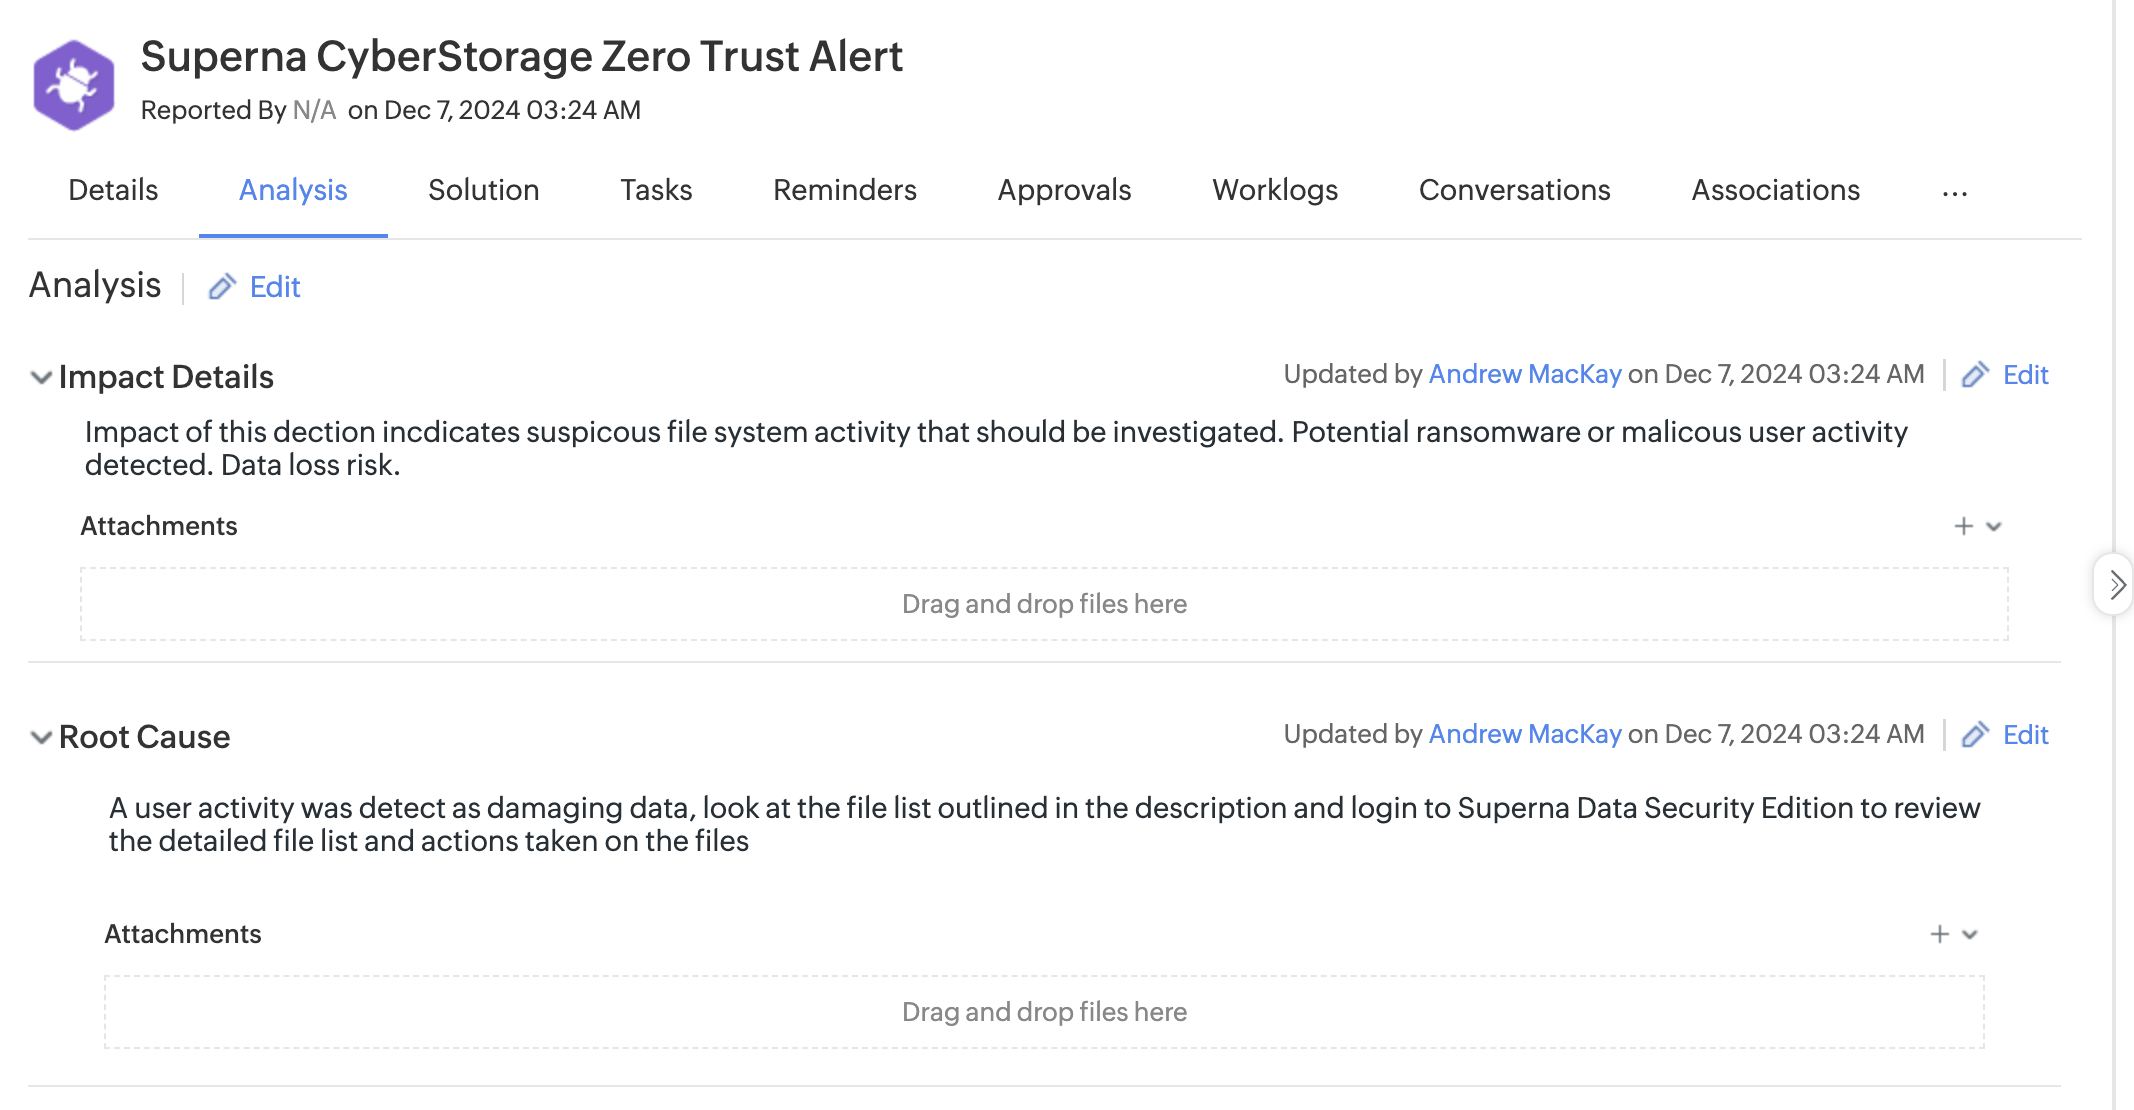
ManageEngine ServiceDesk Plus SecOps administrators Integration Experience
When Problems are created the root cause and impact fields are updated along with details of the event in the description. The title of the problem includes the user name that was affected.