AWS Security Hub Integration with Zero Trust Alarms
- Overview
- Support Statement
- Limitations
- Solution Overview
- What is AWS Security Hub?
- Integration Architecture
- Solution Configuration in AWS Security Hub and Defender Zero Trust
- Prerequisites
- Configuration in AWS Security Hub
- Configuration Steps on Eyeglass Virtual Machine
- High Level steps
- Configuration Step by Step
- Configure Defender Zero Trust Webhooks
- How to test the Integration with AWS Security Hub
- AWS Security Hub SecOps Integration Experience
Overview
Customers using AWS Security Hub to aggregate Cloud alarms and on premise security events can now integrate Superna products with native AWS Security Hub API integration to translate Zero Trust API alerts sent by Webhooks into native Findings within the Security Console. This guide will walk through how to set up a Zero Trust to AWS Security hub finding sync process that operates in real time.
Support Statement
-
NOTE: This documentation is provided "as is" without support for 3rd party software. The level of support for this integration guide is best effort without any SLA on response time. No 3rd party product support can be provided by Superna directly. 3rd party components require support contracts
Limitations
- The update finding API methods are not supported in this solution guide. This means the last Zero trust alert sent to create the Finding will be used by Security Hub.
Solution Overview
Superna Defender Zero Trust API is the cornerstone technology used to integrate with SIEM, SOAR and XDR platforms. Automation begins with data that summarizes the threat and places that information into a security tools to be acted on by Secops and run playbooks to protect corporate IT assets from vulnerabilities and insider or external attackers. In order to allow a Security Hub to act on the data from an external tool it is vital to field map data from one alert to the schema used within the Security Hub. This guide will cover basic field mapping used to push Zero Trust Defender alerts into AWS security Hub.
What is AWS Security Hub?
Suggested reading
Integration Architecture
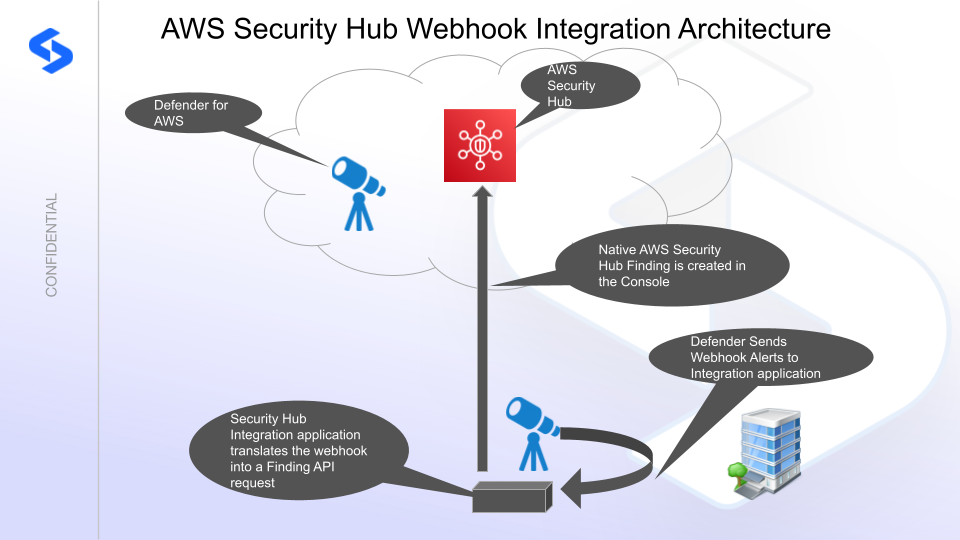
Solution Configuration in AWS Security Hub and Defender Zero Trust
Prerequisites
- Installed Ransomware Defender and or Easy Auditor or Defender for AWS
- Eyeglass OS appliance version 15.5
- cat /etc/os-release
- License key for the Zero Trust API
- Activate the Security Hub service in your AWS account
Configuration in AWS Security Hub
Once the Security hub service is activated the home region needs to be decided. This is the region where Zero trust API findings will be sent. Security hub allows aggregation of findings across different regions but the main region is where 3rd parties should integrate the custom findings. The Security Hub custom API and custom findings requires customers to use an account specific ARN. This is created as follows:
-
The custom ARN used to identify the Findings created by Superna Defender require an ARN, replace the yellow highlighted values as follows:
- The account ID of your AWS account where Security Hub is activated in the example below this is 123456
- The primary region for Security Hub findings in this example below it is us-east-2, replace with a value that makes sense in your environement.
- example arn:aws:securityhub:us-east-2:123456:product/123456/default
- This value will be used in the configuration below.
- Create minimum permissions IAM user in the main region to be used by the integration application
- an IAM user can be created for the Integration. AWS has a built in role AWSSecurityHubFullAccess. This was used in this guide.
- To create a role with the minimum permissions here is an example below, additional permissions can be added for integrations as needed.
- an IAM user can be created for the Integration. AWS has a built in role AWSSecurityHubFullAccess. This was used in this guide.
Configuration Steps on Eyeglass Virtual Machine
High Level steps
- Create python location to run the application on the Eyeglass vm
- Create python main application script
- Create linux systemd service and set to auto start
- Create Zero Trust configuration in Defender
- update the main script to customize with AWS Security hub custom findings ARN
- Test the script is running as a service
- Create a test event in Defender to validate the alerts appear as Findings in AWS Security Hub
Configuration Step by Step
Configure the Service start and python integration files
Configure the python packages and customize the splunk integration python code
- Customize the application code by downloading the python code from this link to download
- Open the python template file in a text editor. NOTE: make sure to only replace the values and do not delete any of the commas
- Locate this section in the file

- Replace the xxxx and yyyy and us-east-2 in both locations with the main region you have selected for Security Hub integration. The xxxx and yyyy are the authentication keys created in the steps above within the IAM user configuration.
- Locate this section in the file and update the product ARN that was documented above

- replace the 123456 with your account id and update the region to match your selected main region.
- Save the file as ztWebhook.py. (NOTE: The file name must match the exact case and name for the documented steps to work correctly)
- Paste the updated script into the production file
- nano /opt/superna/cgi-bin/ztWebhook.py
- Open the file locally in Windows OS notepad and use control-A or select all the text.
- Paste the clipboard into the ssh terminal session with the open nano editor file
- save the file
- press control+x
- Answer yes to save and exit nano editor
- Start the service and verify it is running
- systemctl start ztWebhook
- systemctl status -l ztWebhook
- Verify the service is started successfully and returns "active and running". If the service does not start do not proceed and double check the steps above are completed.
Configure Defender Zero Trust Webhooks
- The next step creates an Zero Trust Webhook URL.
- Configure Zero Trust endpoint in Ransomware Defender Zero Trust tab.
- Recommended Configuration: Only Critical and Major events and only the webhooks that set lockout or delayed lockout. Customers can customize based on specific requirements. The goal is to send findings versus a list of alarms that do not pinpoint a security incident.
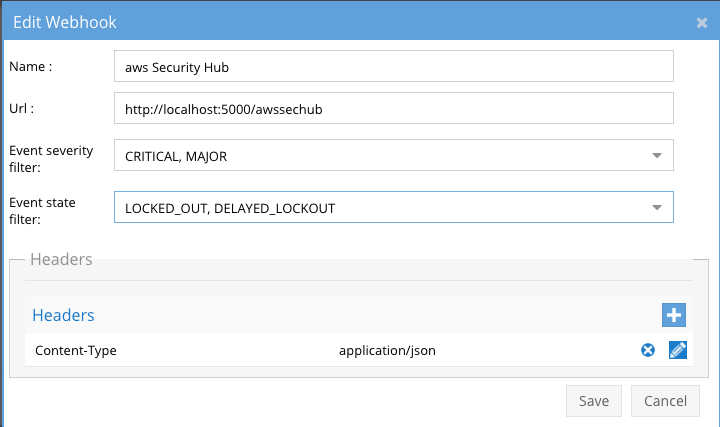
- The endpoint url above will use localhost and will send Webhooks to the application service listening on port 5000. URL to use in the configuration
- http://localhost:5000/awssechub
- Add the Content-Type header with value of application/json as shown above to complete the webhook configuration.
- Click save to commit the configuration.
- Click save on the main Webhook configuration page
- Configure Zero Trust endpoint in Ransomware Defender Zero Trust tab.
- Test the configuration is working following the next section
How to test the Integration with AWS Security Hub
- To test the integration follow these steps
- download this curl command template and open with a text editor
- Copy all the text
- ssh to the eyeglass vm as the admin user
- paste the entire cli command to the ssh prompt to send sample data to the running Zero Trust application. This will send test data directly to the application to be processed and sent to AWS Security Hub.
- The output of a successfully processed webhook test will return this text in the ssh terminal
- done sending AWS secops API call check for http 200 and success count in response
- How to review the process logs from the web application
- sudo -s
- journalctl -f -u ztWebhook
- This allows you to view the logs generated by the application.
- To log to a file and review with nano showing only the most recent 250 lines.
- journalctl -f -n 250 -u ztWebhook > /tmp/ztwebhook.log
- nano /tmp/ztwebhook.log
- In the log below the response code from the AWS Security Hub api call should show http 200 status code and successCount 1 to indicate the Finding was successfully created.

- Login to the AWS Security Hub Main Dashboard to view the new Finding
- Note in order to repeat the test again you need to mark the Finding as resolved in the AWS Security Hub application
- Then edit the curl command to increase the Finding unique value in the curl command. See below.

- Edit the value and increase the number by 1 and run the curl command again to run a second test. NOTE: Each finding requires a unique ID per finding. The production ID is auto incremented by Defender, in a test scenario is it necessary to update this manually.
- Done
AWS Security Hub SecOps Integration Experience
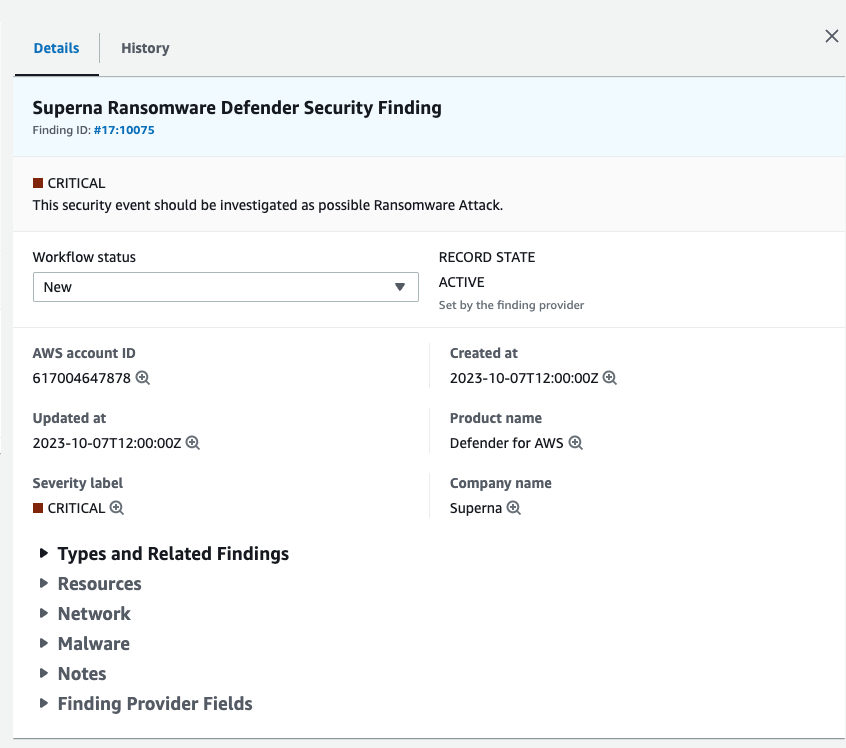
- Once the integration is completed and working the SecOps administrators can view new Findings generated by critical security incidents in Defender for AWS or Ransomware Defender.

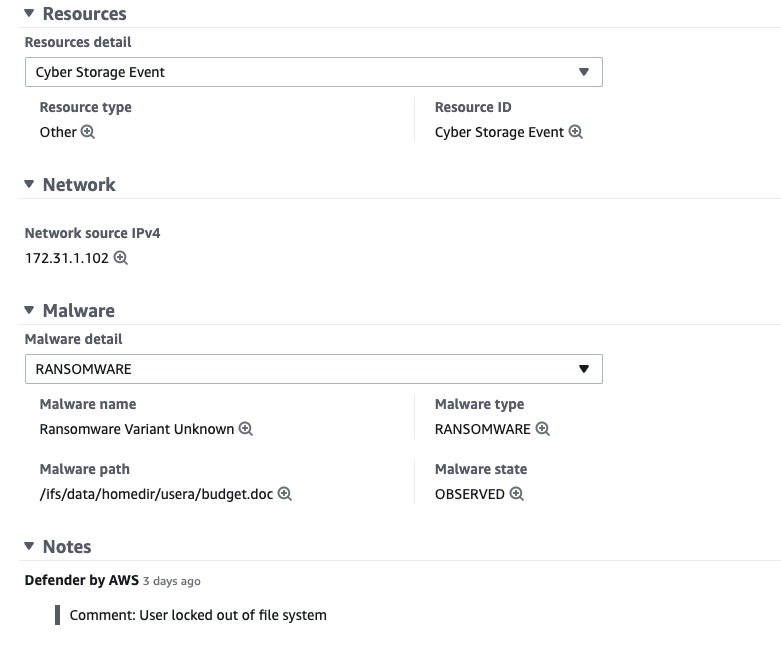
- Click on the "Superna Ransomware Defender Security Finding" to see additional Finding details that are mapped to Standard Finding field Schema
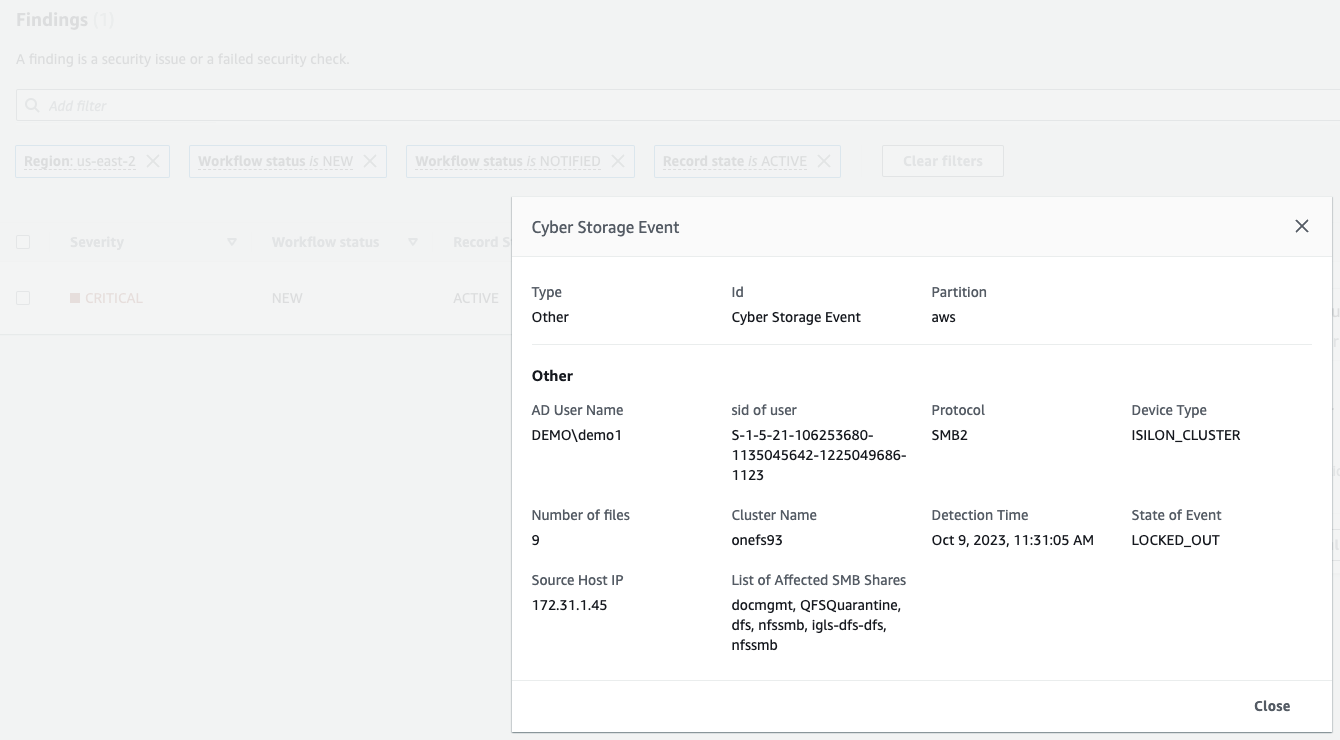
- Click on the Cyber Storage Event. This section is fully customized leverage rich data available in Superna Zero Trust Webhook payloads. There is additional data that can be integrated into the Findings. This is a simple example integration with key data elements integrated to the Finding
- SecOps teams can use this data to effectively triage and action the Finding to dispatch teams to respond to the incident with specific information such as:
- AD user affected
- Protocol detected
- Number of files involved in the incident
- Source ip address of the affected host
- List of SMB shares that contain infected shares
- Status of the incident
- Detection time
- Device type and cluster name affected.
- SecOps teams can now fully use AWS Security Hub features to integrate Cyberstorage protected storage on premise threats and cloud threats to the aggregation.


