Eyeglass Service Description
Part number - eyeglass-P030 Dell SKU AC608027
Revision 1 May 6, 2023
Service - Data Insight Bundle Design and Implementation
- Overview
- Project Plan Summary
- Prerequisites
- Use Case Phase
- Search Section:
- Configuration Phase - Search & Recover
- Test Phase - Search & Recover
- Knowledge Transfer Phase - Search & Recover
- Performance Auditor Section
- Configuration Phase - Performance Auditor
- Test Phase - Performance Auditor
- Knowledge Transfer Phase - Performance Auditor
Overview
This service is designed for customers who are deploying Superna Data Insights bundle (Search & Recover and Performance Auditor products) and will assist with design and implementation/knowledge transfer to use the product to address key use cases or data management challenges with customer file data.
Limitations:
Scope: Covers a single cluster integration
Service Delivery: Remote WebEx or zoom
Operating Hours: Monday to Friday 2:00 AM to 3:00 PM EDT
Service Terms and Conditions are covered in product maintenance agreement Support Services Agreement
Mandatory: Installation Questionnaire Form completed located here with all questions answered. Service will not be scheduled until completed in full.
Exclusions:
Service delivery requires customer to have hands on knowledge of all external IT components.
Project Plan Summary
Prerequisites
- Purchase of Data InSights bundle
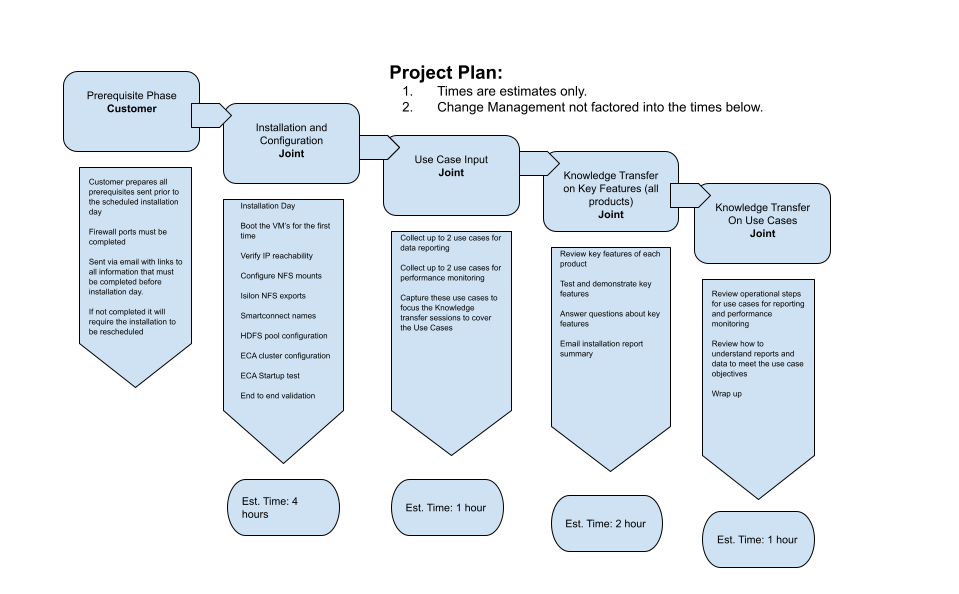
Use Case Phase
- Collect up to 2 use cases on objectives for data reporting
- Collect up to 2 use cases on objectives for performance monitoring
- Document use case objectives
- Offline develop operational steps to achieve the use cases
- Knowledge Transfer to include details on Use cases.
Search Section:
Configuration Phase - Search & Recover
- Download: The OVA can be downloaded by following the normal download instructions here.
- The menu item to select is VMware OVF installers and select the Eyeglass Search & Recover download
Deploy to vCenter: During deployment to VMware enter the IP address information for each node, Enter cluster name all lowercase with no special characters.
- Add License keys:
- Download keys using supplied token in process here.
- Copy the license zip file to node 1 using SCP or Winscp utility to copy the zip file using Secure Shell protocol, login with ecaadmin and password above
- Apply License keys:
- Follow add license keys CLI instructions section "Licensing CLI Commands " in the Admin Guide.
- Add cluster:
- Follow add cluster CLI instructions section "Adding, Viewing Clusters " in the Admin Guide.
- Follow add cluster CLI instructions section "Adding, Viewing Clusters " in the Admin Guide.
- Add Path to be indexed:
- Follow the instructions to add a folder for indexing in the section "How to add a folder path to be Indexed" in the Admin Guide.
- Follow the instructions to add a folder for indexing in the section "How to add a folder path to be Indexed" in the Admin Guide.
- Start Indexing Jobs:
- Follow the instructions to start indexing job in the section "How to start a full index job on a path" in the Admin Guide.
- Monitor Indexing Statistics:
- Follow the instructions to monitor indexing progress of the folder path added above in the section "How to Monitor Index Jobs" in the Admin Guide.
Test Phase - Search & Recover
- Login and try some searches:
- open a browser https://x.x.x.x (ip is node 1 of the cluster)
- Enter an AD user login using DOMAIN\user or user@example.com (note domain name must be uppercase) and then password.
- Try a search for data in the path you indexed.
- NOTE: The user you login must have Share permissions to the path was added to be indexed data
- Advanced Feature Walk though
- Try a file size range search
- Download the results to CSV
- Download a script with example ISI command isi get -D and output to a results file >> results.txt
Knowledge Transfer Phase - Search & Recover
- Explain Solutions available with the product. Guide here.
- Explain how to use the diagnostic tools and how to access. Guide here.
- Explain index process for full versus incremental and lag to detect changed files.
- Demonstrate how to generate a support backup and how to download from the admin download page Guide here.
- Explain how to download CSV and large scripts from the admin download page. Guide here.
- Explain how to set the results location FQDN for smartconnect and how SMB share names are inserted dynamically. Guide here.
- Explain where to find advanced field search syntax examples and search rules with wild cards. Guide here.
- Explain the security modes on indexed folders, guide Here.
Performance Auditor Section
Configuration Phase - Performance Auditor
- Enable the EVTreporter service on the ECA cluster
- Increase RAM on ECA nodes as per sizing table here.
- Verify Eyeglass open ports for the Performance Auditor application table is here.
- Verify Turbo audit events are being processed by EVT reporter container
- Verify cluster audit events are enabled to support the Performance Auditor features here.
Test Phase - Performance Auditor
- Open the Performance Auditor application and verify the display is showing analysis data
- Switch views to verify all metrics are reported including AD user names
Knowledge Transfer Phase - Performance Auditor
- Explain top 5 per category display and view switching
- Explain drill in to an object in each view and how this is used to identify who, what user , what files or application is generating the most work load per node or cluster wide
- Explain yellow band display is baseline computed from all nodes in the cluster as 2 standard deviations above and below cluster wide average and how to use this baseline to track which nodes are above average load level (same applies to all the other views)
- Explain application read and write mode tracks SMB or NFS application requests per second as a way to understand relative application efficiency for NAS operations.
- Demonstrate pinning feature to add a user to the display that is not in the top 5, explain who pinning allows comparison of an object outside the top 5. Demonstrate file extension pinning to monitor an applications impact on cluster resources.
- Demonstrate how to switch rate from MB's to GB's or KB's depending on the throughput rates of the monitored object.