Preparing your System for the Eyeglass Microsoft DFS Mode Failover
This section contains steps to configure an Eyeglass Microsoft DFS Mode Failover / Failback solution. Please refer to Microsoft DFS, PowerScale and Eyeglass documentation for their respective detailed configuration steps.
Overview
Step 1 - Configure PowerScale Smartconnect Zones.
Step 2 - Configure PowerScale SyncIQ Policies and SMB Shares (only source cluster needs the share created).
Step 3 - Configure DFS root (domain based).
Step 4 - Configure DFS folder.
Step 5 - Configure DFS Target (Primary cluster): \\SmartConnect Zone\share name.
Step 6 - Verify Client Access example: \\domain.name\DFSrootname\.
Step 7 - Eyeglass Setup and SyncIQ policy enabled for DFS Mode (enable mirror policy if it exists):
- run DFS Mode policy and verify its green OK.
Step 8 - Configure DFS Target (Secondary cluster): \\Smartconnect Zone\share name.
Step 9 - Verify Client Access:
- mount DFS path: \\domain.name\DFSrootname\folder name.
- Write data successfully.
Preparation Steps
Step 1 - Configure PowerScale SmartConnect Zones:
DFS Folder Targets will be configured using UNC Path to Primary and Secondary SMB Share(s) by using their SmartConnect Zone names. If the PowerScale clusters do not already have SmartConnect Zone names configured they will need to be setup.
Step 2 - Configure PowerScale SyncIQ Policies and Shares:
Create the SyncIQ policies and shares required to protect and access the data if not already existing.
Design Considerations:
- A single SyncIQ policy can have multiple DFS targets underneath it in the file system path.
- This means all DFS targets using this policy failover together.
- To achieve per application failover a single SyncIQ policy for each DFS target is required.
Step 3 - Configure DFS root
Recommend Domain based DFS for higher availability with replicated DFS root between domain controllers.
Step 4 - Create DFS folder
Step 5 - Configure Folder DFS Target (Primary cluster)
Configure the DFS Target for the Primary cluster (cluster which is currently active) by adding UNC path to share created on Primary cluster. This UNC path must use a SmartConnect Zone on the Primary cluster.
Example: \\production.example.com\SMBshare1
Step 6 - Verify Client Access
Check access from DFS enabled client and ensure that they have read / write access enabled to the Primary cluster as per the DFS Folder(s) and Target(s) configured.
IMPORTANT: You must use path including fully qualified active directory domain DNS name - for example: \\ad1.test\DFSRoot\ShareFolder
Tools help debug and plan DFS for DR before going into production. Test machines should install these tools which can be found here: "Where to find DFSUTIL.EXE for Windows Server "
Verify that the SMB client is accessing the DFS target folder’s SMB Share from the primary cluster. DFS utility command to verify: (note DFS client utilities must be installed into the OS, they are not standard tools)
- dfsutil cache referral (ensure both targets are listed)
- dfsutil cache referral flush (clear the cache for debugging)
- dfsutil diag viewdfspath \\domainname\dfsroot\dfsfolder
Example:
C:\Windows\system32>dfsutil cache referral
4 entries...
Entry: \DFS-SVR-01\dfs02\folder2
ShortEntry: \DFS-SVR-01\dfs02\folder2
Expires in 270 seconds
UseCount: 1 Type:0x1 ( DFS )
0:[\cluster11-z01.ad1.test\SMB-Share-002] AccessStatus: 0 ( ACTIVE TARGETSET
)
1:[\cluster12-z01.ad1.test\SMB-Share-002] AccessStatus: 0xc00000cc ( TARGETSE
T )
Entry: \ad1.test\dfs02
ShortEntry: \ad1.test\dfs02
Expires in 270 seconds
UseCount: 0 Type:0x81 ( REFERRAL_SVC DFS )
0:[\DFS-SVR-01\dfs02] AccessStatus: 0 ( ACTIVE TARGETSET )
Entry: \AD1.test\sysvol
ShortEntry: \AD1.test\sysvol
Expires in 0 seconds
UseCount: 0 Type:0x1 ( DFS )
0:[\ad1.AD1.test\sysvol] AccessStatus: 0 ( ACTIVE TARGETSET )
Entry: \DFS-SVR-01\dfs02
ShortEntry: \DFS-SVR-01\dfs02
Expires in 270 seconds
UseCount: 0 Type:0x81 ( REFERRAL_SVC DFS )
0:[\DFS-SVR-01\dfs02] AccessStatus: 0 ( ACTIVE TARGETSET )
DfsUtil command completed successfully.
C:\Windows\system32>dfsutil diag viewdfspath \\ad1.test\dfs02\folder2
The DFS Path <\\ad1.test\dfs02\folder2> resolves to -> <\\production.example.com\SMBshare1>
Done processing this command.
Step 7 - Eyeglass setup:
- Install Eyeglass and add clusters as managed devices to Eyeglass.
- Allow Eyeglass to complete initial discovery and creation of Eyeglass configuration replication Jobs.
- Enable Eyeglass DFS mode on the Eyeglass Configuration Replication Jobs for the SyncIQ policies that will be using the Eyeglass DFS Failover solution.
NOTE: If a SyncIQ policy has already been failed over in OneFS and a mirror policy exists, enable Eyeglass DFS Mode for both the active and disabled policy.
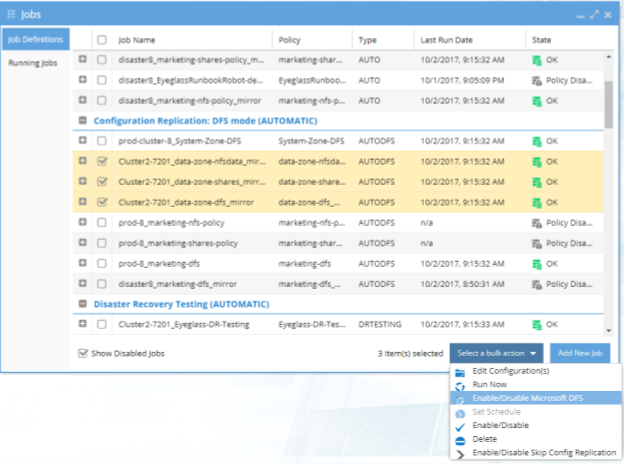
- DFS Enabled SyncIQ policies will show in a new folder and be of Type AUTODFS.
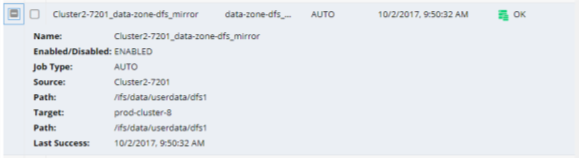
- Initially the state of the Eyeglass AUTODFS job will be pending. Once the next Eyeglass replication cycle has been executed and the new DFS job has been run the state will be updated. The state will be OK if no errors were encountered.
NOTE 1: (See DFS Feature changes table for version behaviour.) With Eyeglass DFS mode, the SMB shares only exist on the active cluster. This is expected and will not interfere with the failover. If Eyeglass detects that the share does exist on the standby cluster, Eyeglass DFS mode Jobs (AUTODFS) will delete it on the cluster that is currently the SyncIQ target (read-only) cluster.
NOTE 2: If the SyncIQ policy associated with an Eyeglass DFS mode (AUTODFS) job is renamed, Eyeglass considers this to a be a new, previously unknown Job and it will be created as a regular Eyeglass Configuration Replication (AUTO) job. You must re-enable DFS for this job.
NOTE 3: See DFS Feature changes table for version behaviour.
Step 8 - Configure DFS Target (Secondary cluster):
Configure the DFS Target for the Secondary cluster (cluster which is NOT currently active) by adding UNC path to share created on Secondary cluster. This UNC path must use a Smartconnect Zone on the Secondary cluster.
Example: \\dr.example.com\SMBshare1
!! IMPORTANT
You must use exactly the same share name as was used for Primary cluster DFS target.
Confirm that both DFS Targets for Primary and Secondary clusters are enabled.
Design Considerations:
Configure Folder Targets with UNC Path to Primary and Secondary SMB Share by using their SmartConnect Zone names. NOTE: With Eyeglass DFS mode, the shares only exist on 1 cluster at a time. You must create both target UNC’s in DFS folder targets. The adding of the target cluster will not be able to detect the site information since the share does not exist. This is ok and will not interfere with the failover. (See DFS Feature changes table for read-only share version behaviour.) 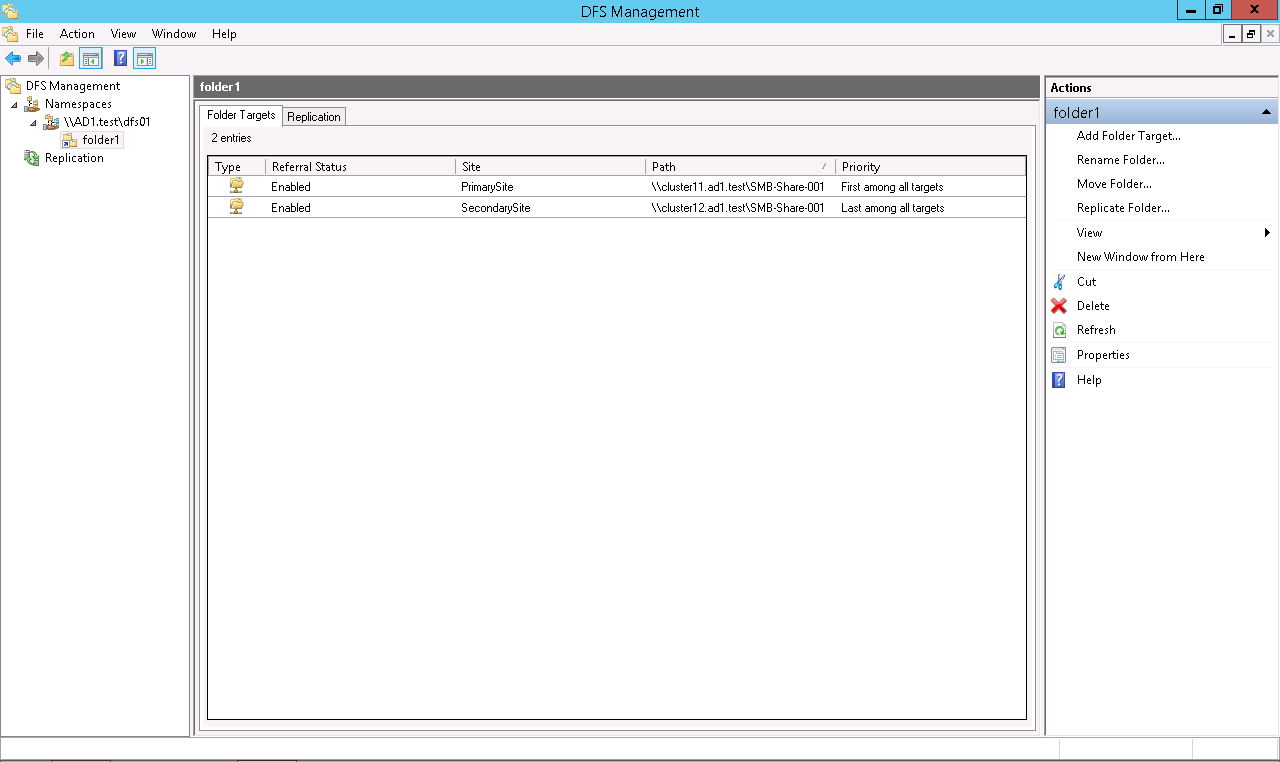
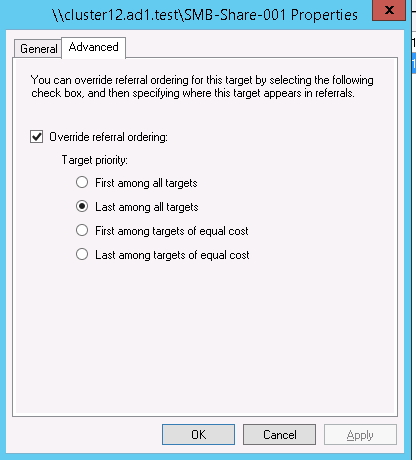
Set the Target Folder Priorities
Priority for Primary Cluster: First among all targets.

Priority for Secondary Cluster: Last among all targets.
Active Directory Sites and Subnets for PowerScale clusters and SMB Clients (Optional)
NOTE: It is not required for successful Eyeglass DFS mode failover.
Best practice:
This step is optional and helps optimize the client decision on which cluster to mount using IP subnets. This requires subnets are configured for all UNC targets and clients in Active Directory. For large networks this may not be practical. If not configured clients will pick a target based on the referral list without using sites.
Use two separate subnets and sites for the Primary cluster (PrimarySite) and Secondary cluster (SecondarySite). Example:
- PrimarySite:Subnet 172.16.80.128/27
- SecondarySite:Subnet 172.16.81.128/27
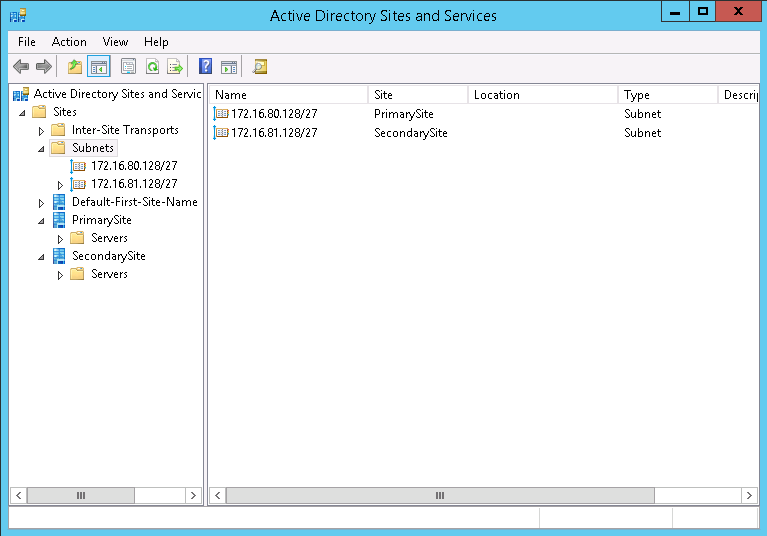
Place the SMB client’s IP address in the Primary Site subnet’s IP address range. With this setting, the Primary Cluster is referred to as the primary folder target path (higher priority).
Step 9 - Verify Client Access
Check access from DFS enabled client and ensure that they still have read / write access enabled to the Primary cluster ONLY as per the DFS Folder(s) and Target(s) configured.
IMPORTANT: You must use path including fully qualified active directory domain DNS name - for example: \\ad1.test\DFSRoot\ShareFolder
Tools help debug and plan DFS for DR before going into production. Test machines should install these tools.
DFS util downloaded by OS type
Now we have DFS folder target paths configured to have access to Primary and Secondary Cluster’s SMB Share. But only the SMB Share on Primary Cluster is active (in normal condition / before failover). The SMB share on Secondary Cluster was created for DFS Folder Target creation as the second path. After it had been registered to DFS Folder setting, then it was deleted. With this initial state, you can verify that the SMB client is still accessing the DFS target folder’s SMB Share from the primary cluster even though a DFS target for the Secondary cluster exists. DFS utility command to verify: (note DFS client utilities must be installed into the OS, they are not standard tools).
- dfsutil cache referral
- dfsutil diag viewdfspath
Example:
C:\Windows\system32>dfsutil cache referral
4 entries...
Entry: \DFS-SVR-01\dfs02\folder2
ShortEntry: \DFS-SVR-01\dfs02\folder2
Expires in 270 seconds
UseCount: 1 Type:0x1 ( DFS )
0:[\cluster11-z01.ad1.test\SMB-Share-002] AccessStatus: 0 ( ACTIVE TARGETSET
)
1:[\cluster12-z01.ad1.test\SMB-Share-002] AccessStatus: 0xc00000cc ( TARGETSE
T )
Entry: \ad1.test\dfs02
ShortEntry: \ad1.test\dfs02
Expires in 270 seconds
UseCount: 0 Type:0x81 ( REFERRAL_SVC DFS )
0:[\DFS-SVR-01\dfs02] AccessStatus: 0 ( ACTIVE TARGETSET )
Entry: \AD1.test\sysvol
ShortEntry: \AD1.test\sysvol
Expires in 0 seconds
UseCount: 0 Type:0x1 ( DFS )
0:[\ad1.AD1.test\sysvol] AccessStatus: 0 ( ACTIVE TARGETSET )
Entry: \DFS-SVR-01\dfs02
ShortEntry: \DFS-SVR-01\dfs02
Expires in 270 seconds
UseCount: 0 Type:0x81 ( REFERRAL_SVC DFS )
0:[\DFS-SVR-01\dfs02] AccessStatus: 0 ( ACTIVE TARGETSET )
DfsUtil command completed successfully.
C:\Windows\system32>dfsutil diag viewdfspath \\ad1.test\dfs02\folder2
The DFS Path <\\ad1.test\dfs02\folder2> resolves to -> <\\production.example.com\SMBshare1>
Done processing this command.
Configuration complete
© Superna Inc