Operational Steps for Eyeglass Assisted SyncIQ Policy Failover
Eyeglass DR Assisted Failover SyncIQ policy Workflow Overview:
This workflow has dependencies that require manual steps to avoid data access loss. These conditions are addressed automatically with Access Zone Failover.
- User selection of PowerScale Cluster which is being failed over “from” (Source).
- User selection of one or more SyncIQ policies for failover.
Note: Quotas failover automatically when they match the SyncIQ policy paths
- Eyeglass will update the target cluster SyncIQ policy to make it writeable and the final sync status is shown to the user when completed.
- SmartConnect Manual steps: The user must ensure that SmartConnect Zone Aliases are created manually on the target cluster. (Note: Make sure the SmartConnect Zone was only in use by the SyncIQ policies selected for failover)
- This is because an alias created on the target cluster is required for SmartConnect to answer DNS queries from clients expecting to mount the production cluster SmartConnect Zone or alias name. In addition, SPN collisions in AD can result in authentication failures if the SPN step is skipped. (see Admin Guide section on Active Directory Machine Account Service Principal Name (SPN) Delegation).
- This can be done from the OneFS CLI and is executed against the SmartConnect Zone on the source and target cluster.
- SMB only - SPN Step: Since SmartConnect Zones and associated SPN entries cannot be deleted on the source cluster with Single policy failover workflow (because this may remove access to any data and mounts that are not failed over), no hints are required and it's up to the administrator to ensure SPN’s that must be deleted at the source cluster are removed from the OneFS CLI and the target cluster SPN’s are created using the OneFS CLI.
- Final Step: DNS updates for SmartConnect Zones can done. The SmartConnect Service IP is used for delegation from DNS to PowerScale. This step is manual but can be scripted with post failover scripting (requires script able DNS server)
- This step is manually implemented in your company's DNS system that delegated the SmartConnect Zones to the PowerScale cluster.
- Verify clients can connect to existing SmartConnect Zone shares and exports using NSLOOKUP to verify DNS and then test mounting from a client machine.
- Failover Complete.
IMPORTANT: Making any changes to the SyncIQ Policies or related Eyeglass Configuration Replication Jobs being failed over during the failover may result in unexpected results.
IMPORTANT: Eyeglass Assisted Failover has a 1 hour timeout on each failover step. Any step which is not completed within this timeout period will cause the failover to fail.
IMPORTANT: Deleting configuration data (shares, exports, quotas) or modifying Share name or NFS Alias name or NFS Export path on the target cluster before failing over without running Eyeglass Configuration Replication will incorrectly result in the object being deleted on the source cluster after failover. You must run Eyeglass configuration replication before the failover OR select the Config Sync checkbox on failover to prevent this from happening.
IMPORTANT: More than one SyncIQ Policy can be failed over in a single Failover Job but an error in any one of the SyncIQ Policy failovers will cause failover of all SyncIQ Policies to be halted.
For detailed steps consult the failover guide table here.
For detailed steps on execution and monitoring consult the Failover Design Guide
SyncIQ Policy Failover Procedure with DR Assistant
This is for application failover when host side automation scripts are required. This is recommended with NFS failover when no SPN or SmartConnect Zone automation is required.
It offers flexibility to design a failover solution customized for an application use case, while using DFS mode or Access Zone failover for standardized failover workflows.
This failover mode can be used with SMB however, manual steps are required for SPN and SmartConnect Zones that are not required with DFS mode or Access Zone modes.
Recommended Use Cases:
- NFS failover with post script host automation
- Application failover with script engine to assist with application automation steps
- Failover without DNS updates using SmartConnect zone names and unmount and remount automation
The diagrams below show the flow and steps of failover.

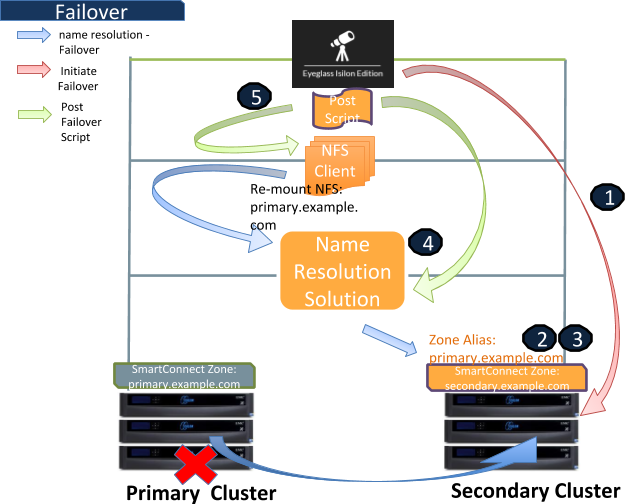
Failover Steps
Step 1: Initiate Failover SyncIQ Policy with Eyeglass
Step 2: Secondary Cluster - Create SmartConnect zone alias name - Manual (automated with Access Zone Failover)
Command:
“isi networks modify pool <subnet>:<zone-name> --add-zone-aliases <zone-alias-name>”
Example:
“isi network modify pool subnet0:zone01-pool --add-zone-aliases primary.ad1.test”
Step 3: Secondary Cluster - Ignore missing SPN - Manual
Command:
“isi auth ads spn check --domain <domain-name>”
When we run this command on the secondary cluster, we can see missing SPN. As this scenario is using local provider as the authentication provider, we can ignore this missing SPN message.
Step 4: Update Name Resolution – IP Address Automated by Eyeglass (with script engine)
We can use the Post Failover Eyeglass script to update the name resolution.
Step 5: Re-mount the NFS Mount Automated by Eyeglass (with script engine)
Unmount and remount the NFS mounting folder on the client to refresh the connection to the NFS export (accessed through the secondary cluster).
Command:
“umount -fl /mnt/z01-nfs01”
and then
For NFSv3:
“mount -t nfs -o vers=3 primary.ad1.test:/ifs/data/zone01/z01-nfs01 /mnt/z01-nfs01”
For NFSv4:
“mount -t nfs -o vers=4 primary.ad1.test:/ifs/data/zone01/z01-nfs01 /mnt/z01-nfs01”
Might need to unmount the export with force / force and lazy options to solve the NFS stale issue
Also for NFSv4, we might need to kill the process that was accessing the export mount before the failover.
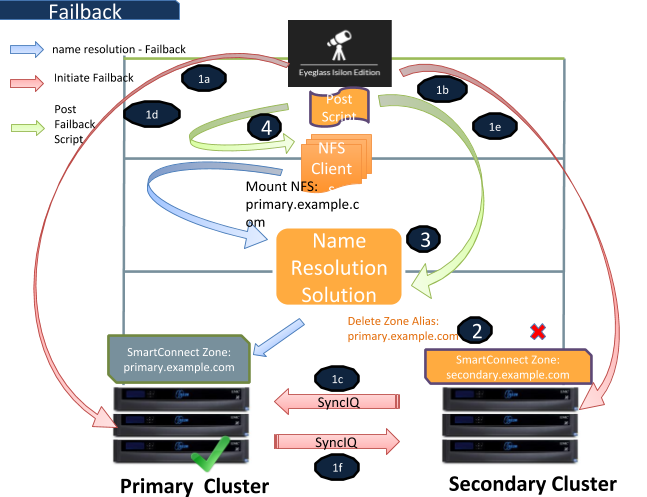
Failback
Step 1: Initiate Failback with SyncIQ policy with Eyeglass
1.a. Automated by Eyeglass
1.b. & 1c. Automated by Eyeglass
On Secondary - replicate data to the primary cluster with the mirror policies
1.d. Automated by Eyeglass
On the primary cluster, allow writes to the target directories of the mirror policies
1.e. & 1f. Automated by Eyeglass
On the secondary cluster, complete the failback process
Step 2: Secondary Cluster - Delete SmartConnect zone alias name (automated with Access Zone Failover)
Command:
“isi networks modify pool <subnet>:<zone-name> --remove-zone-aliases <zone-alias-name>”
Example:
“isi network modify pool subnet0:zone01-pool --remove-zone-aliases primary.ad1.test”
Step 3: Update Name Resolution - IP Address Automated by Eyeglass (with script engine)
We can use the Post Failover Eyeglass script to update the name resolution.
Step 4: Re-mount the NFS Mount Automated by Eyeglass (with script engine)
We can use the Post Failover Eyeglass script to update the name resolution.
Unmount and remount the NFS mounting folder on the client to refresh the connection back to the primary cluster’s NFS export.
Command:
“ umount /mnt/z01-nfs01”
and then:
For NFSv3:
“mount -t nfs -o vers=3 primary.ad1.test:/ifs/data/zone01/z01-nfs01 /mnt/z01-nfs01”
For NFSv4:
“mount -t nfs -o vers=4 primary.ad1.test:/ifs/data/zone01/z01-nfs01 /mnt/z01-nfs01”
© Superna Inc