Advanced DR Robot Configuration
This option exercises all Eyeglass Failover automation and more closely follows the steps for an Access Zone failover and failback operation. This takes more time to set up, but offers the highest level of confidence everything required for failover is in place for production Access Zones.
Prerequisites
- Dedicated IP pool added as member to the Robot Access zone.
- Create SmartConnect Zone name of your choosing on source and target cluster IP pools.
- SyncIQ policy in an Access Zone with Runbook Robot prefixed name AND only one Runbook Robot prefixed policy can exist in this Access Zone. If any other SyncIQ policies are detected the Robot will disable itself and stop functioning. This is designed to ensure no production data ends up getting failed over in the Access Zone.
- Share or export created in the path of the Robot SyncIQ policy, They will be failed over as well using normal configuration sync jobs. It's a good way to test the whole failover of configuration. The configuration names of shares, exports can be any name.
Note: Eyeglass will modify the description, Root Client and Map Root User settings as required for Robot operation on an existing export with the same path as the Robot SyncIQ Policy root path.
- Quotas will be failed over during the Robot execution and deleted on the source automatically if quotas have been created within the SyncIQ policy used for the Robot.
- Zone Readiness task must be enabled (default state is disabled ). The Zone Readiness jobs can be enabled from the jobs windows. or the webshell CLI with (igls admin schedules set --id Readiness --enabled true)
- Zone Readiness task must have run and Zone Readiness status for Robot Zone must be OK. Then Configuration Replication for the Robot Job must have been run successfully.
- Eyeglass Hostname on the Network Card Setup and the Network Settings (setup using yast during initial Eyeglass appliance configuration) must be identical.

Preparation and planning instructions for Zone Readiness can be found in the Eyeglass Access Zone Failover Guide.
Configuration Steps for the Advanced DR Robot
- Create an Access Zone with name beginning with “EyeglassRunbookRobot” on both source and target clusters to be tested for DR. (Note: more than one pair of clusters can be tested with Runbook Robot).
- Create a SyncIQ policy with the well known name “EyeglassRunbookRobot-xxxx” where xxx is a number or string of your choosing. Run the policy once it has been created.
- Use a path that is a child of the access zone base path. any path will do.
- See Basic setup above for detailed steps.

- Create a subnet pool (example Robotpool) and make it a member of the Access Zone created in Step #1, example “EyeglassRunbookRobot”.
Note: the IP address space used should be reachable by Eyeglass to mount with NFS export. Create this pool on the source and target clusters.
- Example: subnet0:Robotpool
- Now create mapping alias for the Robot to move SmartConnect Zones from one pool to another. (see detailed section on hints for explanations in the Access Zone guide that describes syntax and how to make them unique to avoid spn collisions).
- Example on Source cluster: isi network modify pool --name=subnet0:Robotpool --add-zone-aliases=igls-01-prod
- Example on target cluster: isi network modify pool --name=subnet0:Robotpool --add-zone-aliases=igls-01-dr
NOTE: In this release, for the Access Zone Robot to show up in the Runbook Robot jobs, some configuration data needs to exist in the Access Zone. We recommend creating a share with no permissions anywhere in the Access Zone that is under the SyncIQ policy created within the Access Zone root path. Example “Robotshare”
- After inventory runs (5 minutes default interval) you should see the Runbook Robot Jobs section showing the SyncIQ policy created in this section

- To get the Zone Readiness updated (default interval 6 hours), run this job manually (See igls CLI in the Eyeglass CLI to change schedule of all jobs)
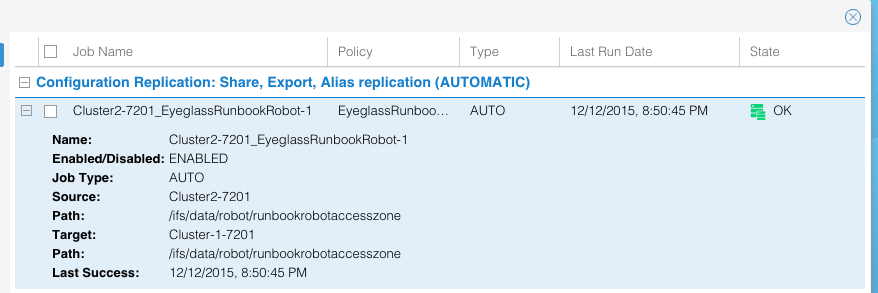
- After the Zone Readiness job has completed, wait for the next Configuration Replication cycle to complete.

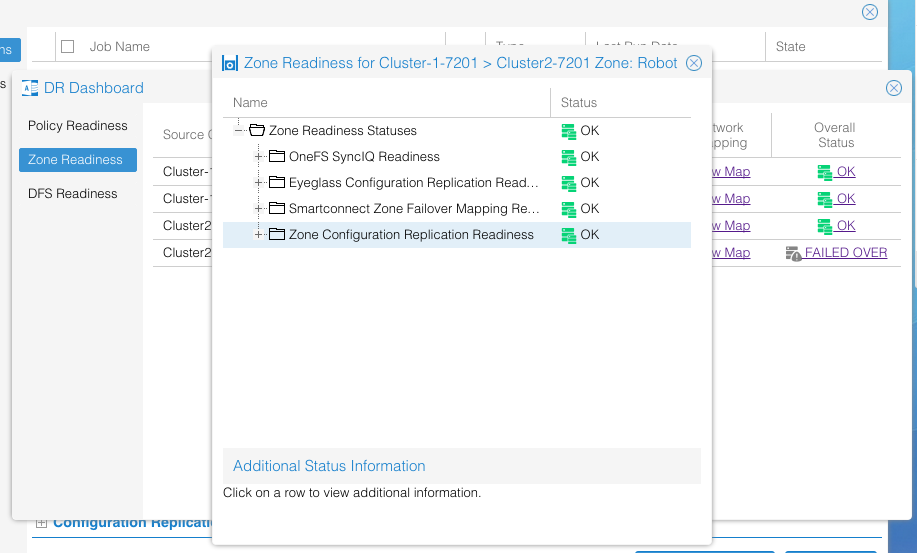
- Now open the DR Dashboard and select Zone Readiness to view the Robot Zone Readiness status
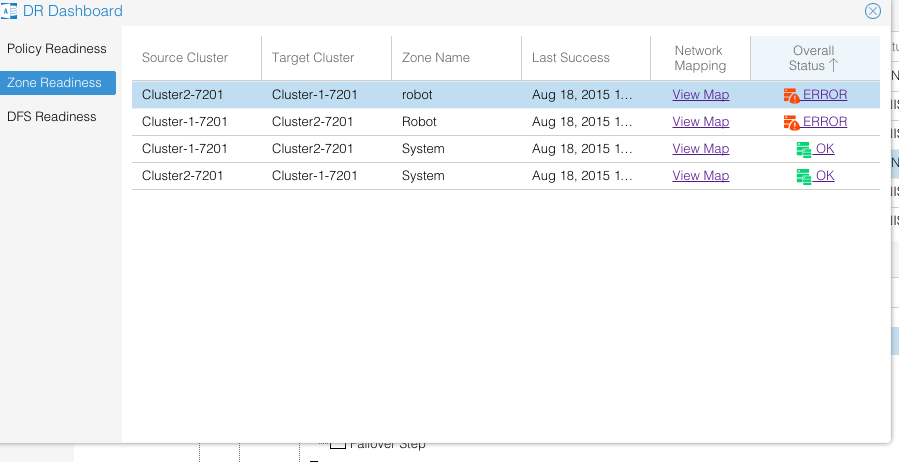
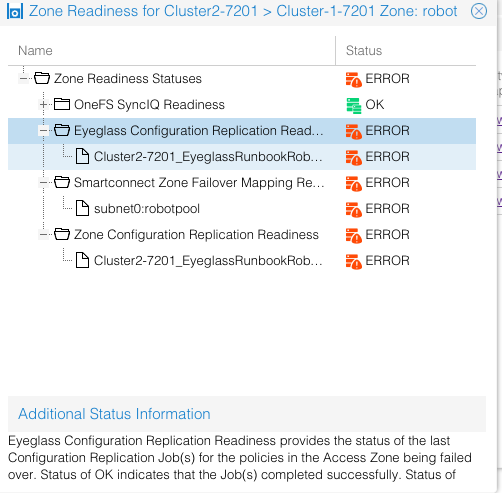
- If you have errors related to the Robot zone, click on the link to view which areas are not correctly setup and correct the errors by reviewing documentation.
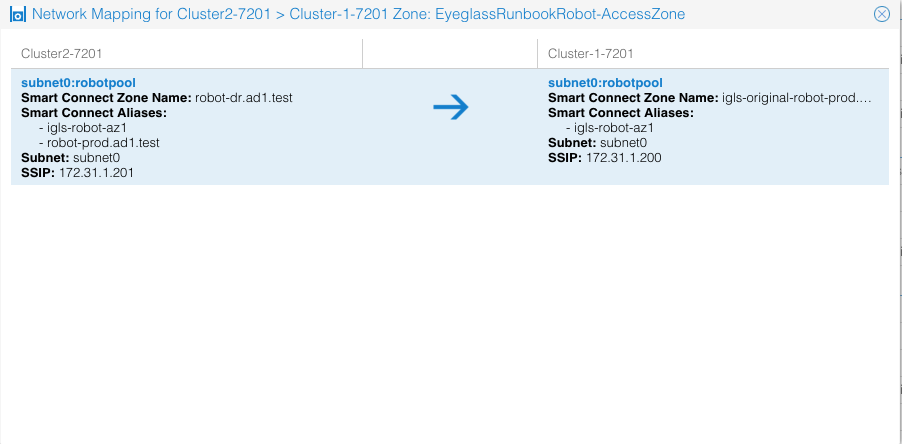
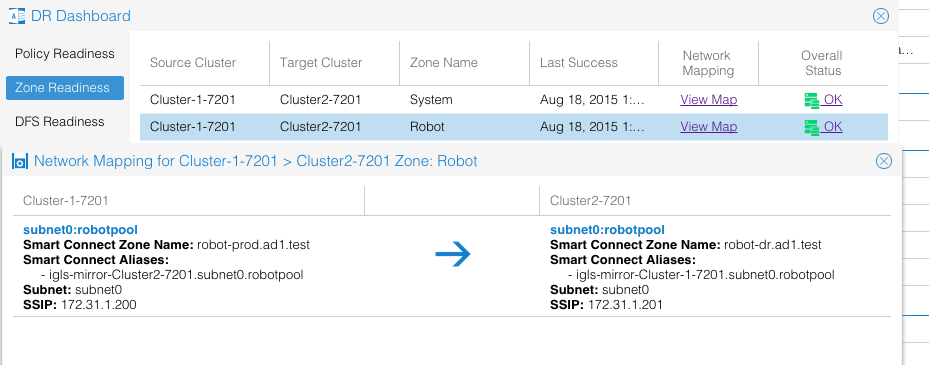
- To view the SmartConnect to pool mapping click the View Map link, correctly mapped with alias hints will look like the image below
Robot Access Zone with mapping example:
- Confirm that your Robot zone is setup with all Zone Readiness Status indicators green (it needs to be all green)
- The default Robot jobs run every day at midnight and executes both Access Zone based failover Robot policies which moves all networking, SPN updates (delete, add) and aliases on subnet pools using the mapping hints each. It also executes any Runbook Robot policies in other Access Zones like system.
Robot jobs are configured without Continue on Error so initial validation check must not have any errors.
- The default Robot jobs run every day at midnight and executes failover Robot policies which fails over the policy.
- Creates export.
- Mounts the cluster writes test data using export created.
- It failovers the policy.
- Runs the policy.
- Deletes SPN’s on source.
- Renames SmartConnect alias on source with igls-original.
- Creates SmartConnect alias on target based on mapping setup before hand.
- Creates new SPN’s against new cluster machine account.
- Mounts the data on synced export on target.
- Unmounts.
- Moves the schedule on policy to the target.
- Runs resync prep on source.
- Goes to sleep until time to failback time.
- Methods to verify it was successful
- Check the DR Dashboard policies tab and verify it’s green.
- Check the cluster SyncIQ policy status on both clusters and make sure the policy moves from one cluster to the other each day.
- Make sure the test file exists with a current date and time stamp on the active cluster (Hint; look in the policy path root file system for the test file).
- If quota was applied to Robot policy path make sure the quota moved to the target cluster AND was deleted on the source cluster (Eyeglass moves policies on failover).
- Review the Failover Log (DR Assistant / Failover History / Open log file). Failover log may also be downloaded from the Failover Log Viewer using the Download File link.
- Check the DR Dashboard Zone Readiness Screen to make sure the Robot runs successfully and shows Failover or Green depending on which cluster the policies are active.
- NOTE: Initially after failover, the Zone Readiness will show an error for Eyeglass Configuration Replication and Zone Configuration Replication until the next Configuration Replication task and Zone Readiness task have completed.
- You can also check the SmartConnect Zone alias on each cluster and look for igls-original prefix on SmartConnect Zone name failed over.
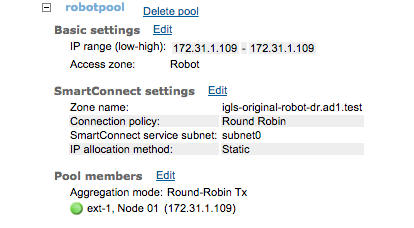
- The image above shows this clusters SmartConnect pool zone name was renamed on failover and indicates the dr.ad1.test zone has been moved to the production cluster based on the alias hints mapping. Cool!
- The other way to check status is see which cluster has the enabled SyncIQ policy for the Robot zone