- Overview
- View Job Definition and Status
- Edit Configuration
- Delete
- Enable/Disable Skip Configuration
- Newly Detected SyncIQ policies Job Type Unconfigured
- How to set job type for unconfigured jobs
- Enable/Disable Microsoft DFS
- Run Now Action next to Job Name
- Run Now Menu Item Bulk Actions
- Running Jobs
- Performance Acceleration for Configuration Jobs
- Troubleshooting Eyeglass Job
- What are the Eyeglass System Alarms?
- Renaming SyncIQ Policy & Eyeglass Jobs
Overview
The Jobs Feature is used to keep track of Eyeglass tasks. Two Job views are provided:
- Job Definitions: Use the Job Definition view to see each job's details and manage Eyeglass Configuration Replications Jobs.
- Running Jobs: Use the Running Jobs view to see the status of active tasks.
View Job Definition and Status
Job Definitions Window : Click the Jobs icon to view this window.
Job Name : It displays the name as was defined during job creation.
This column displays a + symbol along with it which, when expanded, provides more details about the job, such as:
Enabled/Disabled: The Job can be enabled or disabled from the Jobs window itself. Three distinct states can be encountered:
- “USERDISABLED” State: When the job is disabled.
- “ENABLED” State: When the job is enabled.
- “POLICY DISABLED” State is displayed for Auto Type Jobs if the SyncIQ Policy is disabled in OneFS.
Job Type: It displays two Job types: “AUTO” and “MANUAL”.
- Auto: For Jobs automatically detected by Eyeglass when a policy is created in OneFS and the Job is scheduled from there.
- Manual: For Jobs that were manually created from the Jobs window.
Source: It displays PowerScale cluster name configured as Source for a replication Job.
Source Path: The source path is used to provide a point in the file system for Eyeglass to autodetect shares, exports, and quotas, to discover and include in the job. A job can be edited using Edit Configuration(s) to remove a detected configuration that you don’t want included in the job.
Destination: It displays PowerScale cluster name configured as Destination for the replication Job.
Last Success: This field displays the date when the job was last successfully run. If the Job was never run successfully, this field is empty.
Last Run Date: It displays the date when the job was last run regardless of its last state was failed or successful.
State: It displays the current state of the Job.
- “OK” if the Last Run date and Last Success date match.
- “ERROR” if the Last Run date and Last Success date don’t match.
- "SYNC IQ RUNNING" if the associated SyncIQ Job is in a running state
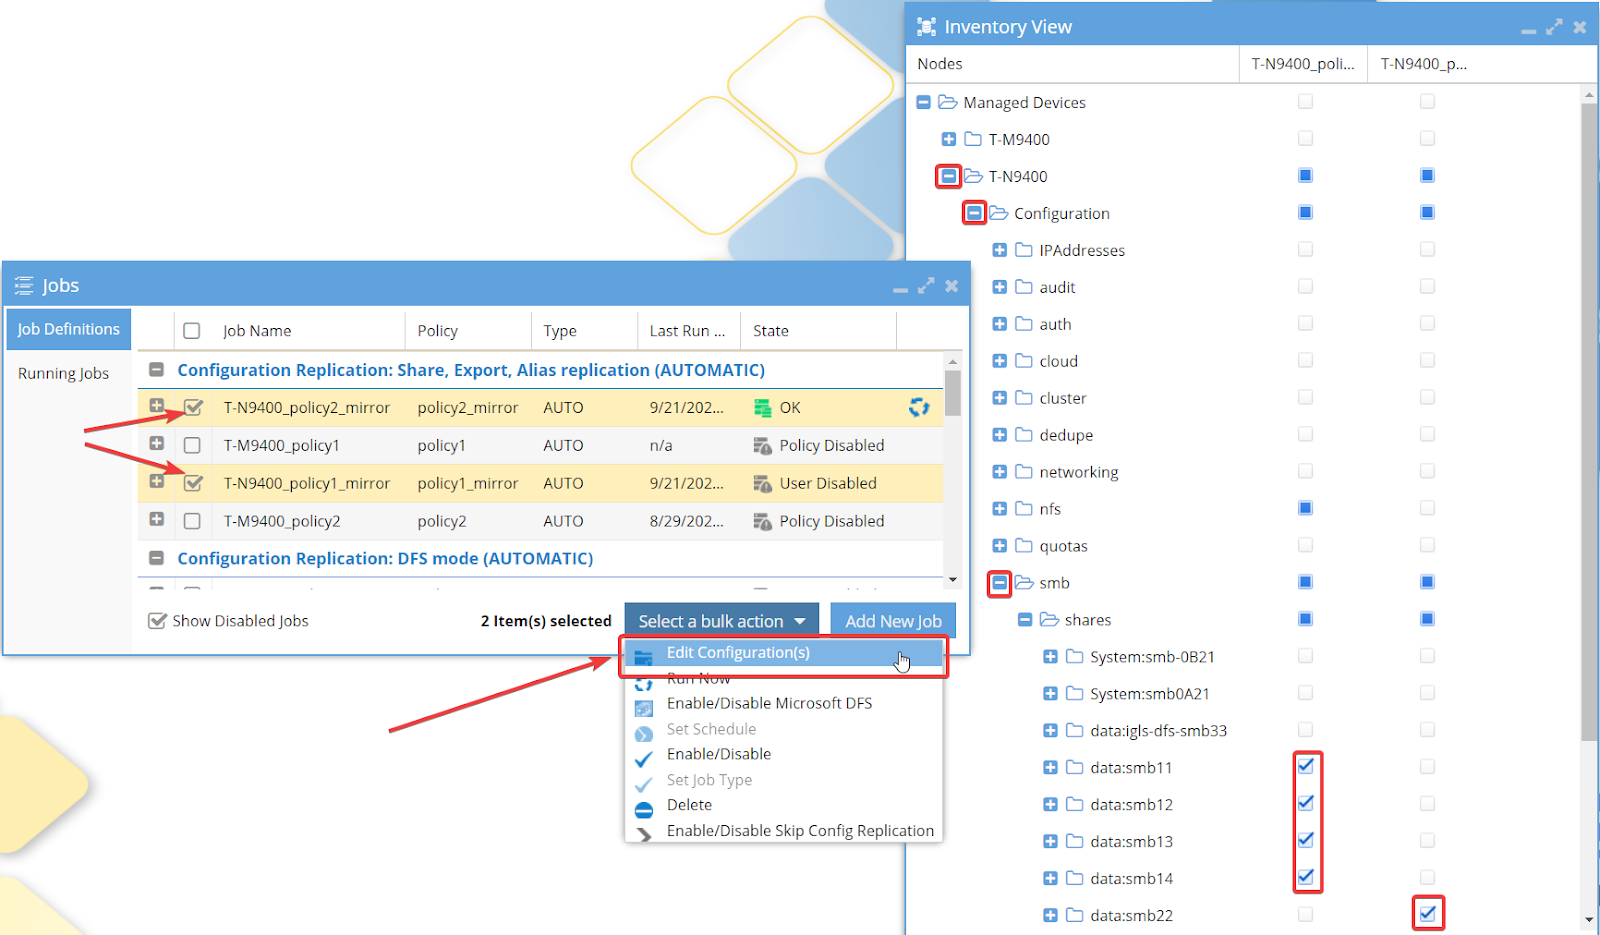
Edit Configuration
Use Edit Configuration to see the SMB shares/ NFS exports/ NFS aliases associated with each Eyeglass Configuration Replication Job.
Select the checkbox for your Job(s) and then go to the Select a bulk action button and click the Edit Configuration(s) option. This will take you to the Inventory View window, where you can expand the tree to see which SMB shares, NFS exports and NFS aliases are associated with the selected job.
Delete
The Delete functionality doesn’t apply to the current release.
Able to enable/disable all types of jobs except Eyeglass Failover: Runbook Robot (AUTOMATIC) (TYPE = RUNBOOK).

|
Note: If disabled, no actions will be taken on the policy, and it will not be eligible for failover |
Enable/Disable Skip Configuration
Set this mode to skip syncing any configuration data on this policy but allow the policy to be eligible for failover. This mode would be used when two different sets of hosts will be used at the production and DR site for NFS exports, and the client lists will be different. This allows configuration to be managed manually on these policies.
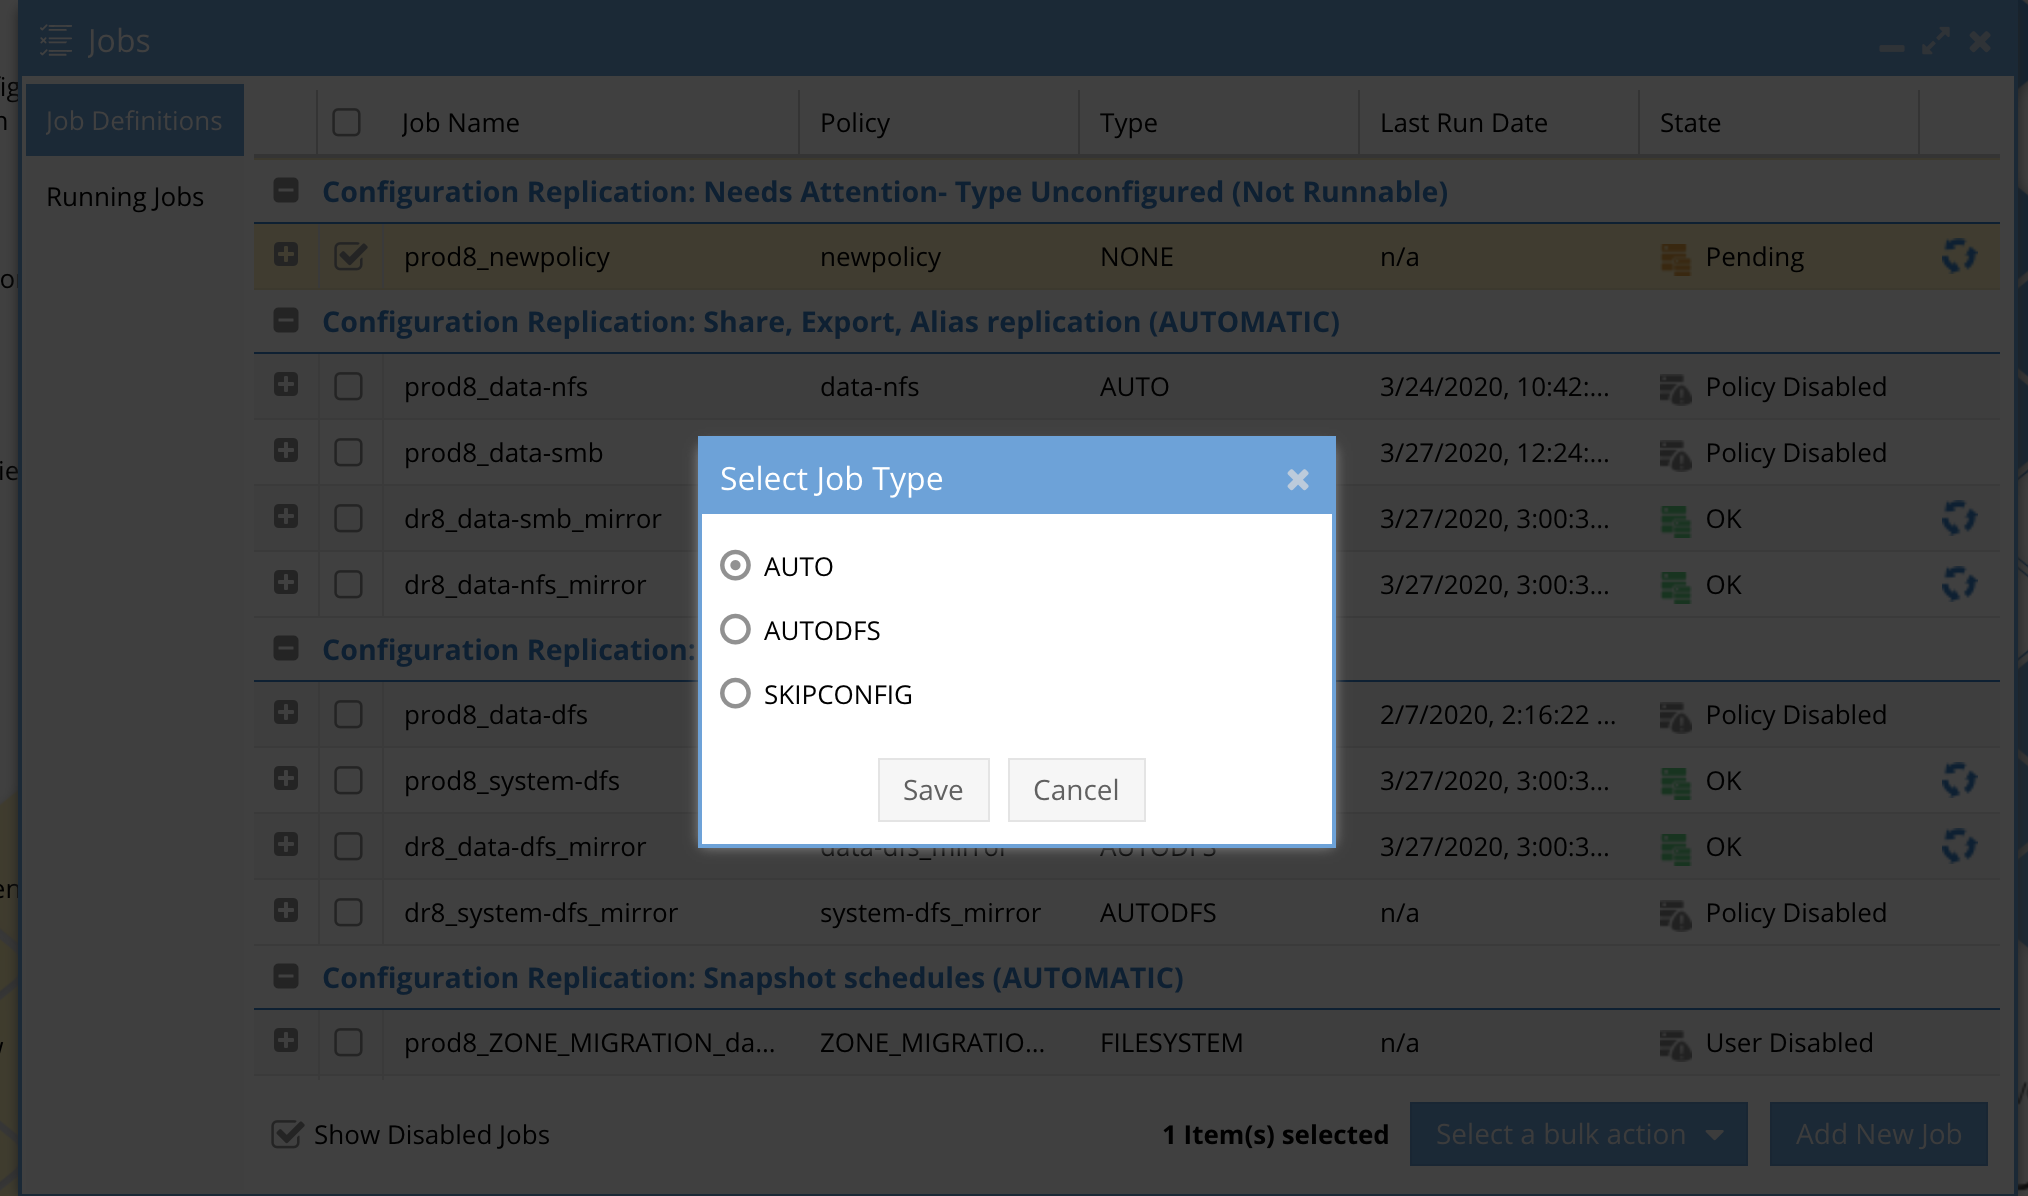
Newly Detected SyncIQ policies Job Type Unconfigured
This allows an Unconfigured Job type to be set to Auto, AutoDFS, or AutoSkipConfig and then enabled for production use. All new policies detected will appear as unconfigured and require the administrator to take action to enter production use.

An alarm will be raised when a new syncIQ policy is detected, indicating that an action is required to set the DR job type for this new policy. This will generate an alarm every 5 minutes until the job type has been configured. If the policy is not in production, then set the job type and then set to User DISABLED.

How to set job type for unconfigured jobs
- Login to Eyeglass
- Open the Jobs icon
- Select the unconfigured policy
- Select bulk actions menu Set Type
- Set the type
- NOTE: Once the job type is set, it will not be possible to set it back to unconfigured status.
Enable/Disable Microsoft DFS
To enable/disable DFS mode for Configuration Replication: Share, Export, Alias replication type of jobs. Please refer to the Microsoft DFS Mode Failover Guide.
Run Now Action next to Job Name
Eyeglass Jobs can run automatically but also on demand. One single click on the Run Now icon will trigger the run. This simplifies running configuration jobs or failover readiness jobs.
The Run Now icon is positioned next to each job that is in a runnable state.
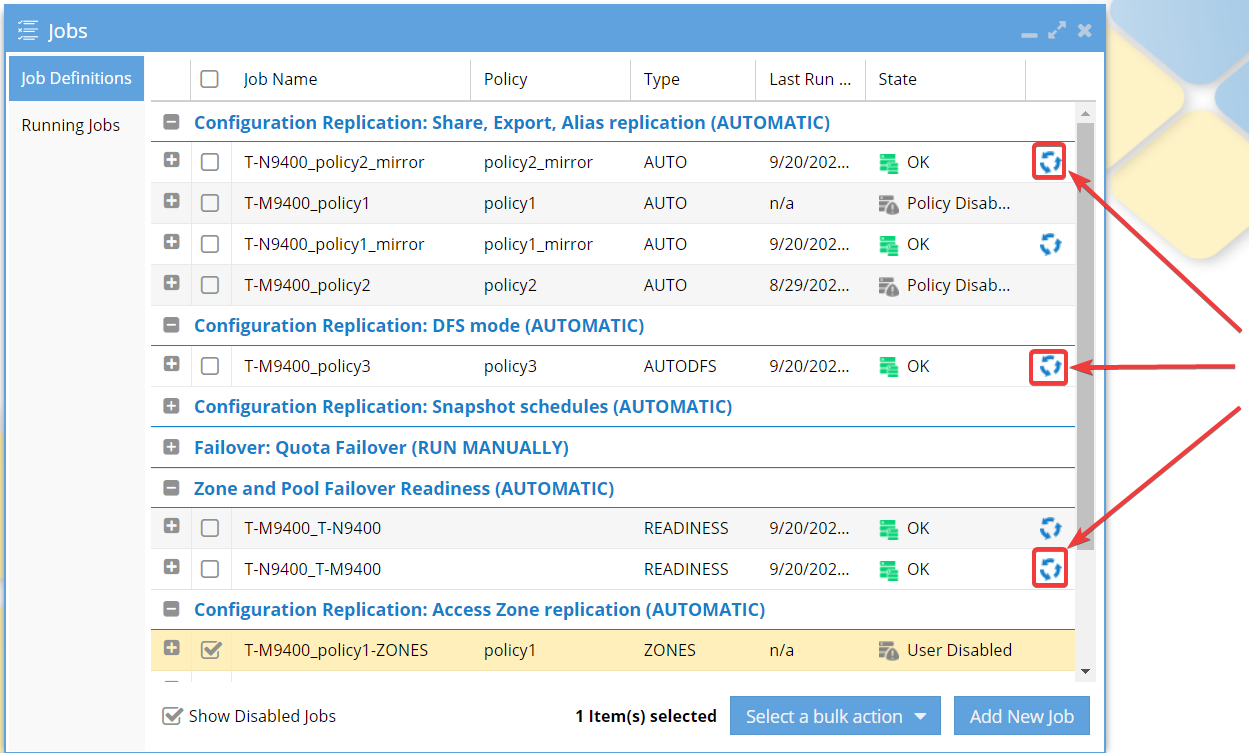
Run Now Menu Item Bulk Actions
Able to run Eyeglass Configuration Replication Jobs on demand.
- Open the Jobs window.
- Select an Eyeglass Configuration Replication Job.
- Select a Job.
- Select a bulk action.

Select Run Now from “Select a bulk action menu”. This will initiate the Eyeglass Configuration Replication task to run all Eyeglass Configuration Replication Jobs. Run Now can also be selected from the small icon present at the end of each row.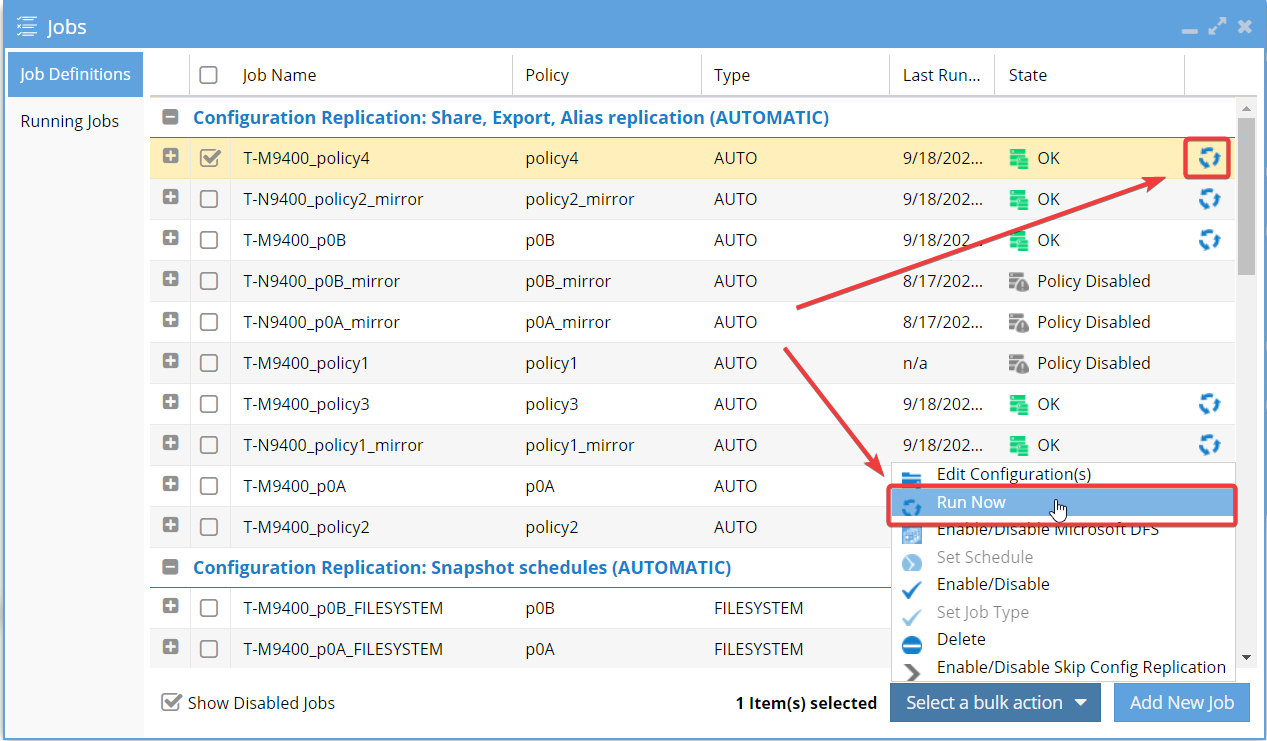
- You can check the progress of the Configuration Replication Job in the Running Jobs view of the Jobs window.
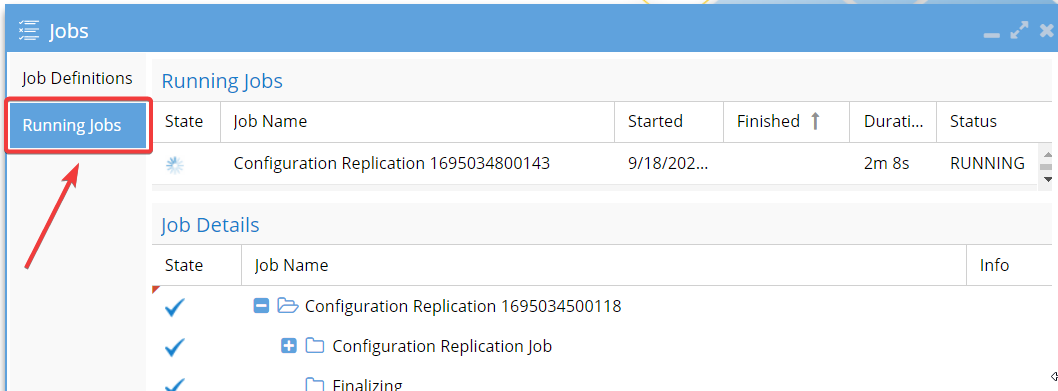
Running Jobs
This category displays the currently Running Jobs and their details such as:
Job Name: displays the name of the Job
State: displays the state of Job: Finished or Running
Started: displays the time when it was Started
Finished: displays the time when it was Finished.
To view a Job in progress, select Running Jobs from the Jobs window. In the bottom Job Details pane, you will see the steps associated with the Job and the status for each step.
Performance Acceleration for Configuration Jobs
- Requirements
- 2.5.9 or later
- Configuration sync Audit job disables the option to increase the performance of config jobs. This is good for customers with large numbers of SMB, NFS configurations to speed up the job processing time. The audit feature does not need to run on each job and could be enabled
- login to eyeglass
- sudo -s
- nano /opt/superna/sca/data/system.xml
- Under the <process> tag add this new tag
- <audit>false</audit>
- control+x
- systemctl restart sca
- done.
Troubleshooting Eyeglass Job
When a problem occurs for a Job in progress, the Running Jobs view will indicate at which step a problem occurred with a link to the information available for the error.
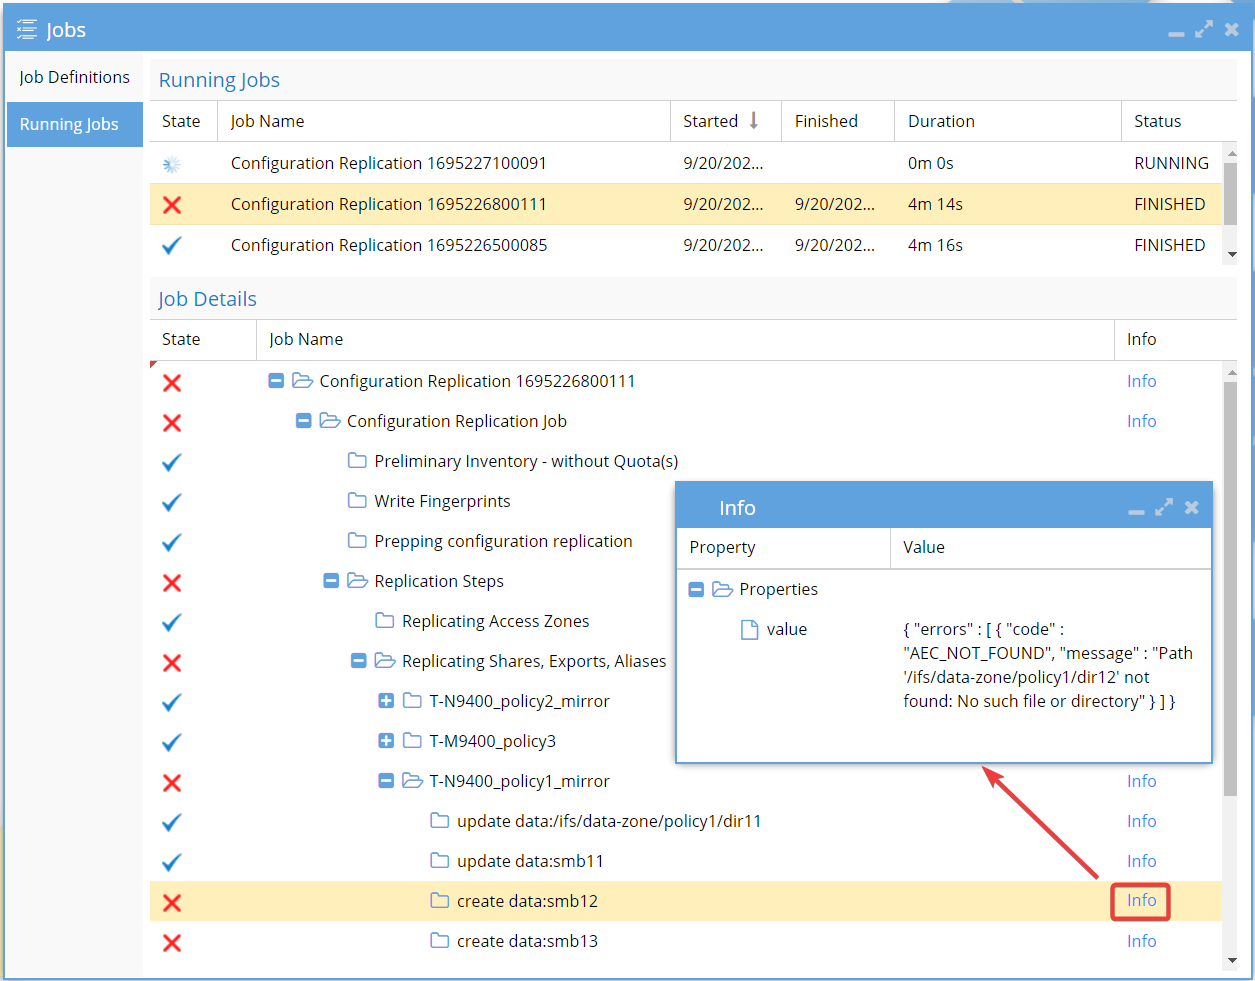
For a completed Job, the Eyeglass system alarm related to the failed Job may contain the extra information you need to troubleshoot the issue. The Alarms window will pop up by clicking the Alarms icon.

What are the Eyeglass System Alarms?
Refer to Eyeglass PowerScale Alarm codes for the list of system alarms.
Renaming SyncIQ Policy & Eyeglass Jobs
When a SyncIQ Policy is renamed, Eyeglass considers it to be a new SyncIQ Policy, and therefore the following happens:
- Eyeglass Job(s) related to the original SyncIQ Policy Name are deleted.
- Eyeglass Job(s) for the new SyncIQ Policy Name is created but will be set to Unconfigured state and will need to be set to auto or autodfs and enabled.
As a new Job, the Eyeglass Configuration Replication Jobs will have a state depending on the Eyeglass appliance default “Initialstate” configuration (see section igls adv initialstate in this Admin Guide). By default, the Jobs will be disabled. Any other customizations to the Job, such as DFS Mode, must also be re-applied. For a SyncIQ Job that has been renamed, follow these steps in Eyeglass:
- Login to the Eyeglass web page.
- Open the Jobs window.
- For any Jobs that were in DFS Mode previously, re-set to DFS Mode.
- For any Jobs where sync of a share or export, and had been customized to be skipped from the Jobs page, use Edit Configuration to deselect those objects from the Job.
In addition to the Job setup, RPO Reporting for the original SyncIQ Policy name will not be linked to RPO reporting for the new SyncIQ Policy name.
© Superna Inc