Eyeglass Administration guides Publication
How to create a Data and Config Migration Job
Home
Read Me First
- 2.5.6 or later
- Existing SyncIQ policies can be detected and used to copy configuration data from a source path to a target path on the same or different cluster, this will avoid Eyeglass creating a new policy to sync data. This allows more flexability when to start the data copy for a migration.
- Configuration only option will allow any source to any target path (same or different clusters) to copy shares, exports and quotas and skip any data policy creation steps. Simple check box in the UI to enable configuration only migration job. This will create a new job in the job icon that will persist to sync data from one path to another using the normal configuration job schedule. This job can be deleted once it is no longer required. NOTE: target path must exist to create the configuration data. No syncIQ policy needs to exist for this feature to work.
- Not Supported with MultiHop Configuration Replication: For same cluster configuration copy on overlapping paths, only the source cluster that replicates writeable data can be selected as the source path for a copy job. A DR cluster cannot be used as the source path for a configuration only migration.
- New dedicated Icon on the desktop to access the migration features.
- IMPORTANT NOTE: Since Data copy phase can take hours to complete, the steps in a migration need a timeout and it's hard coded to 15000 minutes or approx 10 days. Any migration of data longer than this will fail.
- Contact Support before using this feature to ensure your use case is supported.
How to start a Migration Job
- Open Data Config Migration Icon on the desktop (release 2.5.6 and higher previous releases Jobs Data and Config Migration Icon on the desktop).
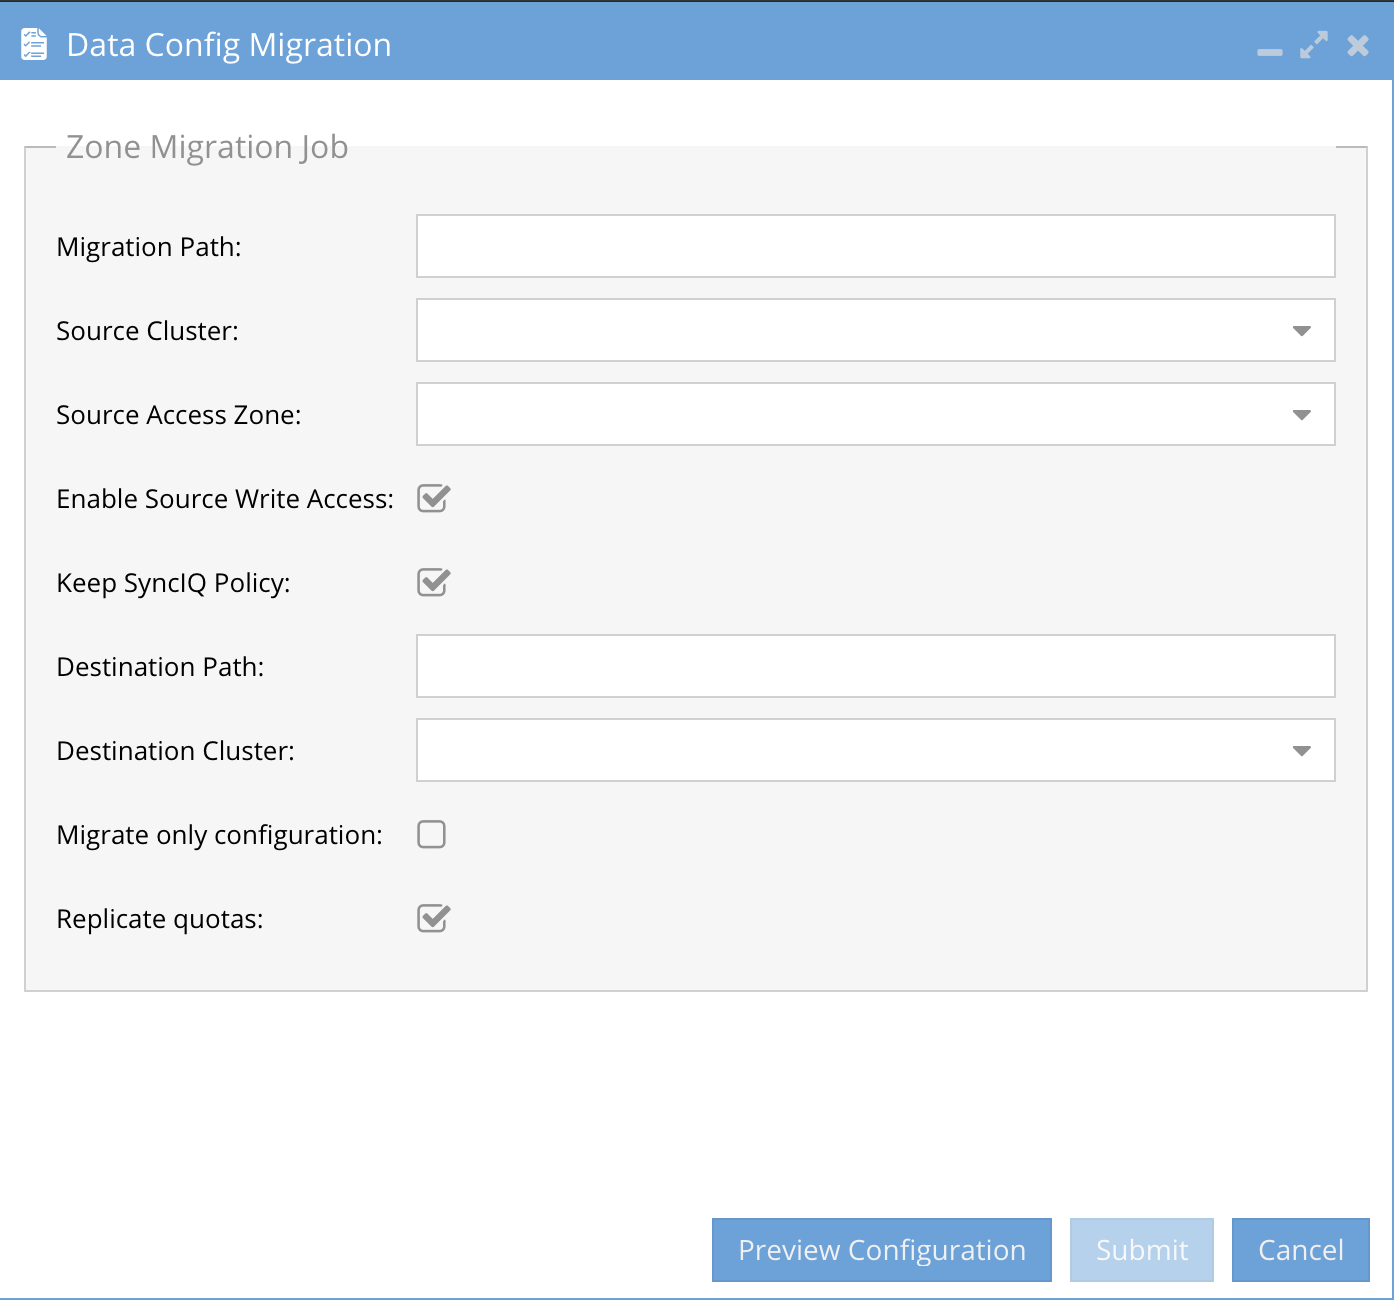
- Enter source path to migrate on the source cluster
- Note: All Configuration data shares, exports, NFS aliases, Quotas must exist at path or below be included in the migration
- Enter the source cluster in the drop down (only Managed clusters in Eyeglass are listed)
- Source Access Zone is a drop down list of all listed access zones detected. Select the zone where the configuration data exists. NOTE: The reason this is not detected is some clusters allowed overlapping access zone base path which means a source path can have configuration from one or MORE access zones.
- if you want to block user access on the source cluster path, you must de-select “Enable Source Write Access” . Advanced option contact support before using this feature.
- NOTE: if blocking user access to the source cluster path and source cluster path is protected by an existing SyncIQ policy. Then you MUST De-Select “Enable source write access” option when the source path is protected by SyncIQ policy. (WARNING: De-Selected means a the lock policy will block writes to the source folder during migration, the migration job will fail since the path is under a SyncIQ domain. Also note that post migration default top level ACL’s will need to be reapplied see section in this guide)
- This option when de-selected will lock the source path and deny all IO regardless of share or export access settings. The migrated data will inherit the locking SyncIQ policy ACL’s on the parent folder when the migration is done.
- The Target path entered into the migration job will have modified permissions that will need to be restored BEFORE users can access the data in the new location. This provides a 2nd level of data locking before the new data is in production.
- See Detailed Steps below to restore the ACL settings on the parent folder.
- Configuration sync only check box (default disabled) (2.5.6 or later release) - Use this if no synciq policy exists from source to target path and the data is already synced, this option will create a special job in the Jobs configuration icon to read all the configuration data from the source path and create it on the target path and will create the configuration data in the access zone that was detected on the target path.
- NOTE: In 2.5.6 build 84 or eariler this feature is a mirror mode and will remove any overlapping configuration data found on the target path or below. This will be changed in a patch release to default to merge mode and will leave all target configuration data as is and copy only new configuration to the target path.
- NOTE: the path must exist on the target location entered relative to the source path configuration objects. This means the entire folder structure must exist on the target path entered. The Share and NFS create will not create a folder if it does not exist.
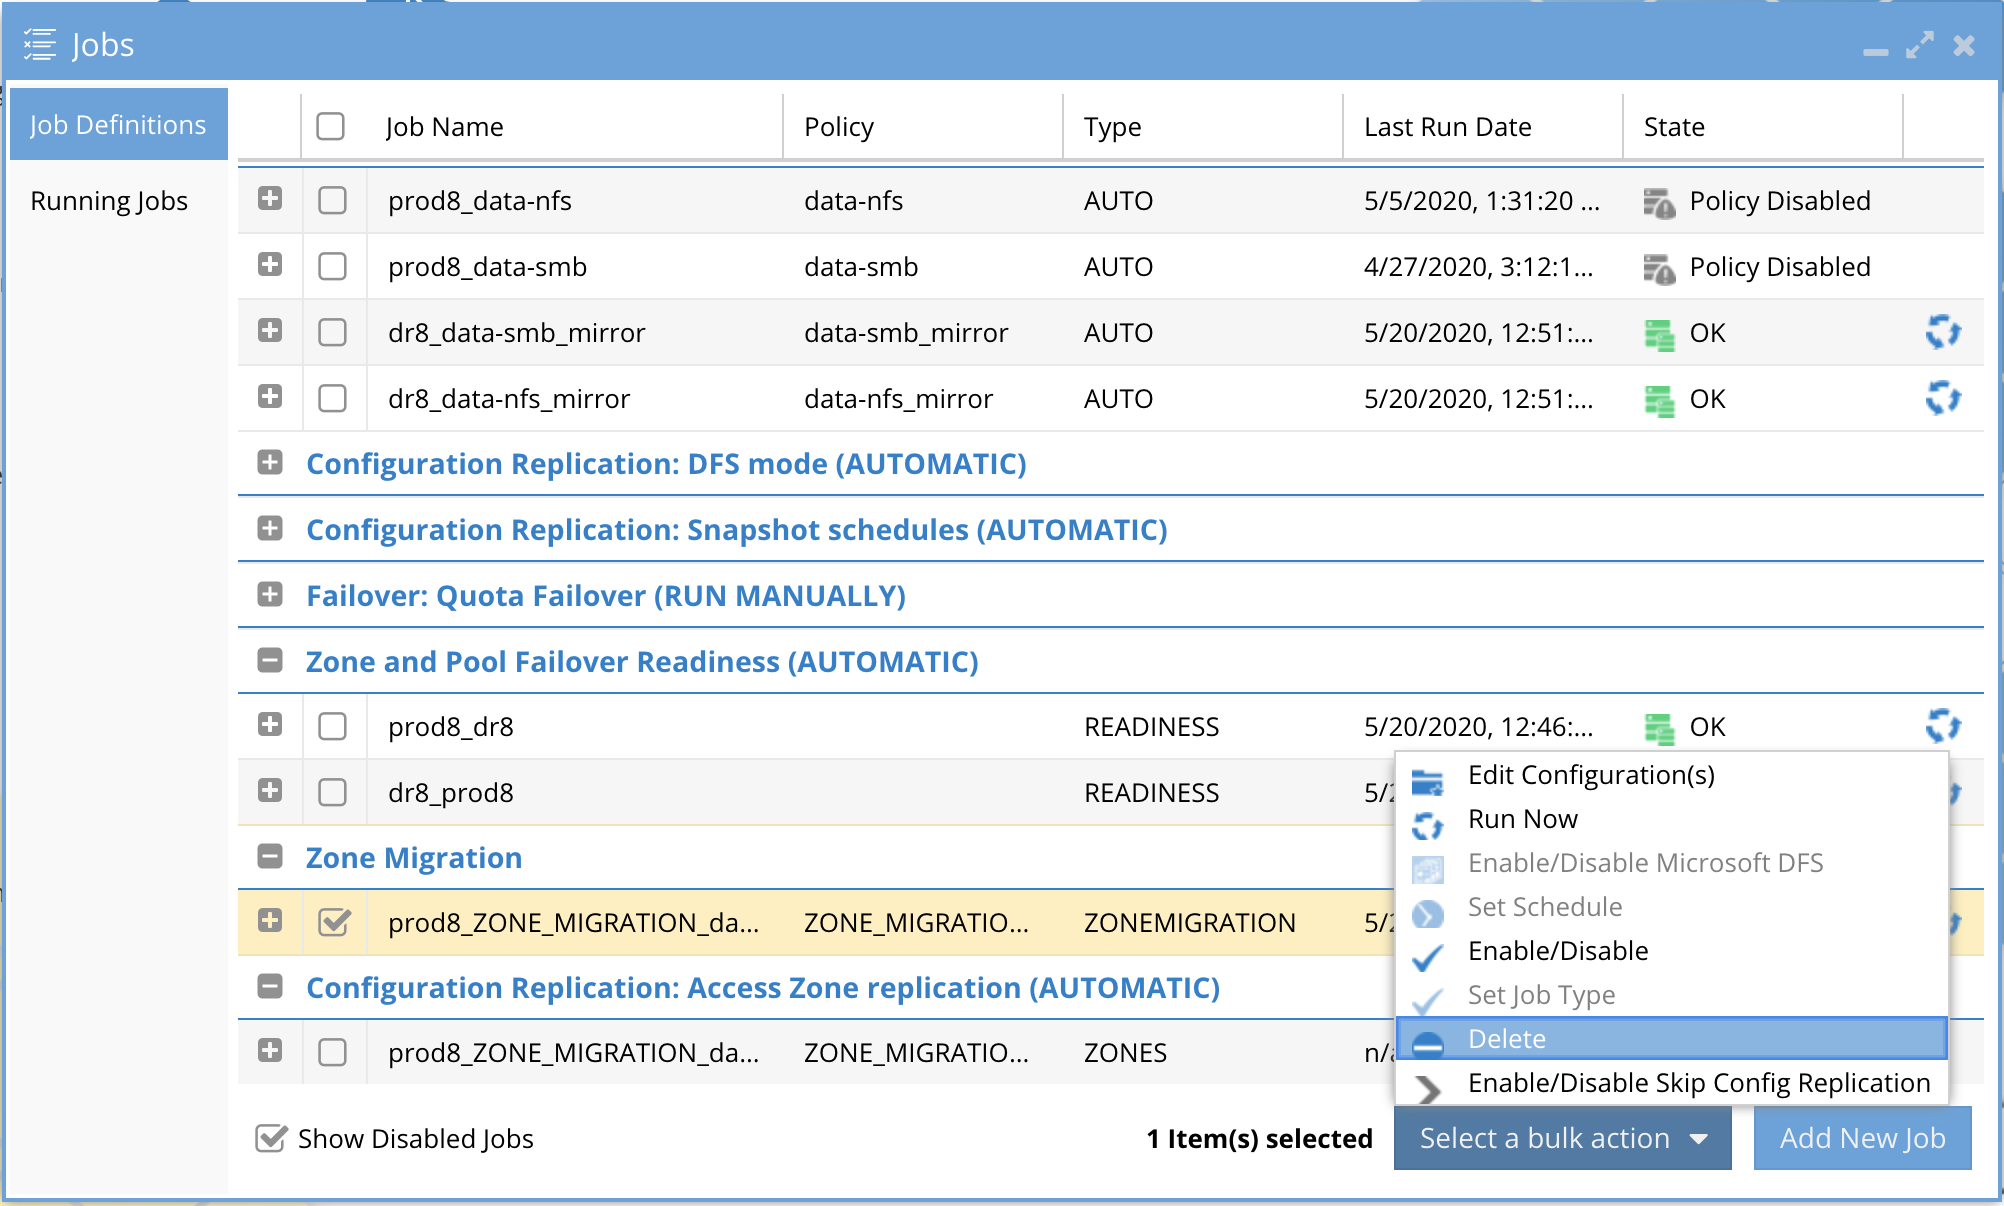
- NOTE: After the configuration migration job has completed. The job should be deleted from the jobs window by selecting the job check box on the left --> bulk actions and delete option. This config job should not be left in place.
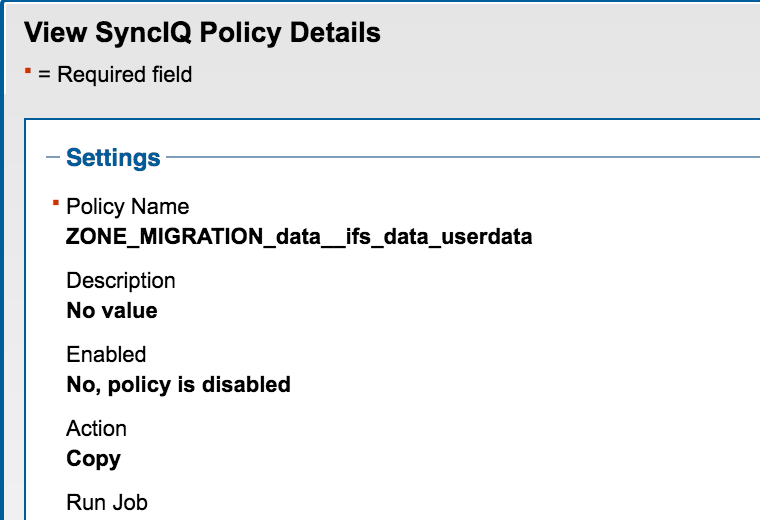
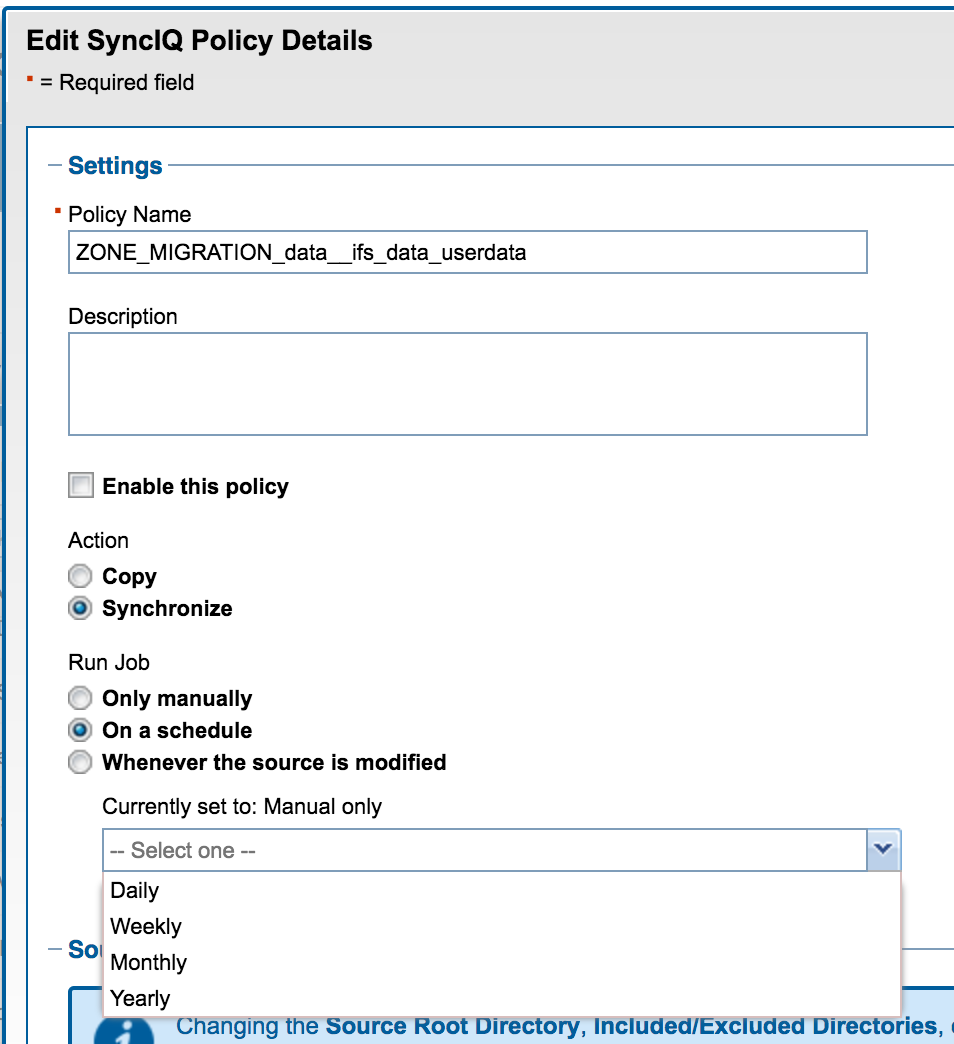
- Keep SyncIQ Policy should be checked. Do not uncheck without asking support. This feature is used for incremental data sync after initial sync of data and allows scheduled cut over process to ensure all data and configuration is synced before schedule cut over.
- Check this box to leave the SyncIQ policy after the policy runs. Leaving the policy allows multi runs from OneFS UI or set a schedule to keep the target path updated before the scheduled cut over day.
- The Configuration data is only synced one time on first job run using Copy mode on the SyncIQ policy.
- Data can by synced incrementally by setting syncIQ policy Sync mode and setting a schedule on the migration policy created by Eyeglass or running it manually.
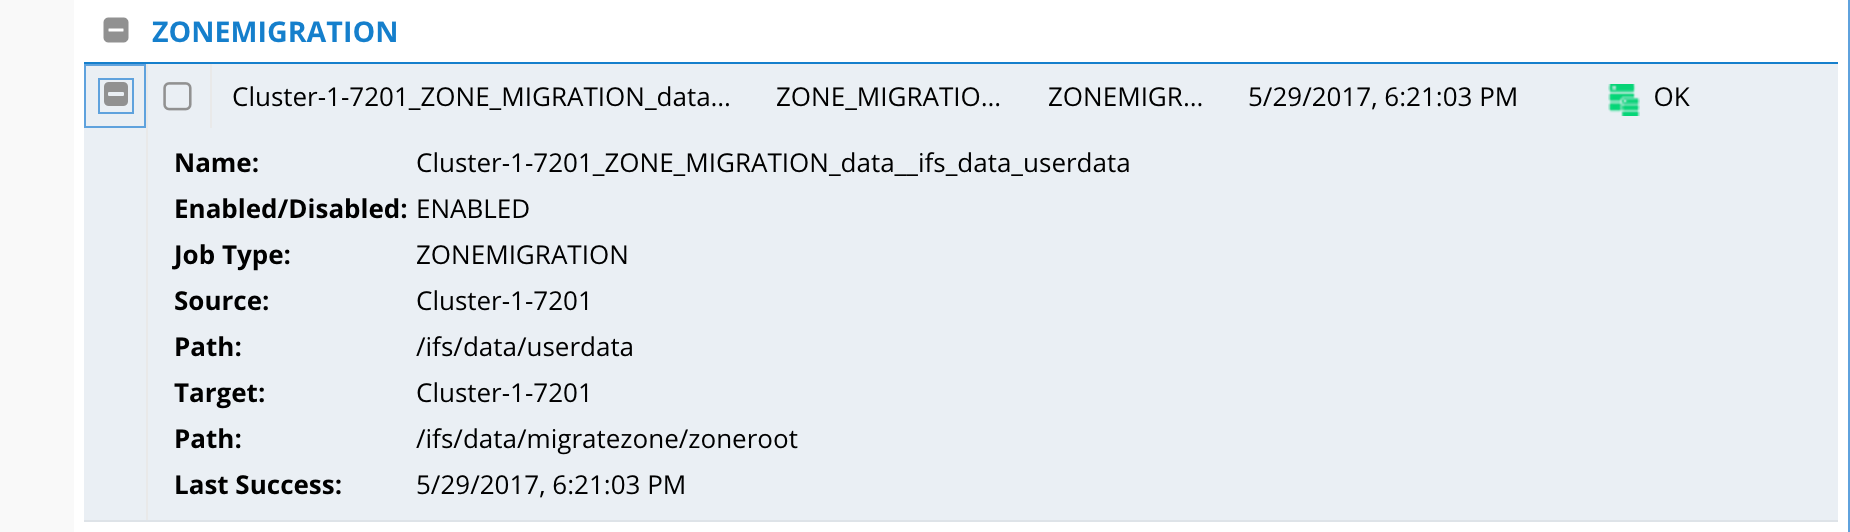
- The policy will appear in the Jobs windows under ZoneMigration section and can be used to incrementally sync configuration data that has changed.
- The target Access Zone will be auto detected based on path matching of the Access Zone Base path (on local or remote cluster migrations)
- Note: This can be changed and configuration path will be updated on shares,exports,quotas and aliases during the migration.
- Note: Path can be on the same cluster or remote cluster (SyncIQ policy will copy data to the target cluster and it must be IP reachable by the source cluster)
- Note: Path cannot be the target of an existing SyncIQ policy as it will be in read-only state which will block migration. Must be writable location on target cluster.
- Note: No path or data can exist on the target cluster. The target path is checked if it exists. If it exists the migration will not continue. An empty target path is required.
- Note: This can be changed and configuration path will be updated on shares,exports,quotas and aliases during the migration.
- Enter destination cluster from the drop down (must be managed cluster in Eyeglass with DR license key)
- Select the Preview option to verify which shares, exports and quotas, aliases were discovered for migration and validate this is expected.
- Auto detect Existing SyncIQ (New in 2.5.6 or later releases) - If a SynIQ policy is detected on the source cluster migration path and correct target cluster path then no migration policy will be created and the existing syncIQ policy will be used to detect configuration data to sync. This allows the Data and Config migration to be used after a data sync copy is already in progress.
- NOTE: No administrator action is required, Eyeglass will automatically detect if SyncIQ policy needs to be created for the migration.
- Click the Submit button to start the migration
- Monitor from the Running Jobs tab of the Jobs Icon.
- (2.5.6 or later releases) When ready to cut over the data to the new cluster or access zone, the DNS update for subnet service ip and SPN changes are manual steps but the data can be failed over with DR Assistant using SyncIQ policy failover mode.