How to Configure DR Test Mode
Best Practice
- For large quantities of data, it is best to break up the tests into smaller tests to avoid long sync times. This can be done with multiple access zones
- Always select data under DR path used by production policies to avoid overlapping schedules, this also also DR test mode policies to run more often and keep the DR test mode copy in sync.
- Only Execute one DR Test mode job at a time and wait for it to complete
- Use all nodes in the cluster when creating the SyncIQ policy and use Subnet service IP for the target host property of the policy.
Important! This solution requires enough disk space on the target cluster to store the DR copy of the data, and enough space to contain the “Test data set” which can be all the DR data or a subset based on the policy path created.
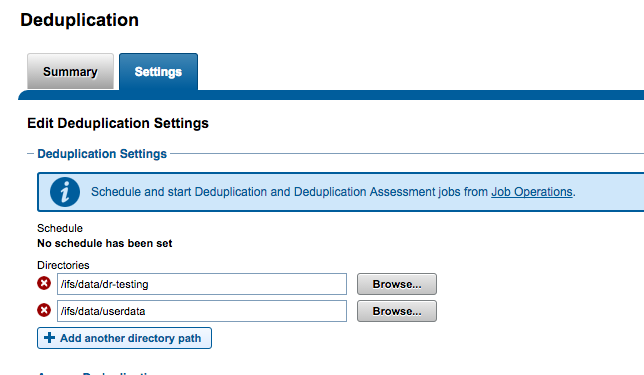
If the cluster has an PowerScale dedupe license key, we recommend adding DR folder and the DR test folder to the dedupe paths configuration. This will reclaim nearly 100% of the disk space used to create the 3rd copy on the DR cluster, since the data is 100% duplication of the source path.
In the example below /ifs/data/userdata is the target folder for the production cluster to copy DR data with SyncIQ. This data is copied into /ifs/data/dr-testing and configuring the dedupe policy and running it will be able to reclaim 100% of the disk usage for DR testing.

- Production to DR clusters SyncIQ synchronizes data as follows:
- Example: SyncIQ policy on Prod /ifs/data/corpdata.
- Destination path DR /ifs/data/dr/corpdata.
- Eyeglass Sync’s configuration data between Prod and DR clusters (shares, exports, aliases).
- Note: Quotas are not used with DR test mode since the SyncIQ policies are one way failover. Quotas will not exist on the DR clusters read-only path and no quotas will be detected in DR test mode. If quotas are required for DR testing, they will need to be created manually.
- Create an Access Zone that will be used to test access to production data. Suggested base path “/ifs/data/dr-testing” (example only) on the DR cluster. The name of the Access Zone can be any name but it should have a good name like this “DR-Testing-Zone”.
- The Access Zone will need an IP pool associated to a IP pool and SmartConnect zone name and should be setup for DR testing applications on a dedicated network.
- The Access Zone MUST be different than the Access Zone used for production data.
- The Access Zone MUST use the same Authentication Provider as the production Access Zone.
- On the DR Cluster a SyncIQ policy is created using prefix of “Eyeglass-DR-Testing” and uses the DR copy of the data as a source path.
- Note: name can include hyphen and other text to add a description.
- SyncIQ Job for DR Testing (see advanced section for multi policy options)
- SyncIQ policy source path for DR cluster “/ifs/data/dr/corpdata”.
- Destination “/ifs/data/dr-testing”. This path must match the Access Zone base path created above. A sub folder can be used as well, the key requirement is the target path MUST fall under the target Access Zone base path that will be used for DR Testing.
- Note: If you change the target path after the DR Testing Zone Access Zone exists, Eyeglass Zone Replication will not be able to update the path for this existing DR Testing Access Zone as per PowerScale default behaviour.
- Destination cluster is the DR cluster (same cluster policy):
- Use an IP address of a subnet service IP on the DR cluster or a pool ip address, leave the default option to use all nodes in the cluster to speed up the copy and sync process. Do not use a value of local host, since Eyeglass needs to validate the target cluster is managed by Eyeglass.
- Manually run the policy after creating it (first copy can take a long time to run depending on the amount of data and will consume cluster resources, schedule this in off peak times).
- Setup a schedule on this policy to an interval that matches your testing requirements to maintain sync with production data. NOTE: information below about overlapping policies.
- IMPORTANT: For case where Eyeglass-DR -Testing SyncIQ Policy Source Path is the same as the production SyncIQ Policy Target Path:
- Stagger the schedule such that the Eyeglass-DR-Testing policy Jobs do NOT start while the production SyncIQ policy is in a running state. The Eyeglass-DR-Testing policy, which starts running at the same time as the production SyncIQ policy is already running, will result in Sync Job failure. This means DR sync policy schedule should be at least 12 hours or 24 hours to maintain a near copy of production data. NOTE: running DR test mode policy on a short schedule using none overlapping schedules configuration is the best option to avoid long sync times when activating DR test mode. In addition, DR test mode uses failover timeout value for all steps which defaults to 45 minutes. If you are not following best practices above ,this value will need to be changes. See the CLI guide in the admin manual for the CLI command to change the failover timeout value.
- This is not an issue if the Eyeglass-DR-Testing policy is a sub-folder of the production SyncIQ Policy Target Path.
- Example:
Note: Make sure to run the policy once, after creating it, to ensure the target path folder structure has been created.
Check the Eyeglass Jobs Window after config sync has run successfully to detect the new policy AND enable the policy since it will be in user-disabled state by default. It will appear in a new section called “Disaster Recovery Testing”

- Run the job now by selecting and using Bulk actions run Now.
- Use running jobs tab to verify it completed successfully.
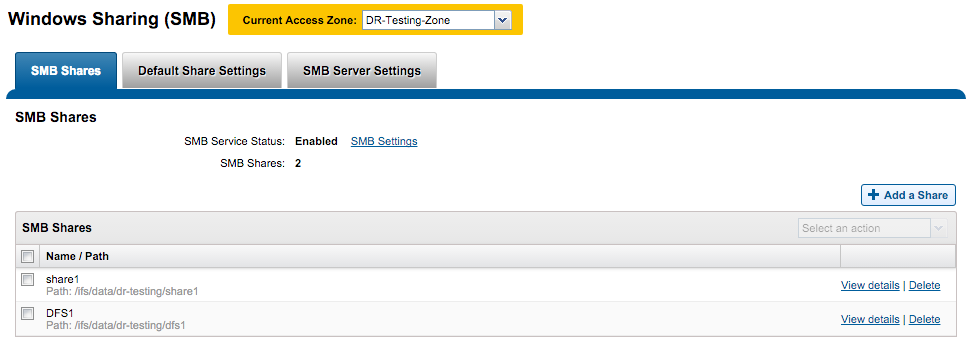
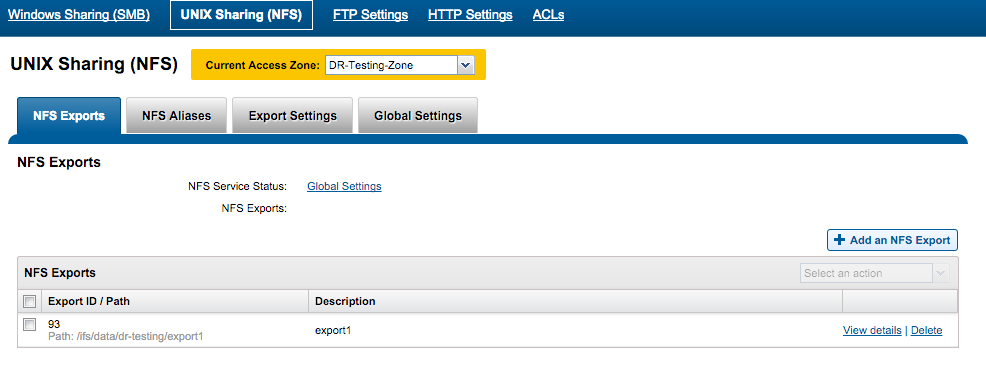
- Now check the cluster Access Zone SMB and export screens on OneFS to verify the configuration data from the production Access Zone has been created in the DR Testing access zone.
- The example below shows the DR test Access Zone and path has configuration data created with the correct path for the DR testing Access Zone used in this example.