Administration Guides

Event State Descriptions

Home


Security Event Action State Descriptions

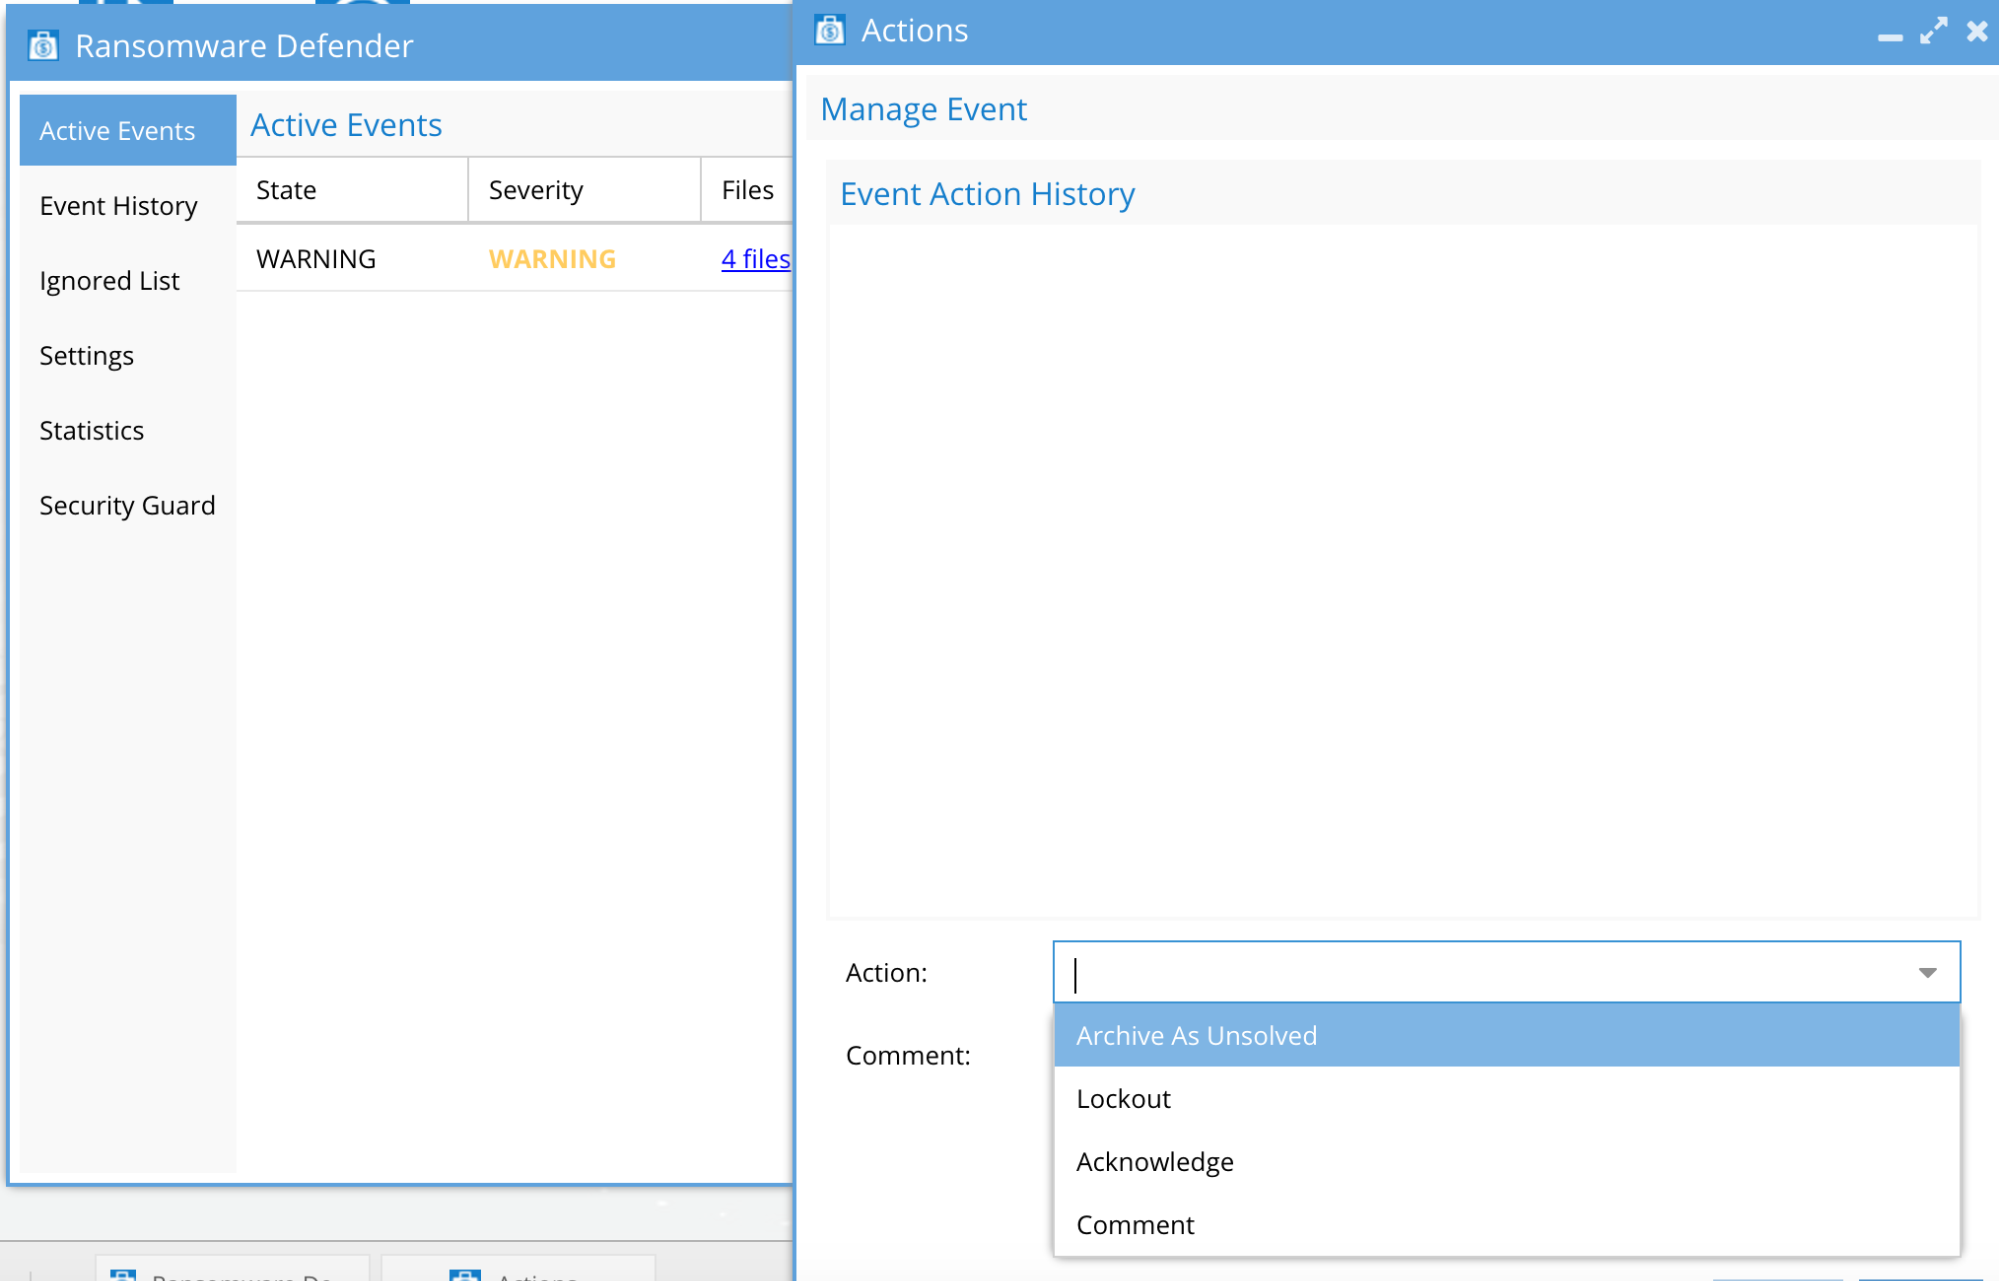
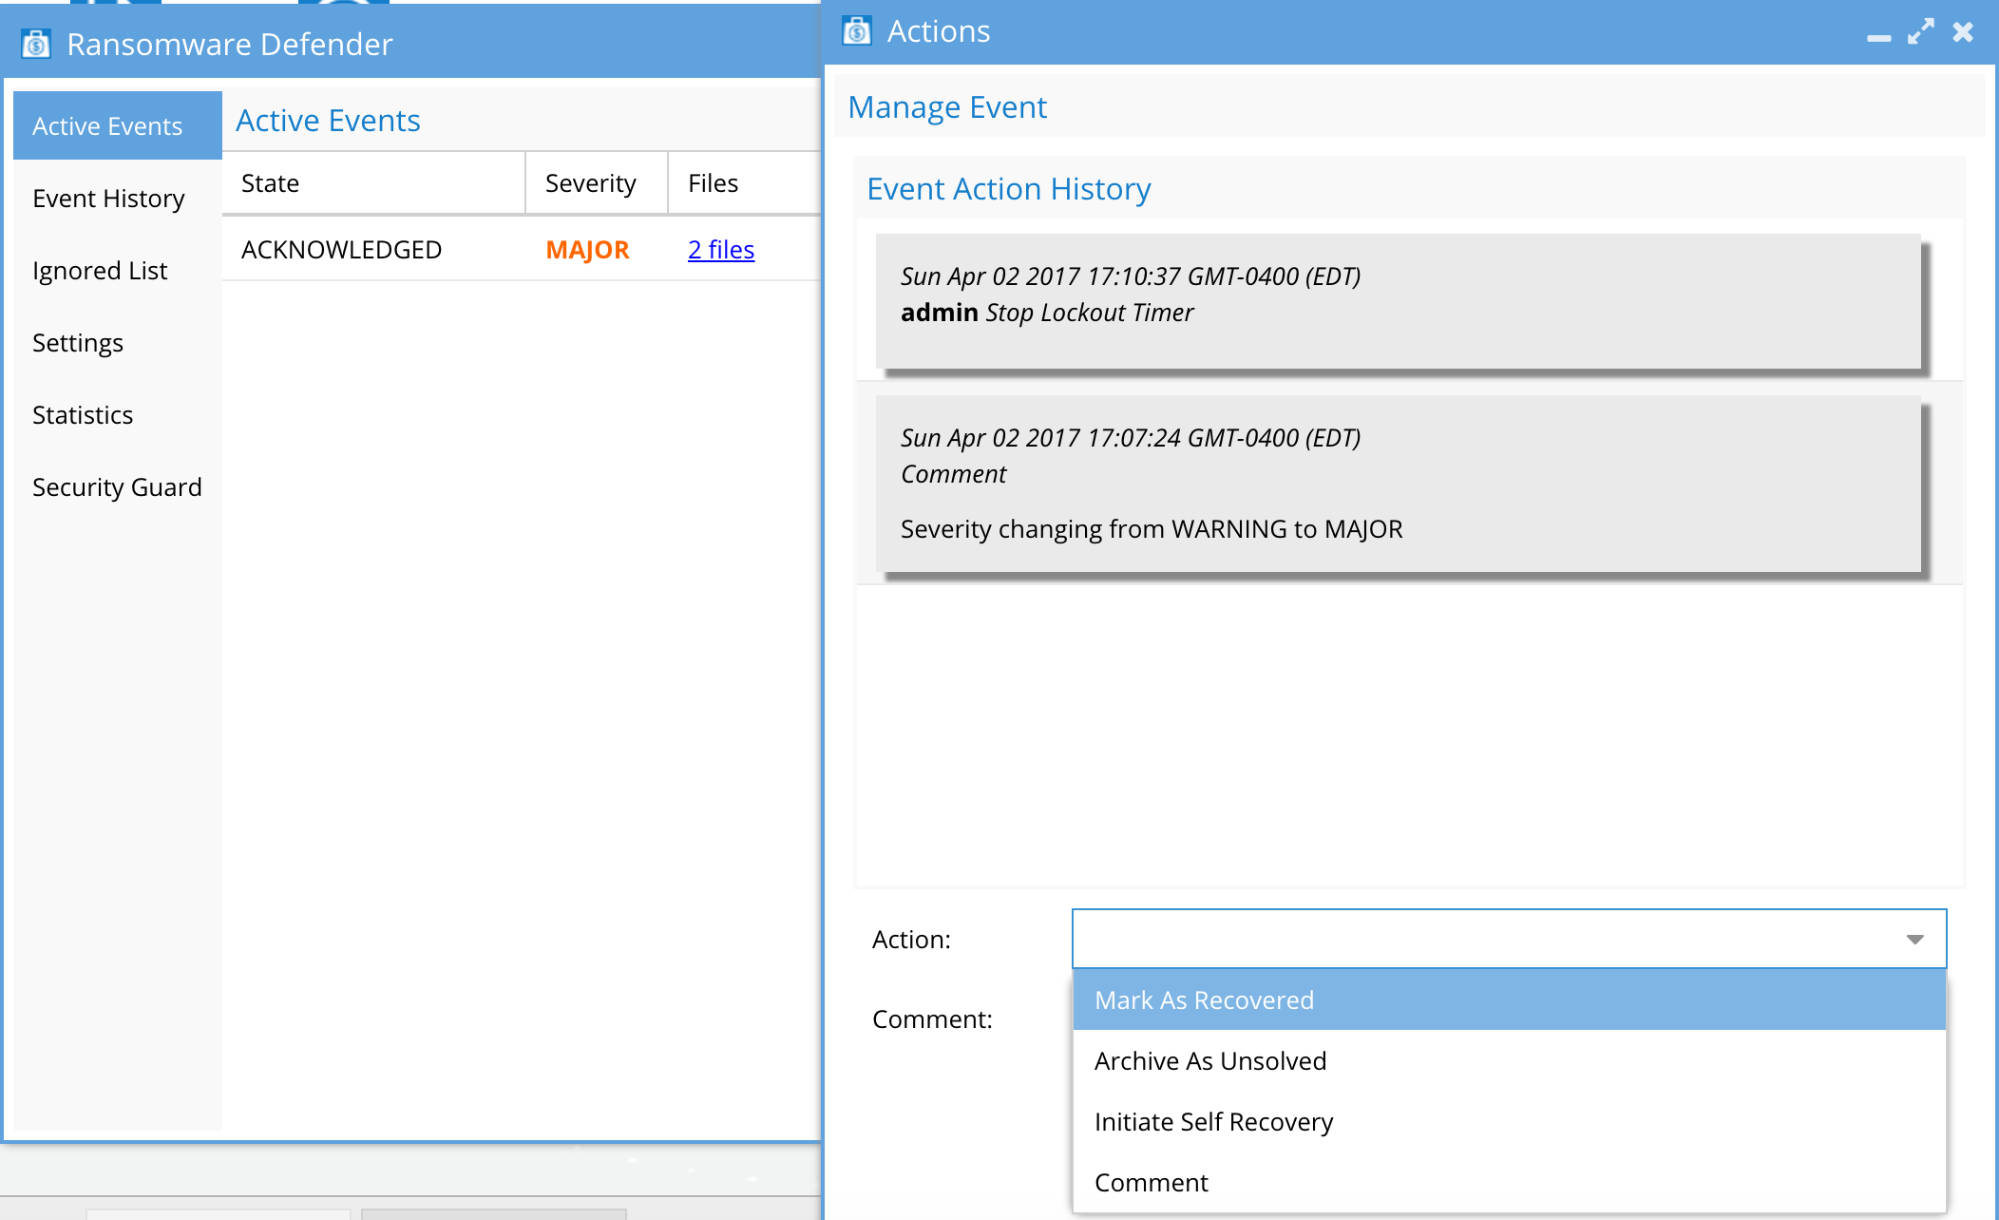
Once a user security event appears in the Active Events tab the following operations are possible by clicking the Actions icon. Each state has several possible actions.  The table below describes the options available for each state of a security event.

State of EventPossible Actions

Warning State

  1. Comment on the event to update the security response or assessment of the event.  Can be viewed by other administrators that review the security event history.
    1. Archive as Unsolved - Moves event to the History tab.  
    2. Lockout -  From the Access Restored state it's possible to re-lockout the user again from the action menu.  This applies deny permission to all shares stored within the lockout event.
    3. Acknowledged State - An administrator has acknowledged this event but has not marked as resolved.  In this state the user is not locked out or in timed lockout states.
    4. Create Snapshot -  Manual snapshot created on all share paths in the security event.
    5. Delete Snapshot - Manual snapshot deleted on all share paths in the security event.

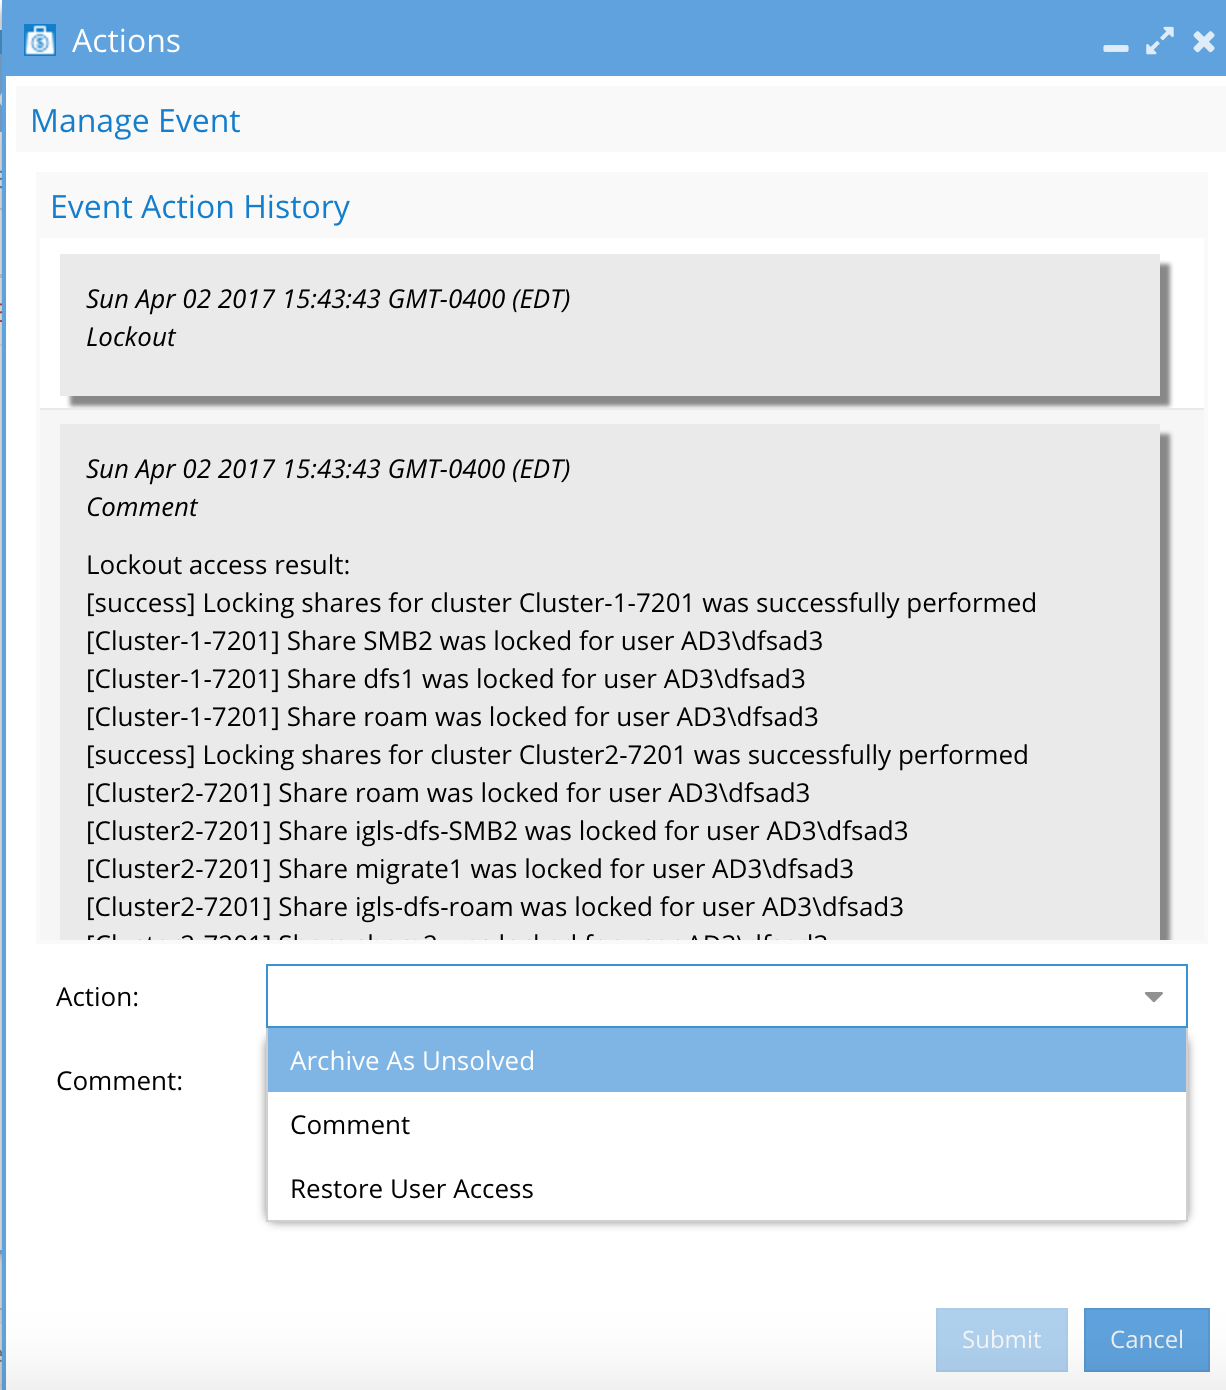
Locked out User State (Critical Severity Threat Detection)

  1. Comment on the event to update the security response or assessment of the event.  Can be viewed by other administrators that review the security event history.
  2. Restore User Access - This will reverse the lockout and grant access to the shares that were locked out.  Review the lockout details for a full list of shares and clusters that lockout was applied.
  1. Once Restore User Access is launched, this will start a restore access job (running jobs window) and real-time restore access to the share that was last locked out.
  2. Verify the user has access
  3. Verify a cluster share to confirm that the restore access was successful
  1. Archive as Unsolved - Leaves the lockout applied and moves the event to the History tab.  Not recommended unless the user access is permanently revoked. 
  2. Create Snapshot -  Manual snapshot created on all share paths in the security event.
  3. Delete Snapshot - Manual snapshot deleted on all share paths in the security event.

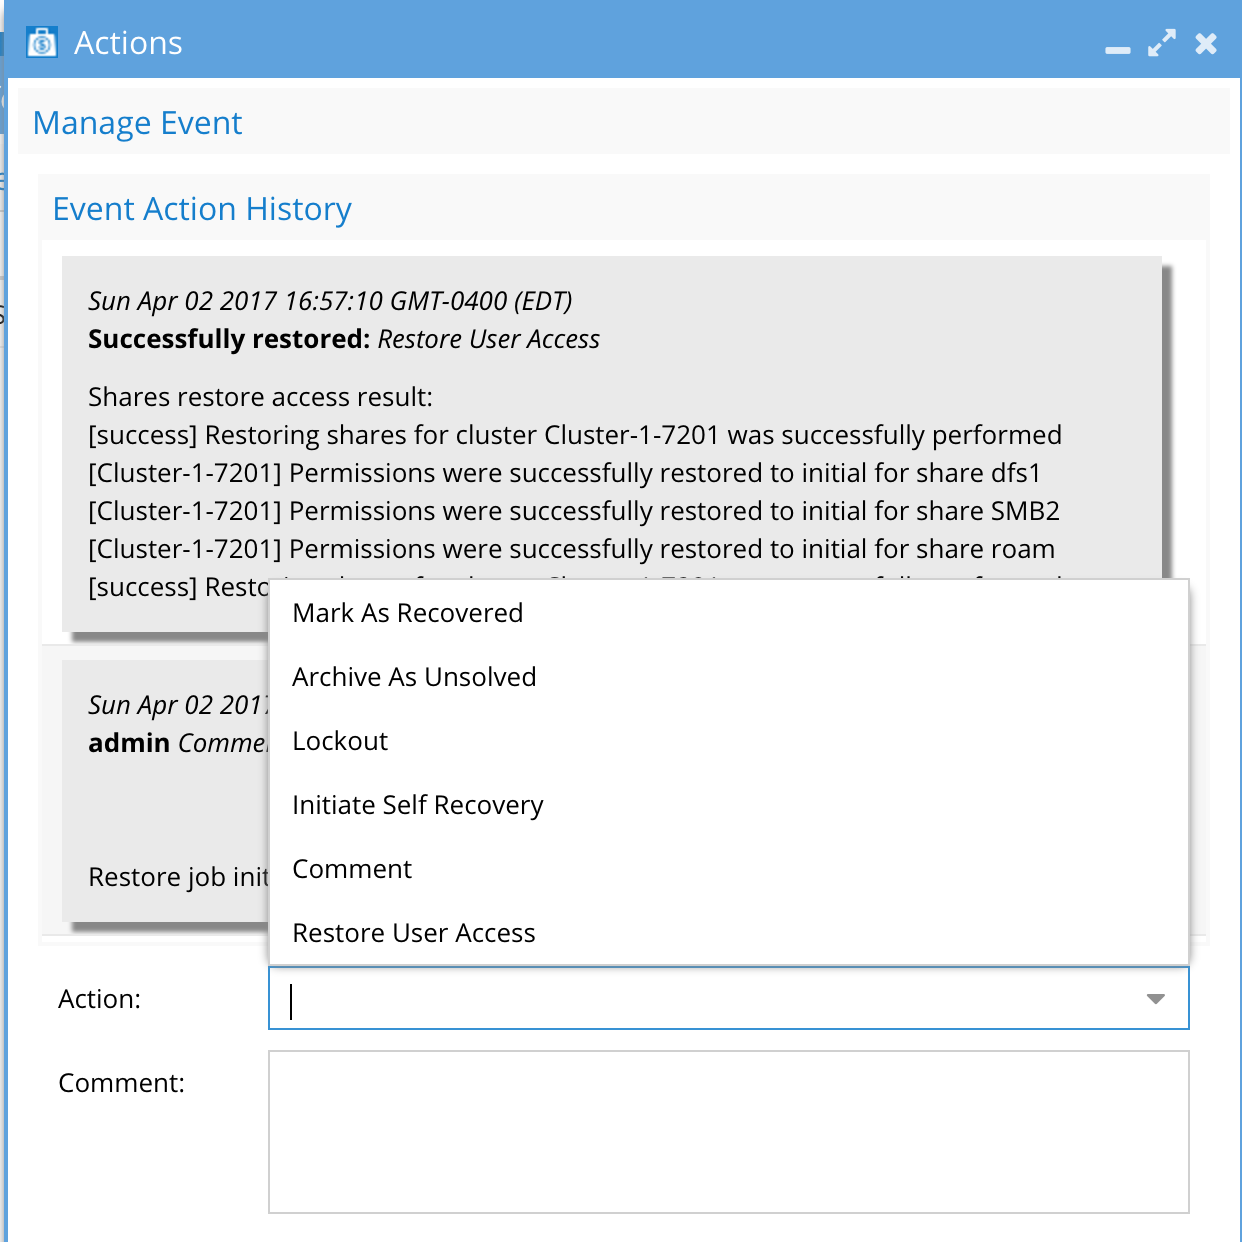
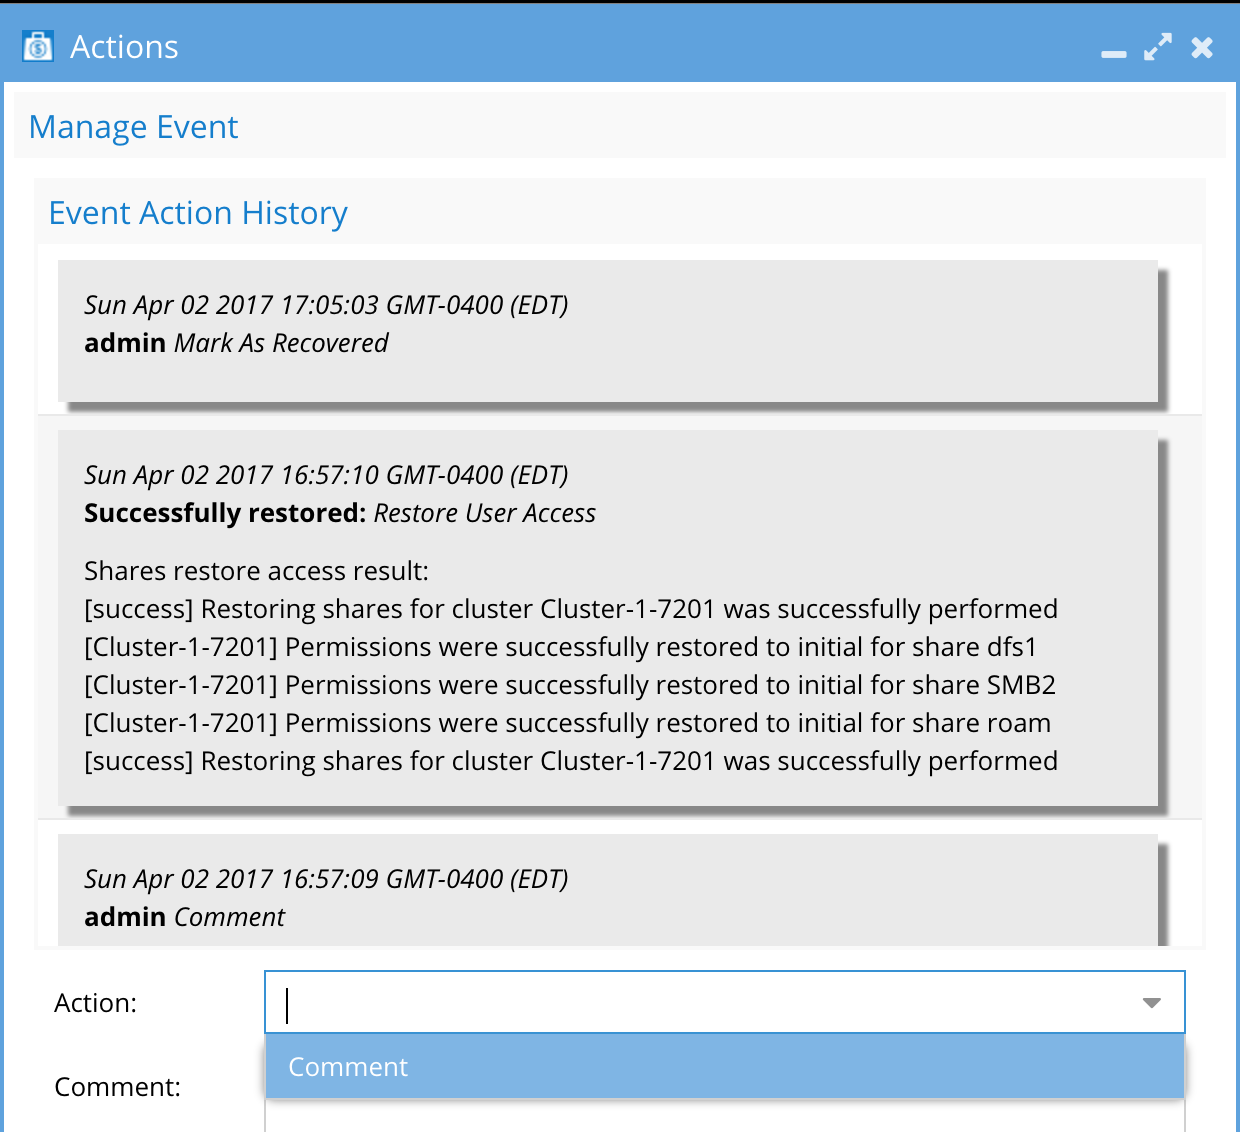
Access Restored State

  1. Mark as Recovered - This option allows archiving the security event to the history tab.
  2. Lockout -  From the Access Restored state it's possible to re-lockout the user again from the action menu.  This applies deny permission to all shares stored within the lockout event.
  3. Initiate Self Recovery -  This option will only function if the Cluster Storage Monitor add-on is purchased.  It integrates with the Backup Recovery User portal to create secured shares to snapshots and DR data that allow the user to recover data from snapshots.  The temporary shares will have a 2 day lifetime by default, after which they will be deleted.  The shares are secured only to the user involved in the lockout.  The data recovery request will require approval in the Data Recovery Manager Icon. See the Data Recovery section in this guide.  (If licensed)
  4. Comment - on the event to update the security response or assessment of the event.  Can be viewed by other administrators that review the security event history.
  5. Restore User Access - (Allows to re-run this job in the event a share or update failed) This will reverse the lockout and grant access to the shares that were locked out.  Review the lockout details for a full list of shares and clusters that lockout was applied.
  1. Once Restore User Access is launched, this will start a restore access job (running jobs window) and real-time restore access to the share last that was locked out.
  2. Verify that the user has access
  3. Verify a cluster share to confirm that restore access was successful
  1. Archive as Unsolved - Leaves the lockout applied and moves the event to the History tab.  Note: recommended unless user access is permanently revoked. 
  2. Create Snapshot -  Manual snapshot created on all share paths in the security event.
  3. Delete Snapshot - Manual snapshot deleted on all share paths in the security event.

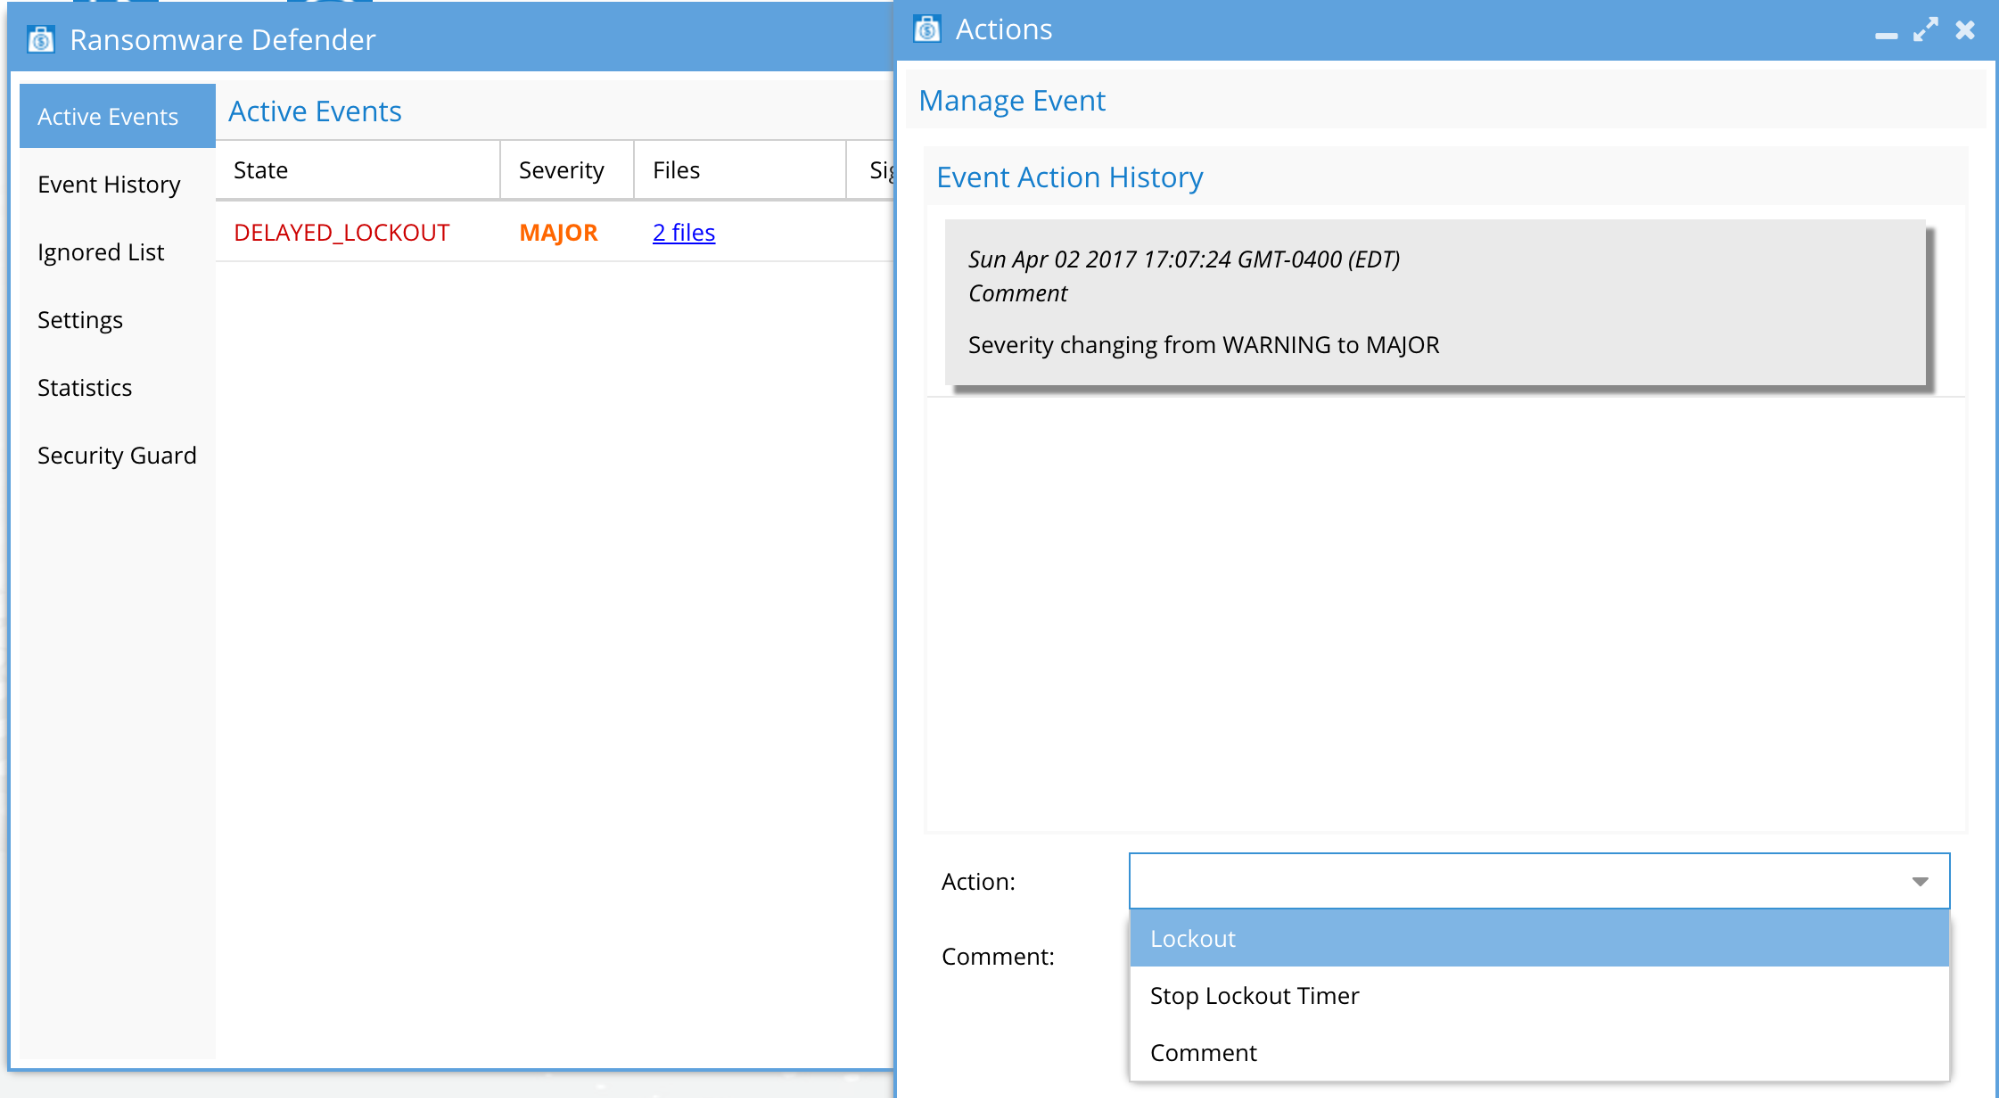
Delayed Lockout state

  1. Lockout -  From the Access Restored state it's possible to re-lockout the user again from the action menu.  This applies deny permission to all shares stored within the lockout event.
  2. Stop Lockout Timer-  This option can be used to stop the timed lockout.  This would be used when the investigation determines the user account should not be locked out.
  3. The status changes to Acknowledged and the lockout will stop.
  4. Comment on the event to update the security response or assessment of the event.  Can be viewed by other administrators that review the security event history.
  5. Create Snapshot -  Manual snapshot created on all share paths in the security event.
  6. Delete Snapshot - Manual snapshot deleted on all share paths in the security event.

Acknowledged State

  1. Comment on the event to update the security response or assessment of the event.  Can be viewed by other administrators that review the security event history.
  2. Archive as Unsolved - Leaves the lockout applied and moves the event to the History tab.  Note: recommended unless user access is permanently revoked.
  3. Mark as Recovered - This option allows archiving the security event to the history tab.
  4. Create Snapshot -  Manual snapshot created on all share paths in the security event.
  5. Delete Snapshot - Manual snapshot deleted on all share paths in the security event.

Archived Event on Event History
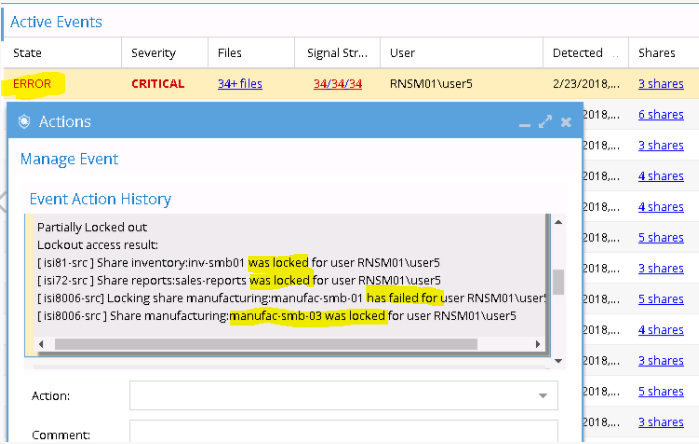
 

  1. Comment on the event to update the security response or assessment of the event.  Can be viewed by other administrators that review the security event history.
  2. Create Snapshot -  Manual snapshot created on all share paths in the security event.
  3. Delete Snapshot - Manual snapshot deleted on all share paths in the security event.

Error State

  1. Open the Action to see the Event Action History Here you will see which shares had an issue in Lockout or Restore and reason
  2. Lockout -  If Lockout Error is related to an AEC_CONFLICT, then select the Lockout action again to re-attempt to complete the Lockout.
  3. Restore - If Restore Error is related to an AEC_CONFLICT, then select the Restore action again to re-attempt to complete the Restore.
© Superna Inc