Cyber Recovery Manager
- Overview
- Requirements
- How to Use Cyber Recovery Manager
- How to Complete Forensics of Quarantine Data
- How Recovery Manager Determines Which Version to Restore
- Powerscale case
- AWS/ECS case
- ECS Recovery Manager
- Submitting Job
- VAST Recovery Manager
- Initial Vast Setup
- JOB STEPS
- 1. Setting up S3Access
- 2. Moving Files to Quarantine Directory
- 3. Moving files from Snapshot to Previous Location
- 4. Save recovered file to database
- Revoke Temp Access Key
- Vast Limitations
Overview
This new recovery solution extends Ransomware Defender to automate data recovery from a cyber attack fully. The solution is integrated into the event and event history tabs in Ransomware Defender Icon. Ransomware Defender caches a history of audit events which allows reaching back in time before an attack is detected to review and recover historical data that is before the detection. This data is presented in the recovery manager, and selective single file or path-based filters allows targeted recovery.
Customers now have an end-to-end solution for detection, response, and recovery that includes automation at all steps in the attack life cycle. This new version also displays recoverable data. Recoverable data is counted as recoverable if a snapshot exists under the file path that was created before the first event on that path.
For example:
If there is a file called /ifs/test/document.txt.
And the file is renamed it to /ifs/test/document.locky at 5:00 pm.
And there is a snapshot taken on the path /ifs/test/ at 4:00 pm.
Then it is recoverable.
But if there is a snapshot taken at 5:03 pm, and no prior snapshot exists on the system that covers the /ifs/test path, then it is not recoverable.
And if there is only one snapshot on the system for the path /ifs/otherpath/ then it is not recoverable.
If there are other snapshots on the system that cover paths not included in /ifs/test, like /ifs/otherpath , but there is no snapshot present on /ifs/test, then any files underneath the /ifs/test the path is unrecoverable.
A key requirement in all cyber incidents is post-mortem analysis and forensics. Cyber Recovery Manager includes an automated quarantine feature to move affected files into a hidden location for analysis to review the files at a later date. This also removes potentially harmful files from the file system, which are not visible to end users.
Requirements
- Release 2.5.9 or later
- Requires Eyeglass DR license for inventory and snapshot management
- NOTE: Default user activity is 1 hour before the event
- NOTE: Data is retained for 7 days after the event. If you try to recover data on day 8 all user activity on a specific event will be auto-purged. To change this to 30 days of retention, make this change.
- On ECA node 1
- nano /opt/superna/eca/eca-env-common.conf
- add a line with this variable
- export ECA_KAFKA_USER_TOPIC_RETENTION_DAYS=30
- control + x (save and exit)
- ecactl cluster down
- ecactl cluster up
How to Use Cyber Recovery Manager
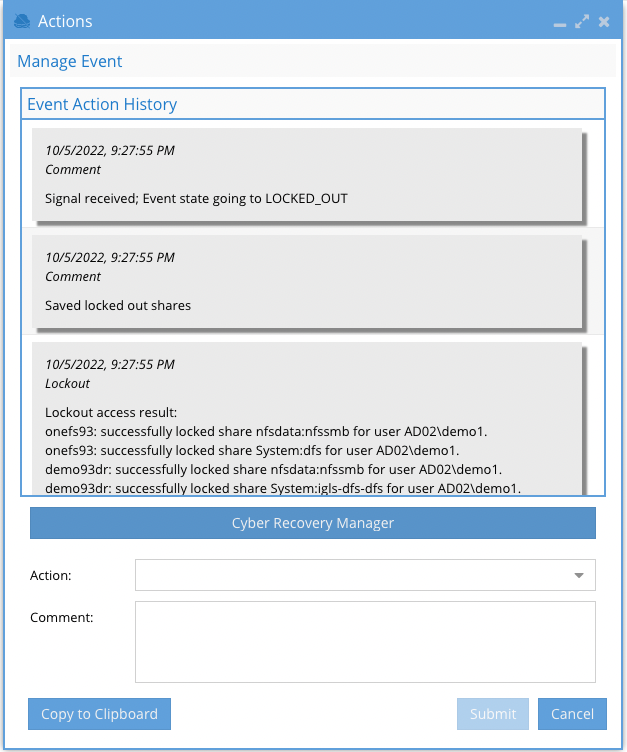
- Cyber Recovery Manager is accessed through the actions menu of an active event or event history tab.
- Open the actions menu of an active event
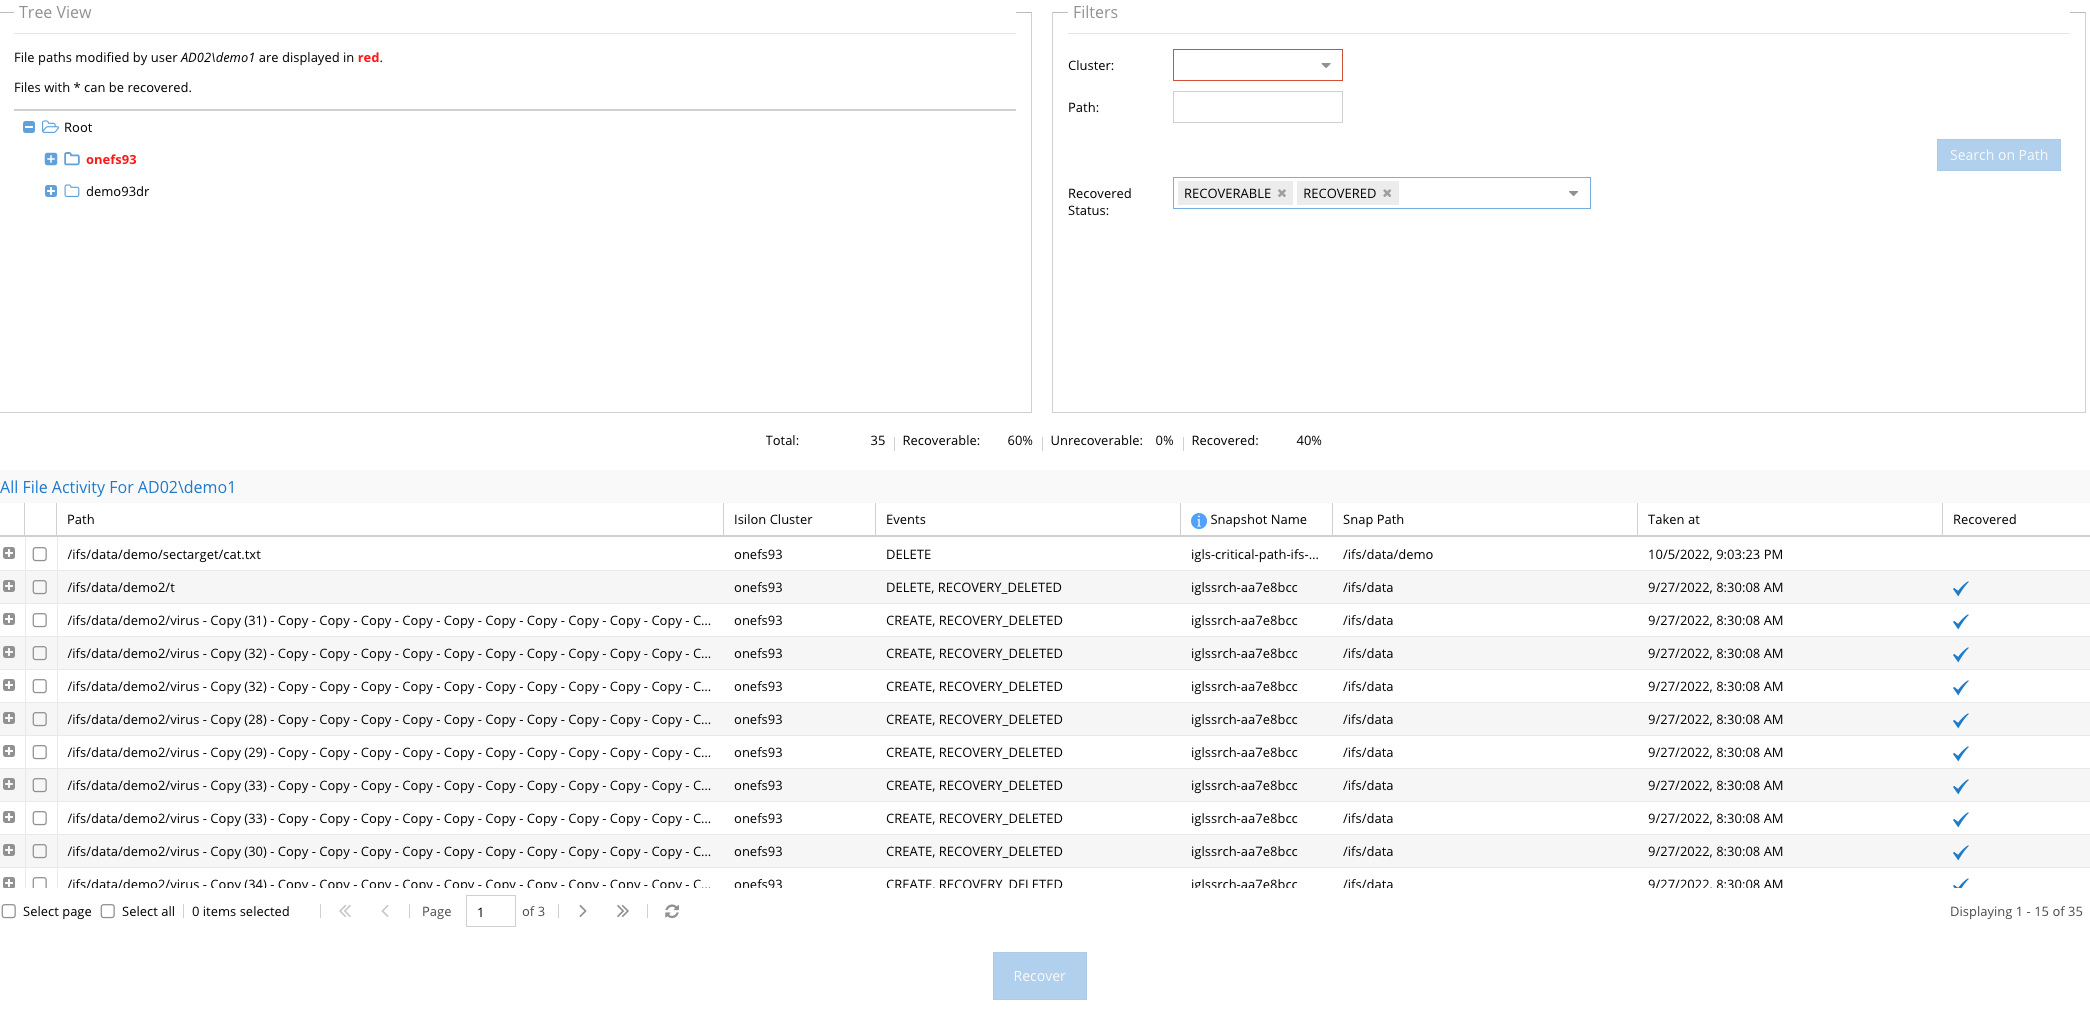
- Tree View - shows folders in Red indicating a file in a folder has been affected. Use this view to browse the file system to see where the data has been impacted.
- Filters - (Optional). Select a cluster and enter a path example /ifs/data/home and then click Search on Path to search the affected files list of this event and only display files at the entered path and below.
- Recovered Status: RECOVERABLE (default) will show all files that have a valid snapshot with the file present BEFORE the attack began. You can change this filter to show UNRECOVERABLE (Files with no snapshot and no way to recover the data), RECOVERED (Shows files that have been recovered already)
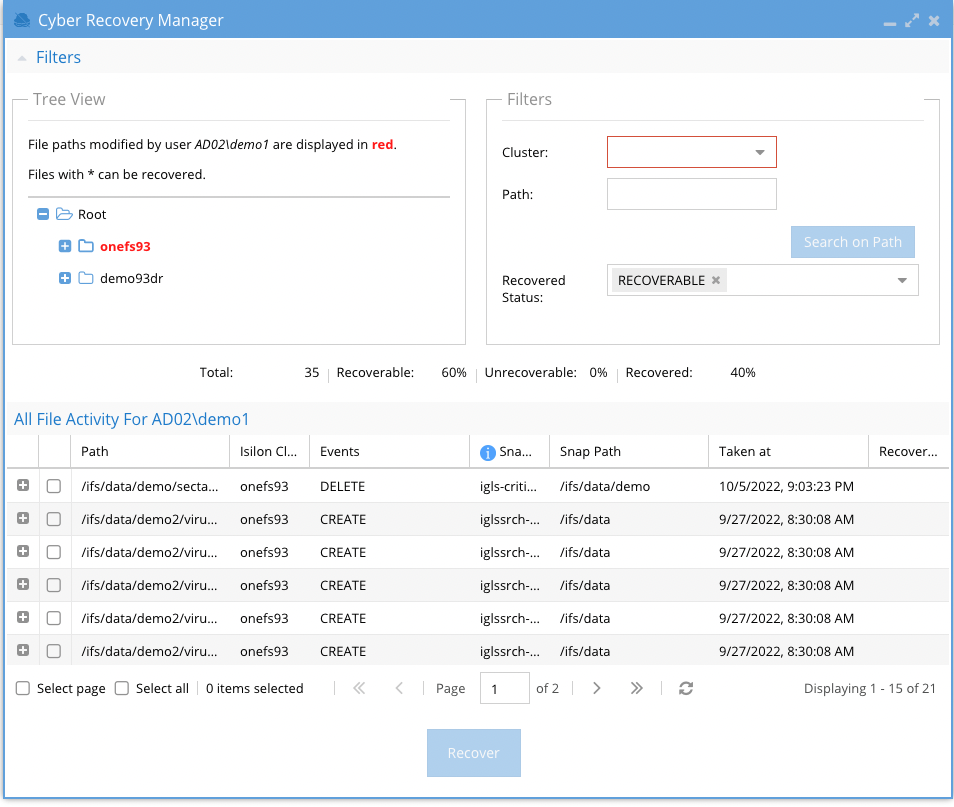
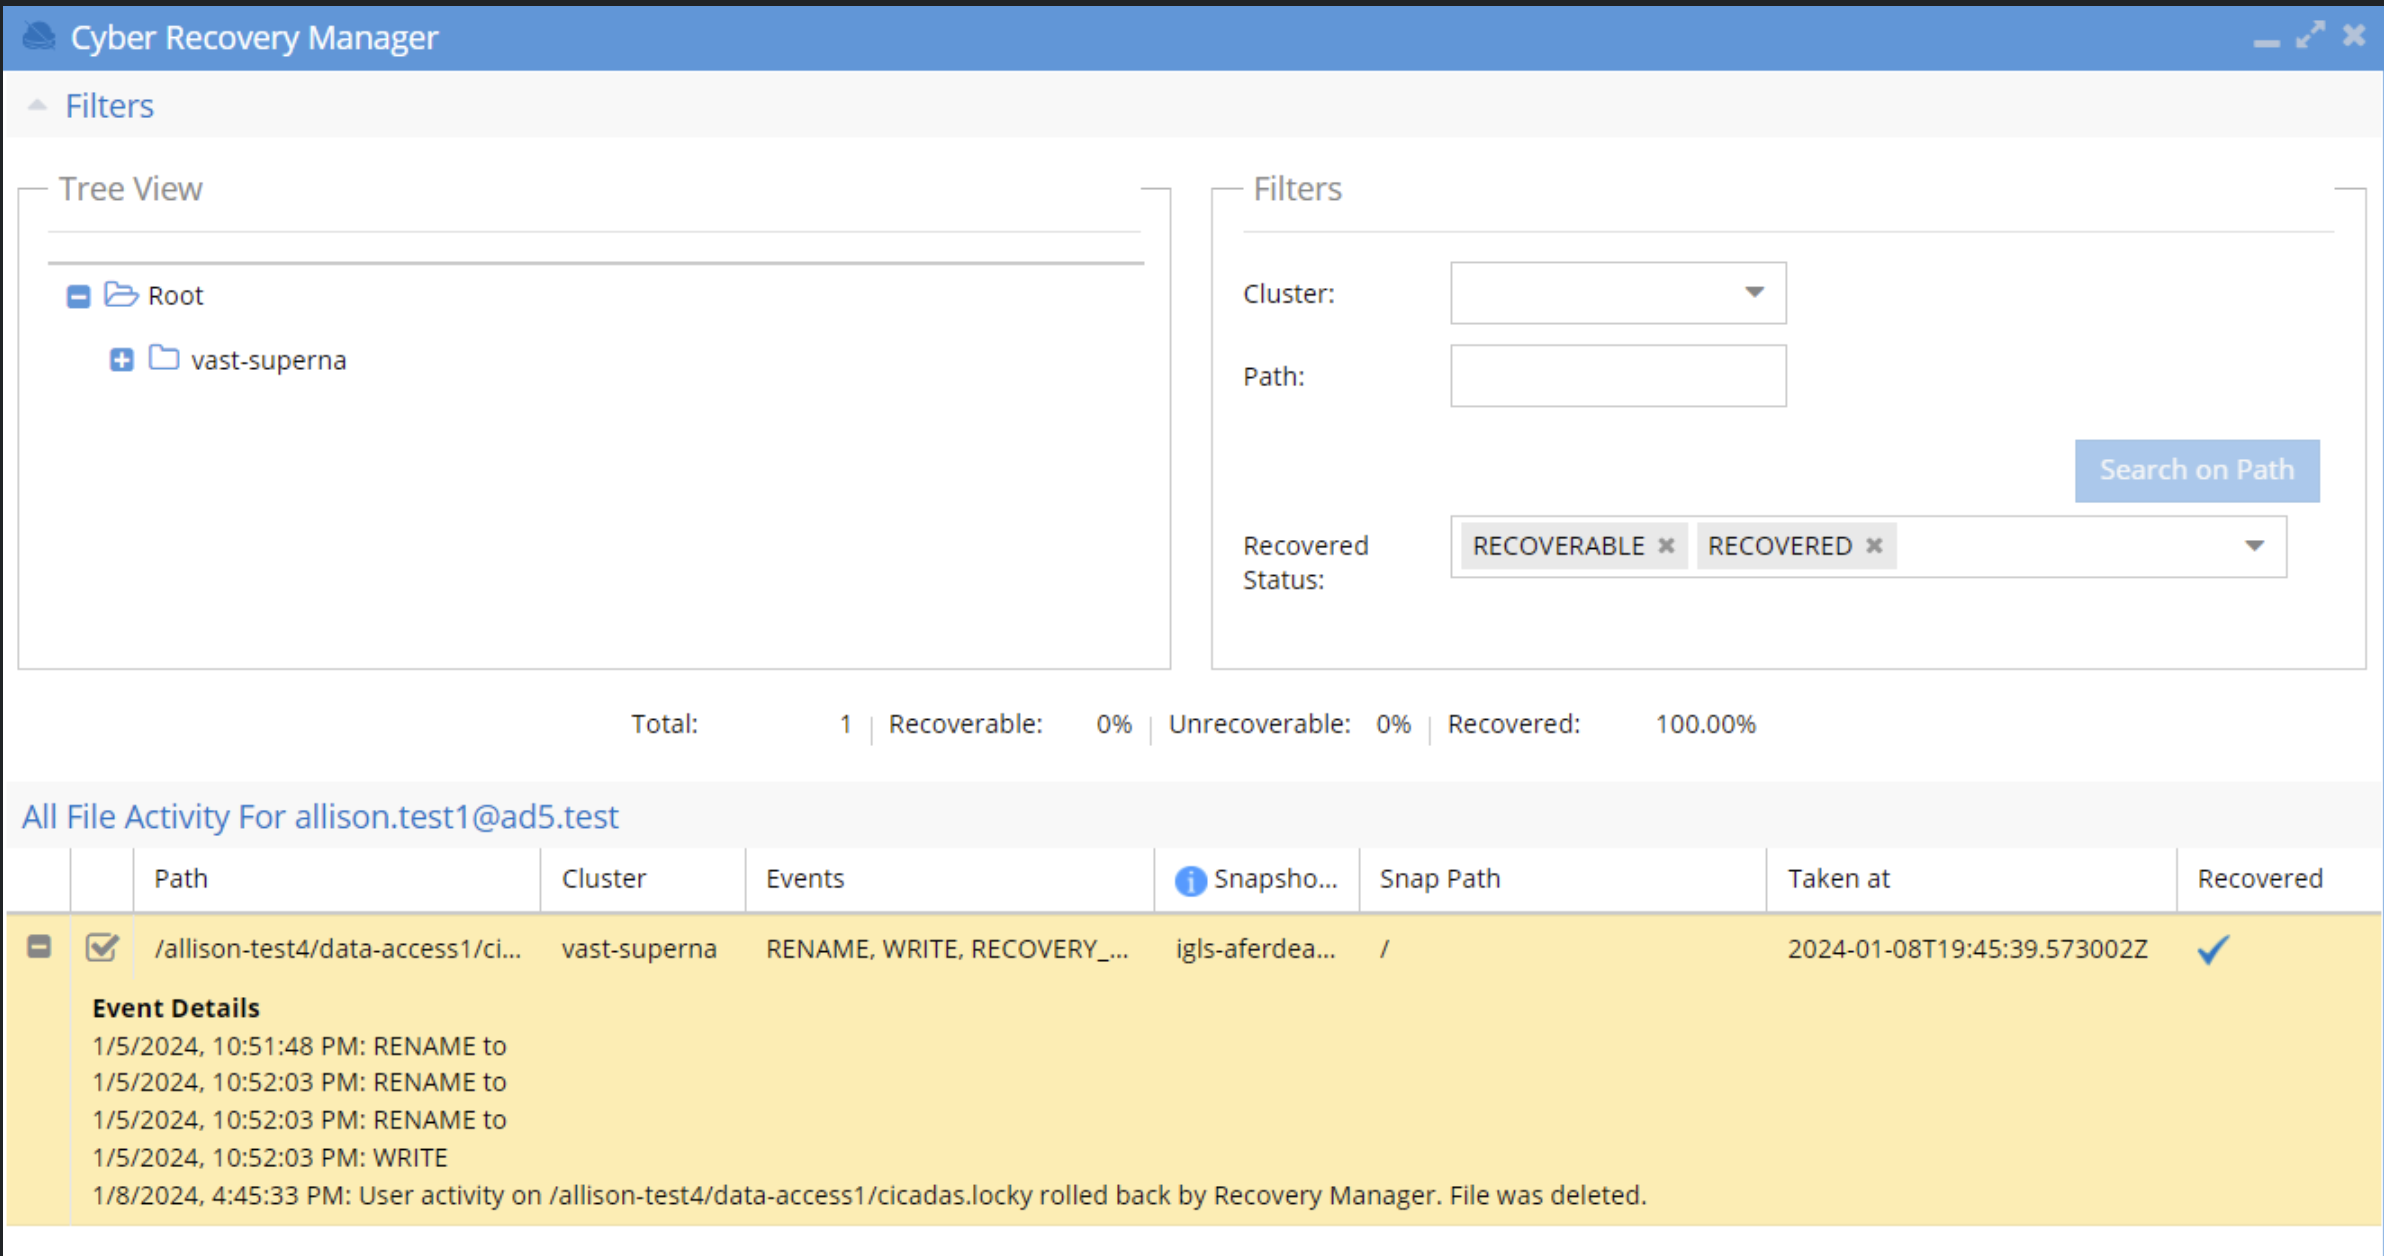
- The Recovery Manager tracks that status of the recovery and displays statistics

- Total files in the incident, Recoverable files based on snapshot analysis, unrecoverable (files that cannot be recovered), Recovered (files already recovered)
- How to Recover files
- The columns:
- The files section shows the path to the file, cluster name, the audit event action associated with the file, The snapshot name that will be used for recovery, the date and time the snapshot was taken and the recovery status (check mark indicates recovered successfully).
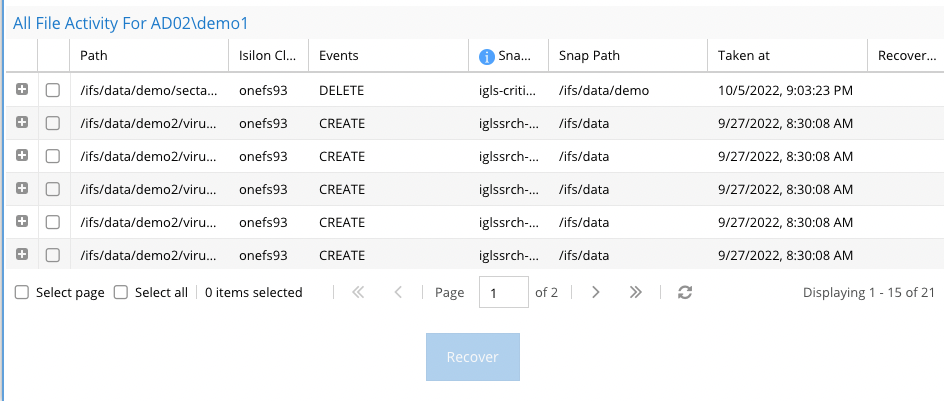
- Select individual files OR click Select page (files displayed) OR select All (to select all files on all pages). You can also use the page navigation buttons to view all the files first
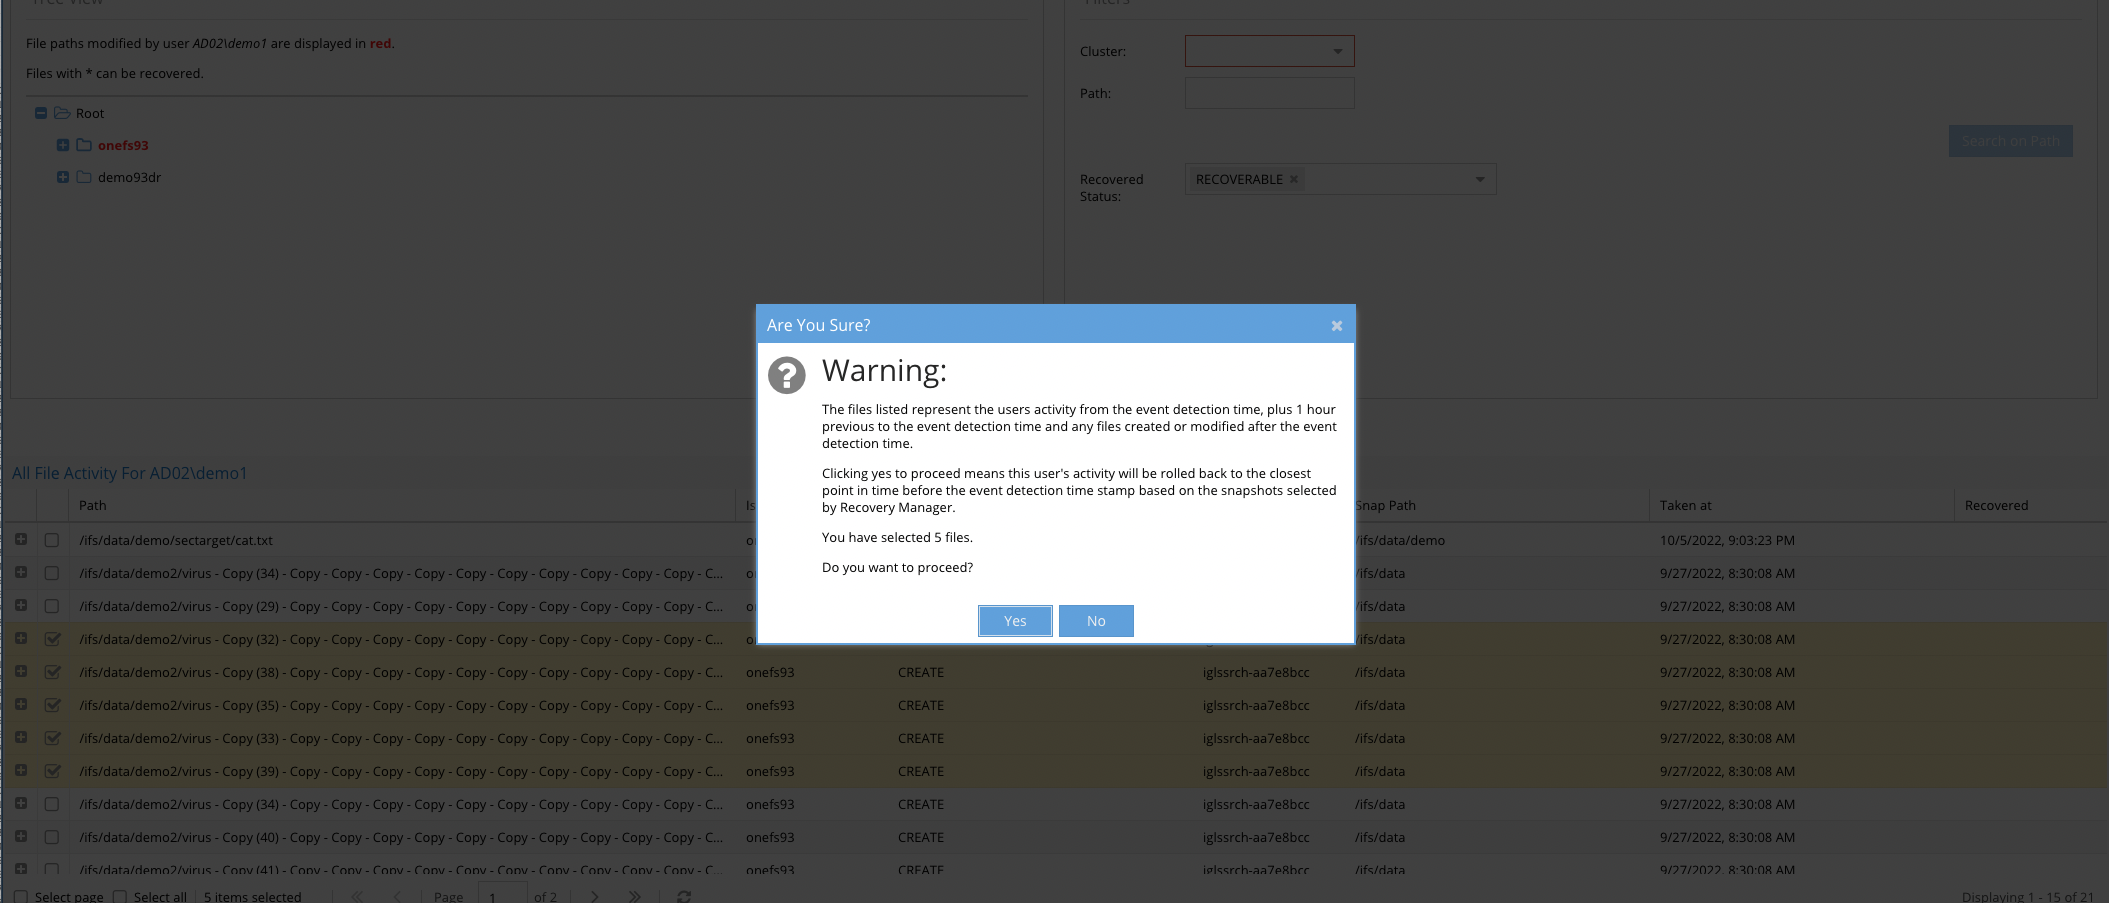
- Once you select some files and click the recover button, the warning above is shown to confirm. Click Yes to proceed
- The Show running Jobs is displayed to see the status of the recovery job.
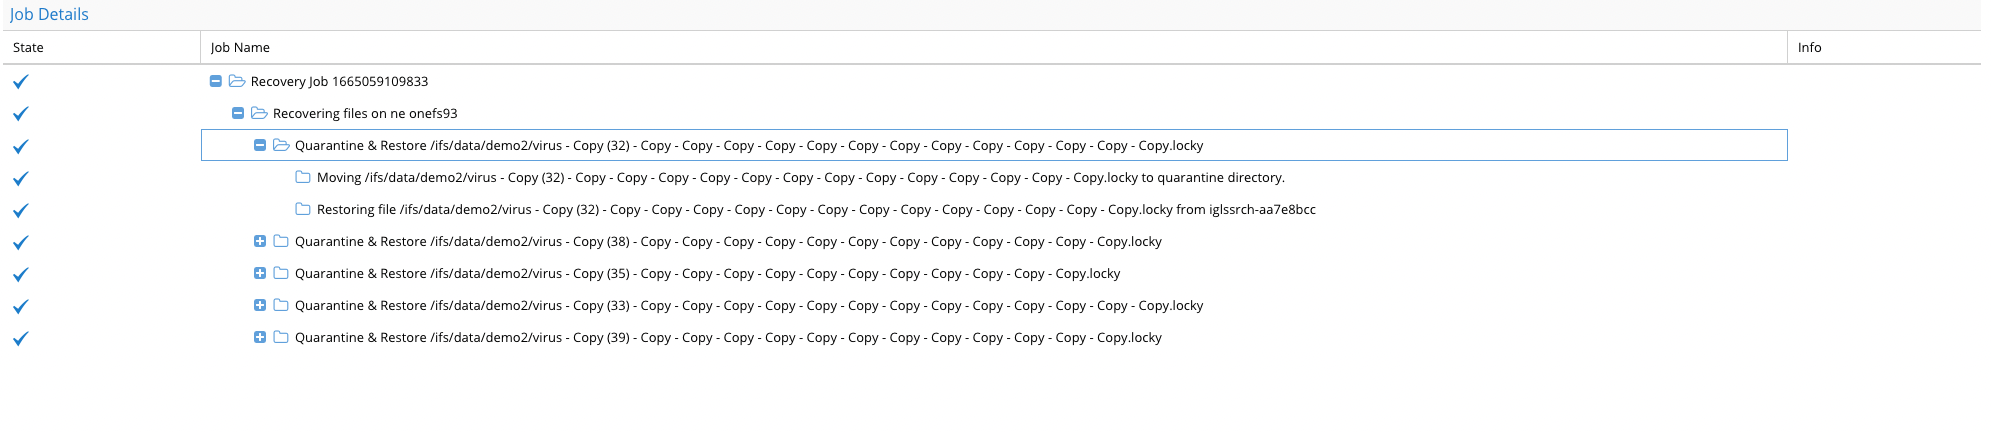
- The recovery Job details
- Each file in the recovery job will show the status of moving the file to quarantine and replacing the original file from the snapshot back into the production file system path.
- The Cyber Recovery Life Cycle
- The tool can be used on different days to work on recovery. The progress of the recovery can be seen by adding Recovered to the filter list to see the check mark
- NOTE: The data in the cache is not permanent and will be rolled off and deleted after several days; recovery efforts should be completed before the cache of files in the history cache.
How to Complete Forensics of Quarantine Data
- All compromised files are moved during recovery to a quarantine location in /ifs/.ransomwaredefender/corrupted/
- Under this location, each SID of each user is created as a subfolder, and the full relative path to each file is created to allow additional scanning with security tools or possible decryption tools to operate only on the affected files.
- This also acts as a map of the data that was attacked and allows a cyber recovery team to view the attack pattern of the attacker in the file system.
- This quarantine location is outside any SMB or NFS exports and hides the data in a secure location.
- An SMB share could be created with read-only access to the data for cyber recovery teams to analyse the data
How Recovery Manager Determines Which Version to Restore
If the RSW user encrypts files, our software detects this and raises a ransomware event.
Once the ransomware event is raised, ALL EVENTS by the RSW user beginning from 1 HOUR BEFORE the event is raised is tracked.
From these events, Recovery Manager will collect a list of all files (objects in the case of AWS/ECS) that have been modified (i.e. have been written to, created, deleted or renamed) by the RSW user.
For each file/object, we will determine the earliest version to recover. This will be a version BEFORE the first time user RSW modified the file/object WITHIN ONE HOUR BEFORE or after the RSW event was raised.
Powerscale case
The user will find the most recent snapshot containing that particular filepath to recover the file.
RSW event was raised at 8:30.
RSW user modified /ifs/test1.txt at 7:40.
Look for a snapshot on the /ifs/ directory taken before 7:40.
There is another file /ifs/dir1/test2.txt.
RSW user modified it at 8:00.
Look for the most recent snapshot on the /ifs/ or /ifs/dir1 directory taken before 8:00.

|
NOTE: If a previous ransomware event has corrupted the file, the admin has acknowledged the event and restored the file to the previous version, and archived the current event, and another ransomware event is raised within the hour, there is a small chance that the most recent snapshot may contain the corrupted version of the file. |
AWS/ECS case
To recover the file, bucket versioning must be enabled. Recovery Manager will restore to the most recent version from before the first tracked modification by the RSW user.
|
|
NOTE: If a ransomware event is raised for a user, and then the same user raises another ransomware event, there is a small possibility that the corrupted version will be chosen to restore. |
ECS Recovery Manager
This part covers the most important differences with other platforms. The UI for Cyber Recovery Manager in ECS mirrors the Isilon interface.
In ECS, instead of cluster information, we display bucket and region details along with versioning information for the bucket. The key difference between other platforms and ECS lies in the system.xml parameter <versioningEnabled>, which can be set to either true or false. When set to true, the Earliest Recoverable Version Time is displayed. If set to false, the Bucket Versioning Status is shown.


Note: When <versioningEnabled> is true, the UI loading times may be significantly slower.
Similar to Isilon, Recovery Items in ECS are sorted based on the timestamp of the first event (the oldest) associated with a Recovery Item. Recovery Items can also be filtered by bucket, path, and status.
When <versioningEnabled> is true, the status options include:
- RECOVERED
- RECOVERABLE
- NO_RECOVERABLE_VERSION
- NO_VERSION_EXIST
- UNKNOWN

When <versioningEnabled> is false, the status options are:
- RECOVERED
- UNRECOVERED
Submitting Job
NOTE: ECS doesn’t have RENAME_OBJECT event. Instead, it combines two other events: DELETE_OBJECT and COPY_OBJECT. This process involves deleting the old file and creating (copying) a new file with the updated name. For submitting a recovery job, we recommend selecting both of these events.
Example: present1.locky ->rename to ->present2.locky

VAST Recovery Manager
Unlike Powerscale, VAST has no REST API available to move files. So we use S3 to get the files from the snapshot to the proper location.
Initial Vast Setup
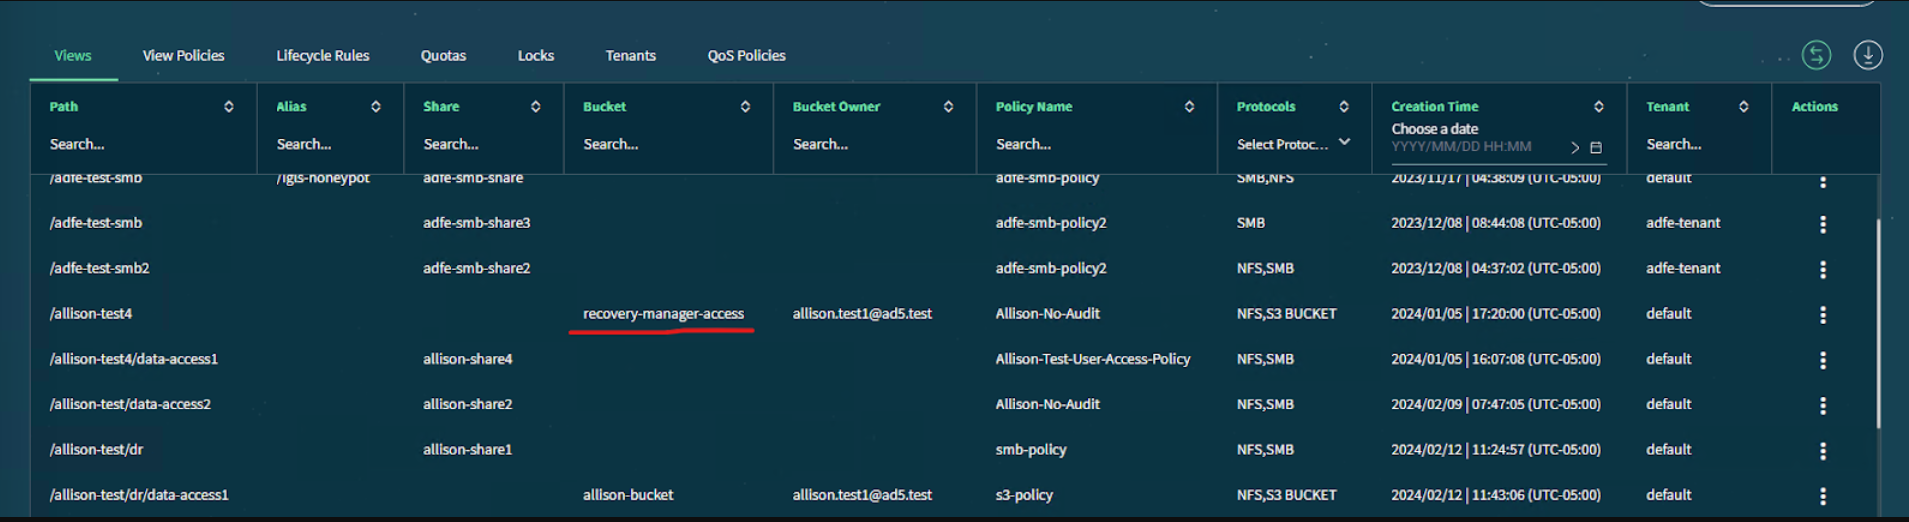
Create a View with an S3 Bucket: ALL VIEWS that we wish to protect and recover files from must be underneath this view path. If it is not under this path, we cannot recover them. For example, if we have a view /allison-test4/data-access1, we should create an s3 bucket on path /allison-test4 to set up Recovery Manager.

- Set bucket owner for S3 Bucket. This user MUST be a non-local user and it must have ONE OR LESS access keys. (i.e. none, or one). The user must also be an S3 Superuser.
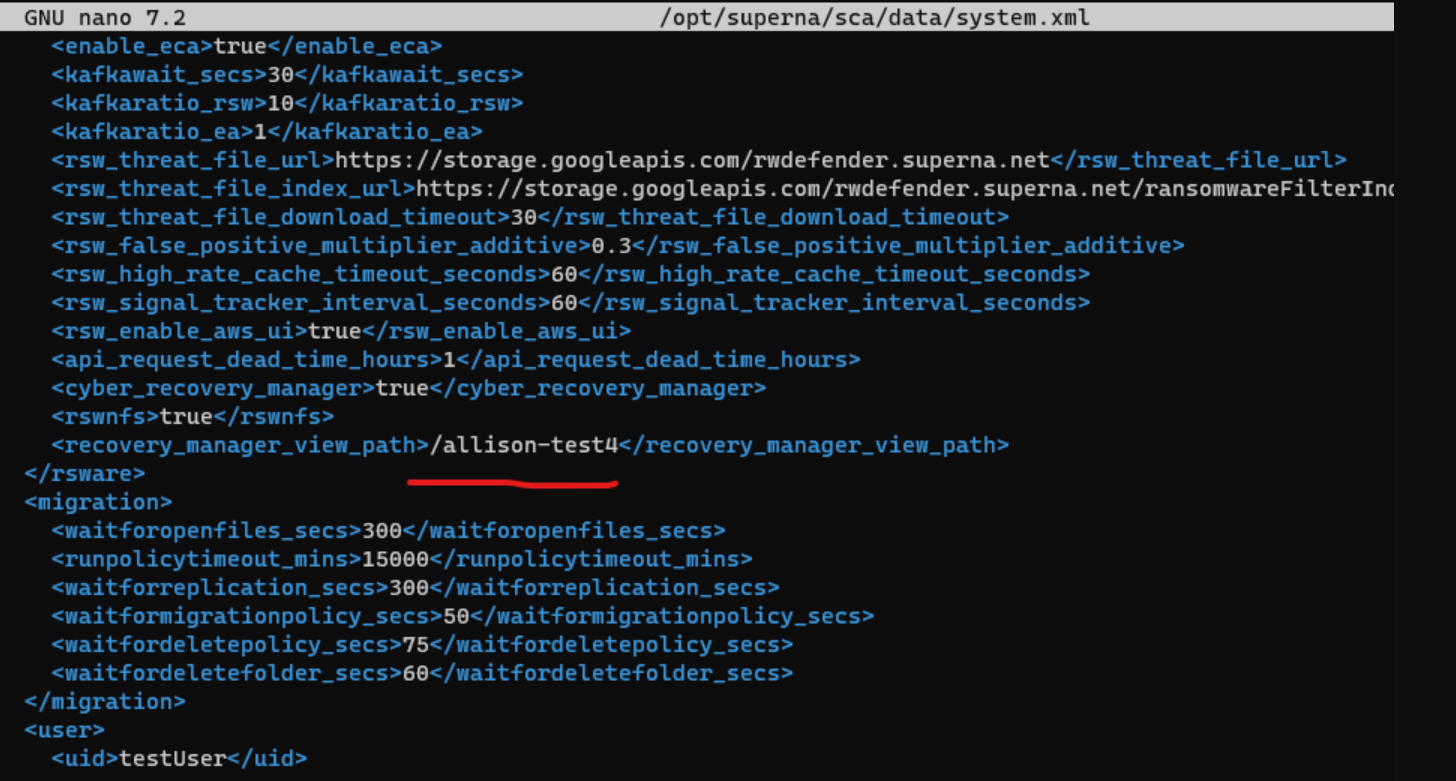
- Add view path to “recovery_manager_view_path> in system.xml. igls config settings set --recover_manager_view_path --<value>
- Add eyeglass ip to ignored list to prevent event being raised by recovery events.
JOB STEPS
1. Setting up S3Access
Before running the actual recovery, there is some information we need.
Before we can do anything, we first have a bit of setup to do. We first find the view whose path is in system.xml, and use it to get the bucket name and vip pool. We also get the bucket owner and issue temporary access keys for them which we will use to access the bucket. If this job fails, we should not continue to the other steps.
2. Moving Files to Quarantine Directory
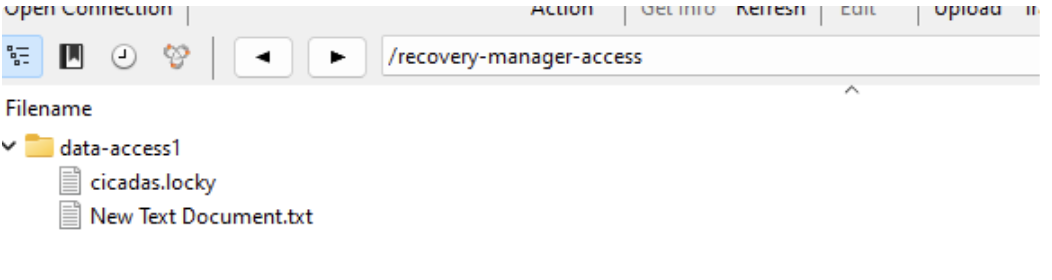
Ransomware user has changed file “cicadas.txt “ to “cicadas.locky” in view /allison-test4/data-access1
First, we will copy the existing file “cicadas.locky” to the quarantine dir for further examination.
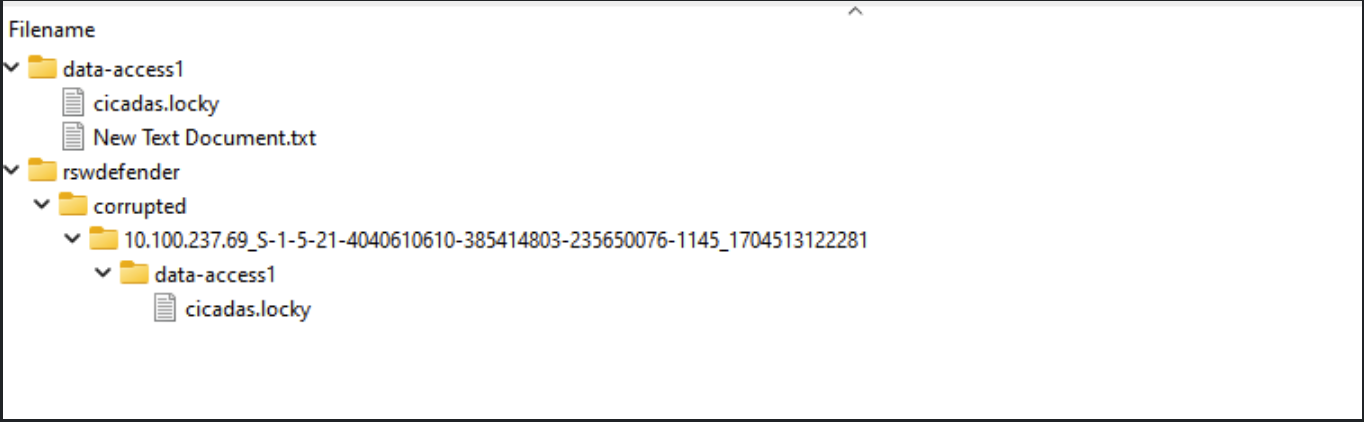
Quarantine dir is located at the root of the bucket on the path rswdefender/corrupted/<kafka-topic>/path/to/file. The file is not moved if it no longer exists.
3. Moving files from Snapshot to Previous Location
Works the same as with Powerscale. File is copied from the snapshot directory to the file path. If it cannot be found in the snapshot, the file is deleted. If it is found, then the ACLS are copied from the snapshot too.
4. Save recovered file to database
File is saved to database. Now in the UI it will be marked as recovered.
Revoke Temp Access Key
This is the very last step for Vast Recovery and should be done for every network element. We remove the access key created for the user before. It should run even if other recovery step fails.
Vast Limitations
Vast has several important limitations.
Only works for files in the "default" directory
Does not copy ACLS correctly