- Support Statement
- Overview
- Azure Copy Tool: AzCopy
- Diagram
- Eyeglass Golden Copy Configuration
- AzCopy Tool
- Download AZCOPY tool
- Authorization
- Read ACL information and set them through SMB Mount
- Batch File
- Golden Copy Incremental Job
- Windows Task Scheduler
Support Statement
NOTE: All sample code is "as is" with no coverage under a support contract, no express or implied warranty . This is a solution guide with external 3rd party products that require direct support from the 3rd party. No support for 3rd party products is provided.
Overview
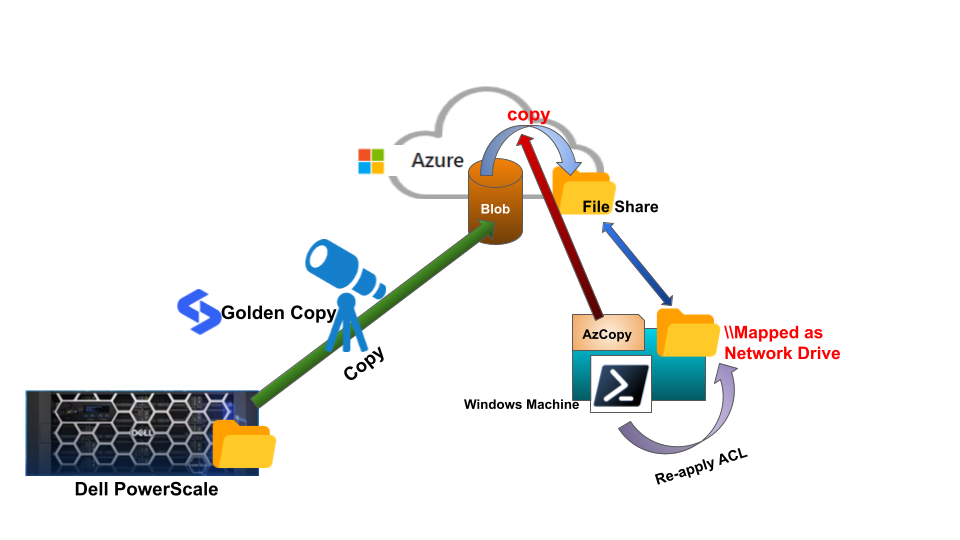
Eyeglass Golden Copy is an integrated PowerScale Files to Object copy tool that is able to copy files from PowerScale to the Target object storage including Azure Blob container.
Once data is copied to Azure Blob container, based on our data life cycle requirement, when needed we can rehydrate it from Azure blob by copying it to the Azure file share for production access.
This rehydration enables us to segregate our production data from our backup data, by keeping the backup data in the Blob container and letting production to access through Azure File share and mounted as SMB Share.
Azure Copy Tool: AzCopy
Azure Storage supports directly copying objects from azure blobs to azure file share, which can be implemented by using the AzCopy command-line utility. We do not need to download files to local disks or buffers and then upload them again.
Copying by using AzCopy does not rely on the network bandwidth of our local computer. This method can take advantage of the performance of storage accounts and Azure Virtual Network to achieve better throughput than downloading and uploading files. There are no bandwidth charges if both storage accounts are in the same region.
Diagram
Eyeglass Golden Copy Configuration
To support rehydration data copy from Azure Blob to Azure File Share process, we need to configure Eyeglass Golden Copy to use a prefix string for ACL information object to avoid conflict names with the actual folder name
Procedure
- SSH to Golden Copy node 1 as ecaadmin
- Edit config file: nano /opt/superna/eca/eca-env-common.conf
- Add the following line:
export ARCHIVE_S3_PREFIX="igls-"
- Control +x to save and exit
- ecactl cluster down (wait till it complete the cluster down process)
- ecactl cluster up
AzCopy Tool
Download AZCOPY tool
The download link for Windows-64 bit:
https://aka.ms/downloadazcopy-v10-windows
Reference:
https://learn.microsoft.com/en-us/azure/storage/common/storage-use-azcopy-v10
- AzCopy V10 is the currently supported version of AzCopy
- Download and unzip the AzCopy V10 executable file to any directory on the Windows machine that will be used to execute AzCopy and also to run powershell script for applying ACL. E.g. F:\mytest\azcopy.exe
Authorization
We need to provide authorization credentials by using Azure Active Directory (AD), or by using a Shared Access Signature (SAS) token.
Both Blob and File Share support SAS token.
We can create the Shared Access Signature (SAS) token for the Blob container use as Golden Copy target with Azure Storage Explorer
- Open the Azure Storage Explorer app on your local machine and navigate to your connected Storage Accounts.
- Expand the Storage Accounts node and select Blob Containers.
- Expand the Blob Containers node and right-click a Blob container that we use as the Golden Copy target, to display the options menu.
- From the options menu => Select Get Shared Access Signature
- In the Shared Access Signature window, make the following selections:
- Select your Access policy (the default is none).
- Specify the signed key Start and Expiry date and time.
- Select the Time zone for the Start and Expiry date and time (default is Local).
- Define your container Permissions by checking and/or clearing the appropriate check box. => we can use the default (select Read & List permission to allow copy from this Blob)
- A new window appears with the Container name, URI, and Query string for your container.
- Copy and paste the container, URI, and query string values in a secure location. They'll only be displayed once and can't be retrieved once the window is closed.
- To construct a SAS URL, append the SAS token (URI) to the URL for a storage service.
We can also create the Shared Access Signature (SAS) token for the Azure File Share that we will use as the Azcopy target with Azure Storage Explorer
- Open the Azure Storage Explorer app on your local machine and navigate to your connected Storage Accounts.
- Expand the Storage Accounts node and select File Shares Containers.
- Expand the File Shares Containers node and right-click a File Share container that we use as the dehydration copy target, to display the options menu.
- From the options menu => Select Get Shared Access Signature
- In the Shared Access Signature window, make the following selections:
- Select your Access policy (the default is none).
- Specify the signed key Start and Expiry date and time.
- Select the Time zone for the Start and Expiry date and time (default is Local).
- Define your container Permissions by checking and/or clearing the appropriate check box. => we can set Read, Create, Write, Delete List permission to allow copy to this File Share)
- Review and select Create.
- A new window appears with the Container name, URI, and Query string for your container.
- Copy and paste the container, URI, and query string values in a secure location. They'll only be displayed once and can't be retrieved once the window is closed.
- To construct a SAS URL, append the SAS token (URI) to the URL for a storage service.
Note: We can set the SAS token start and expiry date and time. Once our SAS token has expired, we need to create a new one and also need to update the batch file with the updated SAS token.
Command to copy data from BLOB to File Share using SAS token
There are 2 copy related commands:
- azcopy copy
- azcopy sync
azcopy copy
Copies source data to a destination location. This command can be used to have full copy of data
Command : azcopy copy [source] [destination] [flags]
Example:
azcopy copy "https://<storage-account-name>.blob.core.windows.net/<Blob-container-name>?<Blob-container-SAS-token>" “'https://<storage-account-name>.file.core.windows.net/<file-share-name>?<file-share-SAS-token>” --recursive=true
azcopy sync
Replicates the source location to the destination location.
The last modified times are used for comparison. The file is skipped if the last modified time in the destination is more recent. This command can be used for incremental copy.
Command : azcopy sync [source] [destination] [flags]
Example:
azcopy sync "https://<storage-account-name>.blob.core.windows.net/<Blob-container-name>?<Blob-container-SAS-token>" “'https://<storage-account-name>.file.core.windows.net/<file-share-name>?<file-share-SAS-token>” --recursive=true
To Synchronize deletion:
azcopy sync "https://<storage-account-name>.blob.core.windows.net/<Blob-container-name>?<Blob-container-SAS-token>" “'https://<storage-account-name>.file.core.windows.net/<file-share-name>?<file-share-SAS-token>” --recursive=true --delete-destination=true
Read ACL information and set them through SMB Mount
- Map Azure File Share as a network drive on the Windows machine that will be used for applying ACL.
- Path: \\<azure-storage-account>.file.core.windows.net\<name-of-azure-fileshare>
- Use azure storage account and access key for authentication
- Place the following PowerShell script to the local drive of that Windows machine (e.g. F:\mytest\mypsscript.ps1)
- Update the $parentfolder accordingly (based on the mapped network drive of Azure File Share)
PowerShell Script
========================
#Set the Parent Folder as the starting point - Drive letter is referring to the SMB mount of the S3 bucket
$parentfolder = 'Z:\dg-isi22\ifs\data'
#Search Golden Copy Object in S3 that contains the ACL information - based on export ARCHIVE_S3_PREFIX="igls-" we search object start with igls- as the prefix
$jsonfiles = (Get-ChildItem -Path $parentfolder igls-* -Recurse | %{$_.FullName} )
$jsonfiles #list of GC ACL objects stored on S3 bucket folder structure
foreach ($item in ($jsonfiles))
{
$data = Get-Content $jsonfiles -Raw | ConvertFrom-Json
$acllist = $data.acl
$allow = "allow"
foreach ($record in ($acllist))
{
write-host "$($record.accesstype) | $($record.accessrights) | $($record.inherit_flags) | $($record.trustee.name) "
if ($($record.accesstype) -eq $allow)
{
write-host "allow type for account " $($record.trustee.name)
write-host "json file : " $item
$actualfolder = $item -replace("igls-","")
write-host “FolderPath : “ $actualfolder
(Get-Acl -path $actualfolder).Access | Format-Table -Autosize
$account = $($record.trustee.name)
$accessright = $($record.accessrights)
$accessright
$newright = switch ($accessright) {
'dir_gen_all' {"F"}
'dir_gen_read' {'R'}
'dir_gen_execute' {"X"}
'dir_gen_write' {'W'}
'std_write_dac' {'WDAC'}
'delete_child' {"DC"}
}
$newright
$finalright = $newright -join ','
$finalright = "(" + $finalright + ")"
$inherit = $($record.inherit_flags)
$newinherit = switch ($inherit) {
'object_inherit' {"(OI)"}
'container_inherit' {"(CI)"}
}
$setting = $newinherit + $finalright
$setting2 = '"' + $setting + '"'
$permission = $account + ":" + $setting2
$permission = $permission.replace(" ","")
$permission2 = "'" + $permission + "'"
$permission2
icacls $actualfolder /grant $permission
(Get-Acl -path $actualfolder).Access | Format-Table -Autosize
}
}
}
======
Batch File
This batch file is to execute two things:
- AzCopy sync command
- Read and apply ACL
Place the following batch file to the local drive of that Windows machine (e.g. F:\mytest\mybatch.bat)
=======
@echo OFF
echo “This script will run azcopy sync and apply ACL"
set TEST_FOLDER=F:\mytest
set SOURCE_SAS="https://<storage-account-name>.blob.core.windows.net/<Blob-container-name>?<Blob-container-SAS-token>"
set TARGET_SAS=“'https://<storage-account-name>.file.core.windows.net/<file-share-name>?<file-share-SAS-token>”
%TEST_FOLDER%\azcopy sync %SOURCE_SAS% %TARGET_SAS% --recursive=true --delete-destination=true
timeout 3
powershell "F:\mytest\mypsscript.ps1"
timeout 3
echo "Done"
================
Notes: Azure SAS (Shared Access Signature might contain special characters like “%”. Use escaping characters for those special characters.
Jobs Scheduler
Golden Copy Incremental Job
Golden Copy Incremental job uses the PowerScale change list and creates snapshots that are compared to detect created, modified and deleted files to copy to the target object storage. The default setting will also sync deletes from the file system to the Target object storage.
To schedule this incremental job we can use command line or WebUI.
The following example is using Golden Copy WebUI for setting the incremental job schedule:
- Login to Golden Copy WebUI - https://<ip-of-GoldenCopy-node1> with admin privileges (default admin user: ecaadmin)
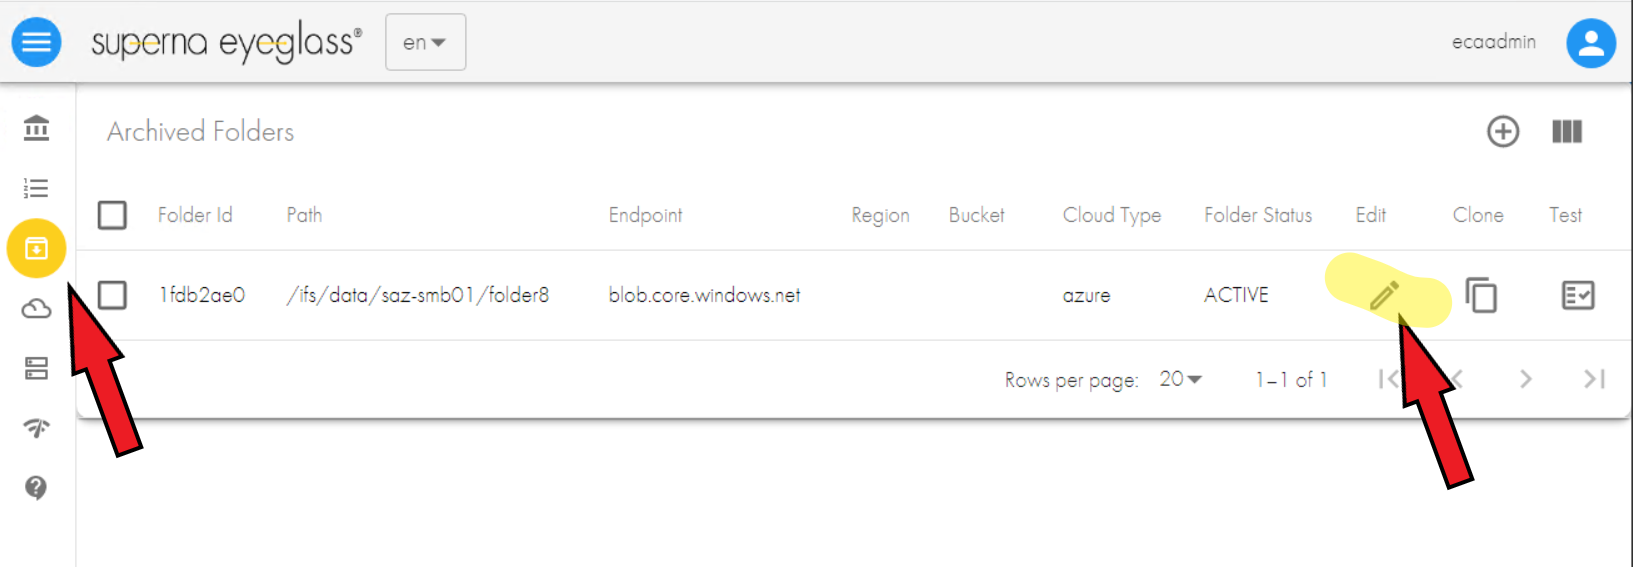
- From the Left side menu, click the Archived Folder icon. Click Edit for the Archived Folder that we want to set the schedule
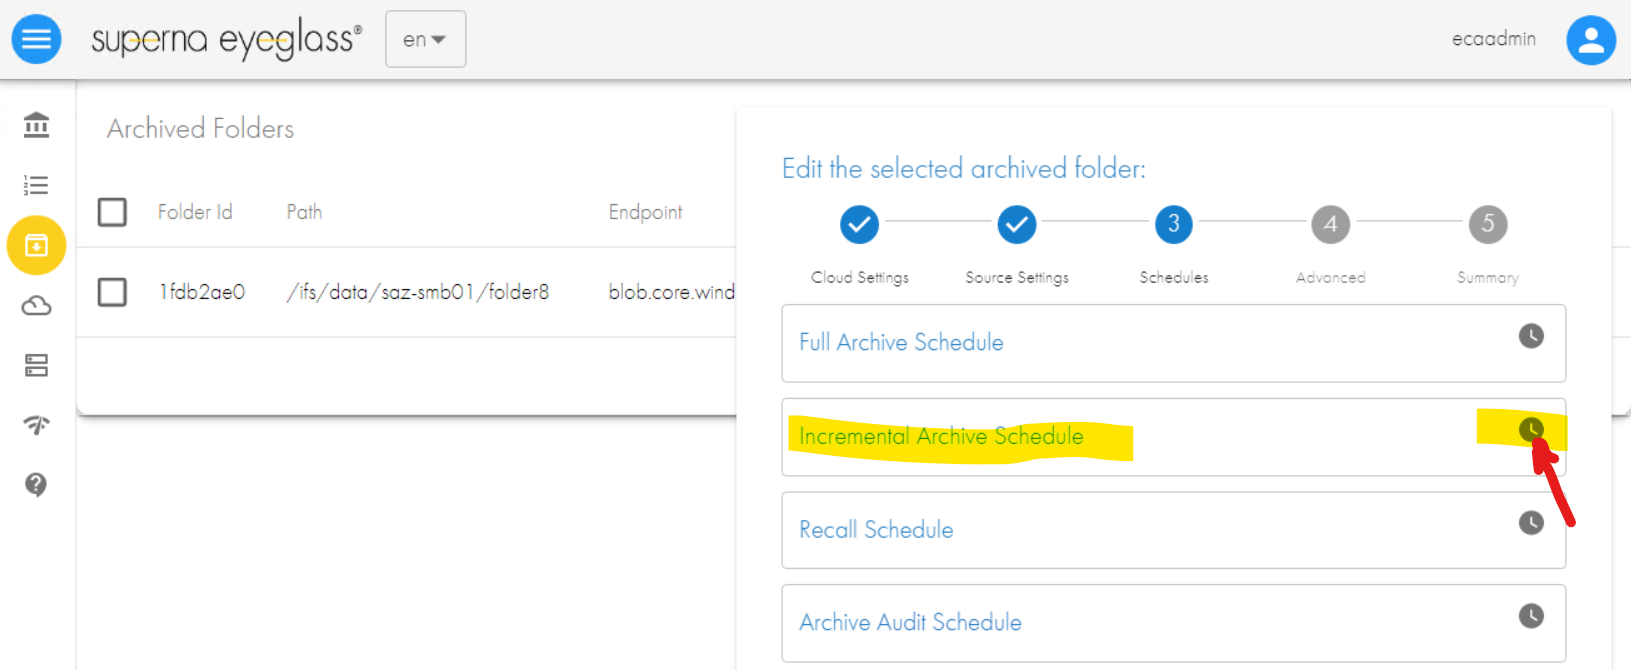
- The Edit the selected archived folder window will be opened. Click Next button two times to move forward to section 3 - Schedules, and click the clock icon next to Incremental Archive Schedule
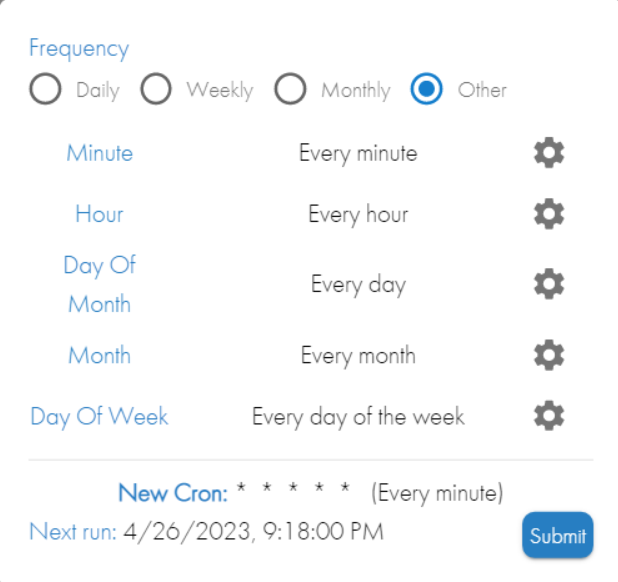
- Set the schedule accordingly and then click Submit
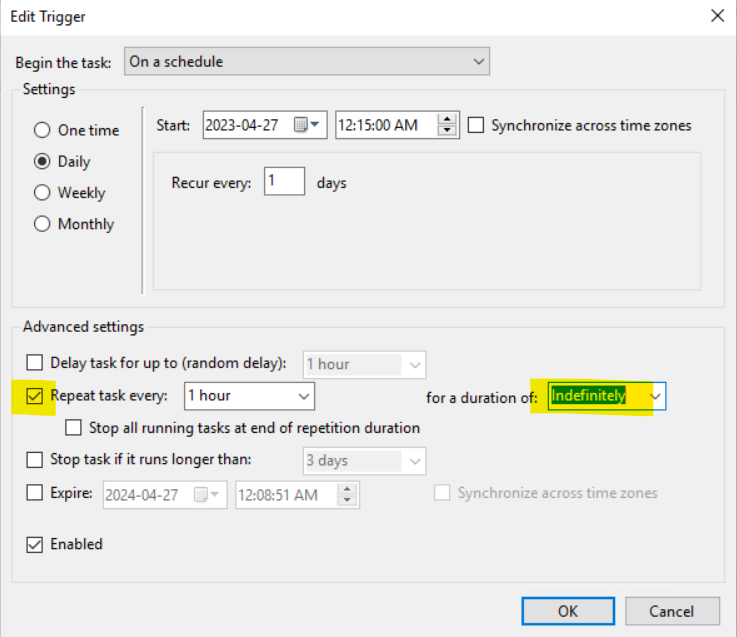
Windows Task Scheduler
We can use Windows Task Scheduler to run our batch file according to our schedule requirements.
To configure Windows Task Scheduler to automatically run that batch file:
- On the same Windows machine that we have the AzCopy tool and powershell script, open Task Scheduler ⇒ From the Start menu, select Windows Administrative Tools > Task Scheduler.
- Under Task Scheduler (Local), select Task Scheduler Library and choose New Folder from the Actions panel.
- Enter a folder name and click OK.
- The new folder is created for our scheduled tasks.
- Expand the Task Scheduler Library and select our new folder.
- In the Actions panel, click Create Basic Task.
- In the Create a Basic Task dialog, enter a name for the task and click Next.
- In the Task Trigger dialog, select Daily and click Next.
- In the Daily dialog, enter the Start date and time, and click Next.
- In the Action dialog, select Start a program and click Next.
- In the Program/script field, browse and select our batch file (e.g. F:\mytest\mybatch.bat), then click Open.
- Click Next.
- In the Summary dialog, select Open the Properties dialog for this task when I click Finish and then click Finish.
- Our Task Properties dialog opens with the General tab displayed. We can modify our task accordingly.
- Click the Triggers tab for modifying the scheduler with more options, for example to run every hour:
- Click OK
- Click the Action tab to modify the task to write the output to the log. Example:

- Click OK
- Click OK to close the Properties window.
© Superna Inc