Legacy - Eyeglass Warm Standby with SyncIQ Guide
Legacy Guide
Eyeglass Warm Standby Configuration and Restore Execution Procedures
- What's New
- Abstract:
- Notes on this solution:
- Procedure Overview below:
- Requirements
- Configuration
- How to Restore the Warm Standby Appliance to become Active Procedures (Requires 2.5.6 release or later)
What's New
- Release 2.5.6 offers an auto detection of most recent backup to use which speeds up the restore process and decreases RTO by eliminating maual steps to select or list files to use for restore. This can remove minutes of time to recovery the 2nd appliance. The procedures to restore the 2nd appliance with auto detect mode should be possible to complete in less < 1 minute with single CLI command needed
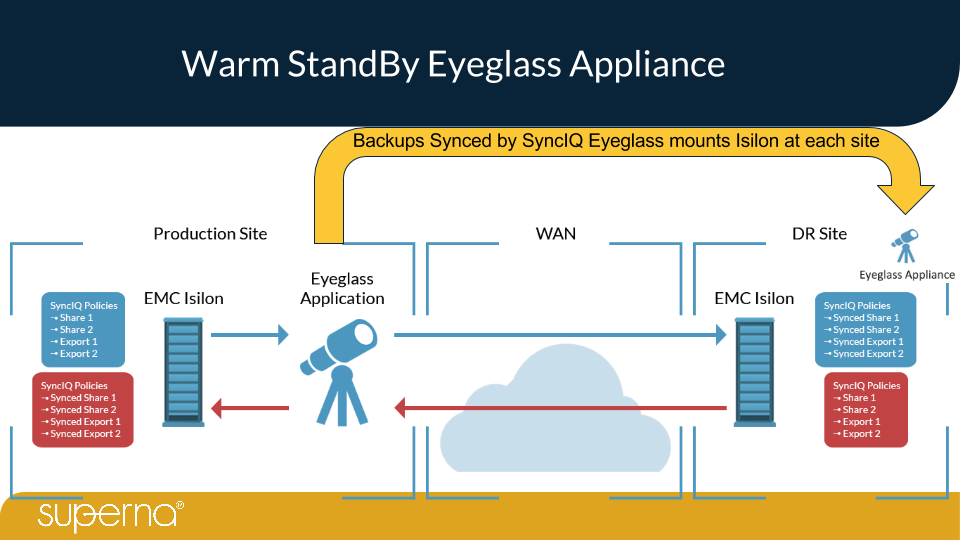
Abstract:
This procedure is to protect the production Eyeglass appliance using the automated 7 day backup feature in Eyeglass and using SyncIQ to sync the backup archives to a 2nd cluster where the Warm standby Eyeglass appliance is running.
Notes on this solution:
- This process also means only One Eyeglass appliance has clusters added.
- This only requires one set of license keys (license keys are appliance specific)
- Requires SyncIQ enabled clusters to protect the archives
- Production Eyeglass sync’s Export used for DR of Eyeglass configuration data
Procedure Overview below:
If you already have an second Eyeglass backup appliance, you may skip to Configuration Steps, otherwise start by installing a second OVF Appliance using the installagion guide.
You will need a second Eyeglass appliance set up. However, it will not manage any clusters and will be “empty”. This appliance is present for the sole purpose of restoring an Eyeglass backup archive to it, just in case a problem should arise in your original Eyeglass appliance. Deploy the Eyeglass OVF and set up the network settings as usual. Confirm the installation went well by logging into your appliance and if all went well, stop there. Do not add any clusters, licenses, etc. to the appliance. Everything will be restored after restoring a backup archive.
Requirements
- Standby appliance deployed at 2nd site
- Standby appliance running the same release as the production appliance
- All firewall ports opened to the clusters that need to be managed
- DNS, NTP configuration is identical to the production appliance
Configuration
- On your Source cluster, create an NFS export and change the following settings:
- Example path /ifs/eyeglasswarmstandby
- Under “clients” and “root clients”, type your 2 Eyeglass IPs, separated by a comma.
- Under “Permissions”, check “Mount access to subdirectories”.
- save the export
- Set permissions in the file system
- ssh to the PowerScale as root user
- set permissions
- chmod 777 /ifs/eyeglasswarmstandby
- done
- Create a SyncIQ policy pointing to the NFS export path while inputting the target cluster ip address or Smartconnect FQDN used for replication and desired target directory on the remote cluster example /ifs/eyeglasswarmstandby
- Run the syncIQ policy manually to create the remote directory.
- Set the schedule on the policy to 1 time per day
- Wait 5 minutes or start Eyeglass Configuration sync job to sync the export to the DR cluster.
- Ensure the export was synced by checking in your Eyeglass appliance the Configuration Replication Jobs is successfully completed and verifying that the export was created on the target cluster using Onefs GUI.
- NOTE: Change the policy setting to "when the source is modified" if you plan to change the scheduled backup process to run more often than once per day. The instructions to increase the interval to run the backup process is documented below.
- done
- You will now need to perform the following mount command on the production eyeglass appliance.
- SSH into your Eyeglass appliance and switch to root user with sudo -s (enter admin password)
- Run this command and enter the admin password when prompted
- sudo chown sca:users /opt/superna/var/backup
- sudo chmod 777 /opt/superna/var/backup
- sudo chown sca:users /opt/superna/var/backup
- Execute the following: vim /etc/fstab
- Add the command line below and replace it as indicated:
- <Source-cluster-IP>:/ifs/eyeglasswarmstandby /opt/superna/var/backup nfs rw 0 0
- Then execute the command:
- mount -a
- verify no errors are returned from this command
- Type "mount" to verify the mount was successful. You should see the NFS export listed in the output of the mount command.
- Backups are created automatically by Eyeglass on a daily basis at 2:00 am. If you would like to test out that this procedure is working and backups are being written to the cluster, you may manually run the script via SSH anytime you'd like, rather than waiting 24 hours. To run the script, do the following:
- SSH into your Eyeglass appliance and gain root access. (login as admin and type sudo -s to switch to root)
- Change directory to: /opt/superna/bin
- Execute the following: ./backup_last_seven_days.sh (this will create a backup)
- NOTE: this schedule can be changed to a more refrequent schedule following these steps
- NOTE: backup runs by default on daily schedule
- How to Change the schedule
- ssh to eyeglass as admin
- enter sudo -s (enter password for admin)
- nano /etc/cron.d/sca-backup
- change the cron string to a new value (Use this set to help with the cron string (https://crontab.guru/)
- save the file with ctrl key + x answer yes to save the file
- Verify that backup file has been created on the cluster mount path.
- Now, you will need to SSH into your warm standby Eyeglass appliance and execute the following command to mount the NFS:
- SSH into your Eyeglass appliance and with sudo -s (enter admin password)
- Run these commands
- sudo chown sca:users /opt/superna/var/backup
- sudo chmod 777 /opt/superna/var/backup
- sudo chown sca:users /opt/superna/var/backup
- Execute the following: nano /etc/fstab
- Add the command line below and replace it as indicated:
- <Target-cluster-IP>: /ifs/eyeglasswarmstandby /opt/superna/var/backup nfs rw 0 0
- mount -a
- Run the SyncIQ Policy on your Source Cluster to copy the backup files to the DR cluster.
- Ensure backup files are present from the Warm Standby appliance by listing the path
- Verify Warm Standy Appliance has visibility to replicated backup files are visible and have a current date stamp.
- sudo -s (enter admin password)
- cd /opt/superna/var/backup
- Type ls (to list contents of the mount point from step above)
- Verify backup archive(s) exist from the source cluster, synced by SyncIQ to target cluster and mounted visible to the “Warm standby Eyeglass appliance”
How to Restore the Warm Standby Appliance to become Active Procedures (Requires 2.5.6 release or later)
- You can restore a backup to your second Warm Standy Eyeglass appliance from the mounted path. SSH into the backup appliance and execute the following:
- ssh to as admin user on the Warm Standby Eyeglass appliance
- Run the restore command - NOTE that command must include full path to backup zip file or use path only and restore command will detect the most recent backup it discovers on the path.
- Option #1 Auto detect the most recent file
- igls app restore /opt/superna/var/backup (this option auto detect the most recent backup files and displays it for confirmation to use the suggested file, accept the file selection. You will be prompted to enter the admin password again to become root after entering the command)
- Option #2 Use a specific file
- igls app restore /opt/superna/var/backup/<name_of_backup.zip> (NOTE: you will be prompted to enter the admin password again to become root after entering the command)
- Option #1 Auto detect the most recent file
- You will be given a confirmation (yes/no).
- For Testing answer No to exit the process. This step should be used to test the restore procedure without actually running the restore.
- For Production appliance recovery answer Yes to continue and monitor the command execution until it completes before trying to login to the GUI, it may take 15-20 seconds before you can login.
- IMPORTANT: Original Eyeglass appliance should be off or gone if restoring. NEVER have two appliances operating against the clusters under management. This can cause a conflict and is not supported. Verify your backup appliance is up and running after a restoration, by https to ip address of warm standby appliance.
- Once the restore process completes, you can login to the GUI to start a failover job following the documentation for exeucting a failover.
How to Restore the Warm Standby Appliance to become Active Procedures (< 2.5.6 releases)
- ssh to as admin user on the Warm Standby Eyeglass appliance
- Run the restore command - note that command must include full path to backup zip file.
- use this command to get list of all available backup files ls /opt/superna/var/backup
- igls app restore /opt/superna/var/backup/<name_of_backup.zip> (NOTE: you will be prompted to enter the admin password again to become root after entering the command)
- You will be given a confirmation (yes/no).
- For Testing answer No to exit the process. This step should be used to test the restore procedure without actually running the restore.
- For Production appliance recovery answer Yes to continue and monitor the command execution until it completes before trying to login to the GUI, it may take 15-20 seconds before you can login.
- IMPORTANT: Original Eyeglass appliance should be off or gone if restoring. NEVER have two appliances operating against the clusters under management. This can cause a conflict and is not supported. Verify your backup appliance is up and running after a restoration, by https to ip address of warm standby appliance.
- Once the restore process completes, you can login to the GUI to start a failover job following the documentation for exeucting a failover.